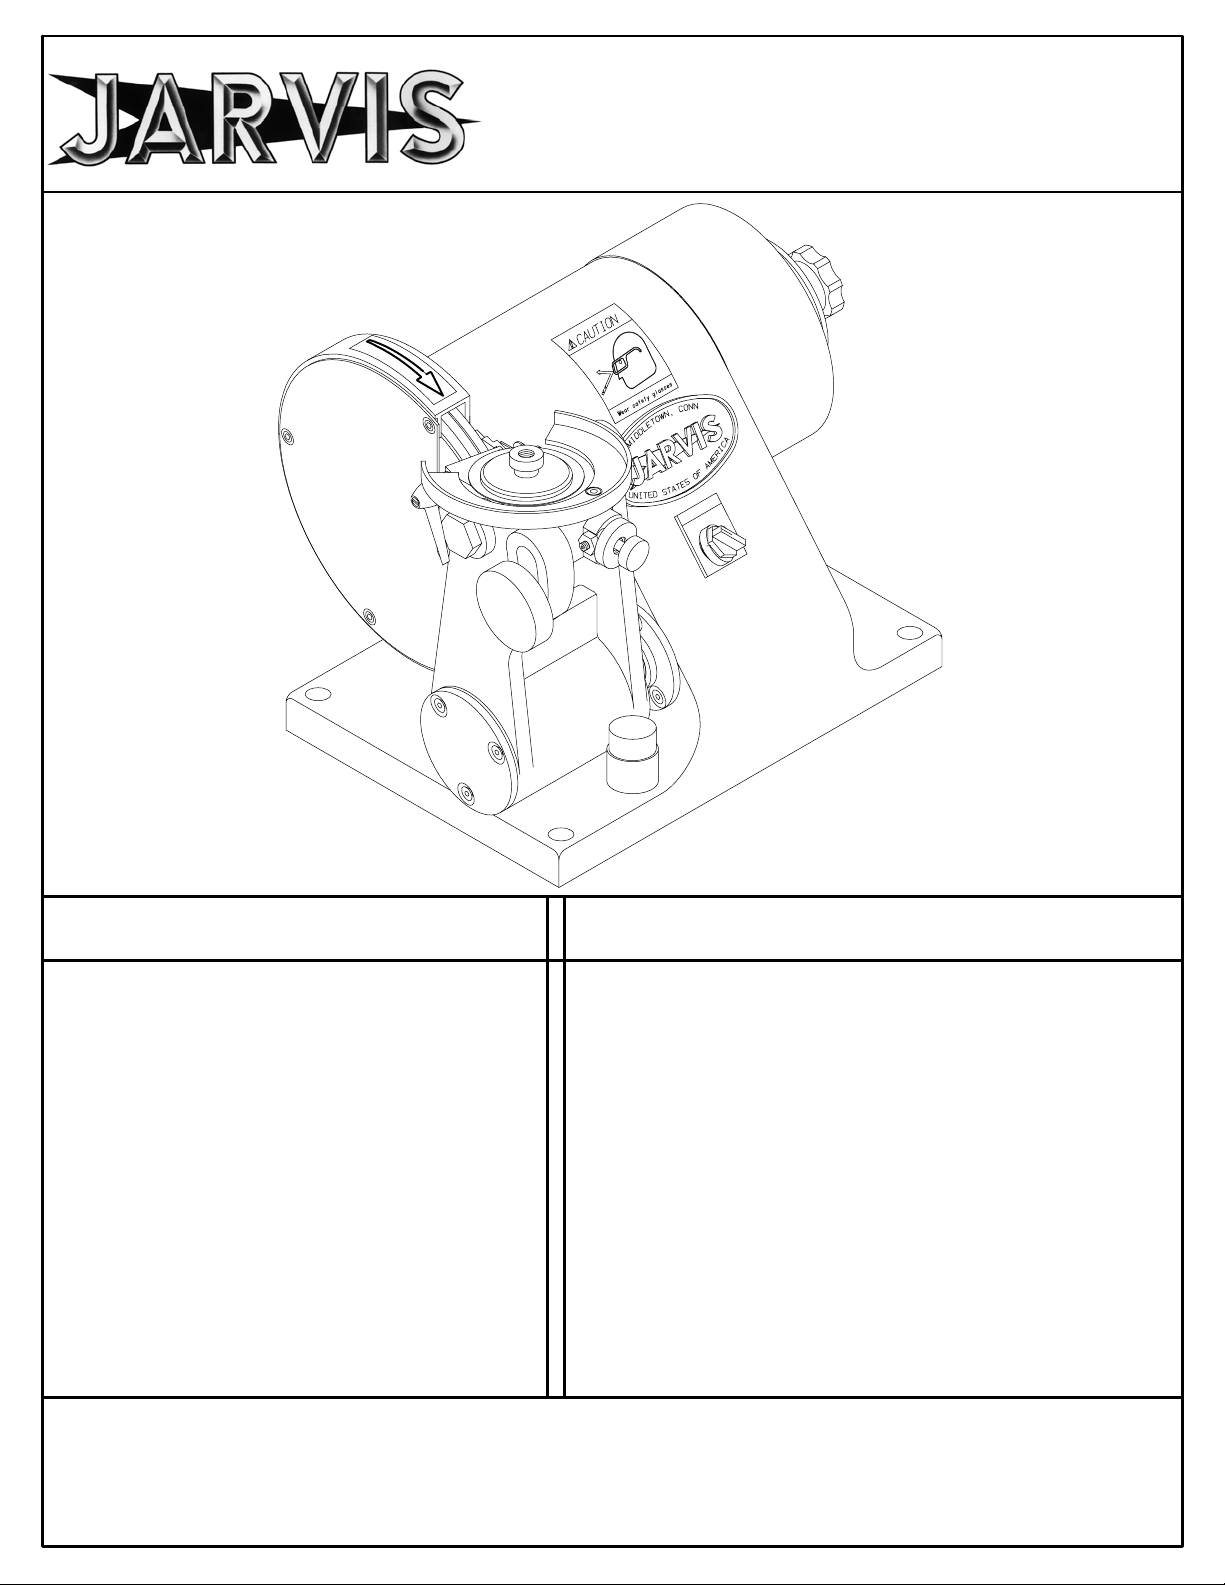
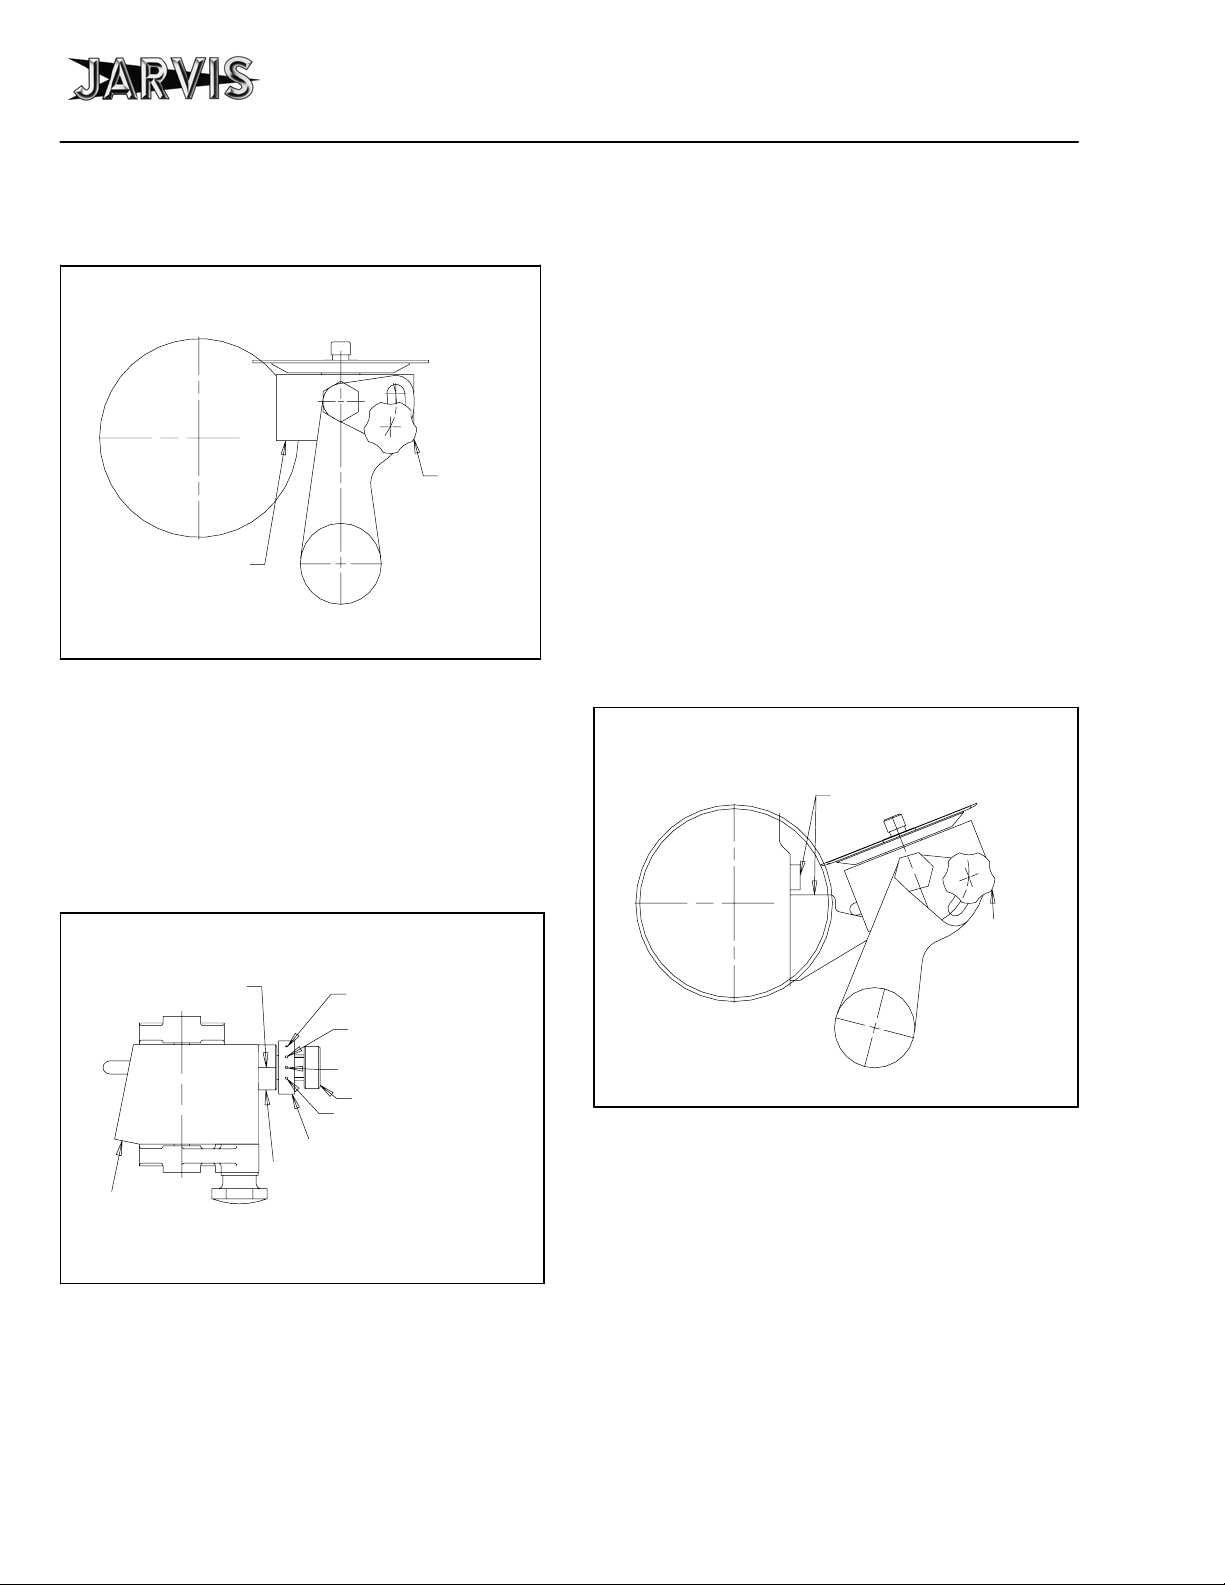
Jarvis BR-5 User manual

TABLE OF
CONTENTS Page............................
Model BR--5 (100 mm Blade)
115V/60Hz 4011021............
115V/50Hz 4011024............
230V/60Hz 4011026............
220V/50Hz 4011019............
220V/50Hz (Round Tooth) 4011037
Model BR--5A (110 mm Blade)
115V/60Hz 4011023............
115V/50Hz 4011025............
230V/60Hz 4011027............
220V/50Hz 4011022............
Model BR--5B (90 mm Blade)
115V/60Hz 4011036............
220V/50Hz 4011032............
Model BR--5D (100 mm & 110 mm Blades)
115V/60Hz 4011042............
115V/50Hz 4011040............
220V/50Hz 4011038............
ModelBR--5/5A/5B/5D
Blade Reconditioner
EQUIPMENT
SELECTION Ordering No...........
•Notice to Employer and Safety
Director 2.................................
•Notice to Operators, Maintenance
and Cleanup Personnel 3...................
•Parts Diagram and List 4....................
•Specifications 7............................
•Installation Instructions 7....................
•Operation Instructions 7.....................
•Maintenance Instructions 10.................
•Wiring Diagram 11.........................
•Blade Size Conversion Kit Installation 11......
®
JARVIS
6211003;
PRODUCTS CORPORATION
33 ANDERSON ROAD, MIDDLETOWN, CONNECTICUT 06457--4926
TEL. 860--347--7271 FAX. 860--347--6978 WWW. jarvisproducts.com

noticetoemployer
and safety director
page 2 of 12
Model BR--5 / 5A / 5B / 5D
®
JARVIS
6211003;
PRODUCTS CORPORATION
33 ANDERSON ROAD, MIDDLETOWN, CONNECTICUT 06457--4926
TEL. 860--347--7271 FAX. 860--347--6978 WWW. jarvisproducts.com
1. Remove and repair any machine that malfunctions. All personnel must be instructed to remove any
malfunctioning equipment.
2. Ensure that all employees who use these machines are trained in the proper use of these machines and
are aware of the dangers that may arise if they do not follow procedures outlined in this brochure.
3. Enclosed are four (4) copies of “NOTICE TO OPERATORS, MAINTENANCE AND CLEANUP PER-
SONNEL.” Post one copy on the employees’ bulletin board; give one copy to the operator(s); give one
copy to the maintenance foreman; and give one copy to the sub--contract cleanup / internal cleanup fore-
man. Additional copies will be provided upon request.
4. The machine is designed and intended to be powerful. This fact should be obvious to your employees,
but you must emphasize it to them.
5. Never make modifications or alterations to the machine. Replace any missing or illegible labels.
6. Ensure that proper procedures are established to prevent accidental startup.
7. Follow our installation and maintenance instructions for proper installation and care of the machine.
8. Ensure that employees wear eye protection in accordance with OSHA’s eye and face protection re-
quirements (29 CFR 1910.133) when using this machine.
9. Avoid injury. Do not permit the machine to be misused.
10. If you resell or distribute a Jarvis product, you must provide the purchaser with the appropriate safety
sheets and machine brochure. Additional copies of safety sheets and machine brochures will be pro-
vided upon request.
NOTICE TO EMPLOYER AND SAFETY DIRECTOR
AVOID INJURY
Wear safety glasses

notice to operators, maintenance
and cleanup personnel
page 3 of 12 Model BR--5 / 5A / 5B / 5D
®
JARVIS
6211003;
PRODUCTS CORPORATION
33 ANDERSON ROAD, MIDDLETOWN, CONNECTICUT 06457--4926
TEL. 860--347--7271 FAX. 860--347--6978 WWW. jarvisproducts.com
1. Disconnect the electric power supply before performing any repairs or maintenance.
2. Disconnect the electric power supply -- or have the electric power supply disconnected -- before per-
forming any cleanup.
3. Disconnect the electric power supply when the machine is not in use.
4. Always check grinding wheels for possible damage. Do not use damaged grinding wheels.
5. Never put fingers, hands or other parts of the body on the grinding edge or within the path of the grind-
ing wheels when the machine is connected to its power supply.
6. Test the machine prior to use or daily. Turn the switch clockwise and the machine should start; turn
the switch counter--clockwise and the machine should stop. If the machine malfunctions, remove it from
service and report or repair it immediately.
7. Never turn the switch on unless you want to use or test the machine.
8. Never make modifications or alterations to the machine. Report or replace any missing or illegible
labels.
9. Always wear eye protection in accordance with OSHA’s eye and face protection requirements (29 CFR
1910.133) when using the machine.
10. Always wear cut protective gloves while operating the machine and handling the blades.
NOTICE TO OPERATORS, MAINTENANCE AND CLEANUP PERSONNEL
REMOVE ANY MALFUNCTIONING MACHINE FROM SERVICE
REPORT ANY PROBLEMS TO YOUR SUPERVISOR
Wear safety glasses

parts diagram and list
page 4 of 12
Model BR--5 / 5A / 5B / 5D
®
JARVIS
6211003;
PRODUCTS CORPORATION
33 ANDERSON ROAD, MIDDLETOWN, CONNECTICUT 06457--4926
TEL. 860--347--7271 FAX. 860--347--6978 WWW. jarvisproducts.com
ModelBR--5/5A/5B/5D

parts list
page 5 of 12 Model BR--5 / 5A / 5B / 5D
®
JARVIS
6211003;
PRODUCTS CORPORATION
33 ANDERSON ROAD, MIDDLETOWN, CONNECTICUT 06457--4926
TEL. 860--347--7271 FAX. 860--347--6978 WWW. jarvisproducts.com
1 1055774 Flat Head Socket Screw 4
2 1002305 Left Guard Cover 1
3 1055727 Socket Head Cap Screw 1
4 1004223 Special Washer 1
5 1057047 Grinding Wheel (BR--5, 5B &5D) 1
1057075 Grinding Wheel (BR--5A)
1057067 Grinding Wheel (Round Tooth)
6 1055775 Flat Head Socket Screw 4
7 1024120 Left Guard (includes item 8) 1
8 1017021 Rotation Label 1
9 1055732 Flat Head Socket Screw 3
10 1035391 Dust Seal 1
11 1029330 Spacer 1
12 1007243 Hex Nut 6
13 1011240 Strain Relief Connector 1
14 3001008 Electric Cord Assembly 1
15 1016380 Grinder Base 1
16 1017159 Safety Label, Glasses 1
17 1017158 Nameplate Label 1
1017402 Nameplate Label, CE
18 1055735 Cheese Head Screw 8
19 1021331 Bearing 1
20 1013196 Retaining Ring 1
21 3020037 Motor Shaft Assembly 1
22 1063427 Stator (115/230V -- 60Hz.) 1
1063435 Stator (115/220V -- 50Hz.) 1
23 1021335 Ball Bearing 1
24 1014109 Wave Spring 1
25 1002303 Rear Motor Cover 1
26 1035393 Seal 1
27 1057046 Hollow Grind Wheel (BR--5A) 1
1057049 Hollow Grind Wheel (BR--5)
1057070 Hollow Grind Wheel (BR--5B)
1057078 Hollow Grind Wheel (BR--5D)
28 1020213 Hollow Grind Shaft 1
29 1021326 Bearing 1
30 1055645 Flat Head Socket Screw 13
31 3019126 Hollow Grind Handle Assembly 1
(includes items 29 and 30)
32 1004005 Split Lock Washer 2
33 1004206 Flat Washer 2
34 1029293 Top Spacer 2
35 1027058 Threaded Rod 2
36 1029294 Bottom Spacer 2
37 1005077 Electric Switch 1
38 1005087 Switch Contact Block 2
39 1017156 Legend Plate 1
40 1024122 Bumper Guard 1
41 1055776 Socket Head Cap Screw 3
42 1036186 Stop Bushing 1
43 1055773 Button Head Screw 3
44 1032318 Stop Plate 1
45 1032332 Stop Grind Plate 1
46 1010177 Dowel Pin 1
47 1030050 Key 1
48 1002302 Arm Shaft Cover 1
49 1014151 Spring Washer 2
50 1021322 Ball Bearing (BR--5, 5A & 5D) 4
1021322 Ball Bearing (BR--5B) 2
1021389** Ball Bearing (BR--5B) 2
51 1029296 Outer Spacer 1
52 see pg. 6 Indexing Arm Assembly 1
53 1029295 Inner Spacer 1
54 1013122 Retaining Ring 1
55 1020211 Arm Shaft 1
56 1007248 Hex Jam Nut 1
57 1036187 Arm Shaft Bushing 1
58 1063083 Ring Terminal 1
59 1055641 Socket Head Cap Screw 7
60 1004227 Lock Washer 1
61 1055733 Socket Head Cap Screw 2
62 1063403 Strip Terminal 1
63 1004225 Flat Washer 2
64 1007253 Hex Lock Nut 2
65 1063074 “F” Disconnect Terminal 6
66 1063304 Capacitor 1
67 1007254 Hex Lock Nut 4
68 1004226 Flat Washer 4
69 1012073 Cable Strap Clamp 2
70 1063402 Piggyback Terminal 2
71 1063305 Electric Switch 1
72 1002304 Wiring Cover with item 74 1
73 1055837 Socket Head Cap Screw 4
74 1055734 Socket Head Cap Screw 2
75 1017085 Safety Label, Electrical 1
1061512 Ferrules (not shown)
3028035 Indexing Arm Assy (BR--5A)
3028036 Indexing Arm Assy (BR--5)
(includes items 30, 43, 48--56,
77, 79--105, 108, 109 and 112)
3028047 Indexing Arm Assy (BR--5B)
(includes items 30, 43, 48--56,
77, 79--105, 108, 110 and 112)
3028050 Indexing Arm Assy (BR--5D)
(includes items 30, 43, 48--56,
77, 79--109, 111 and 112)
ITEM PART NO. PART NAME QTY ITEM PART NO. PART NAME QTY
** BR--5B (90 mm) item different from BR--5 (100 mm),
BR--A (110 mm) and BR--5D (100 and110 mm).

parts diagram and list
page 6 of 12
Model BR--5 / 5A / 5B / 5D
®
JARVIS
6211003;
PRODUCTS CORPORATION
33 ANDERSON ROAD, MIDDLETOWN, CONNECTICUT 06457--4926
TEL. 860--347--7271 FAX. 860--347--6978 WWW. jarvisproducts.com
ITEM PART NO. PART NAME QTY
76 1006045 Knob 1
77 1027059 Stud 1
78 1020209*** Index Block Shaft, Threaded 2
79 1020281 Index Block Shaft, Press 2
80 1028075*** Index Block Arm, Threaded 1
1028115 Index Block Arm, Press 1
81 1055966 Set Screw 2
82 1014095 Disc Spring 2
83 1019134 Index Handle 1
84 1007261 Hex Nut 4
85 1004020 Flat Washer 3
86 1014125 Compression Spring 1
87 1020227 Pawl Shaft 1
88 1036188 Cylindrical Bushing 1
89 1035354 Seal (BR--5, 5A and 5D) 1
1035521** Seal (BR--5B)
90 1020208 Blade Shaft (BR--5, 5A & 5D) 1
1020277** Blade Shaft (BR--5B)
91 1007241 Blade Retaining Knob 1
92 1024123 Index Block Blade Guard 1
93 1010411* Spring Retainer Pin 1
94 1053010 Pawl (BR--5A)
1053009 Pawl (BR--5)
1053012 Pawl (BR--5B)
1053014 Pawl (BR--5D)
95 1010341 Pin 1
3020041 Pawl Assembly (BR--5A)
3020040 Pawl Assembly (BR--5)
3020046 Pawl Assembly (BR--5B)
3020052 Pawl Assy. (BR--5D)
(includes items 87, 94 and 95)
96 1014122 Torsion Spring (BR--5, 5A, 5D) 1
1014162** Torsion Spring (BR--5B)
97 1021332 Ball Bearing 2
98 1041027 Index Block (BR--5A) 1
1041028 Index Block (BR--5) 1
1041041 Index Block (BR--5B) 1
1041045 Index Block (BR--5D)
99 1036178 Bushing 1
100 1055713 Set Screw 1
101 1036179 Dub Adjustment Bushing 1
102 1014123 Compression Spring 1
103 1054131 Adjusting Screw 1
104 1039052 Ball Plunger 1
105 1014083DCompression Spring 1
106 1010545DLocking Pin 1
107 1029290 Blade Shaft Spacer 1
(BR--5, 5A and 5D)
1029337** Blade Shaft Spacer (BR--5B)
108 1002301 Index Block Cover 1
(BR--5, 5A and 5D)
109 1002383** Index Block Cover (BR--5B) 1
110 1035598DSeal 1
111 1013214 Retaining Ring 2
3041007 Index Block Assy (BR--5A)
(incls items 30, 43, 49, 50, 83--
92, 94--104, 107, 108 & 111)
3041008 Index Block Assy (BR--5)
(includes items 30, 43, 49,
50, 83--104, 107, 108 & 111)
3041011 Index Block Assy (BR--5B)
(includes items 30, 43, 49,
50, 83--104, 107, 109 & 111)
3041014 Index Block Assy. (BR--5D)
(includes items 30, 43, 49,
50, 83--108, 110 and 111)
Indexing Arm Assembly
ITEM PART NO. PART NAME QTY
*
**
** **
**
**
***
***
**
**
* Not used on BR--5A (110 mm).
** BR--5B (90 mm) item different from BR--5 (100 mm),
BR--A (110 mm) and BR--5D (100 and110 mm).
*** Not used in current units.
DUsed in BR--5D (100 and 110 mm) only.
D
D
D

specifications, installation
and operation instructions
page 7 of 12 Model BR--5 / 5A / 5B / 5D
®
JARVIS
6211003;
PRODUCTS CORPORATION
33 ANDERSON ROAD, MIDDLETOWN, CONNECTICUT 06457--4926
TEL. 860--347--7271 FAX. 860--347--6978 WWW. jarvisproducts.com
BR--5 / 5A / 5B / 5D SPECIFICATIONS
Motor Power 0.25 hp 186 W
Operating Voltage 115 V, 1 phase, 60 Hz
other voltages and 50 Hz available
Overall Dimensions 17 x 13 x 10 in
431 x 330 x 254 mm
Weight 45 lbs 20.4 kg
Noise (one meter from unit) less than 75 dB
INSTALLATION INSTRUCTIONS
Refer to parts diagram and parts list on pages 4 through
6 for referenced items.
1 Place the BR--5 / BR--5A / BR--5B /BR--5D in a con-
venient location.
2 Plug the 115V/60Hz (USA) models into a standard
115V wall outlet. Plug the 220V/50Hz (outside
USA) models into a standard 220V wall outlet. All
wall outlets must be grounded.
3 Ensure that motor rotation is correct: grinding wheel
(item 5) rotates to the right.
OPERATION INSTRUCTIONS -- 1
Note: If you have a blade set that has been previously
sharpened on another machine, please skip to “OPERA-
TION INSTRUCTIONS -- 2.”
Note: Always keep dehider blades as a matched set.
Refer to parts diagram and parts list on pages 4 through
6 for referenced items.
1Hollow Grind:
1.1 Clean magnet surface on the hollow grind han-
dle assembly (item 31).
1.2 Place one dehider blade with the hollow side up
on the hollow grind handle assembly (item 31).
1.2.1 Ensure that the magnets on the hollow grind
handle assembly (item 31) are holding the
dehider blade in place.
1.3 Turn on the electric switch (item 37).
1.4 Slide the hollow grind handle assembly (item
31 ) onto the hollow grind shaft (item 28).
1.5 Push the hollow grind handle assembly (item
31 ) against the hollow grind wheel (item 27) for
about five (5) seconds. Use only a light pres-
sure.
1.6 Slide the hollow grind handle assembly (item
31 ) off the hollow grind shaft (item 28), ex-
amine the dehider blade, and repeat steps
1.4--1.6 until the hollow grind extends to the tip
of the dehider blade teeth.
1.7 Repeat steps 1.1--1.6 with the remaining dehider
blade.
1.8 Turn off the electric switch (item 37).
2Sharpening and Dubbing: For new blade sets
and blade sets previously sharpened on BR--5 /
BR--5A / BR--5B / BR--5D models.
2.1 Place one dehider blade with the hollow side up
on blade shaft (item 90).
2.2 Pull index handle (item 83) and rotate blade
shaft (item 90) to engage the pawl (item 94) in
one of the four detent holes.
For BR--5D only:
Depress and hold locking pin (item 106) and ro-
tate blade shaft (item 90) until pin engages one
of the four detent holes.
2.3 Tighten dehider blade in place with blade retain-
ing knob (item 91).
2.4 Line up the pawl (item 94) between the second
and third tooth on the dehider blade. The blade
cutout should be to the left of the vertical center
line. Refer to Figure 1.
Pawl
Grinding
Wheel
Blade
Cutout
Figure 1

operation instructions
page 8 of 12
Model BR--5 / 5A / 5B / 5D
®
JARVIS
6211003;
PRODUCTS CORPORATION
33 ANDERSON ROAD, MIDDLETOWN, CONNECTICUT 06457--4926
TEL. 860--347--7271 FAX. 860--347--6978 WWW. jarvisproducts.com
2.5 Rotate the index block assembly into bottom
position and lock it in place with knob (item 76).
Refer to Figure 2.
Knob
Assembly
Index Block
Assembly
Figure 2
(Bottom Position)
2.6 Make adjustments. Refer to Figure 3:
2.6.1 Position the red dot on the dub adjustment
bushing (item 101) in line with the reference
line on the bushing (item 99).
2.6.2 Turn the adjusting screw (item 103) clock-
wise until it stops the dehider blade from
making contact with the grinding wheel
(item 5).
Index Block
Top View
Figure 3
Reference LIne 2nd Right Dot
1st Right Dot
Red Dot
Left Dot
Bushing
Adjusting Screw
Dub Adjustment Bushing
2.7 Turn on the electric switch (item 37).
2.8 Pivot the indexing arm assembly (items 30, 43,
48--57) towards the grinding wheel (item 5).
2.9 Turn the adjusting screw (item 103) counter--
clockwise until the dehider blade tooth contacts
the grinding wheel (item 5).
2.10 Tap the dehider blade tooth against the grinding
wheel (item 5) two or three times.
2.11 Rotate the dehider blade one tooth:
2.11.1 Pull back on index handle (item 83) and turn
blade retaining knob (item 91) counter--
clockwise one tooth.
2.11.2 Release index handle (item 83) to engage
pawl (item 94) in the dehider blade tooth.
2.12 Repeat steps 2.10--2.11.2 for remaining teeth on
the dehider blade. The last tooth on the dehider
blade must be cut free hand.
2.13 Rotate the index block assembly into top posi-
tion and lock it in place with knob (item 76). Re-
fer to Figure 4.
Knob
Assembly
Stop Plates
Figure 4
(Top Position)
2.14 Select type of dub:
2.14.1 Position one of the dots on the dub adjust-
ment bushing (item 101) in line with the ref-
erence line on the bushing (item 99). Refer
to Figure 3.
Light dub: left dot.
Medium dub: red dot.
Heavy dub: 1st right dot.
Very heavy dub: 2nd right dot.

operation instructions
page 9 of 12 Model BR--5 / 5A / 5B / 5D
®
JARVIS
6211003;
PRODUCTS CORPORATION
33 ANDERSON ROAD, MIDDLETOWN, CONNECTICUT 06457--4926
TEL. 860--347--7271 FAX. 860--347--6978 WWW. jarvisproducts.com
2.15 Line up the pawl (item 94) between the second
and third tooth on the dehider blade.
2.16 Pivot the indexing arm assembly (30, 43, 47--57)
towards the grinding wheel (item 5). Allow the
blade to make contact with the grinding wheel
(item 5).
2.17 Rotate the dehider blade one tooth (see step
2.11).
2.18 Repeat steps 2.16-2.17 for remaining teeth on
the dehider blade.
2.19 Turn off the electric switch (item 37).
2.20 Remove dehider blade and replace with un-
sharpened, un--dubbed dehider blade. See notes
below:
2.20.1 Follow steps 2.1--2.5, pages 7 and 8.
2.20.2 Follow step 2.6.1. on page 8. Note: If you
adjusted for a lighter or heavier dub on the
previous blade of the set, the red dot must be
realigned with the reference line on the
bushing.
2.20.3 Do not follow step 2.6.2. on page 8. Note:
The adjusting screw must be kept in the
same position for both blades in the set.
2.20.4 Follow steps 2.7--2.8, page 8.
2.20.5 Do not follow step 2.9, page 8. Note: The
adjusting screw must be kept in the same
position for both blades in the set.
2.20.6 Follow steps 2.10--2.19, pages 8 and 9.
2.21 On newer models, the step on blade holder shaft
(item 90) has been lengthened to allow dubbing
of both blades at the same time. If your blade re-
conditioner has this longer step, the second
sharpened blade can be placed, hollow side
down, on top of the first blade. Complete dub-
bing by following steps 2.13--2.19.
3Deburring:
3.1 Deburr dehider blade:
3.1.1 Follow steps 1.1--1.4, page 7.
3.1.2 Push the hollow grind handle assembly
(item 31 ) against the hollow grind wheel
(item 27 ) for about a tenth (1/10)ofase-
cond.
3.2 Repeat steps 3.1.1--3.1.2 with the remaining de-
hider blade.
3.3 Turn off the electric switch (item 37).
OPERATION INSTRUCTIONS -- 2
Note: If you have a new blade set or a blade set that has
been previously sharpened on a BR- 5 / BR- 5A
/BR- 5B, please return to “OPERATION INSTRUC-
TIONS - 1.”
Note: Always keep dehider blades as a matched set.
Refer to parts diagram and parts list, pages 4 through 6
for referenced items.
1Hollow Grind:
1.1 Follow hollow grind instructions 1.1--1.8, page
7.
2Sharpening: For blade sets previously sharpened
on other machines.
2.1 Apply machinist blue (dye) to the teeth of both
blade halves to be resharpened.
2.2 Place the blade with the hollow side up on blade
shaft (item 90).
2.3 Pull index handle (item 83) and rotate blade
shaft (item 90) to engage pawl (item 94) in one
of four detent holes.
For BR--5D only:
Depress and hold locking pin (item 106) and ro-
tate blade shaft (item 90) until pin engages one
of the four detent holes.
2.4 Tighten dehider blade in place with blade retain-
ing knob (item 91).
2.5 Rotate the index block assembly into bottom
position and lock it in place with knob (item 76).
Refer to Figure 2, page 8.
2.6 Position red dot on the dub adjustment bushing
(item 101) in line with the reference line on
bushing (item 99).
2.7 Turn on the electric switch (item 37).
2.8 With the pawl (item 94) completely disengaged
from any teeth, line up the first tooth to the left
of the blade cut--out with the grinding wheel.
2.9 Bring the tooth toward the grinding wheel (item
5) by pivoting the indexing arm assembly.
2.10 Turn the adjusting screw (item 103) counter--
clockwise until the blade tooth contacts the
wheel (item 5).

operation and
maintenance instructions
page 10 of 12
Model BR--5 / 5A / 5B / 5D
®
JARVIS
6211003;
PRODUCTS CORPORATION
33 ANDERSON ROAD, MIDDLETOWN, CONNECTICUT 06457--4926
TEL. 860--347--7271 FAX. 860--347--6978 WWW. jarvisproducts.com
2.11 Tap the dehider blade tooth against the grinding
wheel until no additional material is removed
from the blade. Light taps will prevent burning
the tips of the blade.
2.12 Rotate the adjustment screw (item 103) count-
er--clockwise slightly without disturbing the
relationship between the red dot on the dub ad-
just bushing and the reference line on bushing
(item 99).
2.13 Repeat steps 2.11--2.12 until all the machinist
blue is removed from the first tooth.
2.14 Rotate the adjust screw 1/4turn counter--clock-
wise without disturbing the dub adjust bushing
(item 101). The adjusting screw should not be
rotated until this blade set is complete.
2.15 Engage the pawl (item 94) in the first slot to the
left of the blade cut--out. Refer to Figure 5.
Pawl
Grinding
Wheel
Blade
Cutout
Figure 5
2.16 Repeat step 2.11.
2.17 Rotate the blade clockwise to engage the pawl in
the second space to the left of the blade cut--out.
2.18 Repeat step 2.11.
2.19 Continue rotating the blade one tooth clockwise
until all teeth are sharpened.
2.20 Examine all teeth. If any machinist blue remains
on any teeth, return to step 2.8, and rotate the ad-
justing screw 1/8turn counter--clockwise with-
out disturbing the red dot or the dub adjust bush-
ing.
2.21 Repeat steps 2.11 -- 2.19.
2.22 When all teeth are sharpened, remove the blade
from the blade shaft and deburr the blade as de-
scribed in section 3, page 9.
2.23 Being careful not to disturb the adjusting screw
(item 103), place the second half of the blade set
on the blade shaft.
2.24 Tighten dehider blade in place with blade retain-
ing knob (item 91).
2.25 Repeat steps 2.8, 2.9, and 2.11. Note: Do not
touch the adjusting screw (item 103).
2.26 Repeat steps 2.14 through 2.22.
2.27 Now follow the standard “OPERATION PRO-
CEDURES -- 1,” section 2 “Sharpening and
Dubbing,” page 7.
MAINTENANCE INSTRUCTIONS
ALWAYS DISCONNECT THE POWER SUPPLY BE-
FORE PERFORMING ANY REPAIRS OR MAINTE-
NANCE.
Refer to parts diagram and parts list, pages 4 through 6
for referenced items.
1Replace grinding wheel (item 5) and hollow grind
wheel (item 27) when necessary:
1.1 Remove grinding wheel (item 5):
1.1.1 Remove flat head socket screws (item 1).
1.1.2 Remove left guard cover (item 2).
1.1.3 Place a wrench around special washer (item
4).
1.1.4 Remove socket head cap screw (item 3)
with a 6 mm allen wrench. Left hand thread.
1.1.5 Remove grinding wheel (item 5).
1.2 Remove hollow grind wheel (item 27):
1.2.1 Remove flat head socket screws (item 1).
1.2.2 Remove left guard cover (item 2).
1.2.3 Place a wrench around special washer (item
4).
1.2.4 Remove hollow grind shaft (item 28) with a
6mmallenwrench.
1.2.5 Remove hollow grind wheel (item 27).

maintenance instructions, wiring diagrams
and conversion kit installation
page 11 of 12 Model BR--5 / 5A / 5B / 5D
®
JARVIS
6211003;
PRODUCTS CORPORATION
33 ANDERSON ROAD, MIDDLETOWN, CONNECTICUT 06457--4926
TEL. 860--347--7271 FAX. 860--347--6978 WWW. jarvisproducts.com
1.3 Install grinding wheel (item 5):
1.3.1 Reverse steps and procedures outlined in
steps 1.1.1--1.1.5, page 10.
1.3.2 Rotate the index block assembly into top
position and lock it in place with knob (item
76). Refer to Figure 4, page 8.
1.3.3 Turn on the electric switch (item 37).
1.3.4 Pivot the indexing assembly towards the
grinding wheel (item 5). Allow the blade to
make contact with the grinding wheel (item
5).
1.3.5 Turn off the electric switch (item 37).
1.3.6 If the dub is not in the center of the tooth,
loosen hex jam nut (item 56).
1.3.7 Adjust arm shaft (item 55) until the dub is
centralized on the tooth.
1.3.8 Tighten hex jam nut (item 56).
1.4 Install hollow grind wheel (item 27):
1.4.1 Reverse steps and procedures outlined in
steps 1.2.1--1.2.5, page 10.
WIRING DIAGRAM
ALL WIRING MUST BE DONE IN ACCORDANCE
WITH NATIONAL, STATE, AND LOCAL ELEC-
TRICAL CODES.
ALWAYS DISCONNECT THE POWER SUPPLY BE-
FORE PERFORMING ANY REPAIRS OR MAINTE-
NANCE.
Refer to applicable wiring diagram for 115V and 220V
models.
1 To change rotation of motor, reverse wires, number
eight (8) and number five (5).
115V
220V
CONVERSION KIT INSTALLATION
INSTRUCTIONS
Refer to parts diagram and parts list on pages 4 through
6 for referenced items. For correct conversion kit refer
to Table 1 on page 12.
ALWAYS DISCONNECT THE POWER SUPPLY BE-
FORE PERFORMING ANY REPAIRS OR MAINTE-
NANCE.
1Replace hollow grind wheel.
1.1 Remove hollow grind wheel (item 27). Follow
steps in section 1.2 on page 10.
1.2 Replace hollow grind wheel (item 27) with de-
sired hollow grind wheel. Reverse steps and
procedures outlined in section 1.2 on page 10.
2Grinding wheel guard modification. For
BR--5D Conversion Kit only.
2.1 Follow steps 1.2.1 and 1.2.2 in section 1.2 on
page 10.
2.2 Remove socket head screw (item 3).
2.3 Remove special washer (item 4). Place an al-
len wrench on hollow grind shaft (item 28) to
prevent motor shaft assembly (item 21) from
turning.
2.4 Remove grinding wheel (item 5).
2.5 Remove flat head screws (item 6) and grinding
wheel guard (item 7).
2.6 Modify guard by removing surface area indi-
cated in drawing 6011016, supplied with con-
version kit 3061263.
2.7 Re--install grinding wheel guard. Reverse
steps 2.1 -- 2.6 above.

conversion kit
installation
page 12 of 12
Model BR--5 / 5A / 5B / 5D
®
JARVIS
6211003;
PRODUCTS CORPORATION
33 ANDERSON ROAD, MIDDLETOWN, CONNECTICUT 06457--4926
TEL. 860--347--7271 FAX. 860--347--6978 WWW. jarvisproducts.com
3Replace index block.
3.1 Loosen index block shafts (item 78) or set
screws (item 81), as applicable. Insert a 4 mm
screw into index block shafts (item 79) and
disengage them from index block assembly.
3.2 Unscrew knob (item 76).
3.3 Remove index block assembly.
3.4 Replace index block assembly with desired in-
dex block assembly. See note below.
3.4.1 For BR--5D conversion, disassemble index
block assembly and replace index block
(item 98), pawl assembly (items 87, 94 and
95), blade guard (item 92), and adjustment
screw (item 103) with parts from conver-
sion kit. Use diagram 6011016 as a guide to
rework blade guard (item 7). Install or re-
place retainer pin (item 93), as applicable.
3.5 Tighten index block shafts (item 78) or rein-
stall index block shafts (item 79) and tighten
set screws (item 81).
3.5.1 Rotate index block assembly into top posi-
tion (see figure 4, page 8). Reinstall knob
(item 76) and lock index block assembly in
that position.
4Center blade.
4.1 Place a new blade of desired size, hollow side
up on blade shaft (item 90).
4.2 Follow steps 2.1--2.4, page 7.
4.3 Follow steps 1.3.3 -- 1.3.8, page 11.
5Sharpen blade.
5.1 Follow steps 2.1--2.12, pages 7--8. Ensure that
step 2.6.1 is followed.
6Shim stop grind plate.
6.1 Follow steps 2.13--2.17, pages 8--9. Ensure
that the medium dub is picked for step 2.14.1.
6.2 Repeat steps 2.16--2.17, page 9 for two or three
teeth.
0.20 mm
6.2.1 Make dub adjustments as necessary. An
appropriate dub is 0.2 mm thick.
6.2.1.1 If the dub is too heavy, remove existing
shims from behind stop grind plate
(item 45). If there are no shims, and the
dub is too heavy, the stop grind plate
(item 45) must be ground.
6.2.1.2 If the dub is too light, place a shim be-
hind stop grind plate (item 45).
7Sharpen, dub, and deburr both blades of set.
7.1 Follow sections 2 and 3, pages 7--9.
TABLE 1
To Convert to: BR--5B (90 mm) BR--5 (100 mm) BR--5A (110 mm) BR--5D (100 & 110 mm)
From: 100 mm 110 mm 90 mm 110 mm 90 mm 100 mm 100 mm 110 mm
Order Complete Kit (Includes) 3061229 3061247 3061167 3061248 3061168 3061168 3061263 3061263
Grinding Wheel (item 5) -- 1057047 -- 1057047 1057075 1057075 -- --
Hollow Grind Wheel (item 27) 1057070 1057070 1057049 1057049 1057046 1057046 1057078 1057078
Index Block Assembly* 3041011 3041011 3041008 3041008 3041007 3041007 1041045* 1041045*
Brochure 6211003 6211003 6211003 6211003 6211003 6211003 6211003 6211003
Guard Modification Diagram* -- -- -- -- -- -- 6011016* 6011016*
Retainer Pin* (item 93) -- -- -- -- -- -- 1010411 1010411
Pawl Assembly* -- -- -- -- -- -- 3020052* 3020052*
Adjustment Screw* (item 103) -- -- -- -- -- -- 1054131* 1054131*
IndexBladeGuard*(item92) -- -- -- -- -- -- 1024123* 1024123*
*Note: For BR--5D conversion, replace index block, pawl assembly, blade guard and adjustment screw from existing index block assembly.
Install or replace retainer pin. Use guard modification diagram as a guide to rework blade guard (item 7).
This manual suits for next models
3
Table of contents
Other Jarvis Power Tools manuals
Popular Power Tools manuals by other brands

VITO
VITO PRO-POWER SAQ-2000W PLUS instruction manual

WAGNER
WAGNER FURNO F100 Translation of the original operating instructions

ISABERG
ISABERG Rapid 101E Operator's manual

Wetekom
Wetekom 81 85 66 instruction manual

Fayat
Fayat DYNAPAC DRP45DX Original operating instructions

Black & Decker
Black & Decker KS654PE instruction manual