JAWA 350 Instruction manual

WORKSHOPMANUAL
JAWA350/638,639,640
JAWAMotospol. s r.o. Týnec nadSázavou
2004

2
WORKSHOPMANUAL
___________________________________________________________________________
ThepurposeofthisManual,intendedprimaryforspecializedJawarepairshops,isto
facilitateall jobsconnectedwithrepairsofJawa350 motorcycles. All thedescribed
dismantling, refittingandadjustingprocedureshavebeenelaboratedundertheassumption,
thatthereccomendedtoolsandspecialjigsandfixtureswillbeusedforthem. All
information,illustrationsandtechnicaldatacontainedinthismanualarebasedonthelatest
knowledgegainedinandduringmanufacture.TheJawaMotospol. sr.o. reservestherightto
changeitsproductsanytimewithoutapreviousnotice. Anychangesandordeviationsfrom
thestandardversionforcertainterritorieswillbepublishedintheformofSupplementstothis
Manual. Itisnotpermitedtoreproduce thisWorkshopmanualoritspartsinanyform
whatsoeverwithoutwrittenconsent.

3
WORKSHOPMANUAL
___________________________________________________________________________
PRE-SALE SERVICE
1. Unpackthemotorcycle,free itfrompreservationgrease, assembletheseparately
deliveredunitsandpartsofaccessories/controlofcompleteness/.
2. Checkengineandframenumbers–tobeconformwiththedocumentation.
3. Takeouttheaccumulator–charging–forming, assemnbly.
4. Controltheoillevelinthegearbox–refilling.
5. Controlall thefunctionsofelectricalaccessories.
6. Basicadjustmentoftheheadlight/page50 operating instructions/andvertificationof
headlighttilting.
7. Checkignition–spacingbetweencatcherandrotor.
8. Adjustmentofcoupling.
9. Adjustmentofbrakes. /idlerun, dearatefront,clearance ofstopswitchcable/
10. Filling themachinewithmin. 1literofpetrol–lubricated1:50 andstartingthe
engine. (MotoswithoutOil-master)BymotorcycleswithOil-master–filling inoil,
deaeratewholesystém,filling inpetrolandstarting.
11. Adjustingtheidlerunonwarmengine, retightening ofcylinderheadsandexhaust
elbows.
12. Controlofboltedconnections.
13. Instructionsaboutattendance ofmachineandhanding overtothecustomer.
TECHNICALDATA
DIMENSIONS OF MOTORCYCLE Length 2100 +/-30 mm
Width 780 +/-15mm
Height 1160 +/-30mm
Clearance 120 +/-10mm
Seat height 820+/-15mm
Axlebase 1370 +/-25mm
Min.turn radius 3,5+/-0,4m
MASS AND LOAD Propermass 149 +/-3kg
Runningmass 162 +/-3kg
Overallmass 342 +/-3kg
Payload 180 kg
Nr. of seats 2
Trailermass 50 kgoverall
Sidecarmass 172 kgoverall
ENGINE Category two-stroke,air-cooled
Nr. of cylinders 2
Cylindercapacity 343,5ccm
Bore 58 mm
Stroke 65 mm
Compressionratio 9,8+0,7:1
-0,3:1
Maxrevs. 5750 /1min
Maxoutput 17 kW–10%-5250/1min+/-3%
Maxtorque 32 Nm–6%-4750/1min+/-5%
CARBURETOR Class Jikov 28-29 CEhorizontal
Slidetype
CLUTCH Type multiple-discinoil bath

4
WORKSHOPMANUAL
___________________________________________________________________________
GEARBOX Type mechanicalwithgears,
doubleshaft
Numberof gears 4
Control byfootlever
Overallratio climbingcapacitywithfullload
1.stgear 1:14,50 41%
2.ndgear 1:8,60 20%
3.rdgear 1:6,10 14%
4.thgear 1:4,96 9,5%
primarychain 2x9,525 x4,7766 links
secondarychain 1x12,7x7,75 126 links
+1conect
SUSPENSION Front telescopicfork,steelspiral
springs
Stroke 150 mm–wheelaxle134mm
Rear swingarm, spiralsprings
Stroke 80 mm–whell axle90mm
Frontshockabsorber hydraulic
Type telescopicinfork´sarms
Rearshockabsorber hydraulic
Type telescopicinsuspensionunits
RIMS Frontwheel steel, deepenedprofile
Dimensions 2,15Bx18“
Rearwheel steel, deepenedprofile
Dimensions 2,15Bx18“
BRAKES Front disctype, hydrauliccontrol
Dimensions 265 mm
Rear drum,mechaniccontrol
Dimensions 165 mm
ELECTRICOUTFIT Ignition magnetoVAPEA67contactless
Output 12 V,180W
Battery leadtype, 12V,6Ah
Headlamp asymmetrical, rectangular,
adjustable
12 V–60/55W
12 V–4WBA9s
Dipswitch sliding type
Indicatorsswitch levertype
Taillamp group type
Indicatorslocation headlampbracket
rearframe
FUELAND LUBRICANTS Fueltank capacity 17 l,2,8lreserve
Gearbox–oilcharge 1+0,1l
Suspension–oil charge
Front 200 ccmperarm
Rear 47 ccmperabsorber
permanentcharge
Frontbrake brakefluidDOT4tomax.
(upperedgeof window)
FRAME Type tubular, double, closed

5
WORKSHOPMANUAL
___________________________________________________________________________
LISTOFREPAIRTOOLSFORTYPE638, 639, 640
1
2
3
4
5
6
7
8
9
10
11
12
13
14
15
16
17
18
19

6
WORKSHOPMANUAL
___________________________________________________________________________
LISTOFREPAIRTOOLSFORTYPE638, 639,640
ITE
M
NR.
TYPE
DESIG.
SERIALNR. QUAN
TITY
DESCRIPTION
1S-46 9.71.51559.4 1 Feelergaugeforignitionadvance adjustment
2S-97 9.71.880097 1 Drag(forrotor)
3S-63 9.71.51589.4 1 Pawlretsiner
4S-64 9.71.515590.4 1 Drift, centeringbushes
5S-71 9.71.51577.4 1 Driftfordriving outbearings
6S-72 9.71.51576.4 1 Driftfordriving homesealing rings
7S-81 16-19758-4 1 TubularspaNner–steeringhead
8S-85 9.71.52248.4 1 Drag, removing primarysprocket
9S-86 9.71.52253.4 1 Driftdia
10 S-87 9.71.52252.4 1 MandrelforgudgeonpinpreSsing dia. 16 inandout
11 S-88 9.71.52251.4 1 AuxilIarybush, connectingrodsmallend
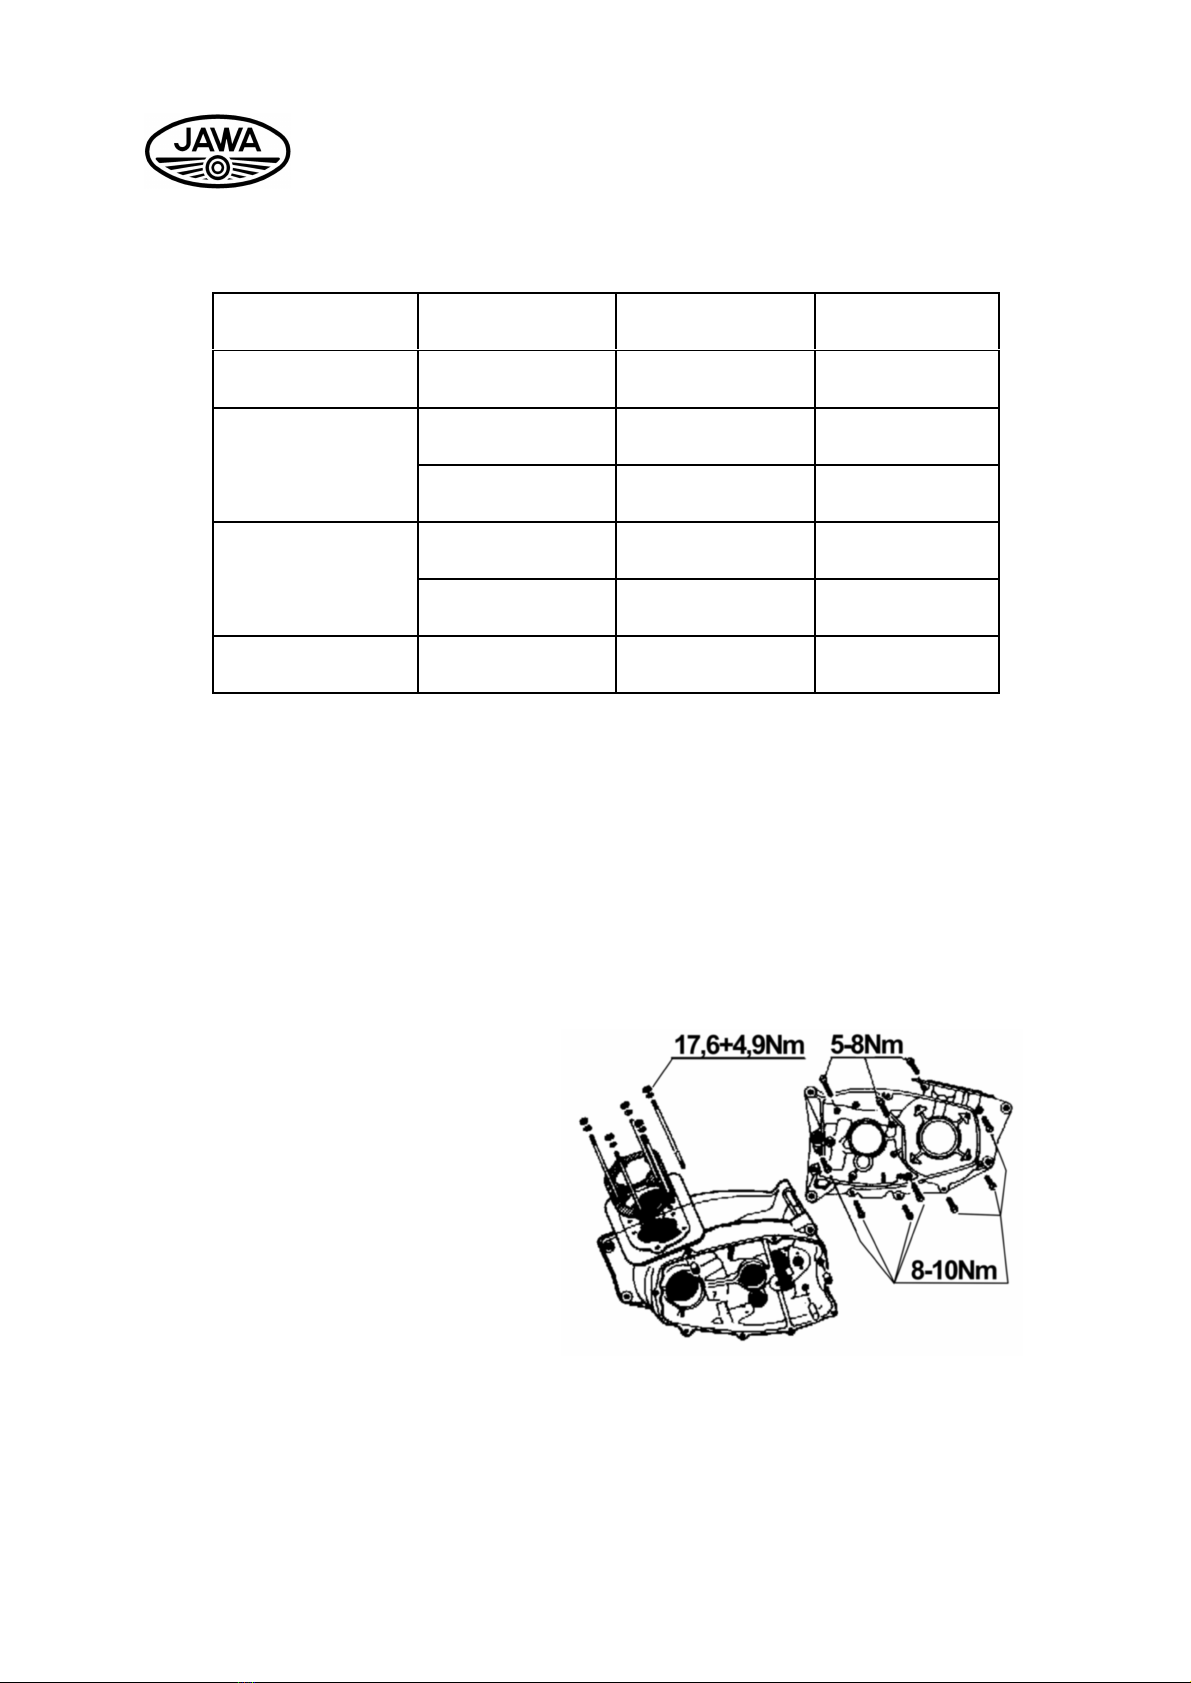
12 S-90 28-86-763 1 Jigwithboltsforseparatingcrankcasehalves
13 S-66 9.71.51603.3 1 AuxilIaryclutchplate
14 S-92 28-86-765 1 Drift
15 S-93 28-86-766 1 Forklegextractor
16 S-94 28-86-814 1 Primarchainadapter
17 S-201 9.96.55407.3 1 Lever
18 S-203 28-86-767 1 Pliers
19 S-205 28-86-725-2 1 Pressingjigwithaccessories
ListoflubricantsrecommendedformotorcycleJAWA350
Useofoil typeofoilintheCzechrep. ViscosityClass notes
A gearbox MogulTrans90 APIGL4
temperatureover0°C
brakeleverpins Gyrol90 SAE 90
clutchleverpins
brakecams MogulTrans80W/90APIGL4 wholeyear
standpins
bowdencables Byrol80W/90 SAE 80W/90
B enginelubrication
B1 lubricatedpetrol Mixtureratio1:60 –afterrunning in, 1:50 duringrunningin
Forwholeyearriding useoilofviscosityclass SAE 30-40 fortwostrokeenginesand
withclassificationaccordingtoAPITS.
B2 LubricationwithOil–mastersystemForwholeyearriding usepredilutedorsyntetic
oilfortwostrokeenginesaccordingtorecommendationofindividualoilproducers.
Forridingintemperaturesover0°Ccanbeusedoilfortwostrokesenginesof
viscosityclass SAE 30-40 andwithclassificationaccordingtoAPI-TC.

7
WORKSHOPMANUAL
___________________________________________________________________________
CTelescopicfrontfork MogulSuper15W/40 APISD/CBor
MogulSuperstabil APISF/CC
15W/40 SAE15W/40
D acceleratortwistgrip energreaseLA2 ISO-L-XBCEB2
Swingingreararm energreaseLA2 ISO-L-XBCEB2
Erearsprocketbearings energreaseLA2 ISO-L-XBCEB2
Fwheelbearings energreaseLA2 ISO-L-XBCEB2
Gsecondarychain special spraye.g. CastrolůMoS2, Gleitmo582……..
OPERATING LIQUIDS TYPEOFLIQUIDINCZ CLASSIFICATION
Abrakefluid SyntolHD260 DOT4
Maintenanceplan
km
500
1500
2500
5000
10000
15000
20000
25000
30000
Transmissionoil * V V K V K V K V
Clutch * K K K K K K K
V
K
Carburettor S
Airfilter *** K K K V K K V
Steeringhead K K M K K
M
Rearsuspension V K
Secondarychain K K K M K V M K V
Wheelsand rearsuspensionbearings M M M
Brakes–brakelining K K K
Bowdencables **** K K K K K K
Battery KKKKKKKKV
Alternator K K
Ignitionspacing-betweenrotorandcatcher S K K K S K S K S
Sparkplugs C V V
Frontfork–oilexchange **** V V V V V V V
Wheels–spokesstretching K
Brakeleverpins, joints,stopswitches,acceleratortwistgrip * K K K K K K K K
Piston,pistonrings,transferports K K
Brakeplate KKKVKKV
Screws, nutsand packings *** K K K K K K K K K
*checkasoftenasnecessary K checking,cleaning,adjustingoreventuallyreplacement
** checkevery1000 km C cleaning
*** checkevery2500 km S adjustment
**** checkevery5000 km M lubrication
V replacement D decarbonization
Afterrunningof:
25 000km primarychainreplacement
30 000km checkorexchangeof connectingrodbearings, steering headbearings, shafttypegasketrings
withthecrankshaftaswell aswheelwithhub, wearof cylinder(event. re-bore)
50 000km completedismantlingof brakesystem

8
WORKSHOPMANUAL
___________________________________________________________________________
Listofmainbearingsand sealingrings
Designation nameofpart pcs. positin
324 594 043400 needlebearing INAHN (15x22x12)1 engine–leftt side
324 163 030100 bearing 6303 A 1 engine–leftt side
324 163 059566 bearing 6305 A 1 engine–leftt side
324 594 049200 needlebearing INABN(16x22x12)1 engine–rightside
324 232 050000 bearing 3205 1 engine–rightside
324 232 050003 bearing 3205 C3 1 engine–rightside
324 162 069566 bearing 6206 2 ckrankshaft
273 521 008617 sealing ring(30x52x10) 1 engine–rightside
273 521 106807 sealing ring(25x52x7) 1 engine–rightside
273 521 006917 sealing ring(25x62x8) 1 engine–leftt side
273 521 100417 sealing ring(8x16x7) 1 speedometerdrive
324 914 010452 ball(Ø6,35) 1+36 framehead, clutchrelease
324 163 020100 bearing 6302 A 2+2 frontandrearwheel
324 162 050100 bearing 6205 A 1 rearwheelsprocket

9
WORKSHOPMANUAL
___________________________________________________________________________
Pistongrading
Grading D2
+0,000
-0,010
Standard A57,972
B 57,982
C 57,992
1. re-bore A58,222
B 58,232
C 58,242
2. re-bore A58,472
B 58,482
C 58,492
3. re-bore A58,722
B 58,732
C 58,742
4. re-bore A58,972
B 58,982
C 58,992
Cylindergrading
Note: Themanufacturerdeliverssparecylindersexclusivelywiththebasic/standardú bore.
Theotherdimensionsgiveninthetableareguidesforcylinderreboring. Asitisverydifficult
toreborethecylindersaccuratelywithinthetolerance limitsofhundredthsofmillimeters, itis
necessarytochecktheboreofthereboredcylinderbymeasuringitatseveralpoints, andto
useapistonofgradingcorrespondingtothemeasureddimension. Thegradingmarkonthe
topfaceofthecylinderhastobechangedaccordingly.
Intheengines(neworrebored)theright-handandleft-
handmaybeofadifferentgradingclass(butnotof
differentreboregrading). Inthecaseofcylinderswith
reboresinbetweenoftwogradinggroups, itispossible
touseapistonofBorCgroup.WiththeBpistonis
running inquicker, withCpistonnockingislikelyon
coldengine(afterstart).
Standard
Grading D1 D2 D3 I.re-bore II.re-bore III.re-bore IV.re-bore
A58,01+0,01 58,01+0,01 58,01+0,02
B58,02+0,01 58,02+0,01 58,02+0,02
C58,03+0,01 58,03+0,01 58,03+0,02
D58,04+0,01 58,04+0,01 58,04+0,02
+0,25 +0,5 +0,75 +1,00

10
WORKSHOPMANUAL
___________________________________________________________________________
Listofgudgeon-pinbearings
Connectingrod Gudgeonpin Needleroller
2x13,8
Clearance
Red
19,994+19,998
Blue
15,994+15,997
1,994+1,996
1,993+1,995
0,005+0,016
0,007+0,018
Red
15,997+16,000
1,994+1,996
1,993+1,995
0,006+0,017
0,008+0,019Blue
19,998+20,002 Blue
15,994+15,997
1,996+1,998
1,995+1,997
0,005+0,016
0,007+0,018
Blue
15,997+16,000
1,996+1,998
1,995+1,997
0,006+0,017
0,008+0,019White
20,002+20,006 Blue
15,994+15,997
1,998+2,000
1,997+1,999
0,005+0,016
0,007+0,018
Yellow
20,006+20,010
Red
15,997+16,000
1,998+2,000
1,997+1,999
0,006+0,017
0,008+0,019
I. ENGINE
1.1. Disassemblyand AssemblyoftheCylinderHeadand Cylinder
Priortodisassemblytakeout
thecarburettorflange, wichis
sharedbybothcylinders.
Usingtheboxspannerloosen
andremovetheeightM10 nuts tobe
abletoloosenandremovethe
cylinderheads. Rotatetheengine
untilthepistonofcylinderwhich
shouldberemovedisinthebottom
deadcenter. Takeoutthecylinder
andcovertheensuing holestoavoid
drainofdirt. Forassemblyproceed
inopossitesequence. Cleanthe
cylinderandenginehousingseating
surfacesbeforeassembly. Oil the
cleanedcylinderworkingsurface
andputitonthepiston. Duringthe
assemblyproceedwithcaution,
checkifpistonringssitrightinthe
jointstoprotectthemfromdamage.
Fit newsealingundercylinderheads(incasetheoldisdamaged).Screwtheheadboltsnutshomecrosswise

11
WORKSHOPMANUAL
___________________________________________________________________________
usingthetorquespannerattheforce
of17,6Nm. Iftheengineis
mountedintheframe,firstremove
seatandtank, separatetheexhaust
elbowsanddisconnectthecoils,
cablesandcableshoes.
1.2. Pistons–demountingandmounting
Since thepistonismountedinthe
cagelessneedlebearing, usespecialtoolsfor
demountingthepiston.
Thereisadangerthatsomeneedles
mayfallintotheengineinternals. Thismay
resultintoheavydamageofengineandwould
benecessarytodismantletheengineandfind
strayedneedles. Thefollowingprocedureis
reccomendable:
Takeoffthecylinders(see sect. 1.1),
plug thecrankcaseholes, removepistonrings
andusing suitablepliesremovepistonpin
locks.
FittheauxiliaryinsertS-88intothe
pistonopeningandthepress-outpininthe
auxiliaryinsert.Pushthepinasfarasthepin
supportsurface. Detachthepistonfromthe
pistonrodtopendandlocktheauxilaryinsert
S-88 (heldbetweentheneedlesinthepiston
rodend). Andthetwooriginaltake-up ringsto
avoidtheirfalling down.
Priortoproceedingtomountingthe
pistons,makesurethatallneedlerollers(28
unitsperrod)andthetake-upringsarefitted
intheconnectingrodtopends. Theauxiliary
insertsS-88 mustbemountedinsidethe
rollers. Whenfittingapistonontheconnecting
rodtopend, makesurethattake-upringsand
rollersdonotfallintotheenginehousing
internals

12
WORKSHOPMANUAL
___________________________________________________________________________
Pistonmusthavesigning L(leftside)
orP(rightside)forthecorrespondingcylinder
andthearrowmustbeorientedforwardtothe
exhaustports. Usethepress-outpinS-87 to
pushthepistonpins. Makesure,thatthe
lightening holesofthepistonpinsareoriented
totheengineoutside. Lockthepistonpins
withlockrings. Whenmountingnewpistons,
checkiftheiridentificationmarks(i.e. A,B,C)
correspondtoeachcylinder.
Makethischeckbeforemountingthe
pistonringstobesurethatthepistoninthe
cylinderisnotofftheaxis:fitthepiston
(withoutrings)provisionallyonthepistonand
turnthecrankmechanismwiththestarting
levertosee ifthepistonhavetheidentical
clearanceoneachsidewhenitisinthetop
deadendposition.
Ifitleanspermanentlyagainstonesideand,
whenpushedoff, returns totheoriginalposition,
takethecylinderoutandbendwithcautionthe
connectingrodwithpistontotheotherside. This
actiscalled„connectingrodangleadjusting“.
Thetrulyadjustedconnectingrodmusthavethe
identicalplayoneachside.

13
WORKSHOPMANUAL
___________________________________________________________________________
1.3. Primarygear, clutch-dissasebly
CAUTION:Firstdrainoilfromthegearbox.
Takeoffthestartinglever(firstmoveittothe
starposition)andremovetheboltsholding the
leftenginecover. Aftercompressing the
springstakeofftheclutchpins, dismantlethe
washersandspringsandplatesandinsertthe
securingplateS-66intotheclutchdrum.
Withbarrelspannernr.19 removethenutM12
andtakeofftheinnerclutchdrum.
Withbarrelspannernr. 27 loosentheprimary
gearnut.UsingS-85 pullerremovethis
primarygearandtakeittogetherwiththe
clutchcageandchainofftheshafts.
Inmostofthecasesyoumayremovethe
clutchcagewithouthaving tostriptheprimary
chainwheel, whilemovingafewtimesthe
clutchcageonthemainshaftandreleasing
thustheclutchgearspacer. Gripthereleased
spacerandpullitoutandremovethecage.
1.3.1. Assembly
Fittheprimarychaingearontheclean,
drycrankshafttaperandthewasherandspacer
(testtherunoutrateofthespacerfacesbeforethe
assembly)onthemainshaft. Placeasteelruleron
thegearflankagainstthegearstomakesurethat
bothgearsarealligned(admissibletoleranceisof
0,5mm).
Thetruealignmentisimportantforprimarychain
lifetimeexpectancyandtheprimarygearnoise
rate.Toeliminatethedeviations(ifany)ofthe
clutchchaingearfitsteelshimpofadequate
thickness onthemainshaftbetweenthebearing
andthewasher. Testtheparallelityandtakeoff
theclutchgearagain. Beforemountingthe
startinggearchecktheconditionoftheshaftseal
ring. Mountthestartinggear(movetheshaftfor
thepurposetobeinthestartingposition). Fitthe
primarychainonthechaingearcrankshafttaper
andcrankshaft. Putontheinnerclutchdrum
(withfittedundamagedlockwasher) onthe
mainshaft. Fixthecarrierwithnutandlockthe
washer. Screwhometheprimarychaingearnut
onthecrankshaftForthejobusetheS-66 jig.

14
WORKSHOPMANUAL
___________________________________________________________________________
1.4. Clutch-assembly
Fittheoiledclutchrodwithrestinthemainshaft. Ontheouterdrumputonebyonethe
frictionandsteeldiscs. Ifwechangetheplates, beforetheassembly,measuretheiroverall
thickness, wichshouldbe18,25 +/-19 mm(5plates). Putonpressureplatewithspringsand
washersoverthem. Compresssuccessivelythespring overwasheswithspannernr. 10 and
overthewashersfixthesecuringpins. Thetightening torqueoftheM12x1,25 nutholding the
clutchis35-40 Nm.
1.5 Speedometerdriveand sealing
Dismounttheprimarygearasdescribedunder1.3. UnscrewtheM6bolt
providedontheenginebottomandholding thespeedometerdrivesocketand
takeitoutoftheengine. Unscrewthegrubscrewfromthelug providedon
enginehousinginnerbottom(thescrewdrivesthespeedometer). Usinga
stick(preferablyanaluminiumone)knockthedrivecasing andthesealring
intothehousingspace. Formounting,fitthenew8x16x7sealring onthe
driveshaft(springshouldface theengineinternals), andusing asuitablepipe
orsocketwrenchof15 mm outerdiametertaponthedrivetopushitthrough
thehousingtoitsseatasfarasthepointwhengrooveonthedrivesurfaceis
inthelinewiththethreadforthelockscrewinthehousing. Onceascrewis
screwedhome, driftitwithcentrepunch

15
WORKSHOPMANUAL
___________________________________________________________________________
1.6. Starterspring
(primarygeardismounted)
Turnthestartershafttotheleftandtakeit
outofitsmountingTakeoffthestarter
segmentandspring. Whenremountingthe
spring,fititsoneendonthesegmentedge.
Turnthesegmenttogetitinitstrueposition,
withthesegmentholecentrealignedwiththe
carrierholecenter.Theotherendofthe
springsitsontheenginehousingrearwall. Fit
inthestartershaft(withspring)andturnitto
getitinthestartingposition.
1.7. Shaftwithcarrier
Gearshiftpawl
(primarygeardismounted)
Turnthestartershaftandtakeit
offalongwiththestartersegmentand
returnspring. Driveoutthepinwhich
holdstheclutch-disengagementcamon
theshaft(fromthebottomtoup)and
removethecam. FitthepawlholderS-
63 betweenthegateandthepawlsand
pullwithcautiontheshiftershaftwith
carrierandpawlsoutofthemounting.
Whenremountingtheset, supporttheS-
63 holderagainstthecarrierpawlandfit
theoiledshaftinitsmounting. See that
thecarrierpinsitstrulybetweenthe
returnspringsinthegate. Mountsemi-
automaticsetoftheclutchontheengine
righthandflank. Thenproceedas
describedunder.
1.8. Dismountingthesemi-
automaticclutch
disengagementset.
Adjusting
Loosenthenutandremovethe
brakepedal. Removetheenginecover.
Usingthespanner10 unboltthree bolts
andremovetheholder. Alsounhookthe
clutchbowden. Forremountingproceed
inreversesequence.
Note:Afterremountingthesemi-
automaticclutchdisengagementset,you
havetoadjustit–see chap. 1.

16
WORKSHOPMANUAL
___________________________________________________________________________
1.9. Adjustingofsemi-automatic
clutchdisengagementset
•Removetherightenginecover
•Screwhometheclutchcableadjustingbolts
onbowden(makebowdenshorter)toloosen
thecablesocketonclutchcontrolset.
•Adjusttheplaybetweenthefootclutch
disengagementcamandthedisengagement
rollerwiththeclutchdisengagementboltM8
tomakethemtouch. (theplaybetweenset
boltandcontrolpoleis0,1–0,3mm)
•Eliminatetheplayontheclutchleveron
handlebarbyadjustingbowdenbolts.
1.10. Rearwheelsprocket
Removingand refitting
Removethesemi-autoclutch
releasedevice. Loosentheclipsoftherubber
chainguardsandliftofftheoutercoverofthe
secondarysprocket. Unlockthelockwasher
underthenut. Withtheslacksecondarychain,
pullthesecondarysprocketwiththechainand
innercoveroutofitsbearings. Itisnot
necessarytodisconnectthechain. Reverse
thisproceduretorefititback.
Note:
Becarefullwhenrefittingthesecondary
sprocket.Itmustslideeasilyonthesplines. Do
notdrivethesprocketforcefullyintothe
bearing (insidethecrankcase)inspiteofits
being securedagainstnormalstressing witha
buttress plate. Thereisdangerofserious
damagetothegearshaftforksandgearsof
gearbox.
1.11. Takeouttheenginefromtheframe
Takeoffthesaddle, disconnectthebatteryfuseandtakeoffthesparkplugscaps. Detachthe
fuelsupplyhoseremovethefueltank, unscrewthecarburettorcapandtakeoffthebowden
withtheslide. RemovetheM8nutholding theexhaustbentflangesandturnthebentstothe
side, sotheywouldnotbeintheway. Detachthetachometerdriveprovidedbelowtheengine
andthespeedometer. Removetherightenginecover, detachthealternatorcables. Dismount
rotorusingjigS-97. AfterscrewingofffourboltsM6removealternatorstator. Detachthe
cablefromtheidling gearcontactandpull thewholecablebundleoutofholderintheengine
case. Detachthebowdencablefromtheclutchautomaticset,unscrewthethree boltsand
removethecontrolsetofclutch. Loosentherearwheelaxisandthetransmissiongearnut.
Loosenthechaintensionerandmovethewheelforwardtoremovethechain.

17
WORKSHOPMANUAL
____________________________________________________________________________
Takeofftheoutercoversprocket, loosen
thegearnutandunscrewwithnr.32 socket
spanner. Pull outthesprocketwithinner
coverfrommounting.
Itisnotnecessarytouncouplethechain.
Removetherightfootrest,boltsandpins
holding engineintotheframe. Standingon
therightsidegriptheenginewithright
handbythecylinderandwithlefthandby
thestartlever(see pic.)Lifttheengine
slightlytothefront, shiftittotherightand
takeitoutoftheframe. Avoiddamaging
thepaint–protectframepipes(e.g. by
rubbertubes).
I
II
I.
.
D
DI
IS
SM
MO
OU
UN
NT
TI
IN
NG
G
A
AN
ND
D
M
MO
OU
UN
NT
TI
IN
NG
G
T
TH
HE
E
E
EN
NG
GI
IN
NE
E
H
HO
OU
US
SI
IN
NG
G
2.1.Basicdisassembly
Clamptheenginefrontsectionbetweenvice jaws
insuchaway, thattheengineleftsideisaccesible.
Removethecarburettor, primarygear, cylinderheads
andpistons. Drivetherearcentringelementfromtheleft
sideofenginehousingtotherightside. Takeoutthe
clutchautomaticreleasedevice andremoveM6bolts
holding twohalvesofenginehousingtogether.Takethe
housingoutofthevice andlayitdownontheleftside.
2.2. Separatingtwohalvesofengine
BolttheS-90pullerintheM6threadholesinthe
housing(see pic). andstripwithituniformlythe
righthalfofthehousingfromthecrank
mechanismbearing. Takecaretokeeptheright
connectingrodinthetopdeadendposition,ithas
topass easilythroughthecentralhousingslit. If
duringthestrippingtherighthalfofhousinggets
jammed, knockwithcautionontherearpoartof
housingevent.turnabitshaftofsprockettokeep
stripping proccesuniform.Aftertwohalvesare
separatedenoughremovethemidinsertbetween
twocylinders–toallowfree passageof
connectingrod.Finishseparatingandremovethe
righthalf.

18
WORKSHOPMANUAL
___________________________________________________________________________
Suggestion: Usegrease(f.ex.PM-NH2, LITOL24,
CASTROLEASE LH-2...)toavoidneedlesfalling outof
countershaftbearings.
2.3. Gearbox–shifting, crankmechanism
Withtheengineinthisdismantledcondition, itis
possibletorepairthegearboxandthegearshift
mechanism.Withoutpressingthecrankshaftmechanism
outoftheothercrankcasehalf. Duringtheinspectionof
gearboxandgearshifting, removetheshifterforkrod,
theshifterforks,thelayshaftandthegears. Withsoft
mallettapthemainshaftoutofbearing. Ifitisnecessary
toremovethegearshiftplate, removethefour, dot
securedcountersinkscrewsfromthegate,turnthegate
tosuitablepositionandremoveitfromcase
ToremovethecrankshaftscrewtheS-85
dragwithtwoM8screwsintothethreaded
holesforfastening screwsoflefthalf
crankcasecover. Pushoutthecrankshaftout
oflefthalfofcase.
Remember: connectingrodmustbeinitstop(T.D.C.)
2.4.Exchangeoflayshaftneedlebearings
Afterremoving locksdrivethebearing intothe
crankcasewithadrift. Tofacilitatethisjob, removethe
speedometerdrivefromlefthalfofengine. Putnew
bearingsintothecrankcase–heatcaseto80-120°C.
Afterpressing themhome, fillthemup withgreaseto
avoidloosingofneedles.
2.5. Testingtheevenness ofseatingsurfaces
Cleanthoroughlytheseatingsurfacesandtest
theevenness ofthewholeenginehousingwiththesteel
ruler. Grindthesurfacesplainonaplateifnecessary.
Cleanthegroundsurfacesthoroughlyofthegrinding
paste.
2.6. Exchangeofbearingsand sealringsof
crankshaftmechanism
Changebearingsincasetheyarenoisyorworn
out. Dismantletheenginehousing, removethelockrings
ofsealing rings. Heatthecaseup to100-120°Candusing
thedriftS-71 driftthebearingintotheenginecase. Use
driftS-72 todriftoutthesealing ring(frominside-out).
Mainshaftbearingdriveoutsimilarway.

19
WORKSHOPMANUAL
___________________________________________________________________________
Alsoafterunlockinganddriving wheelinsidethe
case. Mountingofallbearingisrealisedtoheated
case(100-120°C). Putthebearingsintothepre-
heatedhalfsofenginecase, gettingtheminline
withthemachinedsurface intendedforthecrank
mechanismflywheel. Pushthemainshaftandgear
–plus-hubbearingasfarasthedepthoflocking,
wichhavetobealreadyinitsplace. Sealing rings
aremountedinafterjointingofcasehalves.
Lockthemountedmainshaftbearing against
shifting withshimsanddrifttheboltswithcentre
punch.
2.6.1. Exchangeofsealingrings
Thesealringsalonecanbereplacedwhileengineisintheframe. Howeverthe
primarygearmustbedismountedbefore. Alsoalternatorandchaingear(1.9). Removethe
lockpinandtakeoffthedamagedsealring. Thencheckthetruejointofthespring, oil the
sealringsanddrivethelatterinplace withtheS-72 andS-92jigs.
2.7. Gearbox
Forthecorrectreassemblyofgearboxitis
recommendedtobeginwiththecrankmechanism
removedfromthecrankcasehalvesinorderto
ensurethemaximumclearance ofthelayshaft. To
ascertainthisclearance, fitthelayshaftinto
ballbearing togetherwiththe1st. speedgearand
thenclampbothcrankcasehalvestogether
provisionallywithseveralscrews. Movethe
layshaftforwardandbackwardtocheckitsaxial
clearancewhichshouldbeintherangefrom0–
0,6mm. Thenremovethelayshaftandlocatethe
crankmechanismwiththecentreface plate(if
thisplatehasbeenremoved)intotheleft
crankcasehalfheatedup to100-120°C. The
highesttemperaturehastobearoundthe
crankshaftbearing. Putwoodenblocksunderthe
frontandrearpartofthecrankcasehalfandinsert
thecrankmechanismintoasfastaspossibleso
thatthelockpinofcentreringfitsintotherecess
inthecrankcase. Itisnotpermittedtodrivethe
mechanismintothebearing forcefullybecause
thiswouldresultinits„uncentering“andalsoin
damaging ofbearings. Ifthecrankmechanism
becomesjammedinthebaering, driveitoutof
thebearing(enginedismantling), reheatthe
crankcaseandrepeattheoperation..

20
WORKSHOPMANUAL
___________________________________________________________________________
Setthegearshiftgateinoneofthecentrepositions
(extremepositionsareunsuitable). Thenfitthe
mainshaftwiththespacerandgearlockedinthe
positionwithwireformedringintothebearinginthe
leftcrankcasehalf. Fitthe16 toothgearontheshaft
splineswithitsthree clawspointingdownward.
Putshifterforkguidepinsintothetopandthe
bottomslots ofthegateandfitthetopforkintothe16
toothgearonthemainshaftatthesametime. Then
threadtheguiderodthroughtheforkssothatits
shoulderedendpointsdownward. Locatethe24 tooth
gearwithitsflatsidetowardtheneedlebearing, and
place the16 toothgearonthebottomshifterforkwith
itsthree clawspointingupward. Joinbothgearsbythe
layshaftwiththepreviouslyfittedonandsecured19
toothgear.Checkgearshiftingbyturning thegear
shiftgatetotheindividualpositionscorrespondingto
theindividualspeeds(especialyifanewgearshift
gateisused)inthefollowing manner.
a) Shiftthe1st. gearandcheckwhetherthe
16 toothgearonthelayshaftmeshingwith
the1st speedgear(24 teeth)hasanaxial
clearanceofatleast0,2-0,3mm. Likewise
checkthat,inthisposition, thereisa
clearancebetweentheshifterforkguidepins
andtheendofthegateslots.
b) Shifttheneutralbetween1st and2nd gear
andcheckthattheclawsofthe16 toothgear
do nottouchtheface of1st speedgearand
alsotheclawsofthe2nd speed(19 teeth)
gearwhenliftinginthebottomshifterfork.
c) Whenshiftinginfourthgear,theface of
splinedmainshaftshouldprotrude0,1-0,2
mmfromthe3rd speedgear(16 teeth). At
thesametimecheckthattheshifterfork
guidepinsarenotabuttingagainsttheends
ofthegateslots (see paragrapha).
This manual suits for next models
3
Table of contents
Other JAWA Motorcycle manuals

JAWA
JAWA RVM-600 User manual

JAWA
JAWA 250 TRAVEL User manual

JAWA
JAWA 300 CL 2020 User manual

JAWA
JAWA 1992 350/638 Instruction manual

JAWA
JAWA ZVL 210 User manual

JAWA
JAWA 559/04 User guide

JAWA
JAWA Dandy MJ50 User manual

JAWA
JAWA F 350/634-5,8 User guide

JAWA
JAWA 638 Instruction manual

JAWA
JAWA B User manual