Jays q-Seven Wireless User manual

q-Seven Wireless
Getting started, safety and warranty


x1
2 s
x2
x1
2 s
2
x3
5 s
2 s
13
5
4

Product and controls overview
1.
2.
3.
4.
5.
6.
7.
8.
NC LED indicator
NC button
Operation LED indicator
Multi-function button
Track / Volume button
Audio jack
USB jack
Microphone
Översikt produkt och kontroller
Product and controls overview
1.
2.
3.
4.
5.
6.
7.
8.
NC LED-lampa
NC-knapp
Funktions LED-lampa
Multifunktionsknapp
Låt- / Volymknapp
Ljudingång
USB-ingång
Mikrofon
Vue d'ensemble du produit et des commandes
1.
2.
3.
4.
5.
6.
7.
8.
Voyant LED NC
Bouton NC
Voyant LED de fonctionnement
Bouton multifonction
Bouton de Volume / Piste
Prise jack 3.5mm
Micro USB
Microphone
Produkt- und Bedienelementübersicht
1.
2.
3.
4.
5.
6.
7.
8.
NC-LED-Anzeige
NC-Taste
LED-Betriebsanzeige
Multifunktionstaste
Track-/Lautstärke-Taste
Audio-Buchse
USB-Buchse
Mikrofon
Información del producto y controles
1.
2.
3.
4.
5.
6.
7.
8.
Indicador LED de Cancelación de ruido
Botón de Cancelación de ruido
Indicador LED de funcionamiento
Botón multifunción
Botón pista/volumen
Toma de audio
Toma USB
Micrófono
Panoramica di prodotto e comandi
1.
2.
3.
4.
5.
6.
7.
8.
Indicatore LED NC
Pulsante NC
Indicatore LED di funzionamento
Pulsante multifunzione
Pulsante traccia/volume
Ingresso audio 3.5 mm
Ingresso micro USB
Microfono

製品およびコントロールの概要
1.
2.
3.
4.
5.
6.
7.
8.
NC LEDインジケータ
NCボタン
動作LEDインジケータ
マルチ機能ボタン
トラック / 音量ボタン
オーディオジャック
USBジャック
マイク
產品及使用概覽
1.
2.
3.
4.
5.
6.
7.
8.
NC LED 顯示燈
NC 按鈕
操作 LED 顯示燈
多功能按鈕
曲目/音量按鈕
音頻線插口
USB 插口
麥克風
제품 및 제어 기능 개요
1.
2.
3.
4.
5.
6.
7.
8.
NC LED 표시기
NC 버튼
LED 상태 표시기
다기능 버튼
추적/볼륨 버튼
오디오 잭
USB 잭
마이크
1.
2.
3.
4.
5.
6.
7.
8.
Общий обзор продукта иэлементов управления
Светодиодный индикатор шумоподавления (NC)
Кнопка шумоподавления (NC)
Светодиодный индикатор режима работы
Многофункциональная кнопка
Кнопка переключения треков / регулировки громкости
Аудиоразъем
Разъем USB
Микрофон

Complies with
IMDA Standards
DA106614
Model name: Q7W01
Important safety instructions
Read, follow and keep these instructions.
For the best possible experience, always use the product as described by the manufacturer.
Always handle your headphones with care and protect them from external damage.
Clean your headphones using a soft dry cloth. Never use water, cleaning detergent, leather polish or other.
substances as they may damage your headphones permanently.
Avoid exposure to extreme conditions such as very cold or hot temperatures, magnetic fields or damp
environments.
Listening to music at high volume for prolonged periods of time can cause permanent damage to your
hearing.
Contains small parts and are not suitable for children age three (3) and below.
The headphones contain magnetic material.
The headphones contain a Lithium battery. If misused or damaged it can become a hazard and is at risk
of explosion.
Should a battery cell leak, do not allow the liquid to come in contact with skin or eyes.
The headphones must not be disposed of with regular household waste. Please dispose of in accordance
with local regulations.
Do not use your headphones in the immediate proximity (10 cm) of a pacemaker.
Do not subject the headphones and included accessories to abnormal wear and tear.
Do not expose the headphones to temperatures below -20°C or above +45°C.
Do not charge the headphones in temperatures below 0°C or above +45°C.
Do not attempt to burn the headphones. The battery could explode causing injury and death.
Do not attempt to open, modify, disassemble, repair or in other way access the internal structure of the
headphones. They are notuser serviceable.
Do not use or store the headphones near to a vehicle airbag due to risk of injury.
Do not use headphones while driving, jogging or walking through traffic areas. Headphones effectively
isolate external sound and noise which means that when in use, you might not be able to hear your
surroundings.
Do not drop, sit on or cause other unusual impact to the headphones.
Do not expose to fire, water or high voltage equipment.
Do not expose the headphones to rain or moisture.
Do not use the headphones near water, bathtubs, sinks, saunas, pools, other liquids or moist areas.
1.
2.
3.
4.
5.
6.
7.
8.
9.
10.
11.
12.
13.
14.
15.
16.
17.
18.
19.
20.
21.
22.
23.

Statements
US FCC interference statement
This equipment has been tested and found to comply with the limits for a Class B digital device, pursuant to
part 15 of the FCC Rules. These limits are designed to provide reasonable protection against harmful
interference in a residential installation. This equipment generates, uses and can radiate radio frequency
energy and, if not installed and used in accordance with the instructions, may cause harmful interference to
radio communications. However, there is no guarantee that interference will not occur in a particular
installation. If this equipment does cause harmful interference to radio or television reception, which can be
determined by turning the equipment off and on, the user is encouraged to try to correct the interference by
one or more of the following measures:
• Reorient or relocate the receiving antenna.
• Increase the separation between the equipment and receiver.
• Connect the equipment into an outlet on a circuit different from that to which the receiver is connected.
• Consult the dealer or an experienced radio/TV technician for help.
Modification:
Any changes or modifications not expressly approved by the grantee of this device could void
the user’s authority to operate the device. This device complies with part 15 of the FCC Rules. Operation is
subject to the following two conditions: (1) This device may not cause harmful interference, and (2) this device
must accept any interference received, including interference that may cause undesired operation.
US FCC radiation exposure statement:
FCC ID: 2AJOO-Q7W01. The product comply with the US portable RF exposure limit set forth for an
uncontrolled environment and are safe for intended operation as described in this manual. The further RF
exposure reduction can be achieved if the product can be kept as far as possible from the user body or set the
device to lower output power if such function is available. This transmitter must not be co-located or operating
in conjunction with any other antenna or transmitter.
EU Declaration of conformity
Hereby Jays Group AB declares that this product is in compliance with the essential requirements and other
relevant provisions of Directive 2014/53/EU and all other EU directive requirements. The complete declaration
of conformity can be found at www.jaysheadphones.com.
Caution
Risk of explosions if battery case is damaged or opened. Dispose of used battery according to your local waste
disposal authority.

Getting started
Power on/off and pairing
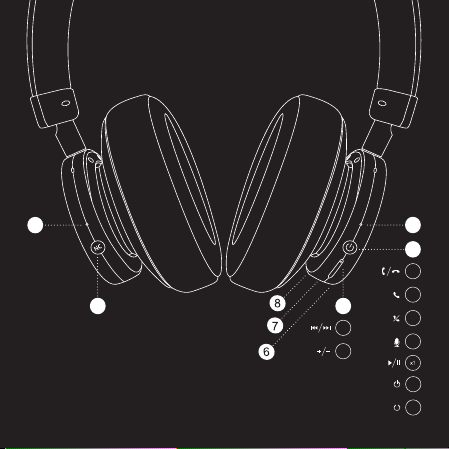
To power on, press and hold the multi-function button for 2 seconds until the operation LED lights up in white.
The headphones enter pairing mode automatically as the operation LED flashes quickly in red and white.
To pair, go to Bluetooth®settings on your device and select “JAYS q-Seven Wireless”. The operation LED will
flash slowly in white upon a successful connection.
To power off, press and hold the multi-function button for 5 seconds. The operation LED flashes once in red
and then in both red and white before the headphones powers off. If the Bluetooth®on the paired device
turns off, the headphones will turn off automatically after a few minutes.
Reconnecting and additional pairing
Next time you power on, the headphones will automatically try to reconnect to the most recently used device.
If not found, pairing mode will automatically be initiated again. If you manually disconnect the headphones from
the device, press the multi-function button once to enter the pairing mode. To force pairing mode, press and hold
the multi-function button for 3 seconds from off state. To clear the pairing history, press and hold the multi-function
button and Volume+ button for 5 seconds. For more information and help on reconnecting and additional pairing,
please view the troubleshooting.
Using the NC button
To enter ANC mode, single click the NC button, the NC LED will light up in white.
To enter HearThrough mode, single click the NC button, the NC LED stays white.
To go back into ANC mode, single click the NC button, the NC LED stays white.
To turn off ANC or HearThrough, hold the NC button for 2 seconds, the NC LED turns off.
Using the audio cable
Connect the audio cable to the audio jack and your device. The device will automatically switch over from
Bluetooth to the audio cable.
Battery status and charging
The operation LED flashes quickly three times in red as the battery level is running low.
Charge by connecting the included USB cable to the USB jack on the bottom of the right ear cuff and
connect it to any certified USB power output. The operation LED will glow in red during the charging.
When the headphones are fully charged, the operation LED will glow in white for 10 seconds, then the
operation LED turns off. A full 100% charge will take around 2-3 hours (depending on temperature
and charger).
EN English

Button functions and LED indicators
Using the multi-function button
Function
Answer/End call
Redial latest caller
Reject call
Voice control
Play/Pause music
Power on
Power off
Clear pairing record
Operation
Single click multi-function button
Triple click multi-function button
Press multi-function button for 2 seconds
Double click multi-function button
Single click multi-function button
Press multi-function button for 2 seconds
Press multi-function button for 5 seconds
Press multi-function button and volume+ for 5 seconds
Operation LED indicator
Explanation
Power on
Power off
Standby
Low battery
During charging
Finished charging
Operation LED
Flash in white
Flash in red / white
Flash in white
Flash in red
Solid red light
Flash in white
Explanation
Bluetooth
®
pairing mode
Successful Bluetooth
®
connection
Lost Bluetooth
®
connection
Clean Bluetooth
®
list
Incoming call
Operation LED
Flash in red / white
Flash in white
Flash in red / white
Flash in white
Flash in white
Operation LED indicator

Troubleshooting
Problem pairing and connecting
•
Make sure the headphones are not connected to another device.
•
Disable and enable Bluetooth on your device.
•
Move the headphones closer to the device or alter their positions to avoid Bluetooth interference.
•Verify no other wireless equipment interfere with your headphones Bluetooth signal.
Problem with sound transmission
Move the streaming device to another position. Your body, distance, different materials and other wireless
equipment can interfere with the wireless signal between your device and headphones.
FAQ and quickstart guide
Visit jaysheadphones.com for more instructions and help on this product.

Legal & Warranty
Environmental information
This product complies with international directives, including but not limited to WEEE Directive
(2012/19/EU). Do not dispose with normal household waste. Please consult your local waste
disposal authority for guidance on how to properly recycle or dispose of this product.
Manufacturer’s limited warranty
Your original Jays Group AB product is covered by a warranty of twelve (12) months from the date of purchase
of a brand new, unused Jays Group AB product by the original purchaser. Jays Group AB guarantees that the
product is free from faults in the materials, design and workmanship when it was sold to the purchaser. If you
are not able to submit the receipt when making a warranty claim you may be obliged to pay for any repairs
carried out. Proof of purchase must clearly state the date of purchase, name of the product and authorized
resellers’ details.
The Warranty Period cannot be extended or renewed due to subsequent resale or replacement of the product.
This Limited Warranty does not affect your legal rights under your applicable national laws relating to the sale
of consumer electronic products. Defective parts replaced within the Limited Warranty Claim shall become the
property of Jays Group AB.
What is not covered by the limited warranty?
• Faults caused by wear and tear, age-related battery capacity loss, accidents, dropping, mechanical damage,
moisture, chemical products, abnormal impact damage or force majeure.
• Modifications or repairs performed by yourself or third party without Jays Group AB approval.
How to get warranty service
If you wish to make a Warranty Claim within the Limited Warranty Period, please contact the reseller of your
product for further help. You will need to provide the proof of purchase and the affected part. Any defective
parts covered by the Limited Warranty will be repaired or replaced free of charge. Replaced or repaired parts
provided during the Warranty Period will be warranted for the remainder of the original Warranty Period or
for sixty (60) days from the date of repair or replacement, whichever is longer.
For FAQ please visit www.jaysheadphones.com.

SV Svenska
Komma igång
Ström på/av och parkoppling
För att starta, tryck och håll inne multifunktionsknappen i 2 sekunder tills att funktions LED-lampan lyser vitt.
Hörlurarna går nu in i parkopplingsläge automatiskt när funktions LED-lampan blinkar fort i rött och vitt.
För att parkoppla, gå till Bluetooth®inställningarna på din enhet och välj “JAYS q-Seven Wireless”.
Funktions LED-lampan blinkar sakta i vitt vid en lyckad parkoppling.
För att stänga av, tryck och håll inne multifunktionsknappen i 5 sekunder. Funktions LED-lampan blinkar rött
en gång och sedan både rött och vitt innan hörlurarna stängs av. Om Bluetooth®stängs av på den
parkopplade enheten stänger hörlurarna av automatiskt efter ett par minuter.
Återanslutning och nya parkopplingar
Nästa gång hörlurarna startas kommer dom automatiskt försöka att återansluta till den senast parkopplade
enheten. Om den inte hittas aktiveras parkopplingsläget automatiskt igen. Om du manuellt kopplat bort
hörlurarna från enheten, tryck på multifunktionsknappen en gång för att aktivera parkopplingsläget igen.
För att tvinga fram parkopplingsläget när hörlurarna är avstängda, tryck och håll inne multifunktionsknappen
i 3 sekunder. För att rensa parkopplingslistan, tryck och håll inne multifunktionsknappen och volym+ knappen
i 5 sekunder. För mer information och hjälp med återanslutning och nya parkopplingar, vänligen läs vår
felsökningsguide.
Använd NC-knappen
För att aktivera ANC-läget, tryck en gång på NC-knappen, NC LED-lampan lyser vitt.
För att aktivera HearThrough-läget, tryck en gång på NC-knappen, NC LED-lampan lyser vitt.
För att gå tillbaka till ANC-läget, tryck en gång på NC-knappen, NC LED-lampan lyser vitt.
För att stänga av ANC eller HearThrough, tryck och håll inne NC-knappen i 2 sekunder, NC LED-lampan släcks.
Använd ljudkabeln
Anslut ljudkabeln till ljudingången på hörlurarna och på din enhet. Enheten kommer automatiskt att byta från
Bluetooth till ljudkabeln.
Batteristatus och laddning
Funktions LED-lampan blinkar rött snabbt 3 gånger när batterinivån börjar bli låg.
Ladda genom att ansluta den medföljande USB-kabeln till USB-ingången på undersidan av hörlurarna och
sedan till en USB-strömkälla. Funktions LED-lampan lyser rött under laddningen. När hörlurarna är fulladdade
lyser funktions LED-lampan vitt i 10 sekunder, sedan släcks lampan. En full 100% laddning tar ca 2-3 timmar
(beroende på temperatur och laddare).

Knappfunktioner och LED-indikationer
Användning av multifunktionsknappen
Funktion
Svara/Avsluta samtal
Ring upp senaste samtal
Neka samtal
Röststyrning
Spela/Pausa musik
Ström på
Ström av
Rensa parkopplingslista
Handling
Ett tryck på multifunktionsknapp
Tre tryck på multifunktionsknapp
Håll inne multifunktionsknapp i 2 sek
Två tryck på multifunktionsknapp
Ett tryck på multifunktionsknapp
Håll inne multifunktionsknapp i 2 sek
Håll inne multifunktionsknapp i 5 sek
Håll inne multifunktionsknapp och volym+ i 5 sek
Funktions LED-lampa
Förklaring
Ström på
Ström av
Viloläge
Lågt batteri
Pågående laddning
Slutförd laddning
Funktions LED
Blinkar vitt
Blinkar rött / vitt
Blinkar vitt
Blinkar rött
Fast rött sken
Blinkar vitt
Förklaring
Bluetooth
®
-parkopplingsläge
Lyckad Bluetooth
®
-anslutning
Förlorad Bluetooth
®
-anslutning
Rensa parkopplingslista
Inkommande samtal
Funktions LED
Blinkar rött / vitt
Blinkar vitt
Blinkar rött / vitt
Blinkar vitt
Blinkar vitt
Funktions LED-lampa

Felsökning
Problem med att parkoppling
• Säkerställ att hörlurarna inte är anslutna till en annan enhet.
• Inaktivera och aktivera Bluetooth på din enhet.
• Flytta hörlurarna närmare enheten eller ändra bådas position för att undvika störningar eller hinder.
• Säkerställ att inga andra trådlösa produkter stör dina hörlurars Bluetooth-signal.
Problem med ljudöverföring
Flytta den spelande enheten till en annan position. Din kropp, avståndet, olika material samt annan trådlös
utrustning kan påverka signalen mellan din enhet och dina hörlurar.
FAQ och quickstart-guide
Besök jaysheadphones.com för mer instruktioner och hjälp för denna produkt.
• Om hörlurarna inte parkopplar, följ instruktionerna för återställning ovan.

Villkor & Garanti
Miljöinformation
Den här produkten följer internationella direktiv inklusive men intebegränsat till WEEE Directive
(2012/19/EU). Får ej slängas tillsammans med vanligt hushållsavfall. Vänligen kontakta dina
lokala myndigheter för råd om hur du lämpligen återvinner eller slänger produkten.
Tillverkarens begränsade garantivillkor
Din Jays Group AB-produkt täcks av en 12-månadersgaranti som gäller från och med inköpsdatumet av en ny,
oanvänd Jays-produkt, inköpt via en auktoriserad Jays Group AB-återförsäljare. Jays Group AB garanterar att
produkten är fri från defekter vid tidpunkten för ditt inköp. Om du inte kan styrka ditt inköp med ett kvitto så
kan du bli ombedd att betala för eventuell reparation. Ett kvitto måste tydligt visa datum för inköp, namn på
produkt samt återförsäljarens uppgifter.
Garantiperioden kan inte förlängas eller förnyas genom att på nytt säljas vidare eller bli utbytt. Den begränsade
garantin påverkar inte dina lagstadgade rättigheter i landet för ditt inköp. Utbytta produkter och tillbehör inom
den begränsade garantiperioden tillhör Jays Group AB.
Vad täcks inte av garantin?
• Fel orsakade av slitage, minskad batterikapacitet p.g.a ålder, olyckor, fall, mekanisk skada, fukt, oaktsam
hantering, kemiska vätskor samt okontrollerbara händelser.
• godkännande av Jays Group AB.
Hur garantin hanteras Kontakta i första hand inköpsstället om du önskar reklamera din produkt inom den
begränsade garantiperioden. Du måste kunna uppvisa ett giltigt kvitto samt produkten du önskar reklamera.
Produkten och de delar som innefattas av garantin kommer att bytas ut eller repareras. Produkt eller tillbehör
som byts ut eller repareras under garantiperioden täcks av kvarvarande garantiperioden eller 60 dagar från och
med utbytes- eller reparationsdatumet beroende av vilket som är längst. För FAQ vänligen besök
www.jaysheadphones.com.

FR Francais
Mise en marche
Mise sous/hors tension (On/Off) et jumelage
Pour mettre sous tension, pressez et maintenez enfoncé le bouton multifonction pendant 2 sec jusqu’à ce que le
voyant LED de fonctionnement s’allume en blanc. Le casque entre automatiquement en mode jumelage lorsque le
voyant LED de fonctionnement clignote rapidement en rouge et blanc. Pour jumeler, allez dans les paramètres
Bluetooth® de votre appareil et sélectionnez « JAYS q-Seven Wireless ». Le voyant LED de fonctionnement doit
clignoter lentement en blanc en cas de connexion réussie.
Pour mettre hors tension, pressez et maintenez enfoncé le bouton multifonction pendant 5 sec. Le voyant LED de
fonctionnement clignote une fois en rouge, puis à la fois en rouge et blanc avant que le casque ne s’éteigne. Si le
Bluetooth® sur l’appareil jumelé s’éteint, le casque s’éteindra automatiquement au bout de quelques minutes.
Reconnexion et jumelage supplémentaire
À la prochaine mise sous tension, le casque essaiera automatiquement de se reconnecter au dernier appareil utilisé. S’il
ne le trouve pas, le mode de jumelage sera automatiquement de nouveau initié. Si vous déconnectez manuellement le
casque de l’appareil, appuyez une fois sur le bouton multifonction pour entrer dans le mode de jumelage. Pour forcer
le mode de jumelage, pressez et maintenez enfoncé le bouton multifonction pendant 3 sec à partir de l'état désactivé.
Pour supprimer l’historique de jumelage, pressez et maintenez enfoncé le bouton multifonction et le bouton Volume+
pendant 5 sec. Pour plus d'informations et d'aide sur la reconnexion et un jumelage supplémentaire, veuillez consulter
le dépannage.
Utilisation du bouton NC
Pour entrer en mode ANC, cliquez une fois sur le bouton NC. Le voyant LED NC s’allumera en blanc.
Pour entrer en mode HearThrough, cliquez une fois sur le bouton NC, le voyant LED NC restera en blanc.
Pour revenir en mode ANC, cliquez une fois sur le bouton NC, le voyant LED NC restera en blanc.
Pour désactiver le mode ANC ou HearThrough, maintenez le bouton NC pendant 2 sec, le voyant LED NC s'éteint.
Utilisation du câble audio
Connectez le câble audio à la prise jack 3.5 mm et à votre appareil. L’appareil basculera automatiquement du
Bluetooth vers le câble audio.
Niveau de la batterie et charge
Le voyant LED de fonctionnement clignote rapidement trois fois en rouge lorsque le niveau de la batterie est faible.
Chargez en branchant le câble USB fourni à la prise micro USB en bas de l’oreillette droite et connectez-le à n’importe
quelle sortie d’alimentation USB. Le voyant LED de fonctionnement s'allumera en rouge pendant la charge. Lorsque le
casque est totalement chargé, le voyant LED de fonctionnement s’allumera en blanc pendant 10 sec, puis s’éteindra.
Une charge complète de 100 % prendra environ 2 à 3 heures (en fonction de la température et du chargeur).

Fonctions des boutons et voyants LED
Utilisation du bouton multifonction
Fonction
Répondre / Mettre fin à l'appel
Rappel du dernier appelant
Rejeter l’appel
Commande vocale
Lecture / Pause de la musique
Mettre sous tension
Mettre hors tension
Effacer la liste Bluetooth
Fonctionnement
Bouton multifonction à clic unique
Bouton multifonction à triple clic
Appuyez sur le bouton multifonction pendant 2 sec
Bouton multifonction à double clic
Bouton multifonction à clic unique
Appuyez sur le bouton multifonction pendant 2 sec
Appuyez sur le bouton multifonction pendant 5 sec
Appuyez sur le bouton multifonction et volume+ pendant 5 sec
Voyant LED de fonctionnement
Explication
Mettre sous tension
Mettre hors tension
En veille
Batterie faible
Pendant le chargement
Chargement terminé
LED de fonctionnement
Clignote en blanc
Clignote en rouge / blanc
Clignote en blanc
Clignote en rouge
Lumière rouge fixe
Clignote en blanc
Explication
Mode de jumelage Bluetooth®
Connexion au Bluetooth® réussie
Connexion au Bluetooth® perdue
Nettoyer la liste Bluetooth®
Appel entrant
LED de fonctionnement
Clignote en rouge / blanc
Clignote en blanc
Clignote en rouge / blanc
Clignote en blanc
Clignote en blanc
Voyant LED de fonctionnement

Dépannage
Problème de jumelage et de connexion
• Assurez-vous que les écouteurs ne sont pas connectés à un autre appareil.
• Désactivez et activez le Bluetooth sur votre appareil.
•
Rapprochez les écouteurs de l’appareil ou changez-les d’endroit pour éviter une interférence avec le Bluetooth.
• Vérifiez qu’aucun autre équipement sans fil n’interfère avec le signal Bluetooth de vos écouteurs.
• Si les écouteurs ne se jumellent pas l’un avec l’autre, réinitialisez les écouteurs. Suivez les instructions
ci-dessus.
Problème avec la transmission du son
Déplacez le périphérique de streaming vers un autre endroit. Votre corps, la distance, différents matériaux et
autres équipements sans fil peuvent interférer avec le signal sans fil entre votre appareil et l’écouteur.
FAQ et guide de démarrage rapide
Rendez-vous sur jaysheadphones.com pour obtenir davantage d’instructions et de l’aide sur ce produit.

Avis juridique et garantie
Mentions légales et garantie
Informations environnementales
Le présent produit respecte les directives internationales, y compris,
mais sans s’y limiter, la directive 2012/19/UE relative aux déchets d’équipements électriques et
électroniques (DEEE). Ne pas éliminer avec les déchets ménagers ordinaires. Veuillez consulter les
autorités locales en charge de l’élimination des déchets pour savoir comment recycler ou éliminer
ce produit.
Garantie limitée du fabricant
Votre produit d’origine Jays Group AB est couvert par une garantie de douze (12) mois à partir de la date
d’achat d’un produit Jays Group AB neuf, non utilisé par l’acheteur d’origine. Jays Group AB garantit que le
produit est exempt de défauts de matériaux, de conception et de fabrication lors de la vente à l’acheteur. Si
vous vous trouvez dans l'incapacité de présenter le reçu lors de votre demande de garantie, vous serez
peut-être obligé(e) de payer les réparations effectuées. La preuve d’achat doit clairement indiquer la date
d’achat, le nom du produit et les détails du revendeur agréé
La période de garantie ne peut pas être prolongée ou renouvelée en raison d’une revente ou d’un
remplacement ultérieur(e) du produit. La garantie limitée n’affecte pas vos droits légaux en vertu de vos lois
nationales en vigueur relatives à la vente de produits électroniques grand public. Les pièces défectueuses
remplacées dans le cadre de la réclamation au titre de la garantie limitée deviennent la propriété de Jays
Group AB.
Qu’est-ce qui n’est pas couvert par la garantie limitée?
• Les défauts causés par l’usure, la perte de capacité de la batterie liée à l’âge, les accidents, les chutes, les
dommages mécaniques, l’humidité, les produits chimiques, les dommages dus à un impact anormal ou à
une force majeure.
• Les modifications ou les réparations effectuées par vous-même ou par un tiers sans l’approbation de
Jays Group AB.
Comment bénéficier du service de garantie
Si vous souhaitez faire une réclamation au titre de la garantie dans le cadre de la période de garantie limitée,
veuillez contacter le revendeur de votre produit pour obtenir de l’aide supplémentaire. Il vous faudra fournir
la preuve de l’achat et la pièce en question. Toutes les pièces défectueuses couvertes par la garantie limitée
seront réparées ou remplacées gratuitement.
Les pièces remplacées ou réparées fournies lors de la période de garantie seront garanties pour le reste de la
période de garantie d’origine ou pendant soixante (60) jours à partir de la date de réparation ou de la date
de remplacement, la date la plus longue étant celle retenue. Pour la FAQ, rendez-vous sur
www.jaysheadphones.com.

DE Deutsch
Erste Schritte
Ein-/Ausschalten und Koppeln
Zum Einschalten halten Sie die Multifunktionstaste 2 Sekunden lang gedrückt, bis die Betriebs-LED weiß aufleuchtet.
Während die Betriebs-LED in schnellem Wechsel rot und weiß blinkt, wechselt der Kopfhörer automatisch in den
Kopplungsmodus. Klicken Sie in den Bluetooth®-Einstellungen Ihres Geräts auf „JAYS q-Seven Wireless“. Sobald
die Verbindung erfolgreich hergestellt wurde, blinkt die Betriebs-LED langsam weiß.
Zum Ausschalten halten Sie die Multifunktionstaste 5 Sekunden lang gedrückt. Die Betriebs-LED blinkt einmal rot
und dann rot und weiß, bevor sich der Kopfhörer abschaltet. Wenn Bluetooth® am gekoppelten Gerät
ausgeschaltet wird, schaltet sich der Kopfhörer nach ein paar Minuten automatisch ab.
Wiederherstellen der Verbindung und zusätzliche Kopplung
Beim nächsten Einschalten wird der Kopfhörer automatisch versuchen, die Verbindung zum zuletzt genutzten Gerät
herzustellen. Wird dieses nicht gefunden, wird der Kopplungsmodus automatisch neu gestartet. Falls Sie die
Verbindung zwischen dem Kopfhörer und dem Gerät manuell trennen, drücken Sie die Multifunktionstaste einmal,
um in den Kopplungsmodus zu wechseln. Um den Kopplungsmodus zu erzwingen, halten Sie die Multifunktionstaste
bei ausgeschaltetem Kopfhörer 3 Sekunden lang gedrückt. Um die gespeicherten Kopplungen zu löschen, halten Sie
die Multifunktionstaste und die Taste Lautstärke+ 5 Sekunden lang gedrückt. Weitere Informationen und Hinweise
zum Wiederherstellen der Verbindung und zur zusätzlichen Kopplung erhalten Sie unter „Fehlerbehebung“.
Nutzung der NC-Taste
Drücken Sie zum Wechseln in den ANC-Modus einmal die NC-Taste; die NC-LED leuchtet weiß auf. Drücken Sie zum
Wechseln in den HearThrough-Modus einmal die NC-Taste; die NC-LED leuchtet durchgehend weiß. Drücken Sie
zum Wechseln zurück in den ANC-Modus einmal die NC-Taste; die NC-LED leuchtet durchgehend weiß. Halten Sie
zum Ausschalten von ANC oder HearThrough die NC-Taste 2 Sekunden lang gedrückt.
Nutzung des Audiokabels
Verbinden Sie das Audiokabel mit der Audiobuchse und Ihrem Gerät. Das Gerät schaltet automatisch von Bluetooth
auf das Audiokabel um.
Batteriezustand und Laden
Die Betriebs-LED leuchtet dreimal kurz rot auf, um einen niedrigen Batteriestand anzuzeigen. Zum Aufladen des
Kopfhörers stecken Sie das mitgelieferte USB-Kabel in die USB-Buchse an der rechten Ohrmuschel und dann in eine
zulässige USB-Steckdose. Während des Ladevorgangs leuchtet die Betriebs-LED rot. Sobald der Kopfhörer
vollständig aufgeladen ist, leuchtet die Betriebs-LED 10 Sekunden lang weiß und geht dann aus. Abhängig von
Temperatur und Ladegerät dauert es etwa 2–3 Stunden, bis der Kopfhörer zu 100 % aufgeladen ist.
Other manuals for q-Seven Wireless
1
Table of contents
Languages:
Other Jays Headphones manuals

Jays
Jays q-JAYS User manual

Jays
Jays d-Jays User manual

Jays
Jays T6TW01 User manual

Jays
Jays q-Seven Wireless User manual

Jays
Jays j-JAYS User manual

Jays
Jays t-Five True Wireless User manual

Jays
Jays x-Five Wireless User manual

Jays
Jays c-JAYS User manual

Jays
Jays m-Seven True M7TW01 User manual

Jays
Jays a- Series User manual

Jays
Jays x-Seven Wireless User manual

Jays
Jays t-JAYS User manual

Jays
Jays t-Four Wireless User manual

Jays
Jays m-Seven True Wireless User manual

Jays
Jays ONE User manual

Jays
Jays t-Five+ True Wireless User manual

Jays
Jays m-Six Wireless User manual

Jays
Jays m-Five True Wireless User manual

Jays
Jays a-JAYS Five User manual