JB Systems Light MCD 200 User manual
Version: 1.3
WWW.BEGLEC.COM
Copyright © 2005 - 2007 by BEGLEC cva.
Reproduction or publication of the content in any manner, without express permission of the publisher, is prohibited.
The Power Source for DJ’s
Operation Manual
Mode d'emploi
Gebruiksaanwijzing
Bedienungsanleitung
Manual de instrucciones
Manual do utilizador
EN
FR
NL
DU
ES
PT

EN - DISPOSAL OF THE DEVICE
Dispose of the unit and used batteries in an environment friendly manner
according to your country regulations.
FR - DÉCLASSER L’APPAREIL
Débarrassez-vous de l’appareil et des piles usagées de manière écologique
Conformément aux dispositions légales de votre pays.
NL - VERWIJDEREN VAN HET APPARAAT
Verwijder het toestel en de gebruikte batterijen op een milieuvriendelijke
manier conform de in uw land geldende voorschriften.
DU - ENTSORGUNG DES GERÄTS
Entsorgen Sie das Gerät und die Batterien auf umweltfreundliche Art und
Weise gemäß den Vorschriften Ihres Landes.
ES - DESHACERSE DEL APARATO
Reciclar el aparato y pilas usadas de forma ecologica conforme a las
disposiciones legales de su pais.
PT - COMO DESFAZER-SE DA UNIDADE
Tente reciclar a unidade e as pilhas usadas respeitando o ambiente e em
conformidade com as normas vigentes no seu país.
ENGLISH USER MANUAL
JB SYSTEMS® 1/81 MCD200
OPERATION MANUAL
Thank you for buying this JB Systems®product. To take full advantage of all possibilities,
please read these operating instructions very carefully.
FEATURES
Full MP3 Playback (max. 999 MP3-files / 255 Folders on 1 CD)
oMPEG1 layer3 (32 + 44,1 + 48kHz)
oMPEG2 layer3 (16 + 22,05 + 24kHz)
oMPEG2.5 layer3 (8 + 11,025 + 12kHz)
Supports both CBR and VBR bitrate modes.
Up to ID3v2 tag support
Reads CD-DA, CD-R, CD-RW
Anti-shock Memory 10seconds
1/75sec Frame search, also on MP3
Digital scratch effect via jog wheel
4 Hot Cue buttons can hold cue points and loops!
Permanent memory for up to 2048 (512 x 4) Cue points and loops
Seamless real-time loop edit function!
Full automatic BPM counter
Pitch Lock (Master Tempo)
Pitch ranges: +/-4% +/-8% +/-16% +/-100% (up to +/-16% on MP3)
Pitch bend on jog wheel and buttons for perfect mixes
Adjustable pitch bend parameter for ultra precise pitch bending (software V22 and up)
Up to 4 Seamless loops for every track with reloop/stutter
Real-time cue (“Cue on the fly”)
Ultra fast memory start within 10msec
Fader start, fader stop, (back cue),
Auto cue function(-48dB)
4 different speed scan
Alphanumeric LCD display (for CD-TEXT and MP3 ID3v2 tags)
Selectable elapsed, remain and total remain time display
Jog wheel with special rubber surface
Single/continuous play
Relay play allows consecutive playback on two decks
S/PDIF digital audio RCA coaxial
60 seconds Transport Protection
Sleep mode (saves the life span of the laser)
BEFORE USE
Check the contents:
Check that the carton contains the following items:
MCD200 unit
User manual
1 Mains cable
ENGLISH USER MANUAL
JB SYSTEMS® 2/81 MCD200
1 cinch/cinch cable
1 mono mini-jack cable for fader start and relay play
SAFETY INSTRUCTIONS:
CAUTION: To reduce the risk of electric shock, do
not remove the top cover. No user-serviceable parts
inside. Refer servicing to qualified service personnel
only.
The lightning flash with arrowhead symbol within the equilateral triangle is
intended to alert the use or the presence of un-insulated “dangerous voltage”
within the product’s enclosure that may be of sufficient magnitude to constitute a
risk of electric shock.
The exclamation point within the equilateral triangle is intended to alert the user to
the presence of important operation and maintenance (servicing) instructions in
the literature accompanying this appliance.
This symbol means: indoor use only.
This symbol means: Read instructions.
To prevent fire or shock hazard, do not expose this appliance to rain or moisture.
To avoid condensation to be formed inside, allow the unit to adapt to the surrounding
temperatures when bringing it into a warm room after transport. Condense sometimes
prevents the unit from working at full performance or may even cause damages.
This unit is for indoor use only.
Don’t place metal objects or spill liquid inside the unit. No objects filled with liquids, such
as vases, shall be placed on this appliance. Electric shock or malfunction may result. If a
foreign object enters the unit, immediately disconnect the mains power.
No naked flame sources, such as lighted candles, should be placed on the appliance.
Don’t cover any ventilation openings as this may result in overheating.
Prevent use in dusty environments and clean the unit regularly.
Keep the unit away from children.
Inexperienced persons should not operate this device.
Maximum save ambient temperature is 40°C. Don’t use this unit at higher ambient
temperatures.
Always unplug the unit when it is not used for a longer time or before you start servicing.
The electrical installation should be carried out by qualified personal only, according to
the regulations for electrical and mechanical safety in your country.
Check that the available voltage is not higher than the one stated on the rear panel of the
unit.
The socket inlet shall remain operable for disconnection from the mains.
The power cord should always be in perfect condition: switch the unit immediately off
when the power cord is squashed or damaged.
Never let the power-cord come into contact with other cables!
When the power switch is in OFF position, this unit is not completely disconnected from
the mains!
In order to prevent electric shock, do not open the cover. Apart from the mains fuse there
are no user serviceable parts inside.
Never repair a fuse or bypass the fuse holder. Always replace a damaged fuse with a
fuse of the same type and electrical specifications!
CAUTION
ENGLISH USER MANUAL
JB SYSTEMS® 3/81 MCD200
In the event of serious operating problems, stop using the appliance and contact your
dealer immediately.
Please use the original packing when the device is to be transported.
Due to safety reasons it is prohibited to make unauthorized modifications to the unit.
INSTALLATION GUIDELINES:
Install the unit in a well-ventilated location where it will not be exposed to high
temperatures or humidity.
Placing and using the unit for long periods near heat-generating sources such as
amplifiers, spotlights, etc. will affect its performance and may even damage the unit.
Take care to minimize shocks and vibrations during transport.
When installed in a booth or flight case, please make sure to have good ventilation to
improve heat evacuation of the unit.
To avoid condensation to be formed inside, allow the unit to adapt to the surrounding
temperatures when bringing it into a warm room after transport. Condense sometimes
prevents the unit from working at full performance.
CLEANING THE CD-PLAYER:
Clean by wiping with a polished cloth slightly dipped with water. Avoid getting water inside
the unit. Do not use volatile liquids such as benzene or thinner which will damage the unit.
CONNECTIONS
Use the supplied cinch cable to connect the audio output of the CD player with a CD
input on your mixing unit.
Also connect the fader start cable if your audio mixer has fader start connections.
(Synq® or Pioneer® compatible)
Connect the mains cable.
ENGLISH USER MANUAL
JB SYSTEMS® 4/81 MCD200
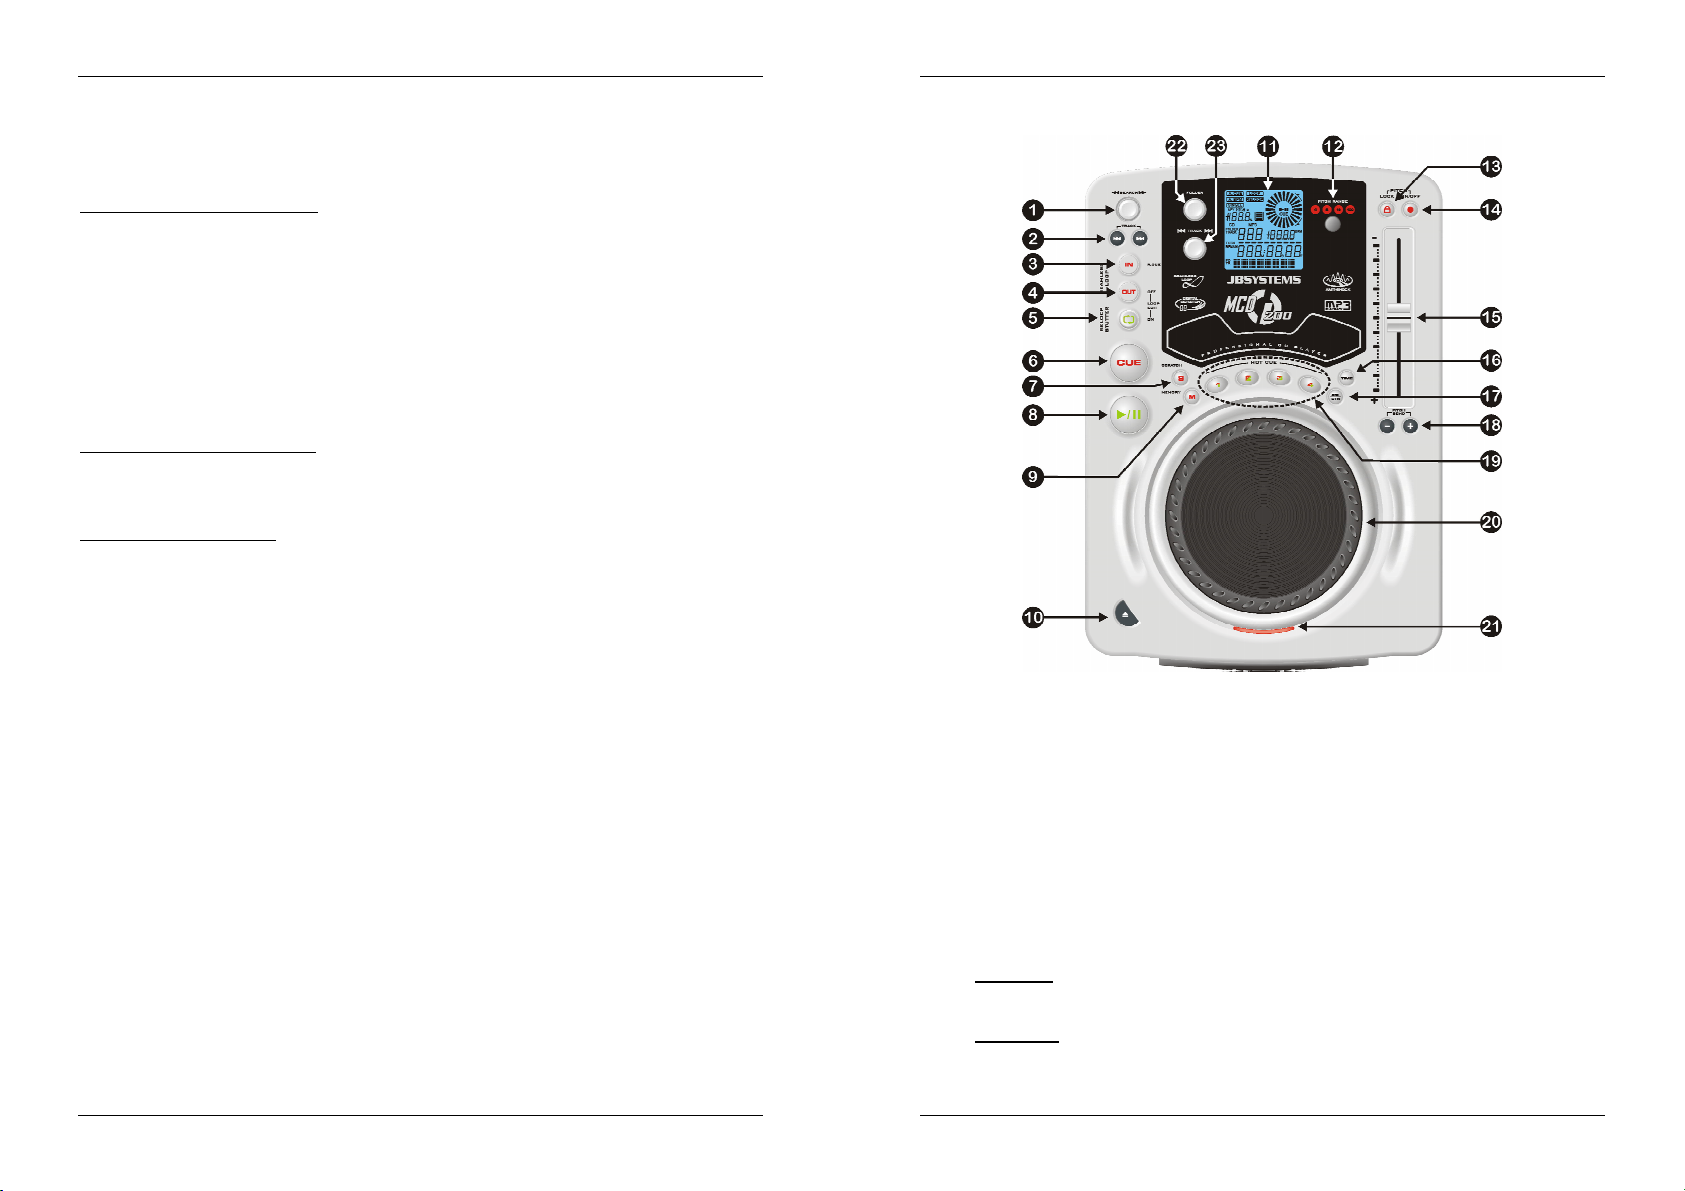
CONTROLS AND FUNCTIONS
1. SEARCH Button: This button has 4 forward and 4 backward speed positions for
searching through songs. The more you turn the wheel in either direction the faster you
will search through the music.
2. TRACK SEARCH Buttons: These buttons are used to select the track to be played.
Forward skip & back skip.
3. IN/R.CUE button: Allows you to set the cue point without stopping the playback (CUE
ON THE FLY). This button also sets the beginning of a seamless loop. When you play
one of the hot cues(19), the starting point is also copied to this button.
4. OUT/EXIT button: Used to set the endpoint when looping music. The player starts to
loop seamlessly until you press this button again to exit. When a loop is programmed
but not active you can also restart the loop. The point where you press the button will
be memorized as the new end point of the loop. When the player is in “loop edit mode”
pressing this button stops the loop editing and saves the current endpoint of the loop.
5. RELOOP/STUTTER button: This button has 3 functions:
RELOOP: If a loop is programmed and you have hit the OUT/EXIT button(4), press
the reloop button to enter the loop again. Just press the OUT/EXIT(4) button to exit
the loop. (intro and end points of the loop are unchanged)
STUTTER: When a loop is playing you can press this button to restart the loop at
once. You can also press this button when a track is not playing in loop. Every time
the RELOOP/STUTTER button is pressed, it will restart the music from the

ENGLISH USER MANUAL
JB SYSTEMS® 5/81 MCD200
preprogrammed cue point. This stutter effect adds extra creativity to your
performance.
LOOP EDIT: When a loop is programmed, press the RELOOP/STUTTER button
for about 2 seconds to enter “loop edit” mode. Now you are able to change the
endpoint of the loop. See chapter “How to use…” for more information.
6. CUE button: Pressing the CUE button during playback provides an immediate return
to the position at which playback was started. Playback starts immediately from the
programmed cue point for as long as the CUE button is pressed. The CD player jumps
back to the cue point as soon as the CUE button is released. Also with the unit in
pause mode (Play/Pause LED blinks) the search and/or jog wheel is used to set a
different start point. By pressing "PLAY/PAUSE" button then "CUE", you can confirm
this new cue point.
7. SCRATCH button: Used to put the MCD200 in scratch mode. This option gives you
the possibility to scratch any track on the CD in real time. You can use the scratch
function in both play and pause mode:
In play mode: The music plays normally until you turn the big jog wheel(20).
While manipulating the jog wheel(20), the scratch effect is audible. Once the jog
wheel is stopped, the music continues playing from the point where you stopped
turning it.
In pause mode: the music is paused for as long as the jog wheel(20) isn’t moved.
When you start manipulating the jog wheel(20), the scratch effect is audible. Once
the jog wheel is stopped, the music stops playing and waits in pause mode.
NOTE: during scratch mode you can switch between play and pause mode by simply pressing the
PLAY/PAUSEbutton(8)
8. PLAY/PAUSE button: every time you press the PLAY/PAUSE button the CD player
changes from play to pause or from pause to play. The button blinks as long as the
player is set to pause.
9. MEMORY Button: is used to store cue points and loops to the Hot Cue buttons and to
the permanent cue memory:
Storing to HOT CUE buttons: Press the MEMORY button shortly to prepare the
MCD200 for storing a cue point or loop to one of the 4 HOT CUE buttons.
Storing to permanent memory: Press the MEMORY button until it starts flashing
and the LCD display shows “SAVING”. The contents of the HOT CUE buttons for
this CD are stored to permanent memory.
Look further in this manual for more information on how to use these functions.
10. OPEN/CLOSE button: press this button to open and close the disc tray in the front of
the MCD200. This button is disabled during playback. If the tray is not closed after
60sec. It will close automatically to prevent damage.
11. LCD DISPLAY: Shows all important information needed during playback. Refer to the
next chapter for more information.
12. PITCH RANGE Button: Every time you press this button, you will change the scale of
the speed slider(15). On normal audio CDs you can select +/-4%, +/-8%, +/-16% and
+/-100%. The +/-100% option is not available on MP3 CDs.
13. PITCH LOCK Button: (Master tempo) activates the Pitch Lock function. This function
allows you to make adjustments to a tracks speed using the pitch control without
altering its tonal pitch. This button turns red when the Pitch Lock is on.
NOTE: be informed that the pitch lock function has its limitations. From a certain speed deviation
(depends on the music style) the pitch lock won’t be able to keep the same pitch anymore.First you will
hear a small distortion that becomes more important at higher speed deviations. This is not always a
disadvantage:atvery low speeds youcan also useitasa special “distortion effect”!
14. SPEED Button: This button is used to turn the speed function on and off.
ENGLISH USER MANUAL
JB SYSTEMS® 6/81 MCD200
15. SPEED slider: Press the SPEED button(14), so it is lit. The speed can be changed up
to +/-100% by moving the fader. The speed will not change if the SPEED button(14) is
off. You can change the pitch range with the PITCH RANGE button(12)
16. TIME Button: The TIME button switches between elapsed playing time, remaining
time in a selection and total remaining time of the disc. (standard = remaining /track)
The “total remaining time of the disc” is not available on MP3 CDs.
The TIME button is also used to set the pitch bend parameter of the jog dial. See
“Pitch bend parameter” in the chapter “How to use”.
17. SGL/CTN Button: with this button you can choose between “single track mode” and
“continuous play”. You can also switch the auto cue function (-48dB) on and off.
Continuous play: the complete CD will be played without interruption. (mostly
used in pubs)
Single track: player stops at the end of each track and waits at the beginning of
the next track. The player waits at the first music note of each track. This means
that badly indexed CDs will not interfere with the instant start capabilities of this
CD player. This is a very useful feature for deejays!
Auto Cue on/off: The MCD200 automatically detects the first “music note” on
each track to ensure the music starts immediately when you press the play
button. To turn this Auto Cue function on/off just press the SGL/CTN button for
about 2 seconds. The display shows “A.CUE” when the function is active.
18. PITCH BEND buttons: The speed rises while the “+ button” is pressed and returns to
the original pitch when the button is released. The speed drops when the “– button” is
pressed and returns to the original pitch when the button is released. These buttons
can be used to synchronize the beats of 2 tracks.
19. HOT CUE buttons: 4 programmable buttons where you can store ordinary cue points
and/or loops. You can program up to 4 cue points and/or loops divided over all the
tracks on your CD.
Button not lit: no cue points loaded.
Button is red: a simple cue point is loaded
Button is green: a loop is loaded
If you like you can store the contents of these HOT CUE buttons to the internal
permanent memory. Look further is this manual for more information on how to
program cue points etc.
NOTE: When you put anotherCD in the disctraywithout firstwriting the current HOTCUEmemories to
theinternalpermanent memory,theywill be erased.
20. BIG JOG WHEEL: This jog wheel serves 3 functions depending on the mode you are
working in.
The jog wheel acts as a slow frame search (1/75sec) control when the CD is not
playing but either paused or set to a cue point. To set a new cue point, spin the
wheel then press PLAY(8) or LOOP IN(3) when you have determined the proper
position. Press CUE(6) to return to the “CUE POINT”.
If the track is playing, the jog wheel temporarily bends the pitch of the music up to +/-
100% by rotating the wheel clockwise to speed it up or counterclockwise to slow it
down. The amount of pitch change is determined by the speed of rotation. This is an
alternative to the PITCH BEND buttons(18).
In scratch mode the jog wheel is used to manipulate the playback of the music in real
time. As a result you can scratch the music on your CD the way you do this with a
normal analog vinyl record.
21. CD TRAY INDICATOR: is lit when no CD is loaded and when the CD tray is open or
prepares to open.
ENGLISH USER MANUAL
JB SYSTEMS® 7/81 MCD200
22. FOLDER SELECTOR: if your CD has MP3 subfolders, you can select these by simply
turning this folder selector. The display shows you the folder number + name. The
folder name is shown instantly when you press the folder selector shortly. Check the
next chapter for more information on the use of subfolders. When the CD doesn’t
contain subfolders, this selector is not used.
23. TRACK SELECTOR: used to select the tracks on your CD. If your CD has MP3
subfolders, the MCD200 has two selection modes:
FOLDER MODE: When used together with the FOLDER selector, you can only
select tracks inside the selected folder. To go to another folder just use the
FOLDER selector.
TRACK MODE: To select track mode, just press the TRACK selector shortly: you
will be able to browse all the tracks on your CD as if no subfolders where present.
To move quickly (by 10tracks) through the CD, press the TRACK selector while
turning it forward/backward.
24. Audio output: Output for the audio signals from the CD-player. Use the supplied
cinch/cinch cable to connect this output to a CD/line input of your mixing unit.
25. Digital out socket: Use this connector to connect the digital signal (S/PDIF format) to
the input of a digital amplifier or digital recorder (ex. Mini disc)
26. RELAY Socket: you can use this connecter in two ways: you can use it with the fader
start option on certain mixers or you can connect two MCD200 players together to
obtain the relay play function.
Relay play: Use the supplied mono mini jack/jack cable to connect the RELAY
sockets of two MCD200 players together. Look further in this manual to learn how
to perform the relay play function.
Fader start: If you are using a mixer with fader start function, use the supplied
mono mini jack/jack cable to connect the player with the fader start of the mixer.
Please note that this socket must never be connected with any voltage.
Attention: This remote control is only compatible with certain (Synq® or Pioneer® compatible)
mixers.Mixerswith remote startsfunctioning witha signal switched to ground will not work.
27. POWER ON/OFF switch: switches the MCD200 on and off.
28. MAINS INPUT: connect the CD player to the 230V AC mains, using the supplied
power-cord.
ENGLISH USER MANUAL
JB SYSTEMS® 8/81 MCD200
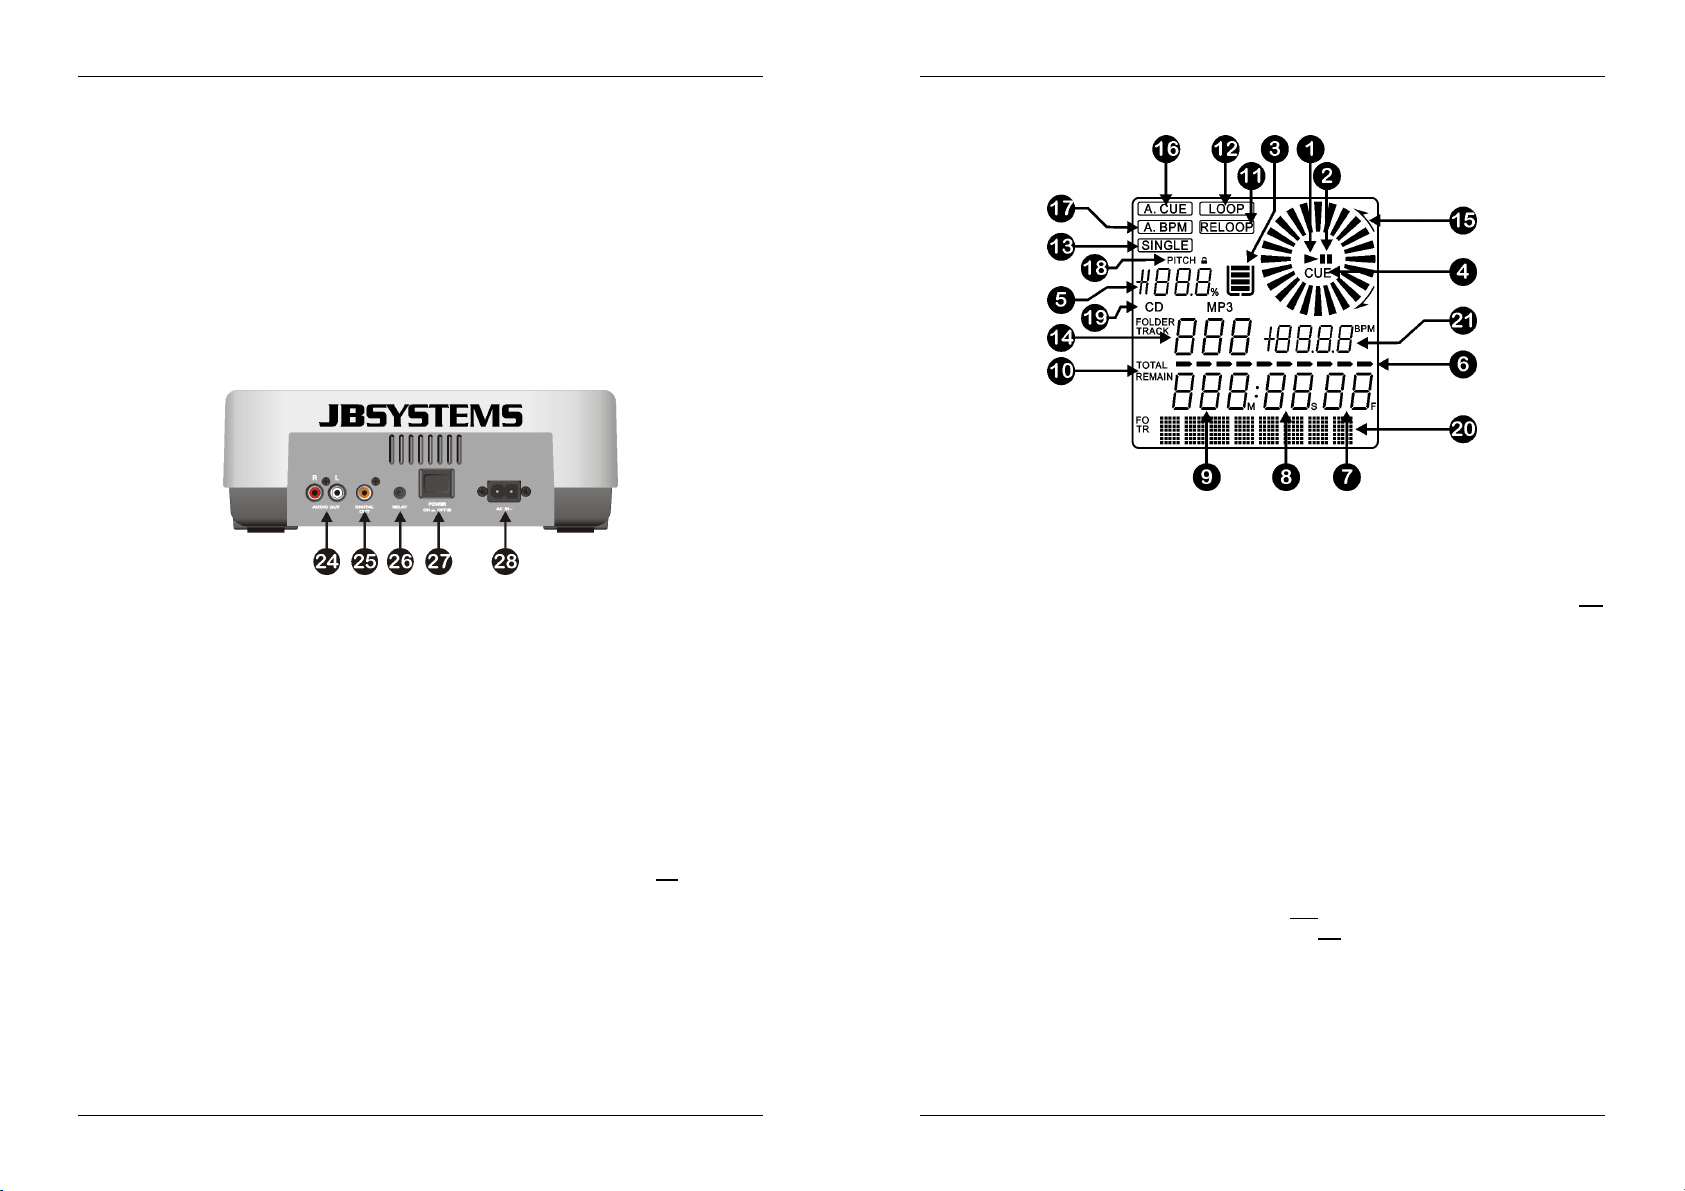
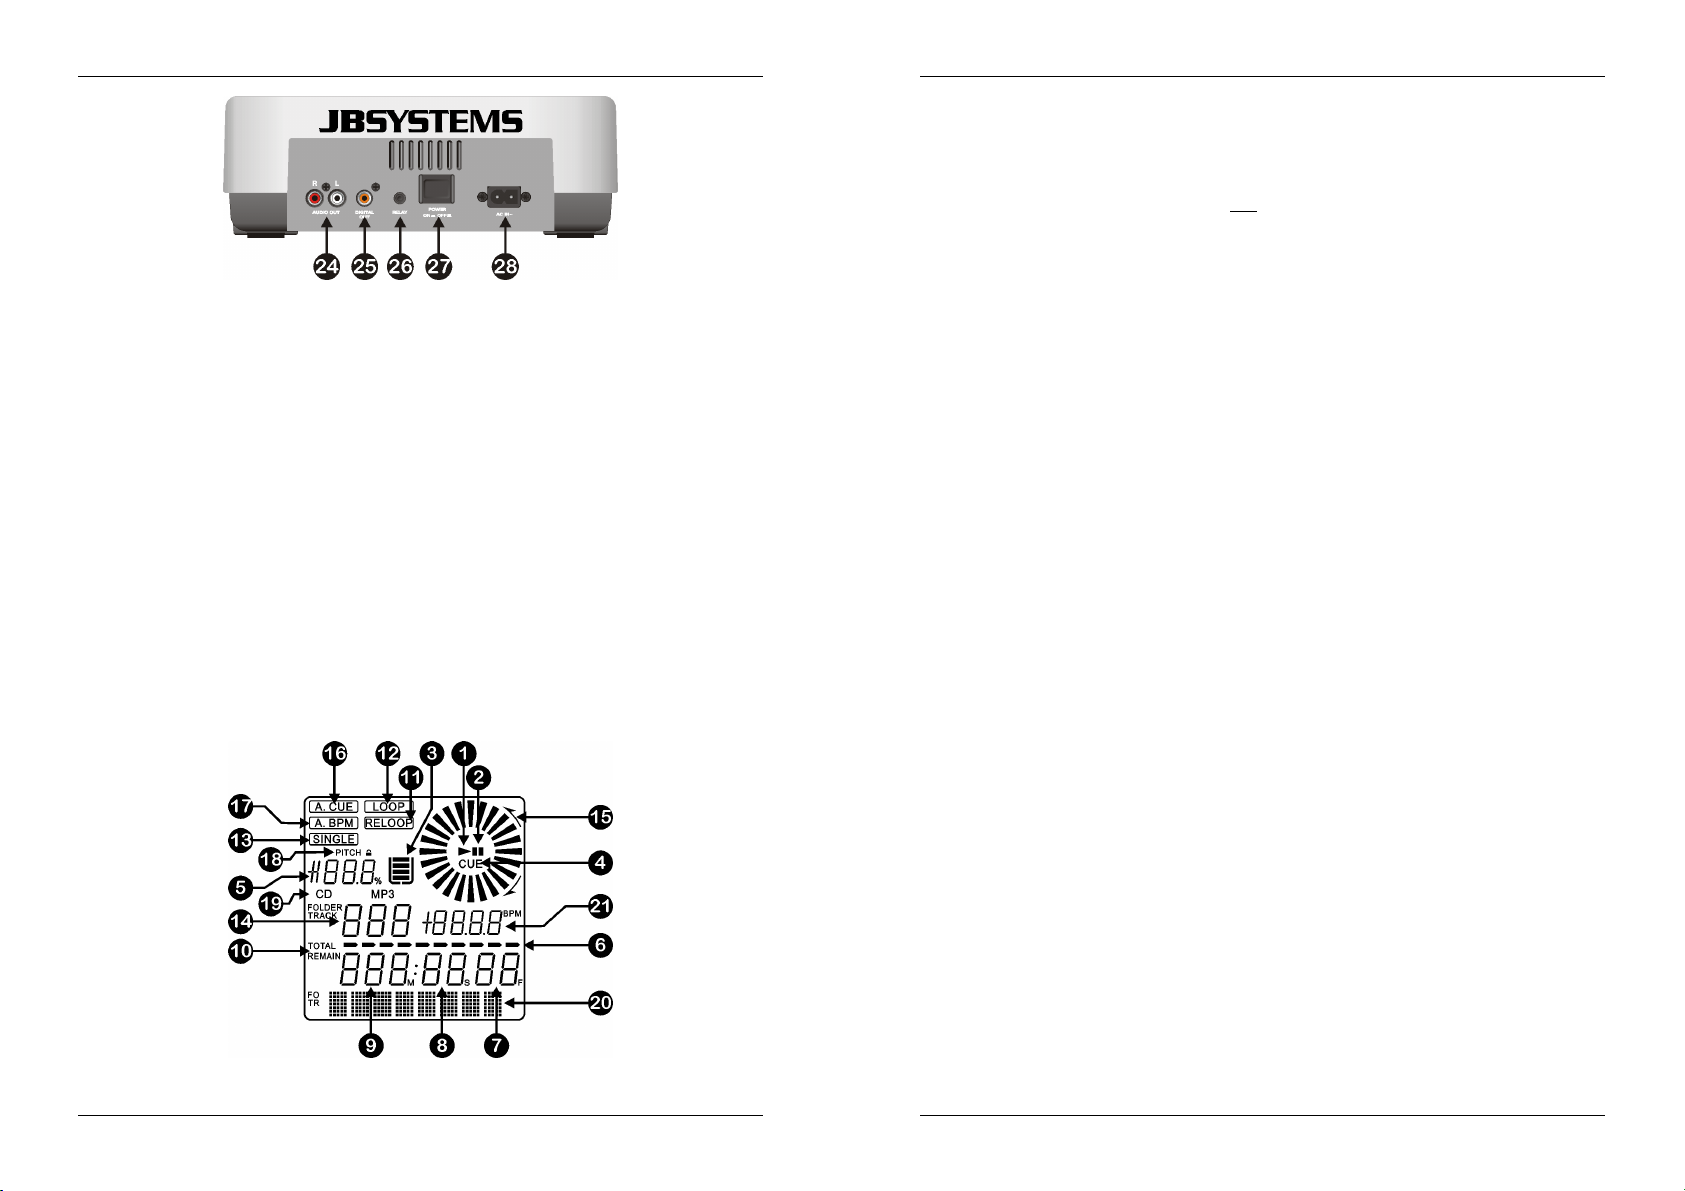
LCD DISPLAY
1. PLAY: appears while the unit is playing a CD.
2. PAUSE: appears while the player is in pause or cue mode.
3. ANTI SHOCK AND BUFFER INDICATOR: The memory status is represented on the
display by a bucket being filled up or emptied. The bucket itself represents that the
instant start function is available. If the bucket is flashing, the instant start is not
available. Each segment within the bucket represents about 2 seconds of anti shock
protection.
4. CUE: appears when the master cue point is programmed.
5. PITCH DISPLAY: Shows the actual percentage of speed change, selected with the
SPEED slider(15).
6. TIME BAR: shows either time remaining or elapsed depending on the setting of the
TIME button(16). Starts flashing at the end of each track to alert the user to take action.
7. FRAME: Shows “frame” time information of current track. (1 frame = 1/75th sec.)
8. SECOND: Shows “seconds” time information of current track.
9. MINUTE: Shows “minutes” time information of current track.
10.ELAPSED, TOTAL REMAIN: indicates that the time shown on the display is the track
elapsed, remaining or total remaining time.
11.RELOOP: appears when the CD has had a loop set previously. You can return to the
loop with the reloop button(5).
12.LOOP: shows when a loop is programmed. (repeating a particular area)
LOOP Flashing: Loop is programmed and currently playing.
LOOP stays on: Loop is programmed but not playing.
13.SINGLE: appears when the unit is set to play just one track at a time. When it is not
shown, the CD plays continuously through all tracks. The function is controlled by the
SGL/CTN button(17).
14.TRACK / FOLDER: Shows current track or folder number.
15.VISUAL MARKER: indicates the play position in frames: a full rotation equals 72
frames. The marker moves clockwise in normal play mode and counter-clockwise when
the track plays backwards. In pause mode the marker stops moving.

ENGLISH USER MANUAL
JB SYSTEMS® 9/81 MCD200
16.AUTO CUE: The display shows “A.CUE” when the auto cue function is active.
17.AUTO BPM: This indicator is always on present to indicate that the automatic beat
counter is working.
18.PITCH LOCK: when Master Tempo is active, the display shows a small “lock” to
indicate that the pitch of the music is locked.
19.CD/MP3: indicates if you have loaded a normal digital audio or MP3 CD.
20.ALPHANUMERIC DISPLAY: Shows the names of folders and MP3 tracks. For MP3
tracks recorded in CBR also the bit rate is shown. For VBR recorded MP3 tracks the
display only shows “VBR”. For Audio CD’s CD-TEXT information will be shown when
it’s available on the CD, otherwise the display shows “no CD-TEXT”.
21.BPM: The automatic beat counter shows the number of Beats Per Minute on the
display.
HOW TO USE …
Most of the common functions are explained in the previous chapter “controls and
functions” In this chapter we talk about the functions that need a little more explanation.
SLEEP MODE:
The CD player automatically shuts off the transport and laser after about 15 minutes
(when in pause or cue mode). This extends the life of your motor drive and laser. During
sleep mode the display shows the word “SLEEP”. To wake up the player, just press the
cue or play button, the display turns to normal and is ready to receive instructions.
FOLDER / TRACK SELECTORS:
Most of the time a CDR contains a lot of MP3 files (sometimes 150 or more). To keep
things manageable you can sort your MP3 files in different subfolders (directories).
These folders can be named after the names of the performers, after the music genres
(techno, slows, salsa …), the BPM count (100BPM, 110BPM, 120BPM …) or any other
idea you have to sort your music…
With the FOLDER / TRACK selectors you can easily browse through the different folders
and tracks. You can put the MCD200 in FOLDER mode and TRACK mode:
FOLDER MODE: use the FOLDER selector to select the desired folder. With the
TRACK selector you can select the desired MP3 track in this folder. Note that you can
only select tracks inside the selected folder. To go to another folder just use the
FOLDER selector.
TRACK MODE: To select track mode, just press the TRACK selector shortly: you will
be able to browse all the tracks on your CD as if no subfolders where present. To
move quickly (by 10tracks) through the CD, press the TRACK selector while turning it
forward/backward. To turn back to folder mode, press or turn the FOLDER selector.
ENGLISH USER MANUAL
JB SYSTEMS® 10/81 MCD200
RELAY FUNCTION:
First check if the special fader start cable connects the two MCD200 players.
Put a disc in both players.
Open the 2 channel faders of the corresponding CD inputs on your mixer.
Check if both players are in Single mode (the “single” indicator(13) on the display
appears). If one of the players is not in single mode, press its SGL/CNT button(17) of
that player.
Begin playback on one of the two players.
Alternately a track will be played from both players. You can always put a new CD in
the player that is waiting in pause. In this way you can create an endless program,
perfect for use in pubs etc.
Remove the relay cable if you don’t want to use the relay function anymore.
CREATE A LOOP:
While a track is playing, press IN/R.CUE button to program the starting point of the loop.
Now press the OUT/EXIT button to program the endpoint of the loop. The seamless loop
starts playing at once. (With some practice you will be able to create perfect loops!)
While the loop is playing, you can press the OUT/EXIT button again to exit the loop and
continue the rest of the track.
It is possible to program a new loop, even when the current loop is still playing. While the
loop is playing, simply press the IN/R.CUE button to set the starting point of the new
loop. Now enter the endpoint by pressing the OUT/EXIT button. Your new loop is
programmed and playing.
RESTART A LOOP:
This can be done in 3 ways:
When a loop is programmed and you left it by pressing the OUT/EXIT button, just
press RELOOP to restart the loop.
When a loop is programmed and you left it by pressing the OUT/EXIT button, just
press OUT/EXIT again to restart the loop. The point where you pressed OUT/EXIT is
now programmed as the new endpoint of the loop.
When the loop is still playing, press the RELOOP button to restart the loop
immediately. You can repeat this several times to create a “Stutter” effect.
EDIT A LOOP:
When a loop is programmed, press the RELOOP/STUTTER button for about 2 seconds
to enter “loop edit” mode. While the loop is seamlessly playing, the alphanumerical
display shows the time information of the loop endpoint. Use the big jog wheel to set the
new loop endpoint. To make things very easy you can hear your modifications to the loop
endpoint continuously. When the loop is perfect, press the LOOP OUT button to save the
new loop endpoint and leave the loop.
NOTE: You can store loopsunder the HOT CUE buttons.This means that you have up to 4 loops per track
to play with. Inthe nextparagraph you learn how to store these loops.

ENGLISH USER MANUAL
JB SYSTEMS® 11/81 MCD200
STORING A MASTER CUE POINT:
There are 2 ways to set a master cue point:
Press the IN/R.CUE button during normal playback to set the new cue point (“CUE on
the fly”).
Put the player in pause and use the jog/shuttle wheel to search for the exact location
for the cue point. Once this location is found, press “IN/R. CUE” button to set the new
cue point. (or press PLAY/PAUSE button)
Once the cue point is programmed, just press the CUE button to recall it.
STORING A SIMPLE CUE POINT TO THE “HOT CUE” BUTTONS:
First press the MEMORY button(9) to make the unit enter hot cue memory mode
(MEMORY button is lit).
Press one of the four HOT CUE buttons at the right moment during normal playback:
the HOT CUE button you just pressed turns to red colour to indicate that the desired
cue point is stored. (“Cue on the fly”).
Put the player in pause and use the jog/shuttle wheel to search for the exact location
for the cue point. Once this location is found, press one of the four HOT CUE buttons
to set the new cue point: the HOT CUE button you just pressed turns to red colour to
indicate that the desired cue point is stored.
Once the cue point is programmed, just press the HOT CUE button to start playback
from the stored cue point.
STORING A LOOP TO THE “HOT CUE” BUTTONS:
This is very similar to storing a simple cue point. The only difference is that you have to
put the MCD200 in loop mode first. When the loop is playing, you press the MEMORY
button to make the CD-player enter hot cue memory mode (MEMORY button is lit). After
this press one of the four HOT CUE buttons: the HOT CUE button you just pressed turns
to green colour to indicate that the loop, playing at that moment, is stored. You can store
up to 4 loops!
STORING HOT CUE MEMORIES TO THE PERMANENT INTERNAL MEMORY:
For each CD you can store up to 4 cue points and loops to the internal permanent
memory. At a later time you can recall these cue points and loops when you insert the
same CD again. The MCD200 can hold up to 2048 (512 x 4) Cue points and loops.
Writing the contents of the HOT CUE buttons to permanent memory is very simple: just
press the MEMORY button for about 2 seconds until the display shows “SAVING”. That’s
all!
NOTE: When you put another CD in the disc tray without first writing the current HOT CUE memories to
theinternalpermanent memory,theywill be lost.
RECALLING HOT CUE MEMORIES FROM PERMANENT INTERNAL MEMORY:
If you have stored permanent cue points and loops for a CD, you can choose to recall
these while reloading that CD at a later time.
RECALL: Before loading the CD, just press the MEMORY button until it starts
flashing and the display shows “RECALL”. Now press the OPEN/CLOSE button to
load the CD. It takes some seconds to load the HOT CUE buttons, during this time
the display shows “RECALL”. If no permanent cue points where found, the MCD200
stops the recall process automatically.
DON’T RECALL: Just insert the CD as usual and start playback. The MCD200 will
ignore the permanent cue point information for this CD.
ENGLISH USER MANUAL
JB SYSTEMS® 12/81 MCD200
DELETE THE CURRENT “HOT CUE” BUTTONS:
This can be done in two ways:
Simply program a new HOT CUE, the previous will be erased.
NOTE: Don’tforget toupdate thenew Cuepoint information topermanent memory!
Put another CD in the disc tray, the HOT CUES will be erased.
NOTE: Only the HOT CUE buttons are erased, the cue point information in permanent memory is
preserved.
DELETE THE ENTIRE INTERNAL CUE MEMORY:
Turn the SEARCH Button(1) to the left (counterclockwise) and keep it in that position
while switching the MCD200 on: the permanent cue memory is cleared. During this
action the display shows “clearALL”.
CAUTION: THIS ACTION IS IRRIVERSIBLE, ALL CUE POINTS/LOOPS WILL BE DELETED!!!
PITCH BENDING:
This function is used to put the beats of two tracks in perfect sync. This can be done in
two ways:
PITCH BEND buttons: The speed increases or decreases respectively as long as the
PITCH BEND+ or PITCH BEND- button is pressed.
JOG WHEEL: During play mode the JOG WHEEL will temporarily bend the pitch of
the music by turning the JOG WHEEL clockwise to speed up or counterclockwise to
slowdown. The rotation speed the JOG WHEEL determines the percent of pitch bend.
PITCH BEND PARAMETER:
The pitch bend parameter determines the impact of the jog wheel on the pitch bend
function. The CD-player comes with the pitch bend parameter set to 50. You can adjust
the parameter between 001 (very little impact) to 100 (extreme impact) to adapt the pitch
bend function perfectly to your personal taste! This is how to change the parameter:
Press the TIME-button (16) until the alphanumeric display (20) shows the parameter
value: BEND xxx (“xxx” is the value)
Change the parameter with the big jog wheel (20) and press the TIME-button (16)
shortly to confirm the new parameter.
Try the new pitch bend parameter setting to see if it’s OK:
New parameter is NOT OK: start the procedure again to set a different value.
New parameter is OK: press the MEMORY-button (9) until the display shows
“SAVING” to save this new setting to the permanent settings of the unit. Now the new
pitch bend parameter will be preserved, even when you turn the CD-player off.
CD-TEXT:
Not only MP3 files can show the track name on the display. Some normal audio CDs use
CD-TEXT to show the track names. Also some CDR burning software (ex. Nero) can
add CD-TEXT to a normal audio CD. When the MCD200 detects these CD-TEXT data,
the display will show them automatically. When no CD-TEXT is available the display
shows “no CD-TEXT”.
PLAYING MP3 FILES:
The CD player automatically detects if a CD contains MP3 files. The MCD200 is able to
read several different MP3 formats. The display shows some of the ID3-tags (song title /
performer / folder name / bitrate). The CD may contain up to 999 MP3- files, spread over
maximum 255 folders.
The MP3-files may have the following file extensions: .mp3 ~ .MP3 ~ .mP3 ~ .Mp3

ENGLISH USER MANUAL
JB SYSTEMS® 13/81 MCD200
Check the technical specifications to see which MP3-files are allowed.
PLAYING CD-R and CD-RW:
Apart from normal audio CD’s the MCD200 can play both CD-R (CD recordable) and
CD-RW (CD rewriteable). Please note that you should always use the “disc at once” and
“track at once” disc writing options! Burning your CD’s at speeds higher than 12x can
cause reading errors. If the disc is multi session, it will only play the first session:
oif the first session is CD-DA you can only play CD-DA tracks.
oif the first session is MP3 you can only play MP3 files.
SPECIFICATIONS
Power Supply: AC 230 V, 50Hz
Power Consumption: 14,5W
Output level: 2,0Vrms +/0.5dB @ 1kHz, 0dB
Frequency response: 20-20.000Hz (+/-0,4dB)
THD + noise (20kHz LPF): 0,005% @ 1kHz, 0dB
S/N Ratio (IHF-A): >120dB @ 1kHz, 0dB
Short access time (next track): <2sec
Long access time (track 1 20): <4sec
Laser Pickup: Sony KSM-213C 3spot detection 780nm
Electronic tracking: Full automatic digital tracking.
DISC FORMAT:
Possible file extensions: .mp3 ~ .MP3 ~ .mP3 ~ .Mp3
ID3 tag compatibility: ID3v2 and earlier
ISO9660: Level1 (max. 8”/8.3” character style)
Level2 (max. 31/30 character style)
Joliet: max. 64/64 character style
CD-ROM sector format: mode-1 only
Max. Folders: 255
Max. Files: 999
MP3 FORMATS:
MPEG1 Layer3 (ISO/IEC11172-3):mono / stereo sampled at: 32 - 44,1 - 48kHz
Bitrates: 32 – 320 Kbps
Bitrate modes: CBR (Constant Bitrate) or VBR (Variable Bitrate)
MPEG2 Layer3 (ISO/IEC13818-3):mono / stereo sampled at: 16 – 22,05 - 24kHz
Bitrates: 8 – 160 Kbps
Bitrate modes: CBR (Constant Bitrate) or VBR (Variable Bitrate)
MPEG2,5 Layer3: mono / stereo sampled at: 8 – 11,025 - 12kHz
Bitrates: 8 – 160 Kbps
Bitrate modes: CBR (Constant Bitrate) or VBR (Variable Bitrate)
Dimensions: 348(W) x 106(H) x 246(D) mm
Weight: 3,06 kg
Every informationis subject tochange withoutprior notice
You can download the latest version of thisuser manual on our website: www.beglec.com
FRANCAIS MODE D’EMPLOI
JB SYSTEMS® 14/81 MCD200
MODE D’EMPLOI
Nous vous remercions d’avoir acheté ce produit JB Systems®. Veuillez lire ce mode
d’emploi très attentivement afin de pouvoir exploiter toutes les possibilités de cet appareil.
CARACTÉRISTIQUES
Compatibilité MP3 intégrale (max. 999 fichiers MP3 / 255 dossiers par CD)
MPEG1 layer3 (32 + 44,1 + 48kHz)
MPEG2 layer3 (16 + 22,05 + 24kHz)
MPEG2.5 layer3 (8 + 11,025 + 12kHz)
Supporte les modes de taux de transfert CBR (constant) et VBR (variable).
Compatible ID3v2 tag et versions antérieures
Lecture de CD-DA, CD-R, CD-RW
Mémoire Anti-choc de 10 secondes
Recherche ultra précise d’un endroit sur le disque jusqu’à 1/75ème de seconde,
également en MP3
Effet de Scratch digital à l’aide de la roue Jog Wheel
4 touches Hot Cue qui peuvent contenir des points Cue et des boucles (Loops)
Mémoire permanente pour jusqu’à 2048 (512 x 4) points Cue et boucles
Paramètre de 'pitch bend' (variation de la hauteur du son) pour faire varier la hauteur du
son de manière ultra-précise (software V22 et suivantes).
Fonction d’édition de boucle parfaite en temps réel!
Compteur BPM entièrement automatique
Verrouillage du Pitch (Master Tempo)
Portée variation Pitch: +/-4% +/-8% +/-16% +/-100% (jusqu’à +/-16% en MP3)
Pitch bend : changement temporaire de la vitesse à l’aide de touches et de la roue Jog
Wheel pour des mixages parfaits
Jusqu’à 4 boucles sans fin pour chaque plage avec reloop/stutter
Programmation des points CUE en temps réel (“Cue volant”)
Démarrage Memory Start ultrarapide en moins de 10msec
Fader start, fader stop, (back cue),
Fonction Auto Cue (-48dB)
4 vitesses de recherche
Ecran Alphanumérique LCD (noms MP3 + CD-TEXT)
Choix entre l’affichage du temps écoulé, du temps restant de la plage ou du temps
restant du disque entier
Jog Wheel équipé d’une surface en caoutchouc spécial
Lecture d’une seule plage où continue du CD
Fonction Relay offrant la possibilité d’une lecture alternée automatique en utilisant deux
lecteurs CD
Sortie S/PDIF digital audio RCA coaxiale
Transport Protection de 60 secondes
Fonction Sleep (prolonge la durée de vie du laser)
FRANCAIS MODE D’EMPLOI
JB SYSTEMS® 15/81 MCD200
CAUTION
AVANT L’UTILISATION
Vérifiez si les pièces suivantes sont incluses dans l’emballage de votre appareil :
Lecteur MCD200
Mode d’emploi
Câble d’alimentation
Un câble aux raccords cinch
Un câble de démarrage « fader start » (mono mini-jack/mini-jack)
INSTRUCTIONS DE SECURITE:
ATTENTION: afin de réduire le risque
d’électrocution, n’enlevez jamais le couvercle de
l’appareil. Il n’y a aucune pièce à l’intérieur de
l’appareil que vous pouvez remplacer vous-même. Confiez l’entretien uniquement
à des techniciens qualifiés.
La flèche dans un triangle met l'utilisateur en garde contre la présence de haute
tension sans isolation dans l'appareil qui peut causer un risque d'électrocution.
Un point d'exclamation dans un triangle prévient de la présence d'instructions de
fonctionnement et de maintenance se trouvant dans le manuel, fourni avec
l'appareil.
Ce symbole signifie : uniquement pour usage à l'intérieur
Ce symbole signifie : Lire le mode d’emploi.
Afin d’éviter tout risque d’incendie ou de choc électrique, ne pas exposer cet appareil à
la pluie ou l’humidité.
Pour éviter la formation de condensation à l’intérieur de l’appareil, patientez quelques
minutes pour laisser l’appareil s’adapter à la température ambiante lorsqu’il arrive dans
une pièce chauffée après le transport. La condensation empêche l’unité de fonctionner
en performance optimale et peut même causer des dommages.
Cette unité est destinée à une utilisation à l’intérieur uniquement.
Ne pas insérer d’objet métallique ou verser un liquide dans l’appareil. Aucun objet rempli
de liquides, tels que des vases, ne peut être placé sur cet appareil. Risque de choc
électrique ou de dysfonctionnement. Si un corps étranger est introduit dans l’unité,
déconnectez immédiatement de la source d’alimentation.
Aucune source de flamme nue, telle que les bougies allumées, ne peut être placée sur
l'appareil.
Ne pas couvrir les ouvertures de ventilation, un risque de surchauffe en résulterait.
Ne pas utiliser dans un environnement poussiéreux et nettoyez l’unité régulièrement.
Ne pas laisser l’unité à portée des enfants.
Les personnes non expérimentées ne doivent pas utiliser cet appareil.
La température ambiante maximum d’utilisation de l’appareil est de 40°C. Ne pas
l’utiliser au-delà de cette température.
Débranchez toujours l’appareil si vous ne l’utilisez pas de manière prolongée ou avant
d’entreprendre des réparations.
Les installations électriques ne peuvent être faites que par du personnel qualifié et
conformément aux régulations de sécurité électrique et mécanique en vigueur dans
votre pays.
FRANCAIS MODE D’EMPLOI
JB SYSTEMS® 16/81 MCD200
Assurez-vous que la tension d’alimentation de la source d’alimentation de la zone dans
laquelle vous vous trouvez ne dépasse pas celui indiqué à l’arrière de l’appareil.
La prise sera toujours accessible pour que le cordon secteur puisse être enlevé à
chaque moment.
Le cordon d’alimentation doit toujours être en condition parfaite. Mettez immédiatement
l’unité hors tension si le cordon est écrasé ou endommagé.
Ne laissez jamais le cordon d’alimentation entrer en contact avec d’autres câbles !
Quand l’interrupteur principal est dans la position OFF, cet appareil n'est pas
complètement isolé du courant 230V!
Utilisez toujours les câbles appropriés et certifiés lorsque vous installez l’unité.
Pour éviter tout choc électrique, ne pas ouvrir l’appareil. En dehors du fusible principal, il
n’y a pas de pièces pouvant être changées par l’utilisateur à l’intérieur.
Ne jamais réparer ou court-circuiter un fusible. Remplacez systématiquement un
fusible endommagé par un fusibleet de mêmes type et spécifications électriques !
En cas de problèmes de fonctionnement sérieux, arrêtez toute utilisation de l’appareil et
contactez votre revendeur immédiatement.
Utilisez l’emballage d’origine si l’appareil doit être transporté.
Pour des raisons de sécurité, il est interdit d’apporter toute modification à l’unité non
spécifiquement autorisée par les parties responsables.
CONSEILS D'INSTALLATION:
Installer l'appareil dans un lieu bien aéré, à l'abri de l'humidité et des fortes
températures.
Placer et utiliser l'appareil à proximité de sources de chaleur telles que spots, amplis,…
pourrait affecter ses performances et même endommager l'appareil.
En cas d'installation dans un 'flight case', assurer une bonne ventilation afin d'évacuer la
chaleur produite par l'appareil.
Pour éviter la condensation à l'intérieur, laisser l'appareil s'adapter à la nouvelle
température ambiante après le transport. La condensation peut altérer les performances
de l'appareil.
NETTOYAGE DU LECTEUR CD:
Nettoyez l’appareil à l’aide d’un chiffon doux, légèrement humide. Evitez d’introduire de
l’eau à l’intérieur de l’appareil. N’utilisez pas de produits volatiles tels le benzène ou le
thinner qui peuvent endommager l’appareil.
CONNECTIONS
Utilisez le câble cinch pour relier la sortie audio du lecteur CD à l’entrée CD de votre
table de mixage.
Connectez également le câble “fader start” si votre table de mixage possède des
connecteurs « fader start ». (compatible Synq® SMX-1 ou Pioneer®)
Connectez le câble d’alimentation.

FRANCAIS MODE D’EMPLOI
JB SYSTEMS® 17/81 MCD200
CONTRÔLES ET FONCTIONS
1. Bouton SEARCH: Ce bouton possède 4 positions de vitesse avant et 4 positions de
vitesse arrière pour rechercher des passages sur votre CD. Au plus que vous tournez
le bouton dans une direction, au plus vite se fera la lecture de votre CD.
2. Touches TRACK SEARCH: Ces touches sont utilisées pour sélectionner la plage du
CD qui doit être lue. Saut en avant & saut en arrière.
3. Touche IN/R.CUE: Vous permet de définir le point CUE sans arrêter la lecture (CUE
VOLANT). Cette touche définit également le début d’une boucle sans fin (seamless
loop) Si vous utilisez une des touches hot CUE (19), le point de départ sera également
copié vers cette touche.
4. Touche OUT/EXIT: est utilisée pour déterminer la fin de la boucle pendant la création
de « loops ». Le lecteur CD reproduira la boucle sans fin jusqu'à-ce que vous appuyez
a nouveau sur cette touche pour sortir de la boucle et continuer la lecture normale.
Quand une boucle est programmée mais pas activé vous pouvez également
redémarrer la boucle avec cette touche. L’endroit où vous appuyez sur la touche
pendant la lecture sera mémorisé comme nouveau point de sortie de la boucle. Quand
le lecteur est en “loop edit mode” (édition de boucle) et que vous appuyez sur cette
touche, l’édition de la boucle s’arrête et le point de fin de boucle actuel est mis en
mémoire.
5. Touche RELOOP/STUTTER: Cette touche a 3 fonctions:
FRANCAIS MODE D’EMPLOI
JB SYSTEMS® 18/81 MCD200
RELOOP: quand une boucle à été programmée et que vous avez appuyé sur la
touche OUT/EXIT (4), appuyez sur la touche reloop pour réactiver la boucle. Pour
sortir de la boucle appuyez sur la touche OUT/EXIT (4). (les points de départ et de
sortie de la boucle restent inchangés)
STUTTER: Quand une boucle est activée (en lecture) vous pouvez appuyer sur
cette touche pour redémarrer instantanément la boucle à partir de son point de
départ. Vous pouvez également appuyer sur cette touche quand une plage n’est
pas reproduite en boucle. Chaque fois que vous appuyez sur la touche
RELOOP/STUTTER, vous redémarrez la musique à partir de son point de départ
programmé.
L’effet “stutter” (bégaiement) vous permet d’ajouter une touche de créativité
supplémentaire à votre prestation.
LOOP EDIT: quand une boucle est programmée, appuyez sur la touche
RELOOP/STUTTER pendant environ 2 secondes pour activer la fonction “édition
de boucle”. Maintenant vous pouvez modifier le point de fin de boucle. Voir chapitre
“Utilisation…” pour plus d’informations.
6. Touche CUE: Si vous appuyez sur la touche CUE pendant la lecture vous obtiendrez
un retour immédiat vers la position de départ de la lecture initiale. La lecture démarre
immédiatement à partir du point de départ programmé (CUE point) et continuera tant
que vous tenez cette touche enfoncée. Le lecteur CD retourne à nouveau au point de
départ « CUE point » dès que vous relâchez la touche CUE. Si le lecteur est en mode
pause (le LED Play/Pause clignote) la roue de recherche ou la roue “jog wheel”
peuvent être utilisées pour définir un nouveau point de départ. En appuyant sur la
touche "PLAY/PAUSE" puis sur la touche "CUE", vous pouvez confirmer ce nouveau
point de départ. Le LED CUE s’allumera aussi longtemps que la touche CUE sera
tenue enfoncée, jusqu’à ce que le CD soit retourné à sa position de départ.
7. Touche SCRATCH: est utilisée pour engager la fonction scratch du MCD200. Cette
option vous offre la possibilité de scratcher n’importe quelle plage du CD en temps
réel. Vous pouvez utiliser la fonction scratch pendant la lecture du CD ou en mode
Pause:
En mode play: La musique joue normalement jusqu’à ce que vous tournez la
grande roue Jog Wheel (20). Pendant que vous manipulez la roue (20), l’effet
scratch est audible. Dès que vous relâchez la roue, la musique continue sa
lecture normale à partir du point ou vous avez relâché la roue.
En mode pause: la musique est en attente (pause) jusqu’à ce que vous tournez
la roue Jog Wheel (20). Pendant que vous manipulez la roue (20), l’effet scratch
est audible. Dès que vous relâchez la roue, la musique s’arrête et le lecteur se
remet en mode pause.
REMARQUE: Pendant le scratchvous pouvez passer du mode pause au mode lecture ou inversement
en appuyant tout simplement sur la touche PLAY/PAUSE(8)
8. Touche PLAY/PAUSE: chaque fois que vous appuyez sur la touche PLAY/PAUSE le
lecteur CD passera du mode lecture au mode pause ou du mode pause au mode
lecture. La touche clignote aussi longtemps que le lecteur CD est en mode pause.
9. Touche MEMORY: est utilisée pour enregistrer des points cue et des boucles (Loops)
dans les touches Hot Cue (19) ainsi que dans la mémoire permanente:
Enregistrer dans les touches HOT CUE: Appuyez brièvement sur la touche
MEMORY pour préparer le MCD200 à l’enregistrement d’un point cue ou d’une
boucle dans une des 4 touches HOT CUE.
Enregistrement dans la mémoire permanente: Appuyez sur la touche
MEMORY jusqu’à ce que elle commence à clignoter et que l’écran LCD affiche

FRANCAIS MODE D’EMPLOI
JB SYSTEMS® 19/81 MCD200
“SAVING”. Le contenu des touches HOT CUE pour ce CD est enregistré dans la
mémoire permanente.
Voyez plus loin dans ce mode d’emploi pour avoir plus d’informations concernant
l’utilisation de cette touche.
10. Touche OPEN/CLOSE: appuyez sur cette touche pour ouvrir et fermer le chargeur CD
qui se trouve à l’avant du MCD200. Cette touche ne fonctionne pas durant la lecture
d’un CD. Si le tiroir n’est pas refermé après 60sec. il se refermera automatiquement
afin d’éviter qu’il soit endommagé accidentellement.
11. Ecran LCD: Affiche toutes les informations importantes, nécessaires pendant la
lecture du CD. Voyez le chapitre suivant pour plus d’informations à ce sujet.
12. Touche PITCH RANGE: Chaque fois que vous appuyez sur cette touche, vous
changerez l’échelle du curseur de vitesse (15). Pour les CD’s audio normaux vous
pouvez sélectionner +/-4%, +/-8%, +/-16% et +/-100%. L’option +/-100% n’est pas
disponible pour les CD’s en MP3.
13. Touche PITCH LOCK: (Master tempo) active la fonction Pitch Lock. Cette fonction
vous permet de faire des réglages de vitesse de lecture en utilisant Pitch Control(15)
sans en altérer le ton. Cette touche devient rouge quand la fonction Pitch Lock est
activée.
REMARQUE: Sachez que la fonction pitch lock à ses limites. A partir d’un certain niveau de
changement de vitesse (dépendant du style de musique) le pitch lock ne pourra plus garder la même
tonalité. Vous entendrez d’abord une petite distorsion qui deviendra plus importante selon que vous
augmentez encore le changement de vitesse.Ceci n’est pas toujours un inconvénient : à de très basses
vitesses vouspouvez égalementl’utilisercommeun effetspécial dedistorsion !
14. Touche SPEED: Cette touche est utilisée pour activer ou désactiver la fonction de
réglage de vitesse.
15. Curseur SPEED: Appuyez sur la touche SPEED (15), pour l’allumer. La vitesse de
lecture peut être modifiée jusqu’à +/-100% en bougeant le curseur. La vitesse ne
changera pas si la touche SPEED (15) est désactivée (éteint). Vous pouvez changer la
portée du changement de vitesse avec la touche PITCH RANGE (12).
16. Touche TIME: La touche TIME vous permet de choisir entre l’affichage du temps de
lecture écoulé (elapsed), le temps restant d’une plage (remaining/track) et le temps
total restant du disque (total remaining) (standard = remaining /track). Le “temps de
lecture total restant” n’est pas disponible pour les CD’s en MP3. Le bouton 'TIME' est
aussi utilisé pour régler le paramètre de pitch bend de la molette. Se reporter à
'Paramètre de pitch bend' au chapitre 'Utilisation'.
17. SGL/CTN: Vous pouvez choisir entre “single track mode” et “continuous play”. Vous
pouvez également allumer ou éteindre la fonction auto cue (-48dB).
Continuous play: Le CD complet sera reproduit sans interruption. (le plus souvent
utilisé dans les tavernes)
Single track: La lecture s’arrête à la fin de la plage et attends au début de la plage
suivante. Le lecteur attendra à la première note musicale de la plage. Ce qui veut
dire que les CD’s mal indexés ne poseront pas de problèmes aux capacités de
démarrage instantané de ce lecteur CD. Ceci est une caractéristique très utile pour
les deejays!
Auto Cue allumé/éteint: Le MCD200 détecte automatiquement la première “note
de musique” de chaque plage afin d’assurer le démarrage instantané de la
musique dès que vous appuyez sur la touche play. Pour couper/allumer cette
fonction Auto Cue il suffit d’appuyer sur la touche SGL/CTN pendant environ 2
secondes. Le cadran affiche “A.CUE” quand la fonction est activée.
18. Touches PITCH BEND: La vitesse augmente si vous appuyez sur la touche “+” et
retourne à sa vitesse initiale dès que vous la relâchez. La vitesse de lecture diminue si
FRANCAIS MODE D’EMPLOI
JB SYSTEMS® 20/81 MCD200
vous appuyez sur la touche “–” et retourne à sa vitesse initiale dès que vous la
relâchez. Ces touches peuvent être utilisées pour synchroniser le tempo des 2
lecteurs.
19. Touches HOT CUE: 4 touches programmables ou vous pouvez enregistrer des points
Cue et/ou des boucles. Vous pouvez programmer jusqu’à 4 points cue et/ou boucles
répartis sur toutes les pistes du CD.
La touche est éteinte: pas de points cue enregistrés.
La touche est rouge: un point cue est enregistré
La touche est verte: une boucle est enregistrée
Si vous le souhaitez, vous pouvez enregistrer le contenu de ces touches HOT CUE
dans la mémoire permanente interne.
Voyez plus loin dans ce mode d’emploi pour plus d’informations concernant la
programmation des points cue, etc.
REMARQUE: Si vous insérez un autre CD dans le chargeur sans d’abord enregistrer les points HOT
CUE actuels dansla mémoire permanenteinterne,ilsseronteffacés.
20. JOG WHEEL: Cette roue contrôle 3 fonctions, selon le mode dans lequel vous
travaillez.
Le « jog wheel » vous permet de rechercher lentement un “frame” (1/75sec) quand
le CD n’est pas en mode lecture, mais en pause ou sur un point « CUE ». Pour
définir un nouveau point “CUE”, tournez la roue puis appuyez sur PLAY (8) ou sur
LOOP IN (3) quand vous avez trouvé l’endroit exact pour installer le nouveau point
CUE. Appuyez sur CUE pour retourner au point “CUE”.
Pendant la lecture du CD, en tournant la roue dans le sens des aiguilles d’une
montre, le “jog wheel” augmente temporairement la vitesse de lecture jusqu’à +/-
100%. Tournez dans le sens inverse des aiguilles d’une montre pour ralentir la
vitesse de lecture temporairement. Le changement de vitesse de lecture est
déterminé par la vitesse de rotation de la roue. (ceci est une alternative aux touches
PITCH BEND (18)
En mode scratch la roue Jog Wheel est utilisée pour manipuler la reproduction de la
musique en temps réel. De ce fait vous pouvez faire du scratch avec la musique de
votre CD en temps réel, comme si vous le faisiez avec un disque vinyle analogique
normal.
21. CD TRAY INDICATOR: est allumé quand le tiroir CD est ouvert ou vas être ouvert.
22. FOLDER SELECTOR: si votre CD contient des sous-dossiers MP3, vous pouvez les
sélectionner en tournant ce sélecteur de dossiers. Le cadran affiche le numéro + le
nom du dossier. Le nom du dossier est affiché instantanément quand vous appuyez
brièvement sur le sélecteur de dossiers. Voyez le chapitre suivant pour plus
d’informations concernant l’utilisation des sous-dossiers. Quand le CD ne contient pas
de sous-dossiers, ce sélecteur ne sera pas utilisé.
23. TRACK SELECTOR: est utilisé pour sélectionner les plages de votre CD. Si votre CD
contient des sous-dossiers MP3, le MCD200 possède 2 modes de sélection:
FOLDER MODE: utilisé en combinaison avec le sélecteur FOLDER, vous pouvez
uniquement sélectionner des fichiers qui se trouvent à l’intérieur du dossier
sélectionné. Utilisez le sélecteur FOLDER pour aller vers un autre dossier.
TRACK MODE: Pour sélectionner le mode de choix de plage, appuyez
brièvement sur le sélecteur TRACK: ainsi vous pourrez parcourir toutes les
plages (fichiers) de votre CD comme si il n’y avait pas de sous-dossiers. Pour
avancer rapidement (par 10 plages), appuyez sur le sélecteur TRACK pendant
que vous le tournez vers l’avant/vers l’arrière.
FRANCAIS MODE D’EMPLOI
JB SYSTEMS® 21/81 MCD200
24. Sortie Audio: Sortie du signal audio du lecteur CD. Utilisez le câble cinch/cinch fourni
avec l’appareil pour relier cette sortie aux entrées CD/line de votre table de mixage.
25. Connecteur Digital out: Utilisez ce connecteur pour relier le signal digital (format
S/PDIF) à l’entrée d’un amplificateur digital ou d’un enregistreur digital (p.ex. Mini disc)
26. Connecteur RELAY: vous pouvez utiliser ce connecteur de 2 façons: vous pouvez
l’utiliser avec l’option fader start sur certaines tables de mixage ou vous pouvez relier
deux lecteurs MCD200 ensemble pour obtenir la fonction de lecture alternée.
Relay play: utilisez le câble mono mini jack/jack qui est fourni avec l’appareil pour
relier les connecteurs RELAY de deux lecteurs MCD200. Voyez plus loin dans ce
mode d’emploi pour apprendre comment utiliser cette fonction.
Fader start: Si vous utilisez une table de mixage qui possède la fonction fader
start, utilisez le câble mono mini jack/jack pour relier le lecteur CD avec les
connecteurs fader start de la table de mixage. Faites attention de ne jamais
raccorder ce connecteur à une source de courant.
Attention: cette commande à distance est uniquement compatible avec certaines tables de
mixage (Synq®ou Pioneer® compatible). Les tables de mixage avec fader start fonctionnant par
un signal relié à la terre ne conviennent PAS.
27. Interrupteur POWER ON/OFF: allume ou éteint le MCD200.
28. Mains input: connectez le lecteur CD au réseau 230V AC, en utilisant le câble
d’alimentation fourni avec l’appareil.
ÉCRAN LCD
FRANCAIS MODE D’EMPLOI
JB SYSTEMS® 22/81 MCD200
1. PLAY: apparaît quand la lecture du CD est activée.
2. PAUSE: apparaît pendant que le lecteur est en mode pause ou CUE.
3. INDICATEUR ANTI SHOCK ET BUFFER: L’état de la mémoire est représentée sur
l’écran par un seau qui se remplit ou se vide. Le seau en lui même précise que la
fonction Instant Start (démarrage instantané) est disponible. Si le seau clignote, c’est
que le démarrage instantané n’est pas disponible. Chaque segment dans le seau
représente environ 2 secondes de protection anti shock.
4. CUE: apparaît quand le lecteur est en attente au point CUE principal.
5. PITCH DISPLAY: vous montre le pourcentage de changement de vitesse.
6. TIME BAR: vous montre soit le temps restant soit le temps écoulé, selon l’option
choisie avec la touche TIME (16). Cette barre se met à clignoter à la fin de chaque
plage pour prévenir l’utilisateur qu’il est grand temps de passer à l’action.
7. FRAME: vous montre le “frame” de la plage en cours d’exécution. (1 frame = 1/75éme
sec.)
8. SECOND: Vous montre les “secondes” de la plage en cours d’exécution.
9. MINUTE: Vous montre les “minutes” de la plage en cours d’exécution.
10.ELAPSED, TOTAL REMAIN: indique si le temps affiché à l’écran est le temps écoulé
(elapsed), le temps restant total du disque (total) ou le temps restant de la plage
(remain).
11.RELOOP: apparaît quand une boucle à été programmée auparavant.
Vous pouvez retourner à la lecture de cette boucle en appuyant sur la touche reloop
(5).
12.LOOP: vous montre quand le CD joue une boucle.
LOOP Clignote: une boucle est programmée et est lue.
LOOP allumé: une boucle est programmée mais n’est pas reproduite.
13.SINGLE: apparaît quand l’appareil est réglé pour jouer uniquement une plage à la fois.
Quand Single n’est pas affiché, le CD sera lu entièrement sans interruption. La fonction
est contrôlée par la touche SGL/CTN (17).
14.TRACK / FOLDER: vous montre la plage ou le folder en cours d’exécution.
15.INDICATEUR VISUEL: indique la position de lecture en frames: une rotation complète
représente 72 frames. L’indicateur évolue dans le sens des aiguilles d’une montre
pendant la lecture normale d’un CD et dans le sens inverse des aiguilles d’une montre
quand la lecture s’effectue à l’envers. En mode pause l’indicateur est à l’arrêt.
16.AUTO CUE: Le cadran affiche “A.CUE” quand la fonction auto cue est activée.
17.AUTO BPM: Cet indicateur est toujours allumé pour vous signaler que le compteur
BPM fonctionne.
18.PITCH LOCK: Quand Master Tempo est activé, le cadran affiche un petit “verrou” pour
indiquer que le pitch (tonalité) de la musique est verrouillé.
19.CD/MP3: vous montre si un CD audio normal ou un CD MP3 est chargé.
20.CADRAN ALPHANUMERIQUE: Affiche le nom des dossiers et des fichiers MP3. Pour
les fichiers MP3 enregistrés en CBR, la valeur « bit rate » est également affiché. Pour
les fichiers MP3 enregistrés en VBR, le cadran n’affichera que “VBR”. Les informations
des CD audio contenant un texte CD seront affichés, dans le cas contraire “no CD-
TEXT” sera affiché sur l’écran. Toutes autres informations interactives seront
également affichées.
21.BPM : le compteur de rythme automatique vous montre le nombre de Beats Per
Minute (battements par minutes) sur l’écran.

FRANCAIS MODE D’EMPLOI
JB SYSTEMS® 23/81 MCD200
UTILISATION …
La plupart des fonctions les plus utilisées sont expliquées dans le chapitre précédent
“contrôles et fonctions” Dans ce chapitre nous parlerons des fonctions qui nécessitent un
peu plus d’explications.
SLEEP MODE:
Le lecteur CD éteint automatiquement le moteur du chargeur CD et le laser après
environ 15 minutes d’inutilisation (en mode pause ou CUE). Ceci prolonge la durée de
vie du moteur et du laser. Pendant le mode veille l’écran affiche le mot “SLEEP”. Pour
« réveiller » votre lecteur CD, appuyez juste sur la touche CUE(6) ou PLAY(8), l’écran
retournera à son affichage normal et l’appareil est prêt à recevoir les instructions.
SELECTEURS FOLDER / TRACK:
La plus part du temps, les CDR contiennent beaucoup de fichiers MP3 (parfois 150 ou
plus). Pour que tout cela reste exploitable vous pouvez organiser vos fichiers MP3 en les
plaçant dans différents sous-dossiers (répertoires). Ces dossiers peuvent être nommés
selon le nom de l’artiste, le style de musique (techno, slows, salsa …), la valeur BPM
(100BPM, 110BPM, 120BPM …) ou selon une quelconque autre façon d’organiser votre
musique…
Avec les sélecteurs FOLDER / TRACK vous pouvez aisément parcourir les différents
dossiers et fichiers. Vous pouvez mettre le MCD200 en mode FOLDER et en mode
TRACK:
FOLDER MODE: utilisez le sélecteur FOLDER pour sélectionner le dossier souhaité.
Avec le sélecteur TRACK vous pouvez sélectionner le fichier MP3 souhaité dans ce
dossier. Remarquez que vous pouvez uniquement sélectionner des fichiers qui se
trouvent dans le dossier sélectionné. Utilisez le sélecteur FOLDER pour aller vers un
autre dossier.
TRACK MODE: Pour activer cette fonction, appuyez brièvement sur le sélecteur
TRACK: vous pourrez parcourir tous les fichiers de votre CD, comme si il n’y avait
pas de sous-dossiers. Pour parcourir rapidement (par 10 fichiers) le CD, appuyez sur
le sélecteur TRACK pendant que vous le tournez vers l’avant/vers l’arrière. Pour
retourner au mode folder, appuyez sur/tournez le sélecteur FOLDER.
FONCTION RELAY:
Vérifiez d’abord si le câble spécial Fader Start relie les deux lecteurs MCD200.
Mettez un CD dans les deux lecteurs.
Ouvrez les 2 curseurs des entrées CD sur votre table de mixage.
Vérifiez si les deux lecteurs sont en mode Single (l’indicateur “single” (13) apparaît sur
l’écran). Si un des lecteurs n’est pas en mode Single, appuyez sur la touche SGL/CNT
(17) de l’appareil en question.
Commencez la lecture sur un des deux lecteurs CD.
Une plage de chaque CD sera reproduite alternativement. Vous pouvez toujours mettre
un nouveau CD dans l’appareil qui est en attente en mode Pause. De cette façon vous
pouvez créer un programme sans fin, l’idéal pour une utilisation dans des tavernes,
etc.
Retirez le câble Relay si vous ne voulez plus utiliser la fonction Relay.
CRÉATION DE BOUCLES:
FRANCAIS MODE D’EMPLOI
JB SYSTEMS® 24/81 MCD200
Pendant qu’une plage du CD est lue, appuyez sur la touche IN/R.CUE(3) pour
programmer le point de départ de la boucle. Appuyez ensuite sur la touche OUT/EXIT
pour programmer le point de fin de boucle. La boucle sans fin se met à jouer
immédiatement. (Avec un peu d’entraînement vous arriverez à créer des boucles
parfaites!) Pendant qu’une boucle est en cours de lecture, vous pouvez appuyer une
nouvelle fois sur la touche OUT/EXIT(4) pour sortir de la boucle et continuer la lecture
normale.
Il est possible de créer une nouvelle boucle, même quand une boucle est toujours en
train de jouer. Pendant que la boucle joue, appuyez simplement sur la touche
IN/R.CUE(3) pour définir le point de départ d’une nouvelle boucle. Entrez ensuite le point
de la fin de la boucle en appuyant sur la touche OUT/EXIT(4). Votre nouvelle boucle est
enregistrée et reproduite.
REDÉMARRER UNE BOUCLE:
Ceci peut être fait de 3 façons:
Quand une boucle est programmée et que vous l’avez quittée en appuyant sur la
touche OUT/EXIT, appuyez juste sur la touche RELOOP pour redémarrer la lecture
de la boucle.
Quand une boucle est programmée et que vous l’avez quittée en appuyant sur la
touche OUT/EXIT, appuyez juste à nouveau sur la touche OUT/EXIT pour redémarrer
la boucle. L’endroit ou vous avez appuyé sur la touche OUT/EXIT est maintenant
programmé comme nouveau point de fin de boucle.
Quand une boucle est lue, appuyez sur la touche RELOOP pour redémarrer la
boucle immédiatement. Vous pouvez répéter cette action plusieurs fois de suite afin
de créer un effet de « bégaiement »
ADAPTER UNE BOUCLE (LOOP EDIT):
Quand une boucle est programmée, appuyez sur la touche RELOOP/STUTTER pendant
environ 2 secondes pour entrer dans le mode d’édition de boucle “loop edit”. Quand une
boucle est lue, le cadran alphanumérique affiche l’information en temps du point de fin
de boucle. Utilisez la grande roue pour définir un nouveau point de fin de boucle. Pour
vous faciliter la tâche vous pouvez entendre vos modifications sur la fin de boucle
continuellement. Quand la boucle est parfaite, appuyez sur la touche LOOP OUT pour
enregistrer le nouveau point de fin de boucle et quitter la boucle.
REMARQUE: Vous pouvez enregistrer des boucles dans les touches HOTCUE. Ainsi vous pouvez avoir
jusqu’à 4 boucles par plage à votre disposition.Au chapitre suivant vous apprendrez comment enregistrer
cesboucles.
ENREGISTRER UN « MASTER CUE POINT »:
Il y a 2 façons pour programmer le point CUE principal:
Appuyez sur la touche IN/R.CUE pendant la lecture normale pour définir un nouveau
point CUE (“CUE volant”).
Mettez le lecteur en Pause et utilisez les roues jog/shuttle pour rechercher l’endroit
exact du nouveau point CUE. Si vous avez repéré l’endroit exact, appuyez sur la
touche “IN/R. CUE” pour enregistrer votre nouveau point CUE. (ou appuyez sur la
touche PLAY/PAUSE)
Une fois ce point CUE enregistré, appuyez juste sur la touche CUE pour le rappeler.
ENREGISTRER UN SIMPLE POINT CUE DANS LES TOUCHES “HOT CUE”:
Appuyez d’abord sur la touche MEMORY(9) pour entrer dans le mode hot CUE memory
(la touche MEMORY s’allume).

FRANCAIS MODE D’EMPLOI
JB SYSTEMS® 25/81 MCD200
Appuyez sur une des quatre touches HOT CUE au bon moment pendant la lecture
normale d’une plage: la touche HOT CUE sur laquelle vous venez d’appuyer devient
rouge pour indiquer que le point CUE est enregistré.
Mettez le lecteur CD en mode pause et utilisez les roues jog/shuttle pour rechercher
l’endroit exact du nouveau point CUE. Si vous avez repéré l’endroit exact, appuyez
sur une des quatre touches HOT CUE pour enregistrer le nouveau point CUE: la
touche HOT CUE sur laquelle vous venez d’appuyer devient rouge pour indiquer que
le point CUE est enregistré.
Dès que ce point CUE est enregistré, il suffit d’appuyer sur la touche HOT CUE pour
démarrer la lecture à partir du point CUE enregistré.
ENREGISTRER UNE BOUCLE DANS LES TOUCHES “HOT CUE”:
Ceci est pratiquement identique à l’enregistrement d’un point CUE. La seule différence
est que vous devez d’abord mettre le MCD200 en mode boucle. Quand une boucle est
lue, appuyez sur la touche MEMORY pour entrer dans le mode Hot Cue Memory (la
touche MEMORY commence s’allume). Après cela, appuyez sur une des quatre touches
HOT CUE: la touche HOT CUE sur laquelle vous venez d’appuyer devient vert pour
indiquer que la boucle qui joue est enregistrée. Vous pouvez enregistrer jusqu’à 4
boucles!
ENREGISTRER LES HOT CUES DANS LA MEMOIRE PERMANENTE:
Pour chaque CD vous pouvez enregistrer jusqu’à 4 points cue et boucles dans la
mémoire permanente interne. Plus tard vous pourrez rappeler ces points cue et ces
boucles quand vous relirez le même CD. Le MCD200 peut garder en mémoire jusqu’à
2048 (512 x 4) points Cue et boucles. Enregistrer le contenu des touches HOT CUE
dans la mémoire permanente interne est très facile: appuyez pendant environ 2
secondes sur la touche MEMORY jusqu’à ce que le cadran affiche “SAVING”. C’est tout!
REMARQUE: Si vousinsérez un autre CD dans le chargeur sans d’abord enregistrer les pointsHOT CUE
actuels dansla mémoirepermanenteinterne,ilsserontperdus.
RAPPELER DES MEMOIRES HOT CUE DE LA MEMOIRE PERMANENTE:
Si vous avez enregistrés des points cue et des boucles pour un CD, vous pouvez les
rappeler quand vous réinsérez le CD plus tard.
RAPPELER: avant de charger le CD, appuyez sur la touche MEMORY jusqu’à ce
qu’elle commence à clignoter et que le cadran affiche “RECALL”. Appuyez ensuite
sur la touche OPEN/CLOSE pour charger le CD. Il faudra patienter quelques
secondes pendant le chargement des touches HOT CUE, pendant ce temps le
cadran affiche “RECALL”. Si l’appareil ne trouve pas de points cue, le MCD200
arrêtera automatiquement le processus de rappel.
NE PAS RAPPELER: insérez le CD comme d’habitude et appuyez sur play. Le
MCD200 ignorera les informations des points cue permanents pour ce CD.
EFFACER LA MEMOIRE DES TOUCHES “HOT CUE”:
Ceci peut être fait de 2 façons:
Programmez un nouveau HOT CUE, le précédent sera effacé.
REMARQUE: n’oubliez pas d’enregistrer les informations des nouveaux points Cue dans la mémoire
permanente!
Mettez un autre CD dans le chargeur, les points HOT CUE seront effacés.
REMARQUE: uniquement la mémoire de touches HOTCUE sera effacée, l’information despoints cue
qui setrouve dansla mémoire permanente seraconservée.
FRANCAIS MODE D’EMPLOI
JB SYSTEMS® 26/81 MCD200
EFFACER ENTIEREMENT LA MEMOIRE INTERNE:
Tournez le bouton SEARCH (1) vers la gauche et gardez le dans cette position pendant
que vous allumez le MCD200: la mémoire cue permanente sera effacée. Pendant cette
action le cadran affiche “clearALL”.
ATTENTION: CETTE ACTION EST IRREVERSIBLE, TOUS LES POINTS CUE / BOUCLES SERONT
EFFACES!!!
PITCH BENDING:
Cette fonction est utilisée pour synchroniser parfaitement les beats des 2 CD. Ceci peut
être fait de 2 façons:
Touches PITCH BEND : La vitesse augmente ou diminue tant que vous tenez les
touches PITCH BEND+ ou PITCH BEND- enfoncées.
JOG WHEEL: Pendant la lecture le JOG WHEEL changera temporairement la
vitesse. En tournant la roue dans le sens des aiguilles d’une montre la vitesse
augmentera. En tournant en sens inverse, la vitesse diminuera. La valeur du
changement de vitesse est déterminée par la vitesse de rotation de la roue.
PARAMETRE DE PITCH BEND
Le paramètre de pitch bend détermine l'impact de la molette sur la fonction de pitch
bend. Le lecteur de CD est livré avec le paramètre de pitch bend réglé sur 50. Vous
pouvez ajuster le paramètre de 001 (impact très faible) à 100 (impact très important) afin
d'adapter parfaitement la fonction de pitch bend à vos goûts personnels. Voici comment
changer ce paramètre :
Appuyez sur le bouton TIME (16) jusqu'à ce que le display alphanumérique (20)
affiche la valeur de paramètre suivante : BEND xxx (“xxx” représente la valeur)
Changez le paramètre avec la grosse molette (20) et appuyez brièvement sur le
bouton TIME (16) pour confirmer le nouveau paramètre.
Essayez le nouveau réglage du paramètre de pitch bend pour voir s'il fonctionne bien :
Si le nouveau paramètre n'est pas bon : recommencez la procédure pour fixer une
autre valeur.
Si le nouveau paramètre est bon : appuyez sur le bouton MEMORY (9) jusqu'à ce
que le display affiche le message 'SAVING' afin d'enregistrer ce nouveau réglage
parmi les réglages permanents de l'appareil. A partir de ce moment, le nouveau
paramètre de pitch bend sera préservé, même lorsque l'on mettra le lecteur CD hors
tension.
CD-TEXT:
Il n’y à pas que les fichiers MP3 qui peuvent contenir des informations affichables à
l’écran. Certains CD audio contiennent un texte CD qui montre le titre des plages.
Certains logiciels de gravure pour CDR (par ex. Nero) permettent d’ajouter un texte CD
sur un CD audio normal. Quand le lecteur détecte ces informations de texte CD, ils
seront automatiquement affichés à l’écran. Si aucun texte n’est disponible, “no CD-
TEXT” sera affiché à l’écran.
LECTURE DES FICHIERS MP3:
Le lecteur CD détecte automatiquement si un CD contient des fichiers MP3. Le MCD200
est capable de lire différents formats MP3. Le cadran affiche quelques-uns des ID3-tags
(titre / artiste / nom du dossier / taux de transfert). Le CD peut contenir jusqu’à 999
fichiers MP3, répartis dans maximum 255 dossiers.
Les fichiers MP3 peuvent avoir les extensions de fichier suivants: .mp3 ~ .MP3 ~ .mP3 ~
.Mp3

FRANCAIS MODE D’EMPLOI
JB SYSTEMS® 27/81 MCD200
Consultez les spécifications techniques pour savoir quels fichiers MP3 sont acceptés.
LECTURE DES CD-R et CD-RW:
A part les CD’s audio normaux, le MCD200 peut également lire les CD-R (CD
enregistrable) et les CD-RW (CD réenregistrable). Remarquez que vous devriez toujours
utiliser l’option de gravure “disc at once” et “track at once”! Enregistrer vos CD’s à une
vitesse supérieur à 12x pourrai causer des erreurs de lecture.
Si le disque est gravé avec l’option multi session, il ne jouera que la première session:
Si la première session est en CD-DA vous ne pourrez lire que les pistes CD-DA.
Si la première session est en MP3 vous ne pourrez lire que les fichiers MP3.
SPECIFICATIONS TECHNIQUES
Alimentation: AC 230 V, 50Hz
Consommation: 14,5W
Niveau de sortie: 2,0Vrms +/-0,5dB @ 1kHz, 0dB
Réponse de fréquence: 20-20.000Hz(+/-0,4dB)
Distorsion Harmonique + bruit: 0.005% @ 1kHz,0dB (20kHz LPF)
Rapport Signal/Bruit (IHF-A): >120dB @ 1kHz, 0dB
Temps d’accès court plage suivante: <2sec
Temps d’accès long (plage 1 20): <4sec
LaserPickup: Sony KSM-213C, détection3spot 780nm
Trackingélectronique: Full automatic digital tracking.
FORMAT DISQUE:
Extensionspossibles: .mp3 ~ .MP3 ~ .mP3 ~ .Mp3
Compatibilité ID3 tag: ID3v2 et antérieur
ISO9660: Level1 (max. 8”/8.3” character style)
Level2 (max. 31/30 character style)
Joliet: max. 64/64 character style
CD-ROM sector format: mode-1 only
Max.Directories: 255
Max.Fichiers: 999
FORMATS MP3:
MPEG1 Layer3(ISO/IEC11172-3): mono / stereo sampled at: 32 - 44,1 - 48kHz
Bit rates: 32 – 320Kbps
Bitrate modes: CBR (Constant Bitrate) or VBR (Variable Bitrate)
MPEG2Layer3(ISO/IEC13818-3): mono / stereo sampled at: 16 – 22,05 - 24kHz
Bitrates: 8 – 160 Kbps
Bitrate modes: CBR (Constant Bitrate) or VBR (Variable Bitrate)
MPEG2,5Layer3: mono / stereo sampled at: 8 – 11,025 - 12kHz
Bitrates: 8 – 160Kbps
Bitrate modes: CBR (Constant Bitrate) or VBR (Variable Bitrate)
Dimensions: 348(L) x 106(H) x246(P) mm
Poids: 3,06 kg
Chacune de ces informations peut être modifiée sans avertissementpréalable. Vous pouvez
télécharger la dernière version de ce mode d’emploi de notre site Web: www.beglec.com
NEDERLANDS HANDLEIDING
JB SYSTEMS® 28/81 MCD200
HANDLEIDING
Hartelijk dank voor de aankoop van dit JB Systems®product. Om ten volle te kunnen
profiteren van alle mogelijkheden en voor uw eigen veiligheid, gelieve de aanwijzingen
zeer zorgvuldig te lezen voor U begint het apparaat te gebruiken.
EIGENSCHAPPEN
Volledige MP3 weergave (max. 999 MP3-files / 255 Mappen per CD)
oMPEG1 layer3 (32 + 44,1 + 48kHz)
oMPEG2 layer3 (16 + 22,05 + 24kHz)
oMPEG2.5 layer3 (8 + 11,025 + 12kHz)
Ondersteunt zowel de CBR als de VBR transmissiesnelheden.
Ondersteunt ID3-tags tot en met ID3v2.
Leest CD-DA, CD-R, CD-RW
Antishock geheugen: 10 seconden
Frame opzoeking tot op 1/75sec, eveneens met MP3 files
Digitaal scratch effect via jog wiel
4 Hot Cue toetsen voor het programmeren van cue punten en loops!
Permanent geheugen voor max. 2048 (512 x 4) cuepunten en loops
Naadloos bewerken van de loop in “real-time”!
Volautomatische BPM counter
Pitch Lock (Master Tempo)
Anti-shock memory 10sec.
4 schalen voor de snelheidsregelaar: +/-4% +/-8% +/-16% +/-100% (tot +/-16% voor
MP3 files)
Pitch bend op het jog wiel en via toetsen (synchroniseren van de beats)
Aanpasbare pitch bend parameter voor zeer precieze pitch bending (software V22 en
hoger)
Tot 4 naadloze loops voor 1 track met reloop/stutter
Direct programmeerbare cue (“Cue on the fly”)
Ultra snelle memory start binnen 10msec
Fader start, fader stop, (back cue),
Auto cue functie(-48dB)
Snel zoeken van een passage op 4 snelheden
Alfanumeriek LCD display voor uitlezing van CD-TEXT en MP3 ID3v2 tags.
Verschillende tijdsaanduidingen: verlopen, blijvende en totaal blijvende tijd.
Jog wiel met een speciale rubber bedekking
Single/continuous play
Relay play voor een eindeloze weergave op twee MCD200 spelers.
Digitale S/PDIF uitgang
CD-lade sluit automatisch na 60seconden
Sleep mode (verlengt de levensduur van de laser)

NEDERLANDS HANDLEIDING
JB SYSTEMS® 29/81 MCD200
VÓÓR DE INGEBRUIKNAME
Controleer of de volgende onderdelen in de verpakking zitten:
MCD200 speler
Handleiding
Voedingskabel
Een cinch kabel
Een mono mini-jack kabel voor fader start en relay play
VEILIGHEIDSVOORSCHRIFTEN:
WAARSCHUWING: Om het risico op elektrocutie
zoveel mogelijk te vermijden mag u nooit de
behuizing verwijderen. Er bevinden zich geen
onderdelen in het toestel die u zelf kan herstellen.
Laat de herstellingen enkel uitvoeren door een bevoegde technicus.
De bliksempijl die zich in een gelijkbenige driehoek bevindt is bedoeld om u te
wijzen op het gebruik of de aanwezigheid van niet-geïsoleerde onderdelen met
een “gevaarlijke spanning” in het toestel die voldoende kracht heeft om een risico
van elektrocutie in te houden.
Het uitroepteken binnen de gelijkbenige driehoek is bedoeld om de gebruiker erop
te wijzen dat er in de meegeleverde literatuur belangrijke gebruik en
onderhoudsinstructies vermeld staan betreffende dit onderdeel.
Dit symbool betekent: het apparaat mag enkel binnenhuis worden gebruikt.
Dit symbool betekent: Lees de handleiding!
Stel dit apparaat niet bloot aan regen of vocht, dit om het risico op brand en elektrische
schokken te voorkomen.
Om de vorming van condensatie binnenin te voorkomen, laat het apparaat aan de
omgevingstemperatuur wennen wanneer het, na het transport, naar een warm vertrek is
overgebracht. Condensatie kan het toestel soms verhinderen perfect te functioneren. Het
kan soms zelfs schade aan het apparaat toebrengen.
Gebruik dit apparaat uitsluitend binnenshuis.
Plaats geen stukken metaal en mors geen vocht binnen in het toestel om elektrische
schokken of storing te vermijden. Objecten gevuld met water, zoals bvb. Vazen, mogen
op dit apparaat worden geplaatst. Indien er toch een vreemd voorwerp of water in het
apparaat geraakt, moet U het direct van het lichtnet afkoppelen.
Open vuur, zoals brandende kaarsen, mogen niet op het apparaat geplaatst worden.
Bedek geen enkele ventilatieopening om oververhitting te vermijden.
Zorg dat het toestel niet in een stoffige omgeving wordt gebruikt en maak het regelmatig
schoon.
Houd het apparaat uit de buurt van kinderen.
Dit apparaat mag niet door onervaren personen bediend worden.
De maximum veilige omgevingstemperatuur is 40°C. Gebruik het apparaat dus niet bij
hogere temperaturen.
Trek altijd de stekker uit wanneer het apparaat gedurende langere tijd niet wordt gebruikt
of alvorens met de onderhoudsbeurt te beginnen.
CAUTION
NEDERLANDS HANDLEIDING
JB SYSTEMS® 30/81 MCD200
De elektrische installatie behoort uitsluitend uitgevoerd te worden door bevoegd
personeel, volgens de in uw land geldende regels betreffende elektrische en
mechanische veiligheid.
Controleer dat de beschikbare spanning niet hoger is dan die aangegeven op de
achterzijde van het toestel.
Het stopcontact zal steeds vrij toegankelijk blijven zodat de stroomkabel op elk moment
kan worden uitgetrokken.
De elektrische kabel behoort altijd in uitstekende staat te zijn. Zet het apparaat
onmiddellijk af als de elektrische kabel gekneusd of beschadigd is.
Laat de elektrische draad nooit in contact komen met andere draden.
Als de netschakelaar zich in OFF (uit) positie bevindt dan is dit apparaat niet volledig van
het lichtnet gescheiden!
Om elektrische schokken te voorkomen, moet U de behuizing niet openen. Afgezien van
de zekering zitten er geen onderdelen in die door de gebruiker moeten worden
onderhouden.
Repareer nooit een zekering en overbrug de zekeringhouder nooit. Vervang een
beschadigde zekering steeds door een zekering van hetzelfde type en met dezelfde
elektrische kenmerken.
Ingeval van ernstige problemen met het bedienen van het toestel, stopt U onmiddellijk
het gebruik ervan. Contacteer uw dealer voor een eventuele reparatie.
Gebruik best de originele verpakking als het toestel vervoerd moet worden.
Om veiligheidsredenen is het verboden om ongeautoriseerde modificaties aan het
toestel aan te brengen.
INSTALLATIEVOORSCHRIFTEN:
Plaats dit apparaat in een goed geventileerde ruimte waar het niet blootgesteld is aan
hoge temperaturen of vocht.
Het plaatsen en het gebruik van dit apparaat gedurende een lange periode in de
nabijheid warmtebronnen zoals versterkers, spots, enz. zal zijn werking beïnvloeden.
Zorg, bij inbouw in een vaste installatie of flightcase, voor een goede ventilatie om de
warmte optimaal te kunnen afvoeren.
Zorg ervoor, om inwendige vorming van condensatie te voorkomen, dat de mengtafel
zich na transport kan aanpassen aan de warme binnentemperatuur. Condensatie kan de
goede werking soms verhinderen.
REINIGEN VAN DE CD SPELER:
Reinig het toestel met een zacht, lichtjes bevochtigd doek. Vermijd water te morsen in het
toestel. Gebruik nooit vluchtige producten zoals benzeen of thinner, dit kan het toestel
beschadigen.
AANSLUITINGEN
Gebruik de meegeleverde cinch kabel om de audio uitgang van de CD speler te
verbinden met de CD ingangen van uw mengtafel.
Verbind eveneens de fader start kabel indien uw audio mixer voorzien is van fader start
aansluitingen. (Synq® SMX-1 of Pioneer® compatibel)
Verbind de voedingskabel.
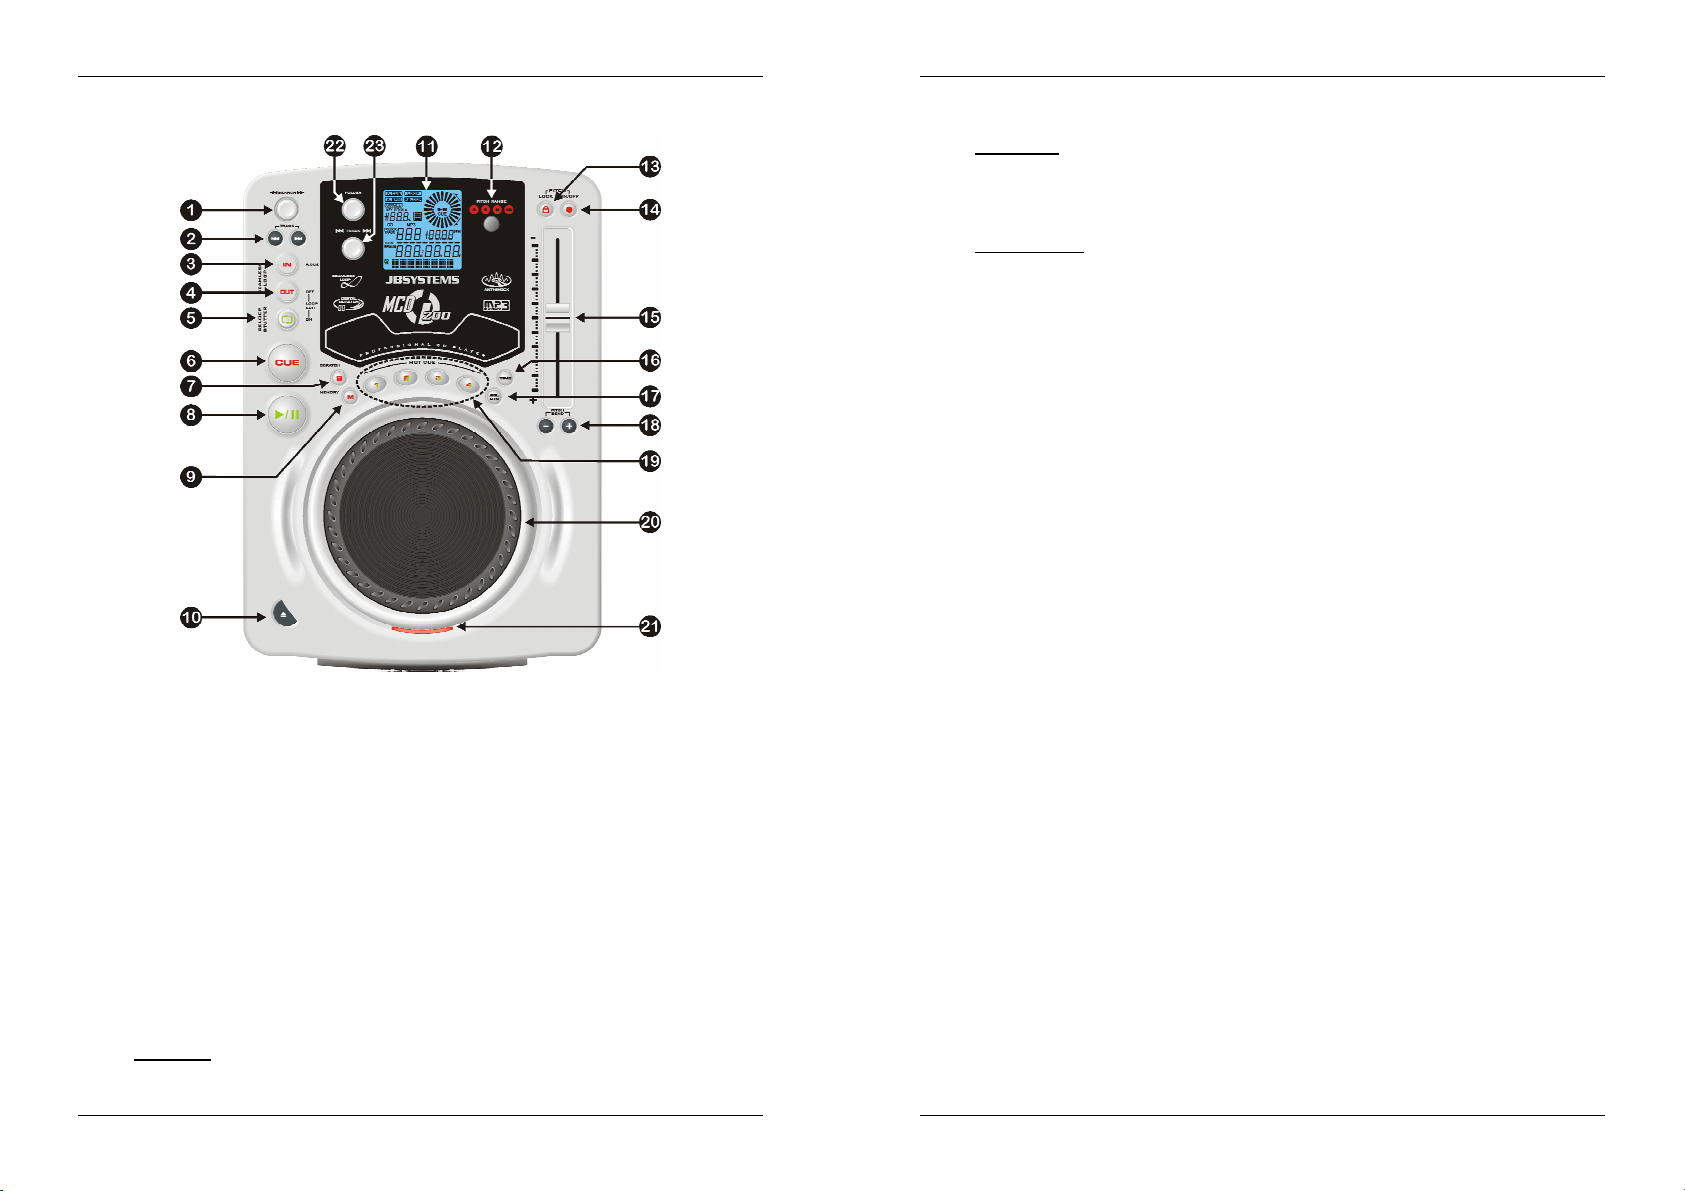
NEDERLANDS HANDLEIDING
JB SYSTEMS® 31/81 MCD200
BEDIENING EN FUNCTIES
1. SEARCH knop: Deze knop heeft 4 voorwaartse en 4 achterwaartse snelheidsposities
voor het snel opzoeken van muziekfragmenten. Hoe verder u de knop in elke richting
draait, hoe vlugger u door de muziek heen gaat.
2. TRACK SEARCH Toetsen: Deze toetsen worden gebruikt om een bepaald nummer
op de CD te kiezen. Voorwaarts & achterwaarts verspringen.
3. IN/R.CUE toets: Laat u toe het Cue punt in te stellen zonder de weergave van de CD
te stoppen (CUE ON THE FLY). Deze toets bepaalt ook het beginpunt van een
naadloze Loop. Wanneer u op één van de hot cue(19) toetsen drukt wordt het
startpunt ook gekopieerd naar deze toets.
4. OUT/EXIT toets: Wordt gebruikt om het eindpunt van een Loop te bepalen. De CD
speler start het afspelen van de naadloze Loop tot wanneer u terug op deze toets drukt
om de Loop te verlaten. Wanneer een Loop geprogrammeerd is maar niet afgespeeld
wordt kan men zo ook het aflezen van de Loop herstarten. De plaats in het nummer
waar u op deze toets gedrukt heeft zal opgeslagen worden als nieuw eindpunt van de
Loop. Als u op deze toets drukt wanneer de speler in “loop edit mode” staat dan stopt
u het bewerken van de loop en wordt het huidige eindpunt van de loop opgeslagen als
nieuw eindpunt.
5. RELOOP/STUTTER toets: Deze toets heeft 3 functies:
RELOOP: Als een loop geprogrammeerd was en u hebt op de OUT/EXIT toets (4)
gedrukt, druk dan op de Reloop toets om de loop opnieuw te starten. Druk op de
NEDERLANDS HANDLEIDING
JB SYSTEMS® 32/81 MCD200
OUT/EXIT(4) toets om de Loop terug te verlaten. (start en eindpunt van de Loop
blijven onveranderd)
STUTTER: Wanneer een loop afgespeeld wordt kunt u op deze toets drukken om
de loop onmiddellijk te herstarten. U kunt ook op deze toets drukken wanneer een
nummer geen loop afspeelt. Telkens u op de RELOOP/STUTTER toets drukt
herstart de muziek vanaf het geprogrammeerd Cue punt. Het stotter effect (stutter)
laat u toe extra creatief te zijn.
LOOP EDIT: wanneer een loop geprogrammeerd is, druk dan op de
RELOOP/STUTTER toets gedurende ongeveer 2 seconden om de “loop edit”
modus in te schakelen. U kunt nu het eindpunt van de loop veranderen. Raadpleeg
hoofdstuk “Hoe gebruiken…” voor meer informatie.
6. CUE toets: Als u op de CUE toets drukt tijdens de weergave, dan veroorzaakt dit een
onmiddellijke terugkeer naar de positie waar de weergave gestart werd. De weergave
start onmiddellijk vanaf het geprogrammeerde Cue punt, en duurt verder zolang de
CUE toets ingedrukt blijft. De CD speler springt terug naar het Cue punt zodra de CUE
toets losgelaten wordt. Wanneer het toestel in pauze modus staat (Play/Pause LED
knippert) kan het Search en/of het Jog wiel gebruikt worden om een ander startpunt te
kiezen. Door op de "PLAY/PAUSE" toets en nadien op de "CUE" toets te drukken kunt
u dit nieuwe Cue punt bevestigen.
7. SCRATCH toets: hiermee zet U de MCD200 in scratch mode. U kan nu eender welk
nummer op de CD digitaal scratchen alsof het een vinyl plaat is. U kan de scratch
functie zowel in play als in pause gebruiken:
In play mode: De muziek speelt normaal tot U het grote jog wiel(20) beweegt.
Het scratch effect is hoorbaar zolang U het jog wiel(20) snel vooruit en achteruit
beweegt. Zodra U het wiel niet meer beweegt speelt de muziek verder vanaf het
punt waar de laser zich op dat ogenblik bevindt.
In pause mode: zolang het jog wiel(20) niet beweegt, hoort U niets. Zodra U het
jog wiel(20) snel voorwaarts en achterwaarts beweegt is het scratch effect
hoorbaar. Zodra U het jog wiel stopt zal de muziek stoppen en wacht de speler in
pauze.
TIP: tijdens de scratch mode kan U de PLAY/PAUSE toets(8) indrukken om tussen play en pause om te
schakelen.
8. PLAY/PAUSE toets: Telkens u op de PLAY/PAUSE toets drukt zal de CD speler
overgaan van afspelen naar pauze of van pauze naar afspelen. De toets knippert
zolang de CD speler in pauze staat.
9. MEMORY toets: wordt gebruikt om Cue punten en Loops op te slaan in de Hot Cue
toetsen(19) en het permanente cue geheugen:
Opslagen in de HOT CUE toetsen: Druk heel even op de MEMORY toets om de
MCD200 voor te bereiden voor het opslaan van een cue punt of een Loop in één
van de 4 HOT CUE toetsen.
Opslagen in het permanente geheugen: Druk op de MEMORY toets tot deze
begint te knipperen en “SAVING” op het LCD scherm verschijnt. De inhoud van
de HOT CUE toetsen voor deze CD worden opgeslagen in het permanente
geheugen.
Kijk verder in deze handleiding om te leren hoe U dit juist doet.
10. OPEN/CLOSE toets: gebruik deze toets om de CD lade vooraan de MCD200 te
openen of te sluiten. Deze toets kan niet gebruikt worden tijdens het afspelen van een
CD. Indien de lade niet gesloten wordt, zal deze na 60sec. automatisch sluiten om
schade te voorkomen.
11. LCD scherm: toont alle belangrijke informatie tijdens het afspelen van een CD. Verder
in deze handleiding worden alle onderdelen van de display besproken.

NEDERLANDS HANDLEIDING
JB SYSTEMS® 33/81 MCD200
12. PITCH RANGE toets: Telkens als U deze toest indrukt wordt de schaal van de
snelheidfader(15) aangepast. Voor gewone audio CD’s kunt u +/-4%, +/-8%, +/-16%
en +/-100% kiezen. De +/-100% optie kan niet gebruikt worden met MP3 CD’s.
13. PITCH LOCK toets: (Master tempo) activeert de Pitch Lock functie. Deze functie laat
u toe de snelheid van een nummer te regelen door middel van de Pitch Control
schuifregelaar, zonder de toonhoogte te wijzigen. Deze toets wordt rood wanneer de
Pitch Lock ingeschakeld is.
TIP: U moet weten dat de pitch lock functie zijn technische grenzen heeft. Vanaf een bepaalde
snelheidsafwijking (afhankelijkvan de muziekstijl) zalde pitch lockniet meer correctwerken.Eersthoort
U een kleine vervorming die steeds groter naarmate de snelheidsafwijking toeneemt. Dit is daarom
echter niet direct een: bij erg lage snelheden kan U deze vervorming perfect als een soort
“vervormingseffect”gebruiken!
14. SPEED toets: Deze toets wordt gebruikt om de snelheidsregeling aan te zetten of uit
te schakelen.
15. SPEED schuifregelaar: Druk op de SPEED toets(14), zodat deze aan is. De snelheid
kan bijgeregeld worden tot +/-100% door de schuifregelaar te verzetten. De snelheid
zal niet veranderen als de SPEED toets(14) uit staat. U kunt het bereik van de
snelheidsverandering instellen met de toets PITCH RANGE (12)
16. TIME toets: De TIME toets laat u toe over te schakelen naar het weergeven van de
reeds verstreken tijd, de resterende tijd van het nummer of de totaal resterende tijd
van de CD. (standaard = resterende tijd van het nummer)
De total resterende tijd van de CD is niet beschikbaar bij MP3 CD’s.
De TIME toets wordt tevens gebruikt om de pitch bend parameter van het jog wiel in
te stellen. Zie “Pitch bend parameter” in het hoofdstuk “Hoe gebruiken
17. SGL/CTN: U kunt kiezen tussen “single track mode” en “continuous play”. Tevens is
het ook mogelijk om de “auto cue” functie (-48dB) aan/uit te schakelen.
Continuous play: de volledige CD zal afgespeeld worden zonder onderbreking.
(meestal gebruikt in taverne’s)
Single track: de CD speler stopt aan het einde van elk nummer en wacht op de
eerste muzieknoot van het volgende nummer. Dit betekent dat slecht
geïndexeerde CD’s geen hindernis vormen voor de onmiddellijke start-
mogelijkheden van deze CD speler. Dit is een zeer nuttige eigenschap voor
deejays!
Auto Cue on/off: De MCD200 detecteert automatisch de eerste “muzieknoot”
van elk nummer zodat de muziek onmiddellijk start wanneer u op de Play toets
drukt. Om deze Auto Cue functie aan/uit te zetten moet u gedurende ongeveer 2
seconden op de SGL/CTN toets drukken. Er staat “A.CUE” op het scherm
wanneer deze functie ingeschakeld is.
18. PITCH BEND toetsen: De snelheid verhoogt wanneer men op de “+ toets” drukt en
keert weer naar zijn oorspronkelijke snelheid wanneer de toets losgelaten wordt. De
snelheid daalt wanneer men op de “– toets” drukt en keert weer naar zijn
oorspronkelijke snelheid wanneer de toets losgelaten wordt.
19. HOT CUE toetsen: 4 programmeerbare toetsen waarin U zowel gewone cue punten
als loops kan opslagen. Verspreid over de CD kan U dus maximaal 4 loops en/of cue
punten programmeren die U onmiddellijk kan gebruiken.
De toets is niet verlicht: er zijn geen Cue punten opgeslagen.
De toets is rood: een Cue punt is opgeslagen
De toets is groen: er is een Loop opgeslagen
Indien u dat wenst dan kunt u de inhoud van deze HOT CUE toetsen in het interne
permanente geheugen opslagen. Kijk verder in deze handleiding om te leren hoe U de
HOT CUE toetsen gebruikt.
NEDERLANDS HANDLEIDING
JB SYSTEMS® 34/81 MCD200
OPMERKING: Wanneer u een andere CD in de CD lader steekt zonder eerst de huidige HOT CUE
geheugensopteslaaninhetinternepermanentegeheugen,danzullendezegegevensverlorengaan.
20. JOG WIEL: Dit grote wiel heeft 3 functies, afhankelijk van de werkmodus:
Met het jog wiel kunt u traag de frames (1/75sec) opzoeken wanneer de CD niet
afgespeeld wordt maar in pauze of op een Cue punt staat. Om een nieuw Cue punt
in te stellen draait u aan het wiel tot u op de juiste plaats bent, daarna drukt u op de
PLAY(8) of LOOP IN(3) toets. Druk vervolgens op CUE(6) om naar het ingegeven
“CUE PUNT” terug te keren .
Tijdens de weergave van een nummer kan men met het jog wiel de snelheid van de
weergave tijdelijk verhogen door het wiel in wijzerzin te draaien of verlagen door het
wiel in tegen wijzerzin te draaien tot +/-100%. De waarde van de
snelheidsverandering wordt bepaald door de snelheid van de rotatie van het wiel.
(dit is een alternatief voor de PITCH BEND toetsen (18)
In scratch mode gebruikt U dit wiel om het afspelen van de track te beïnvloeden. Op
deze manier kan U de muziek op de CD scratchen alsof het een gewone vinyl plaat
is.
21. CD LADE INDICATOR: licht op als er geen CD aanwezig is, als de CD lade open is of
zich klaar maakt om zich te openen.
22. FOLDER KEUZEKNOP: als uw CD MP3 mappen bevat dan kunt u deze selecteren
door eenvoudigweg aan deze FOLDER keuzeknop te draaien. Op het LCD scherm
ziet u het nummer + de naam van de map. De naam van de map wordt onmiddellijk
weergegeven wanneer u even op de FOLDER keuzeknop drukt. In het volgende
hoofdstuk vindt u meer informatie over het gebruik van mappen. Als de CD geen
mappen bevat, dan wordt deze keuzeknop niet gebruikt.
23. TRACK KEUZEKNOP: wordt gebruikt om de nummers van uw CD te kiezen. Als uw
CD MP3 mappen bevat, dan kunt u met de MCD200 op 2 verschillende manieren
werken:
FOLDER MODE: Wanneer de Track keuzeknop in combinatie met de FOLDER
keuzeknop gebruikt wordt, dan kunt u alleen nummers kiezen binnen de
geselecteerde map. Gebruik de FOLDER keuzeknop om een andere map te
kiezen.
TRACK MODE: Druk even op de TRACK keuzeknop om de TRACK modus in te
schakelen: zo kunt u alle nummers van uw CD overlopen, alsof er geen mappen
aanwezig waren. Om de nummers van de CD snel te overlopen (per 10
nummers) moet u op de TRACK keuzeknop drukken terwijl u deze
vooruit/achteruit draait.
24. Audio output: audio uitgang van de CD speler. Gebruik de meegeleverde cinch/cinch
kabel om deze uitgang te verbinden met de CD/line ingang van uw mengtafel.

NEDERLANDS HANDLEIDING
JB SYSTEMS® 35/81 MCD200
25. Digitale uitgang: sluit dit digitale uitgangssignaal (S/PDIF formaat) eventueel aan op
een digitale versterker of een digitale recorder (vb. Mini disc)
26. RELAY Socket: U kan gebruikmaken van de compatible faderstart functie op
sommige mixers of U kan ook 2 MCD200 spelers met elkaar verbinden om zo de relay
functie te activeren.
Relay play: Verbind de relay aansluitingen van beide MCD200 spelers met elkaar
door middle van het bijgeleverde mono mini jack/jack kabeltje. Verder in deze
handleiding wordt beschreven hoe U deze functie gebrukt.
FADER START aansluitingen: wanneer u een mengtafel hebt die uitgerust is
met een fader start functie, verbind de CD speler dan met de fader start
aansluitingen van de mixer door middel van het bijgeleverde mono mini jack/jack
kabeltje. Let er wel op dat deze aansluitingen nooit verbonden worden met één of
andere spanning.
Opgelet: Deze afstandbediening is enkel verenigbaar met een bepaald type mixers (Synq® of
Pioneer®compatibel.) Mixers die beschikken over een start functie die werken met een signaal
datverbondenwordtmetdemassa zullenniet werken.
27. POWER ON/OFF switch: schakelt de MCD200 aan en uit.
28. Mains input: Verbind de CD speler met het 230V AC net door middel van de
meegeleverde voedingskabel.
LCD DISPLAY
1. PLAY: verschijnt tijdens het afspelen van een CD.
2. PAUSE: verschijnt wanneer de CD speler in pause of in cue modus staat.
3. ANTI SHOCK EN BUFFER INDICATOR: De staat van het geheugen wordt op het
scherm weergegeven door middel van een emmer die gevuld of leeggemaakt wordt.
De emmer zelf geeft aan dat de Instant Start functie beschikbaar is. Als de emmer flitst
is de Instant Start functie niet beschikbaar. Elk segment in de emmer vertegenwoordigt
ongeveer 2 seconden anti shock bescherming.
4. CUE: verschijnt wanneer de CD speler Stand-by staat aan het master cue punt.
NEDERLANDS HANDLEIDING
JB SYSTEMS® 36/81 MCD200
5. PITCH DISPLAY: toont de actuele snelheidsafwijking zoals deze ingesteld werd met
de snelheidsfader(15).
6. TIME BAR: toont u ofwel de verstreken tijd, ofwel de resterende tijd, afhankelijk van de
keuze die gemaakt werd door middel van de TIME toets(16). De Time Bar begint te
knipperen aan het eind van elk nummer om de gebruiker te verwittigen dat het hoog tijd
is om tot de actie over te gaan.
7. FRAME: Geeft de tijdsinformatie van het lopende nummer weer in “frames”.
(1 frame = 1/75th sec.)
8. SECOND: Geeft de tijdsinformatie van het lopende nummer weer in “seconden”.
9. MINUTE: Geeft de tijdsinformatie van het lopende nummer weer in “minuten”.
10.ELAPSED, TOTAL REMAIN: toont aan dat de tijd die weergegeven is op het scherm
de verstreken tijd (elapsed), de totaal resterende tijd van de CD (total) of de resterende
tijd van het nummer (remain) is.
11.RELOOP: verschijnt wanneer er voordien al een Loop werd geprogrammeerd voor de
CD. U kunt terugkeren naar deze Loop door op de Reloop toets(5) te drukken.
12.LOOP: wijst u erop dat een loop wordt uitgelezen.
LOOP knippert: een Loop is geprogrammeerd en wordt afgespeeld.
LOOP blijft aan: een Loop is geprogrammeerd maar wordt niet afgespeeld.
13.SINGLE: verschijnt wanneer men gekozen heeft om slechts één nummer te lezen.
Wanneer Single niet verschijnt, zal de CD speler de volledige CD lezen zonder
onderbreking. Deze functie wordt ingesteld door middel van de SGL/CTN toets(17).
14.TRACK / FOLDER: Toont het track of folder nummer.
15.POSITIE MARKERING: geeft de afspeelpositie in frames aan: een volledige
omwenteling op de display komt overeen met 72 frames. De markering beweegt in
wijzerzin bij het voorwaarts afspelen en in tegen wijzerzin bij het achterwaarts afspelen
van de muziek. In pauze stopt de markering.
16.AUTO CUE: Op het LCD scherm staat “A.CUE” wanneer de auto cue functie
ingeschakeld is.
17.AUTO BPM: Deze indicator duidt aan dat de automatische beat counter werkt.
18.PITCH LOCK: wanneer Master Tempo ingeschakeld is dan verschijnt er op de display
een klein “slot” wat betekent dat de pitch van de muziek vergrendeld is.
19.CD/MP3: duidt aan of u een gewone audio CD of een MP3 CD opgeladen hebt.
20.ALFANUMERISCHE DISPLAY: Toont de namen van de mappen en de MP3 files. Als
de MP3 files in CBR opgenomen zijn, dan wordt ook de transmissiesnelheid
weergegeven. Voor in VBR opgenomen MP3 files wordt alleen “VBR” weergegeven.
Als normale audio CD’s CD-TEXT informatie bevatten dan wordt deze ook getoond.
Als er geen CD-TEXT informatie gevonden wordt dan toont het scherm “no CD-TEXT”.
Ook allerlei interactieve informatie en vragen worden hier weergegeven.
21.BPM: hier leest U het aantal Beats Per Minuut af, afkomstig van de automatische
beatcounter.
HOE GEBRUIKEN …
De meeste algemene functies worden uitgelegd in het voorgaande hoofdstuk “controle en
functies” In dit hoofdstuk spreken we over de functies die wat meer uitleg nodig hebben.
SLEEP MODE:
De CD speler zet na 15 minuten inactiviteit automatisch de motor en de laser uit
(wanneer in pauze of in cue modus). Dit verlengt de levensduur van de motor en de
laser. Tijdens de Sleep Mode wordt het woord “SLEEP” weergegeven op het scherm.
Table of contents
Languages:
Other JB Systems Light MP3 Player manuals


