manuals.online logo
Brands
  1. Home
  2. •
  3. Brands
  4. •
  5. JBJ
  6. •
  7. Aquarium
  8. •
  9. JBJ Reaction HOB User manual

JBJ Reaction HOB User manual

Reaction HOB
Hang-On-Back Aquarium Power Filter
Parts Diagram & Identification
Quick Installation
Features
HB-05
Notice
Unpack your new Reaction HOB Power Filter. Inspect all its
components and confirm all parts are included before using.
Report any damages or missing components to:
Toll Free: (877) 374 9981
Email: [email protected]
1. Tightly assemble the U-shaped inlet pipe, extension tube,
and inlet prefilter.
2. Mount the inlet pipe assembly onto the filter’s main body
with the regulation valve facing outward.
3. Place filter media inside the reservoir chamber of the filter’s
main body.
4. Mount the filter onto your aquarium and use the leveling
wheel on the bottom of the main body to stabilize the filter
parallel to your aquarium.
5. Fill the filter with water and adjust the regulation valve to
maximum flow (curved edge facing right).
6. Slide the filter cover over the regulation valve ensuring the
guide notches line up with the on the main body slots.
7. Ensure there is enough slack in the power cable to create a
drip-loop BEFORE plugging the filter into an electrical
socket.
8. Turn on the filter and adjust the flow rate to the ideal
setting for your aquarium.
1. Always unplug Reaction HOB power filter before inspecting
or disassembling for any reason.
2. For best results, disassemble filter and clean it monthly.
1. JBJ Reaction Power Filters hang compactly on the back of
your aquarium, keeping your aquascape in focus.
2. Works to reduce particulates in aquarium using a
combination of fine and coarse sponge filters.
3. The waterfall-style flow of water helps diffuse CO2 and
circulate oxygen throughout the aquarium.
Filter Sponge
Bio Filter Sponge
Flow Control Valve
Filter Body Power Head
Power Cord
Filter Cover
Inlet U-Pipe
Leveling Wheel
Inlet Tube
Inlet Prefilter
Limited Warranty
Safety Instructions
DANGER - TO AVOID POSSIBLE ELECTRICAL SHOCK.
Special care should be taken to avoid possible electric shock, since water is
employed in the use of aquarium equipment. Do not attempt any repairs by
yourself; return the appliance to an authorized service facility for service, or
discard the appliance.
1. If the appliance falls into water, DON’T reach for it! First, unplug it and then
retrieve it. If electrical components of the appliance get wet, unplug the
appliance immediately.
2. Carefully examine the appliance after installation. Unplug the appliance if
there is water on parts not intended to get wet.
3. Do not operate any appliance if it has a damaged cord or plug, or if it is
malfunctioning, or if it has been dropped or
damaged in any manner.
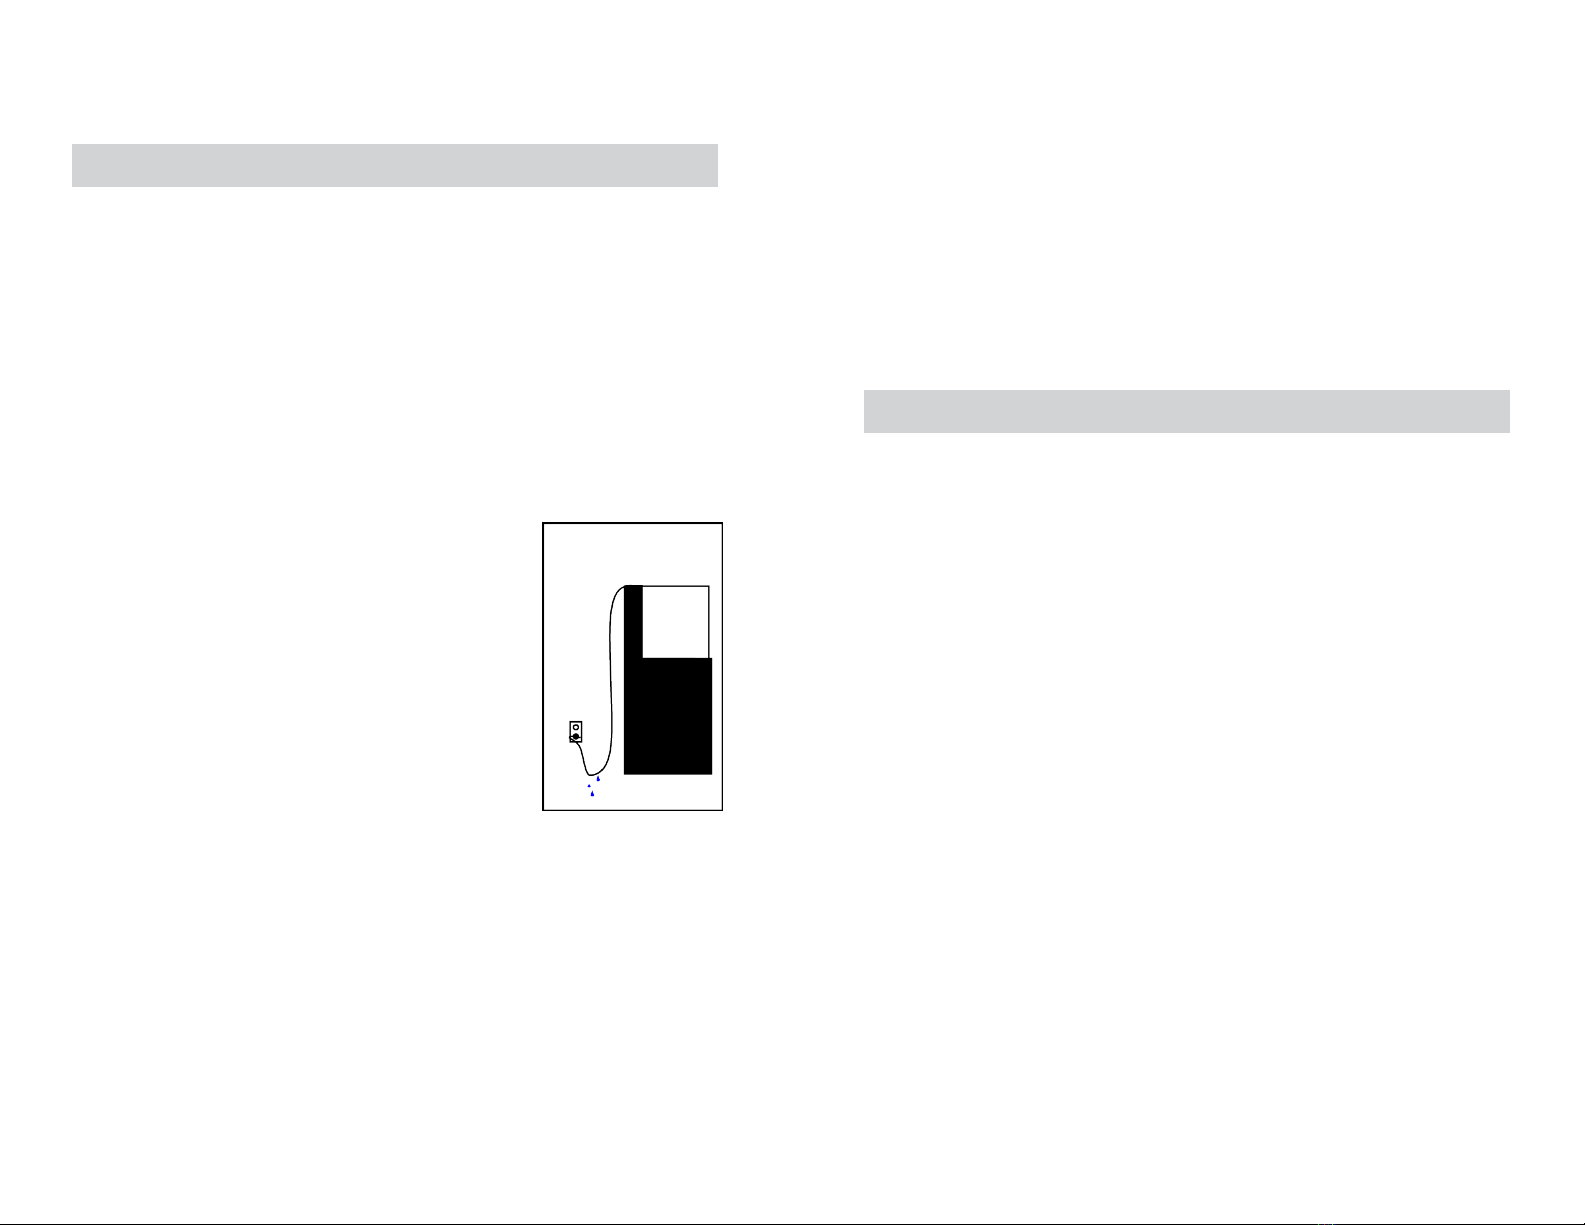
4. Arrange a “drip loop” for each cord connecting an
aquarium appliance to an outlet. The “drip loop” is
the part of the cord below the level of the outlet
that prevents water from traveling along the cord
and coming in contact with the outlet.
5. If the plug or outlet should get wet, do not unplug
the cord. Disconnect the fuse or circuit breaker that
supplies power to the appliance. Once the power
has been disconnected, unplug the cord and
examine it for the presence of water in the outlet.
6. Always unplug the appliance from an outlet when it
is not in use. Also unplug it before cleaning, and
prior to disconnecting or attaching parts. Never yank the cord to pull the
plug from the outlet. Grasp the plug and pull to disconnect.
7. The filter is designed to operate while filled with water. If the filter runs
“dry” over an extended period of time, the motor should be examined to
determine if its plastic surfaces have warped or melted. If so, replace the
motor.
8. Do not use an appliance for anything other than its intended use. Do not use
attachments that are not recommended or sold by the manufacturer; they
may cause an unsafe condition.
9. Do not install or store the appliance where it will be exposed to the weather
or to temperatures below freezing.
10. Make sure the appliance is securely installed before operating it.
6 Month Limited Warranty
Reaction HOB filters are warrantied to the original purchaser against defective
material and workmanship for 6 months from the date of original purchase.
This warranty is valid only under the following conditions: additions, modifica-
tions, or changes made to the product by the purchaser and not by the
manufacturer shall void this warranty. Damages brought on by abuse, misappli-
cation, or mishandling also voids this warranty.
This warranty is limited to the repair or replacement of the product at the
discretion of the manufacturer. This warranty does not cover personal injury,
property loss, including livestock or damage (direct, incidental, or consequen-
tial) arising out of use of this product. This warranty gives you specific rights
and you may also have other rights, which may vary from state to state.
A proof of purchase from an authorized dealer must be provided when making
a warranty claim.
Upon discovery of a defect, please call us to obtain an RMA #.
Tel: (310) 672-4099
Tel: (310) 672-4021
All claims should be sent prepaid to the following address:
Transworld Aquatics Enterprises, Inc.
3730 W Century Blvd, Ste. 3
Inglewood, CA 90308
Register your product online at www.jbjaquariums.com/register
11. This appliance has a polarized plug (one blade is wider than the other).
As a safety feature, this plug will fit in a polarized outlet only one way. If
the plug does not fully fit into the outlet, reverse the plug. If it still does
not fit, contact a qualified electrician. Never use with an extension cord
unless the plug can be fully inserted. Do not attempt to defeat this safety
feature.
12. To avoid injury, do not touch hot or moving parts.
13. Read and observe all notices on the appliance.
14. Supervise children closely when they are near or using the appliance.

Other JBJ Aquarium manuals

JBJ Arctica Aquarium Series User manual

JBJ

JBJ Arctica Aquarium Series User manual

JBJ HB-15 User manual

JBJ

JBJ HB-15 User manual

JBJ Nano RL User manual

JBJ

JBJ Nano RL User manual

JBJ NANO-CUBE 6g User manual

JBJ

JBJ NANO-CUBE 6g User manual

JBJ Maxum Air MX-1000 User manual

JBJ

JBJ Maxum Air MX-1000 User manual

Popular Aquarium manuals by other brands

Innovative Marine AUQA Gadget BioSkim DC user guide

Innovative Marine

Innovative Marine AUQA Gadget BioSkim DC user guide

Newa More NMO 20 CRNE Instructions and warranty

Newa

Newa More NMO 20 CRNE Instructions and warranty

Fluval FLEX user manual

Fluval

Fluval FLEX user manual

Ultra Reef UZ-120 instruction manual

Ultra Reef

Ultra Reef UZ-120 instruction manual

TMC aquaGro CO2 Compact Diffusers manual

TMC

TMC aquaGro CO2 Compact Diffusers manual

EHEIM professionel5e 450 operating instructions

EHEIM

EHEIM professionel5e 450 operating instructions

Aquatlantis Aqua Tower 96 operating manual

Aquatlantis

Aquatlantis Aqua Tower 96 operating manual

Deltec PF 501 Operating instructions and spare parts list

Deltec

Deltec PF 501 Operating instructions and spare parts list

Newa FRESH DAYLIGHT Instructions and warranty

Newa

Newa FRESH DAYLIGHT Instructions and warranty

juwel RIO 350 instruction manual

juwel

juwel RIO 350 instruction manual

Ferplast CAYMAN SCENIC Series user manual

Ferplast

Ferplast CAYMAN SCENIC Series user manual

Marineland Eclipse Three Quick setup guide

Marineland

Marineland Eclipse Three Quick setup guide

JBL JBL PROFLORA CO2 REGULATOR BASIC manual

JBL

JBL JBL PROFLORA CO2 REGULATOR BASIC manual

EcoSystem Aquarium MIRACLE MUD PRO Series owner's manual

EcoSystem Aquarium

EcoSystem Aquarium MIRACLE MUD PRO Series owner's manual

Aquadistri BlueMarine Reef 350 instruction manual

Aquadistri

Aquadistri BlueMarine Reef 350 instruction manual

Deltec KM 500 Operating instructions and spare parts list

Deltec

Deltec KM 500 Operating instructions and spare parts list

CIANO AQUA 60 Assembly guide

CIANO

CIANO AQUA 60 Assembly guide

AquaScape 84074 installation instructions

AquaScape

AquaScape 84074 installation instructions

manuals.online logo
manuals.online logoBrands
  • About & Mission
  • Contact us
  • Privacy Policy
  • Terms and Conditions

Copyright 2025 Manuals.Online. All Rights Reserved.