jcb JCB-MS-ST-NA User manual

ORIGINAL INSTRUCTIONS
EN
JCB-MS-ST-NA
Original Instructions
IM-MS-ST-NA-EN
Iss: 09/2019

2JCB-MS-ST-NA
Instruction & User Manual
GENERAL WARNINGS
To reduce the risk of injury, the user must read the instruction manual.
This symbol is used throughout this manual to warn the user about potential
risks. Please read & understand these sections before using the device.
Personal Protective Equipment (P.P.E.), such as ear defenders, eye protection,
safety gloves and a dust mask, must be worn during the operation of the
device.
WARNING: Drilling, sawing, sanding or machining wood products can
expose you to wood dust, a substance known to the State of California
to cause cancer. Avoid inhaling wood dust or use a dust mask or other
safeguards for personal protection. For more information go to www.
P65Warnings.ca.gov/wood.

3
JCB-MS-ST-NA
Instruction & User Manual
Contents
SAFETY WARNINGS 4
COMPONENT LIST 5
TECHNICAL DATA 6
OPERATING INSTRUCTIONS 7
Intended Use 7
Before starting the equipment 7
ASSEMBLY AND OPERATION 8
Cleaning, maintenance, storage and transport 11
WARRANTY STATEMENT 12

4JCB-MS-ST-NA
Instruction & User Manual
SAFETY WARNINGS
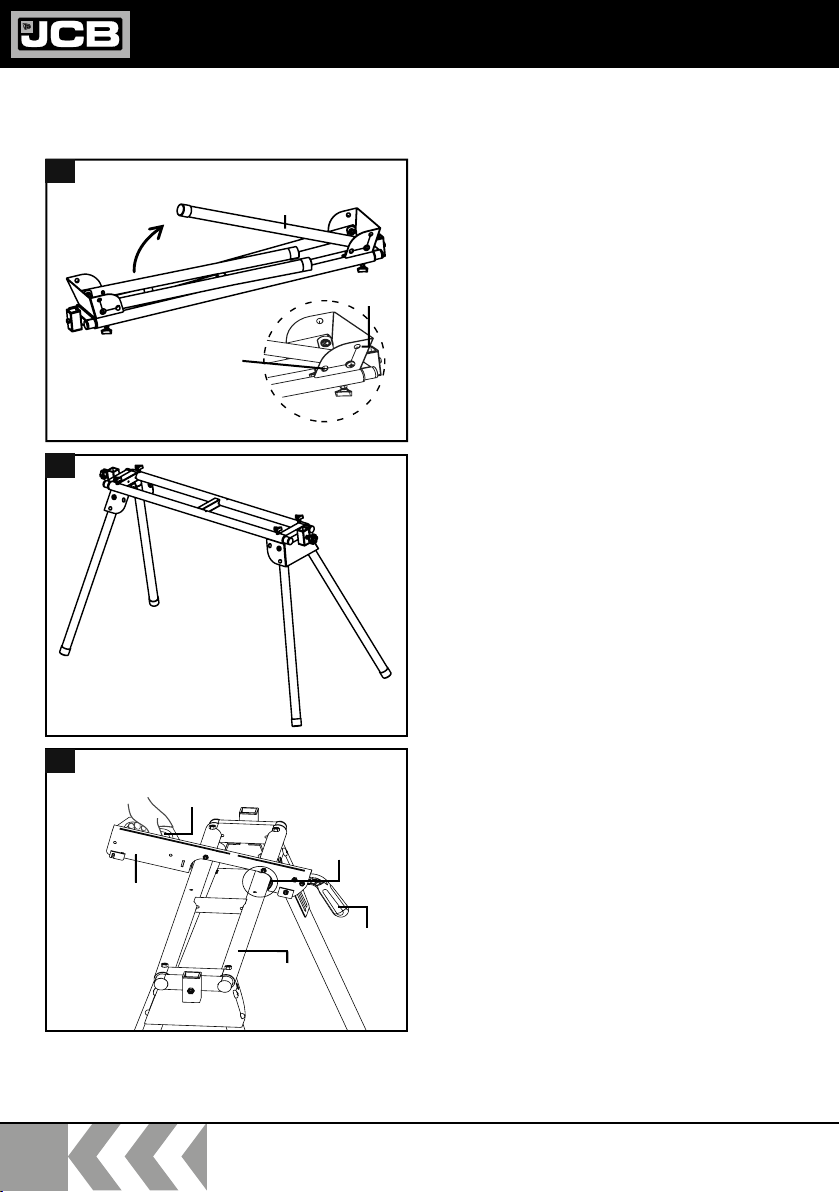
m Use the mitre saw stand only in
conjunction with suitable electric
power tools!
m Check the mitre saw stand for
damage each time before use.
Electric power tools shall not be
mounted or operated on damaged
support arms / crossbars.
m Electric power tools must be bolted
to the support arms / crossbars and
be secured on the mitre saw stand in
accordance with the manufacturers
instructions.
m Do not use the stand on uneven
surfaces. The stand is designed to be
used on a stable flat surface.
m Do not use on a slippery surface. The
stand load capacity is greatly reduced
if used on a slippery surface.
m Always ensure the mitre saw stand is
secure when setting it up.
m Always ensure that you assume a
natural and safe standing position
when working.
m Do not use the mitre saw stand for
purposes for which it is not intended.
m Modifications or unauthorised
changes to the mitre saw stand as
well as the use of unapproved parts is
forbidden.
m All parts of the mitre saw stand,
including any safety devices, must
be correctly mounted in order to
guarantee trouble-free operation.
m Keep the mitre saw stand out of
reach of children. Store the device
in a location that is inaccessible to
unauthorised persons and children.
m Do not exceed the maximum working
load specified on the product label. It
is unsafe to climb, sit or stand on the
table.
ATTENTION!
When using electric power tools, in
conjunction with the mitre saw stand, the
respective machine-specific safety measures
must be implemented as protection against
electric shock, and the risk of injury or fire.
Read all of the instructions for the electric
power tool that you intend to mount and
operate before using the tool.
Safety instructions for the electric device
mounted must likewise be observed. Store
these safety instructions safely.
Observe all safety instructions. If you disregard
the safety instructions, you endanger yourself
and others.
Never place your fingers or hands in the
vicinity or in line with the saw blade
WARNING!

5
JCB-MS-ST-NA
Instruction & User Manual
COMPONENT LIST
AMitre saw stand
BSupport arm 2x
CCrossbar 2x
DAdjustable workpiece support 2x
ECoach bolt M6x16 4x
FCoach bolt M6x60 4x
GWasher 6mm 8x
HSpring washer 6mm 8x
INut M6 8x
JStar-grip screw (small) 4x
KStar-grip screw (large) 2x
AB CD
K
J
1
A
BC
D
F
K
E
G
H
I
J
2

6JCB-MS-ST-NA
Instruction & User Manual
TECHNICAL DATA
Dimensions (LxWxH) in mm 1000 - 1650 x 580 x 810 - 910 mm
Table height 750 mm
Height range of the workpiece supports 810 - 910 mm
Width range of the workpiece supports 1000 - 1650 mm
Max. permissible load 200 kg
Weight net / gross 13.3 / 15.1 kg
Dimensions (LxWxH) in inch 40 - 65 x 23 x 32 - 36”
Table height 30”
Height range of the workpiece supports 32 - 36”
Width range of the workpiece supports 40 - 65”
Max. permissible load 440 lb
Weight net / gross 29.3 / 33.2 lb

7
JCB-MS-ST-NA
Instruction & User Manual
OPERATING INSTRUCTIONS
Intended Use
Always observe the proper use of your mitre
saw stand.
The mitre saw stand is designed for use with
tabletop devices such as mitre saws, scroll
saws, circular table saws, etc.
Electric power tools without suitable mounting
holes are not permitted to be fitted to the
mitre saw stand and shall not be operated in
conjunction with the mitre saw stand. Electric
power tools must be firmly bolted
to the mitre saw stand before starting
them up.
The mitre saw stand is also designed as a
workpiece support when working with mitre
saws, scroll saws, circular table saws, and other
similar electric power tools.
The maximum workpiece length is 10ft (3m).
Additional workpiece supports may have to be
used (e.g. a roller trestle) in order to prevent
longer workpieces tilting.
Attention: Ensure that the workpiece support is
secure and not tilted!
Do not use the mitre saw stand as a ladder or
as scaffolding. Ensure that all handgrips, nuts
and screws are tightened before use. Electric
power tools on this device shall not exceed an
overall height of 130 cm (4 ft). The maximum
permissible load is 200 kg (440 lbs). Ensure
that the mitre saw stand is on a level, firm and
stable floor. Any use beyond this is improper
use. The manufacturer is not responsible for
the resultant damages, the user bears this
risk alone.
Before starting the equipment
Check the device for transport damage.
Immediately report any damage to the
transport company that delivered the device.

8JCB-MS-ST-NA
Instruction & User Manual
The mitre saw stand is largely assembled and
you need only fit the support arms and the
crossbars as follows:
Erecting the mitre saw stand
(Fig. 3-4)
Place the mitre saw stand (A) on the floor or
on a workbench such that the frame legs (A.1)
are uppermost.
Press the spring pins (M) and fold out the frame
legs.
Once the spring pin latches into the intended
position, the frame leg is locked.
Rotate the mitre saw stand and set down on
its feet.
Mounting support arms (Fig. 5)
Fit the support arms (B) to the frame bed (A)
by pulling the locking lever (B.3) upwards to
unlock it and then latching the arm into place
on the frame base, firstly on the front side
(B.2).
Lower the rear side onto the bed and fasten
the support arm in place on the frame bed by
pressing the locking lever (B.3).
Disassembly is performed in reverse order.
ASSEMBLY AND OPERATION
A.1
L
M
3
4
M
A
B.2
B.3
B.1
B
A
5

9
JCB-MS-ST-NA
Instruction & User Manual
The width and height of the workpiece
supports can be adjusted with the star-grip
screws (J, K). (Fig. 6)
Fastening your tabletop machine (Fig. 7)
Different tabletop machines can be fastened to
your mitre saw stand by adjusting the support
arms (B) to the spacing of the mounting holes
on your machine.
m Place your tabletop machine (e.g. mitre
saw) on the support arms (B) (Fig. 7).
m Fasten the tabletop machine with 4 coach
screws (F), 4 washers (G), 4 spring washers
(H) and 4 hexagonal nuts (I) on each of the
support arms.
m Tighten the screws after assembly.
m Fasten the support arms (B) with the
mounted tabletop machine on the mitre
saw stand, as described on page 8.
If your machine has different hole
spacing for mounting, use the crossbars
(C) provided as an adapter as follows:
m Position the crossbars (C) on the support
arms (B) and secure them with 4 coach
screws (E), 4 washers (G), 4 spring washers
(H) and 4 hexagonal nuts (I). (Fig. 8-9)
m Place your tabletop machine on the
crossbars (C). (Fig. 10)
m Fasten the tabletop machine with 4 coach
screws (F), 4 washers (G), 4 spring washers
(H) and 4 hexagonal nuts (I) on each of the
crossbars (C).
m Tighten the screws after assembly.
m Fasten the support arms with the mounted
tabletop machine on the mitre saw stand, as
described on page 8.
Fitting the workpiece supports (Fig. 6-7)
Insert the workpiece support (D) into the
support post (N) of the frame bed and fasten in
place with the star-grip screw (K).
Repeat the above for the other support.
JD
K
N
6
F
BG
HI
7
I
H
G
E
8

10 JCB-MS-ST-NA
Instruction & User Manual
Using the workpiece stops, Fig. 12
The workpiece supports (D) have integrated
workpiece stops (D.2), which can be used
to saw multiple pieces of wood to the same
length. (Fig. 11)
m Loosen the star-grip screw (K) on the
desired side of the mitre saw stand and
adjust the height of the workpiece support
(D) such that the support surface (D.2) is at
the same height as the workpiece support of
the saw. (Fig. 12)
m Loosen the star-grip screws (J) to slide the
workpiece support horizontally.
m Set the desired distance between the saw
blade and the stop surface (D.1).(Fig. 11)
m Lock your setting by tightening the star-grip
screws (J) again.
K
JD
A
12
C
C
B
B
9
I
H
G
F
10
D.1
D.2
D
11

11
JCB-MS-ST-NA
Instruction & User Manual
CLEANING, MAINTENANCE, STORAGE AND
TRANSPORT
IMPORTANT!
Before any cleaning or maintenance work, the
electrical tool fitted must be switched off and
the mains plug disconnected, or battery pack
removed! Risk of injury!
Cleaning
m Keep the mitre saw stand as free of dust and
dirt as possible. Rub the mitre saw stand
clean with a clean cloth or blow debris off
with compressed air at low pressure.
m We recommend that you clean the mitre
saw stand immediately after every use.
m Clean the stand at regular intervals using a
damp cloth and a little soft soap. Do not
use any cleaning products or solvents - they
could attack the plastic parts of the mitre
saw stand.
Storage
ATTENTION!
Store the mitre saw stand only in dry locations.
Do not allow access to the mitre saw stand by
unauthorised persons or children.
Transport
ATTENTION! !
Do not transport whilst the electric power tool
is running.
Before moving the mitre saw stand, pull out
the mains plug, or remove the battery pack,
of the electric power tool mounted on it! Risk
of injury due to electric shock and unexpected
start-up of the power tool!
Two people can lift the mitre saw stand by its
frame bed in order to move the mitre saw
stand within rooms (do not drag it along the
ground).
If being transported in a vehicle, remove the
electric power tool first. Fold up the legs for
transport.
Ensure that the load is well secured if
transporting the mitre saw stand in a motor
vehicle.

12 JCB-MS-ST-NA
Instruction & User Manual
JCB TOOLS WARRANTY TERMS AND
CONDITIONS
JCB Power Tools are guaranteed against manufacturing defects for
up to 12 months from date of purchase. Proof of purchase required.
This does not affect your statutory rights.
The original sales receipt will be required in the event of any claim within the warranty period.
Warranty cover commences from the date of purchase on the retail sales receipt and is valid only
for JCB Tools products bearing the CE mark and a visible serial number.
In the unlikely event your JCB Power Tool is subject to a manufacturing fault within the warranty
period, please contact the seller/retailer where the item was purchased.
JCB Power Tools used for Hire Fleets or as part of B2B and Service Contracts are not covered by
these terms and conditions.
JCB Tools Warranties excludes the following (where relevant):
m Components normally subject to wear such as carbon brushes.
m Batteries, Chucks and Chargers.
m Accessories and consumable items.
m Cases and tool storage products.
If your product develops a fault, contact the seller/retailer where it was purchased together with
your sales receipt.
Only products purchased from JCB Tools authorised sellers are covered by the warranty.
JCB TOOLS WILL NOT BE LIABLE FOR ANY INJURIES OR CONSEQUENTIAL DAMAGES
RESULTING FROM USE OF THIS PRODUCT.

13
JCB-MS-ST-NA
Instruction & User Manual
Table of contents
Other jcb Saw manuals

jcb
jcb 21-MS-ST User manual

jcb
jcb JCB-MS-210SB Planning guide

jcb
jcb JCB-20RS Planning guide

jcb
jcb JCB-MS-254SB-L Planning guide

jcb
jcb JCB-18RS Planning guide

jcb
jcb JCB-20BLMS User manual

jcb
jcb JCB-18CS Planning guide

jcb
jcb JS710LE Installation manual

jcb
jcb JCB-MS-305SB-L Planning guide

jcb
jcb JCB-SCMS210 Installation manual