Jecod AF Series User manual

AF Series Auto Fish Feeder
USER’S MANUAL
Warning:
1. To ensure personal safety, children or people without the
ability to identify danger are prohibited from using the device.
2 Do not disassemble the device to avoid damage.
3. Do not let children play with this product.
4. The battery should be pulled out, if the device will be idle
for long time.
Please subject to the actual products due to technology upgrade.
I. Introduction
AF series feeder is under IC smart control, which can
manually set feeding time and quantity. Suitable for fish
tanks of different sizes. It can meet the daily needs of
aquarium enthusiasts for feeding fish. In order to use this
product correctly, please read and understand the
instructions carefully before installation and use.
II. Control Panel
Timing icon
Feed icon Portion size
icon
Switch Button Set Button Manual/Save Button
Time Button Program
Button
Portion
Button
Battery icon
The number of days
between feedings
byte1 byte2 byte3 byte4
Product Features
1. Built-in 3 AA batteries (rechargeable), no external power
supply (AA batteries need to be purchased by the user).
2. Daily feeding time can be set.
3. Feeder can be set to synchronize with the local time.
4. Auto fish feeding on time, up to 6 feeding times per day,
set the daily feeding time for each meal.
5. Food quantity of per feeding can be set freely (No.1-No.9),
maximum up to 9 times
6. Small size and multi-function.
7. LCD display to display time and feeding parameters.
8. The capacity of the installed extension hopper can
reach 250ml or even 500ml.
9. Easy to fill the food.
10. This product is suitable for granulates up to 3 mm.
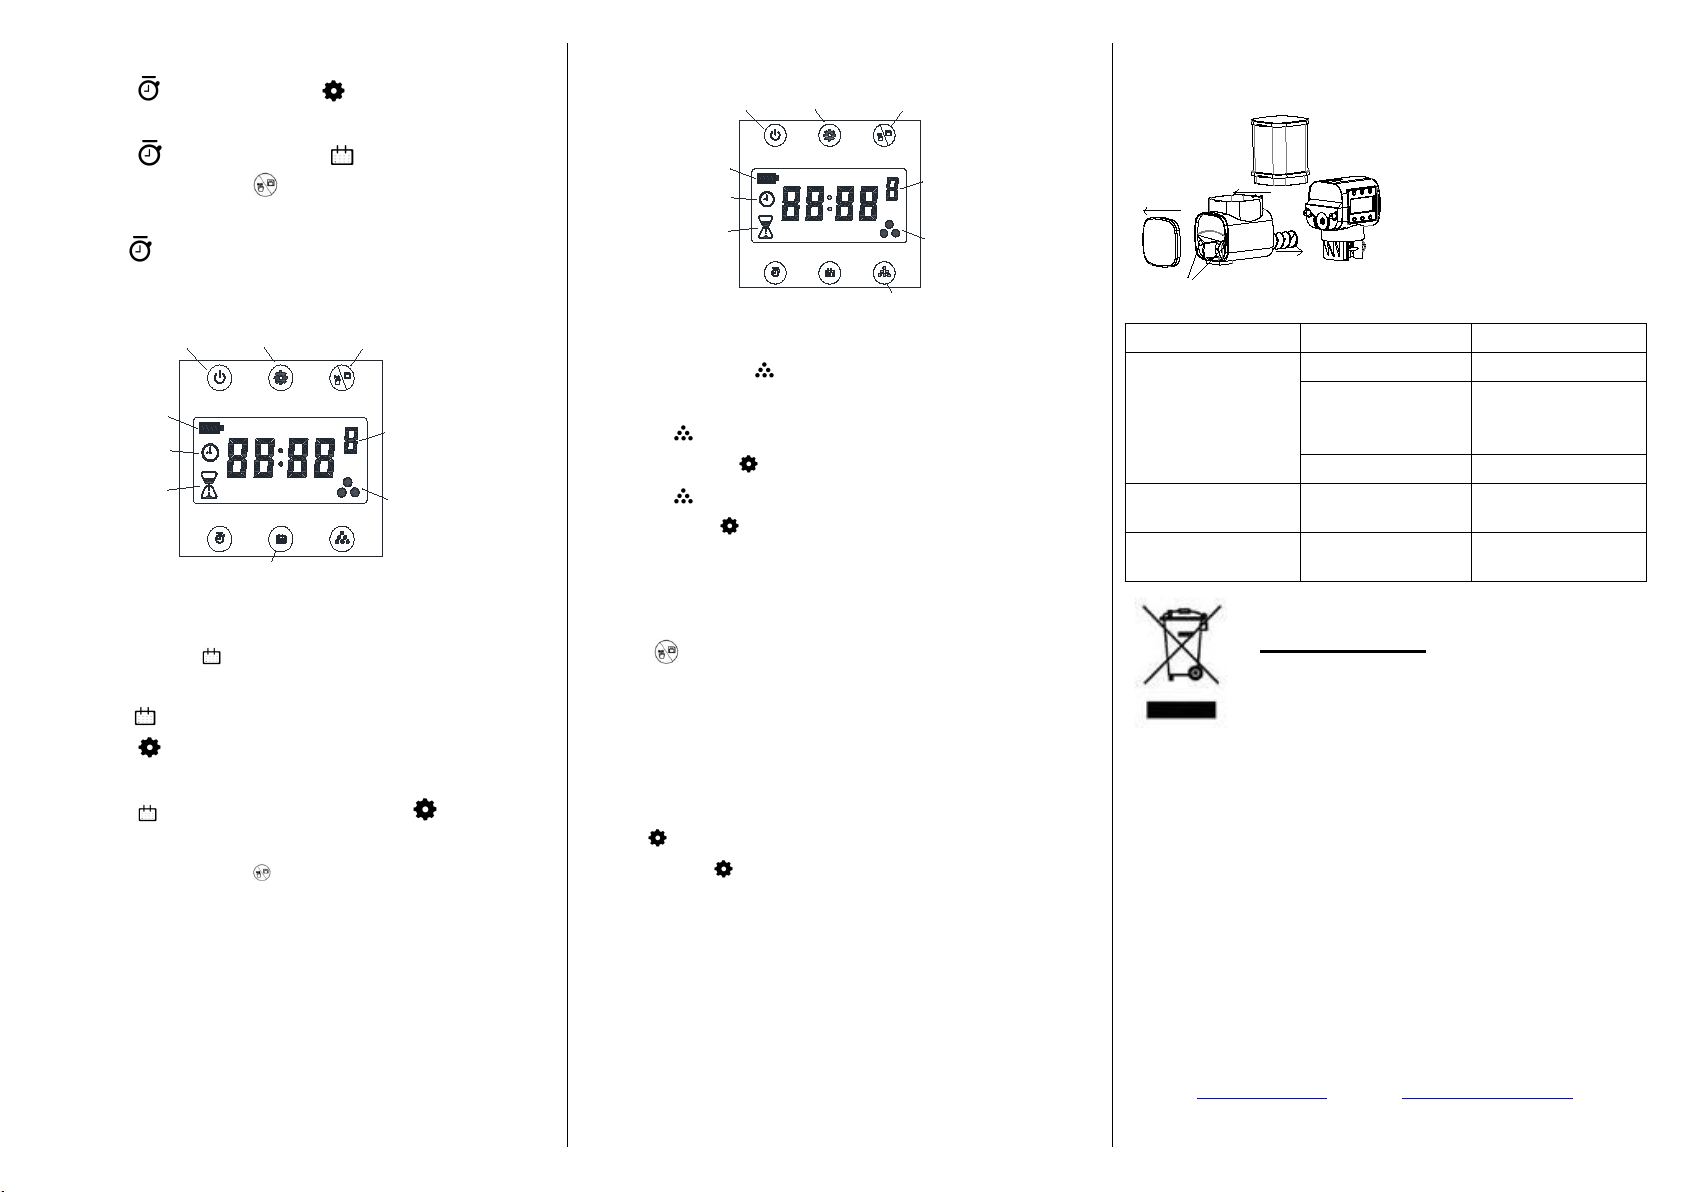
III. Installation & Accessories
Battery compartment
Screw
Extended
Feed silo
Cover
Outlet
Knob
Feed silo
360°
1. Installation Instructions:
1) Installation:
①Install the bracket, and install the adjustment knob to the
edge of the aquarium. The maximum glass thickness is
15mm.
②Install the base on the platform through the suction cup.
2. Replacement Instructions:
1) Accessories include: base, feeding ring, sucker, 3 AA
batteries.
2) The extended hopper can be dismantled. If there is no need
to the extended hopper, the upper cover can also be
disassembled and installed on the hopper.
3) To replace the battery, you need to disassemble the battery
compartment (only the AA battery can be replaced).
4) To add feed, open the top cover o the hopper and pour in
the feed.
IV. Factory Settings
Number of meals
Feeding time
Volume
(Servings/meal)
1
8:00
2
2
20:00
2
-
-
-
Explain: ”-” is unset;
Running time is 2 seconds per serving.
V. Functional Configuration
1. Memory function: No need to reset parameters after each
power failure.
2. Operation keys: Set parameters according to II. Control
Panel.
3. The Feed icon is displayed when manual feeding or auto
feeding is on.
4. Power display: Displays the current battery.
VI. Control Process
Timing icon
Feed icon Portion size
icon
Battery icon
The number of days
between feedings
byte1 byte2 byte3 byte4
Main interface (Standby state)
1. Feeding starts when it comes to the preset feeding
time.
2. The main screen shows the next feeding time, current
battery, and the charging status (as shown in the picture
above).
VII. Operation Settings
1. Time Setting
Timing icon
Feed icon Portion size
icon
Switch Button Set Button Manual/Save Button
Time Button Program
Button
Battery icon
The number of days
between feedings
byte1 byte2 byte3 byte4
Time diagram
Movable
Base
Clock Setting:
①Press “ ”, and then press “ ”, to enter the time
setting interface.
②Press “ ” to set hours and “ ” to set minutes;
③After setting, press “ ” to save and exit to the main
interface.
④Press " " once in normal mode to check the set time.
2. Feeding Time Setting
Timing icon
Feed icon Portion size
icon
Switch Button Set Button Manual/Save Button
Program
Button
Battery icon
The number of days
between feedings
byte1 byte2 byte3 byte4
Feeding time diagram
Press “ ” to view the feeding times
Steps:
①Press “ ” to enter the feeding time setting interface;
②Press “ ” to set the feeding time for the first meal,
four digits flash (“- -” indicates no feeding).
③Press “ ”to set hour, then press “ ” to set the
next meal.
④After setting, press “ ” to save.
Notice:
①
Feeding time is on the hour.
②
Up to 6 times can be set.
③
Please set feeding time clockwise.
3. Feeding Portion Setting
Timing icon
Feed icon Portion size
icon
Switch Button Set Button Manual/Save Button
Portion
Button
Battery icon The number of days
between feedings
byte1 byte2 byte3 byte4
Feeding portion diagram
Press “ ” to check feeding portions
Portion Setting Per Meal:
①Press “ ” to check the servings per meal, when four digits
flash. Then press “ ” to reset if necessary.
②Press “ ” to adjust feeding quantity, maximum 9 portions
and then press “ ”to the next meal.
③After setting, press “Manual/Save” to save and exit.
Explain: Each feeding portion is 2 seconds.
4. Manual Feeding
Press “ ” to manual feeding in standby mode, 2 seconds
running time.
For only one meal each day, the interface displays "-- --" and
lasts for one hour after feeding, to indicate that feeding is done
today.
5. Feeding Interval Setting
Press " " for 3 seconds, “the number of days between feeding”
flashes. Press " " each time, it increases 1 unit. The default is
"0", and the interval is "7" days at most.
VIII. Maintenance
1. This product is suitable for indoor use. Do not soak in water.
2. Please clean up the canister before changing feed, to avoid
food sticking to the bolt due to moisture.
3. Clean the canister and bolt regularly, and keep them dry to
prevent the feed from agglomerating at least once a month.
4. Do not flush the canister with water.
5. Do not touch buttons with wet hands.
Steps To Dismantle The Bolt:
①
③
④
②Screws
IX. Troubleshooting
Trouble
Reason
Solution
No display on
control panel
Low battery
Replace battery
Loosen internal
connecting cable
Open the battery
compartment to
reattach
The switch is off
Turn on the switch
Display but no
response
The screw is
stuck
Clean the bolt
The impeller
rotates but no feed
Feed
agglomeration
Smash the feed
DISPOSAL:
Do not dispose this product as unsorted
municipal waste. Collection of such waste
separately for special treatment is necessary. This product
must not be disposed together with the domestic waste. This
product has to be disposed at an authorized place for recycling
of electrical and electronic appliances. By collecting and
recycling waste, you help save natural resources, and make
sure the product is disposed in an environmentally friendly and
healthy way.
Jebao Co., Ltd.
Add: Tongmao Industrial Park, Xiaolan, Zhongshan, Guangdong, China
Tel: +86-760-28136708, 28136720
①Remove the front cover
②Remove two screws
③Remove the canister
④Take out the bolt
This manual suits for next models
2
Other Jecod Aquarium manuals


