Jede QUATTRO User manual
QUATTRO
SERVICE MANUAL
English - GB

QUATTROjskjsdfdsfdzxczxczxczxczxc
QUATTRO
Rev. A 2012-09-10Service manual
1
Contents
1. Important information 3
1.1 Safety 3
1.2 This user instruction 4
1.3 Type plate 4
1.4 Disposal 4
2. Symbols 4
3. Description of the machine 5
3.1 Quattro 5
3.2 Cartridge system 5
3.3 Drinks 5
3.4 Serving 5
3.5 Description of the front of the machine 6
3.6 Description of the back of the machine 7
3.7 Description of the inside of the machine 8
3.8 Placement of the vending machine 9
4. Installation and start-up 10
4.1 Installation and start-up, direct connection
to a mains water supply 10
4.2 Installation and start-up, built in manual
llwatertank 11
4.3 Installation of drink cartridges 11
5. Loading schedule 12
5.1 Loading schedule, variants 13
5.2 Change of loading schedule 14
5.3 Menu panel 14
6. Daily care and cleaning 15
6.1 Rinsing the mixer bowls 15
6.2 Cleaning the spill tray 15
6.3 External cleaning 15
6.4 Cleaning of the machine’s internal parts 16
6.5 Disassembling the machine’s internal parts 17
6.6 De-scaling 18
7. Troubleshooting 19
7.1 Resetting errors 20
7.2 Error indicators 20
7.3 Resettingoverllprotection 20
7.4 Resetting overheating protection 21
7.5 Removal of casing 22
7.6 Replacing the pump (built-in cold water tank) 23
7.7 Replacing the whipper motor 23
7.8 Replacing the dispenser motor 24
7.9 Replacing the valve unit 25
7.10 Replacing the level sensor 25
7.11 Replacing the temperature sensor 26
7.12 Replacing the inlet valve 27
7.13 Replacing the push button panel 28

QUATTRO
Rev. A 2012-09-10 Service manual 2
8. Removing the vending machine from service 29
8.1 Transport 29
9. Technical data 30
10. Service 30
11. Warranty 30
12. Energy saving function 31
13. Notes 31
14. Front 33
15. Casing 35
16. Base cover 37
17. Mixer system 39
18. Tank module 41
19. Tank complete unit 43
20. Serving module 45
21. JM Dispenser 47
22. Motor unit 49
23. Manualllcoldwatertank 51
24. Wiring diagram 230 V 53
25. Wiring diagram, sensors 54
26. Wiring diagram, motors 55
27. Wiring diagram, valves and button keypad 56
QUATTROjskjsdfdsfdzxczxczxczxczxc
QUATTRO
Rev. A 2012-09-10Service manual
3
Tillverkare
JEDE AB Box 303 SE-542 23 MARIESTAD Tel 0501 670 00 Fax 0501 670 67 www.jede.se
An updated manual when available is found via the following link: www.jede.com
1. Important information
Thank you for choosing an automatic vending machine from Jede. Before the
machine is put into service, read this manual carefully. This is important so that
installation and use can be carried out in a safe manner and a prerequisite for the
warranty terms applying. Information in this manual can be changed without prior
notice. Store this user manual in a safe place for future use. This user manual may
not be copied, used or translated, either wholly or partly without written consent
from Jede AB except in accordance with copyright laws.
1.1 Safety
The vending machine may only be used with Jede’s drink cartridges.
For safety reasons, repairs may only be carried out by trained personnel on
Jede equipment, repairs carried out by non trained personal can involve
risks to the user and cause the warranty to become invalid.
Only original parts may be used for any repairs.
Note that the heater tank inside the machine contains hot water and can
cause burns if touched or if the machine is used incorrectly.
The vending machine may only be connected to a protective earthed socket
via the attached mains cable.
The machine must be connected via an earth fault breaker.
The machine is only voltage-free when the plug is removed from the wall
socket or the mains cable from the back of the machine.
In case the machine is directly connected to a mains water supply, regulary
check the hose for wear damage, cracks or other defects. By replacing it in
time, you can prevent water damage.
Before the automatic machine is transported, moved or stored for a long
period of time, its tanks must be emptied from all water.
Replacementhosesmustbeofthesamespecicationassuppliedwiththe
machine which is approved for use for Jede’s automatic drinks machines.
Never use cleaners containing solvents. The machine can become damaged
and poisonous gasses may occur which could create a potential risk of
reandexplosion.
•
•
•
•
•
•
•
•
•
•
•

QUATTRO
Rev. A 2012-09-10 Service manual 4
1.3 Type plate
The machine’s type plate with its
serial number is placed on the
back of the machine.
Figure 1
This product may not be discarded among household waste when its
lifespan has ended. The machine contains electronics, plastic and metal.
Sort it and recycle the material. Contact either the reseller where you
purchased the machine or your local municipality for information on how
you can best dispose of the product in an environmentally adapted
manner.
If the machine is replaced by a new one, the Jede machine supplier may
take back the old machine. If so, they will ensure the machine is recy-
cled in a responsible manner. (Please check your country regulations in
regard to this).
All plastic material is type marked for easier sorting.
1.2 This user instruction
The contents in this user instruction describe the vending machine’s function and
operation, as well as instructions for installation and maintenance.
This symbol states that there is hazardous current in the machine,
which involves the risk for electric shocks and severe personal
injury.
2. Symbols
1.4 Disposal
This symbol marks important instructions and tips concerning the
machine’s operation and care.
QUATTROjskjsdfdsfdzxczxczxczxczxc
QUATTRO
Rev. A 2012-09-10Service manual
5
1
2
34
3. Description of the machine
3.1 Quattro
Quattro is a new addition to Jede’s machine product range for drink cartridges. The
machineispreparedforbothxedconnectiontoamainswatersupply(seechapter
4.1) and a water supply via its built-in tank (see chapter 4.2). The type of water
connection is automatically detected upon start-up (see chapter 4).
3.2 Cartridge system
The machine is constructed for four drink cartridges, which are easy to change ac-
cording to consumption. The cartridges are accessible when the vending machine’s
front is lifted up and folded upward (see chapter 4.3)
3.3 Drinks
The machine is programmed with 3 different loading schedules for varying drink
volumesandavours(seechapter5).Itisalsopossibletotemporarilyvarythe
avourofthedrinksbyholdinginthedrinkbuttonwhileserving(seechapter5.3).
3.4 Serving
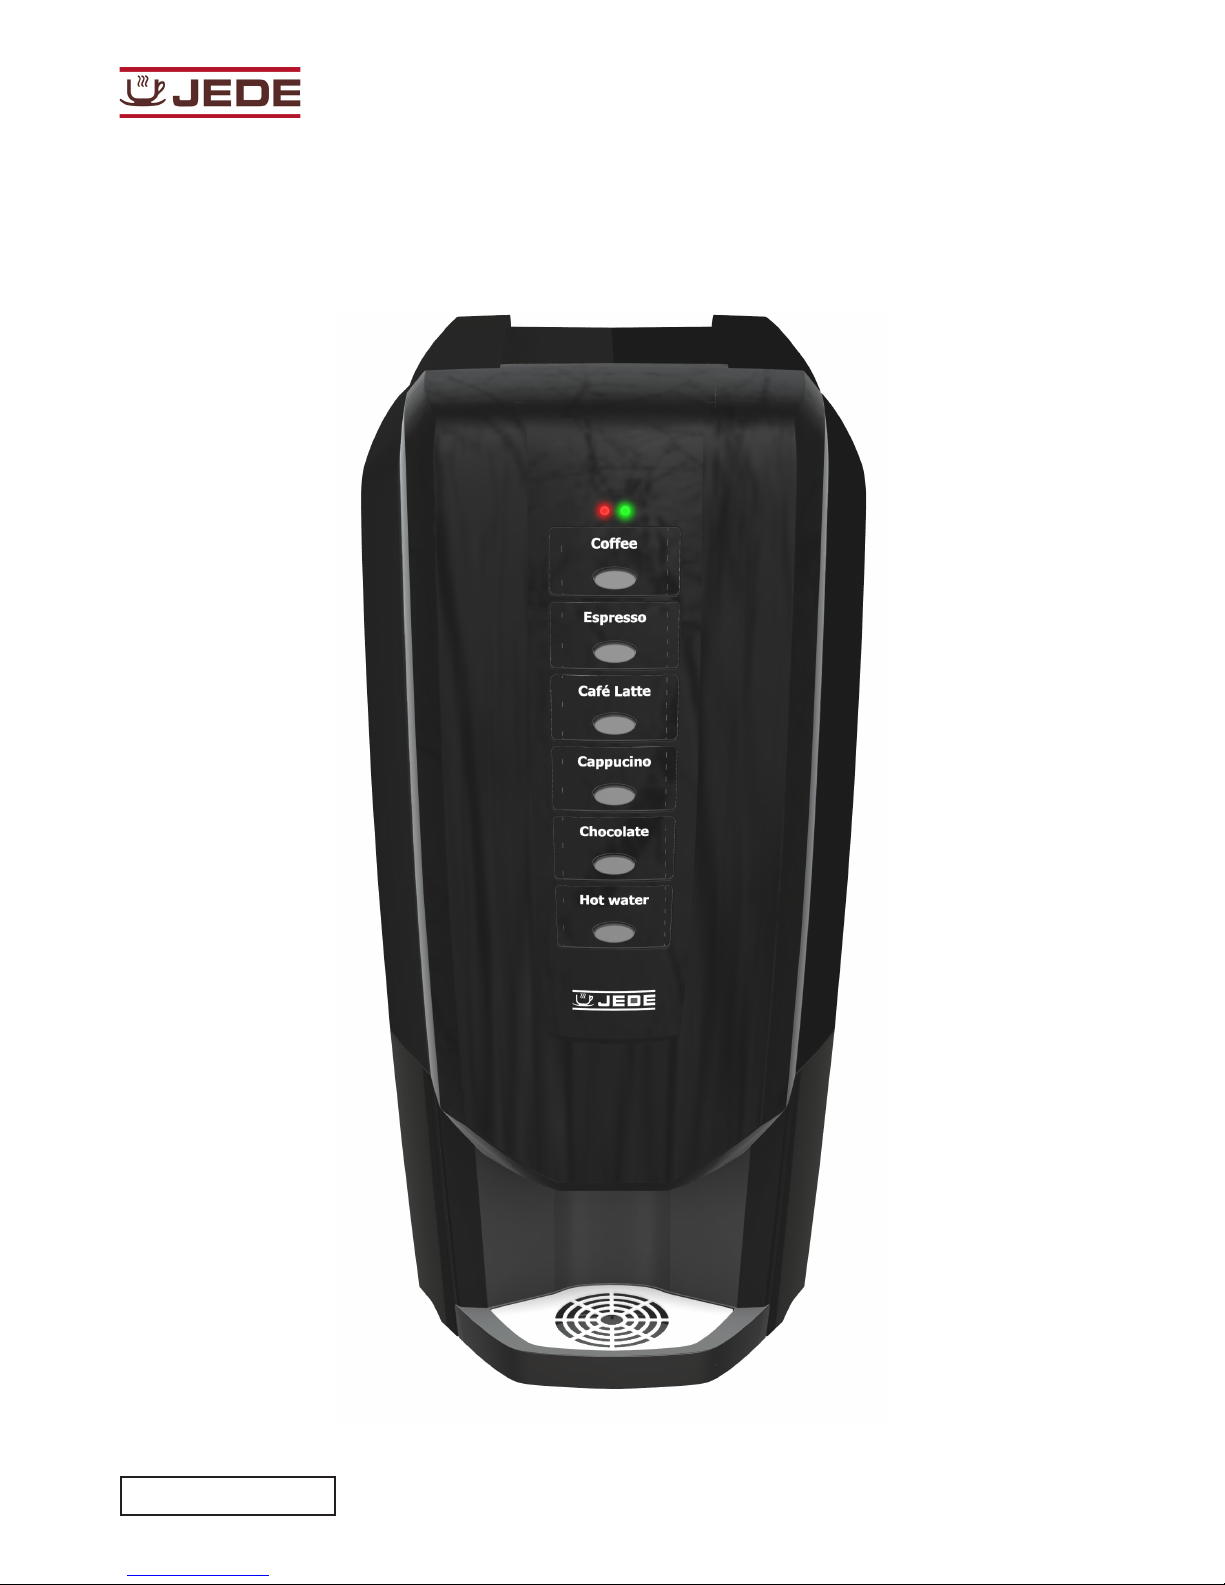
The vending machine serves 4 different coffee drinks, hot chocolate and tea water.
The cup of your choice can be used with a max. height of 110 mm. Drinks are pre-
pared in separate mixer bowls and whippers (see chapter 6).
1. Front.
2. Drink cartridge.
3. Water tank, cap.
4. Mixing bowl.
Figure 2
QUATTRO
Rev. A 2012-09-10 Service manual 6
1
2
3
4
5
6
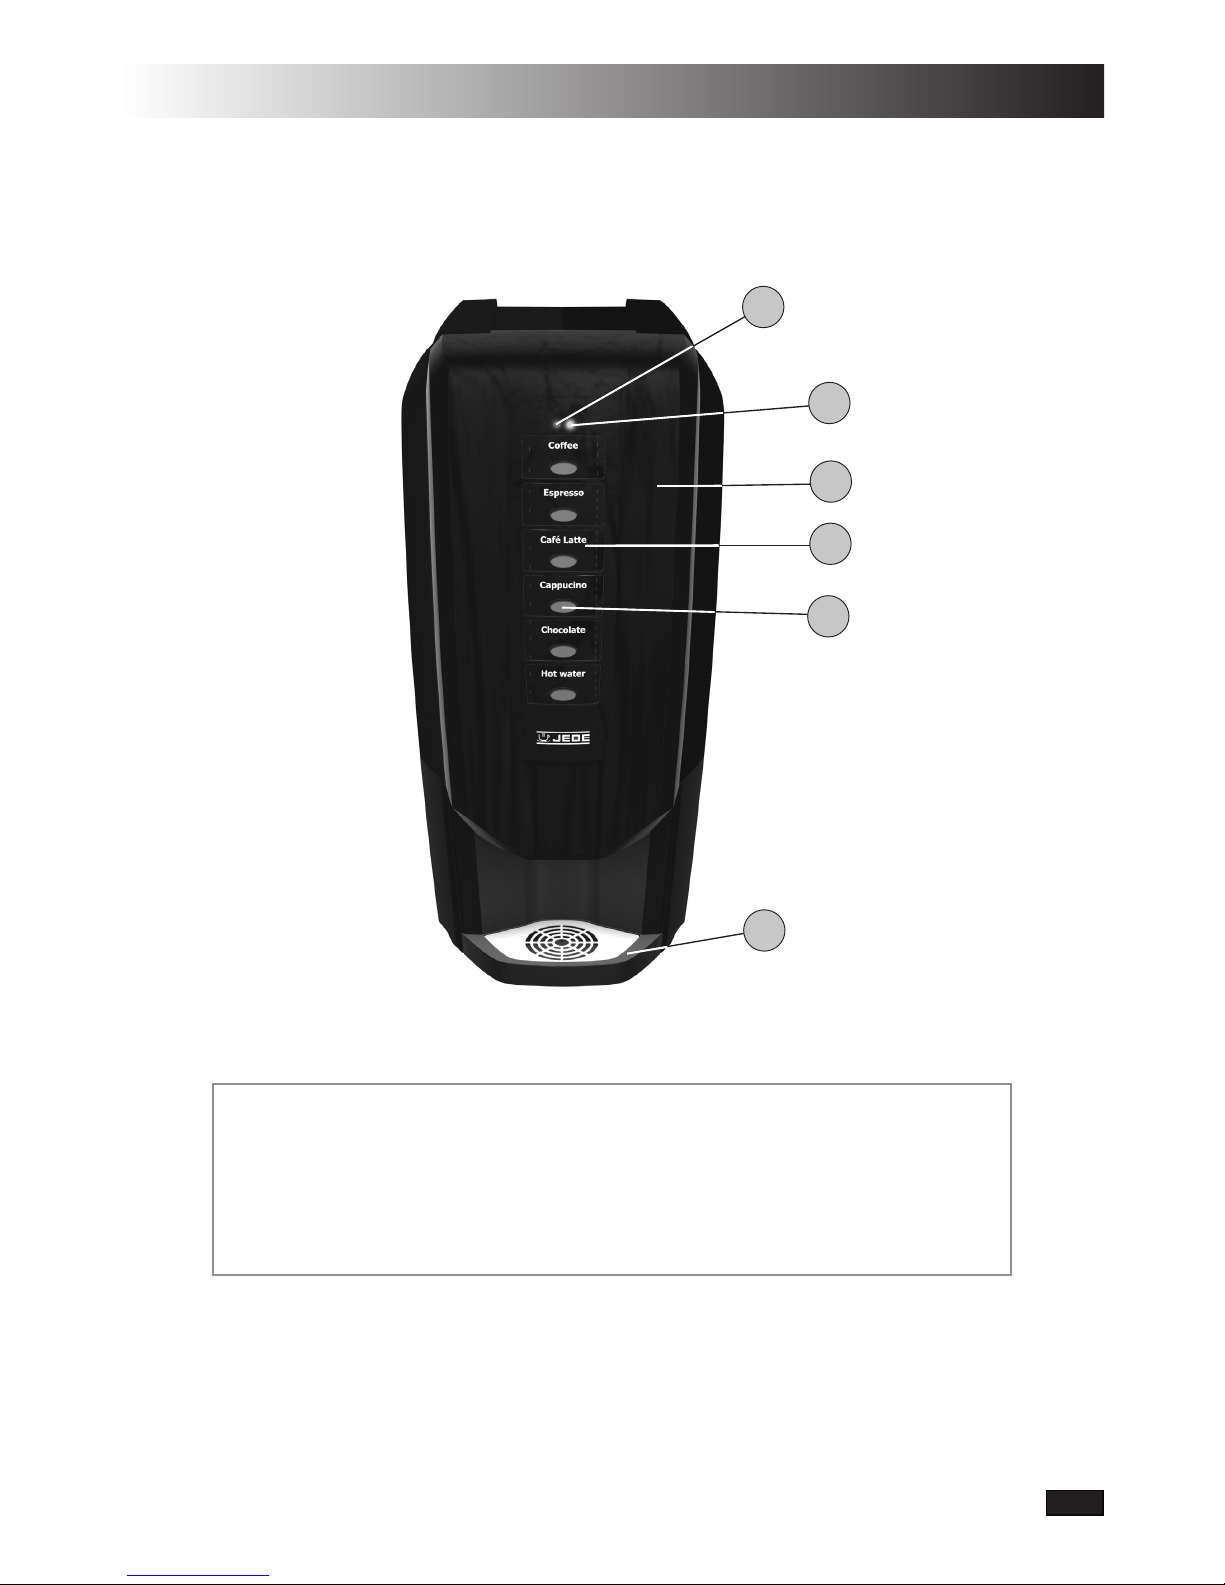
3.5 Description of the front of the machine
1. Red LED, indicates start-up and error status.
2. Green LED, indicates normal function.
3. Lift open front.
4. Menu label.
5. Button for drink selection.
6. Spill tray.
Figure 3
QUATTROjskjsdfdsfdzxczxczxczxczxc
QUATTRO
Rev. A 2012-09-10Service manual
7
1
2
3
4
5
6
7
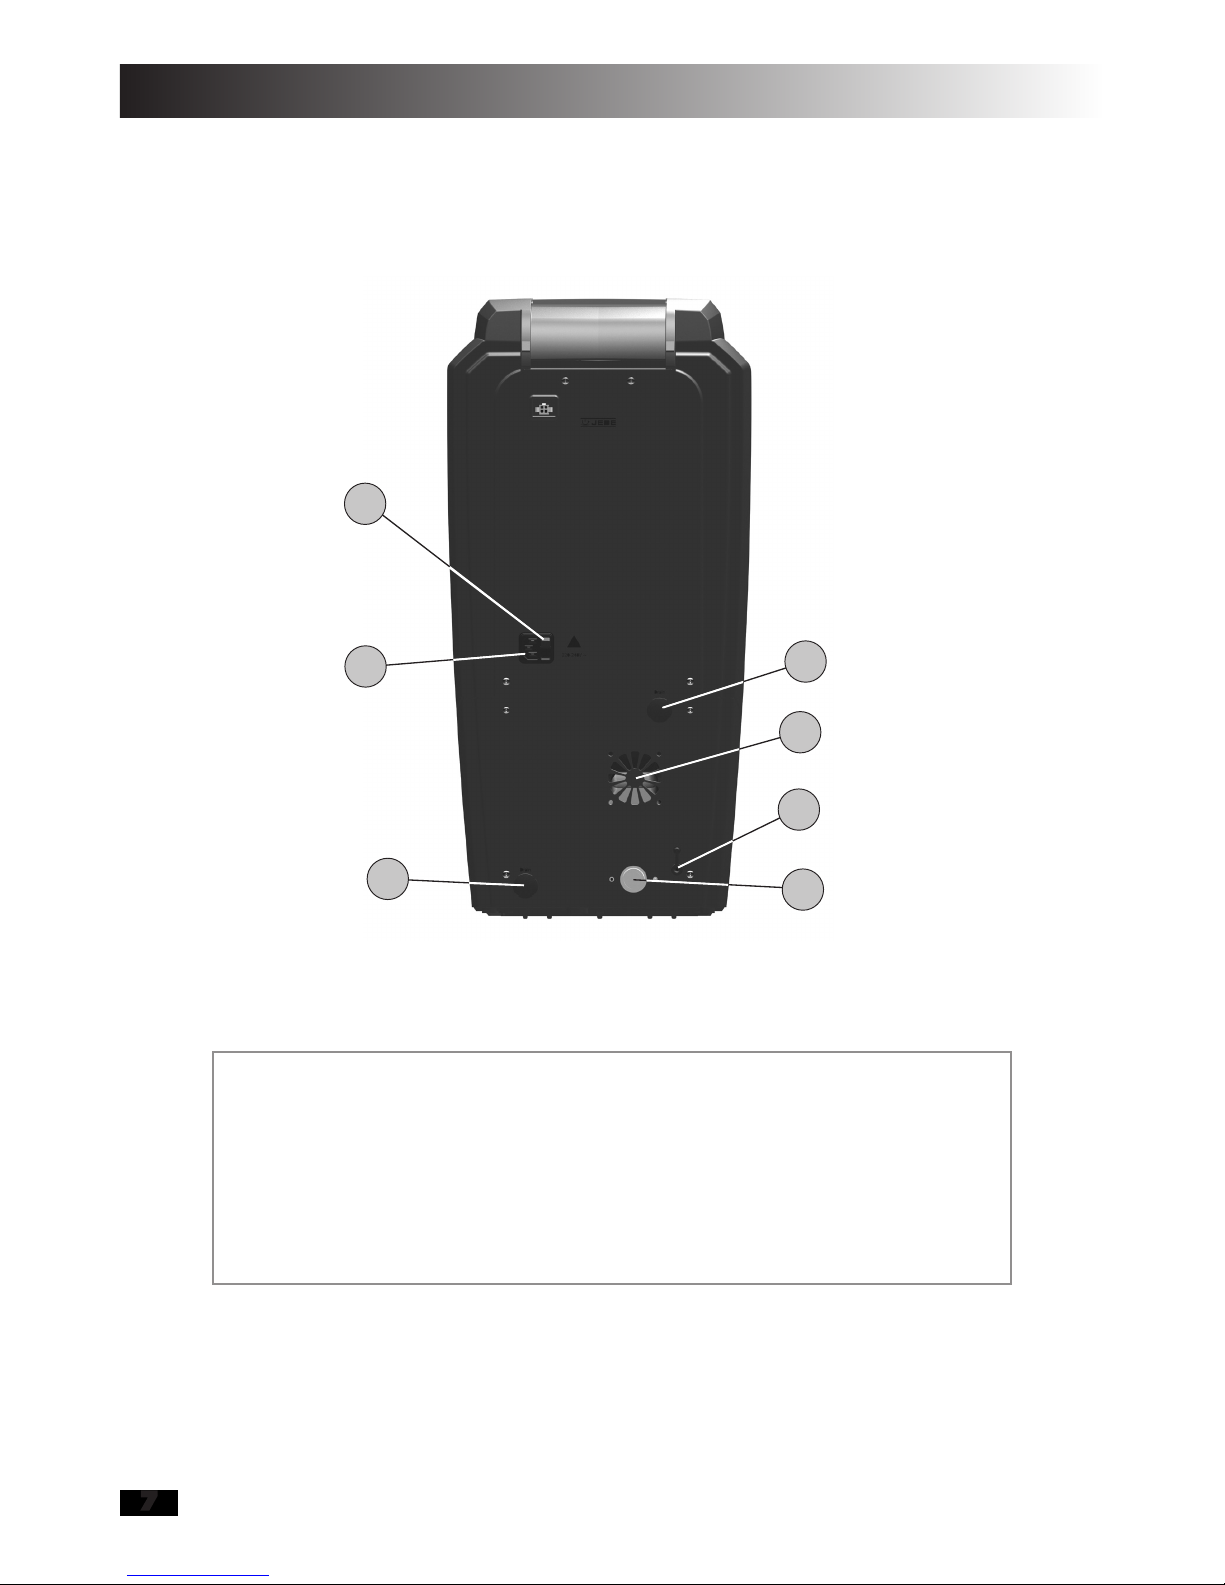
3.6 Description of the back of the machine
1. Power switch.
2. Electrical supply.
3. Drain for manual tank.
4. Drain for heater tank.
5. Fan for ventilation.
6.Drainforoverllprotection.
7. Inlet valve (for connection to mains water supply).
Figure 4

QUATTRO
Rev. A 2012-09-10 Service manual 8
1
2
3
4
5
6
7
8
11
9
10
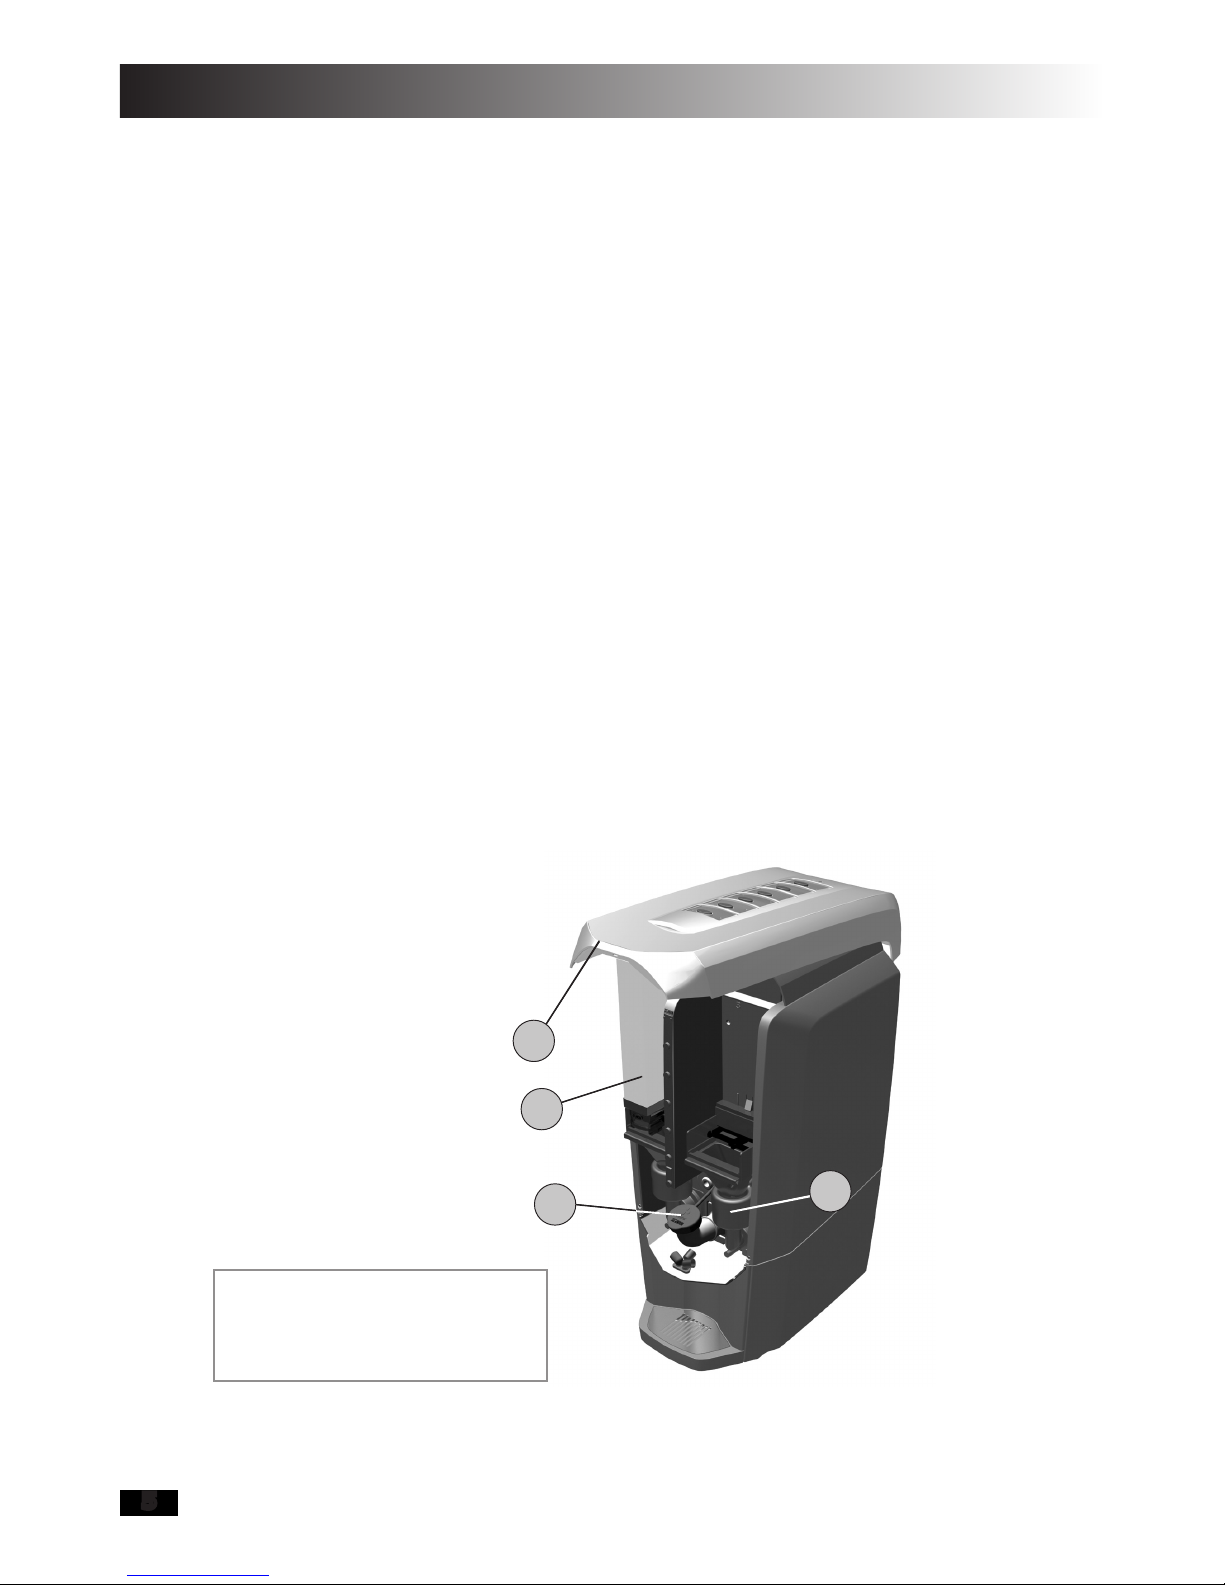
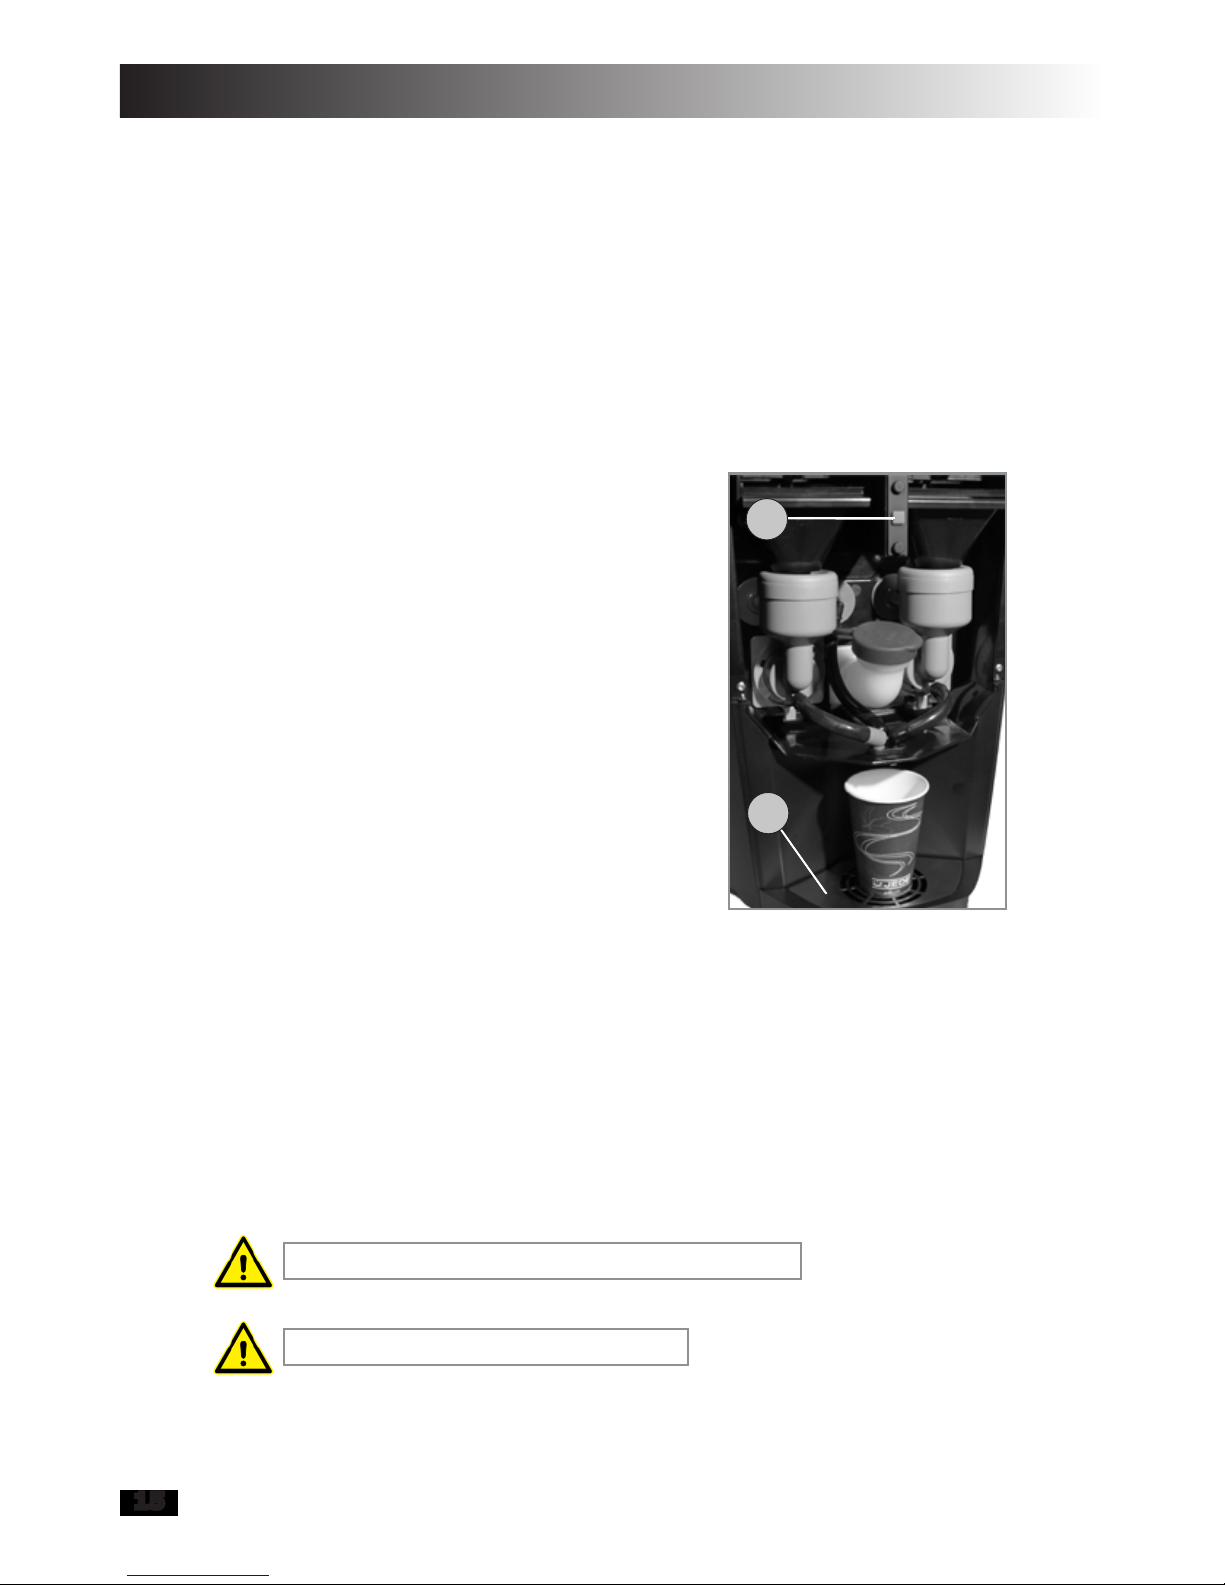
3.7 Description of the inside of the machine
Front (open position).
Drink cartridge.
Push buttons.
Funnel.
Button for rinsing.
Filling, manual tank.
Outlet nozzle.
Spill tray.
Slide, drink cartridge.
Place for drink cartridges.
Mixing bowl and steam trap.
1.
2.
3.
4.
5.
6.
7.
8.
9.
10.
11.
Figure 5
QUATTROjskjsdfdsfdzxczxczxczxczxc
QUATTRO
Rev. A 2012-09-10Service manual
9
10 cm.
3.8 Placement of the vending machine
Remove the packaging from the machine at the place it will be installed. Remove
the transport protection. Check that the automatic machine and its parts have not
been damaged during transport. If this is the case, then contact the forwarding
agent and supplier immediately.
The machine is only intended for placement
indoors in a dry place with a temperature
above 12 degrees Celsius and a relative
humidity below 75% Rh.
The machine may not be placed in an environ-
ment where high pressure water is used for
cleaning.
The machine contains electronic components.
Avoid placement near microwave ovens, X-ray
equipment or other equipment that generates
high currents.
The highest ambient temperature during
operation is max. 30 degrees Celsius.
The machine requires a installation area of
32 cm. in width, 45 cm. deep and 75 cm. in
height.
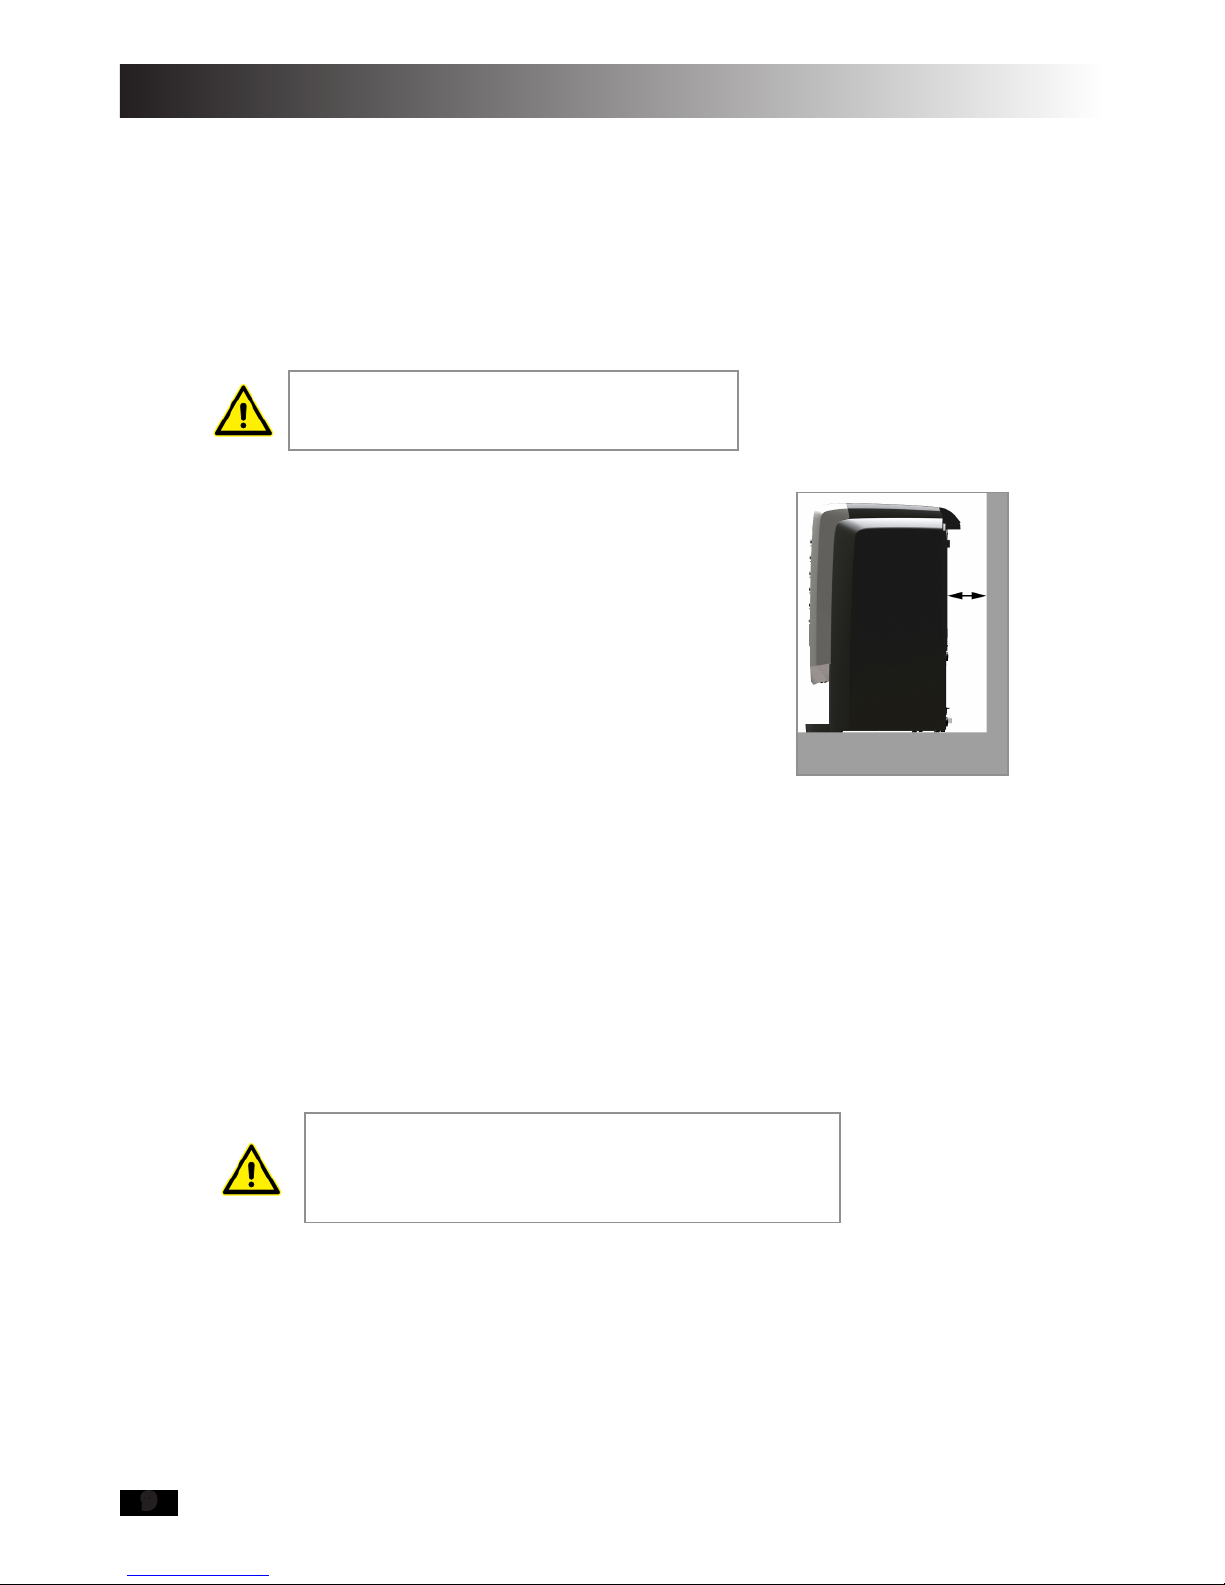
Place the machine at least 10 cm from the wall
so that the fan exhaust located on the back of
themachineisnotblocked(gure6).
•
•
•
•
•
•
WARNING
Packaging materials such as styrofoam and
plastic must be kept out of reach of children.
Figure 6
In order for the machine to function optimally, it
must be placed horizontally. Check the installation
surface with a level.
QUATTRO
Rev. A 2012-09-10 Service manual 10
7
12
3
7
4. Installation and start-up
The machine is prepared for either direct connection to a
mainswatersupplyormanuallylledviathebuilt-inwa-
ter tank. At rststart-up or after the machine has been
switched offforalongperiodoftime,themachinewillrst
attempt to take in water via the mains water inlet valve (7) for
approx. 40 seconds. If this is unsuccessful, then the pump
from the built-in water tank will start.
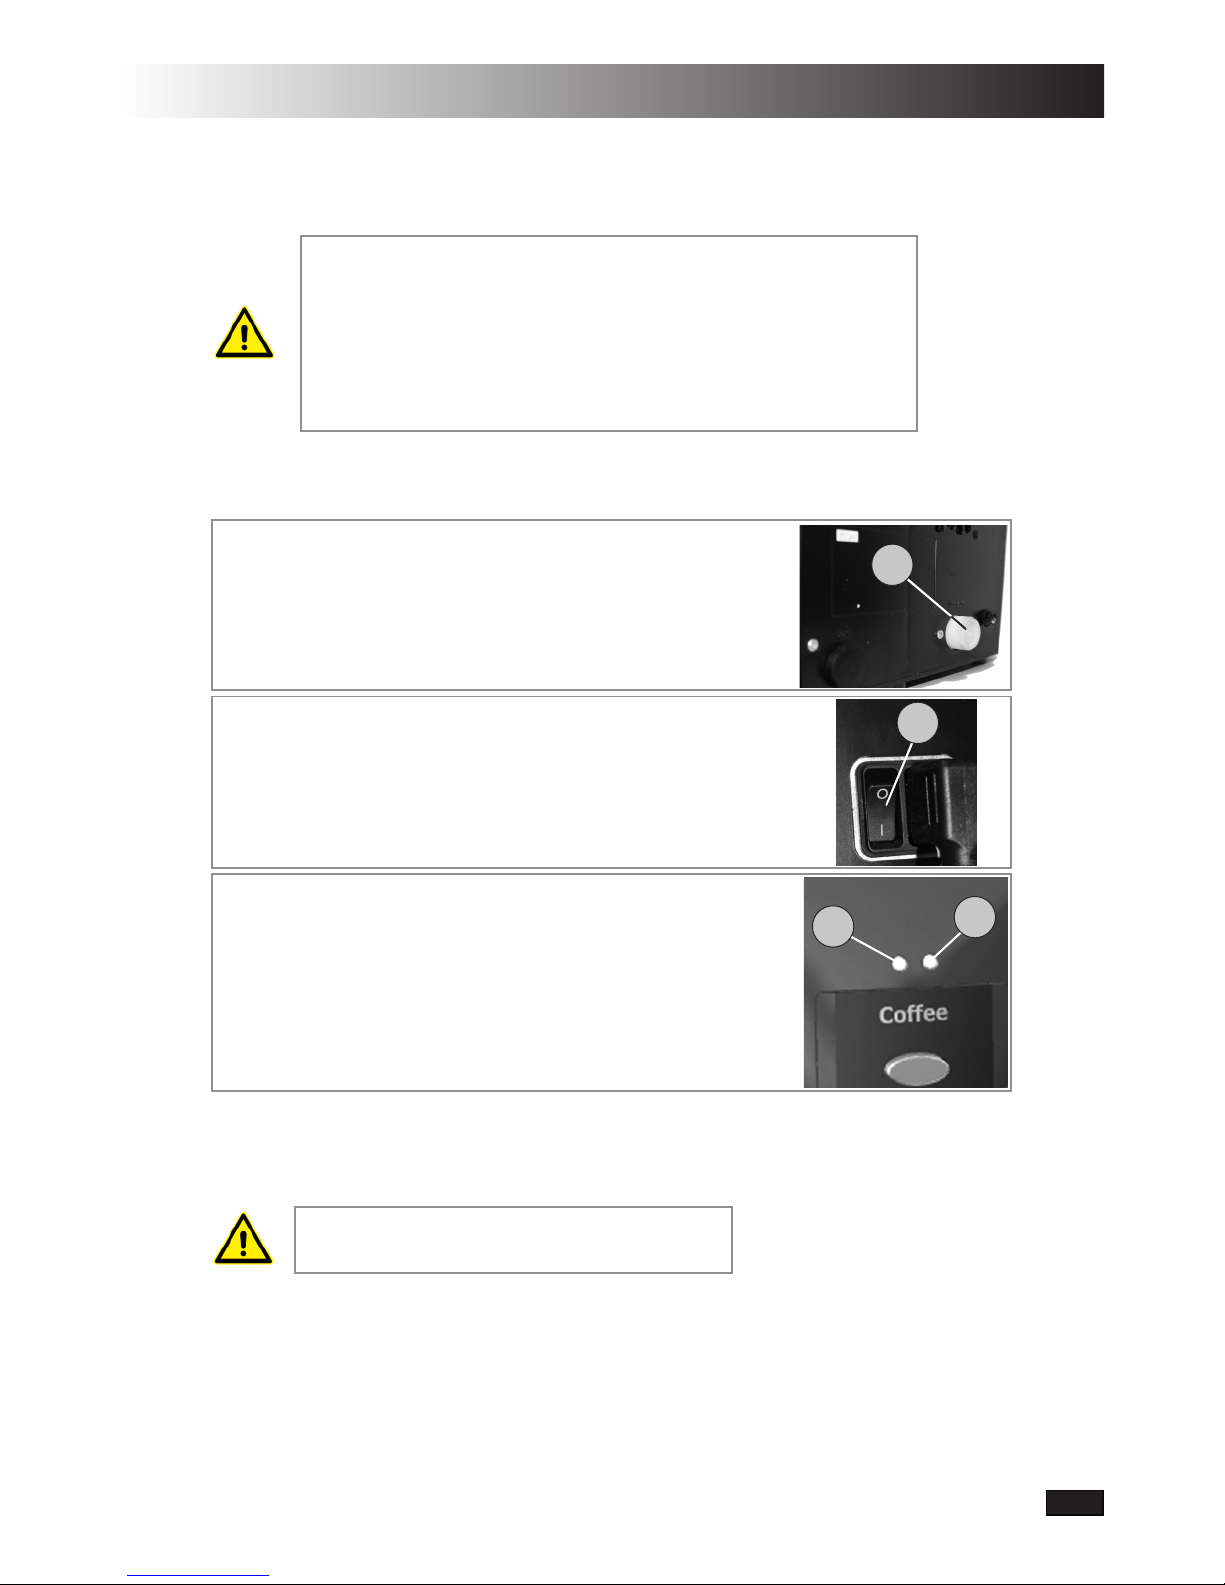
4.1Installationandstart-up,directconnectiontoamainswatersupply
Connect the machine from its inlet valve (7)
to a mains water supply, using the enclosed
hose (connection dimension 1/2” - 3/4”).
Connect the enclosed cable with plug to a
protective earthed electrical socket,
230VAC/50Hz. Connect the other connection
to the switched socket on the back of
the machine. Then ensure that the switch (3)
on the back of the machine is in the “On”
position “1”.
Check that the red LED (1) is illuminated with
axedredlight.Themachineheatertankis
lledwithwaterandheatingbegins.
After approx. 5 minutes the red LED (1)
should extinguish and the green LED (2)
shouldshinewithaxedgreenlight.The
machine has then heated the water to
a pre-set temperature.
1.
2.
3.
4.
Keep in mind that the heater tank contains
hot water, which can cause scalding.
QUATTROjskjsdfdsfdzxczxczxczxczxc
QUATTRO
Rev. A 2012-09-10Service manual
11
3
12
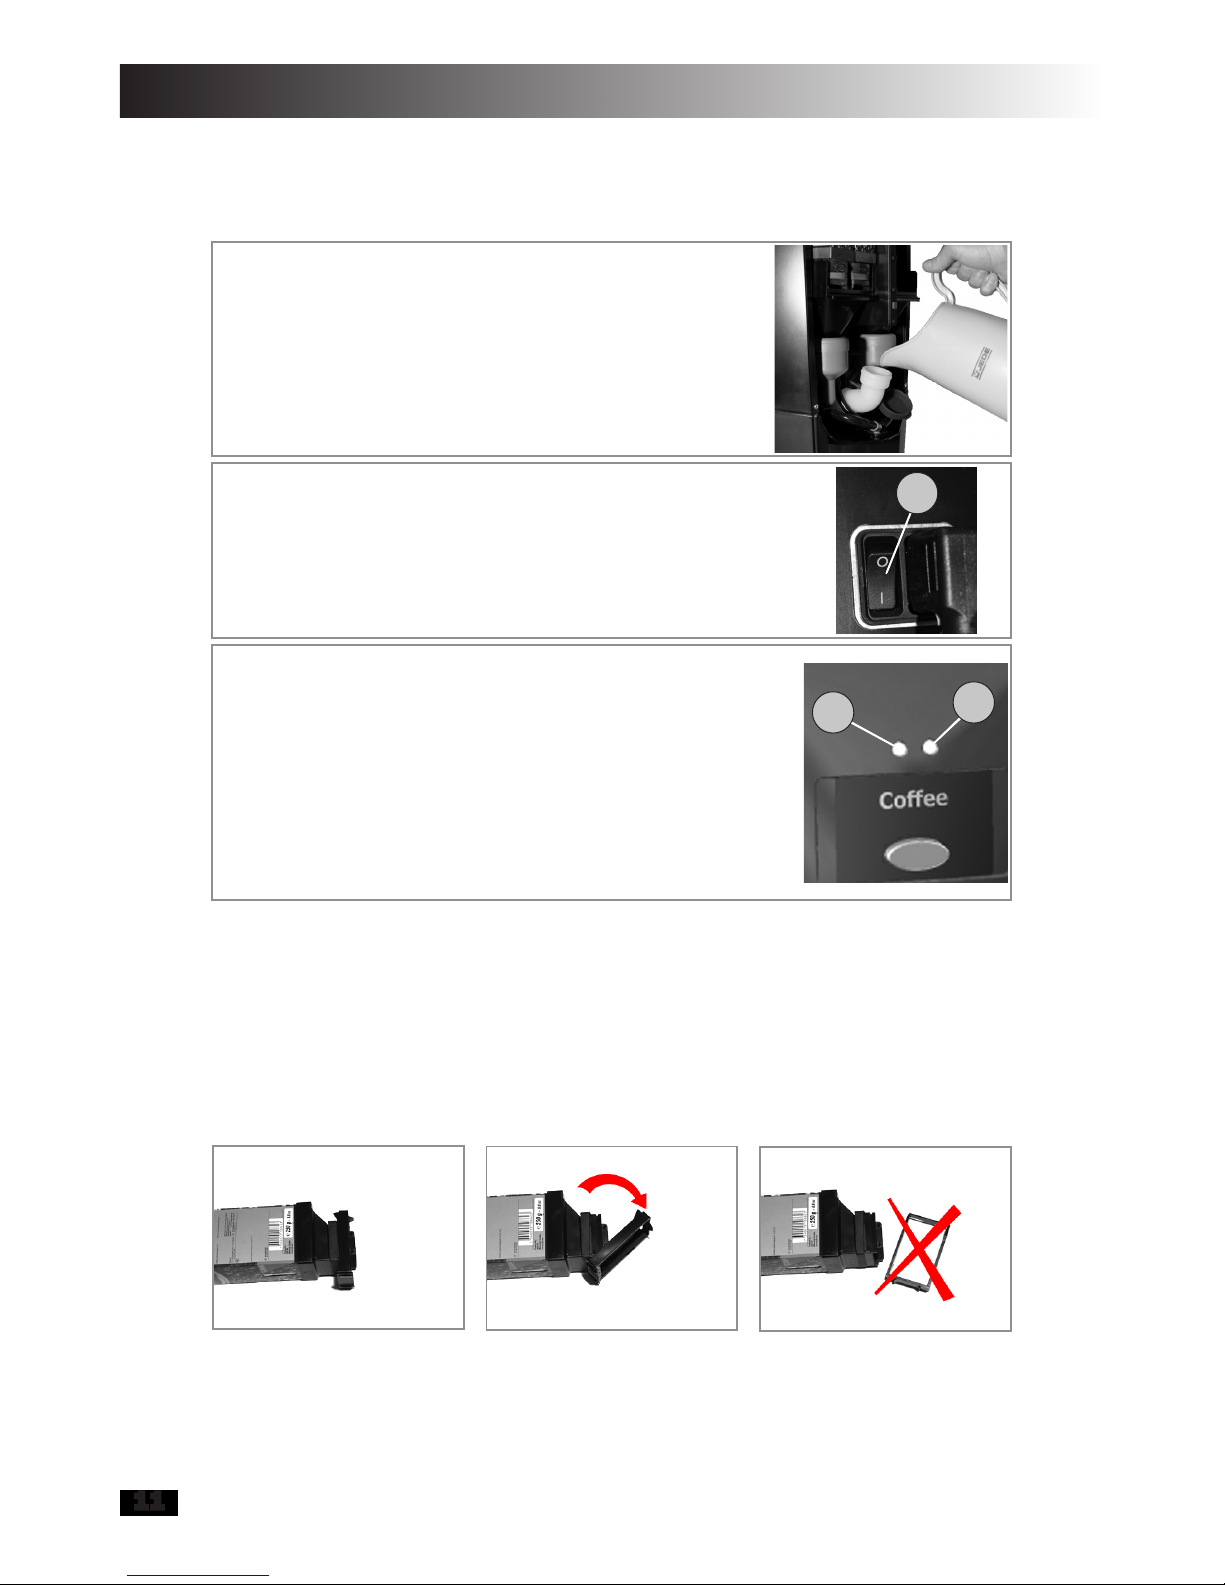
4.2Installationandstart-up,builtinmanualllwatertank
Open then lift the front of the machine and
pushitbackwards.Removethebluellcap
marked “Water”. Fill with approx. 5 litres of
coldwater.Replacethebluellcapandclose
the front of the machine.
Connect the enclosed cable with plug to a
protective earthed electrical socket,
230VAC/50Hz. Connect the other connection
to the switched socket on the back of
the machine. Then ensure that the switch (3)
on the back of the machine is in the “On”
position “1”.
Check that the red LED (1) is illuminated with
axedredlight.Themachineheatertankis
lledwithwaterandheatingbegins.Therst
llfromthemanuallltanktakesapprox.
1 minute.
After approx. 5 minutes the red LED (1)
should extinguish and the green LED (2)
shouldshinewithaxedgreenlight.The
machine has then heated the water to
a pre-set temperature.
1.
2.
3.
4.
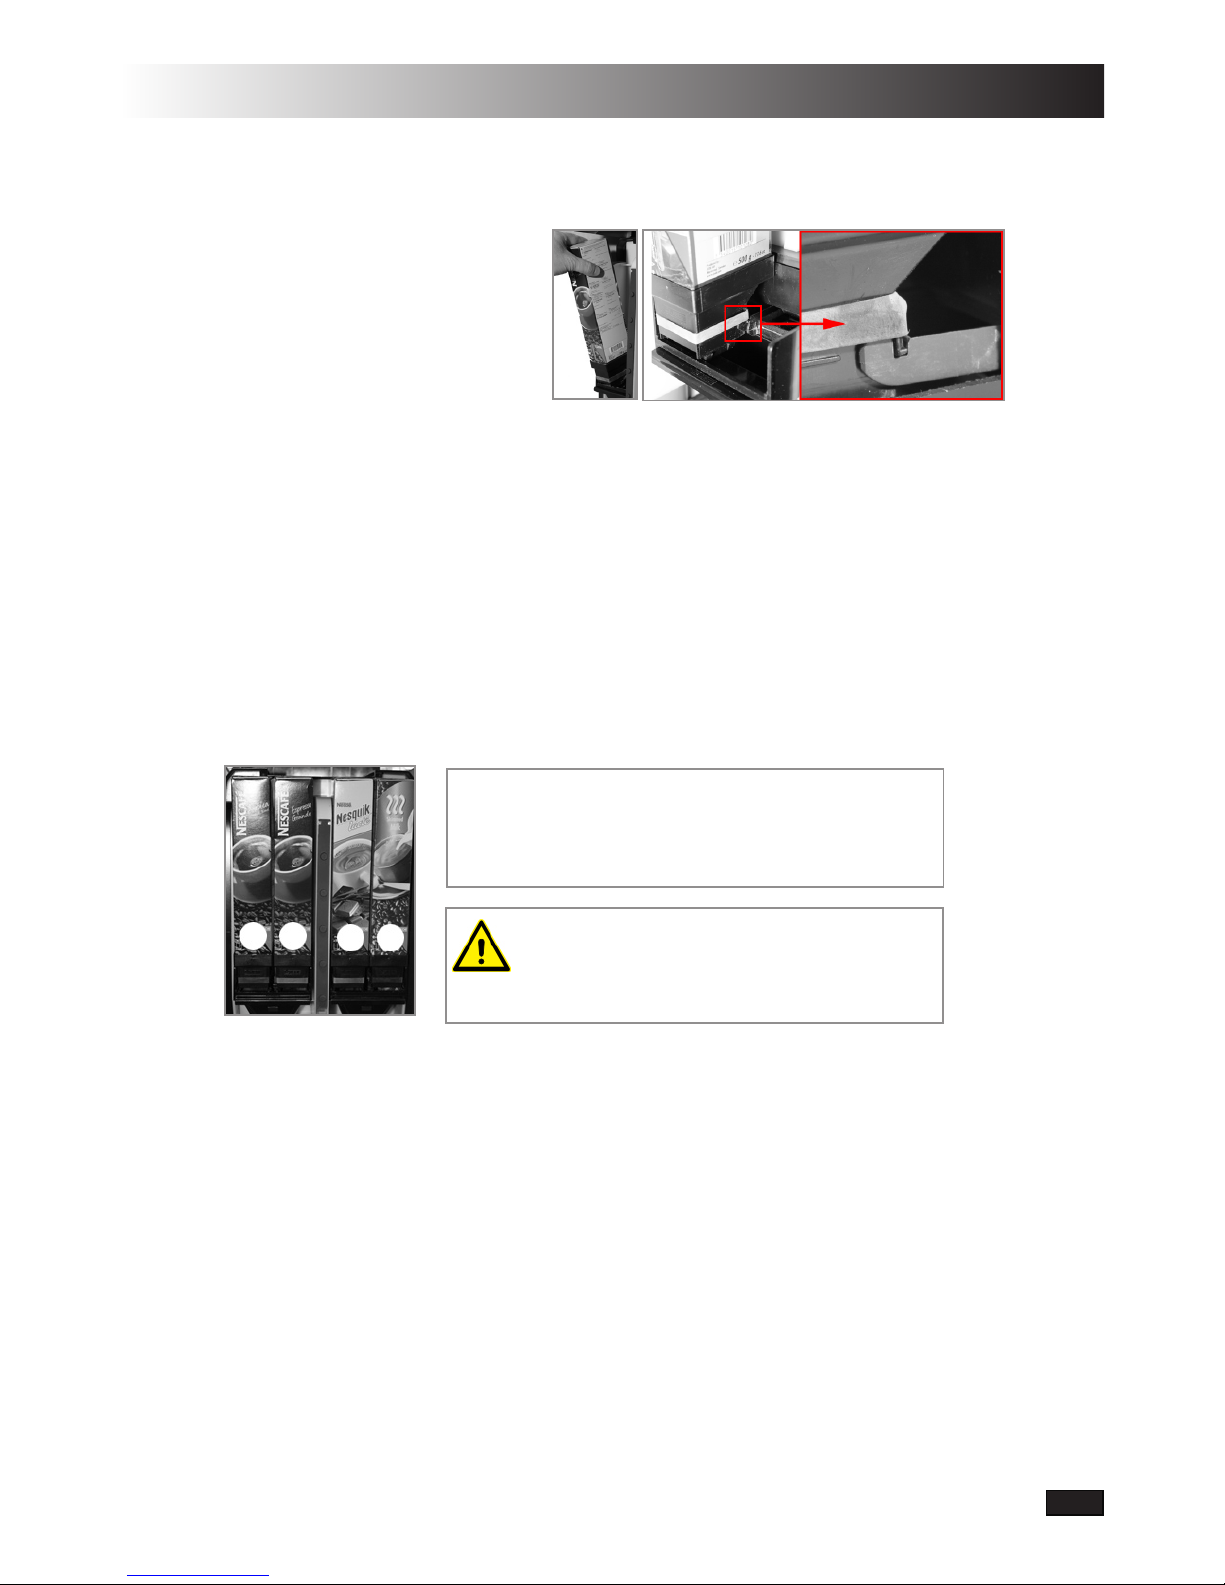
4.3 Installation of drink cartridges
Begin by removing the cartridge packaging. Then remove the cartridge bracket as
pergures7to9.Thispartofthecartridgeis not used in this vending machine.
Note: Never remove the rubber band.
Figure 7 Figure 8 Figure 9
QUATTRO
Rev. A 2012-09-10 Service manual 12
1234
Insertthecartridgesasperg-
ures 10-12. Check that they locate
properly into the grip hooks
(gure11and12).
The cartridges must be placed
in the correct order as per the
loading schedule below.
5 Loading schedule
This vending machine is pre-programmed for 3 different loading schedules. As
standard, loading schedule no. 1 is used. Place the drink cartridges as per the
following:
Nescafe Arabica Item no: 1053
Nescafe Espresso Grande Item no: 1069
Nesquick Lacté Item no: 1073
Skimmed milk Item no: 1018
1.
2.
3.
4.
Irrespective of loading schedule, cartridge
number 4 can be replaced with:
Figure 10 Figure 11 Figure 12
Cappuccino Topping Item no: 10884.
Figure 13

QUATTROjskjsdfdsfdzxczxczxczxczxc
QUATTRO
Rev. A 2012-09-10Service manual
13
Rev: 1.0-A
Variant Volume (cl) Drink Doses 1 Doses 2 Doses 3 Doses 4
114 1 Coffee 5
14 2 Espresso 5
14 3 Café Latte 5 6
14 4 Cappuccino 4 7
14 5 Chocolate 10
14 6 Hot Water
Variant Volume (cl) Drink Doses 1 Doses 2 Doses 3 Doses 4
214 1 Coffee 6
14 2 Espresso 5
14 3 Café Latte 5 6
14 4 Cappuccino 4 7
14 5 Chocolate 10
14 6 Hot Water
Variant Volume (cl) Drink Doses 1 Doses 2 Doses 3 Doses 4
314 1 Coffee 4
14 2 Espresso 5
14 3 Café Latte 4 6
14 4 Cappuccino 3 7
14 5 Chocolate 10
14 6 Hot Water
5.1 Loading schedule, variants
Loading schedules are set as follows:
Variant Volume (cl) Name Cartridge 1 Cartridge 2 Cartridge 3 Cartridge 4
114 Premium Arabica Espresso
Grande
Nesquick
Lacté
Skimmed
milk
214 Super Premium Arabica Espresso
Grande
Nesquick
Lacté
Skimmed
milk
314 Eco Arabica Espresso
Grande
Nesquick
Lacté
Skimmed
milk

QUATTRO
Rev. A 2012-09-10 Service manual 14
1
2
3
To change from the preset loading schedule (1) to another, do as
follows:
Turn off the power to the machine (use the switch on the
back).
Wait approx. 5 sec. (until the green LED has extinguished).
Hold in the desired drink button (1-3) for the desired
loadingschedule(gure14).
Turn on the power to the machine withoutlettinggoof
the drink button.
When the red LED light is lit, release the drink button.
The red LED blinks 1 to 3 times to indicate the loading
schedule that has been chosen.
The change of the loading schedule is now complete.
1.
2.
3.
4.
5.
6.
7.
As previously stated, the machine has 3 different loading schedules for 6 different
drinks.Thismeansthatthedrinkstrengthandavourcanbevariedaccordingto
personal preferences.
5.2 Change of loading schedule
Figure 14
5.3 Menu panel
By holding in buttons 1-5, respectively button 6 (hot water) you can change the
drink’s properties. The green LED blinks quickly during app. 5 seconds, then
slowly. The following apply to these choices:
Buttons 1-5:•
Button 6:• If the drink button is released directly after pressing, then
the tea water will be dispensed according to the loading
schedule (14 cl.).
If the drink button is kept pressed in then the tea water
is dispensed until the button is released.
Observe that the above choices via menu panel only apply
for one dispensing. The machine returns to the selected
loading schedule after the drink has been delivered.
If any drink button is held in until the green LED blinks
slowlyand is released during this period, then the coffe
strength is reduced for drinks 1-4 and the chocolate’s
strength for drink 5.
ObservethatthegreenLEDrstblinksslowly.
QUATTROjskjsdfdsfdzxczxczxczxczxc
QUATTRO
Rev. A 2012-09-10Service manual
15
5
8
6 Daily care and cleaning
In order for the vending machine to supply quality drinks and function optimally, it
is important to perform a basic daily clean at regular intervals. This machine is built
so that cleaning can be done by the user in a simple and effective manner.
6.1Rinsingthemixerbowls
This should be included in the daily cleaning
and always at the endoftheweek or follow-
ing longer periods when the machine is not in
use.
Open then lift the front of the
machine and push it backward.
Place a cup that holds at least 15 cl. on
thespilltray(8,gure15).
Press the machine’s blue rinse button
(5), the mixer bowls, hoses and nozzle
will then be rinsed with hot water.
1.
2.
3.
6.2 Cleaning the spill tray
This should be included in the daily care
routine.
Removethespilltray(8,gure15).
Empty the tray and rinse it.
1.
2.
6.3 External cleaning
Wipe down the casing and spill tray with a mild
cleaning agent or soapy water. Dry off using a
soft cloth.
Rinsing of the mixer bowls is done withhotwater.
Never use cleaners containing solvents.
Figure 15

QUATTRO
Rev. A 2012-09-10 Service manual 16
1
2
3
4
5
6
7
8
9
10
11
12 13
6.4 Cleaning of the machine’s internal parts
We recommend you perform this process every week with normal use.
Partsthatmustbewashed(gure16): Quantity:
Dispenser. 2
Funnel. 2
Fan duct (rear). 1
Filter. 1
Fan duct (front). 1
Steam trap. 2
Mixing bowl. 2
Hose. 3
Nozzle. 3
Spill grate. 1
Spill tray. 1
Whipper. 2
Lock ring (mixer bowl). 2
1.
2.
3.
4.
5.
6.
7.
8.
9.
10.
11.
12.
13.
Figure 16
Always switch off the power to the machine
before you begin the cleaning process.

QUATTROjskjsdfdsfdzxczxczxczxczxc
QUATTRO
Rev. A 2012-09-10Service manual
17
1
2
Ensure that the marking dot on the whipper
isalignedwiththeatedgeonthewhipper
shaft.(gure19),thenpressrmlyuntilit
clips fully in place.
6.5 Disassembling the machine’s internal parts
Open then lift the front of the machine and push it
backward.
Remove the drink cartridges. Note their placement.
Removethetwofunnels(2,gure16)bypulling
them straight out.
Removethedispenser(gure17)bypressinginthe
catch (1), then lift the dispenser upward and then
straight out (2).
Removethehoses(8,gure16)frommixerbowls
(7,gure16).
Remove the mixer bowls by turning the lock ring
counterclockwise(gure18).
Removethewhipper(12,gure16)bypullingit
outward.
Removethelockring(gure18)byturningitcoun
ter clockwise to stop and then pull it outward parallel
to the whipper shaft.
Pulloutthefanduct(3,5,gure16)andopenits
twohalves.Removethelter(4).
Removethespilltray(11,gure16)anditsgrate
(10).
1.
2.
3.
4.
5.
6.
7.
8.
9.
10.
Figure 17
Figure 18
Wash all of the parts in warm water. Be careful to dry all the parts before they
are re-mounted as moisture has a negative effect on the machine’s function. Put
the parts back together in reverse order as per the above.
Figure 19

QUATTRO
Rev. A 2012-09-10 Service manual 18
1
2
3
6.6 De-scaling
After the machine has been used for a while it must be de-scaled. This is particu-
larly important if you use hard water (over 10 ºDH). De-scaling removes any lime
scale deposits in the machine’s components and ensures that the machine contin-
ues to function correctly.
De-scalingisdoneasfollows:
Switch off the power to the machine. If
the machine is connected to a mains
watersupply then also shut off the
water.
Drain the machine’s water heater tank
(1,gure20)andthemanuallltank(2).
Note that the water from the heater tank
is very hot. Put back the clamps (3) on
the hoses when the tanks are empty
(gure20).
Mix 1.5 dl. Jede Cleaner with 3 litres cold
water.Removethebluellcapmarked
“water”andpourthenishedmixtureinto
the manuallltank.(gure21).
Start the machine and check that it func-
tions normally, the red LED will extinguish
after approx. 5 minutes, the green LED
willthenbecomeilluminatedwithaxed
light. Note that any connection to the
mainswatersupply must remain
shut off.
Place a vessel on the machine’s spill tray
and then press the machine’s blue rinse
buttononce(4,gure23).
Allow the machine to remainwiththe
poweron for at least 1 hour.
1.
2.
3.
4.
5.
6.
Figure 20
Figure 21
Caution!
Always use Jede Cleaner for de-scaling. Use of any other agent
that is not approved by Jede can cause the machine’s components
to malfunction.
Prevent the machine from unintentionally
being used while de-scaling takes place.

QUATTROjskjsdfdsfdzxczxczxczxczxc
QUATTRO
Rev. A 2012-09-10Service manual
19
1
Switch off the power to the machine.
Empty the machine’s heater tank
(1,gure22)andmanuallltank(2).
Note that the water from the heater tank
is very hot. Put back the clamps (3) on
the hoses when the tanks are empty
(gure22).
Removethebluellcapmarked“Water”.
Fill with approx. 5 litres of cold water.
Switch on the machine and allow the
watertolluptheheatertank,thistakes
approximately 1 minute.
Place a vessel on the machine’s spill tray
and then press the blue rinse button
(4,gure23).
Switch off the power to the machine.
Empty the machine’s heater tank (1) and
manuallltank(2).Putbacktheclamps
(3) on the hoses when the tanks are
empty(gure22).
Repeat points 8 to 10 a further three
times.
If the machine is connected to a mains
water supply, then do not forget to turn
the water back on once de-scaling is
completed.
7.
8.
9.
10.
11.
12.
If any of the drinks from the vending
machine have a sour after taste follow-
ing de-scaling, then repeat rinsing as
per points 8 to 10. Jede Cleaner is not
classed as hazardous to the health.
7 Troubleshooting
The machine’s red LED can indicate errors with the aid of different blinking
patterns. By following the instructions in chapter 7.2 (Error indicators), you can
rectify minor problems in the machine’s function without having to call for service.
Figure 22
1
2
3
Figure 23
4
Table of contents
Other Jede Coffee Maker manuals

Popular Coffee Maker manuals by other brands


Sprada
Sprada FUTURE One Touch Cappuccino Operating instructions and useful tips

Coleman
Coleman Portable Propane Coffeemaker Instructions for use

Premier
Premier CM-4356 instruction manual

Philips
Philips Essence quick start guide

Adler Europe
Adler Europe CR 4406 user manual

Oster
Oster BVSTEM3300 instruction manual