Jefferson JEFPDB1500 User manual
User Manual
v.1.1
JEFPDB1500
Pillar Drill
230V ~ 50Hz

2
USER MANUAL v1.1
JEFPDB1500
1500W Pillar Drill • 230V ~50Hz
www.jeffersontools.com
Contents:
About This Document: 2
Introduction 2
Specications 3
Safety Information 3
Parts Identication 5
Unpacking & Working Environment 5
Assembly Instructions 6
Settings & Adjustments 7
Using Straight Shank Drill Bits 7
Using Morse Taper Drill Bits 7
Pre-Setting The Drilling Depth Bench Type 8
Adjusting Speed Settings 8
Operation Guide 8
Drilling 9
Maintenance 9
Troubleshooting 10
Circuit Diagram 11
Parts Lists & Diagram 12
Environmental Protection 16
WEEE Waste Electrical and Electronic Equipment Statement 16
RoHS Directive 2011/65/EU 16
EC Declaration of Conformity 17
Limited Warranty Statement 18
About This Document:
This manual has been compiled by Jefferson Tools and is an integrated part of the product with which it's enclosed and should be kept with it for
future reference. Please read all of the information supplied in this User Manual before operating this product.
This manual describes the purpose for which the product has been designed and contains all the necessary information to ensure its correct and
safe use. We recommend that you read the information supplied before carrying out any maintenance or repair. By following all the general safety
instructions contained in this manual you will help to ensure operator safety and extend the potential life span of the equipment.
All photographs and drawings in this manual are supplied by Jefferson Tools to help illustrate the operation of the product. Whilst every effort
has been made to ensure accuracy of information contained in this manual our policy of continuous improvement determines the right to make
modifications without prior warning.
The information contained in this Instruction Manual is designed to assist you in the safe operation and maintenance of the equipment. Some
illustrations in this Instruction Manual may show details or attachments that differ from those on your own model. Contact your nearest Jefferson
Dealer if you are unsure about any information included in this manual or require any additional information about the safe use, operation
maintenance, or repair of this equipment.
Introduction:
This equipment has been designed for drilling large or small holes in metal, wood, plastic, etc.
Before attempting to use this product, please read this manual thoroughly and follow the instructions carefully. In doing so you will ensure the
safety of yourself and that of others around you and will help to ensure long and reliable service from the equipment.
3
USER MANUAL v1.1
JEFPDB1500
1500W Pillar Drill • 230V ~50Hz
www.jeffersontools.com
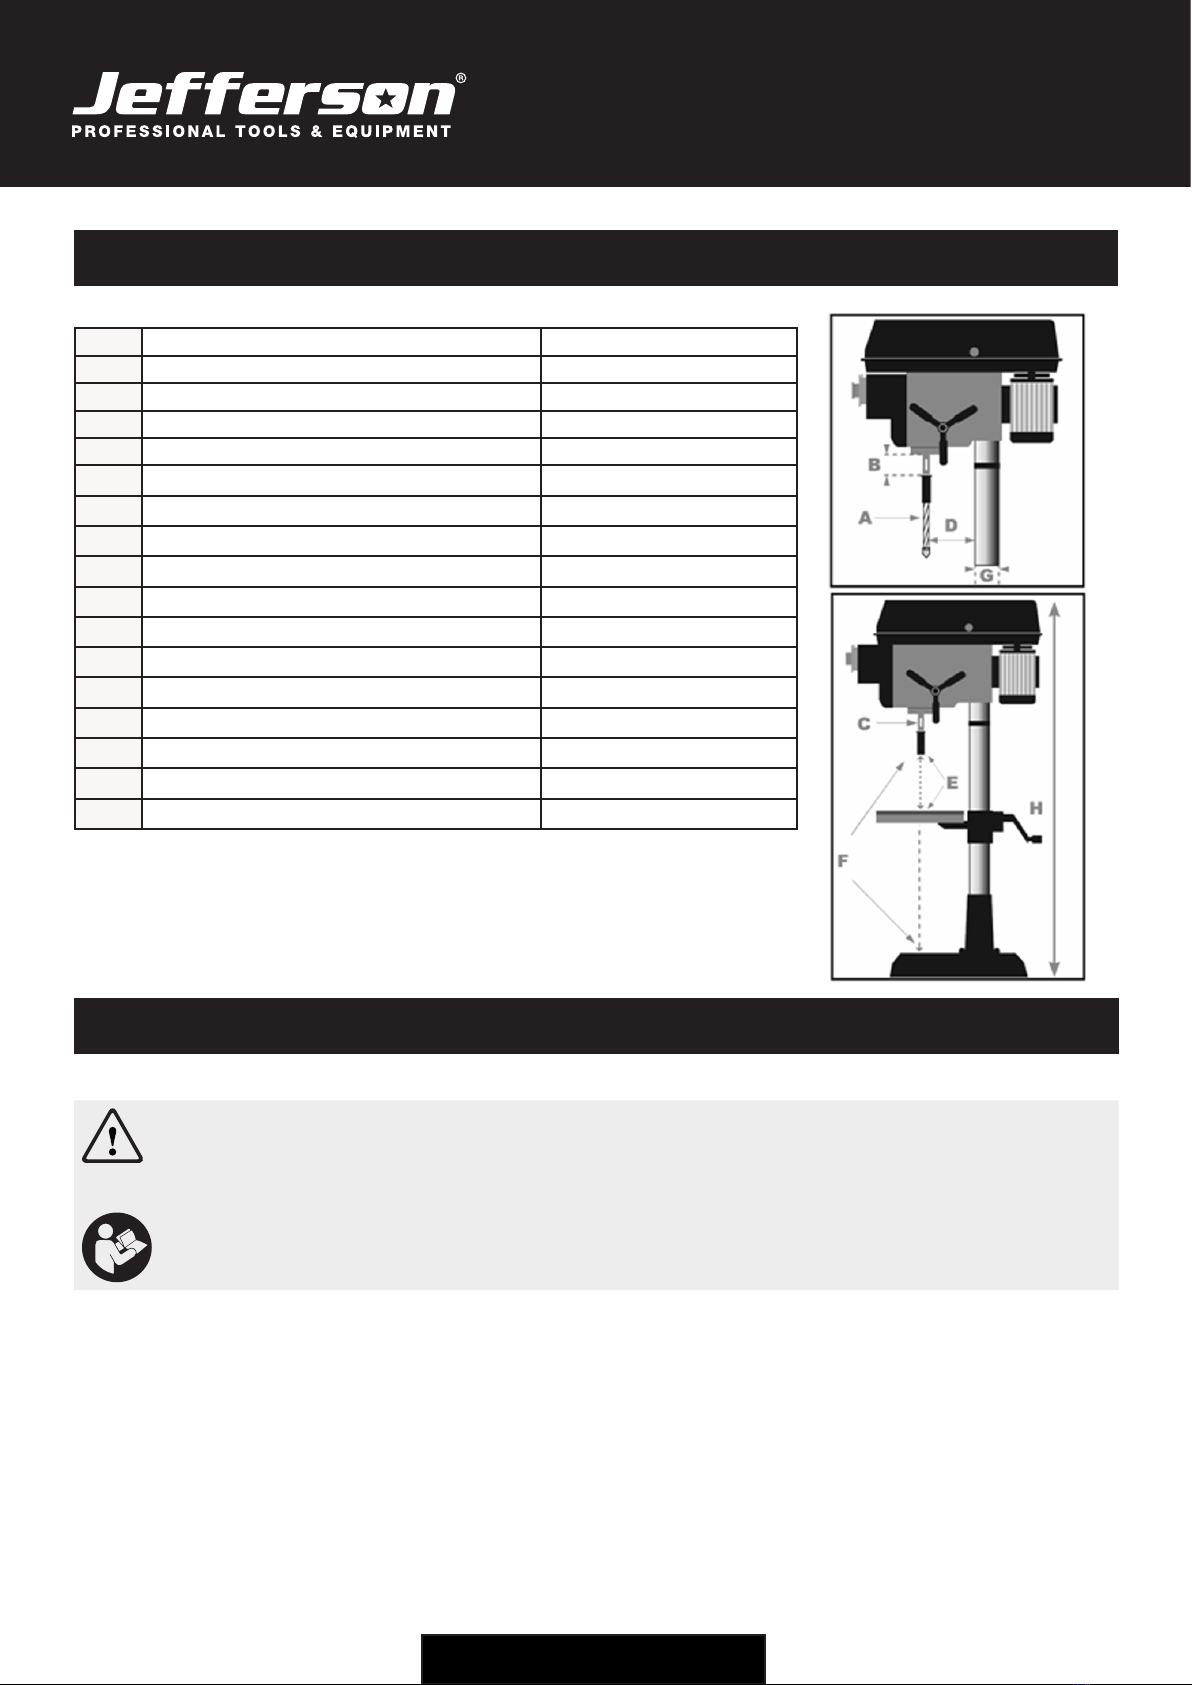
Specifications:
AMax Drilling Diameter 32mm (1/1-4”)
Motor Power 1500W
Chuck Capacity 5-20mm
Input Voltage - Frequency 230V - 50Hz
BSpindle Travel 120mm
Number of Speeds 12
Speed 50Hz 150-2450R.P.M.
CSpindle Taper MT4
DMax. distance from spindle axis to surface of column 255mm
EMax. distance from spindle end to surface of table 745mm
FMax. distance from spindle end to surface of base 1205mm
Swing 510mm
Table Size 420X480mm
Base Size 575X425mm
GColumn Diameter 92mm
HHeight 1710mm
NW/GW 125/130kg
Safety Information:
Warning: this symbol is used throughout the instructions whenever there is a risk of personal injury. Ensure that these warnings are
read and understood at all times. When using electric tools, basic safety precautions should always be followed to reduce the risk of
fire, electric shock and personal injury: You should not operate this machine unless you are thoroughly familiar with drilling machines
and drilling techniques. If there is any doubt whatsoever you should consult a qualified person.
Please read all safety warnings and all instructions. Failure to follow the warnings and instructions may result in electric shock, fire
and/or serious injury. Store this instruction manual in a safe place for future reference.
General Safety
• Always ensure that air can circulate around the machine and that the air vents are unobstructed.
• Always keep work area clean & tidy. Cluttered work areas and benches increase the risk of accidents and injury.
• Never over-reach. Maintain a balanced footing at all times.
• Never use or store this equipment in a wet/damp environment or expose to rain.
• Keep untrained personal, children and pets away from the work area.
• Never operate a machine when under the inuence of alcohol, drugs or medication.
• Always ensure the workplace is well lit. Ensure that lighting is placed so that you will not be working in your own shadow.
• Do not use tools in the presence of ammable liquids or gasses.
• Stay alert at all times, watch what you are doing, use common sense and do not operate the tool when you are tired.

4
USER MANUAL v1.1
JEFPDB1500
1500W Pillar Drill • 230V ~50Hz
www.jeffersontools.com
Safety Information: (continued)
Equipment Safety
• Always keep guards in place and in clean, working order. A guard or other part that is damaged should be properly repaired or replaced using
Jefferson approved parts.
• Don’t force the machine or use it for purposes other than it was designed for. Do not modify the equipment to improve performance or ex-
ceed the specied rated speed.
• Remove any adjusting keys or wrenches before using the equipment.
• Always disconnect the machine from the power supply before carrying out any servicing or changing accessories.
• Check the alignment and condition of all moving parts before use. Do not use if any parts are damaged or worn.
• Never remove the cover panel unless the machine is disconnected from the power supply, and never use the machine with the cover panels
removed.
• Guard against electric shock. Avoid body contact with earthed or grounded surfaces.
• This equipment is designed for use in dry, indoor working environments with suitable ventillation.
• Avoid accidental starting by making sure the power switch is off before plugging in the power cable.
• Never operate the machine until it is completely assembled and you have read and understood this entire manual.
• Always use clamps or a drill vice bolted to the table, to hold the work. The workpiece should never be held with bare hands.
• Always shut off the power & remove the drill bit before leaving the machine. Never leave the drill unattended whilst it is running.
• Always use the correct drilling speeds for the drill size and the type of material being drilled.
• Always remove and store the drill bits when you have nished working with the equipment.
• Never attempt to drill into a workpiece that does not have a at surface unless a suitable support is used.
• Always stop the drill before removing workpieces, work supports or swarf from the table.
• Keep drills sharp and clean for best and safest performance.
• Adjust the table or depth stop where necessary to avoid drilling into the table surface.
• Always be sure that the drill bit is securely locked in the chuck.
• Never assemble or set up any work on the table while the drill is running.
• Always ensure the table lock is tight before starting the drill.
• Keep the handles dry, clean and free from oil and grease.
• Always keep hands and ngers away from the drill bit when the equipment is connected to the power supply.
• Do not operate the equipment if you are tired or under the inuence of alcohol, drugs or medicine.
• Keep children and animals away from the equipment and work area at all times.
Dust generated from certain materials can be hazardous to your health. Always operate the drill in a well-ventilated area. Use a dust
collection system if possible. Use a dust mask or other suitable respiratory protection as required. The use of any accessory or
attachment other than one recommended in this instruction manual may present a risk of personal injury.
Protective Clothing
• Always wear the appropriate clothing and personal protection equipment
• Non-slip footwear and safety boots is recommended.
• Wear a protective hair covering or tie back long hair.
• Always wear safety glasses and ear protection.
• Wear a face mask if drilling into any material which produces dust.
• Do not operate this equipment using loose clothing or other jewellery may get caught in moving parts.
Electrical Safety
• Ensure that you check the equipment thoroughly to ensure it is safe and t for purpose before each use. It is important that you inspect all
plugs, sockets, power cables and electrical ttings for wear and damage and repair or replace any defective components. The risk of electric
shock can be minimised by the correct use of the appropriate electrical safety devices.
• We recommend that you t a Residual Current Circuit Breaker (RCCB) in the main distribution board and that a Residual Current Device
(RCD) is used when operating this equipment.
• The Electricity at Work Act 1989 includes legislation that places legal implications on employers to ensure the safety of electrical devices
in the workplace. The regulations dictate that all portable equipment must be inspected regularly and tested to ensure that it is safe for use.
'Portable equipment' means any electrical item that can be moved and this is often referred to as Portable Appliance Testing (PAT). PAT
testing should be carried out regularly on this equipment by trained, authorised personnel, as required by the legislation.
The Health and Safety at Work Act 1974 states that it is the responsibility of the owner of electrical appliances to ensure that both the
equipment and working environments are maintained to ensure safe operation at all times.
• Check that all equipment cables are secure, correctly insulated, free from damage, and protected against short circuit and overload before
connecting to the power supply. Do not use worn or damaged cables, plugs, sockets or other ttings.
• Ensure that the power supply matches voltage requirements specied on the equipment and that the plug is wired correctly and tted with
the correct fuse. If the electrical fuse blows, ensure it is replaced by an identical type of fuse with the same rating. maintaining, cleaning,
replacing or checking any parts.
• Ensure the power cable is kept away from heat, oil and sharp edges.
• Always disconnect the equipment from the power source before servicing, inspecting, adjusting or changing accessories.
5
USER MANUAL v1.1
JEFPDB1500
1500W Pillar Drill • 230V ~50Hz
www.jeffersontools.com
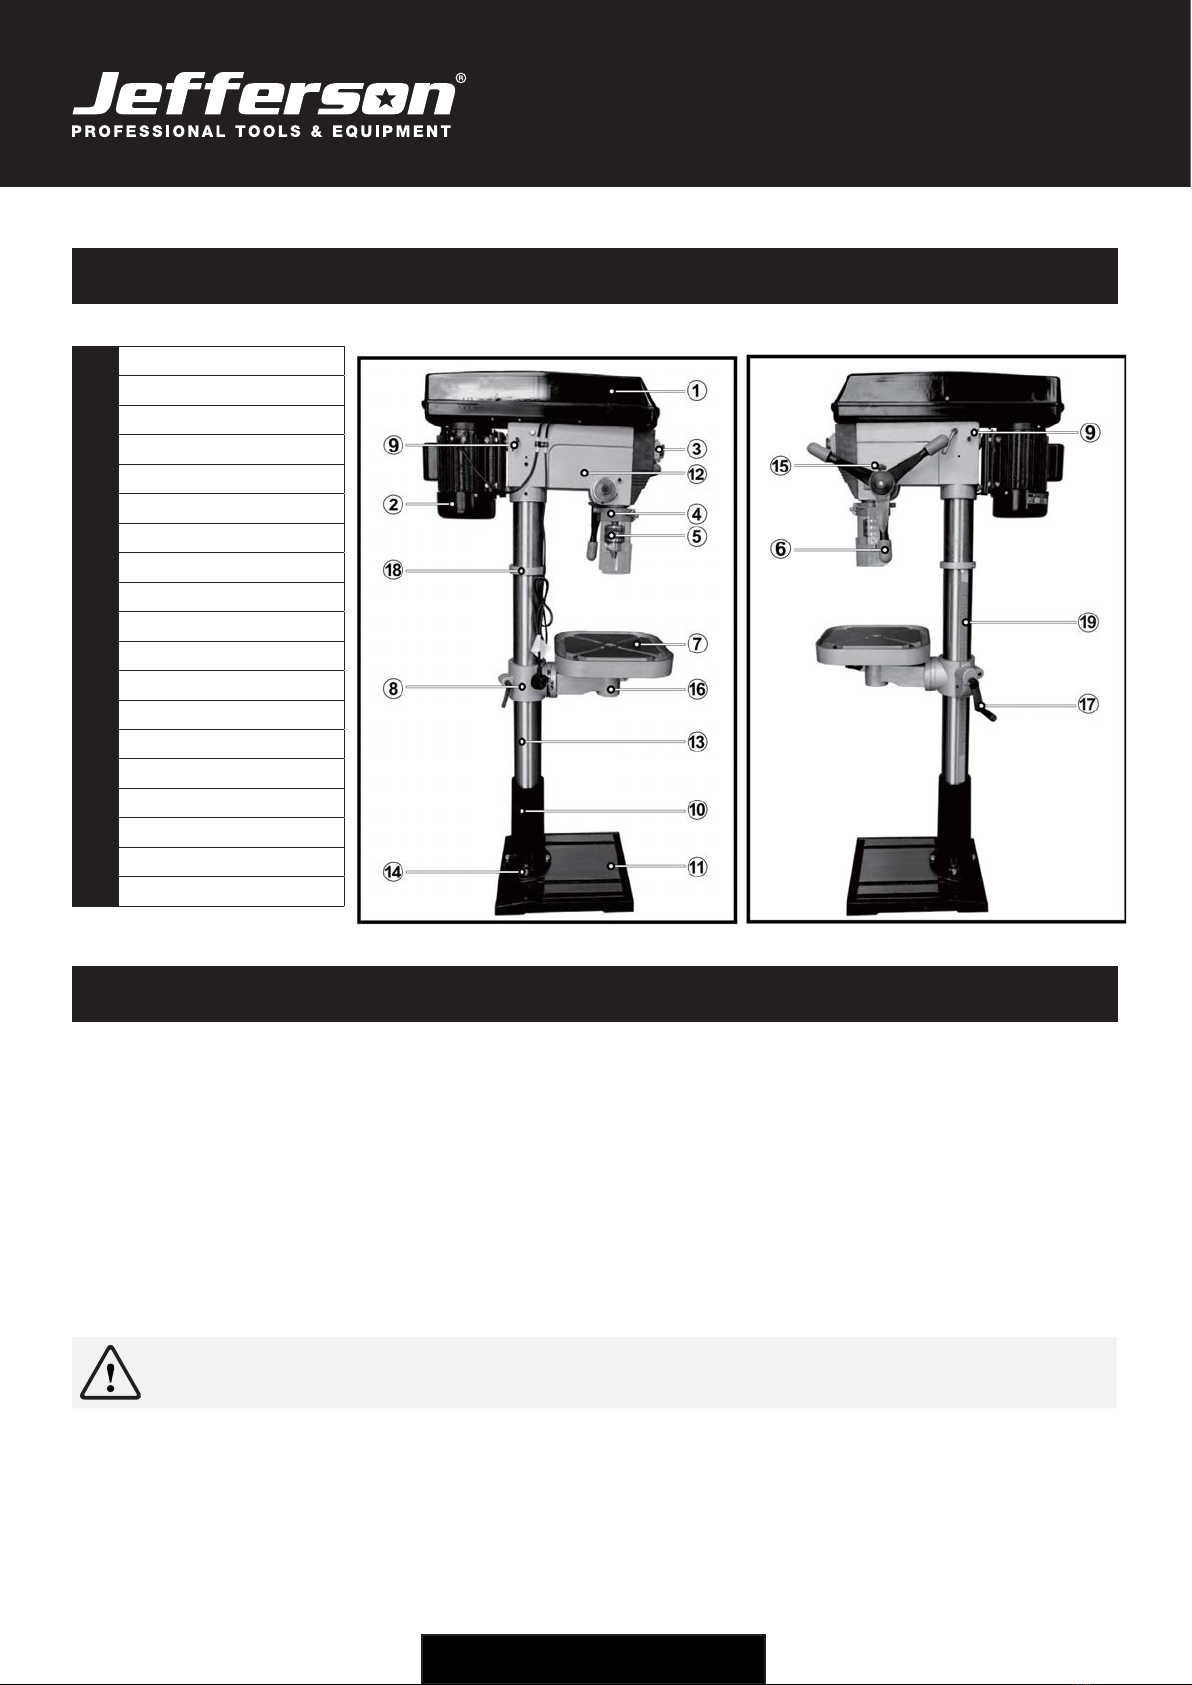
Parts Identification
1Pully Cover
2Motor
3Switch
4Chuck Guard
5Chuck
6Feed Handle
7Table
8Table Holder
9Belt Tension Lock Knob
10 Column Support
11 Base
12 Main Housing
13 Column
14 Bolts
15 Depth Stop Lock Knob
16 Table Lock
17 Table Adjustment Handle
18 Rack Collar
19 Rack
Unpacking & Working Environment
The equipment is delivered with the components shown above. After unpacking, check the parts against this list and check for any damage aused
during transit. If any damage is found contact your Jefferson Dealer and arrange a replacement.
Do not discard the packaging until the machine is assembled. The packaging consists of cardboard and appropriately marked materials which can
be sent to a suitable re-cycling centre.
To protect the machine parts from moisture, a protective coating of light machine oil will have been applied to the outside surfaces. Remove any
excess with a paper towel.
Take care when lifting the heavy head assembly. Before use, the machine must be mounted, and securely bolted, to a strong, heavy workbench, of
sufcient height that you will be standing upright when working.
Ensure the work place is adequately lit, and that you will not be working in your own shadow.
Always ensure the bench drill is disconnected from the power supply during assembly, setup, adjustment and servicing. Never leave
the equipment running while unattended.

6
USER MANUAL v1.1
JEFPDB1500
1500W Pillar Drill • 230V ~50Hz
www.jeffersontools.com
Assembly Instructions
Base & Column
1. Carefully remove contents from the packing box.
2. Select a rm, level surface on which to assemble the bench drill.
3. Select the base (Fig.1) and align the column support over the large
hole (Fig.2).
4. Align the holes in the column support with those in the base and
secure in place using the bolts and washers. (Fig.5).
5. Use a spanner to securely tighten all bolts (Fig.3). We recommend
mounting the base to stable surface for proper support.
6. Slide the column into the column support (Fig.4).
7. Secure in place with 2 grub screws using the hex key (Fig.5).
Rack & Table
1. Fix the rack on the table support as shown (Fig.6).
2. Assemble the support and rack onto the column, ensuring the rack is
positioned on the right side of the column (when viewing the product
from the front) (Fig.7).
3. Slide the rack all the way down until it locates into the lower column
support (Fig.8).
4. Slide the collar, tapered side facing down, over the column until it
locates the rack.
5. Tighten the grub screw on upper collar (Fig.9).
6. Fix table adjustment handle on the support (Fig.10).
7. Assemble table onto table support, tighten in place with table lock
(Fig.11).
Main Housing
1. Lift the main housing and slide it down onto the column as far as it will
go (Fig.12).
2. Ensure the spindle aligns with the table and base before securing the
housing.
3. To secure in position tighten the grub screws on the left and right hand
sides of the housing (Fig.13).
4. To t the feed wheel handles, screw them into feed wheel hub (Fig.14).
5. For some cast iron feed handle, tighten the 3 grub screws to wheel hub
(Fig.15) then x the plastic case on cast iron feed handle as shown
(Fig.16).
Chuck & Arbor
1. Before any assembly, ensure the chuck jaws are wound all the way up
(inside the chuck) to prevent them from damage (Fig.17).
2. Tighten Philip's head screws of the chuck guard to quill shaft (Fig.18).
3. Fit the tapered arbor end into the chuck by hand, using reasonable
force (Fig. 19).
5. Once it is located a rm tap on the underside of the chuck with a soft
hammer is required to secure it. The chuck & arbor are installed
correctly if they cannot be pulley out with hand force (Fig. 21).
Fig.1 Fig.2
Fig.3 Fig.4
Fig.5 Fig.6
Fig.7 Fig.8
Fig.9 Fig.10
Fig.11 Fig.12
Fig.13 Fig.14
Fig.15 Fig.16
7
USER MANUAL v1.1
JEFPDB1500
1500W Pillar Drill • 230V ~50Hz
www.jeffersontools.com
Settings & Adjustments
Table Height Adjustment
1. Loosen the table support lock (Fig. 22).
2. Rotate the table adjustment handle to set the desired table height and
tighten the table rock to secure the table in position (Fig. 23).
Table Bevel Adjustment
1. The bevel angel is adjusted by loosening the bolt that is located
underneath table support with a spanner (Fig. 24).
2. After tilting the working table (Fig. 25). to appropriate position,
re-tighten the bolt to secure its position.
Caution: When the table is angled/tilted, ensure the workpiece is clamped
to the table.
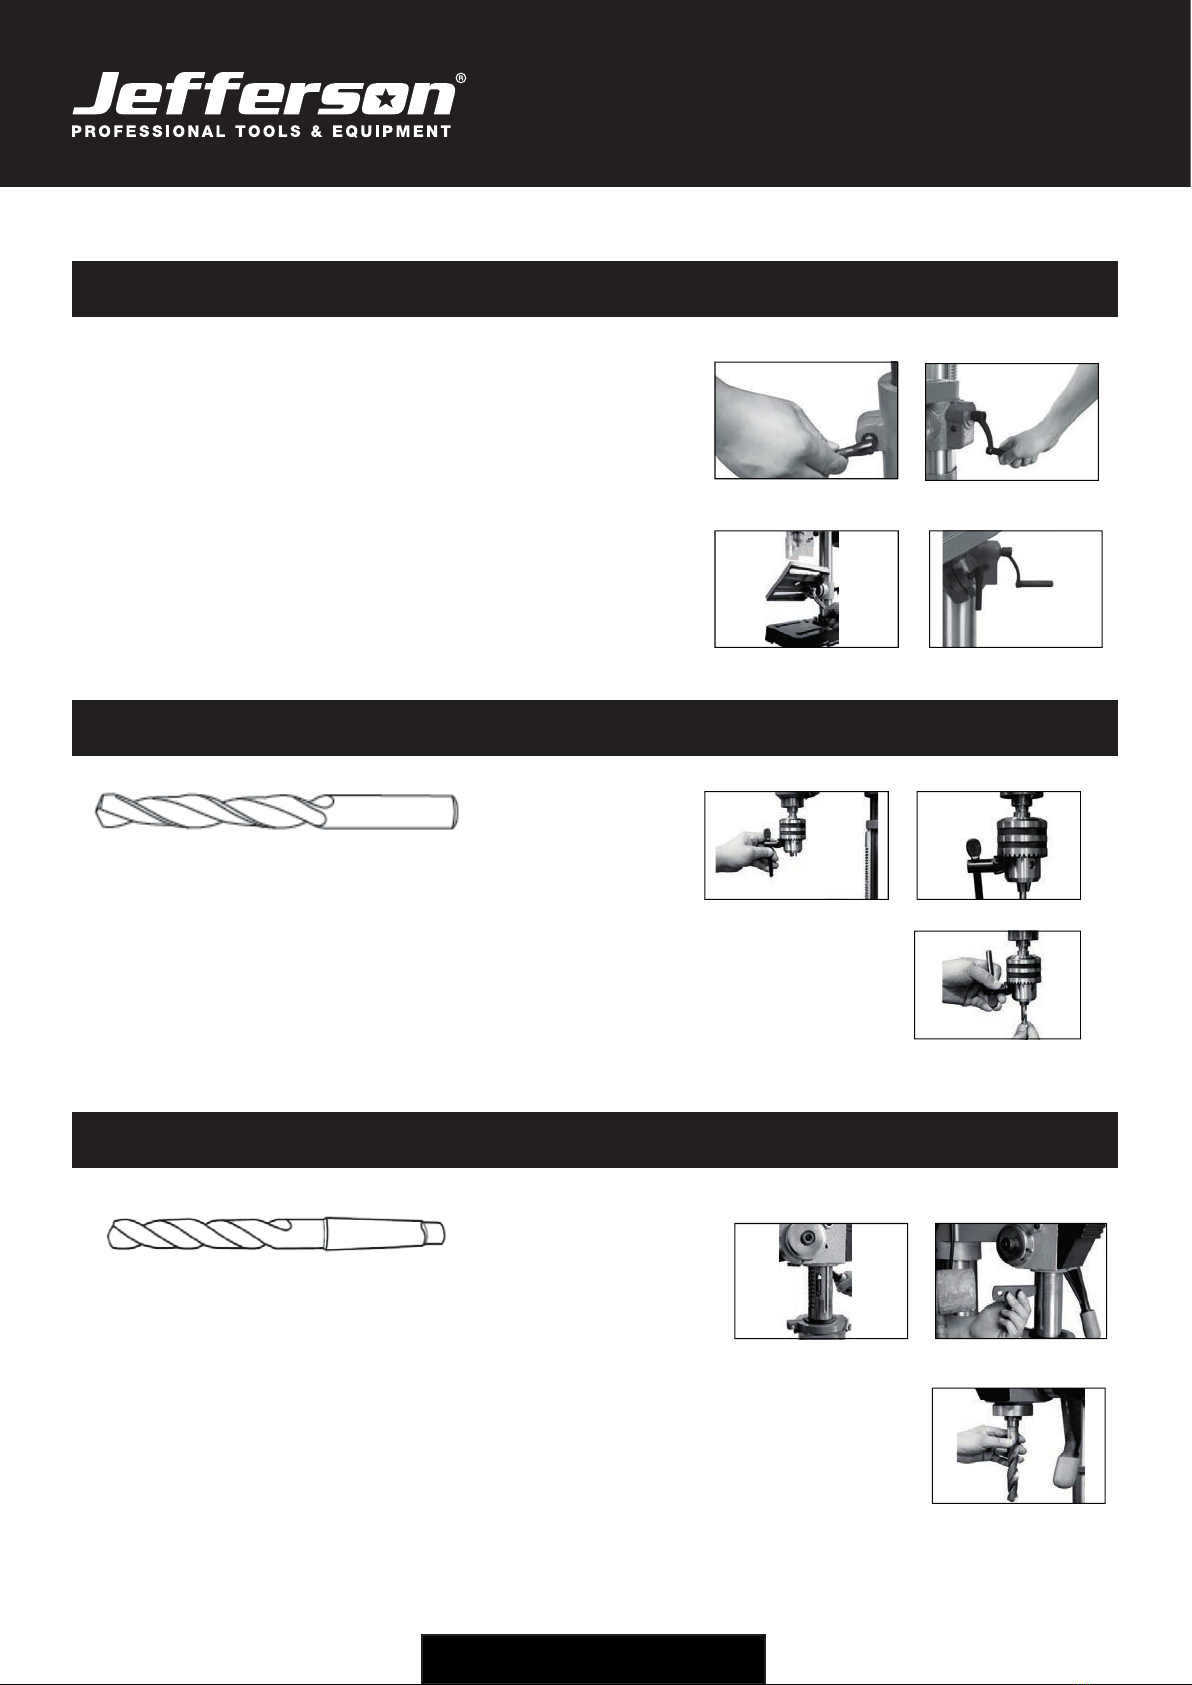
Using Straight Shank Drill Bits
1. Using the chuck key, loosen the jaws of the chuck by rotating in an
anti-clockwise direction (Fig. 26).
2. Insert the drill bit into the chuck (Fig.27).
3. While holding the drill bit in one hand rotate the top collar of the chuck
in a clockwise direction. Insert the chuck key into 1 of the 3 rotating
holes and tighten until the drill bit is secure (Fig. 28).
Using Straight Shank Drill Bits
1. To use Morse taper bits, remove chuck and arbor.
2. Turn arbor until the tang aligns with the slot in the quill (Fig. 29).
3. Insert the drill key into the slot and tap rmly with a metal hammer
until it is released (ensure the chuck jaws are wound all the way up to
prevent any damage (Fig. 30).
3. Place tapper bit into the spindle hole, twisting and pushing upward until
the bit is snug (Fig. 31).
4. Place block of wood on the table and raise up table until the tapered
bit is rmly into the spindle.
Fig.22 Fig.23
Fig.24 Fig.25
Fig.26 Fig.27
Fig.28
Fig.29 Fig.30
Fig.31

8
USER MANUAL v1.1
JEFPDB1500
1500W Pillar Drill • 230V ~50Hz
www.jeffersontools.com
Pre-Setting The Drilling Depth
To set the depth of the hole, adjust the depth stop as follows:
• Loosen depth stop lock knob by turning in an anti-clockwise
direction see (Fig.32.1)
• Rotate the to the desired depth, then tighten the half-wing
bolt (Fig.32.2)
To hold the spindle (and bit) at a desired depth:
• Loosen depth stop lock knob, turn feed wheel handle to lowest point
(Fig.32.3).
Rotate depth scale to desired depth and re-tighten the depth stop lock
knob. workpiece is clamped to the table.
Adjusting Speed Settings
You can change the drill press speed by adjusting the belt on the pulley
system. Refer to the chart inside the pulley cover for the various speed
congurations available for your model.
• Release the belt tension locking knobs located on either side of the
main housing (Fig.33.1).
• Once the tension is released, the belt tension handle can be used to
move the motor pulley closer to the idler pulley (Fig.33.2).
• The belt is removed by lifting it over the lip of the pulley while rotating
the pulley simultaneously (Fig.33.3).
• After re-adjustng the belts, use the belt tension handle to move the
motor pulley further away from the idler pulley. When the desired
positon is achieved use the locking knobs to secure the pulleys in
place (Fig.33.4).
• Proper belt tension is achieved when the measured deection (by
pushing in the centre of the belt) is approx. 5mm (Fig.33.5).
Operation Guide
Turning the Equipment On And Off
Note: The pulley cover must be closed to operate the drill.
• Turn the bench vice on by pressing the green button on the switch as
shown (Fig.34).
• Switch the bench vice off by pressing the red button on the switch.
(Fig.35).
• Secure your workpiece to the table if possible (for example use a vice
or a set of clamps).
Fig.32.1 Fig.32.2
Fig.32.3
Fig.33.1 Fig.33.2
Fig.33.3 Fig.33.4
Fig.33.5
Fig.35
Fig.34

9
USER MANUAL v1.1
JEFPDB1500
1500W Pillar Drill • 230V ~50Hz
www.jeffersontools.com
Drilling
1. Ensure the bench drill is switched off and disconnected from the power supply.
2. Loosen the jaws of the chuck with the chuck key by turning in an anti-clockwise direction and insert the selected drill bit into the as far as it
will go.
3. Insert the chuck key into 1 of the 3 locating holes and tighten until the drill bit is secure.
4. Select your drilling depth and secure the depth stop lock knob in position.
5. Turn the bench drill on by pressing the green button on the switch (Fig.34).
6. Adjust the table to your desired position.
7. Slowly rotate the feed wheel handles to bring the drill bit down towards the table and into your workpiece.
After drilling a hole, release the feed wheel handles slowly to return the chuck to its original position.
8. Continue the operation until the task is completed.
9. When your work is complete, switch the bench drill off by pressing the red button on the switch.
Maintenance
For maximum performance, it is essential that the bench drill is properly maintained. Always inspect it before use. Any damage should be re-
paired, and faults xed immediately. Always remove the plug from the power supply before carrying out any adjustment, servicing or maintenance
on this equipment. Contact your nearest Jefferson Dealer if any faults or damage is found.
Monthly Maintenance
1. Check tightness of mounting bolts, and head and column securing set screws.
2. Check the drive belt for wear, and replace if frayed or damaged.
3. Blow out with compressed air, or vacuum clean out, any dust that may have accumulated in the motor fan vents.
4. Apply a thin coat of wax paste or light oil to the table and column, for lubrication, and to help prevent corrosion.
5. If the mains lead is damaged in any way, it should be replaced immediately.
Lubrication
• All bearings are packed with grease at the factory and require no further lubrication.
• Occasionally, lubricate the quill shaft assembly and rack with light oil if required.
After Use
• Remove all swarf from the machine and thoroughly clean all surfaces.
• Components should be kept dry, with machined surfaces lightly oiled.
• Always remove drill bits, and store in a safe place.
Parts & Servicing
For Jefferson approved replacement parts contact your
nearest dealer or contact Jefferson tools
Telephone: +44 (0)1244 646 048
Fax: +44 (0)1244 241 191
Email: [email protected]

10
USER MANUAL v1.1
JEFPDB1500
1500W Pillar Drill • 230V ~50Hz
www.jeffersontools.com
Troubleshooting
PROBLEM POSSIBLE CAUSE SOLUTION
Noisy operation
(under load)
a. Incorrect belt tension
b. Dry spindle
c. Loose pulley
d. Loose belt
e. Worn bearing
a. Adjust tension
b. Remove spindle and quill assembly and lubricate
c. Tighten pulley
d. Adjust belt tension
e. Replace bearing
Excessive drill wobble a. Loose chuck
b. Worn spindle or bearing
c. Worn chuck
d. Bent drill bit
a. Tighten the chuck by pressing it down on to a block of wood against
the table
b. Replace the spindle shaft or bearing
c. Replace the chuck
d. Renew the drill bit
Motor wont start a. Power supply
b. Motor connection
c. Switch connection
d. Faulty switch.
e. Motor windings burned
f. Pulley cover not closed
g. Micro switch on cover is
not operating correctly
a. Check power cord/fuse.
b. Check motor connections.
c. Check switch connections.
d. Replace switch.
e. Replace motor.
f. Close pulley cover.
g. Check operation of micro switch, and renew /
adjust as necessary.
Drill binds in the
workpiece
a. Excessive feed pressure
b. Loose belt
c. Loose drill
d. Incorrect bit speed
e. Drill angles incorrect
for type of material
a. Apply less pressure
b. Check belt tension
c. Tighten drill with key
d. Adjust the drill speed reasonably
e. Consult a technical manual dealing with materials, drills and cutting
angles, and sharpen drill
accordingly.
Drill bit burns or smokes a. Incorrect speed
b. Swarf is not discharging
c. Dull drill or not proper
clearance for material
d. Needs coolant
e. Excessive feed pressure
a. Adjust drill speed accordingly
b. Clean drill
c. Check sharpness & taper
d. Use coolant whilst drilling
e. Apply less pressure
Table is difcut to raise a. Needs lubrication
b. Table lock tightened
a. Lubricate with light oil
b. Loosen clamp
11
USER MANUAL v1.1
JEFPDB1500
1500W Pillar Drill • 230V ~50Hz
www.jeffersontools.com
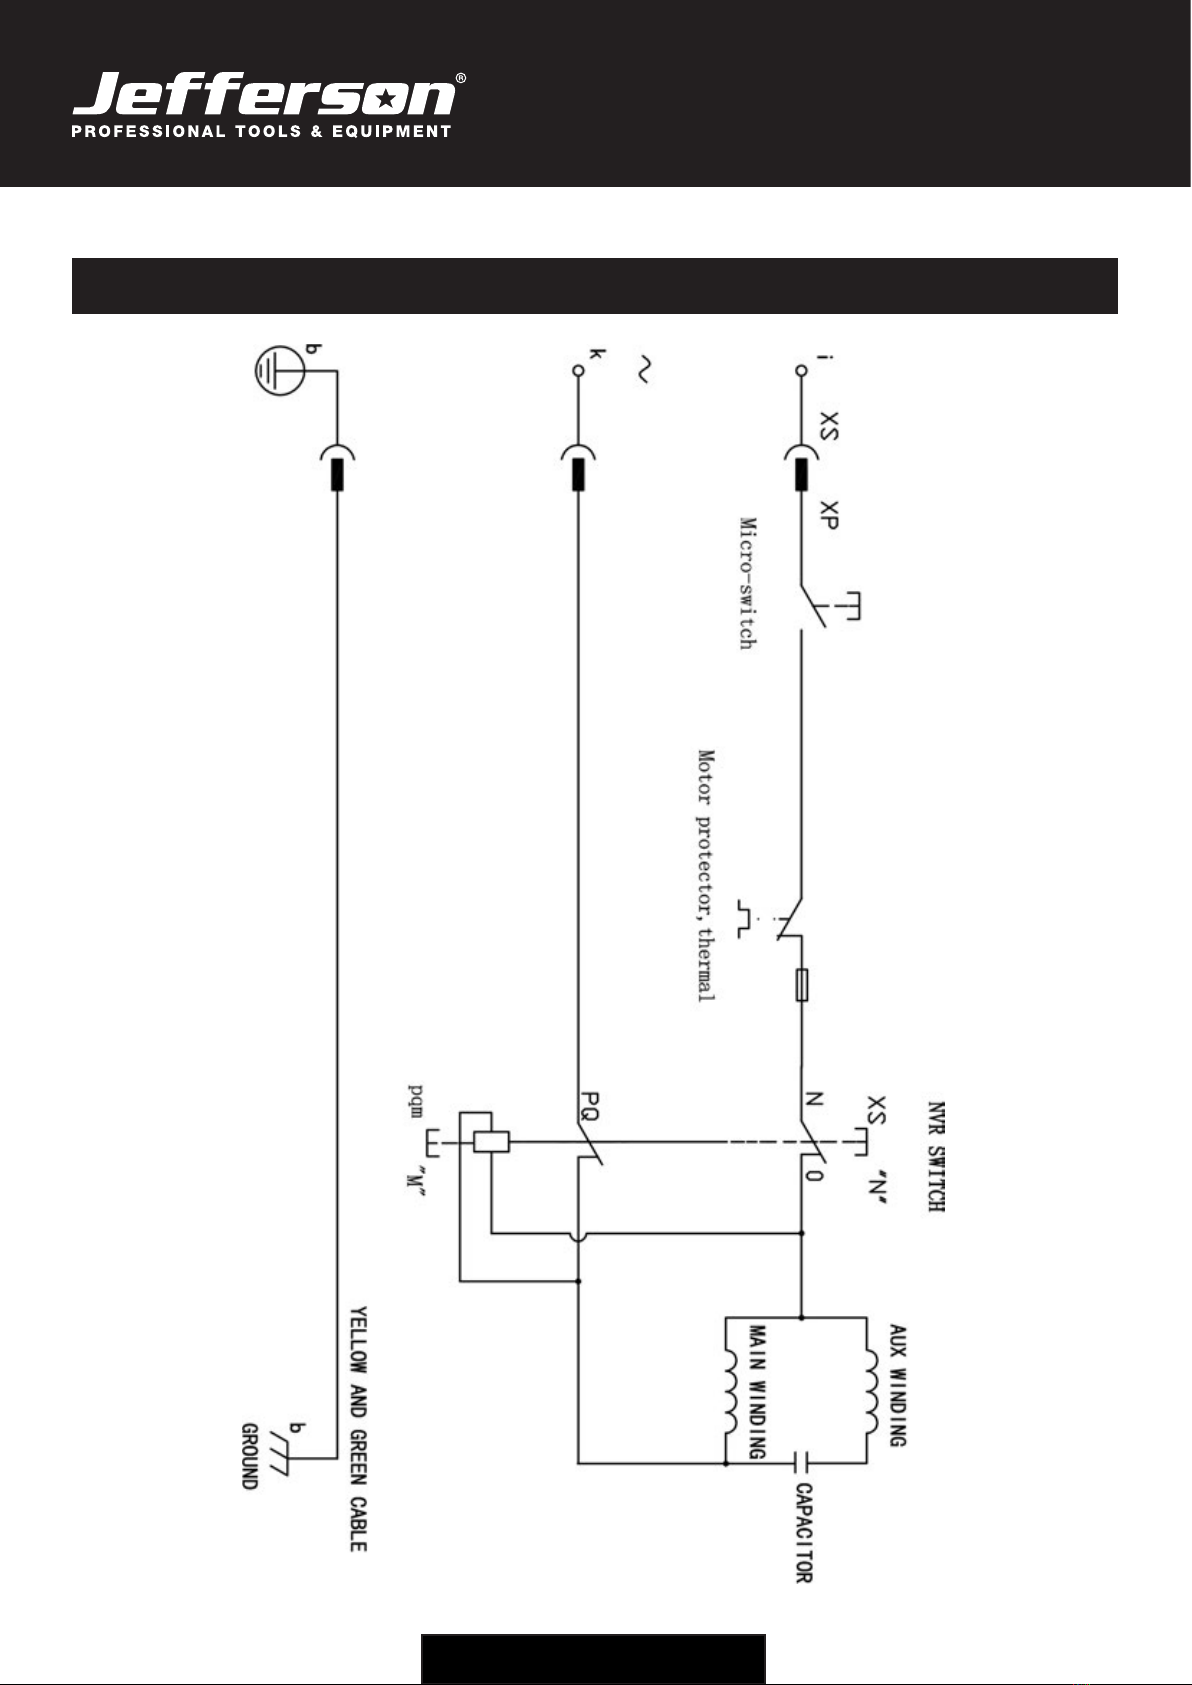
Circuit Diagram
12
USER MANUAL v1.1
JEFPDB1500
1500W Pillar Drill • 230V ~50Hz
www.jeffersontools.com
115
116
(72)
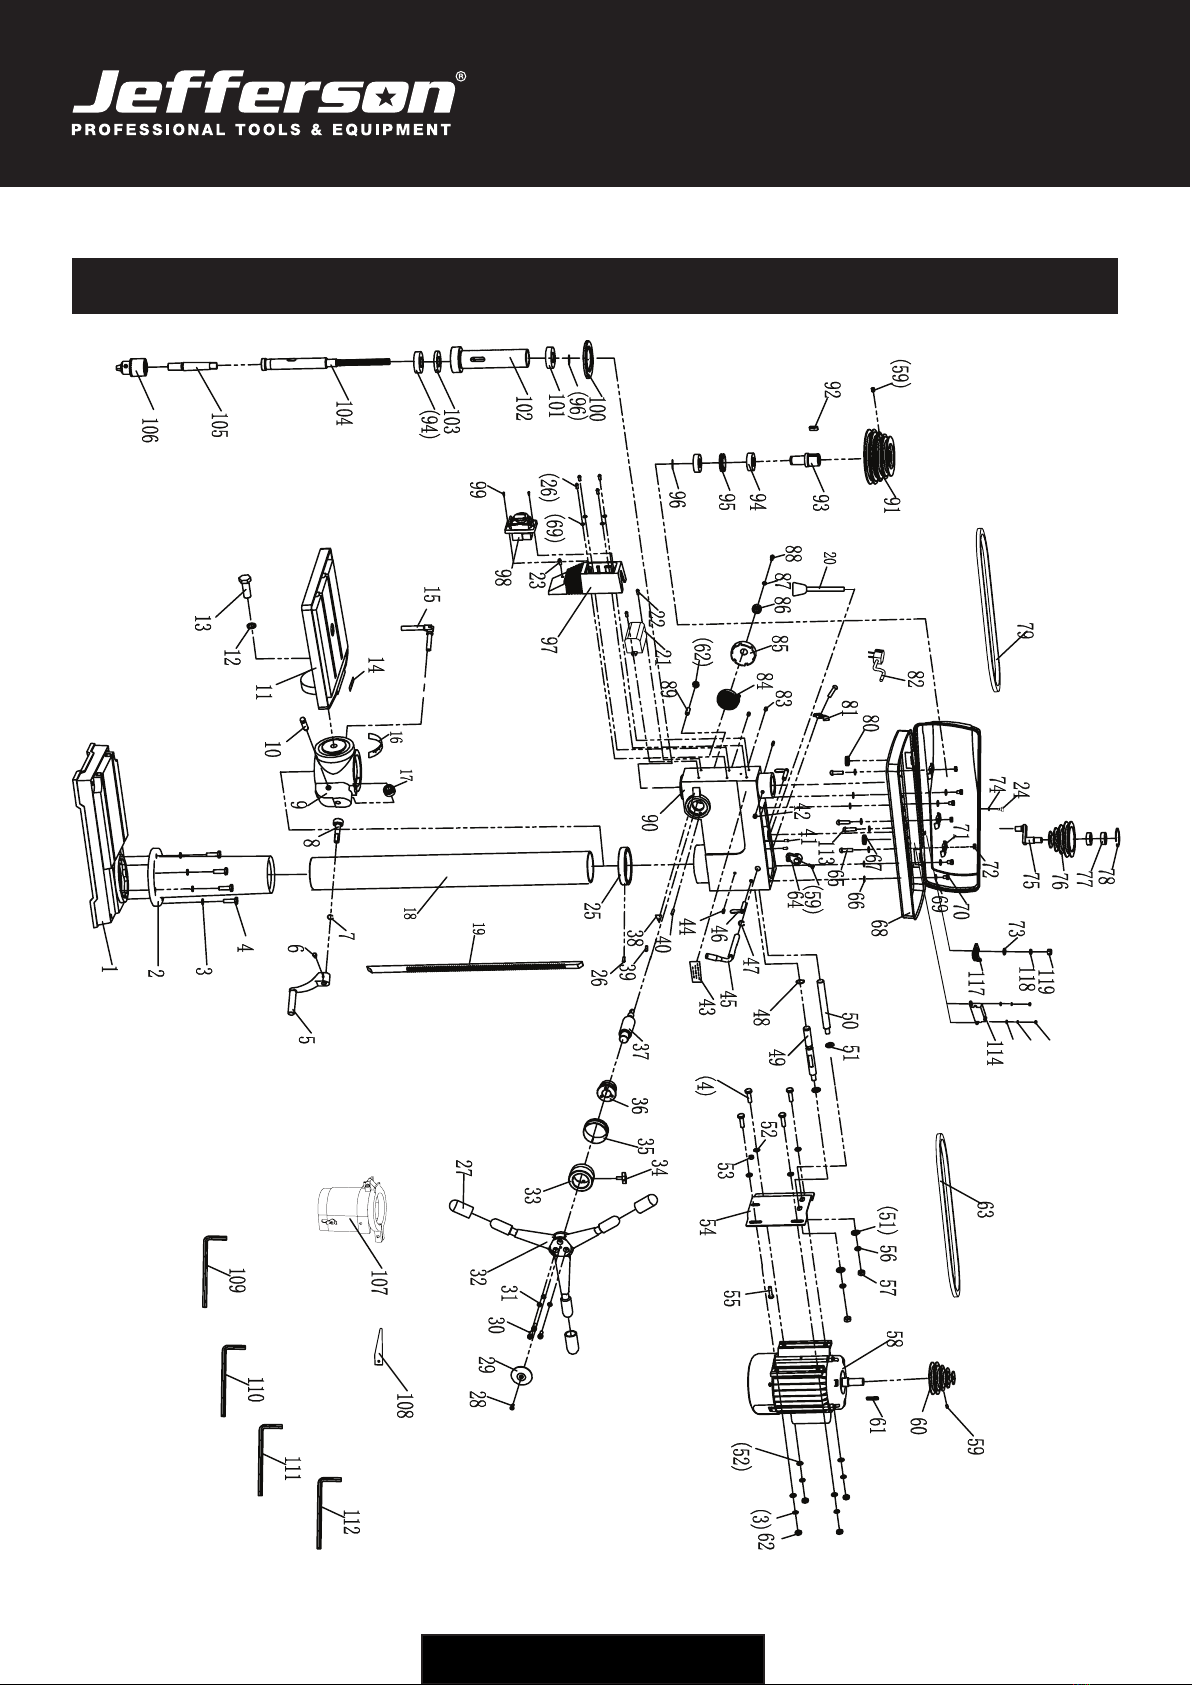
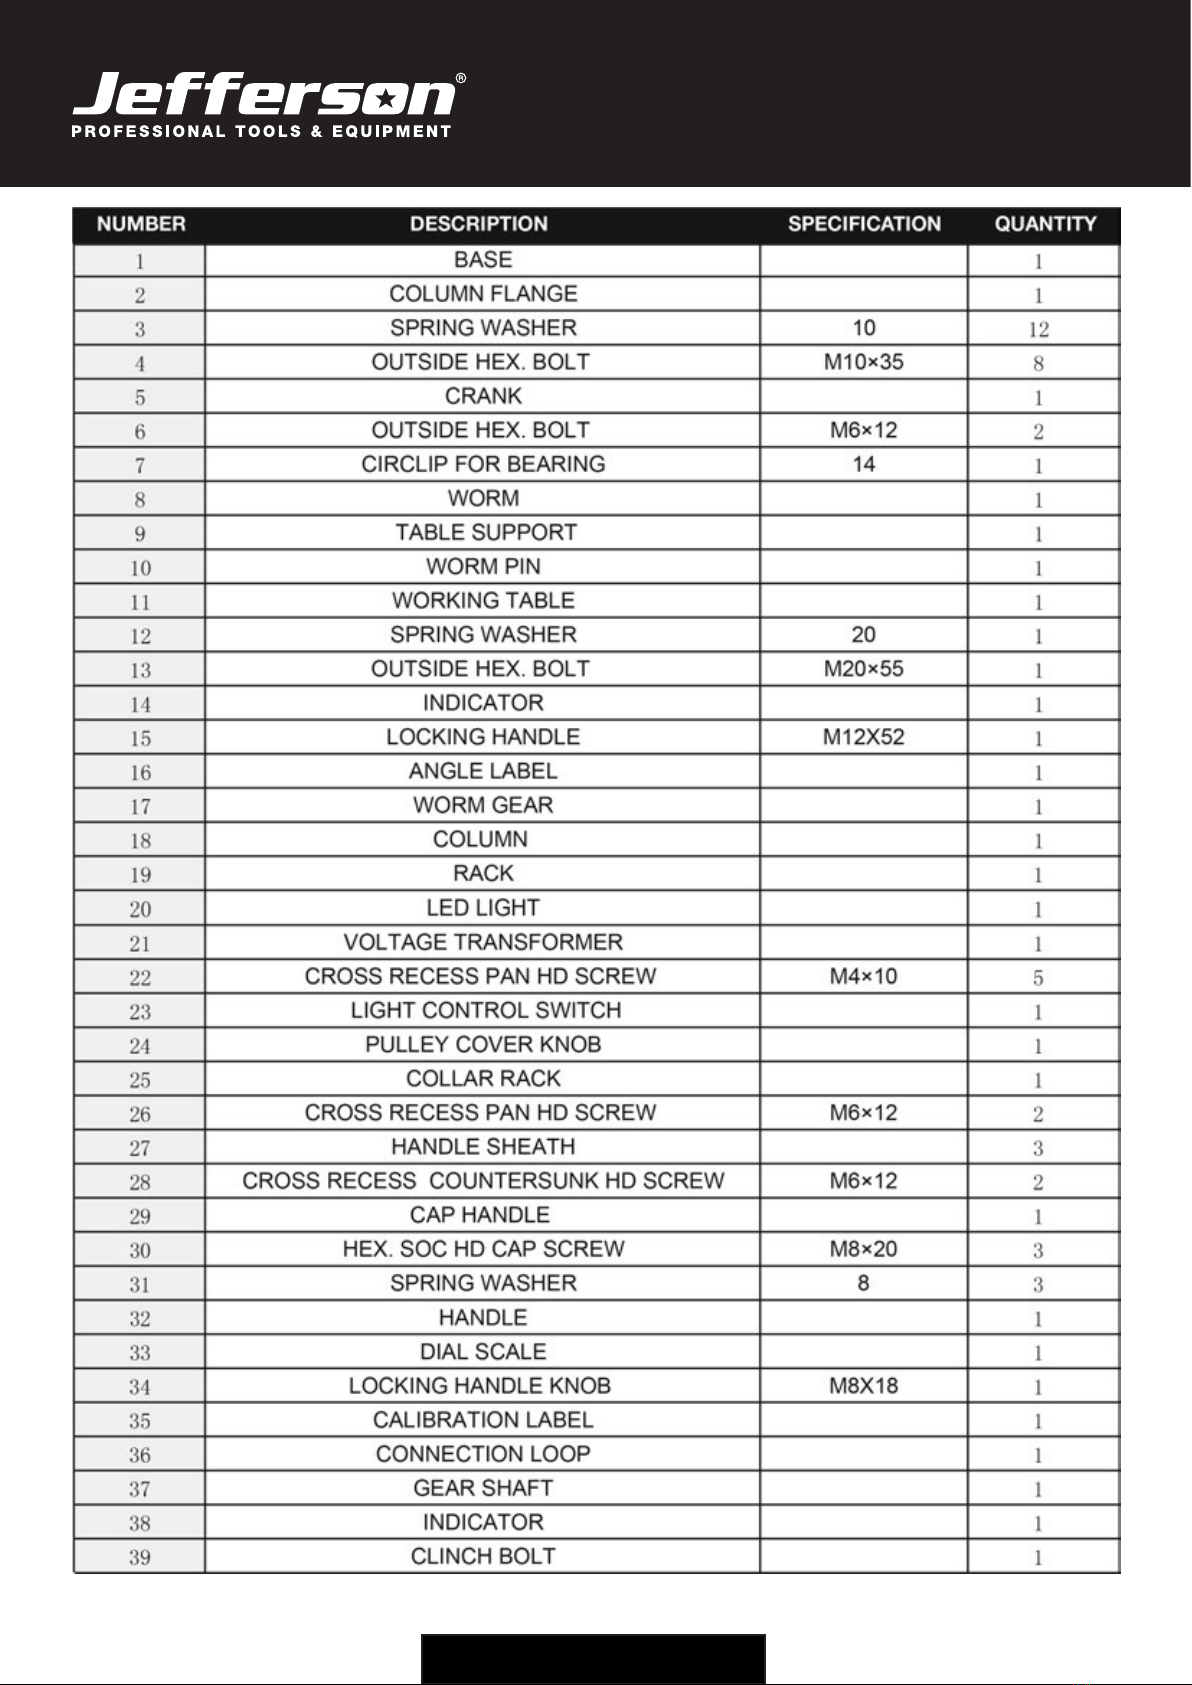
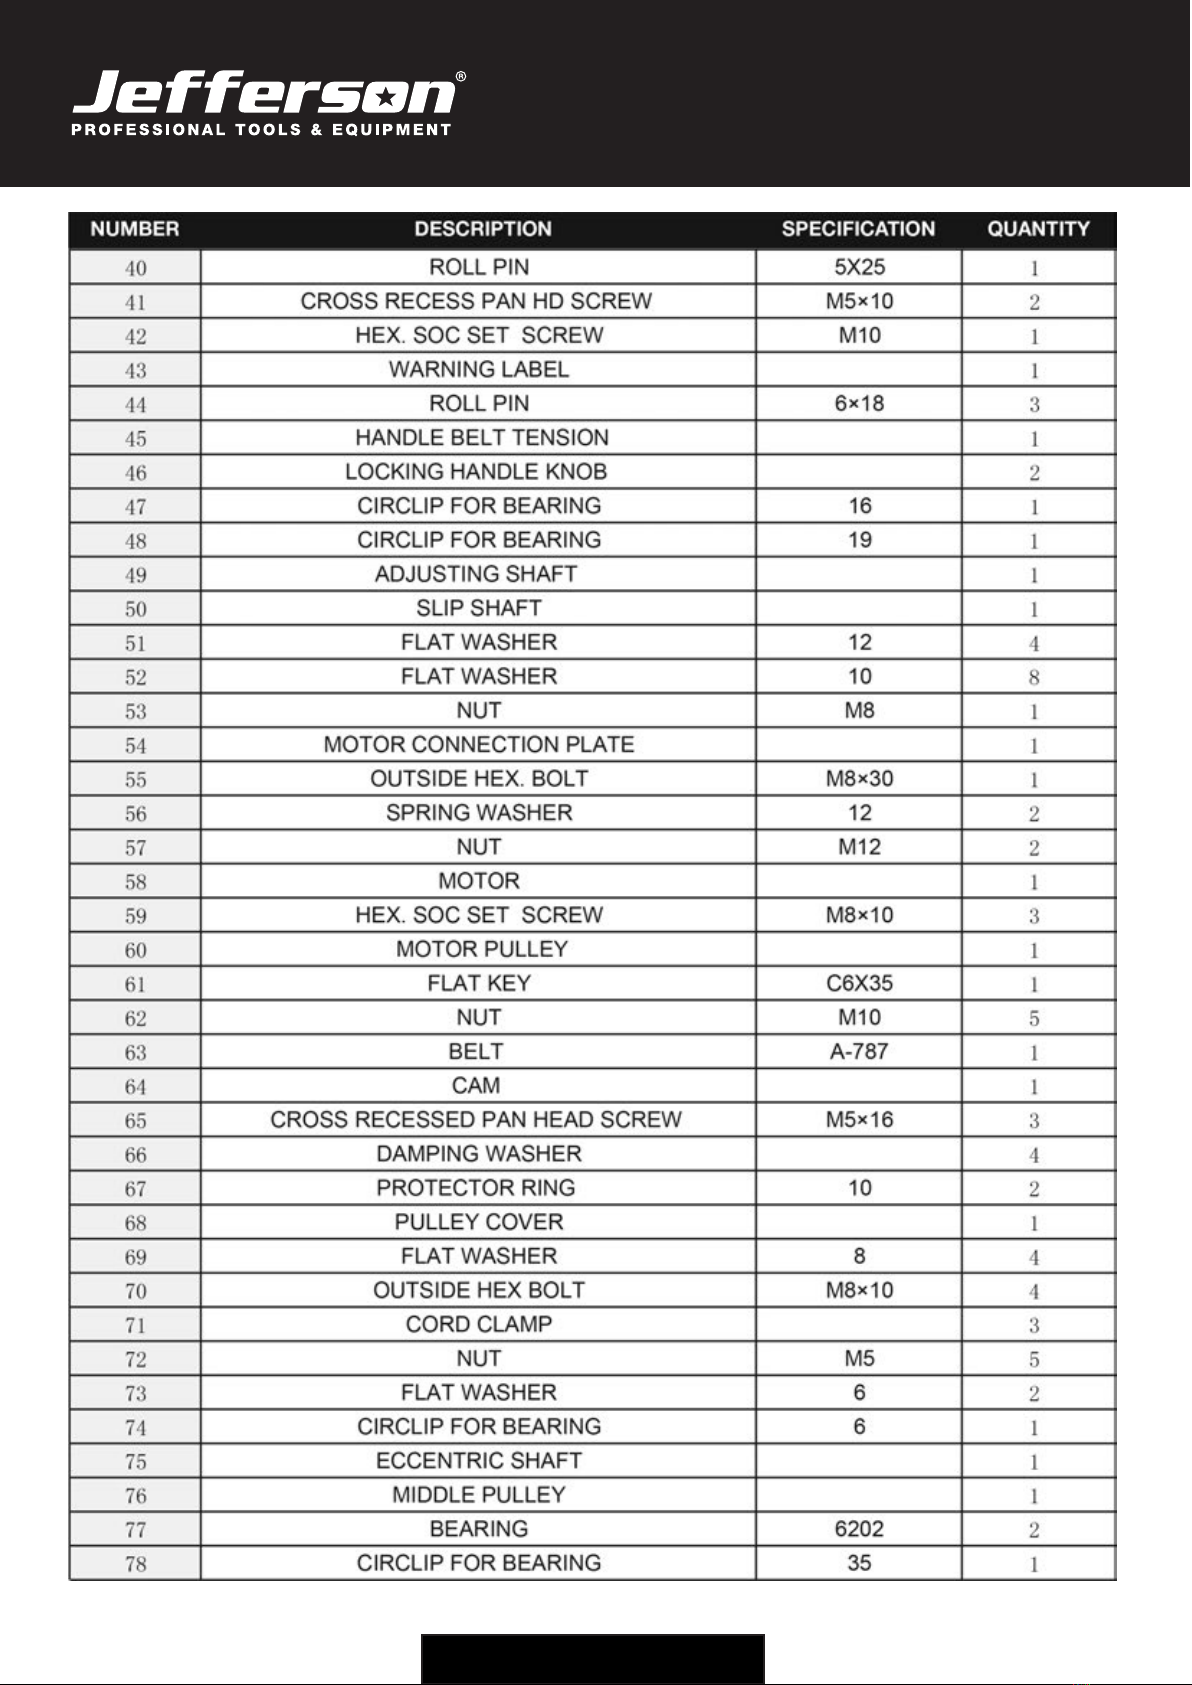
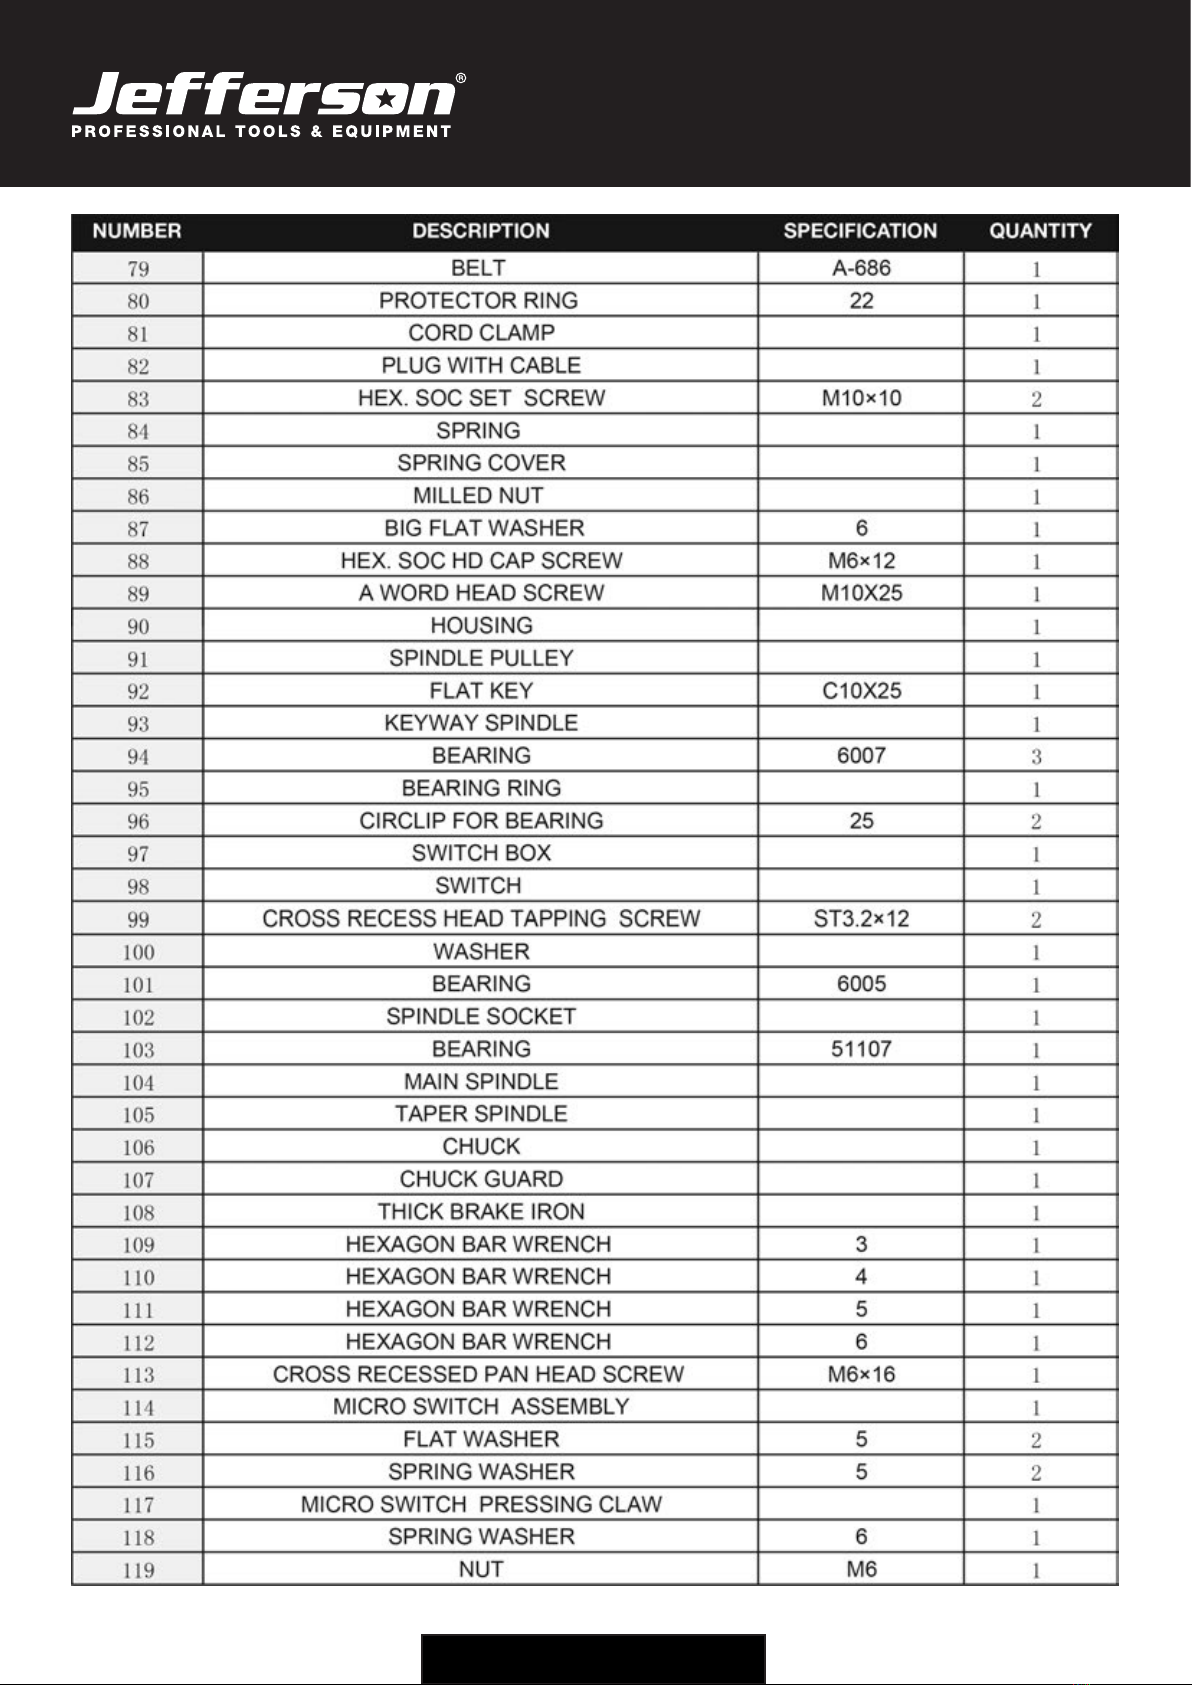
Parts List & Diagram
13
USER MANUAL v1.1
JEFPDB1500
1500W Pillar Drill • 230V ~50Hz
www.jeffersontools.com
14
USER MANUAL v1.1
JEFPDB1500
1500W Pillar Drill • 230V ~50Hz
www.jeffersontools.com
15
USER MANUAL v1.1
JEFPDB1500
1500W Pillar Drill • 230V ~50Hz
www.jeffersontools.com

16
USER MANUAL v1.1
JEFPDB1500
1500W Pillar Drill • 230V ~50Hz
www.jeffersontools.com
Environmental Protection
Recycle any packaging and unwanted materials instead of disposing of them as waste. All tools, accessories and packaging
should be sorted, taken to a recycling centre and disposed of in a manner which is compatible with the environment.
When the product becomes completely unserviceable, reaches the end of its working life and requires disposal, drain off any
uids (if applicable) into approved containers and dispose of the product and the uids according to local regulations.
WEEE Waste Electrical and Electronic Equipment Statement
Information on Disposal for Users of Waste Electrical & Electronic Equipment
This symbol on the product(s) and / or accompanying documents means that used electrical and electronic products should
not be mixed with general household waste. For proper treatment, recovery and recycling, please take this product(s) to
designated collection points where it will be accepted free of charge.
For private households:
Dispose of this product at the end of its working life and in compliance with the EU Directive on Waste Electrical and Electronic
Equipment (WEEE). Contact your local solid waste authority for recycling information for this equipment.
Disposing of this product correctly will help save valuable resources and prevent any potential negative effects on human health and the
environment, which could otherwise arise from inappropriate waste handling.
Please contact your local authority for further details of your nearest designated collection point.
Penalties may be applicable for incorrect disposal of this waste, in accordance with you national legislation.
For business users in the European Union:
If you wish to discard electrical and electronic equipment, please contact your dealer or supplier for further information.
Information on Disposal in other Countries outside the European Union:
This symbol is only valid in the European Union. If you wish to discard this product please contact your local authorities or dealer and ask for the
correct method of disposal.
RoHS Directive 2011/65/EU
We hereby declare that this equipment has been tested and found to be compliant to RoHS Directive 2011/65/EU of the
European Parliament and the Council from 08/06/2011 on restriction of the use of certain hazardous substances in electrical
and electronic appliances.
2011/65/EU
RoHS

17
USER MANUAL v1.1
JEFPDB1500
1500W Pillar Drill • 230V ~50Hz
www.jeffersontools.com
EC Declaration of Conformity
We, Jefferson Professional Tools & Equipment, as the authorised European
Community representative of the manufacturer, declare that the following equipment
conforms to the requirements of the following Directives:
Directive: Description:
2014/30/EU (as amended) Electromagnetic Compatibility
2006/42/EC (as amended) Machinery Directive
2014/35/EU (as amended) Low Voltage Directive
2011/65/EU (as amended) RoHS Directive
Equipment Category: Bench Drill / Pillar Drill / Drill Press
EU Member State United Kingdom
Product Name/Model: JEFPDB1500 - 1500W Pilllar Drill
Signed by: Stephen McIntyre
Position in the company: Operations Director
Date: 19 August 2019
Name and address of manufacturer
or authorised representative:
Jefferson Tools, Herons Way, Chester Business Park, Chester, United Kingdom,
CH4 9QR
Telephone: +44 (0)1244 646 048 Fax: +44 (0)1244 241 191
Email: [email protected]

18
USER MANUAL v1.1
JEFPDB1500
1500W Pillar Drill • 230V ~50Hz
www.jeffersontools.com
Limited Warranty Statement
Jefferson Professional Tools & Equipment, or hereafter "Jefferson" warrants its customers that its products will be free of defects in workmanship
or material. Jefferson shall, upon suitable notication, correct any defects, by repair or replacement, of any parts or components of this product
that are determined by Jefferson to be faulty or defective.
This warranty is void if the equipment has been subjected to improper installation, storage, alteration, abnormal
operations, improper care, air compressor service or repair.
Warranty Period
Jefferson will assume both the parts and labour expense of correcting defects during the stated warranty
periods below.
All warranty periods start from the date of purchase from an authorised Jefferson dealer. If proof of purchase is unavailable from the end user, then
the date of purchase will be deemed to be 3 months after the initial sale to the distributor.
1 Year
• All Jefferson Bench & Pillar Drills
90 Days
• All replacement parts purchased outside of the warranty period
Important: All parts used in the repair or replacement of warranty covered equipment will be subject to a minimum of 90 days cover or the remain-
ing duration of the warranty period from the original date of purchase.
Warranty Registration / Activation
You can register and activate your warranty by visiting the Jefferson Tools website using the following address: www.jeffersontools.com/warranty
and completing the online form. Online warranty registration is recommended as it eliminates the need to provide proof of purchase should a war-
ranty claim be necessary.
Warranty Repair
Should Jefferson confirm the existence of any defect covered by this warranty the defect will be corrected by repair or replacement at an author-
ized Jefferson dealer or repair centre.
Packaging & Freight Costs
The customer is responsible for the packaging of the equipment and making it ready for collection. Jefferson will arrange collection and transpor-
tation of any equipment returned under warranty. Upon inspection of the equipment, if no defect can be found or the equipment is not covered
under the terms of the Jefferson warranty, the customer will be liable for any labour and return transportation costs incurred.
These costs will be agreed with the customer before the machine is returned.
* Jefferson reserve the right to void any warranty for damages identified as being caused through misuse
Warranty Limitations
Jefferson will not accept responsibility or liability for repairs made by unauthorised technicians or engineers. Jefferson's liability under this war-
ranty will not exceed the cost of correcting the defect of the Jefferson products.
Jefferson will not be liable for incidental or consequential damages (such as loss of business or hire of substitute equipment etc.) caused by the
defect or the time involved to correct the defect. This written warranty is the only express warranty provided by Jefferson with respect to its prod-
ucts. Any warranties of merchantability are limited to the duration of this limited warranty for the equipment involved. Jefferson is not responsible
for cable wear due to exing and abrasion. The end user is responsible for routine inspection of cables for possible wear and to correct any issues
prior to cable failure.

19
USER MANUAL v1.1
JEFPDB1500
1500W Pillar Drill • 230V ~50Hz
www.jeffersontools.com
Claiming Warranty Coverage
The end user must contact Jefferson Professional Tools & Equipment (Tel: +44 (0) 1244 646 048) or their nearest authorised Jefferson dealer where
nal determination of the warranty coverage can be ascertained.
Step 1 - Reporting the Defect
Online Method:
• Visit our website www.jeffersontools.com/warranty and complete the Warranty Returns form. You can complete the form online and submit it
to us directly or download the form to print out and return by post.
Telephone Method:
Contact your Jefferson dealer or sales representative with the following information:
• Model number
• Serial number (usually located on the specication plate)
• Date of purchase
A Warranty Returns form will be sent to you for completion and return by post or fax, together with details of your nearest authorised Jefferson
repair centre. On receipt of this form Jefferson will arrange to collect the equipment from you at the earliest convenience.
Step 2 - Returning the Equipment
It is the customer's responsibility to ensure that the equipment is appropriately and securely packaged for collection, together with a copy of the
original proof of
purchase. Please note that Jefferson cannot assume any responsibility for any damage incurred to equipment during transit. Any claims against a
third party courier will be dealt with under the terms & conditions of their road haulage association directives.
Please note: Jefferson will be unable to collect or process any warranty requests without a copy of the original proof of purchase.
Step 3 - Assessment and Repair
On receipt, the equipment will be assessed by an authorised Jefferson engineer and it will be determined if the equipment is defective and in need
of repair and any repairs needed are covered by the warranty policy. In order to qualify for warranty cover all equipment presented must have been
used, serviced and maintained as instructed in the user manual.
Where repair is not covered by the warranty a quotation for repair, labour costs and return delivery will be sent to the customer (normally within 7
working days).
Note: If the repair quotation is not accepted Jefferson Professional Tools & Equipment will invoice 1 hour labour time at £30 per hour plus return
carriage costs (plus VAT).
In cases where no fault can be found with the equipment, or, if incorrect operation of the equipment is identied as the cause of the problem, a
minimum of 1 hour labour at £30 per hour plus carriage costs will be required before the equipment will be despatched back to the customer.
Any equipment repaired or replaced under warranty will normally be ready for shipment back to the customer within 7 working days upon receipt
of the equipment at an authorised Jefferson Repair centre (subject to part availability). Where parts are not immediately available Jefferson will
contact you with a revised date for
completion of the repair.
General Warranty Enquiries
For any further information relating to Jefferson warranty cover please call +44 (0) 1244 646 048 or send your enquiry via email to warranty@jef-
fersontools.com
Disclaimer:
The information in this document is to the best of our knowledge true and accurate, but all recommendations or suggestions are made without
guarantee. Since the conditions of use are beyond their control, Jefferson Tools® disclaim any liability for loss or damage suffered from the use of
this data or suggestions. Furthermore, no liability is accepted if use of any product in accordance with this data or suggestions infringes any patent.
Jefferson Tools® reserve the right to change product specifications and warranty statements without further notification. All images are for illustra-
tion purposes only.

20
USER MANUAL v1.1
JEFPDB1500
1500W Pillar Drill • 230V ~50Hz
www.jeffersontools.com
Jefferson Tools,
Herons Way,
Chester Business Park,
Chester,
United Kingdom,
CH4 9QR
Tel. +44 (0)1244 646 048
Email: [email protected]
IMPORTANT! SAFETY FIRST!
Before attempting to use this product please read
all the safety precautions and operating instructions
outlined in this manual to reduce the risk of re,
electric shock or personal injury.
www.jeffersontools.com
Table of contents
Other Jefferson Drill manuals

Jefferson
Jefferson JEFMAGDPER35-230 User manual

Jefferson
Jefferson JEFMAGDAUT35-230 User manual

Jefferson
Jefferson JEFPDB0350 User manual

Jefferson
Jefferson JEFMAGD42HD/110 User manual

Jefferson
Jefferson JEFPDB1100 User manual

Jefferson
Jefferson JEFPDB0550 User manual

Jefferson
Jefferson JEFMGNDR40-110 User manual
Popular Drill manuals by other brands


Parkside
Parkside PBH 1050 A1 Operation and safety notes

EINHELL
EINHELL LE-BM 1010 operating instructions

Micromat
Micromat 1575 user manual

Parkside
Parkside PABH 20-Li B2 instructions

Bosch
Bosch 06019G010A Original instructions

Harbor Freight Tools
Harbor Freight Tools EarthquakeXT EQ38XT-20V owner's manual