Jefferson JEFHOSRLH15-1/2 User manual
User Manual
www.jeffersontools.com
v1.1
Auto Retracting Air Hose Reel
JEFHOSRLH15-1/2


3
USER MANUAL
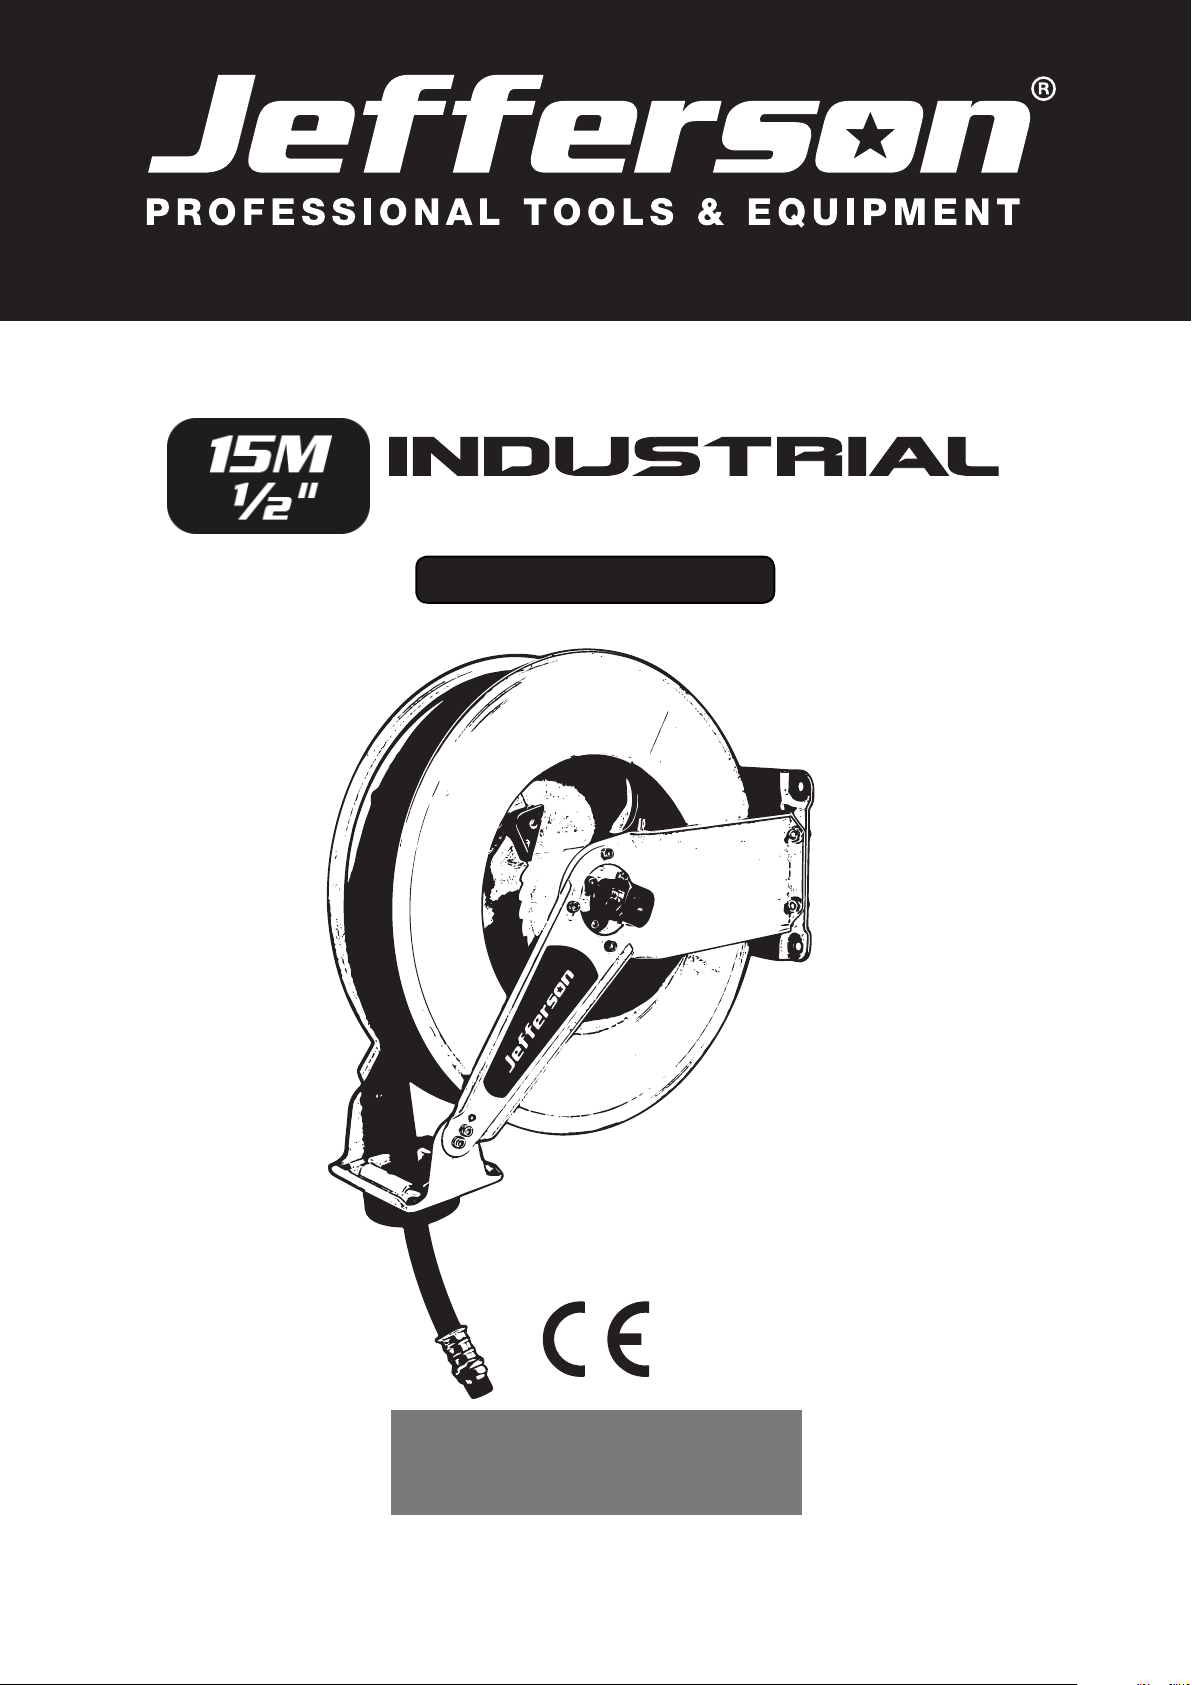
15M - 1/2" Industrial Auto Retracting Air Hose Reel
JEFHOSRLH15-1/2
Contents
1. Introduction 5
2. Safety Guidelines 6
3. Assembly / Mounting The Reel 5
4. Operation 7
5. Maintenance 7
6. Parts List & Diagram 8
Limited Warranty Statement 10
EC Declaration of Conformity 12
Disclaimer:
The information in this document is to the best of our knowledge true and accurate, but all recommendations or suggestions are made without guarantee. Since the conditions of use are beyond
their control, Jefferson Tools® disclaim any liability for loss or damage suffered from the use of this data or suggestions. Furthermore, no liability is accepted if use of any product in accordance
with this data or suggestions infringes any patent. Jefferson Tools® reserve the right to change product specifications and warranty statements without further notification.
All images are for illustration purposes only.
4
USER MANUAL
15M - 1/2" Industrial Auto Retracting Air Hose Reel
JEFHOSRLH15-1/2
Important: Please read the following precautions and instructions before you begin to assemble or use this
equipment. Failure to comply with these instructions could result in personal injury or property damage. Keep these
instructions in a convenient location for future reference.
Features:
• 15M x 1/2" Industrial grade air hose
• Heavy, ribbed steel reel casing with auto-retracting spring-driven drum
• Four-way non-snag hose rollers & locking ratchet
• Adjustable arm guide
• Wall, oor, ceiling and pit mountable
• Dual pedestal base
• With 1m M½" BSPT lead hose
• Ball-bearing swivel joint reduces friction between the spool and body
This equipment should only be operated by qualified and responsible individuals who have read and understood
the information and guidelines described in this document. In particular, the following safety instructions should be
followed to reduce the risk of injury to the operator and members of the public.
• Disconnect equipment from the air supply before changing accessories, servicing or performing any
maintenance.
• Ensure that this equipment is well maintained and kept in good clean condition. Check equipment regularly for
damage.
• Any damage should be repaired by an authorised Jefferson Repair Centre. Use only Jefferson recommended
parts when repairing the equipment. Unauthorised parts and servicing may be dangerous and will invalidate the
warranty.
• Locate and assemble the air hose reel in a suitable working area. Do not position the hose in direct sunlight, or in
areas of extreme heat or cold. Ensure that adequate lighting.
• Keep the extended air hose away from heat, oil, sharp edges etc. Check hose for wear before each use, and
ensure all connections are secure.
• Keep the unwound air hose at a safe distance from the working area and free from wet, damp, oily surfaces.
• Always wear approved eye or face protection when operating the air hose reel.
• Always maintain balance and footing when using the equipment. Ensure the floor is not slippery and wear non-
slip shoes.
1. Introduction
2. Safety Guidelines
SPECIFICATIONS
Rated Working Pressure 300psi / 20bar
Hose Length 15m / 50ft
Hose Material Rubber (Blue)
Inlet Connection ½" BSPT
Outlet Connection ½” BSPT
Reel Casing Steel

5
USER MANUAL
15M - 1/2" Industrial Auto Retracting Air Hose Reel
JEFHOSRLH15-1/2
2. Safety Guidelines (continued)
• Remove all loose and ill fitting clothing before use (ties, watches, rings, loose jewellery etc), tie back long hair.
• Keep children, animals and unauthorised persons away from the working area.
• Make sure the incoming air pressure does not exceed the rated operating pressure indicated for this equipment.
• Do not use the air hose reel for any purpose other than that for which it is designed.
• Do not operate the air hose reel when you are tired or under the influence of alcohol, drugs or intoxicating
medication.
• When not in use ensure the air supply is turned off and tools disconnected. Disconnect from the air supply and
retract the hose into case.
• Do not dismantle the hose reel casing, or attempt to remove the screws and covers on the sides. To do so may
result in damage to the appliance and/or personal injury and will invalidate the warranty. Internal maintenance,
which will require the opening of the casing, must only be undertaken by an authorised Jefferson Repair Centre.
Warning: exposure of skin directly to pressurized air, or uid could result in severe bodily injury. Do not
direct air from the air hose at yourself or others.
• Do not position the reel in areas of extreme heat or cold. Prolonged exposure to direct and intense sunlight may
affect the integrity of the polymers within the moulded components.
• Avoid, if possible, positioning the reel in direct sunlight.
• The air hose reel can be mounted using in the positions illustrated in below.
3. Assembly / Mounting the Reel

6
USER MANUAL
15M - 1/2" Industrial Auto Retracting Air Hose Reel
JEFHOSRLH15-1/2
Mounting the Reel
The reel base is supplied with four 12.7mm (1/2’’) drilled mounting holes for mounting on a suitable flat surface.
Using the four holes in the base, mount the reel in the desired location. Be sure to use appropriate hardware and
tighten securely.
The reel is also supplied with a hose guide roller bracket. The bracket position may be changed depending on the reel
mounting position.
You can follow the following procedure to change the bracket position:
1. Pull out some hose and let reel latch
2. Remove the bolls that attach the guide roller bracket to the support post
3. Rotate guide roller bracket to position, replace bolts, and tighten
Apply PTFE (Teflon) tape or pipe sealant to the supply line threads, attach to reel inlet and tighten securely.
The other end of incoming line can now be connected to a suitably rated air supply source.
Check the connection for leakage, also check hose reel for correct operation.
If hose stopper adjustment is required, pull hose from reel and allow to latch at desired length. Loosen stopper bolts,
and slide stopper to a position close to the hose guide. Tighten stopper bolts, and unlatch the reel.
Note: For ceiling mounting, always ensure that the reel is mounted at least 10 feet above the floor.
Fitting the Hose
1. Securely stabilize the reel
2. Facing the swivel fitting side of reel: turn the drum clockwise, by hand, until the rewind spring is tight, and drum
has latched. As an extra precaution while installing new hose, secure drum in the latched position
3. Insert end of the hose through guide roller bracket, and feed through the opening in the center of the drum hub
4. Screw fitting into swivel and tighten
Note: To avoid damage to the swivel, use a spanner to support the swivel fitting while tightening the hose.
5. Attach hose stopper on the other end of hose, near the outlet fitting
6. Carefully release drum latch, and slowly allow hose to wind onto the reel
Note: The final spring tension adjustment is accomplished by adding, wraps of hose around the drum (to increase
tension) or taking off wraps of hose (to decrease tension).
3. Assembly / Mounting The Reel (continued...)

7
USER MANUAL
15M - 1/2" Industrial Auto Retracting Air Hose Reel
JEFHOSRLH15-1/2
• Check reel for correct operation by slowly pulling out the hose. A “clicking” nose will be heard every half revolu-
tion of the drum
• To latch the reel, pull out the hose and allow it to retract after hearing the rst second or third “click”
• To unlatch, slowly pull out the hose until the “clicking” noise stops, and then let the hose retract until the hose
stop rests against the hose guide
• Periodically check the hose condition for wear or damage, and check the swivel tting for leakage. Replace any
worn, damaged, or leading parts
Adjusting the Spring Tension
• Pull out approximately 6ft or 2m of hose and allow the drum to latch
• Remove hose stopper from hose, and feed hose back through guide
• Wrap the pulled hose one time around the drum to increase tension or unwrap hose one time from drum to de-
crease intension
• Re-insert hose through guide, and install stopper onto hose end
• Unlatch the drum and check tension. Pull hose from reel, and adjust stopper position if necessary
Replacement of the Swivel Seals
Note: There are two types of swivel arrangements
• Turn off and disconnect the air supply line from the swivel inlet
• Remove the swivel assembly from the reel axle
• Hold the tting body in a vice. Remove the brass tube from the body, and remove the swivel nut from the tube
• Replace the seals and reassemble swivel. Apply pipe sealant to brass tube threads, thread into tting body and
tighten
• Re-connect the swivel to the reel axle and tighten
• Re-connect the air inlet supply line
Replacing the Hose
• Turn off the air supply to the hose reel
• Pull out all of the old the hose and lock the reel in this position.
Caution: Make sure reel drum is securely locked and can’t rotate back
• Carefully disconnect the hose from the male tting in the centre of the axle and remove the old hose
• Feed the new hose through the guide and the opening in the drum, and connect to male tting.
• Install stopper on other end of hose in the same position as before
• Carefully release the drum latch, and slowly allow the hose to wind onto the reel.
Note: The final spring adjustment is accomplished by adding or removing wraps of hose around the drum.
4. Operation
5. Maintenance
Warning: If the rewind spring fails for any reason contact your nearest Jefferson Dealer to organise
replacement / repair of the spring canister.

8
USER MANUAL
15M - 1/2" Industrial Auto Retracting Air Hose Reel
JEFHOSRLH15-1/2
6. Parts List and Parts Diagram

9
USER MANUAL
15M - 1/2" Industrial Auto Retracting Air Hose Reel
JEFHOSRLH15-1/2
# Quantity Description
1 2 Support bracket arm
2 2 Support bracket
3 1 Assembly hub bearing
4 1 Drum for spring
5 1 Spring
6 1 Axle
7 1 Drum
8 1 Drum
9 1 Assembly hub bearing
10 1 Locking ring
11 1 Guide plate
12 1 Guide sub-plate
13 1 Base
14 8 Nut
15 8 Washer
16 8 Bolt
17 8 Nut
18 1 Retaining ring
19 1 Fitting
20 1 Hose
21 2 Rubber bumper block
22 1 Axle
23 1 Support block
24 1 Spring, dog
25 1 Cam, locking
26 1 Retaining ring
27 4 nut
# Quantity Description
28 4 Bolt
29 4 Washer
30 4 Nut
31 4 Bolt
32 4 Nut
33 4 Bolt
34 2 Roller
35 2 Axle for roller
36 2 Roller
37 2 Axle for roller
38 2 Nut
39 2 Bolt
40 1 Board
41 2 Nut
42 2 Washer
43 2 Bolt
44 1 Spring caution sticker
45 1 Direction sticker
46 1 Brand name
47 1 Swivel caution sticker
48 1 Swivel part
49 1 Nut
50 1 Washer
51 1 O ring
52 1 Rigid part
53 1 Washer
54 2 Oil seal

10
USER MANUAL
15M - 1/2" Industrial Auto Retracting Air Hose Reel
JEFHOSRLH15-1/2
Limited Warranty Statement
Jefferson Professional Tools & Equipment, or hereafter "Jefferson" warrants its customers that its products will be
free of defects in workmanship or material. Jefferson shall, upon suitable notication, correct any defects, by repair
or replacement, of any parts or components of this product that are determined by Jefferson to be faulty or defective.
This warranty is void if the equipment has been subjected to improper installation, storage, alteration, abnormal
operations, improper care, unauthorised service or repair.
Warranty Period
Jefferson will assume both the parts and labour expense of correcting defects during the stated warranty
periods below.
All warranty periods start from the date of purchase from an authorised Jefferson dealer. If proof of purchase is
unavailable from the end user, then the date of purchase will be deemed to be 3 months after the initial sale to the
distributor.
1 Year
•Jefferson Industrial Auto-Retracting Air Hose Reel
90 Days
• All replacement parts purchased outside of the warranty period
Important: All parts used in the repair or replacement of warranty covered equipment will be subject to a minimum of
90 days cover or the remaining duration of the warranty period from the original date of purchase.
Warranty Registration / Activation
You can register and activate your warranty by visiting the Jefferson Tools website using the following address:
www.jeffersontools.com/warranty and completing the online form.
Online warranty registration is
recommended as it eliminates the need to provide proof of purchase should a warranty claim be necessary.
Warranty Repair
Should Jefferson confirm the existence of any defect covered by this warranty the defect will be corrected by repair
or replacement at an authorized Jefferson dealer or repair centre.
Packaging & Freight Costs
The customer is responsible for the packaging of the equipment and making it ready for collection. Jefferson will
arrange collection and transportation of any equipment returned under warranty.
Upon inspection of the equipment, if no defect can be found or the equipment is not covered under the terms of the
Jefferson warranty, the customer will be liable for any labour and return transportation costs incurred.
These costs will be agreed with the customer before the machine is returned.
Warranty Limitations
Jefferson will not accept responsibility or liability for repairs made by unauthorised technicians or engineers.
Jefferson's liability under this warranty will not exceed the cost of correcting the defect of the Jefferson
products.
Jefferson will not be liable for incidental or consequential damages (such as loss of business or hire of substitute
equipment etc.) caused by the defect or the time involved to correct the defect. This written warranty is the only
express warranty provided by Jefferson with respect to its products.

11
USER MANUAL
15M - 1/2" Industrial Auto Retracting Air Hose Reel
JEFHOSRLH15-1/2
Any warranties of merchantability are limited to the duration of this limited warranty for the equipment involved.
Jefferson is not responsible for cable wear due to flexing and abrasion. The end user is responsible for routine
inspection of cables for possible wear and to correct any issues prior to cable failure.
Claiming Warranty Coverage
The end user must contact Jefferson Professional Tools & Equipment (Tel: +44 (0) 1244 646 048) or their
nearest authorised Jefferson dealer where final determination of the warranty coverage can be ascertained.
Step 1 - Reporting the Defect
Online Method:
• Visit our website www.jeffersontools.com/warranty and complete the Warranty Returns form. You can complete
the form online and submit it to us directly or download the form to print out and return by post.
Telephone Method:
Contact your Jefferson dealer or sales representative with the following information:
• Model number
• Serial number (usually located on the specification plate)
• Date of purchase
A Warranty Returns form will be sent to you for completion and return by post or fax, together with details of your
nearest authorised Jefferson repair centre. On receipt of this form Jefferson will arrange to collect the equipment
from you at the earliest convenience.
Step 2 - Returning the Equipment
It is the customer's responsibility to ensure that the equipment is appropriately and securely packaged for collection.
Please ensure that you include a copy of your proof of purchase. Please note that Jefferson cannot assume any
responsibility for any damage incurred to equipment during transit. Any claims against a third party courier will be
dealt with under the terms & conditions of their road haulage association directives.
Step 3 - Assessment and Repair
On receipt, the equipment will be assessed by an authorised Jefferson engineer and it will be determined if the
equipment is defective and in need of repair and any repairs needed are covered by the warranty policy. In order to
qualify for warranty cover all equipment presented must have been used, serviced and maintained as instructed in
the user manual.
Where repair is not covered by the warranty a quotation for repair, labour costs and return delivery will be sent to the
customer (normally within 7 working days).
Note: If the repair quotation is not accepted Jefferson Professional Tools & Equipment will invoice 1 hour labour time at £30 per
hour plus return carriage costs (plus VAT).
In cases where no fault can be found with the equipment, or, if incorrect operation of the equipment is identified as the cause
of the problem, a minimum of 1 hour labour at £30 per hour plus carriage costs will be required before the equipment will be
despatched back to the customer.
Any equipment repaired or replaced under warranty will normally be ready for shipment back to the customer within 7 working
days upon receipt of the equipment at an authorised Jefferson Repair centre (subject to part availability). Where parts are not
immediately available Jefferson will contact you with a revised date for completion of the repair.
For any further information relating to Jefferson warranty cover please call +44 (0) 1244 646 048 or send your enquiry

12
USER MANUAL
15M - 1/2" Industrial Auto Retracting Air Hose Reel
JEFHOSRLH15-1/2
EC Declaration of Conformity
We, Jefferson Professional Tools & Equipment, as the authorised European
Community representative of the manufacturer, declare that the following equipment
conforms to the requirements of the following Directives:
93/68/EEC (as amended) CE Marking Directive
2006/42/EC (as amended) Machinery Directive
Equipment Category: Industrial Air Hose Reel
Product Name/Model: 15m /1/2" Industrial Auto Retracting Air Hose Reel / JEFHOSRLH15-1/2
EU Member State: United Kingdom
Signed by: Stephen McIntyre
Position in the company: Operations Director
Date: 06 April 2016
Technical document is held by: Jimmy Hemphill
Technical file holder's address as shown below
Name and address of manufacturer or authorised representative:
Jefferson Tools, Herons Way, Chester Business Park, Chester, United Kingdom, CH4 9QR
www.jeffersontools.com

13
USER MANUAL
15M - 1/2" Industrial Auto Retracting Air Hose Reel
JEFHOSRLH15-1/2
Notes:

14
USER MANUAL
15M - 1/2" Industrial Auto Retracting Air Hose Reel
JEFHOSRLH15-1/2
Notes:

15
USER MANUAL
15M - 1/2" Industrial Auto Retracting Air Hose Reel
JEFHOSRLH15-1/2

16
USER MANUAL
15M - 1/2" Industrial Auto Retracting Air Hose Reel
JEFHOSRLH15-1/2
Jefferson Tools, Herons Way, Chester Business Park, Chester, United Kingdom, CH4 9QR
Tel. +44 (0)1244 646 048
Email: [email protected]
IMPORTANT! SAFETY FIRST!
Before attempting to use this product please
read all the safety precautions and operating
instructions outlined in this manual to reduce
the risk of fire, electric shock and
personal injury.
www.jeffersontools.com
Table of contents
Other Jefferson Tools manuals

Jefferson
Jefferson JEFHTG2S-230 User manual

Jefferson
Jefferson JEFHOSRL15-3/8HVP User manual

Jefferson
Jefferson JEFARIVT02H User manual

Jefferson
Jefferson JEFUNIPCPGR User manual

Jefferson
Jefferson JEFLUGGUN03 User manual

Jefferson
Jefferson JEFBGSSTDADJ User manual

Jefferson
Jefferson JEFTRCH09ILSG User manual
Popular Tools manuals by other brands


Vantage Hearth
Vantage Hearth Hollister-Whitney GLT-25S2 instruction manual

Stihl
Stihl 4141 Series manual

BGS technic
BGS technic 6282 instruction manual

Sunex Tools
Sunex Tools 4940B owner's manual

GÜDE
GÜDE GPR 801 E Translation of the original instructions

Bosch
Bosch GSH 11 E Professional Original instructions


