Jegs 45000 User manual
1-800-345-4545
User Manual for 45000
AC Balance Charger/Discharger

1-800-345-4545
Thank you for purchasing this AC
Balance Charger/Discharger from
JEGS.
Read this manual in its entirety
before attempting to use this product.
Damage resulting from misuse or
modification will void your warranty.
JEGS will not be held responsible for
any incidental damages or injury that
may result from improper use of this
product.
In purchasing this product the
buyer/user agrees to bear all the
responsibilities of these risks and not
hold JEGS, its distributors (owners and
employees) and/or retailer responsible
for any accidents, injury to person, or
property damage. If you do not agree
with these conditions, please return the
charger to the place of purchase.
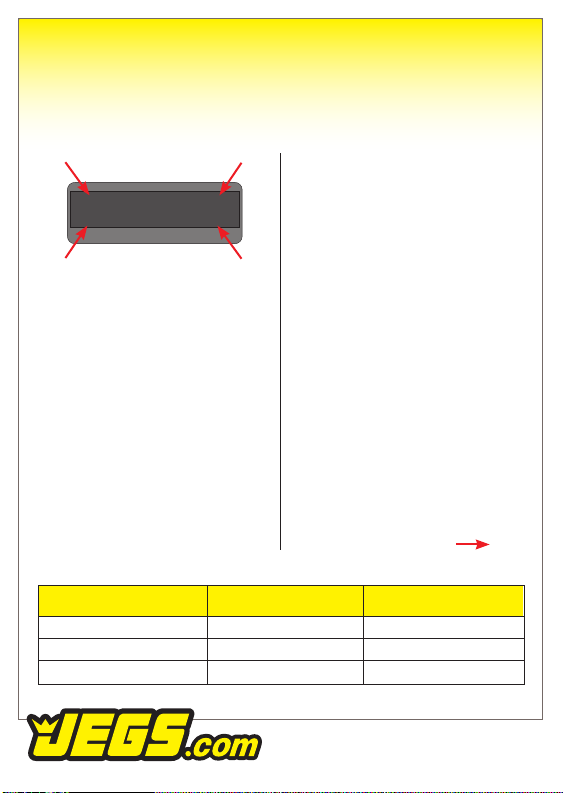
Failure to follow these instructions
can result in severe and permanent
damage to batteries and the charger,
cause personal injury, and even start
a fire.
JEGS chargers are designed and
intended for use with radio
controlled vehicle batteries only and
any other uses are not authorized,
recommended, or warrantied by JEGS.
If you have read this entire manual
and are still unclear regarding any
of the functions, warnings, or safety
instructions, please contact our
customer service department PRIOR
to using this charger.
WARNING:
Charging Batteries
Can Be Hazardous!

1-800-345-4545
Caution & Warnings 1 & 2
Features & Specifications 3
Exterior of Unit 4
Main Menu Options 5
User Settings 6-7
Charging & Storage Charging Lithium Batteries 8-11
Lithium Battery Meter 12
Charging/Discharging/Cycling
NiMH & NiCd Batteries 13-16
Charging Lead Acid (Pb) Batteries 17-18
Warning & Error Messages 19-20
Warrany & Service 21
Table of Contents

1-800-345-4545
1.
Before attempting to charge
or discharge a battery, first
read the safety warnings
and charging instructions
provided with your battery.
Make sure to contact the
battery manufacturer if
these instructions were not
provided or are unclear.
2.
Before charging or discharging
any battery, carefully inspect
the pack to ensure no physical
damage, swelling or “ballooning”
is evident. Signs such as this
indicate that a dangerous
problem exists with the
battery that could lead
to a catastrophic failure
including fire and explosion.
3. Under no circumstances should
you charge or discharge any
battery that has become
swollen “ballooned” or been
damaged in any way. Refer to
the safety warnings provided
with your battery for further
instruction.
4.
Batteries on charge, or
discharge MUST remain
under constant observation
so that you may react quickly
should any problems arise.
5. Always keep a class D chemical
fire extinguisher
6.
Be sure to understand the
specifications of the battery pack
to be charged or discharged. If
the charger program is set up
incorrectly the battery pack can
be severely damaged, catch
fire, and cause personal injury.
Refer to the battery label for the
specifications of your battery
pack, and if they are
unclear be sure to contact the
manufacturer.
7. Battery packs when improperly
charged or discharged, can
sustain permanent damage,
catch fire, explode, and cause
personal injury.
8.
Immediately discontinue the
charging or discharging of a
LiPo battery that begins to swell
or “balloon”.
Caution & Warnings
1
Continued onto next page.

1-800-345-4545
9.
This charger and the battery to
be charged or discharged should
be placed upon a heat-resis-
tant, non-flammable and non-
conductive surface away from
any flammable materials.
10.
Never charge a battery pack
that feels too hot to the touch.
Always allow a battery to cool to
ambient temperature before
charging.
11. Always make sure to use a LiPo
safety sack or other fireproof
containers when charging or
discharging battery packs.
12.
Charge each battery pack
individually. Never charge
battery packs in series or par-
allel. Using this method may
result in the improper cell
recognition of the charger,
improper charging rate, and over
charging that may lead to fire or
explosion.
13. Never leave the battery charger
unsupervised when it is con-
nected to its power supply.
If any type of malfunction
is observed immediately
terminate the charging
process and refer to the operation
manual.
14.
Keep the ac balance charger/
discharger away from dust,
water, heat, direct sunlight and
vibration.
15. Do not disassemble, modify, or
attempt any form of repair on
this charger.
2
Caution & Warnings
Cont.

1-800-345-4545
Features & Specifications
•
High Power 60-Watt, 6-Amp
Charging Circuit
•
Integrated XT60 & Balance
Connections
•
Multiple Chemistry Charging:
LiPo, LiHV, LiFe, Li-ion, NiMH,
NiCd, and Pb
•
Operating Software Optimized
for Safety & Ease of Use
• Charge Lead Included:
• AC Input Voltage:
• 100V-240V
• Charge Current:
• 0.1-6.0A
• Circuit Power:
• Max 60W for charging
• Max 10W for discharging
• Battery Type:
• LiPo
• LiHV
• Li-ion
• NiMH
• NiCd
• Lead Acid (Pb)
• Lithium Battery Cell Count:
• 2S-4S NiMH/NiCd
• NiCd Battery Cell Count:
• 6-8 Cells Lead Acid (Pb)
• Battery Voltage:
• 6V-12V
Features Specifications
3
1-800-345-4545
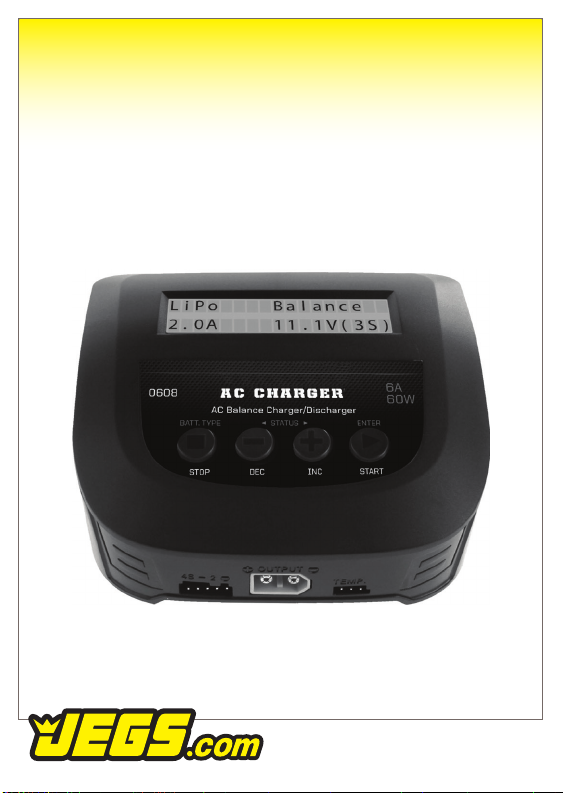
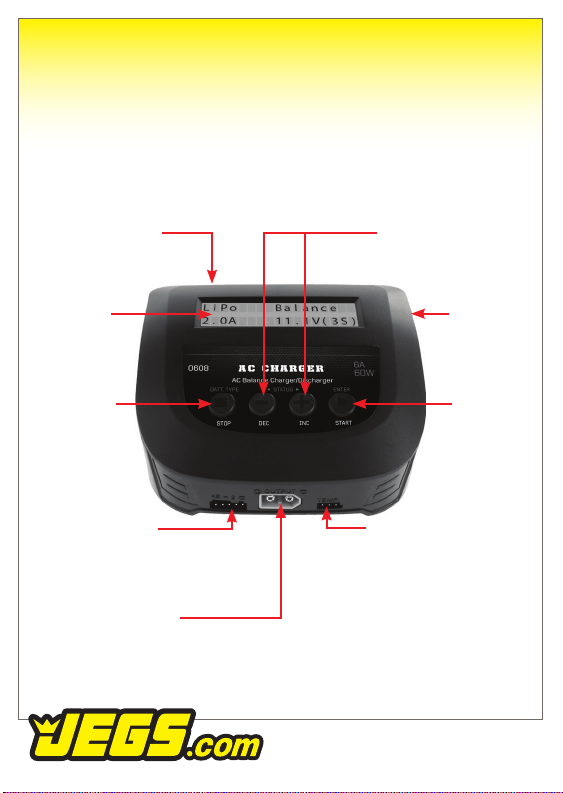
Exterior of Unit
LCD Display
Battery Type:
(To select
main program
& to stop
the operation)
Start/Enter
(To start
or resume
operations)
Cooling Fan
Balance Lead Ports:
• 2S-4S
• JST-XH
XT60 Charge Lead Port
Temperature Sensor Port
AC Input (100-240V) Decrease/Increase
(To select sub program
& to alter values)
4
1-800-345-4545
Main Menu Options
To navigate to any of the main menu
options press the BATT TYPE/STOP
button until the menu is reached. Press
the START/ENTER button to enter the
desired menu option.
Display
Lithium
Battery Mode
Display
NiMH/NiCd
Battery Mode
Display
Lead Acid
Battery Mode
Lithium Battery Mode contains options
to allow for the balance charging and
storage charging of LiPo, LiHV, LiFe,
and Li-ion batteries.
NiMH/NiCd Battery Mode contains
program options to allow for the
charging, discharging and cycling
(charging & discharging) of NiMH and
NiCd batteries.
Lead Acid Battery Mode contains
program options to allow for the
charging of Lead Acid (Pb) batteries.
User settings menu contains program
options for advanced user settings.
This charger features preprogrammed
advanced settings that are well suited
for most users.
Lithium Battery Meter provides user
individual cell voltage readings and
overall pack voltage readings for any
2S-4S LiPo, LiHV, LiFe, and Li-ion
batteries connected to the XT60
charge lead port and balance lead port
of this charger.
5
Display
Lithium
Battery Meter
Display
User Settings
1-800-345-4545
User Settings
This charger features preprogrammed
settings that are well suited for most
users. To adjust these, navigate to
User Settings by pressing BATT
TYPE/STOP button until the menu is
reached and then press the ENTER/
START button.
To navigate through the specific user
setting options use the INC (increase)
button to move forward or the DEC
(decrease) button to move backwards.
Return back to the main menu options
at any time by pressing the BATT
TYPE/STOP button.
Once the setting to be adjusted is
reached press the ENTER/START
button and the value will begin to flash
indicating the value is in adjust mode.
Use the INC or DEC button to adjust
the value and once complete press
the ENTER/START button to adjust
the next value applicable. When the
adjustment values are no longer
blinking the settings have been saved.
This value controls the amount of
resting time between charge and
discharge that a NiMH/NiCd battery
will experience when using the cycle
option. Because heat causes irrevers-
ible battery damage please exercise
caution when adjusting this value
below the default of 15 minutes.
Continued onto next page.
6
This value controls when the charger
will stop an active process (charge/
storage/discharge/cycle) when an
optional temperature sensor is used.
This is especially useful for NiMH and
NiCd batteries as it is common for
battery temperature to rise on charge.
If an optional temperature sensor
is used please exercise caution
increasing this value from the default
120ºF. Setting this value to low may
cause the charger to stop the process
prematurely.
Display
Temp Cut-off
ON 120F
Display
Cool Down Time
CHG>DCHG 15min

1-800-345-4545
User Settings Cont.
This value controls the amount of
capacity (mAh) the charger will allow
during any active process (charge/
storage/discharge/cycle). With the
default set to on at 5500mAh during
any single charge/storage/discharge/
cycle the charger will automatically
stop at 5500mAh. For the best
results set this value to just above the
With the key beep set to ON, every
button press will cause a short beep
to sound. With the alert tone set to ON,
a series of tones will sound following
completion of any process (charge/
storage/discharge/cycle).
To return the charger back to
default factory settings, press and
hold the ENTER/START button. When
complete the screen will show OK
on the lower line and at this time the
charger has been reverted to factory
settings.
This value controls the amount of
time the charger will allow any active
process (charge/storage/discharge/
cycle) to run. With the safety timer on
by default at 120 minutes any active
process will automatically stop at
this set time. This helps prevent over
charging of a battery if it proves to be
faulty or the termination circuit cannot
detect the battery is full. This is one of
many redundant safeties the charger
uses while monitoring active
processes.
label value on the battery. This will
ensure the process does not stop
prematurely. The default setting of
550mAh is recommended for all
5000mAh to 5200mAh batteries.
7
Display
Safety Timer
On 120min
Display
Capacity Cut-off
ON 5500mAh
Display
Key Beep On
Tone Alert On
Display
Load Factory
Settings

1-800-345-4545
Charging & Storage Charging
Lithium Batteries
To charge a LiPo/LiHV/LiFe/Li-ion
battery, press the BATT TYPE/STOP
button until the screen shows Lithium
Battery Mode and then press START/
ENTER.
The screen is broken up into four
quadrants and the value in each
quadrant is adjustable allowing the
charger to be configured to a wide
range of lithium batteries. Before
proceeding, be sure to confirm the
appropriate settings for your bat-
tery as recommended by the battery
manufacturer.
To change the first quadrant’s value
press the START/ENTER button and
the value will begin to flash. Change
the value using the INC (increase) or
DEC (decrease) buttons. Pressing
the START/ENTER button once more
will cause the next quadrant value to
flash and this can be changed in the
same way. When the final selection
for quadrant 4 has been made press
the START/ENTER button once more.
At this point no value should be flash-
ing and this information has been
saved. Unless these settings are later
adjusted, the next time the charger is
used these settings will automatically
be recalled with the default mode
being charge.
Continued onto next page.
Warning: Lithium battery packs
when improperly charged or
storage charged, can sustain
permanent damage, catch fire,
explore, cause personal injury
and property damage.
Warning: Never charge on or
near flammable items and never
leave a battery on charge,
storage charge, or cycle left
unattended.
8
1-800-345-4545
Charging & Storage Charging
Lithium Batteries Cont.
Quadrant 1 allows the charger to be
set for LiPo, LiHV, LiFe, and Li-ion
battery types. By default the charger
is set to LiPo mode supporting 7.4V,
11.1V, and 14.8V batteries. Notice the
nominal battery voltage in quadrant
4 will change to match the selected
lithium battery type.
Quadrant 2 allows the charger to
be set for charge or storage. Charge
mode provides the lithium battery with
a balancing charge, which ensures the
cell voltages are equalized throughout
the charge process. Storage mode
will either balance charge or discharge
the battery as required to return the
battery to a safe storage voltage,
which is roughly nominal voltage of the
battery pack.
Note: Storage mode should be
used for all lithium batteries within 24
hours of having depleted the battery
or within a few days for a charged
battery pack that will not be used for a
week or more. This will help to prevent
irreversible damage to your lithium
battery.
Quadrant 3 allows the charge or
storage charge rate (current in amps)
to be set. Confirm the recommended
charge rate for your battery and set this
per the manufacturer’s recommenda-
tions. As a general reference, a safe
charge rate for LiPo batteries is 1C or 1
times the capacity of the battery in amp
Continued onto next page.
9
Display
LiPo Charge
5.0A 7.4V(2S)
Quadrant 1 Quadrant 2
Quadrant 3 Quadrant 4
Battery Label Voltage Calculation 1C Charge Rate (Amps)
30C 2S 5000mAh 7.4V LiPo
50C 3S 5200mAh 11.1V LiPo
25C 4S 800mAh 14.8V LiPo
5000mAh/1000 = 5Ah
5200mAh/1000 = 5.2Ah
800mAh/1000 = 0.8Ah
5.0A
5.2A
0.8A
1C Charge Rate Examples
1-800-345-4545
hours (Ah). Most RC battery manufac-
turers label batteries with a mAh value,
which is 1000 times the amp hours (Ah)
rate. So to calculate the 1C charge rate
divide your mAh label value by 1000
and this is your 1C charge rate.
Continued onto next page.
Charging & Storage Charging
Lithium Batteries Cont.
Quadrant 4 allows the cell count
and voltage of the battery to be set.
Confirm the nominal voltage of your
battery pack, which is typically
listed on the battery label. If the label is
damaged or this informaiton is unclear
contact the battery manufacturer
before proceeding.
After having confirmed all values are
accurate, to start the LiPo/LiHV/
LiFe/Li-ion charge or storage charge,
first connect the batteries main lead
(largest two red and black wires with
a single plug) to the charger. This
charger has a built in XT60 charge
lead port and also includes a XT60
(yellow) to EC3 (blue) adapter. Contact
your local hobby shop for additional
adapters as needed.
With the main lead connected to the
charger, now connect the battery
balance lead (smallest wires with a
single plug) to the appropriate balance
lead port location, which is just to the
left of the XT60 charge lead port.
Note: This charger will not
allow a charge or storage charge of
lithium battery without the balance lead
connected to the charger and the
10
LiPo
LiHV
LiFe
Li-Ion
7.4V (2S)
7.6V (2S)
6.6V (2S)
7.2V (2S)
14.8V (4S)
15.2V (4S)
13.2V (4S)
14.4V (4S)
11.1V (3S)
11.4V (3S)
9.9 (3S)
10.8V (3S)
Quadrant 4 Voltage & Cell Count (S/Series) Values by Lithium Type
Warning: Exceeding a 1C
charge rate may cause irre-
versible damage to the battery
pack which may lead to fire,
explosion, personal injury or
property damage

1-800-345-4545
Charging & Storage Charging
Lithium Batteries Cont.
screen will provide an error message.
Your battery is now ready to charge
or storage charge. Start the selected
mode by pressing and holding the
START/ENTER button for 3 seconds
after which a series of tones will sound
followed by a “Battery Check Wait...”
message on the screen. Following
the “Battery Check Wait...” screen
the charger will display R: and S:
value followed by confirm (ENTER or
STOP). “R:” represent the cell count
recognized by the charger while the
“S:” value represents the value select-
ed by the user as part of the charger
program setup. Confirm that the R:
and S: values match before pressing
START/ENTER.
When charging or storage charging,
press the DEC (decrease) button
to scroll through other useful details
like the end voltage for the battery on
charge or storage charge, capacity
cut-off, safety time, and temp cut-off
setting values. Press INC (increase)
button to view the current voltage for
each individual cell in the battery pack.
To return to the main screen press the
START/ENTER button.
Warning: Over discharging
batteries MAY be detected as
a lower cell count pack. Always
confirm your settings before
starting a charge sequence.
11
Display
R: 2SER S: 2SER
CONFIRM (ENTER)
Display
Li2S 5.0A 7.4V
CHG 004:43 00116
Charging
Mode
Number
of Cells
Charging
Time
Charging
Current
Charge
Capacity (mAh)
Battery
Voltage

1-800-345-4545
Lithium Battery Meter
This charger features a lithium battery
meter, which will display the individual
cell voltage, as well as the overall
voltage from the battery pack. To use
this feature connect both the balance
lead and the main lead of the battery
to the charger. Press the BATT TYPE/
STOP button until the screen displays
Lithium Battery Meter and Press
START/ENTER.
The first screen shows the voltage of
each individual cell for the battery pack
that is connected.
A second screen is available to show
the overall voltage of the battery pack
as well as providing values for the high-
est cell voltage (H:) in the pack as well
as the lowest cell voltage (L:) in the
pack. To access this screen press the
INC (increase) button. You can return
to the individual cell voltage screen
by pressing the INC (increase) button
once more.
When finished press the BATT TYPE/
STOP button to return back to the
main menu options.
12
Display
C1: 3.70 C2: 3.70
C3: 0.00 C4: 0.00
Display
Overall: 7.4V
H:3.70V L: 3.70V

1-800-345-4545
Charging/Discharging/Cycling
NiMH & NiCd Batteries
To charge, discharge or cycle
(charging & discharge) a NiMH or NiCd
battery, press the BATT TYPE/STOP
button until the screen shows NiMH/
NiCd Battery Mode and then press
START/ENTER.
The screen is broken up into four
quadrants and the value in each
quadrant is adjustable allowing the
charger to be configured for charging,
discharging and cycling modes for
both NiMH and NiCd batteries. Before
proceeding be sure to confirm the
appropriate settings for your battery
as recommended by the battery
manufacturer.
To change the first quadrant’s value
press the START/ENTER button and
the value will begin to flash. Change
the value by using the INC (increase)
or DEC (decrease) button. Pressing
the START/ENTER button once more
will cause the next quadrant value to
flash and this can be changed in the
same way. When the final selection for
quadrant 4 has been made press the
START/ENTER button once more. At
this point no value should be flashing
and this information has been saved.
Unless these settings are later adjusted,
the next time the charger is used these
settings will automatically be recalled
with the default mode being charge.
Continued onto next page.
13
Display
NiMH CHARGE
CURRENT 2.0A
Quadrant 1 Quadrant 2
Quadrant 3 Quadrant 4
CHARGE
MODE
Display
NiMH DISCHG
2.0A 6.0V
DISCHARGE
MODE
Quadrant 1 Quadrant 2
Quadrant 3 Quadrant 4
Display
NiMH CYCLE
CHG/DCHG 1
CYCLE
MODE
Quadrant 1 Quadrant 2
Quadrant 3 Quadrant 4
1-800-345-4545
Charging/Discharging/Cycling
NiMH & NiCd Batteries Cont.
Quadrant 1 allows the charger to be
set for NiMH or NiCd batteries. By
default the charger is set to NiMH
mode supporting 7.2V, 8.4V, and 9.6V
batteries.
Quadrant 2 allows the charger to be
set for charge, discharge or cycle.
Charge mode will bring the battery
to full charge for use, discharge will
bring the battery to a user defined
voltage while cycle will both charge and
discharge the battery in the order
defined by the user.
Quadrant 3 when in charge mode, is
not adjustable. For discharge mode
(DISCHG), this quadrant allows the
discharge amperage to be set. For
cycle mode, this quadrant allows for
the order of discharge and charge to
be set.
Set to CHG>DCHG the battery
will first charge using the settings
configured in charge mode, rest for the
amount of time configured under User
Settings > Cool Down Time, and
then the charger will discharge
using the settings configured in
discharge mode.
Set to DCHG>CHG the battery will
first discharge using the settings
configured in discharge mode, reset
for the amount of time configured
under User Settings > Cool Down
Time and then charge using the
settings configured in charge mode.
Confirm the recommended charge rate
for your battery and set this per the
manufacturer’s recommendations. As
a general reference, a safe charge rate
for NiHM and NiCd batteries has been
provided in the table below.
Continued onto next page.
14
Battery Capacity (mAh) Charge Rate (A)
Less than 3000mAh
3000mAh to 3600mAh
4200mAh to 5000mAh
6.0V
7.0V
8.0V
NiMH to NiCd Charge Rate Recommendations
1-800-345-4545
Charging/Discharging/Cycling
NiMH & NiCd Batteries Cont.
Quadrant 4 for charge mode
allows the charge rate in amps (A)
to be set. For discharge mode, this
quadrant allows the ending voltage
to be set. JEGS recommends setting
this value to no lower than 1.0V per
cell unless otherwise specified by the
battery manufacturer. Cell count and
discharge voltage references are pro-
vided in the table below for the NiMH
and NiCd batteries supported by
the charger.
Confirm the nominal voltage of your
battery pack, which is typically list-
ed on the battery label. If the label is
damaged or the information is unclear
contact the battery manufacturer
before proceeding.
For cycle mode this quadrant allows
the number of times the battery is
cycled to be set.
After having confirmed all values are
accurate, start the NiMH or NiCd
charge, discharge, or cycle, connect
the battery’s main lead to the charger.
The charger has a built in XT60 charge
lead port and also includes a XT60 (yel
-
low) to EC3 (blue) adapter. Contact
your local hobby shop for additional
adapters as needed.
Continued onto next page.
Warning: Over discharging
an NiMH battery may generate
excessive heat in the battery. This
may cause irreversible damage
to the battery pack and it may
explode, cause personal injury
and property damage.
15
Battery Label Voltage Cell Count Recommended Discharge Volts
7.2V
8.4V
9.6V
6 cells
7 cells
8 cells
6.0V
7.0V
8.0V
NiMH to NiCd Voltage to Cell Count
1-800-345-4545
Charging/Discharging/Cycling
NiMH & NiCd Batteries Cont.
Your battery is now ready to charge,
discharge, or cycle. Start the
selected mode by pressing and
holding the START/ENTER button
for 3 seconds after which a series
of tones will sound followed by a
“Battery Check Wait...” message on
the screen. If the charger does not
detect any abnormalities the mode will
automatically start.
When charging, discharging, or
cycling, the screen provides useful
information like the type of
battery (NiMH or NiCd), current rate of
charge, battery voltage, mode (charge,
discharge, or cycle displaced as C>D
or D>C) and the amount of mAh or
capacity that the charger has put into
or taken out of the pack currently being
charged, discharged, or cycled. Press
the BATT TYPE/STOP button to stop
the process at any time.
When charging or storage charging,
press the DEC (decrease) or INC
(increase) button to scroll through the
available information options such as
capacity cut-off, safety timer, temp
cut-off setting values, and internal
termperature readings.
16
Display
NiMH 2.0A 7.2V
CHG 001:43 00142
Battery
Type
Mode
Charging
Current
Charging
Time
Battery
Voltage
Charged
Capacity (mAh)
1-800-345-4545
Charging Lead Acid
(Pb) Batteries
To charge a lead acid (Pb) battery,
press the BATT TYPE/STOP button
until the screen shows Lead Acid
Battery Mode and then press START/
ENTER.
The screen is broken up into four
quadrants. Quadrants 3 and 4 have
the only values that are adjustable
allowing the charger to be configured
for use with a wide range of lead acid
batteries. Before proceeding, be sure to
confirm the appropriate settings for your
battery as recommended by the
battery manufacturer.
To change the first quadrant’s value
(quadrant 3) press the START/ENTER
button and the value will begin to
flash. Change the value by using the
INC (increase) or DEC (decrease)
button. Pressing the START/ENTER
button once more will cause the next
quadrant value to flash and this can
be changed in the same way. When
the final selection for quadrant 4 has
been made press the START/ENTER
button once more. At this point no
value should be flashing and this
information has been saved. Unless the
settings are later adjusted, the next time
the charger is used these settings will
automatically be recalled with the
default mode being charge.
Quadrant 3 allows the charge
rate (current in amps) to be set.
Continued onto next page.
Confirm the recommended charge rate
for your battery and set this per the
manufacture’s recommendations.
Warning: Charging lead acid
batteries at a high rate can cause
permanent damage to the battery
which may lead to dangerous
hydrogen gas being released.
17
Display
Pb Charge
1.0A 12.0V (6P)
Quadrant 1 Quadrant 2
Quadrant 3 Quadrant 4
Table of contents
Other Jegs Batteries Charger manuals


