Jensen JSCR-75 User manual

CASSETTE PLAYER WITH MP3 ENCODER
INSTRUCTION MANUAL
JSCR-75
PLEASE READ THIS INSTRUCTION MANUAL COMPLETELY
BEFORE OPERATING THIS UNIT AND RETAIN IT FOR
FUTURE REFERENCE.

1
FEATURES
●
Rediscover your old cassette tapes on the go.
●
Convert your old mix tapes and cassettes to MP3 and play them back on any MP3 player, or burn
them to a CD.
●
The portable design is easy to carry and enables you to play and transfer almost anywhere.
●
Flexible battery or USB-powered operation.
●
Includes Tape Converter software to guide you through the transfer.
●
Audio output enables you to listen on your stereo, head phones or other speaker systems.
●
It can be used as a regular, portable cassette player. Just insert batteries into the slot under where
the cassette goes, and you’re ready to listen to your cassettes on the go!
FUNCTIONS OF CONTROLS
1. EJECT: Slide this switch to open the cassette door/holder.
2. VOLUME: Adjusts the volume of the headphones and USB connection.
3. HEADPHONE JACK: Connect 3.5mm headphones here.
4. USB port: Use the included USB cable to connect the Cassette Player to your computer in order to
transfer audio. We have provided a software package on the included CD to aid in this process.
5. STOP: Press to stop the tape.
6. FAST FORWARD: Press to fast forward the tape.
7. REWIND: Press to rewind the tape.
8. PLAY: Press to play the tape.
POWER SOURCE
This Cassette Player is designed to operate on 2 x 1.5V ‘AA’ (UM-3) batteries (not included) or power up
by PC when connected to the USB port of a PC.
BATTERY INSTALLATION
1. Open the Cassette Door by sliding EJECT downwards.
2. Press and lift up the Battery Door in the direction as shown on the Battery Door.

2
3. Insert 2 ‘AA’ batteries, according to the polarity on Cassette Compartment, into the battery
compartment and replace the Battery Door.
IMPORTANT:
Be sure that the batteries are installed correctly.
Wrong polarity may damage the unit and void the warranty.
For best performance and longer operating time, we recommend the use of good quality
alkaline-type batteries.
CAUTION
1. Do not mix old and new batteries.
2. Do not mix alkaline, standard (carbon-zinc) or rechargeable (nickel-cadmium) batteries.
3. If the unit is not to be used for an extended period of time, remove the battery. Old or leaking battery can
cause damage to the unit and may void the warranty.
4. Do not dispose of batteries in fire, batteries may explode or leak.
BATTERY REPLACEMENT
When the output sound of this unit becomes distorted or the CD player operation appears unstable, the
batteries are weak. You need to replace all the exhausted batteries at the same time as soon as possible
to avoid battery leakage.
SOFTWARE INSTALLATION
1. Insert the Quickstart CD into your computer’s CD-ROM drive. Go to your CD Rom drive and then
double click “JYKRecorder_Setup” to install.
Note: If a warning message pops up asking you to give permission, click “Yes” or “Allow”. If nothing
pops-up automatically, see the FAQ section.
2. Click the “Next” button. If you want to change the destination folder, click the “Browse” button, make a
selection and then click “OK”.
3. Click “Next” and wait until the installation is finished. Click “Close” to complete the installation.

3
USING THE JYK Recorder (MP3 ENCODING SOFTWARE)
1. Connecting the USB: Plug in the small end of the USB cable into the matching USB port on the
Cassette Player (#4) and the large end of the USB cable into a matching USB port on your computer.
(These are rectangular and are usually located on the front or back of desktop computers, and on the
side of laptop computers). If you would like to listen to the tape while it is recording (recommended)
you can plug your headphones into the headphone jack (#3).
2. For Windows Vista/7 only, Windows XP users please go to step #3
Setting default Playback Device: Right click on the speaker icon located at the bottom right corner
of your PC desktop, then select “Playback Devices” from the pop up menu. After that, the “Sound”
window will show, change the default playback device to the first one as shown below.
Note: The name of the default playback device may be different in different computers, please repeat
this and try others if there is no sound when playback
.
3. Open Software: Double-click the icon
which can be found on your desktop. A window will pop-up
that looks like this:
The first time you run this software it will ask you to select the language, the default is “English
(U.S.)”. Click “OK”to confirm selection. The JYK Recorder will pop-up as shown below.

4
Note: If another program opens up other than the JYK Recorder software when you plug your Cassette
Player into the computer, click “Cancel” or “Close” to exit and return to the JYK Recorder software.
To insure a good quality transfer, make sure all other programs are closed while recording.
4. Insert and Prepare Cassette Tape: Open the Cassette Player by sliding the eject switch (#1) down.
Insert a tape into the Converter and close the door until it clicks.
5. Rewind the tape to the position where you would like to begin recording, making sure to allow a few
extra seconds of silence to minimize unwanted trimming.
6. If there are two lines visible in the audio wave box of the software, you are ready to begin converting
your tapes to MP3s! If not, see the FAQ section for additional information.
7. Familiarize Yourself with the Software:
A
B
C
D
E
F
G

5
A. Audio Wave: If two bars are present, the Tape to MP3 Converter is connected correctly. If bars are
moving, playback is being detected.
B.
C. Adjust recorded volume; Boost, the default is 20dB.
D. Save recorded tracks manually. Save recorded tracks automatically.
Note: Please choose Auto Save icon, in case the USB be plugged out from PC
unexpectedly, the recorded track will be automatically saved into JYK Recorder installation
folder.
E. Record Quality: 8000 Hz~48000 Hz (44100 Hz is recommended).
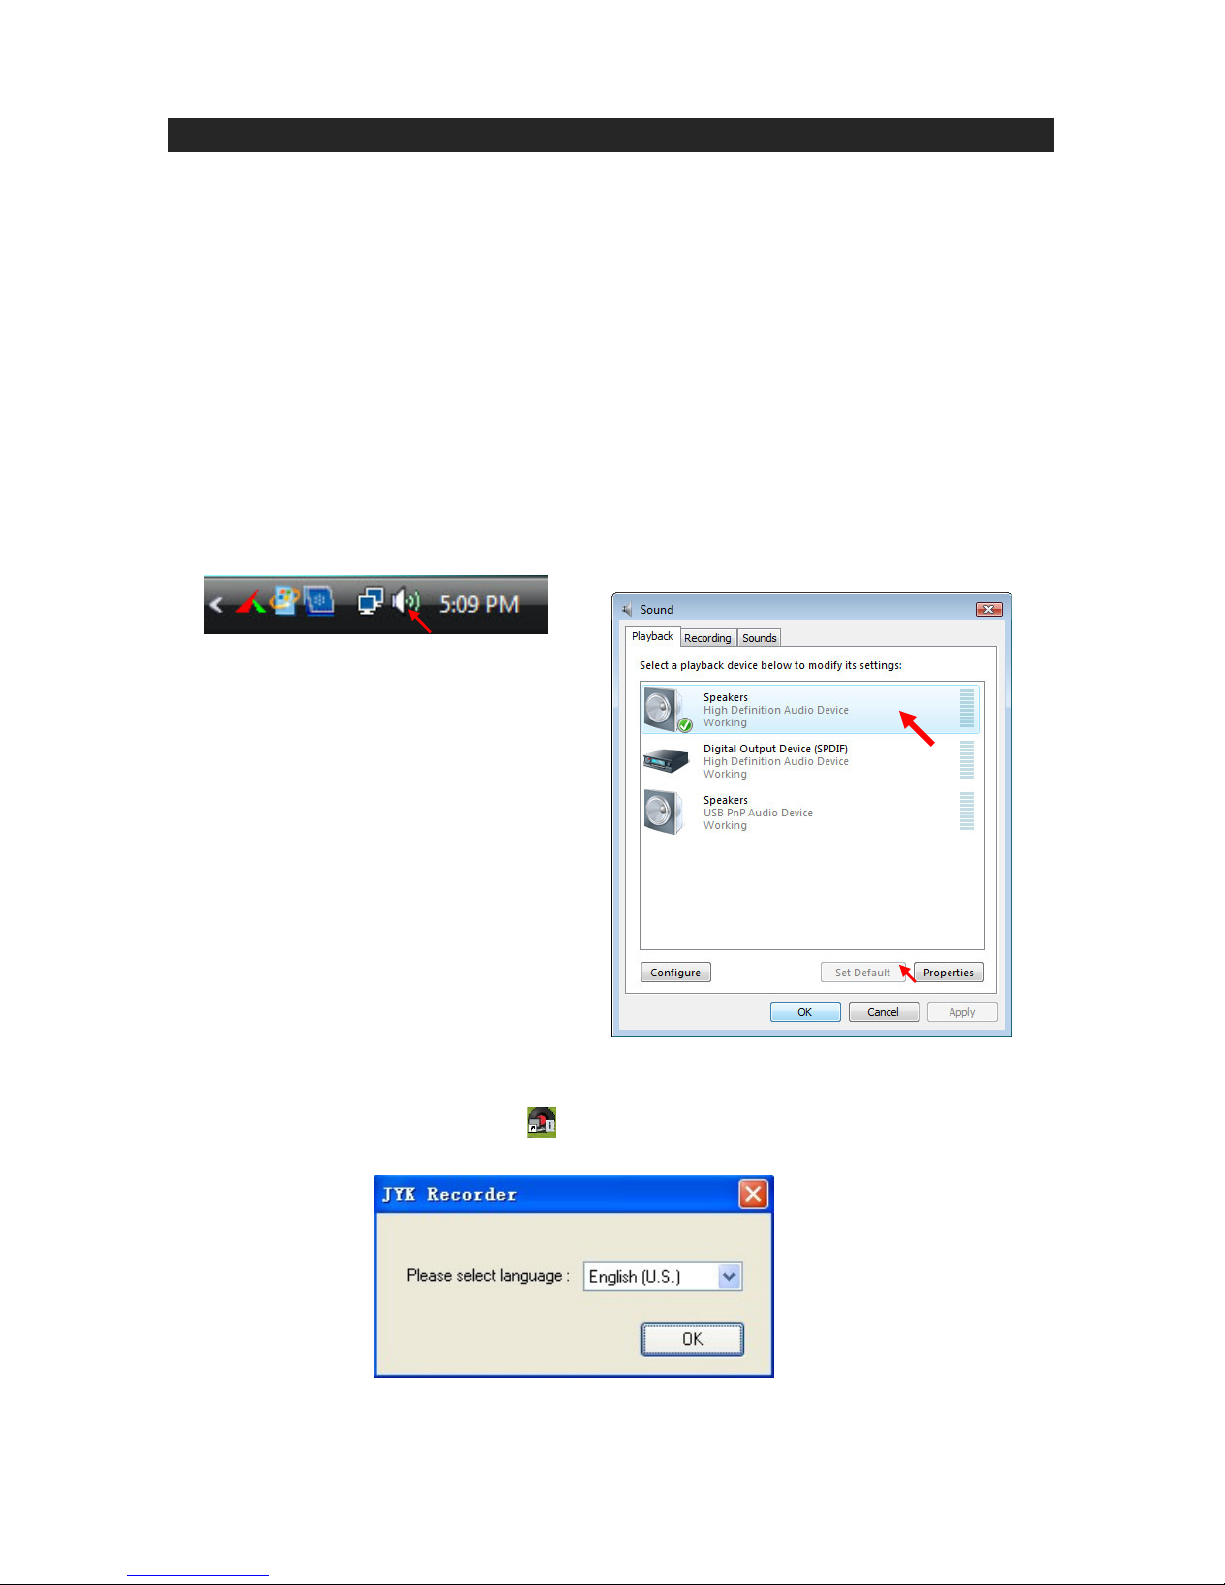
F. Playback Device selection.
G. Language selection.
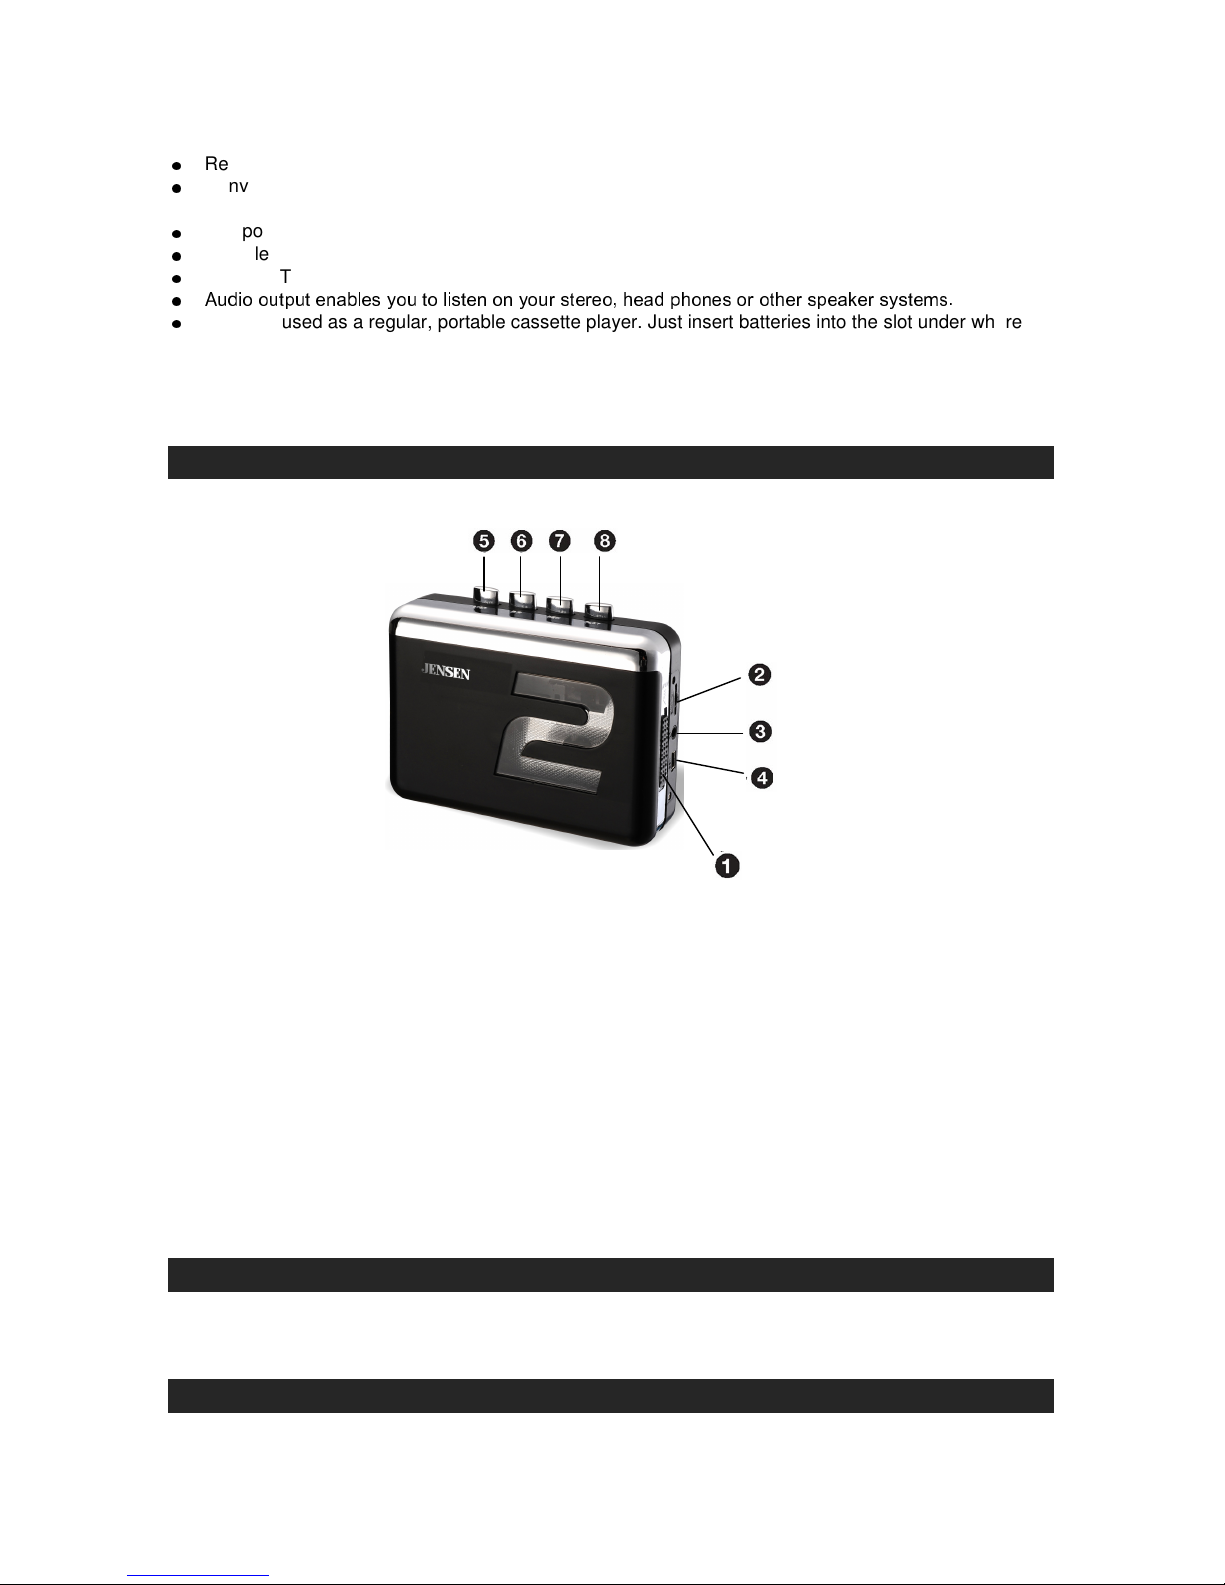
8. Recording: To start recording, you must first press the “Play” button on the device and then
immediately click the “Record” button in the JYK Recorder software.
9. To stop recording, press the “Stop” button in the software first, and then press “Stop” on the Cassette
Player device.
10. Playback: You can playback the recorded tracks by pressing “Playback” button.
Note: If you cannot hear the tracks you have recorded, see the FAQ section at the end of this guide.
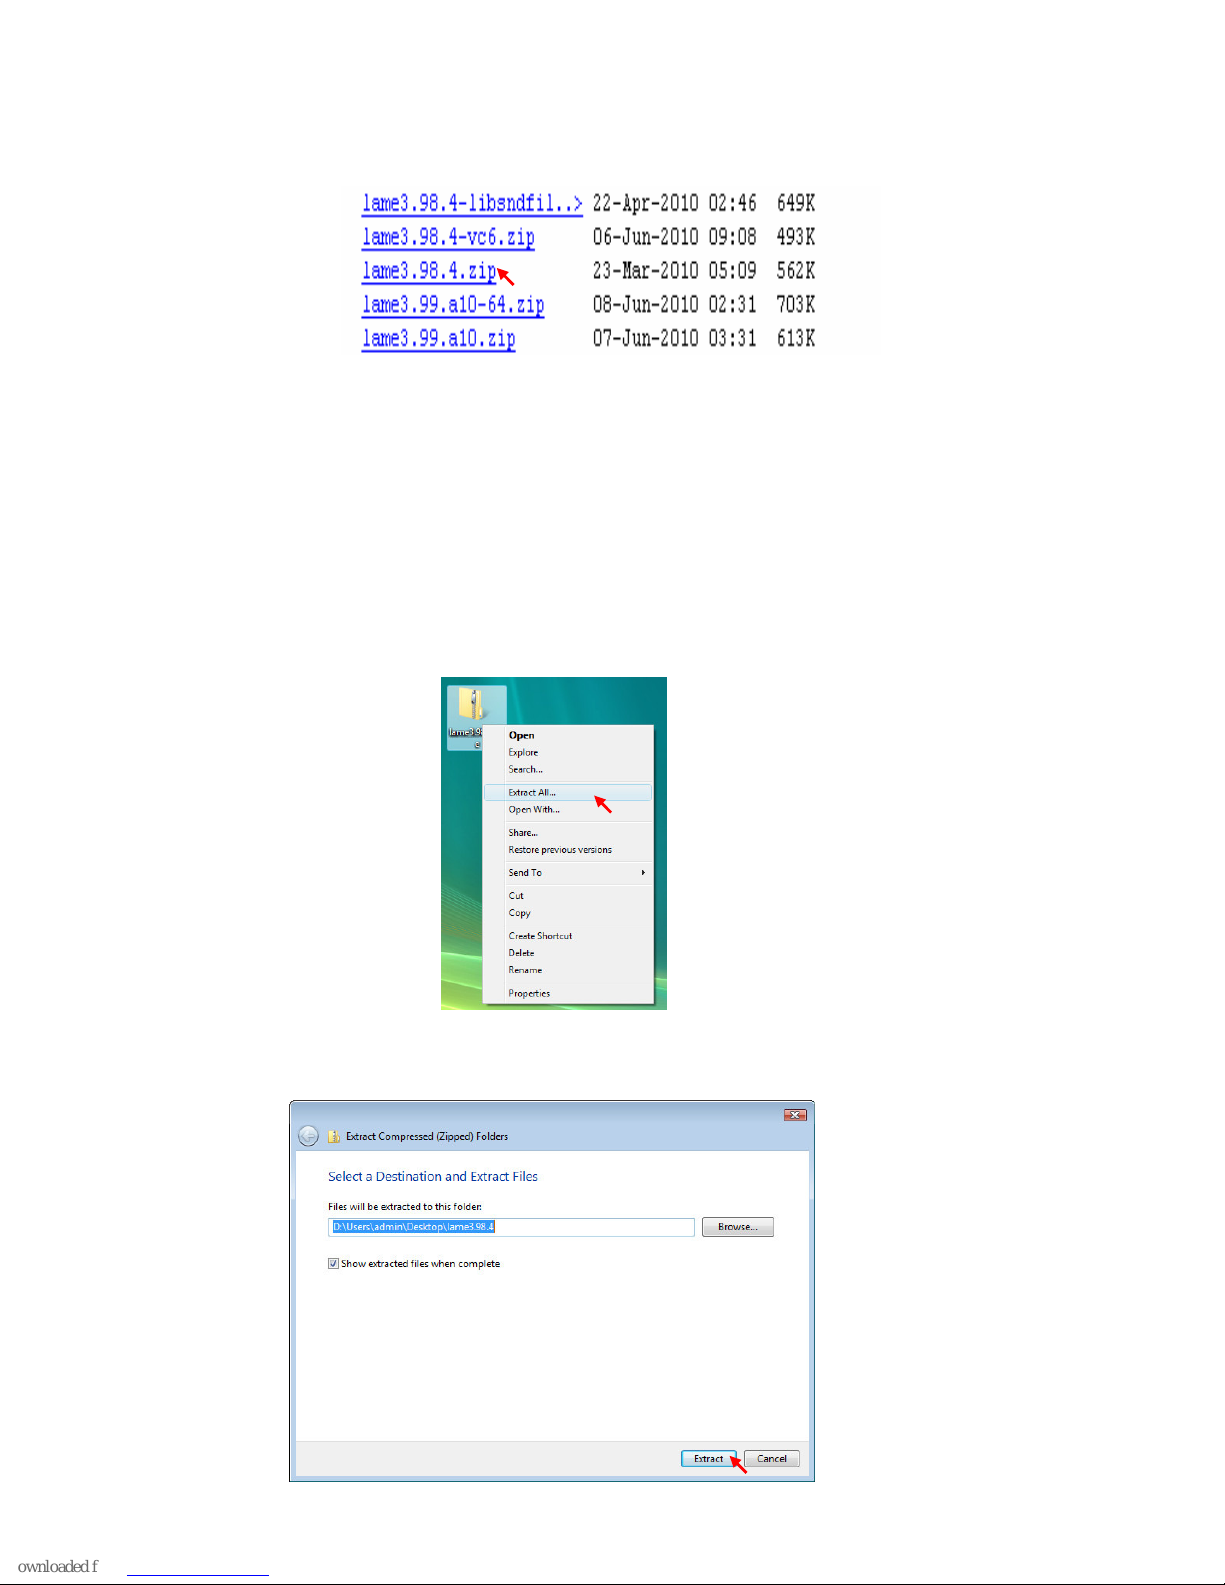
11. Saving recorded track as WAV/OGG/FLAC/MP3 type:
11.1 You will need to manually save your tracks by clicking the “Save As” button. The JYK recorder
software default record type is WAV, which can be directly saved into your PC. You can also
choose OGG/FLAC as you like. Choose the destination to save the file, then key in the file
name and press “Save” button to save the file.
Note: It is recommended to save your tracks in the same directory where the rest of your digital
music is stored (i.e.: iTunes, My Music or other music folder).
Starts the Recording
Stops the Recording
Pauses the recording (Note: Does not stop playback on the converter.)
Playback the recorded tracks

6
11.2 If you want to save the tracks as MP3 type, you will need the “Lame MP3 encoder” software to
do it. Open your Internet Browser and key in below website address and the download page
will show as below diagram. Note: You need to download the “Lame MP3 encoder” for the
first time use only.
www.rarewares.org/files/mp3

7
On the download page, choose “Lame3.98.4.zip” to download and save into your PC desktop.
After finish downloading the “Lame MP3 encoder”, go to your PC desktop to extract (unzip) it.
Please refer to the following diagrams.
11.2.1 Right click on the downloaded Lame encoder “lame3.98.4” on your PC desktop, select
“Extract All” or “Extract to Lame 3.98.4” (if you installed other unzip software) from the pop up
menu. Note: Different unzip software may have different pop up windows but usually
the files will be extracted after clicking “Next” button several times. Here using the
built-in unzip software in Windows Vista as an example.
Then click “Extract” button to extract files immediately and the extracted files will
be saved to your desktop.

8
11.2.2
11.2.211.2.2
11.2.2
To save your recorded track as MP3 file, please proceed as below:
First click the
“
ave As
”
button.
Choose MP3 type as below diagram, select the destination to save your recorded file, then key in
your file name, finally press the “Save” button to save your recorded track.
Diagram: File Format election (MP3)

9
11.2.3 Select MP3 encode bitrate: 64k bps~320k bps (say 128K bps) and click “OK” to confirm.
Diagram: MP3 Encode Bitrate Selection.
11.2.4 When the following JYK Recorder window pops up, click “OK” to confirm since you have
already downloaded the “Lame MP3 encoder”.

10
11.2.5 Now select your PC desktop to look for the Lame MP3 encoder, select “lame3.98.4” folder
and then click “Open” button as illustrated in the following diagram.
Then select the
“
lame
”
file and then click the
“
Open
”
button.

11
If it is loaded correctly, your screen will show “Conversion success”. Click “OK” then your MP3 is saved
successfully.
Note: The JYK recorder software default record type is WAV. Every time you want to save the
tracks as MP3 type, you will need to choose MP3 type from the list as shown in the diagram, JYK
Recorder software will save the music in the file format according to your choice. No need to
download LAME MP3 ENCODER again.
CARE AND MAINTENANCE
1. If the cabinet becomes dusty, wipe the exterior with a soft dust cloth only. Never use dusting sprays or
polishes on the cabinet.
2. If the cabinet becomes dirty or smudged with fingerprints it may be wiped with a soft cloth that has
been slightly dampened with a mild soap and water solution.
Avoid installing the unit in locations described below:
3. Places exposed to direct sunlight or close to heat radiating appliances such as electric heaters.
4. Dusty places.
5. Places subject to constant vibration.
6. Humid or moist places.
FREQUENTLY ASKED QUESTIONS (FAQs) WINDOWS OS
Q
.
Why doesn’t anything pop up automatically when I insert the CD?
A. Locate the CD-ROM drive of your computer by clicking the “Start” button, and then “My Computer” or
“Computer”. Locate the (D:) drive and double-click its contents. You should then see the image
mentioned in Step 1 of the USING THE TAPE-TO-MP3 CONVERTER section. Double-click on it.
Q. Why doesn’t the audio wave in the JYK Recorder software move?
A. The volume dial on the side of the TAPE-TO-MP3 Converter may be set to minimum. Try turning it to

12
maximum.
A. The TAPE-TO-MP3 Converter may not be plugged in correctly. Make sure that you have properly
followed Step 2 of the “USING THE TAPE-TO-MP3 CONVERTER” section.
Q.Where is the Audio Tab in the Sound and Audio Properties Screen?
A. It varies by operating system, but is generally available via a right-click on the volume icon in the
Windows XP taskbar. In Windows Vista and 7, it is located in the Hardware and Sound section of the
Control Panel.
Q. It appears to record but why can’t I hear any sound when I play it back on my PC?
A. Try to unplug the device from your computer first. Then play the track again or close and re-start the
JYKRecorder software. If you want to go back to recording more tracks after you have unplugged the
device, you must first plug it back in to continue recording. If the computer does not recognize the
device, close and re-start the JYKRecorder software. Please refer to the “USING THE JYK Recorder
(MP3 ENCODING SOFTWARE)”, section#2 to change the default playback device.
Q. I want to save my files onto a CD, what format do I need to save/write/burn the files in?
A. This depends on your CD player but the MP3 format is a widely used format. Writing/burning the CD
as an audio disc is an option.
Q. What types of tape can I convert?
A. Normal or Chrome format tapes of 45, 60, 90 or 120 minutes in length. Certain types of super chrome
or long-play (LP) tapes may not transfer correctly.
Q. I want to use it as a portable tape player, where do I put the batteries?
A. Two AA type batteries fit inside the player under where the cassette goes.
Q. A tape is in the player, why doesn’t it turn when I press play?
A. Your USB port might not be able to output sufficient power. Try putting batteries in the player.
A. Has it reached the end of the tape? If so, open the player and turn the cassette over.
Q. Why isn’t the playback quality as good as I normally get on my PC?
A. The quality of the original tape/sound recording is a key factor in the transfer process. Try lowering the
volume control on the side of the Cassette Player when recording.
Q. What operating systems is this software compatible with?
A. Windows XP, Vista and 7 (official retail release versions only). It is compatible with Mac OS.X as well,
but requires additional drivers to be downloaded from: http://audacity.sourceforge.net/download/mac
Q. I need additional drivers for my PC. Where can I get them?
A. A variety of drivers can be downloaded from:
http://audacity.sourceforge.net/download
Q. I want to edit sound files. What software can I use?
A. Audacity software provides some functionality to edit files and change recording quality (e.g. remove
static, hiss, or humming). More details can found at:

13
http://audacity.sourceforge.net/about/features
Q. Can I use the Tape-to-MP3 Converter files with iTunes?
A. Once you have converted your cassette tape to MP3 format and saved it to your PC, it can be
imported to an iTunes library, uploaded to MP3 players or burned onto an audio CD.
SERVICE
All necessary care is taken at the point of manufacture to ensure this unit will perform to the Jensen’s
high quality standards. However if this unit becomes faulty within the warranty period please return it to
the point of purchase with your proof of purchase for a replacement.
Distributed in Australia by:
K2 Sales Pty Ltd
PO Box 21
Balaclava, Vic
Australia 3183
Telephone 1800 686 079
Email: accounts@k2sales.com.au
Printed in China
Other manuals for JSCR-75
2
Table of contents
Other Jensen Cassette Player manuals

Jensen
Jensen JSCR-50 User manual

Jensen
Jensen CD-550BT User manual

Jensen
Jensen SCR-70 User manual

Jensen
Jensen JSCR-75 User manual

Jensen
Jensen SCR-68B User manual

Jensen
Jensen SCR-90 User manual

Jensen
Jensen JSCR-75 User manual

Jensen
Jensen MCR-60 User manual

Jensen
Jensen MCR-100 User manual

Jensen
Jensen SCR-68A User manual