Jenx Dreama User manual

INSTRUCTION FOR USE
Important Information: These instructions must be kept with
the product at all times. This product is a prescribed Medical
Device. To be used only under the guidance of a Therapist
or Prescribing Practitioner. You must read these instructions
carefully before use.
Version 010
Dreama

INSTRUCTION FOR USE
Dreama
Note: Some fabric and plastic colours may vary,
adjustments are not affected.

Contents
Carers and
home users
Re-issue
and stores
Professional and
technical users
General Information
Safety Labels ......................................................... 7
Care & Cleaning Instructions ................................. 8
Maintenance .......................................................... 9
Product Induction & Hand Over ............................ 10
Specification & Warranty ....................................... 11
Assembly................................................................ 12
Frequent Adjustments
Mattress Units........................................................ 14
Fitting & Removing Covers .................................... 15
Optional Components
Glide Lock Accessories ......................................... 17
Locking Stop Accessories..................................... 18
Accessories............................................................ 19
Maintenance & Inspection
Maintenance & Inspection ..................................... 25
Frequently Asked Questions.................................. 27
Notes...................................................................... 27
4
General Information
Important Safety Info
Ensure that your Therapist has confirmed that the product is correctly set up, by signing the ‘Set
Up’ section of the Log book before using this product. If the product has not been set up by your
Therapist DO NOT USE.
Jenx Limited recommends that children are never left unattended whilst using this Medical
Device. Children may slip or fall when unattended and may suffer serious injury. It is the sole
responsibility of the person caring for a child using this Medical Device to ensure the safety of the
child in the Device should they be left alone.
Always read the instructions before operating. Failure to read and follow the Instruction for Use,
especially with regard to moving parts, may pose a risk to the user.
Do not use this product if you suspect or know that it is broken or faulty. Please contact Jenx
Limited immediately for advice: Jenx Limited, Tel: +44 (0)114 285 3376.
This product contains small parts which could present a choking hazard to small children.
All Jenx Limited products are tested to meet current Fire Safety regulations. Always keep
products away from; naked flames, cigarettes and sources of heat such as heaters.
Jenx Limited supplies the necessary tools to adjust each product. These tools are supplied for
use by trained therapists only. Store the tools in a safe place and keep away from children.
Assemble product fully before use. Please contact Jenx Limited if you have any problems at this
stage. Jenx Limited, Tel: +44 (0)114 285 3376.
Ensure that good care is taken of your product: clean regularly. Do not use abrasive cleaners.
When not in use, store this product in a dry place that is not subject to extreme temperatures.
Places not to store this product include garages, attics or garden sheds.
Any changes or alterations carried out by persons other than a Jenx authorised service person
will invalidate the warranty and Jenx can accept no liability for any injury or damage so caused.
All Jenx products are Medical Devices and are sold on the understanding that they will be
prescribed, issued and maintained in line with current national device management guidelines.
This product conforms to the European Medical Devices Directive. It has not been tested in
conjunction with other manufacturer’s products. Do not add any accessories other than Jenx
Limited accessories to this product. If in doubt, contact Jenx for advice +44 (0)114 285 3376.
All belts and harnesses should be used at all times. For therapy purposes it may be necessary
to deviate from this rule and any deviation should be fully documented as part of a Risk
Assessment or Therapy Program and all relevant staff and carers appropriately trained. Secure
client with straps before adjusting product. Ensure finger’s width between safety strap and client
to prevent over tightening or client moving to inappropriate position. Adjust straps for each client
and changes of clothing. Minimum Velcro® overlap: 3 inches (7.5cm) on all straps. If strap is not
long enough: DO NOT USE PRODUCT.
This product must be thoroughly inspected by a qualified person at least annually

5
Dreama
jenx.com
Key
Wing knob Allen key bolt Swiss clip
Wing nut Star knob
Key for Users
T-Nut
Plastic spacer Plastic washer
Key to Components
Carers and
home users
Re-issue
and stores
Professional and
technical users
Scallop wheel

Carers and
home users
Re-issue
and stores
Professional and
technical users
CHAPTER ONE
General
Information
7
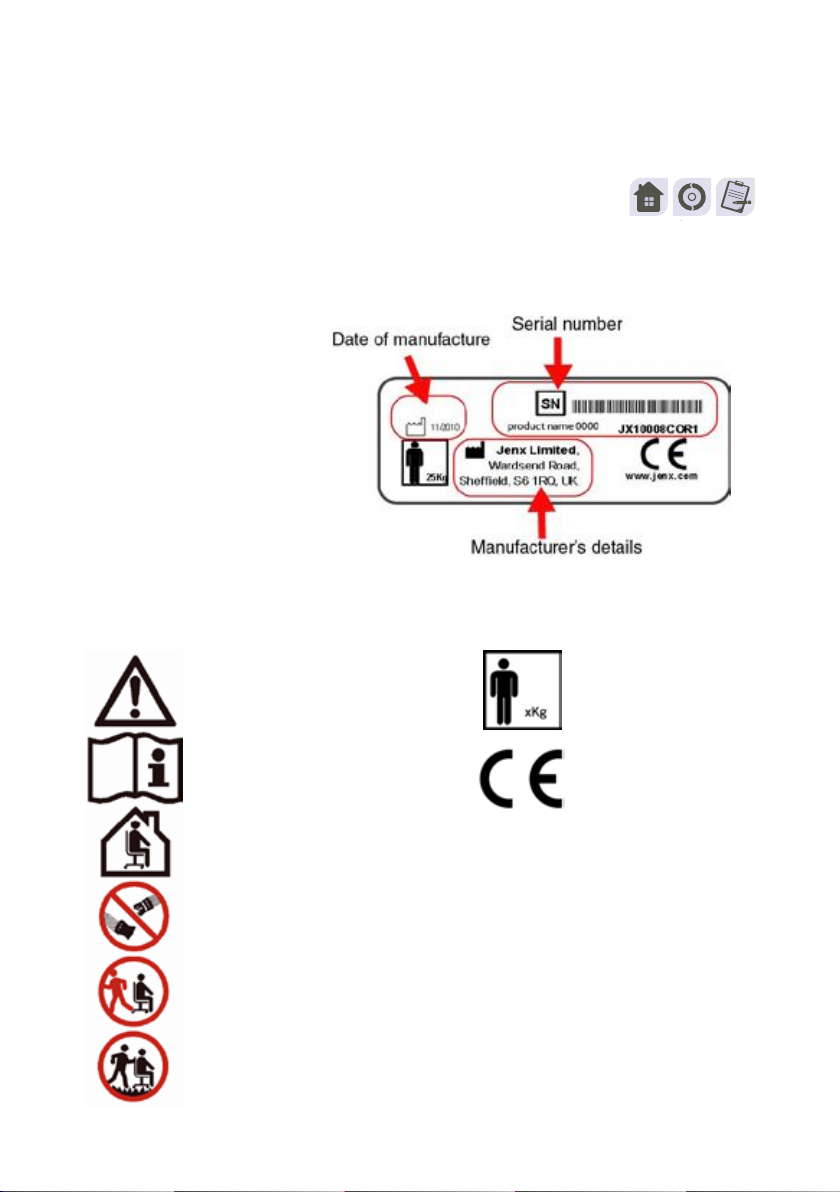
Serial Number/ CE Certification
Conforms to CE Marking
Regulations
Medical Devices Directive
(MDD) 93/42 EEC)
Each Jenx product has a number of pictorial safety labels attached, these refer to the explanations below.
Product Labels
Client weight Limit (chang-
es per model and size)
The serial number is written on the CE
label (see picture), which is located on
the product. Please quote this number
on all correspondence.
Attention/ Warning
Please read Instruction for use
Only for indoor use
Always fasten and adjust positioning straps and belts to suit the child.
Adjust to suit changes in clothing. Allow one fingers width between
the belt and the child
Do not leave child unattended (see page 4 for full warning)
DO NOT USE as a mobility device
Never use product on rough ground or uneven surface
Safety Labels
Dreama

8
General Information
Metal Frames and Coated Parts
• For deep cleaning a low pressure steam cleaner can be used
• Do not use organic solvents to clean Jenx products
• Soap and water or antibacterial spray can be used
• Daily cleaning: Wipe framework down with a damp cloth as necessary
Wooden Products and Parts
• For deep cleaning a low pressure steam cleaner can be used
• Do not use organic solvents to clean Jenx Products
• Soap and water or antibacterial spray can be used
• Check for breaks or splintering of the wood before re-issuing
• Daily cleaning: Spray polish or wax polish can be used
Fabrics, Vinyl and PU (polyurethane)
• Minor spills can be removed with a damp cloth
• Spillages should be removed as quickly as possible after contact, dab the stain, do not rub
• Do not over wet the stain
• Do not use organic solvents, dry cleaning fluids, abrasive cleaners or industrial bleaches
• Antibacterial spray or wipes can be used
• Always ensure that the product is dry before use
Care & Cleaning
Instructions

9
Dreama
jenx.com
This product must be thoroughly inspected by a qualified person at least annually
Daily Checks
Daily checks of the equipment should be carried out by carers. These checks are not technical but a basic un-
derstanding of the product is needed. Multiple daily checks may be needed in schools or therapy rooms where
the products are used by multiple users. The checks should include the following points:
• Replace any lost or worn washers or bolts
• Check tray for damage. Ensure that the tray edging is secure and that the tray is clean and free of any
rough or sharp corners
• Check all upholstery for any signs of wear and tear
• Brush Velcro® to remove fluff
• Check wooden parts for splitting or splintering
• Check straps for fraying and missing or broken buckles
• Clean any stains or spillages
• Contact Jenx Limited if any accessories not manufactured by Jenx Limited have been attached to the
product. Unauthorised accessories may affect the safety of this product and invalidate your warranty
• Check that gas spring levers are not bent. Do not use the product if any levers are bent. Contact Jenx
Limited to arrange replacement
We recommend that on a monthly basis a competent person who is familiar with this piece of equipment and
who has been trained in its use should carry out a more detailed check:
Monthly Checks
• Check that all nuts and bolts are in place and secured
• Check that all mechanical movements operate fully
• Check the structure of the product for signs of fatigue
• Castors: Lift base and check each wheel to ensure it is not loose or worn. Remove any grease or dirt that
has built up on the wheels, check that the brake stops the wheels rotating (where applicable)
• Check gas springs for normal operation and resistance. Slow descent (creeping) of the gas spring can be
checked by observing the position of the unit over a period of time
• Check that gas spring levers are not bent. Do not use the product if any levers are bent. Contact Jenx
Limited to arrange replacement
If you have filled your product inspection log book, copies can be printed from www.jenx.com
Maintenance

10
General Information
This product is a Prescribed Medical Device and as such it is important that all users understand the use
and adjustments that this product offers. This booklet shows the range of adjustments and gives guidelines
for each type of user to follow.
Professional/Technical users
This refers to the Therapist and Prescribing Practitioner.
Ensure you read all sections in this booklet and are fully familiar with all the adjustments. As well as the selec-
tion, prescription and set up of the product to suit the client’s needs, the technical user has the responsibility
for the induction of the Carer, ensuring that the Carer:
• Has an understanding of the safety aspects of the product
• Is familiar with the product. What to use and what not to use
• Knows which accessories have been added and what daily adjustments to make
• Has an understanding of the care and cleaning procedures
A formal hand over procedure should be adopted for this product. Use the separate Inspection Log to record
set ups and changes to the product. Jenx Limited offers Product Courses for Technical Users. Please con-
tact us for more information.
Carer (This section refers to the daily carer)
This product is a Prescribed Medical Device. It should only be used with the guidance of a prescribing pro-
fessional. Do not make any adjustments other than those you have been instructed to make.
The Carer section of this guide gives the adjustments needed to aid daily use only, any other adjustments
are only to be performed by the Therapist.
Re-Issue (This section refers to Stores Personnel)
Stores personnel must follow the checks and maintenance guide before re-issue. The Medicines and
Healthcare products Regulatory Agency (MHRA) releases regular bulletins regarding product updates and
issues. These should be monitored.
• Records should be kept on all products serviced or re-issued
• Repairs or replaced parts should be traceable
• The Jenx serial number should always stay with the product and never be removed
• Instructions should always be issued with the product. Copies are available from Jenx Limited or can
be downloaded from www.jenx.com
• Always inform the technical user before a product is issued to a home for set-up purposes
• If the product is to be re delivered, ensure adequate and secure packaging is used
• If in any doubt as to the safety of this product do not issue it, contact Jenx Limited for advice
• Products must only be issued fully assembled, clean and in good working order. Instruction for Use
must be with the product
Jenx Limited offer Technical User Courses for stores personnel. The course gives guidance for: maintenance,
inspection of the products, regulatory information, cleaning. Please contact us for more information.
Product Induction
& Hand Over
11
Dreama
jenx.com
Warranty
The Instruction for Use of this product should be followed carefully. It is impossible to eliminate all risks
inherently associated with the use of this product. Product failure or other unintended consequences may
result because of such factors as improper storage, use or maintenance, unauthorised and inappropriate
alteration or repair or improper or violent treatment, excessive strain, use of improper replacement parts, or
because of normal wear and tear, all of which are beyond the control of the Manufacturer and Seller. Buyer
and User assume all such risks.
Manufacturer and Seller warrant that this product will be free from defects in material and workmanship for a
period of 24 months from the date of purchase and is reasonably fit for the purposes stated in the Instruction
for Use, subject to the inherent risks under normal use conditions. This Warranty does not extend to the
use of the product contrary to the Instruction for Use, or under abnormal conditions, or under conditions not
reasonably foreseeable to or beyond the control of the Manufacturer or Seller. Buyer and User assume the risk
of any such use. MANUFACTURER MAKES NO WARRANTIES OF SATISFACTORY QUALITY OR OF FITNESS
FOR A PARTICULAR PURPOSE NOR ANY OTHER EXPRESS OR IMPLIED WARRANTY EXCEPT AS STATED
ABOVE.
In no event shall Manufacturer or Seller be liable for any incidental, consequential or special damages resulting
from the use of this product. THE EXCLUSIVE REMEDY OF THE USER OR BUYER AND THE EXCLUSIVE
LIABILITY OF MANUFACTURER AND SELLER FOR ANY AND ALL CLAIMS, LOSSES, INJURIES OR
DAMAGES (INCLUDING CLAIMS BASED ON BREACH OF WARRANTY, CONTRACT, NEGLIGENCE, TORT
STRICT LIABILITY OR OTHERWISE) RESULTING FROM THE USE OF THIS PRODUCT, SHALL BE THE
RETURN OF THE PURCHASE PRICE OF THE PRODUCT OR THE REPLACEMENT OF THE PRODUCT.
Manufacturer and Seller offer this product, and Buyer and User accept it, subject to the foregoing conditions of
sale and limitations of warranty and liability, which may not be modified except by written agreement signed by
a duly authorised representative of the Manufacturer.
Specification & Warranty
Description Cot (mm) Bed (mm)
Width 560 900
Length 1200 1900
Height (including base) 170 170
Individual cushion width (single) 90 90
Individual cushion width (double) 190 190
Individual cushion height 150 150
Individual cushion length 560 900
No of single cushions supplied 815
No of double cushions supplied 2 2

12
General Information
Assembly
1. Unroll the aluminium base
carefully on top of the exist-
ing bed base or mattress.
2. Fasten the aluminium
base to the bed using the
anchor straps. Pass the
strap through the white link*
nearest to you and thread
it through the link on the
opposite side of the bed.
Take the strap loop around
the existing bed base or
mattress and fasten through
the tri-glide. Pull tight. Use
an anchor strap at either end
of the bed for security. 1
2

Carers and
home users
Re-issue
and stores
Professional and
technical users
CHAPTER TWO
Frequent
Adjustments

14
Frequent Adjustments
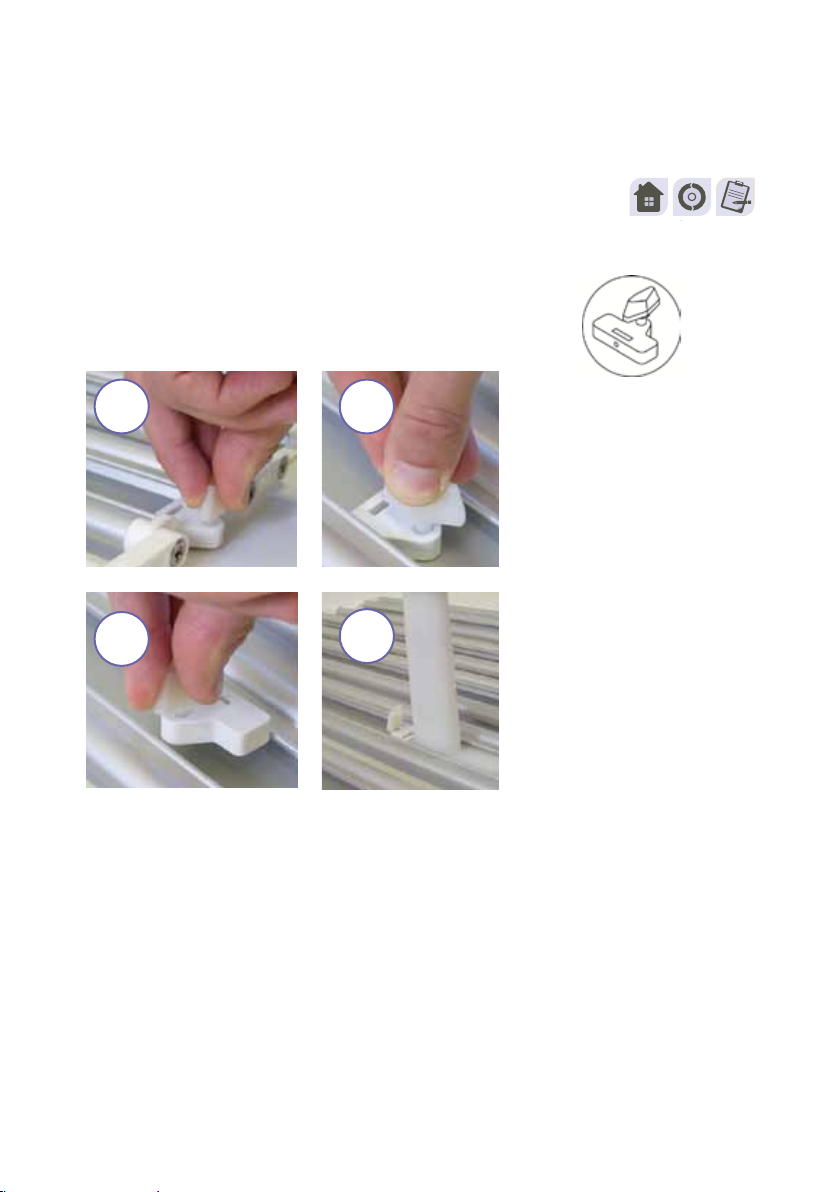
Mattress Units
Double mattress unit Single mattress unit
Double mattress unit used at each end Push the plastic clip into the link at one end
Push the plastic clip into the link at the other end The image above shows the clip securely located
into the link
To remove the mattress units,
pull from the middle and lift the
unit out
Inserting the mattress units
Removing the mattress units
1 2
3 4

15
Dreama
jenx.com
Fitting &
Removing Covers
Note: Wash sheets before use
Sheets fit as shown above, in the same way as a standard fitted sheet
Note: Do not hook the cover over
the clip. As shown opposite
Correct Incorrect

CHAPTER THREE
Carers and
home users
Re-issue
and stores
Professional and
technical users
Optional
Components

17
Dreama
jenx.com
Glide Lock Accessories
Insert the glide lock
end into the alu-
minium base of the
bed, between two
of the sections of
mattress, as shown
above.
Fitting the glide lock accessories
Adjusting the glide lock accessories: Position
1: To move backwards, tip the
pad forwards
2. To move forwards, tip the pad
backwards
Adjusting the glide lock accessories: Angle
Why? Benefits of the Adjustments:
The positioning pads are the main means of controlling posture in Dreama2. The pads slide between the mattress sections
giving unlimited scope to support a whole body, a limb or a joint. The pads can be moved with the client in position and the
client’s position can be changed in moments without the need to take them out of the bed. The rotating mechanism allows
you to contour the support even more closely to suit an individual client’s needs. See the examples below of how the position-
ing pads can be used.
To rotate the glide-lock positioning pads, hold the top of the pad, pull slightly upwards and rotate. When in
desired position, push down to lock.
1 2
18
Optional Components
Locking Stop
Accessories
Fitting the locking stops
and locking stop Accessories
1. Slide Locking stops in
from the end of the channel,
as shown left.
2. Locking stops can also be
dropped sideways into the
channel and turned to locate
3. Make sure the locking foot
is lying completely horizontally
across the channel before
tightening it up. Tighten the
white wing nut to secure.
Where the locking feet are an integral part of an accessory (except hoops) they come attached to the
accessory via webbing. There are quick release buckles on the webbing. Ensure these buckles are done up
when using the locking feet. Do not use the locking feet in the same channel as the accessory if you want to
use the quick release mechanism.
Why? Benefits of the Adjustments:
Locking Feet/Pad Stops are used to enhance the security of the accessory’s position when the client
displays repetitive movements that are likely to ‘walk’ the accessory out of place. As locking feet, the locking
section comes as part of the accessory.
The locking section can be used on its own to form a stop in a given channel which ensures that accessories
such as support pads are always positioned in the same place. This allows the technical user to set up
positions for pads and accessories and carers simply push the pads up to the stops when using Dreama2.
4. When using to keep an
accessory in place, make sure
that the straight edge of the
locking foot is touching the
straight edge of the accessory
base.
1
2
3
4
19
Dreama
jenx.com
Accessories
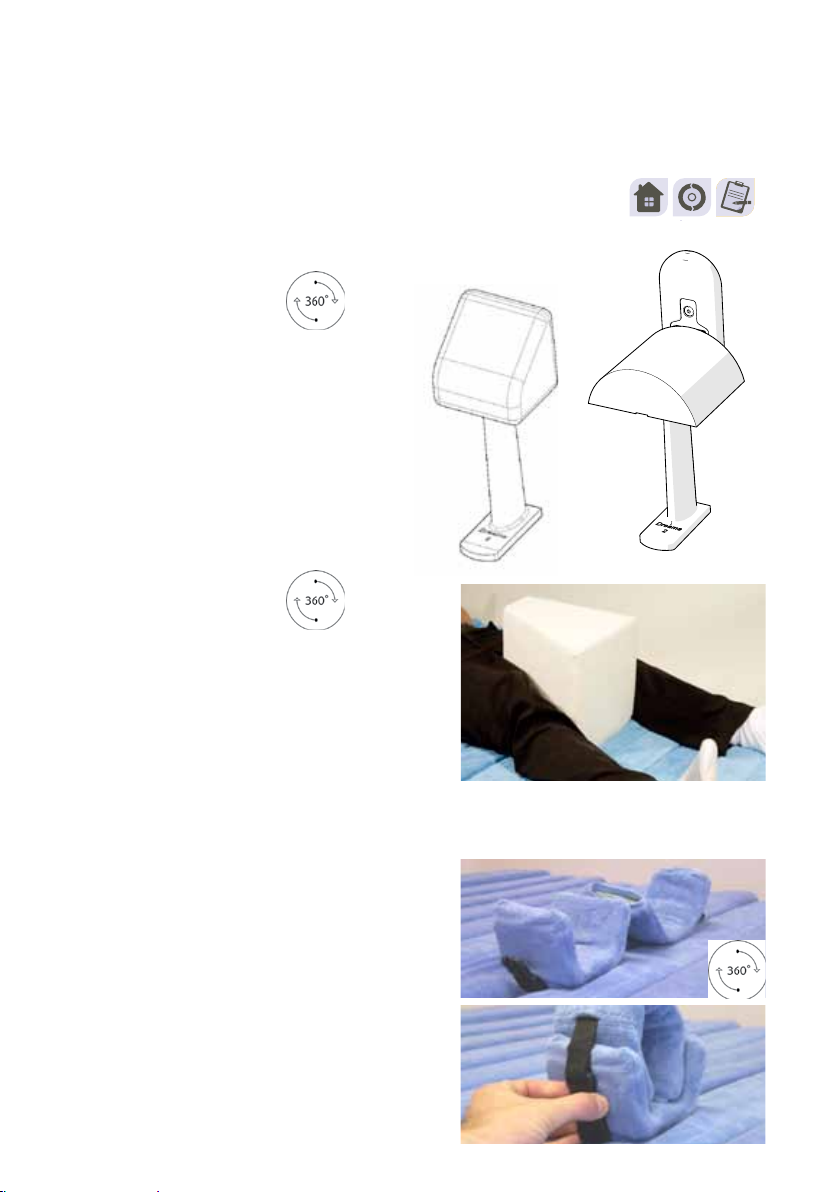
Abduction Block
The abduction block is a glide lock accessory and is
fitted as described on page 17. It can also be used
along with locking feet, as shown on page 18
WHY?
The abduction block is used to maintain the client’s
legs in abduction.
Leg Supports
The Leg Supports are glide lock Accessories and are
fitted as described on page 17. They can also be used
along with locking feet, as shown on page 18.
To position a client in the leg supports, undo the buckle
on the side of the knee cup, open the knee cup, gently
lift the client’s leg into position. Once in position, clip the
buckle back together, ensuring at least a fingers width
between the client’s knee and the upper pad.
WHY?
The leg supports are designed for use when there is a
specific reason that the leg requires extra support. This
may be following injury or surgery.
Positioning Pads
The positioning pads are glide lock accessory and
are fitted as described on page 17. They can also
be used along with locking feet, as shown on page
18
Why? Benefits of the Adjustments:
Positioning pads are used to hold the client in the
required position

20
Optional Components
Accessories
Footplates (angle adjustable)
The angle adjustable foot supports use the
glide-lock post and rotating head system, as
explained on page 17. They can be used in
conjunction with locking feet as explained on
page 18.
Hoops
WHY?
The foot support allows the correct therapeutic
position for the feet to be achieved and offers
support for the feet in the chosen position.
To alter the footplate angle, loosen the wing
knob as shown, adjust angle and tighten the
wingknob
To alter the footplate position, loosen the two
wing knobs show, slide forwards or back-
wards and retighten both wingknobs
The hoops use the locking stop attachment and fit as shown on page
18.
Why? Benefits of the Adjustments:
Hoops can control a client’s movements while still allowing them
some ‘wriggle room’. In this way a given range of movement can be
prescribed.
Hoops can also be used to take the weight of bed covers so protecting
clients who cannot tolerate the weight or those who have broken skin.
Do not use hoops over clients head or neck
Table of contents


