JetBlack Z2 Fluid User manual

4) USING YOUR TRAINER
GETTING THE BEST FROM YOUR TRAINER:
Do not ride your trainer with less than 1.5 complete turns (three half turns) of the roller
adjustment knob after the roller rst makes contact with the tyre. It is important that the
tension between the tyre and the roller is set correctly every session for two reasons. (1)
It ensures that the tyre will not slip on the roller which could cause permanent damage
to the trainer and your tyre. (2) It ensures the resistance of your trainer is consistent for
every training session allowing you to track performance.
The trainer base power curves used in the JetBlack app are measured on a bike using
700x23c slick road tyres at 110psi with exactly 1.5 complete turns (three half turns) of the
roller adjustment knob after the roller rst makes contact with the tyre. If your setup is
different you will have a slightly different resistance, but as long as you keep the setup
identical between each training sessions you will be able to monitor your performance.
The proprietary uid in the JetBlack Fluid Trainers increases resistance exponentially, the
faster you spin the harder it gets. Correct use of your bicycle’s gears will allow you to ne
tune any training session without having to manually adjust resistance.
To make your indoor workout as quiet as possible, set the trainer on a JetBlack Trainer
Mat and use a rear tyre with a smooth tread pattern. Once attached, the bicycle slopes
downward slightly. To level, use the optional JetBlack Riser Block under the front tyre.
CONSISTENT REPEATABLE TRAINING SESSIONS:
1. Increasing the tension of the roller from our recommended 1.5 turns to 2 full turns will
increase the resistance approximately 10-15%. If you are using the trainer for tracking
your power performance, you should resist adjusting the roller up to 2 full turns.
2. For every 20 psi your tyre deates you will lose approximately 5% resistance. Check
your tyre pressure before every ride, making sure it is inated to whichever comes
rst - the tyre manufacturer’s maximum recommended pressure or 110 psi (if your tyres
will allow).
NOTE: Fluid trainers require a warm up period of between 5 to 10 minutes. This is also
great time for you to do your own warm up. Once the trainer has been running for 5 to 10
minutes the resistance will be easier and more stable. Trainer power curves for the uid
trainers are measured after the trainer has sufcient time to warm up. You should avoid
monitoring your performance during this warm up period as resistance uctuates until the
resistance unit is adequately warmed up.
5) BIKE REMOVAL
Undo the roller adjustment knob on by turning it anticlockwise 1.5 turns to back the roller
away from the tyre. Hold your bike with one hand and with the other hand undo the drive
side adjustment knob, turning it towards your bicycle frame. Now unscrew the outer
adjustment knob until the axle support cups are unscrewed away from the bicycle. Now
you may carefully remove the bike forwards or upwards, until it clears the trainer frame.
6) CARING FOR YOUR TRAINER
When used according to the manufacturer’s instructions and cared for with common
sense, your JetBlack trainer will provide a lifetime of training.
Wipe any sweat off after a workout.
Keep the machine away from any corrosive substances, such as salt or other potentially
hazardous substances.
If the roller darkens or shows black tyre build up you may clean it off with a cloth. This
tyre build up can be cleaned with a rag by friction rubbing the roller with a side to side
motion. The rubbing motion with a clean rag will lift the tyre build up off the roller. Do not
use alcohol or any cleaning solvents on the hydrogel roller. A clean cloth and friction is all
that is required.
7) STORAGE
Caution! The trainer will become hot during use. Keep children and pets away and allow
trainer 15 minutes to cool down before transporting or storing your trainer.
To store or transport your trainer:
• Grasp the trainer frame by the adjustment bolts/axle support cups and then lift so
that you can fold the legs together.
• Be careful when folding the legs to avoid pinching your ngers.
• Store the trainer indoors, out of the rain and away from temperature extremes.
• Keep the trainer away from any corrosive substances such as salt or other
potentially hazardous substances.
1) WARNING
• Read and follow all instructions concerning trainer setup and installation of your
bicycle into the trainer. Failure to securely attach the bicycle to the trainer could result
in serious injury to the rider or bystanders.
• Remove all oils and moisture from the roller and the tyre before use.
• Keep both hands on handlebar at all times.
• Do not over-tighten the adjustment knobs. Over tightening may cause damage to the
trainer or your bicycle frame. The clamp handles should be rm and secure. Do NOT
force!
• Regularly check your trainer, particularly the mounting system, for damage. If you think
your trainer may be damaged, do not use it and contact your supplier.
• Always take care when training to prevent children or pets moving close to the trainer.
2) CAUTION
• This trainer is intended for single-rider bicycles only.
• Read and follow all instructions.
• Before beginning each workout, be sure the bicycle is securely attached to the trainer.
• Ensure you always use the trainer on a at surface.
• Do not put ngers, feet or dangling objects near any moving parts.
• Do not attempt to dismount until all moving parts have come to a standstill.
• Do not attempt to modify your JetBlack trainer.
• Do not attempt to stop the resistance unit or ywheel manually.
• Resistance unit can become hot enough to cause burns. Do not touch resistance unit
during use and for some period after use, until it has had sufcient time to cool.
• Keep children and pets away from the trainer during use.
• Before you start any exercise program you should consult a physician. Should you
become ill, feel dizzy, light-headed or nauseous while riding the trainer, stop riding
immediately and seek medical attention.
• The roller adjustment knob must be tightened correctly to prevent damage to the
trainer.
8) WARRANTY
JetBlack offers the original owner a lifetime warranty against manufacturing defects in
materials and workmanship. Units which use batteries or computer display units come
with a one year warranty on these products. This warranty is not applicable to damage
caused by misuse, abuse, neglect, accident or unauthorised modication. If the unit is
disassembled by the consumer, this warranty is void.
It is the responsibility of the purchaser to retain receipts for proof of purchase in the event
that warranty is required. Returning goods to JetBlack or the place of purchase is done at
the owner’s expense.
If you experience any problem with your trainer, please email us at
www.jetblackcycling.com
JBT-Z2FLUID
Locking Ring Axle Support Cups
Frame Assembly
Roller Adjustment Knob
Resistance Unit Assembly
Threaded Adjustment Bolt
Roller
Flywheel
Trainer QR Skewer
Axle Adjustment Knob
Resitance unit horizontal adjustment bolts
Resitance unit horizontal adjustment bolts
SCAN & DOWNLOAD
OR DOWNLOAD HERE
www.jetblackcycling.com/app/rego_90
FREE
LITE TRAINING APP
Compatibility
iOS devices:
iPhone 4s and above, iPad (3rd gen and above),iPad mini
Ensure Bluetooth services are enabled and latest iOS is installed.
Android devices:
Androids with OS version 4.3 or newer.
Please check your phones manufacturing details for compatibility with either ANT+ or
Bluetooth Smart.
Free app for iOS or Android with Multiple coaching sessions crafted by Olympic cycle
coach Murray Healey.
• Upload your workout to Training Peaks and Strava!
• Test and monitor yourself with an in built Fitness/Zone test and Training Zone
calculator
• View: Gear Recommendations, Goal Cadence, Session Time, Session Proles. Optional
accessories allow upgrades to include, Speed, Cadence, Heart Rate, Power (watts)
and Calories Burnt
Locking Ring Axle Support Cups
Frame Assembly
Roller Adjustment Knob
Resistance Unit Assembly
Threaded Adjustment Bolt
Roller
Flywheel
Trainer QR Skewer
Axle Adjustment Knob
Resitance unit horizontal adjustment bolts
Resitance unit horizontal adjustment bolts
3) BICYCLE MOUNTING
INITIAL SETUP
This setup must be followed every time a bicycle with a different axle length is used.
BICYCLE SETUP
1. Your bicycle must be in good mechanical condition, if you are unsure please see your
local bicycle service centre for assessment.
2. Your bicycle wheel must be in good condition, true and free from any issues. The
wheel’s rim must have less than 2mm side to side movement and less than 1mm
vertical movement per revolution. If your wheel is outside of this, please visit your local
bicycle service centre to have it trued. Untrue wheels may cause vibration during use
and could cause permanent damage to the trainer or trainer roller.
3. To measure tness improvement, it is important to use consistent tyre pressures for
each workout.
For road bike tyres we recommend 110psi.
For mountain bike tyres, please see the manufacturer’s guidelines written
on the tyre sidewall.
The trainer base power curves used in the JetBlack app are measured on a bike using
700x23c slick road tyres at 110psi with exactly 1.5 complete turns (three half turns)
of the roller adjustment knob after the roller rst makes contact with the tyre. Lower
pressures can still be measured as long as they are used consistently.
Standard Nut and Bolt
• Ensure the nuts on your axle are tightened securely
• Check that the nut and axle nests into the axle support cups by more than 5mm (3/16
inch)
Quick Release Skewer
• JetBlack strongly suggests you use the supplied quick release skewer (for those
bicycles that use QR systems
• Replace the bicycle’s rear wheel quick release (QR) skewer with the one provided. See
your bicycle owner’s manual for instructions on how to properly adjust the QR skewer.
• The skewer lever must be on the non-drive side of your bicycle (the left hand side).
• Your skewer must be tight and your wheel must be aligned properly in the bicycle.
Thru Axle
• Bicycles that use a thru axle system in most cases do not nest the minimum of 5mm
(3/16 inch) into the axle support cups. If your thru axle does not nest more than 5mm
(3/16 inch), you should acquire a trainer specic trainer thru axle that is suitable for
your bicycle. These are sold separately.
• Install your trainer specic thru axle making sure to follow the manufacturer’s
instructions.
BICYCLE MOUNTING
1. Check your tyre pressure is inated to whichever comes rst; the tyre manufacturer’s
maximum recommended pressure or 110 psi (if your tyres will allow).
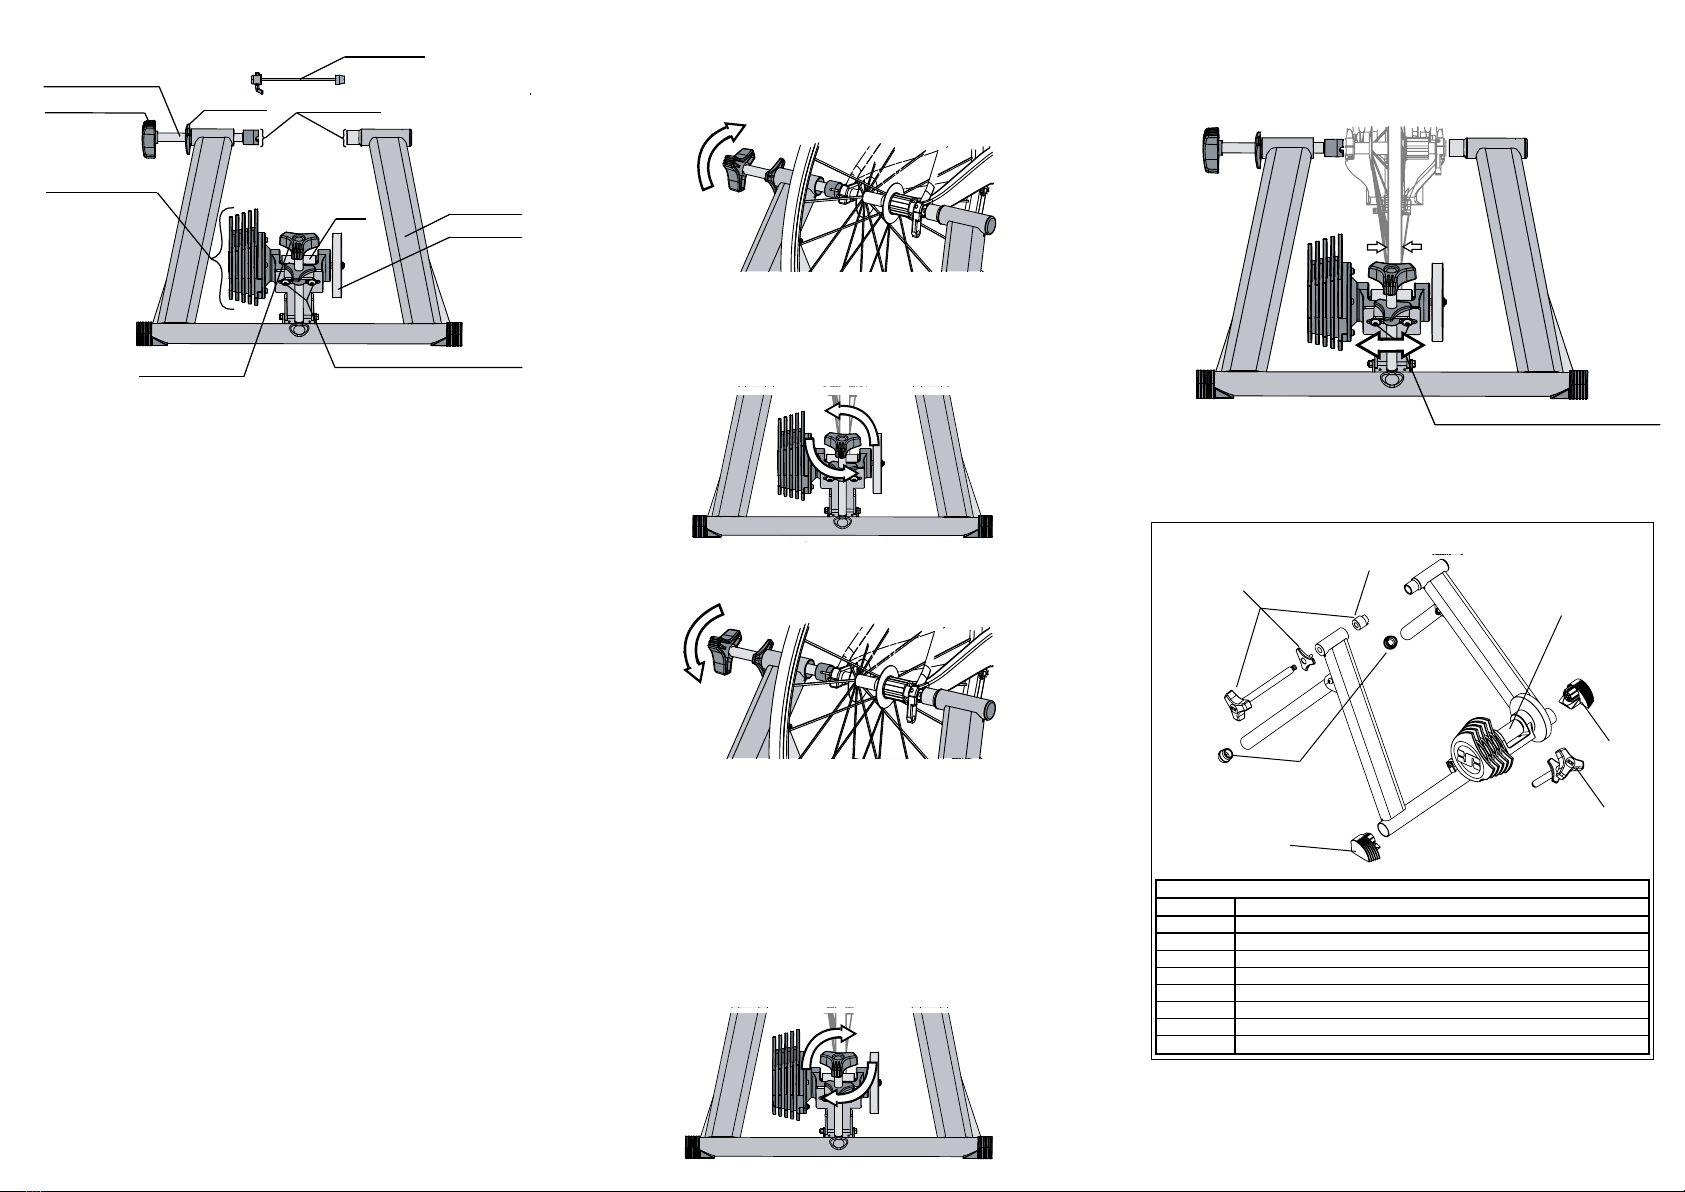
2. On the left hand side, rotate the adjustment bolt anticlockwise to allow sufcient room
for your bicycle to be inserted. See gure 1.
3. Take your bike and gently lower it into the trainer frame. Align the bike and rear wheel
to the right side of the trainer so that the bicycle axle is rmly resting inside the axle
support cup.
Note: If the roller is touching the tyre and not letting the axle nest into the axle support
cup, you may need to lower the resistance unit by winding the roller adjustment knob
anti clockwise. See gure 2.
4. While holding the bicycle steady rotate the adjustment knob clockwise tightening the
clamp cones until they come into contact with the bicycle’s QR skewer. Make sure that
the QR skewer aligns with the notch in the clamp cones. See gure 3.
5. After contact is made with axle support cup, tighten the adjustment knob until the bike
is securely held – an additional few complete turns of the handle.
6. When you have completed these steps make sure the black locking ring is rotated
clockwise until it is rmly against the trainer frame. This will lock the threaded bolt in
place, preventing it from tightening or loosening during use.
7. Check the bicycle is secure in the trainer frame. The bicycle must not move separately
from the trainer. Test this by holding the bicycle saddle and moving it from side to side
and up and down. If the bicycle moves, please return to initial setup.
8. If the roller needs adjusting horizontally (left or right) to centre the tyre onto the roller
to within 10mm (3/8 inch), there are two bolts located under the resistance unit that can
be loosened with a 6mm hex key to allow side to side adjustment. See gure 4.
IMPORTANT: The bolts holding the resistance unit in place must be rmly tightened
after any adjustments are made.
9. Finally, check that the roller is tightened to exactly 1.5 turns (three half turns) after the
tyre rst makes contact with the roller. See gure 5.
IMPORTANT: Ensure that your tyre is centred on the trainer’s roller to within 10mm (3/8
inch. Your tyre must have a minimum 5mm (3/16 inch) clearance from the metal (silver
coloured) roller frame. See gure 5.
Figure 1
Figure 3
Figure 2
Figure 4
Figure 5
Locking Ring Axle Support Cups
Frame Assembly
Roller Adjustment Knob
Resistance Unit Assembly
Threaded Adjustment Bolt
Roller
Flywheel
Trainer QR Skewer
Axle Adjustment Knob
Resitance unit horizontal adjustment bolts
Resitance unit horizontal adjustment bolts
Locking Ring Axle Support Cups
Frame Assembly
Roller Adjustment Knob
Resistance Unit Assembly
Threaded Adjustment Bolt
Roller
Flywheel
Trainer QR Skewer
Axle Adjustment Knob
Resitance unit horizontal adjustment bolts
Resitance unit horizontal adjustment bolts
Locking Ring Axle Support Cups
Frame Assembly
Roller Adjustment Knob
Resistance Unit Assembly
Threaded Adjustment Bolt
Roller
Flywheel
Trainer QR Skewer
Axle Adjustment Knob
Resitance unit horizontal adjustment bolts
Resitance unit horizontal adjustment bolts
Locking Ring Axle Support Cups
Frame Assembly
Roller Adjustment Knob
Resistance Unit Assembly
Threaded Adjustment Bolt
Roller
Flywheel
Trainer QR Skewer
Axle Adjustment Knob
Resitance unit horizontal adjustment bolts
Resitance unit horizontal adjustment bolts
Locking Ring Axle Support Cups
Frame Assembly
Roller Adjustment Knob
Resistance Unit Assembly
Threaded Adjustment Bolt
Roller
Flywheel
Trainer QR Skewer
Axle Adjustment Knob
Resitance unit horizontal adjustment bolts
Resitance unit horizontal adjustment bolts
Locking Ring Axle Support Cups
Frame Assembly
Roller Adjustment Knob
Resistance Unit Assembly
Threaded Adjustment Bolt
Roller
Flywheel
Trainer QR Skewer
Axle Adjustment Knob
Resitance unit horizontal adjustment bolts
Resitance unit horizontal adjustment bolts
ITEM CODE DESCRIPTION
JBT-15C JB Axle support cup Non-Drive-Side
JBT-17E JB Axle bolt with Knob (V2) and Axel Support Cup Non Drive Side (Z2Fluid)
JBT-21B JB Foot For Trainer Base - Finned Design (LH)
JBT-21C JB Foot For Trainer Base - Finned Design (RH)
JBT-22 JB Skewer For Trainer
JBT-37B JB Foot For Trainer Legs (S1 & Z2)
JBT-69A JB Resistance unit adjustment Bolt (V2) w' Lock Nut and Knob (Z2Fluid)
JBT-87 JB Resistance Unit Z2Fluid
Z2 FLUID - TRAINER PARTS
JBT-17E
JBT-15C
JBT-37B
JBT-21B
JBT-69A
JBT-21C
JBT-87
TRAINER SPARE PARTS
This manual suits for next models
1
Other JetBlack Exercise Bike manuals


