JetBlack VOLT V2 User manual

ACCESSIBLE PERFORMANCE
QUICK START GUIDE


CONTENTS
JETBLACK VOLT™ V2 EMS TRAINER 5
DESIGN SPECIFICATIONS 5
INTHE BOX 6
BIKE COMPATIBILITY 7
SETTING UP YOUR VOLT 9
CASSETTE REPLACEMENT 10
CHANGINGTO A CAMPAG OR XD-R FREEHUB BODY 12
MOUNTINGYOUR BICYCLE 14
CONNECTIVITY LIGHT (LED) DISPLAY 15
DEVICE COMPATIBILITY 16
CONNECTINGYOURTRAINERTOTHE JETBLACK VOLT APP 16
UPDATING / CHECKING FIRMWARE VERSIONS 16
PERFORMING SPIN DOWN 17
CONNECTINGTO 3RD PARTY TRAINING APPLICATIONS 17
PRODUCT CARE AND MAINTENANCE 19
TROUBLE SHOOTING AND FAQ’S 20
THIRD PARTY COMPATIBILITY 20
WARRANTY 22
ONLINE REGISTRATION 22
SAFE USE GUIDELINES 21
WARNING 21

VOLT™ V2 QUICK START GUIDE
04
THANK YOU FOR PURCHASING
THE JETBLACK VOLT™ V2 SMART TRAINER.
BE SURETO READ AND FOLLOW ALL
INSTRUCTIONS BEFORE USE.

VOLT™ V2 QUICK START GUIDE
05
JETBLACK VOLT™ V2
EMS SMART TRAINER
DESIGN SPECIFICATIONS
Total weight 16.5KG
Max User Weight 120 kg
Power Requirements 100-240 VOLT™, 1.5A, 50Hz-60Hz
Wireless Connection Bluetooth FTMS and ANT+ FEC
Resistance type Electromagnetic braking system
Accuracy 2%
Maximum Simulated Grade 16%
Maximum Power Output 1800 Watts
Wireless software updates Yes
Ability to Broadcast ANT+ Power
and Speed
Yes
Ability to Broadcast Bluetooth Power
and Speed
Yes
Metrics Speed, Power, Cadence and Dis-
tance
Warranty 1 year

VOLT™ V2 QUICK START GUIDE
06
IN THE BOX
NOTE: ACCESSORIES MAY VARY BY COUNTRY OR REGION.
1 VOLT™ V2 Electromagnetic unit
2 VOLT™ V2 stabilisation legs x2
3 Bolt/Nut x4
4 Quick Release Kit
5 Open-End Wrench
6 Power Adapter
7 Adapter A- Quick Release- Drive Side Spacer
8 Adapter B- Quick Release- Non-Drive Side Spacer (130mm/135mm)
9 Adapter C-Thru Axle- Drive Side Spacer
10 Adapter D-Thru Axle Non-Drive Side Spacer (12x142mm/12x148mm)
21
76
3
8
4
9
5
10

VOLT™ V2 QUICK START GUIDE 07
BIKE COMPATIBILITY
JETBLACK VOLT™ V2 IS COMPATIBLE OR ADAPTABLE WITH
MOST ROAD AND MOUNTAIN BIKES BUT MAY NOT SUIT
SOME SINGLE SPEED, RECUMBENT AND SOME THRU AXLE
CONFIGURATIONS.
• 130 / 135MM QUICK RELEASE
• 12 X 142/148MMTHRU AXLE
REAR WHEEL SIZE:
• ROAD: 650C, 700C
• MOUNTAIN: 24”, 26”, 27.5” AND 29”
Further information on your bike compatibility visit support.jetblackcycling.com
VOLT™ V2 QUICK START GUIDE
08

VOLT™ V2 QUICK START GUIDE
09
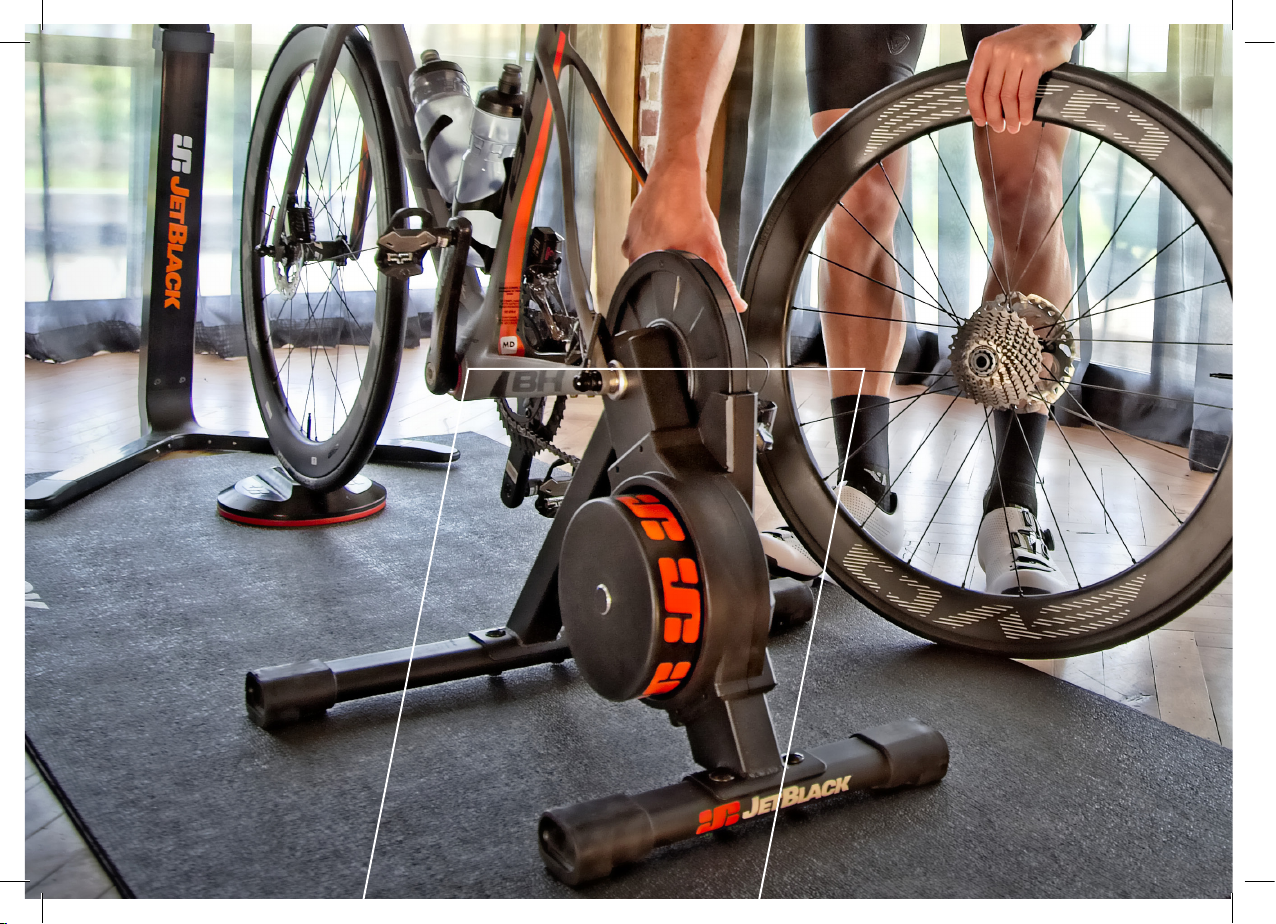
SETTING UP YOUR VOLT™
ATTACH THE FRONT AND REAR LEGS
USING TOOLS PROVIDED.
VIEW VIDEO
Unboxing & Installation
Short leg to the rear. Long leg to the front.
This ensures optimal stability; the front should have the longer
side supporting the Drive side.

VOLT™ V2 QUICK START GUIDE
10
CASSETTE REPLACEMENT
ATTACHING A 9-SPEED
OR 10-SPEED CASSETTE
Your VOLT™ V2 comes with a pre-installed 11 speed cassette. Please view
video online for a guide on changing your cassette.
VIEW VIDEO
Before attaching a 9-speed or 10-speed cassette,
you need to put the 1.8mm cassette washer
onto the cassette body rst and then secure the
cassette tightly on the VOLT™ V2 cassette body
as per the instructions in the video guide in the
link above.
Cassette Replacement

VOLT™ V2 QUICK START GUIDE
11
130MM OR 135MM QUICK
RELEASE INSTALLATION
142MM OR 148MM THRU
AXLE INSTALLATION
When using a quick release bicycle frame, you
need to use adapter A, adapter B and the quick
release kit (these three accessories are
included in the package). Please refer to the
gure on the right for the installation.
When using a thru axle bicycle frame, you
need to use adapters C and D (the two
accessories are included in the package).
Please refer to the gure on the right for the
installation.
VOLT™ V2 QUICK START GUIDE
12
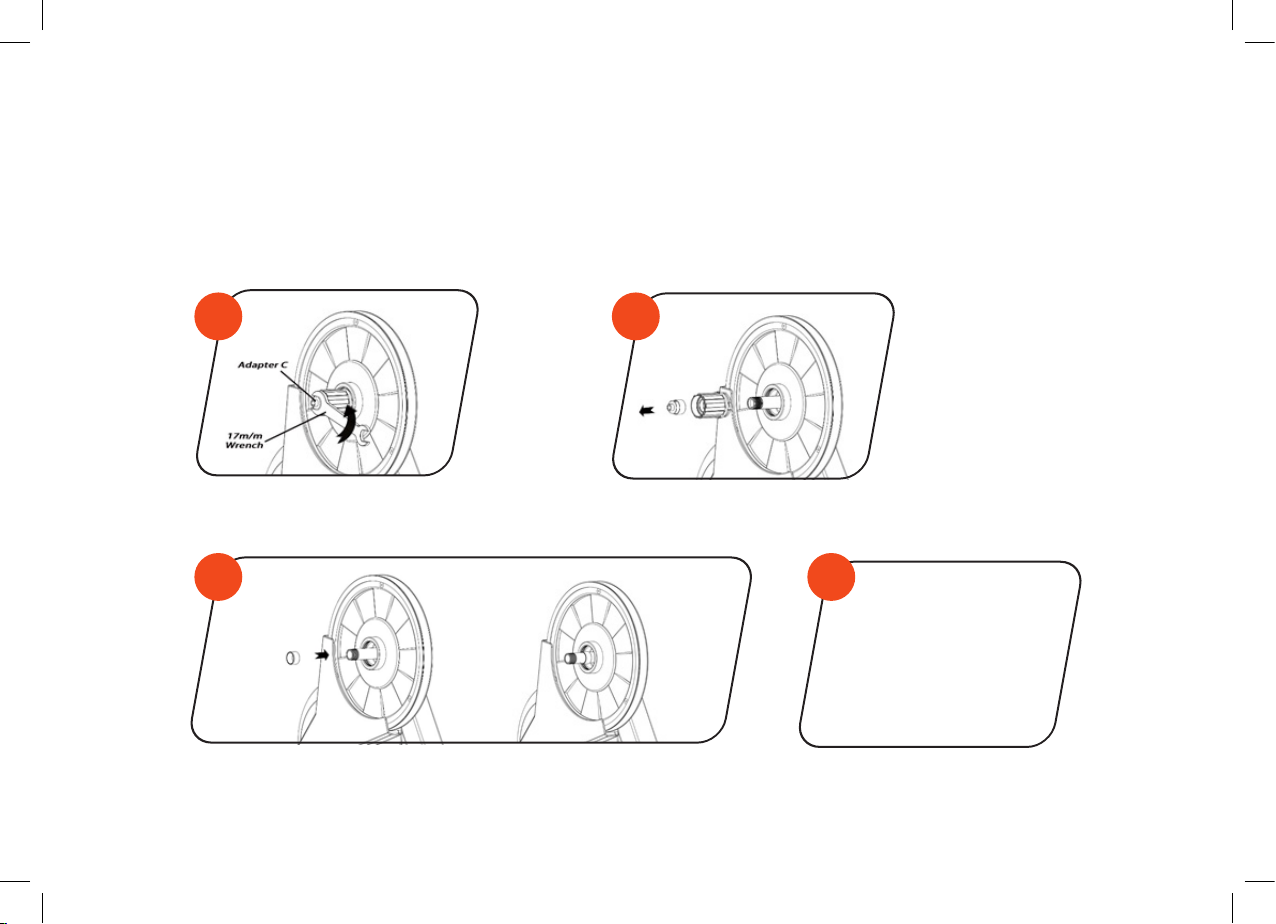
CHANGING TO A CAMPAG OR XD-R FREEHUB BODY
The stock free hub can be removed with or without the cassette installed. If you choose to remove the cassette
prior to removing the free hub, follow the instructions on previous page.
Remove the Adaptor C nut with the 17mm
wrench. Set this aside to use again.
Remove the
retaining ring
from the
Campagnolo
free hub
Remove the existing free hub by sliding off.
4
If a spacer is supplied with new Free hub body, install this now.
1
3
2

VOLT™ V2 QUICK START GUIDE
13
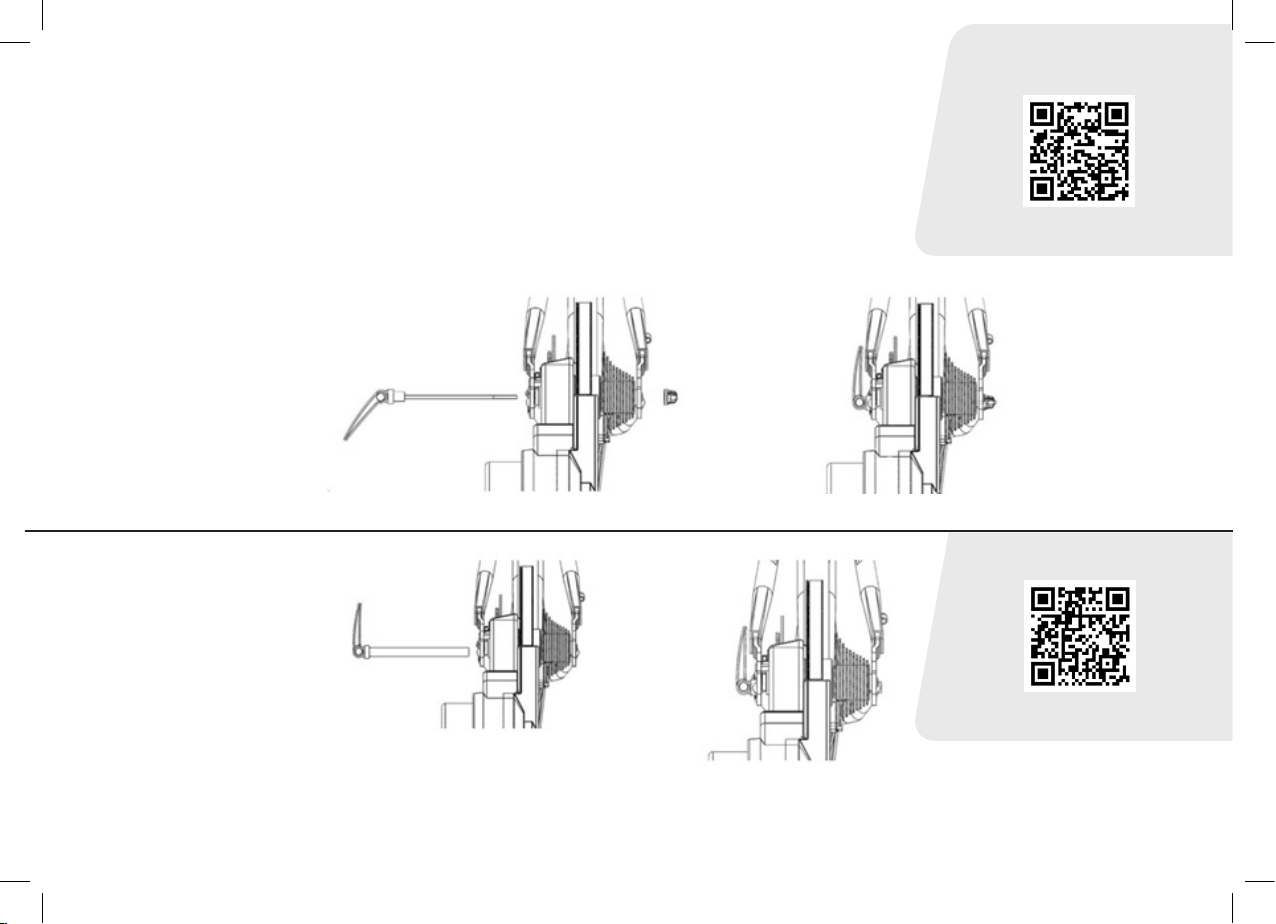
IMPORTANT: Over-torquing the nut may cause damage to the bearings.
If you do not have a torque wrench, your local bike shop most certainly will!
Install the free hub on the axle.Twist counter clockwise to help the pawls
fall into place. You should not be able to see the pawls.
Torque the nut to precisely 6Nm.
Re-install the Adaptor C nut removed in step 1.
VIEW VIDEO
Cassette Replacement
5
67
VOLT™ V2 QUICK START GUIDE
14
MOUNTING YOUR BICYCLE
Shift the chain on your bicycle to the smallest sprocket on the cassette and then remove the
rear wheel. Align the bicycle’s chain with the smallest sprocket on the trainer cassette, then
mount the bicycle frame onto the VOLT™ V2’s axle.
Please follow the
same mounting
instructions above,
then refer to the
images to the right
for mounting a thru
axle frame to the
VOLT™V2.
Securely tighten
the QR axle as
you would on your
bicycle wheel.
VIEW VIDEO
VIEW VIDEO
Quick Release
Thru Axle

VOLT™ V2 QUICK START GUIDE
15
CONNECTIVITY LIGHT (LED) DISPLAY
CONNECTIVITY LIGHT (LED) DISPLAY USING BLUETOOTH
CONNECTIVITY LIGHT (LED) DISPLAY USING ANT+
LED DISPLAY WHEN PERFORMING A FIRMWARE UPDATE
(Once connected to your power source)
1. Flashing RED / BLUE / GREEN will ash to show trainer is starting up.
(This process normally will complete in 2 -4 seconds after power is on)
2. BLINKING BLUE = Showing trainer is searching for a Bluetooth Device to connect.
3. SOLID BLUE = Bluetooth is connected and the trainer is active and sending signals to your device.
TIP:The JetBlack VOLT™ will only connect to one Bluetooth device at a time. Please ensure App is properly
closed before trying to connect to a different training App.
*DO NOT disconnect trainer or your device while the rmware is updating.
(Once connected to your power source)
1. Flashing RED / BLUE / GREEN will ash to show trainer is starting up.
(This process normally will complete in 2 -4 seconds after power is on)
2. BLINKING BLUE = Showing trainer is available.
3. ANT+ is at a “ON” status, App will show connection. Blue light will continue to blink.
1. Flashing RED / BLUE / GREEN will ash to showTrainer is starting up.
(This process normally will complete in 2 -4 seconds after power is on)
2. SOLID RED indicates the JBOOTLOADER (Firmware update service) is connected
3. SOLID BLUE indicates the trainer is connected and uploading
4. BLINKING BLUE = Showing trainer has completed upload and is searching for a Bluetooth Device to
connect. It is now safe to connect to your training app
Quick Release
Thru Axle

VOLT™ V2 QUICK START GUIDE
16
DEVICE COMPATIBILITY CONNECTING YOUR
TRAINER TO THE
JETBLACK VOLT APP
UPDATING / CHECKING
FIRMWARE VERSIONS
APPLE iOS
WINDOWS / MAC
ANDROID
The JetBlack VOLT™ V2 is designed to work with the
JetBlack Volt App which supports devices running iOS
11 and newer.
The JetBlack VOLT works with popular Windows and
Mac training Apps with Bluetooth and/or ANT+
capabilities.
support.jetblackcycling.com
The JetBlack VOLT™ V2 is designed to work with the
JetBlack Volt App which supports most Bluetooth®
compliant Android devices running Android version
5.1 or newer.
Note: Since Android devices vary widely, compatibility
cannot be assured for all devices.
Note:The JetBlack Volt App is required for important
rmware updates. JetBLack Volt App is only available
on iOS and Android mobile devices.
1. Ensure all 3rd party Apps are closed on your
device.
2. Attach your bike to your VOLT™ V2 Trainer and
ensure it is connected to the power source.
3. Open the JetBlack Cycling App.
4. Ensure Bluetooth or ANT+ is activated on your
phone.
5. Follow the volt setup wizard.
1. Open the JetBlack Cycling App
2. Navigate to settings
3. Select ‘Firmware Update’
4. Select ‘Update’ if available
IMPORTANT: ONLY USE the JetBlack Volt App for
Firmware updates

VOLT™ V2 QUICK START GUIDE
17
PERFORMING SPIN DOWN
CONNECTING TO 3RD PARTY
TRAINING APPLICATIONS
1. Open the JetBlack Cycling App
2. Navigate to Settings
3. Select Spin Down Calibration
4. Follow instructions
Blue ashing light- indicates your Volt™ V2 is available for connection.
Solid Blue light- indicates your Volt™ V2 is connected.
We recommend performing a spin down calibration if your trainer has
moved or there has been a signicant change in temperature. For optimal
calibration we recommend using the JetBlack Volt App.
IMPORTANT: Ensure your JetBlack VOLT™ V2 is disconnected from
all devices within the JetBlack App.
FOR BEST RESULTS WARM UP YOUR TRAINER FOR 10 MINUTES
BEFORE PERFORMING SPIN DOWN CALIBRATION.
JetBlack App
VOLT™ V2 QUICK START GUIDE
18

VOLT™ V2 QUICK START GUIDE
19
The VOLT™ V2 has been designed to require minimal maintenance.
• Human sweat is extremely corrosive. Use a sweat towel while training to avoid
sweating on your trainer.
• Periodically wipe down the VOLT™ V2 with a moist cloth. Wiping moisture away will
help maintain quality surfaces.
• Moving parts like the cassette body can dry out.To maintain a silent ride, occasional
application of grease will benet the performance.
• Do not use degreasers or petroleum based lubricants and keep corrosive substances
clear of the VOLT™ V2.
• Regularly check the VOLT™ V2 and particularly the mounting system for damage. If
you suspect your VOLT™ V2 may be damaged, do not use it and contact your supplier.
We recommend using an indoor training fan when training.
PRODUCT CARE AND MAINTENANCE
JetBlack
Trainer
Fan

VOLT™ V2 QUICK START GUIDE
20
TROUBLE SHOOTING
AND FAQ’S
THIRD PARTY COMPATIBILITY
Visit support.jetblackcycling.com
The JetBlack VOLT™ V2 uses industry standard
protocols allowing us to seamlessly connect to most
Third Party Apps.
INCLUDED FREE
TRIALS:
Table of contents
Other JetBlack Exercise Bike manuals


