Jinko Solar PV-JK03M Series User manual

Installation Manual
for PV-JK03M/xy Series
Cable Connector
JinkoSolar Switzerland AG
Chamerstrasse 85
6300 Zug SWITZERLAND
Tel: +41 41 748 0010
Fax: +41 41 748 0019
JinkoSolar GmbH
Freisinger Straße 9
85716 Unterschleißheim GERMANY
Tel: +49 89 1433246-0
Fax: +49 89 1433246-29
JinkoSolar Enerji Teknolojilero A.Ş.
NİDA KULE İş Merkezi Göztepe Merdivenköy
Mah. Bora Sk. No:1, Kat:7 34732, Kadıköy,
Istanbul, TURKEY
www.jinkosolar.eu | Technical Support: [email protected]
w
w
w
.
j
e
t
.
o
r
.
j
p

Table of Contents
1.Products Overview
2.Tools and Parts Overview
3.Technical Data
4.Tools Instruction
5.Installation Instruction
5.1 Cable Preparation
5.2 Crimping
5.3 Male/Female Terminals Installation
5.4 Disconnecting Cable Connector
5.5 Installation Warning
......................................................
...............................................................
...............................................................
...............................................................
04
...........................................
................................................
................................................
................................................
.......................
.........................
05
06
07
08
08
09
12
13
14
Installation Manual for PV-JK03M/xy Series Cable Connector | 0302

1.Products Overview 2.Tools and Parts Overview
1
23 4 5
3
78
45
6
1. O Ring
2. Male Housing
3. Lock Termina
4. Cable Gland
5. Gland Nut
6. Female Terminal
7. Female Housing
8. Male Terminal
Item Tool Type Tool Name Pic.
Stripping Tool1
2
3
4
5
Assembly Tool
Open-end-Wrench
Universal Tool
Crimping Tool
Dust plug
JKT-01
JKT-02
JKT-03
JKT-04
4JB03M31005
4JB03M31007
6Torque wrenchJKT-08
Installation Manual for PV-JK03M/xy Series Cable Connector | 0504

3.Technical Data 4.Tools Instruction
The Stripping Tool-JKT-03 is applicable to 2.5mm²(14AWG) or 4.0mm²(12AWG) or
6.0mm²(10AWG) cable.
There is one stripping tool JKT-04 per tool set.
Function: Cutting the wire insulation (exposing the copper wire).
The Crimping Tool-JKT-02 is applicable to 2.5mm²(14AWG) or 4.0mm²(12AWG) or
6.0mm²(10AWG) cable.
There is one crimping tool-JKT-02 per tool set.
Function: The connection and crimping between the copper wire and metal
terminals are all made by the crimping tool.
Type Name or Model No.
Rated Voltage ( V DC)
PV-JK03M/xy Series
1000 V DC/1500 V DC (IEC: PC only for 1000V)
1000 V DC/1500 V DC (UL)
Rated Insulation Voltage
Rated Current (A DC)
Application Class
6000 V (1000 V DC)
8000 V (1500 V DC)
Class A
Protection Class / Pollution Degree Class II / 2
Ambient Temperature -40℃to +85℃
Upper Limit Temperature 105℃ (IEC)
Over Voltage Category CAT III
Flammability Class
Degree of Protection, mated / unmated
UL94 V-0
Rewireable No
Cable Diameter 5,00mm to 8,50mm (IEC)
6,20mm to 9,00mm (UL)
Contact Resistance ≤ 0.3 m Ω
Contact material Copper, tin plated
Insulation Material m-PPE /PC/ PA66
Existence of an enclosure Enclosed connector
Certification Standard IEC62852
UL6703
IP68(1m, 2h) in mated condition
IP2X in unmated condition
30 A (2.5mm²/14AWG)
45 A (4.0mm²/12AWG)
50 A (6.0mm²/10AWG)
60 A (10.0mm²/8AWG)
Wire Cross Section Area or Cross
Section Range
1X2.5mm²(14AWG) for y=A;
1X4.0mm²(12AWG) for y=B;
1X6.0mm²(10AWG) for y=C;
1X10.0mm²(8AWG) for y=D;
Note: PV-JK03M-F/xy ; PV-JK03M-M/xy (x=1 or 2, y=A or B or C or D)
Stripping Tool - JKT-01
Crimping Tool- JKT-02
Assembly Tool -JKT-03:There are two assembly tools per tool set. Universal Tool-
JKT-04 :There is a universal tool per tool set.
Function: To disassemble the cable connector and disconnect male / female
cable connector.
Installation Manual for PV-JK03M/xy Series Cable Connector | 0706

5.1 Cable Preparation
5.2.11 Manual Tools Crimping
5.2 Crimping
According to different specifications of cables, please select the appropriate configura-
tion from table 1:
Open the crimping tool and press the clip. Insert the male/female terminal into ap-
propriate groove until fully seated. To make the opening of the male/female terminal
face up. (Fig. 3 & 4).
Squeeze the crimping tool gradually until the male/female terminal touches the
lower half of the crimping mold.(Fig.5).
When crimping with specified Crimping tools(e.g. JKT-02), insert striped cable into
contact barrel and insure all conductor strands are captured in the contact barrel.
Crimp contact barrel by using the corresponding crimping die, See below pictures
from Fig.3 to Fig.7. Check whether the crimping is firm after the crimping is complet-
ed. (Fig. 8). The pull-out force has to meet below table-1.
Figure 1
Figure 3 Figure 4 Figure 5
Figure 2
5.Installation Instruction
Installation Manual for PV-JK03M/xy Series Cable Connector | 0908
Conductor cross section Connector configuration
mm2AWG
2.5
4
6
10
14
12
10
8
PV-JK00M1/1y
For TÜV & UL
PV-JK00M1/2y
PV-JK00M1/2y
PV-JK00M1/3y
Table-1
Do not use untreated cables. Tinned wires are recommended. L=7-9mm
When stripping the cable insulation “L”, 7mm to 9mm in length should be removed on the
end of cable.
Do not cut the copper wire inside.
L
Fix the stripping tool, cutting length to 7mm to 9mm (the length of L should be fixed).
Take the cable one hand and take the stripping tool-JKT-03 the other hand.
Insert cables until the end touches fixed block.(Fig. 1)
Squeeze the handle of the stripping tool by hand, then cut and remove the cable insula-
tion.(Fig. 2).
Cable Size Cable Crimping Pull-Out Force
2.5mm²/14AWG
4.0mm²/12AWG
6.0mm²/10AWG
10.0mm²/8AWG
≥223 N (Min.223 N)
≥310 N (Min.310 N)
≥360 N (Min.360 N)
≥400 N (Min.400 N)
Table-2
No.
1
2
3
4

Insert the stripped wire into the male/female terminal until the cable insulation touch-
es the opening of the male/female terminal. Press the crimping tool completely. (Fig.
6、7).
Be sure the crimping is completed and fixed. (Fig. 8).
Figure 6 Figure 7 Figure 8
Installation Manual for PV-JK03M/xy Series Cable Connector | 1110
5.2.2 Automatic Machine Crimping
If customer use the automatic crimping machine, we suggest that the contact crimping
spec. should meet the table-2 requirement.
It is very important to do a micro-cutting tests, the test should be contained following
items:(REF. Fig.9).
If the compression rate can't meet recommened technical requirement, we suggest that
secondary soldering tin process should be adopted at the cable and conductor connec-
tion , to ensure a reliable connection.
Figure 9
(Table-2 Cable cross-sectional Analysis)
Cross-SectionalNO. Spec.
1
2
3
4
5
6
7
8
9
CH
CB
CBm
D
GH
GB
CH/CB
C/R
P
Crimp Height
Crimp Width
Measurable Crimp Width
Crimp face Ends
Burr Height
Burr Width
Crimp Height/Crimp Width
Compression Ratio
Void Ratio
12AWG/4mm²
2.30±0.05mm
4.00±0.10mm
1.0*CB≤CBm≤1.1*CB
D ≤ 0.35mm
GH ≤ 0.7mm
GB ≤ 0.5mm
50%≤(CH/CW)≤70%
75%≤C/R≤85%
≤1.00%
10AWG/6mm²
2.60±0.05mm
4.25±0.10mm
1.0*CB≤CBm≤1.1*CB
D ≤ 0.35mm
GH ≤ 0.7mm
GB ≤ 0.5mm
50%≤(CH/CW)≤70%
75%≤C/R≤85%
≤1.00%
Note: The above cross-sectional analysis is only for 12AWG/4mm2 & 10AWG/6mm2cable.
Figure 10 (Up Blade)Figure 11 (Down Blade)
Crimping Tool Drawing (Fig 10&11)
Crimping Tool Drawing (Fig 12&13)
12AWG/4mm2
Note: The above crimping tool drawing are only for 12AWG/4mm2cable.
10AWG/6mm2
Note: The above crimping tool drawing are only for 10AWG/6mm2cable.

5.3 Male/Female Terminals Installation 5.4 Disconnecting Cable Connector
Insert the crimped male or female terminal into back of male or female cable connector
(Fig.14). A “click” should be heard or felt when the contact cable assembly is seated in
correct position. Contacts cannot be removed once seated. (Fig.15)
To fixed the gland nut by the torque wrench-18mm of the assembly tool, and to fixed the
male cable connector or female cable connector by the another assembly tool, then
tighten the gland nut with the specified tightening torque.(Fig. 16).
Tighten the gland nut clockwise by using a tool or a torque wrench, refer to the torque
values in the table below and ensure that the nut is screwed to the anti-loosing position
and can be buckled. Take onsideration of the production process of different wire manu-
facturers and the softness and hardness of insulation/sheath material.To avoid damage to
the nut and prevent deformation,do not screw the nut to the bottom of the body (It is rec-
ommended to leave a gap of 0.8~1.5mm) (see Figure 17).
Insert the female cable connector into the male cable connector when the gland nut is
fully tightened. The connection of female and male cable connector is complete when
an “audible click” is heard. (Fig. 18 & 19).
Insert the forks into the buckle of the cable connector by the universal tool.
(Fig. 20)
Pull the cable connector by hand respectively. The cable connector can
now be separated.(Fig. 21 to 22)
Figure 14 Figure 15 Figure 16
Figure 20 Figure 21
Figure 22
Figure 17
Figure 19Figure 18
Installation Manual for PV-JK03M/xy Series Cable Connector | 1312
Cable Size
6mm²/10AWG
4mm²/12AWG
2.0~2.5 N.m
2.0~2.5 N.m
Tightening Torque

5.5 Installation Warning
If parts and tools used are not specified by JinKO or not prepared and assembled as
JinKO described during installation , the uniformity of safety and technical data on prod-
ucts are not guaranteed.
The connector is considered to be in compliance with UL 6703 only when assembled in
the manner specified by these assembly instructions.
During assembling, the connector must not be touched with any machine oil, grease, sol-
vent, with which connector would be out of action. Notice that the gloves the operators
used must not contain the substance above. The male cable connectors and the female
connectors must not plugged together when soiled.
The work described here must not be carried out on live or load-carrying part.
Connectors must not be disconnected under load. Plugging and unplugging when volt-
age is permitted.
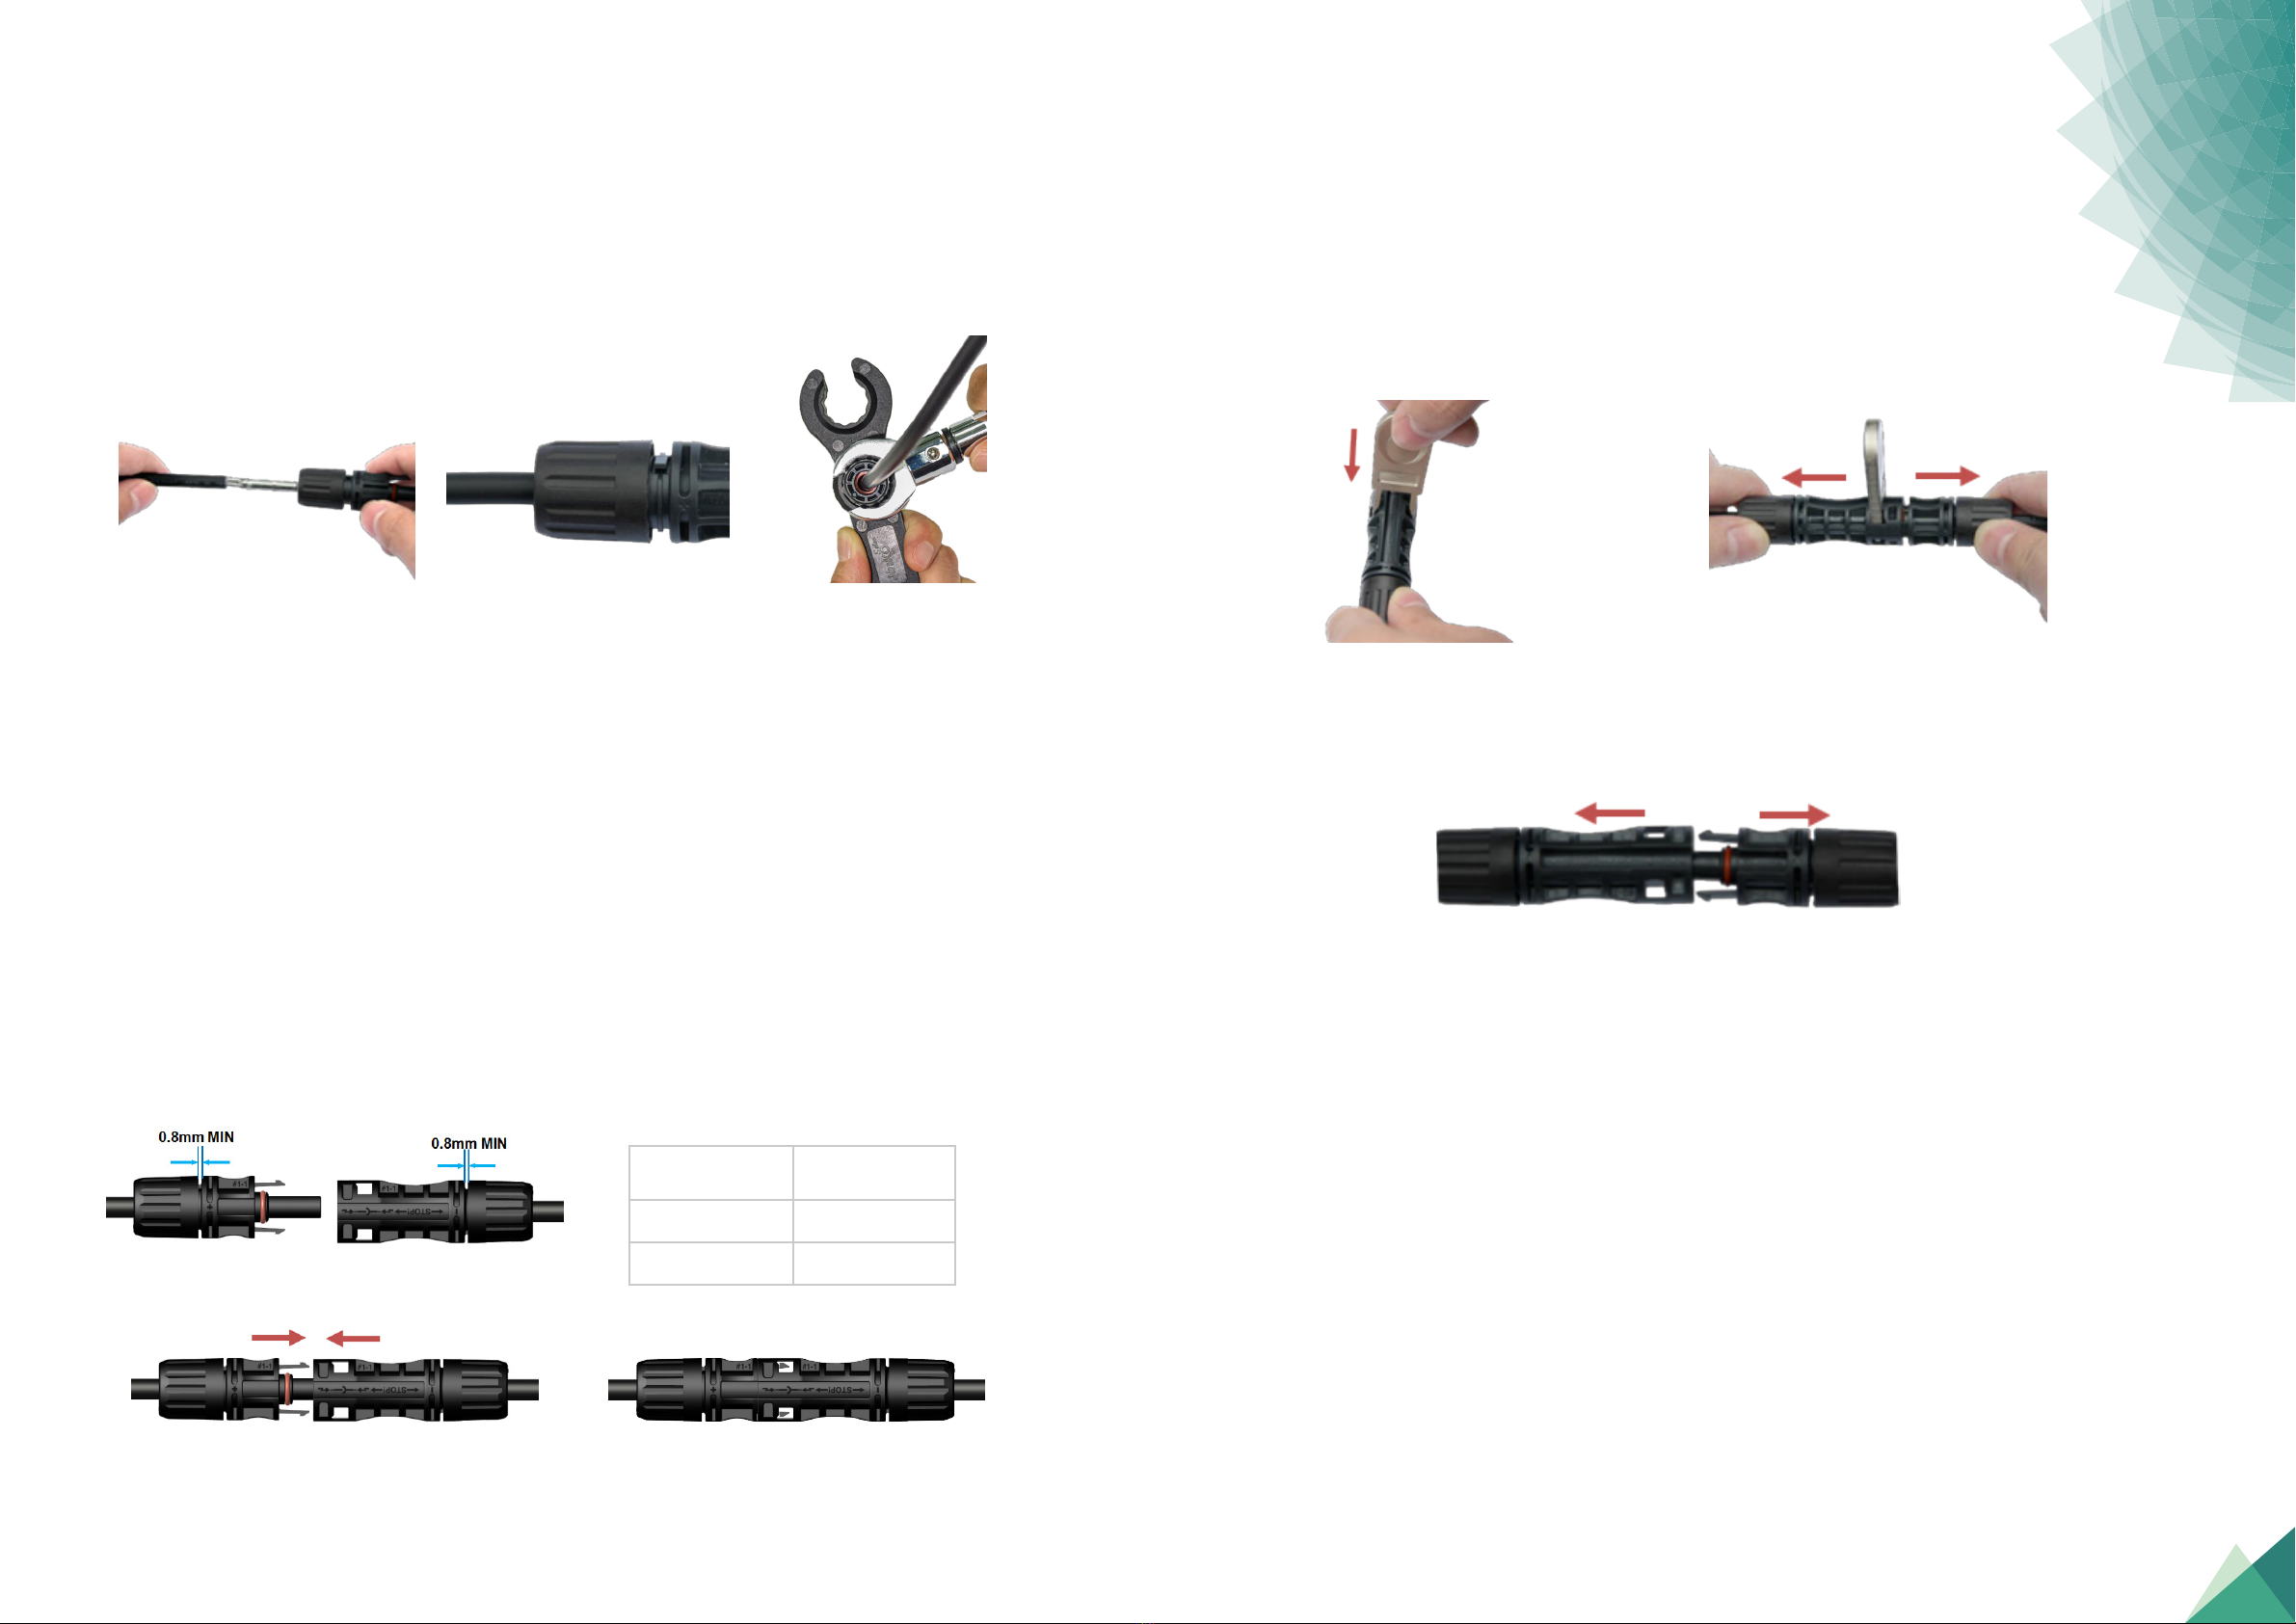
The dust plug(4JB03M31005/4JB03M31007)should be placed to avoid exposing the dust
and water when disconneted or disconnected after connected.
The plug connectors are watertight in accordance with IP68 protection class. However,
they are not suitable for continuous operation under water. Do not place the connectors
directly on the roof.
The plug connection must not be subjected to continuous mechanical tension. The cable
should be fixed with cable binders.
For safety reason, the use of either PVC cables or untinned cables are prohibited.
This connector is suitable for use only with Class B and C stranded copper conductors (See
NFPA NEC 70 Chapter 9, Table 10).
Notes: If you have any questions during installation, please feel free to contact us as follows:
Jiangxi Jinko PV Material Co., Ltd.
Add:No.10, Xingye Road, Economic Development Zone, Shangrao ,Jiangxi Province, P.R. China
Tel.:(+86)0793-8876086
Postcode:334100
Website:www.jinkopvm.com
Sales Contact Information
Tel.:(+86)0793-8876028
E-mail:[email protected]
Technician Contact Information
Tel.:(+86)0793-8876018
E-mail:[email protected]
Installation Manual for PV-JK03M/xy Series Cable Connector | 1514
Table of contents
Other Jinko Solar Cables And Connectors manuals
Popular Cables And Connectors manuals by other brands

FRONIUS
FRONIUS OPT/i TPS SpeedNet Connector installation instructions

Mobile
Mobile MB-1026 quick start guide

Tripp Lite
Tripp Lite N001-007-BL Specifications

Tripp Lite
Tripp Lite Multimode Fiber Optics 1-meter N816-01M Specifications

Pro2
Pro2 H2SPC5L operating instructions

IB Connect
IB Connect Duplo user manual