JJC SR-F2W User manual

Model: SR-F2W
Wireless Remote Controller
English Instruction Manual
Thanks for your purchase of a JJC SR-F2W Wireless Remote Controller. For the best
performance, please read this instruction carefully before using. You must read it
thoroughly and fully understand this manual to avoid improper operation which may result
in damage to the product.
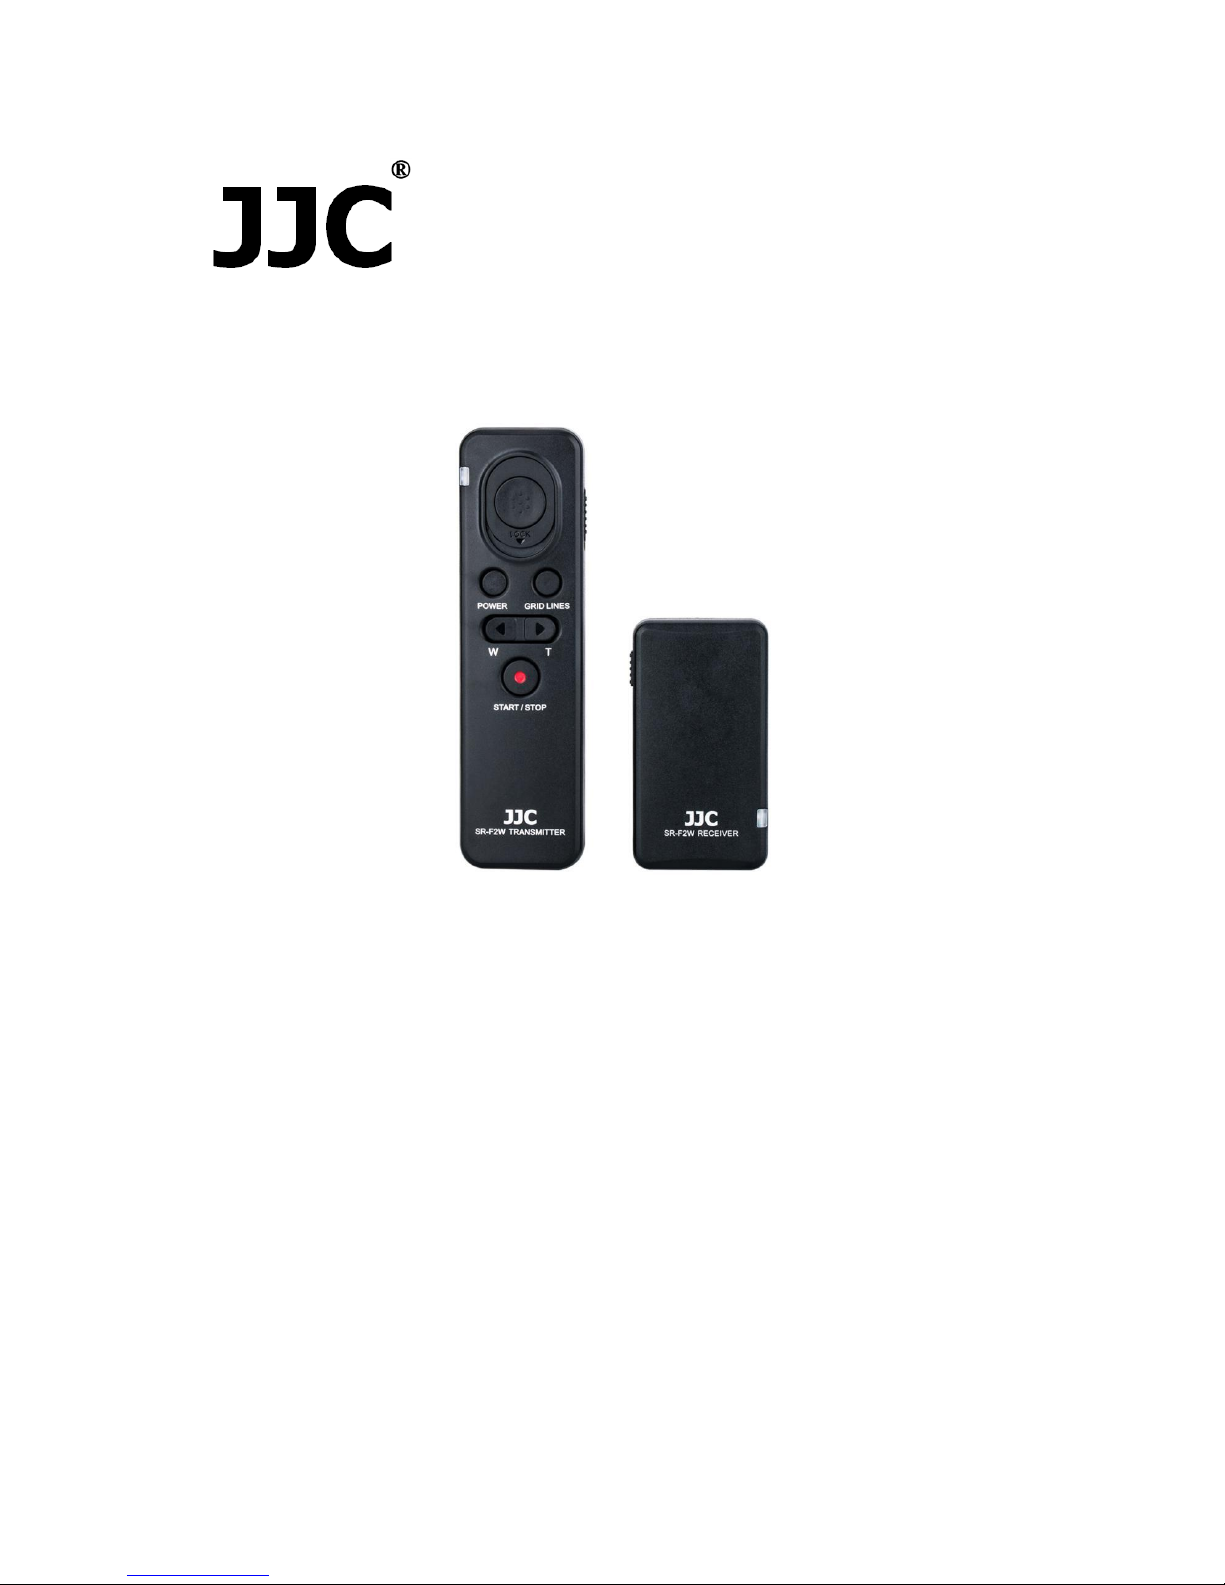
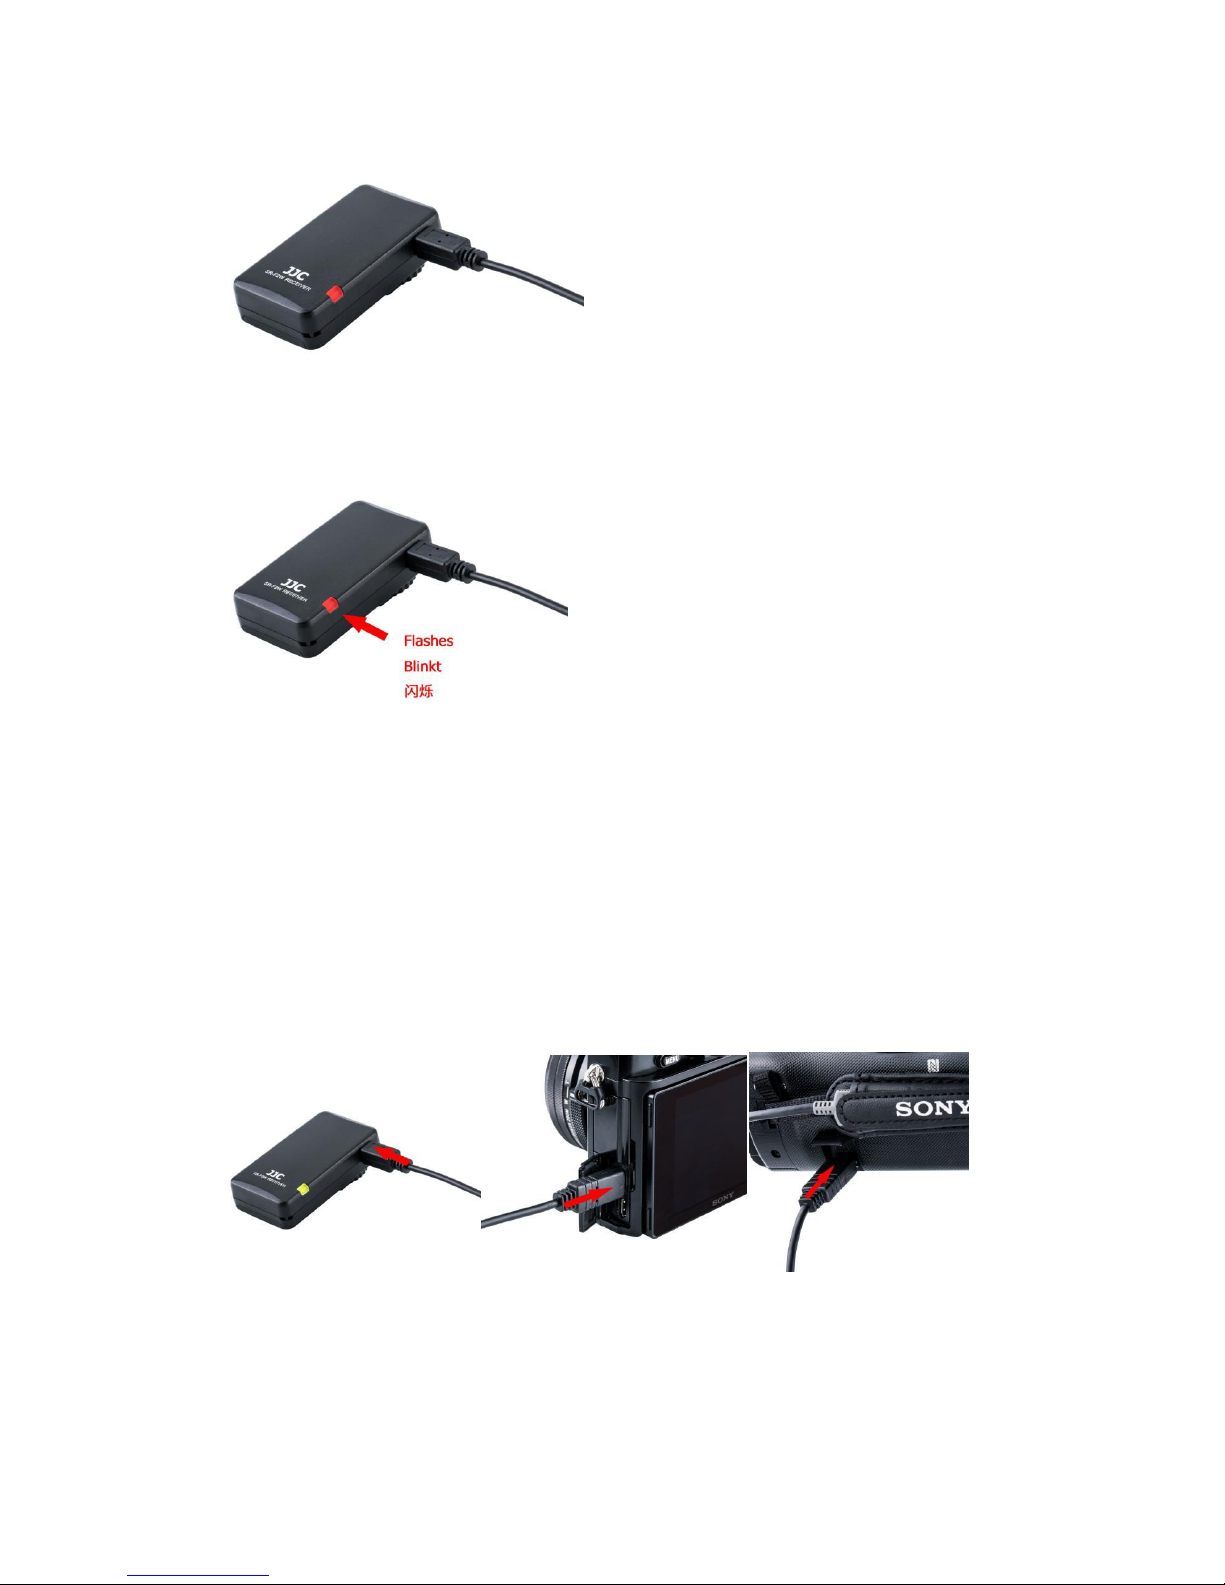
JJC SR-F2W Wireless Remote Controller is specially designed for Sony cameras and
camcorders. You can use the wireless remote controller to operate a camera or a
camcorder that has a Sony Multi Terminal. The wireless remote controller allows you to
control the camera or camcorder from afar when shooting, so it also prevents camera
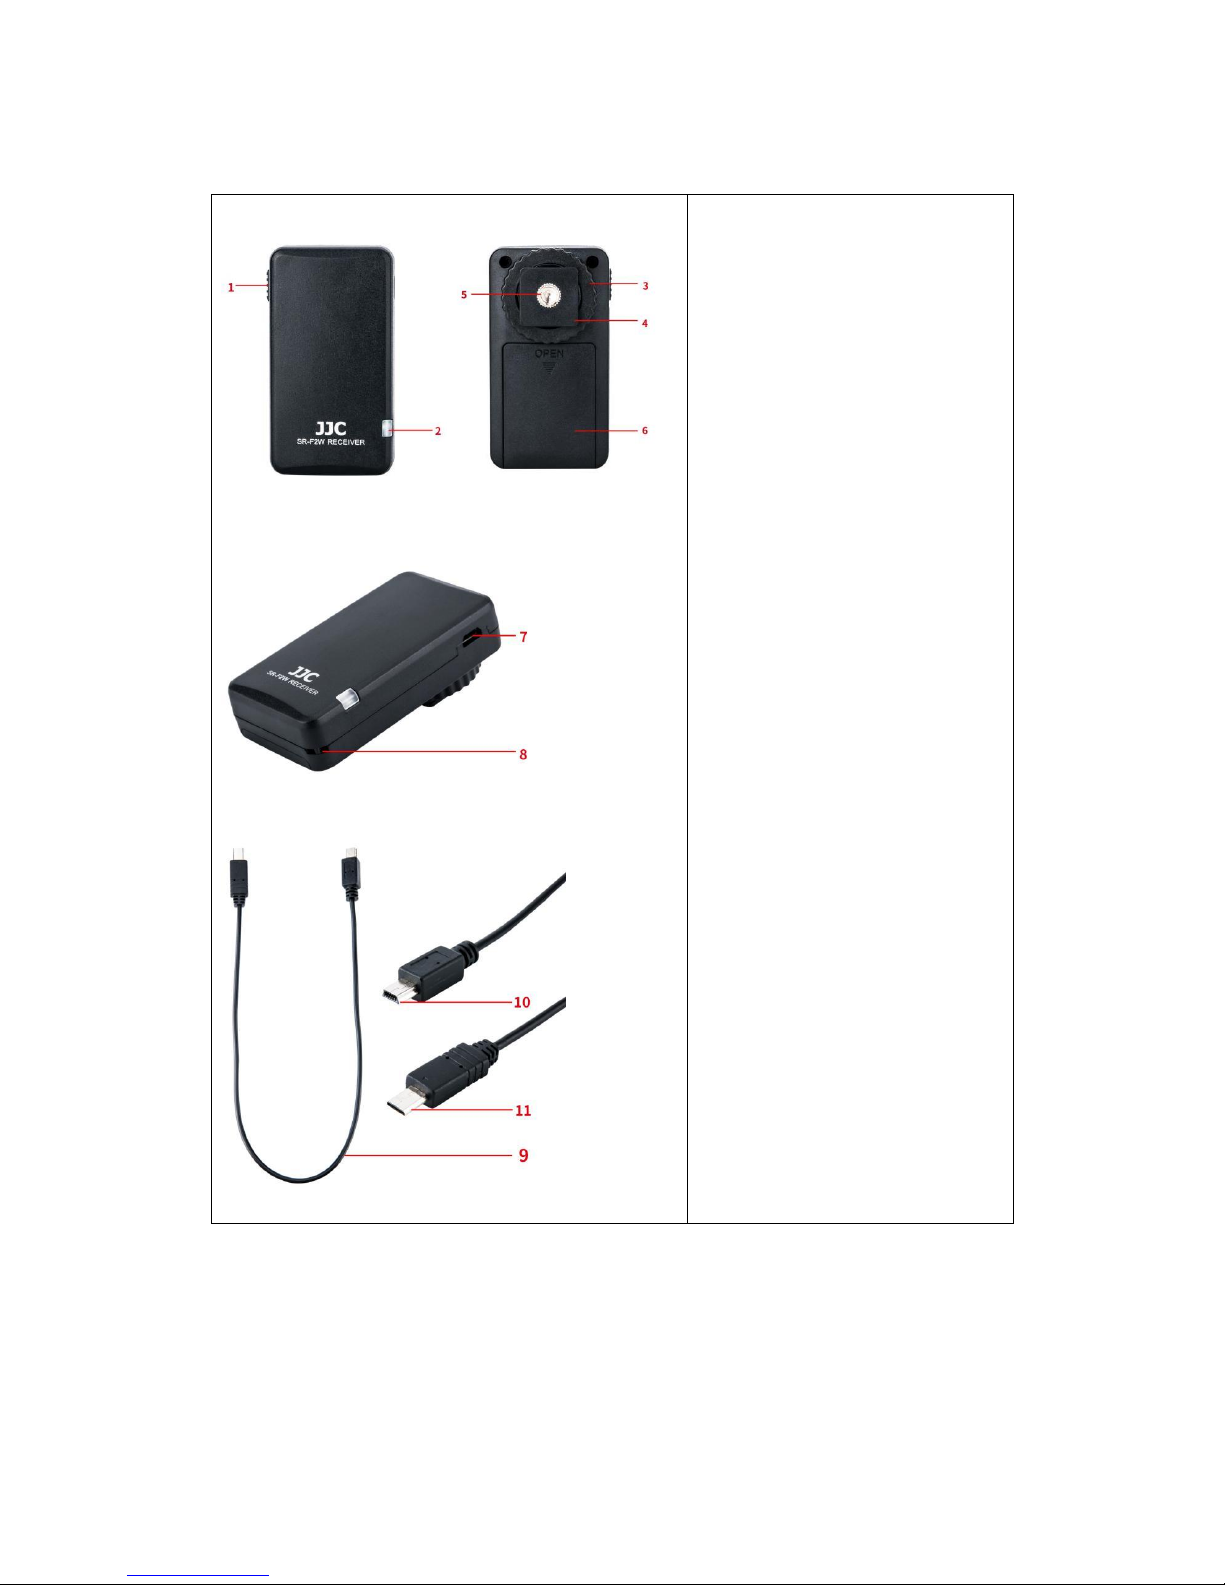
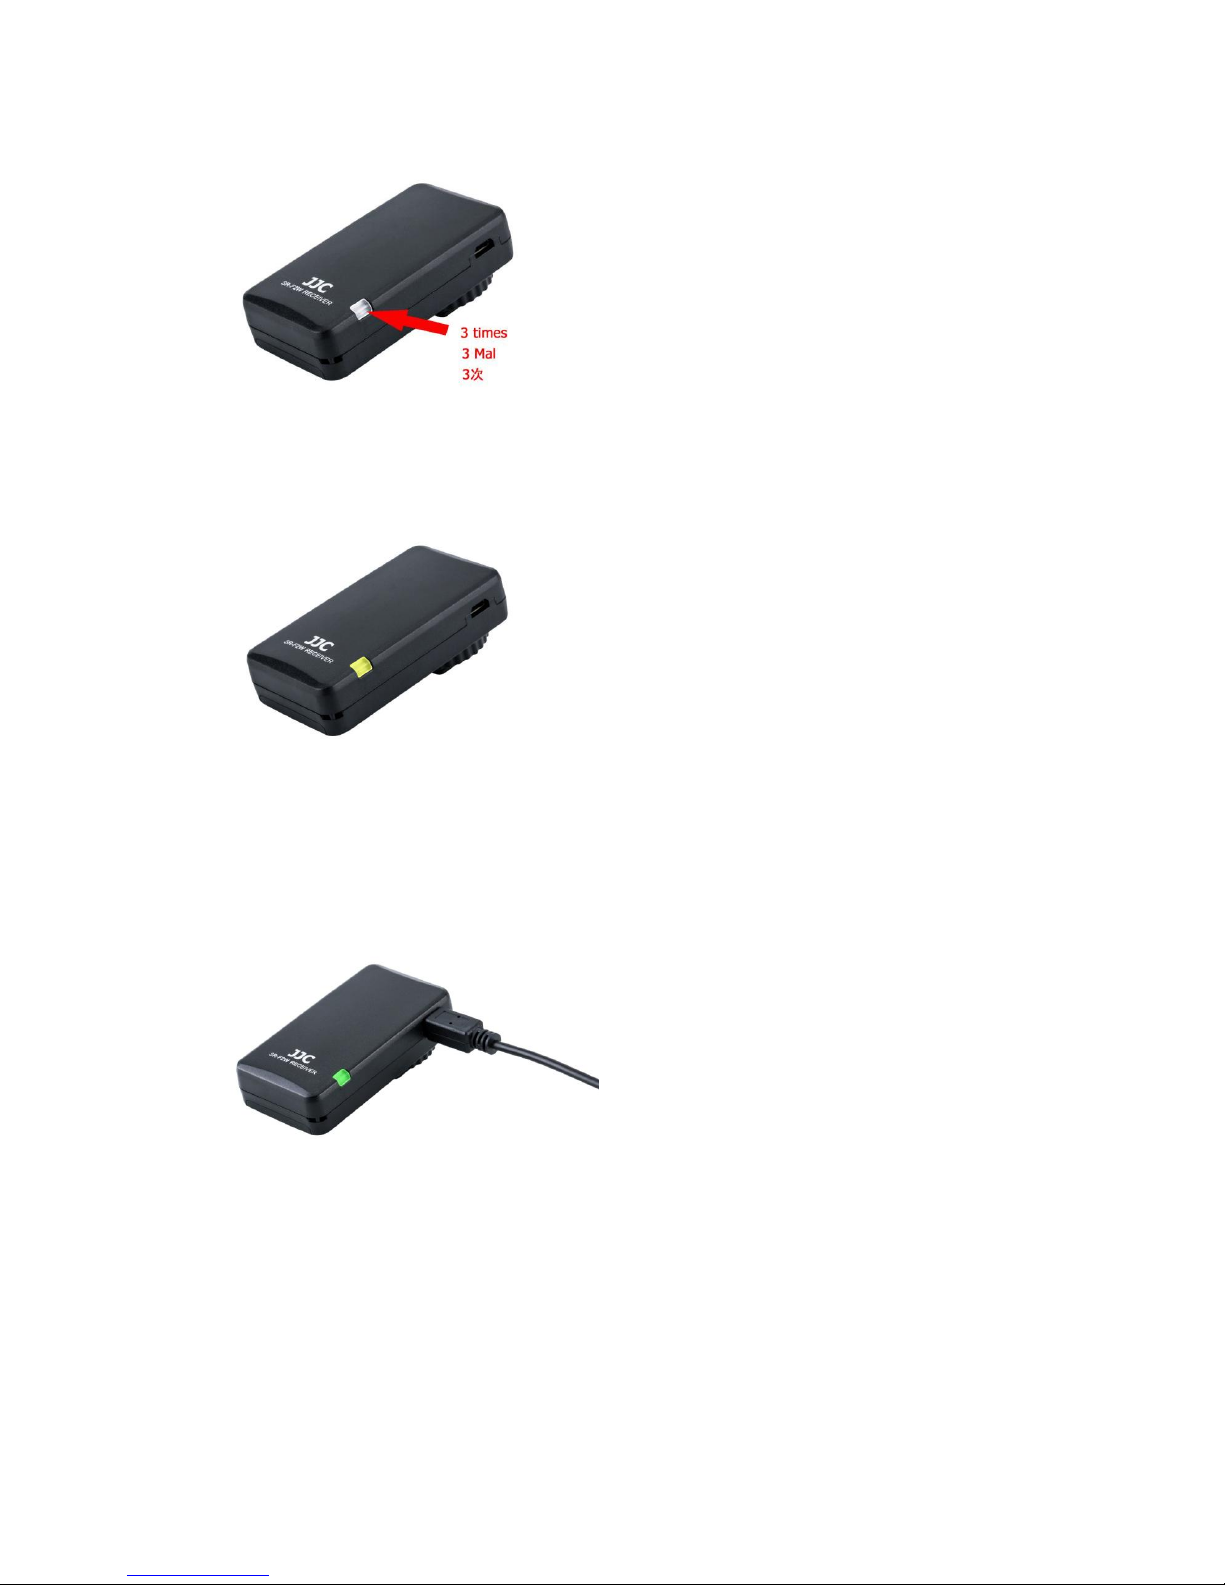
shaking. The working distance of SR-F2W is up to 100 meters. The unit includes three
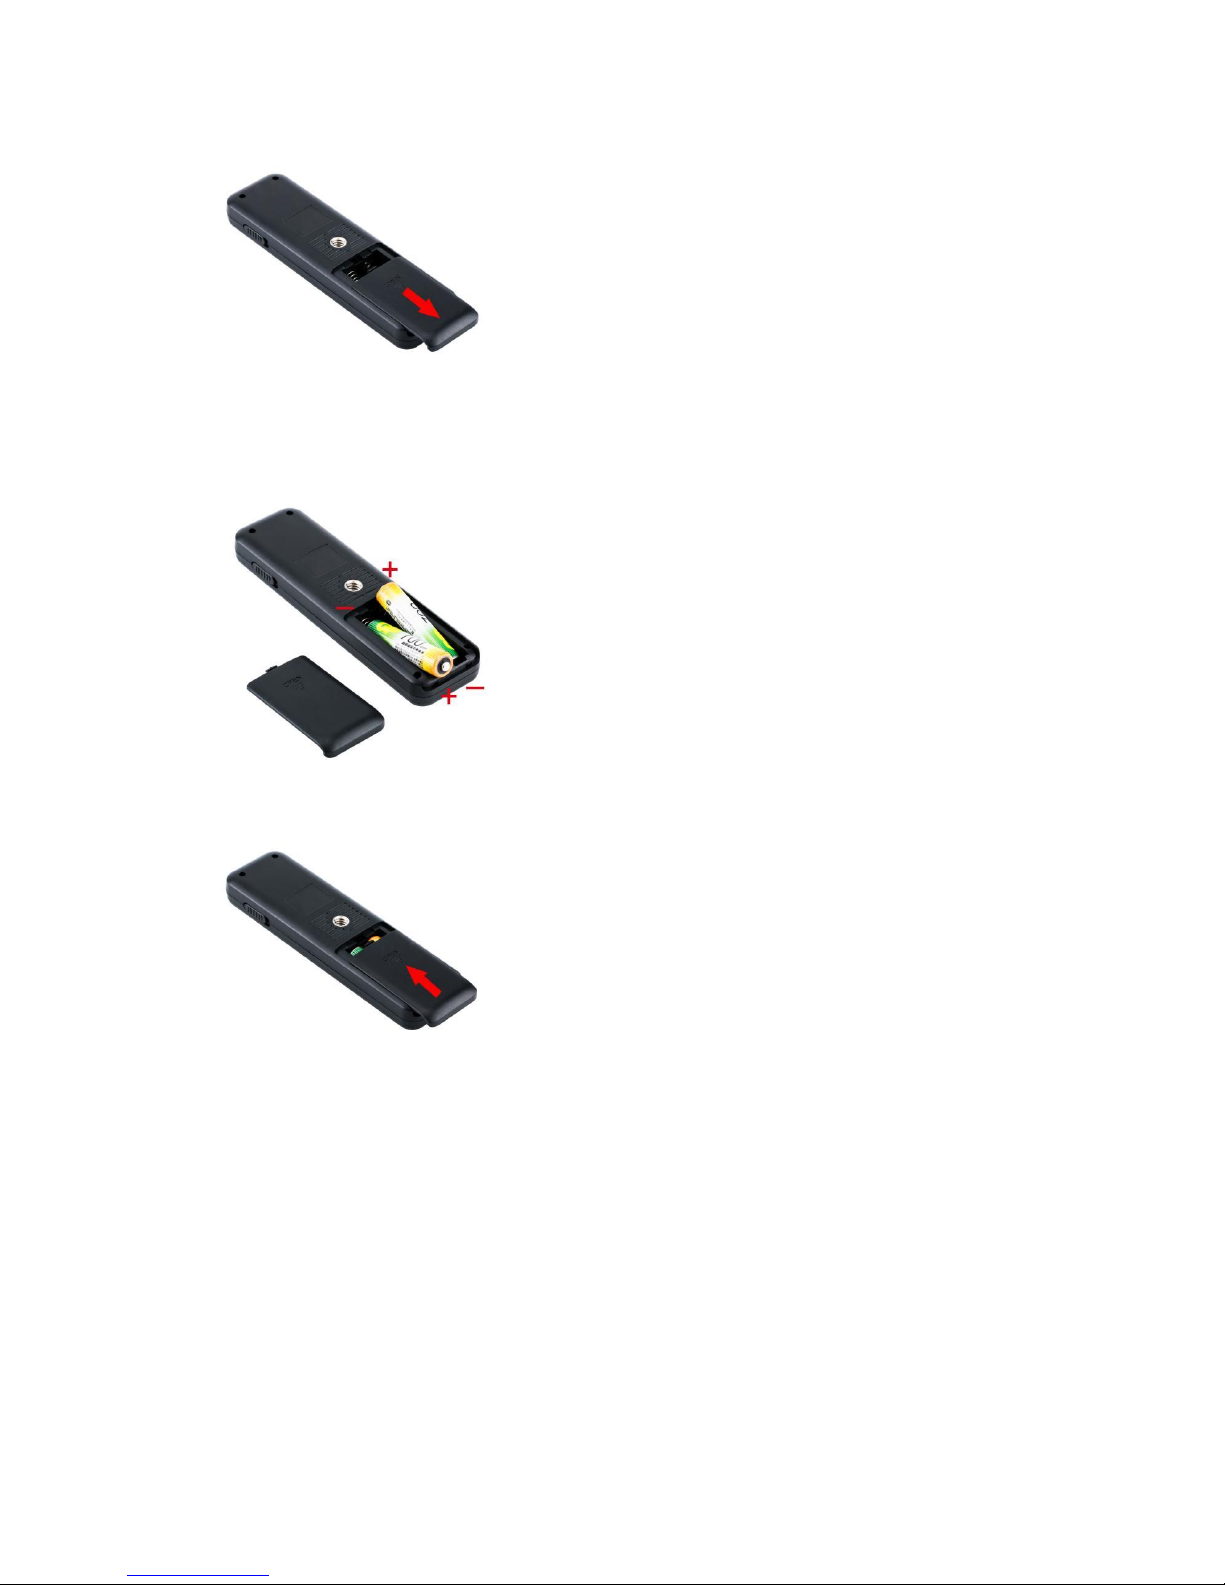
parts: transmitter, receiver and a connecting cable. It powers easily. The transmitter and
receiver are respectively powered by two AAA batteries. The wireless remote controller
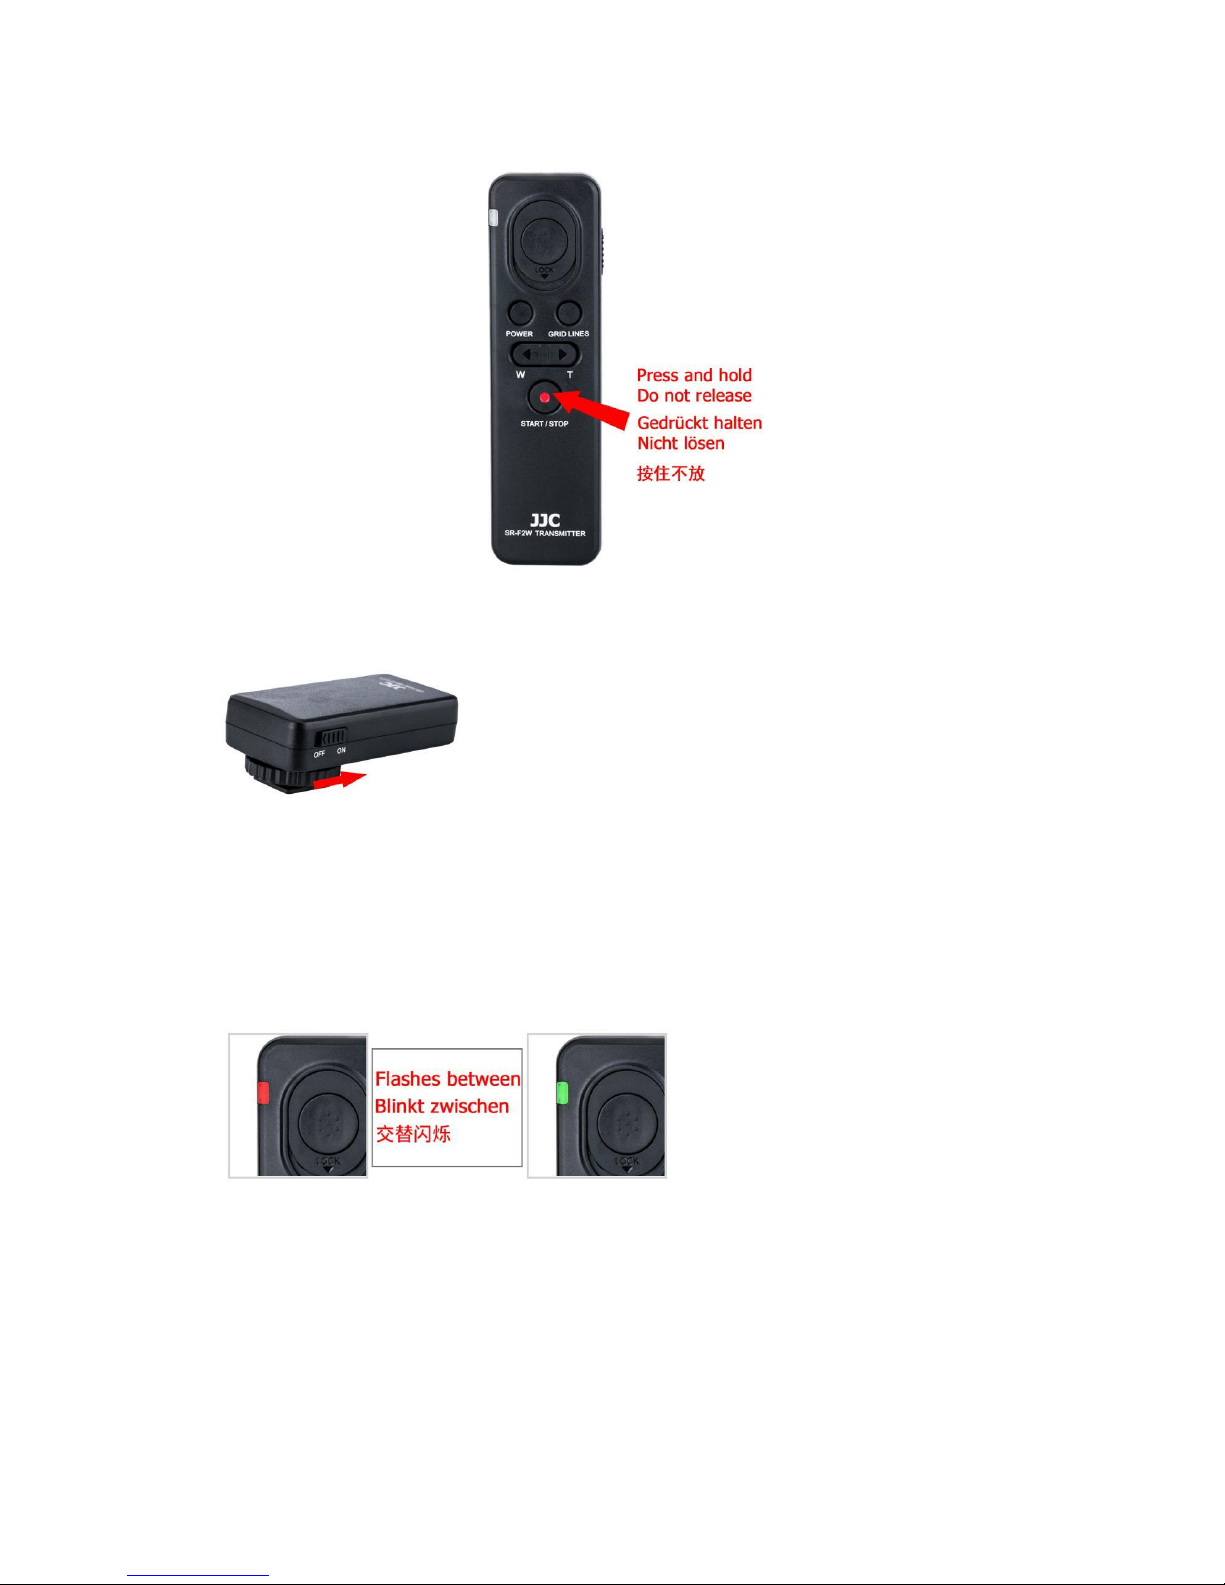
has basic recording functions (power on / off, video start / stop, focusing / shooting,
zooming and displaying grid lines). With locking function, JJC SR-F2W is ideal for Bulb
long exposure and continuous shots. The receiver has a universal 1/4"-20 tripod socket
on the bottom, so you can even mount it onto a tripod. Moreover, equipped with a 1/4"-20
tripod socket in the backside, the transmittercan attach to any object with a 1/4"-20 male
screw. JJC SR-F2W replaces Sony RMT-VP1K and RM-VPR1 Remote Commander.

Package including
SR-F2W transmitter x 1
SR-F2W receiver x 1
Cable for Multi Terminal x 1
Instruction manual x 1
Warranty card x 1
A string for receiver x 1
Specifications
SR-F2W Transmitter:
Battery type: AAA battery x 2
Operating Temperature: 0°C to 40°C (32°F to 104°F)
Net weight:30.5g
Dimensions:123.5 x 35.7x 16.7mm
SR-F2W Receiver:
Battery type: AAA battery x 2
Operating Temperature: 0°C to 40°C (32°F to 104°F)
Net weight :26.5g
Dimensions: 70 x 38.8 x 27.1mm (with shoe mount)
Length of Cable for Multi Terminal: 1.3' / 40cm
Replaces: Sony RMT-VP1K and RM-VPR1 Remote Commander

Identify the Transmitter and Receiver
Transmitter
1. Power Switch
2. Indicator Lamp
3. Shutter Release Button
4. Camera Power Button
5. Grid Lines Button
6. Wide Angle Button
7. Telephoto Button
8. Video Recording Button
9. 1/4"-20 Tripod Mount
Socket
10. Battery Compartment
11. String Hole

Receiver
1. Power Switch
2. Status Lamp
3. Locking Disk
4. Cold Shoe Mount
5. 1/4"-20 Tripod Mount Socket
6. Battery Compartment
7. Mini USB Socket
8. String Hole
9. Connecting Cable
10. Multi Terminal Plug
11. Mini USB Plug
Replace Batteries (The batteries are not included in the package.)
Transmitter Batteries
1. Remove the battery cover by sliding it towards the “OPEN”sign.

2. Insert the fresh battery, and please ensure the batteries are put in a correct direction.
Do not install the batteries in the reverse direction as this could cause the batteries to
leak corrosive liquids, generate heat or explode.
3. Put the battery cover back towards the opposite direction of the “OPEN”sign.
ReceiverBatteries
1. Remove the battery cover by sliding it towards the “OPEN”sign.

2. Insert the fresh battery, and please ensure the batteries are put in a correct direction.
Do not install the batteries in the reverse direction as this could cause the batteries to
leak corrosive liquids, generate heat or explode.
3. Put the battery cover back towards the opposite direction of the “OPEN”sign.
Smart Pairing
First, turn on the power switch on the transmitter.

Then press and hold the video recording button.
After that, turn on the power switch on the receiver.
Until the indicator lamp on the transmitter flashes alternately between red and green,
which means successful pairing. Now you can release the video recording button.
The Displaying of Status Lamp
The status lamp will flash three times when the transmitter triggers the receiver.

The status lamp is yellow when the receiver is not connected to the camera or some other
troubles appear.
When the receiver connects to the camera properly, the status lamp will show red or green
according to the mode of the camera.
Standby mode:
When recording a video:

Camera in low battery:
Attach the Set to Camera
Note:
When connecting via a multi terminal, you can use all buttons. However,you may be
unable to use some buttons depending on your camera / camcorders model.
1. Turn OFF the power of the camera before attaching the receiver to camera.
2. Connect the wireless remote controller to the camera / camcorder via the connecting
cable.
3. You can choose to attach the receiver to camera. Slide the receiver gently into your
camera hot shoe as shown in the picture below. Then rotate the locking disk clockwise
to tight the receiver on your camera hot shoe. Besides, some camcorders can not
compatible with the standard hot shoe, you can choose our another product JJC
MSA-MIS Shoe Adapter to attach the receiver to your camcorder. Please refer to our

website WWW.JJC.CC for more details.
4. Turn on the camera / camcorder and the status lamp on the receiver lights in green.
5. If the camera stays in standby mode, press the camera power button of SR-F2W to
wake it.
Using the Wireless Remote Controller
Still Image Shot
Half-press the shutter release button to bring the image into focus, and then pressthe
button fully to take a photo.

Long Exposure Shot
1. Set the camera to manual mode and adjust the shutter speed to BLUB. Then slide the
shutter release button down to lock the shutter.
2. Slide the shutter release button upwards to end the shooting, and you will get a
long exposure picture.

ContinuousShots
1. Set the camera to continuous shooting mode. Then slide the shutter release button
down to lock the shutter.
2. Slide the shutter release button upwards to end the shooting.
Video Recording
1. Press the video recording button. The status lamp lights in red and recording starts.

2. To stop recording, press the video recording button again.The status lamp lights in
green.
Zooming
Telephoto Button: Subject appears closer.
WideAngle Button: Subject appears farther away.

Note: The zooming speed is slow when you press the zoom button lightly, and quick when
you press the button all the way down.
Grid Lines
You can set the grid lines by pressingthe grid lines button.
Rule of 3rds Grid:
Place main subjects close to one of the grid lines that divide the image into thirds for a
well-balanced composition.
Square Grid:
Square grids make it easier to confirm the horizontal level of your composition. This
issuitable to determine the quality of the composition when shooting landscape, close-up,
or
duplicated images.
Diag. + Square Grid:
Place a subject on the diagonal line to express an uplifting and powerful feeling.
Off:

Does not display the grid line.
Note: The specific displaying of the grid lines depends on the camera / camcorder itself.
After Recording
Turn the camera / camcorder off before removing the wireless remote controller. You can
press the camera power button of SR-F2W to turn off the camera / camcorder.
Tips for Use
The usable buttons and functions vary depending on the camera / camcorder.
You cannot use the wireless remote controller if the power switch of the camera is set
to OFF.
Both plugs of the connecting cable must be inserted the right way up.
Please hold the plug when detaching the cable.
Notes
1. Do not expose the product to high temperatures or high humidity.
2. Keep the product away from all combustible materials.
3. Put the product out of the reach of children.
4. Do not disassemble or modify this product, as it may cause danger.
All specifications above are based on JJC’s testing standards.
Product specifications and external appearance are subject to change without notice.
About trademark
JJC is a trademark of JJC Company
ONE YEAR GUARANTEE
If for quality factor, this JJC product fails within ONE YEAR of the date of purchase, return
this product to your JJC dealer or contact service@jjc.ccand it will be exchanged for you
at no charge (not including shipping cost). JJC products are guaranteed for ONE FULL
YEAR against defects in workmanship and materials. If at any time after one year, your
JJC product fails under normal use, we invite you to return it to JJC for evaluation.
Shenzhen JinJiaCheng Photography Equipment Co., Ltd.
Office TEL: +86 755 82359938/ 82369905/ 82146289
Office FAX:+86 755 82146183
Website: www.jjc.cc
Email:[email protected] / [email protected]
Address: Main Building,Changfengyuan,Chunfeng Rd, Luohu District, Shenzhen, Guangdong, China

FCC Statement
This equipment has been tested and found to comply with the limits for a Class B digital device,
pursuant to Part 15 of the FCC Rules. These limits are designed to provide reasonable
protection against harmful interference in a residential installation. This equipment generates
uses and can radiate radio frequency energy and, if not installed and used in accordance with
the instructions, may cause harmful interference to radio communications. However, there is
no guarantee that interference will not occur in a particular installation. If this equipment does
cause harmful interference to radio or television reception, which can be determined by turning
the equipment off and on, the user is encouraged to try to correct the interference by one or
more of the following measures:
-- Reorient or relocate the receiving antenna.
-- Increase the separation between the equipment and receiver.
-- Connect the equipment into an outlet on a circuit different from that to which the receiver is
connected.
-- Consult the dealer or an experienced radio/TV technician for help.
This device complies with part 15 of the FCC Rules. Operation is subject to the following two
conditions:
(1) This device may not cause harmful interference, and (2) this device must accept any
interference received, including interference that may cause undesired operation.
Changes or modifications not expressly approved by the party responsible for compliance
could void the user's authority to operate the equipment.
Table of contents
Other JJC Remote Control manuals