JJC WT-868 User manual

Model: WT-868
Wireless Timer Remote Control
English Manual Instruction
Thank you for your purchase of a JJC WT-868 Wireless Timer Remote Control. For the best performance,
please read this manual instruction carefully before using. You must read it throughly and fully understand
this manual to avoid improper operation lead to damage of the product.
WT-868 Wireless Timer Remote doesn't just trip your shutter wirelessly. It's also equipped to handle a
long list of timer functions: self-timer, interval timer, long exposure timer, as well as controlling the number
of continuous shutter releases. It works with a vast array of different cameras--just swap out the camera
release cable for the correct camera. The transmitter works at a distance up to 100m(328 feet) on any
one of 16 channels over a reliable 2.4GHz frequency.

For Your Safety
To prevent damage to your JJC product or injury to yourself or to others, read the following safety
precautions in their entirety before using this product. Keep these safety instructions where all those who
use the product will read them.
WARNINGS
Do not disassemble or modify.
Keep Dry.
Keep out of reach of children.
Do not use in the presence of flammable gas.
Do not expose to high temperatures.
Observe proper precautions when handling batteries.
Do not handle with wet hands.
Cut power immediately in the event of malfunction.
Do not remain in contact with the camera or controller for extended periods while
the products are on or in use.
Supplied Accessories
The product is sold in the sets below.
1. Transmitter (WT-868TX) -------
2. Receiver (WT-868RX) ----------
3. Manual (this manual) -----------
4. CR2 3V Lithium Battery -------
5. AAA 1.5V Battery ----------------
1pc
1pc
1pc
1pc
2pcs

The name of each part:
1. Control Panel
2. Shutter Release Button
3. Background Light / Lock Button
4. Arrow Button
5. Indicator Light
6. Timer Start/Stop Button
7. SET Button
8. ACC Socket
9. Power Switch
Transmitter (WT-868TX)

The name of each part:
1. Indicator Light
2. Control Panel
3. Power Switch
4. Channel Increase Button
5. Channel Reduce Button
6. Battery Hatch
7. Hot Shoe fixed nut
8. 1/4"-20 Threaded Sockets
9. ACC socket
10. Hot Shoe mount
Receiver(WT-868RX)

11. Selection cursor
12. Timer display
13. LOCK indicator
14. Low power indicator
15. Timer active indicator
16. Speaker ON/OFF
17. SET indicator
18. Release indicator
19. Number of shots
20. Multi Exposure indicator
21. Channel display

Install and replace the battery:
WT-868(TX)

WT-868(RX)

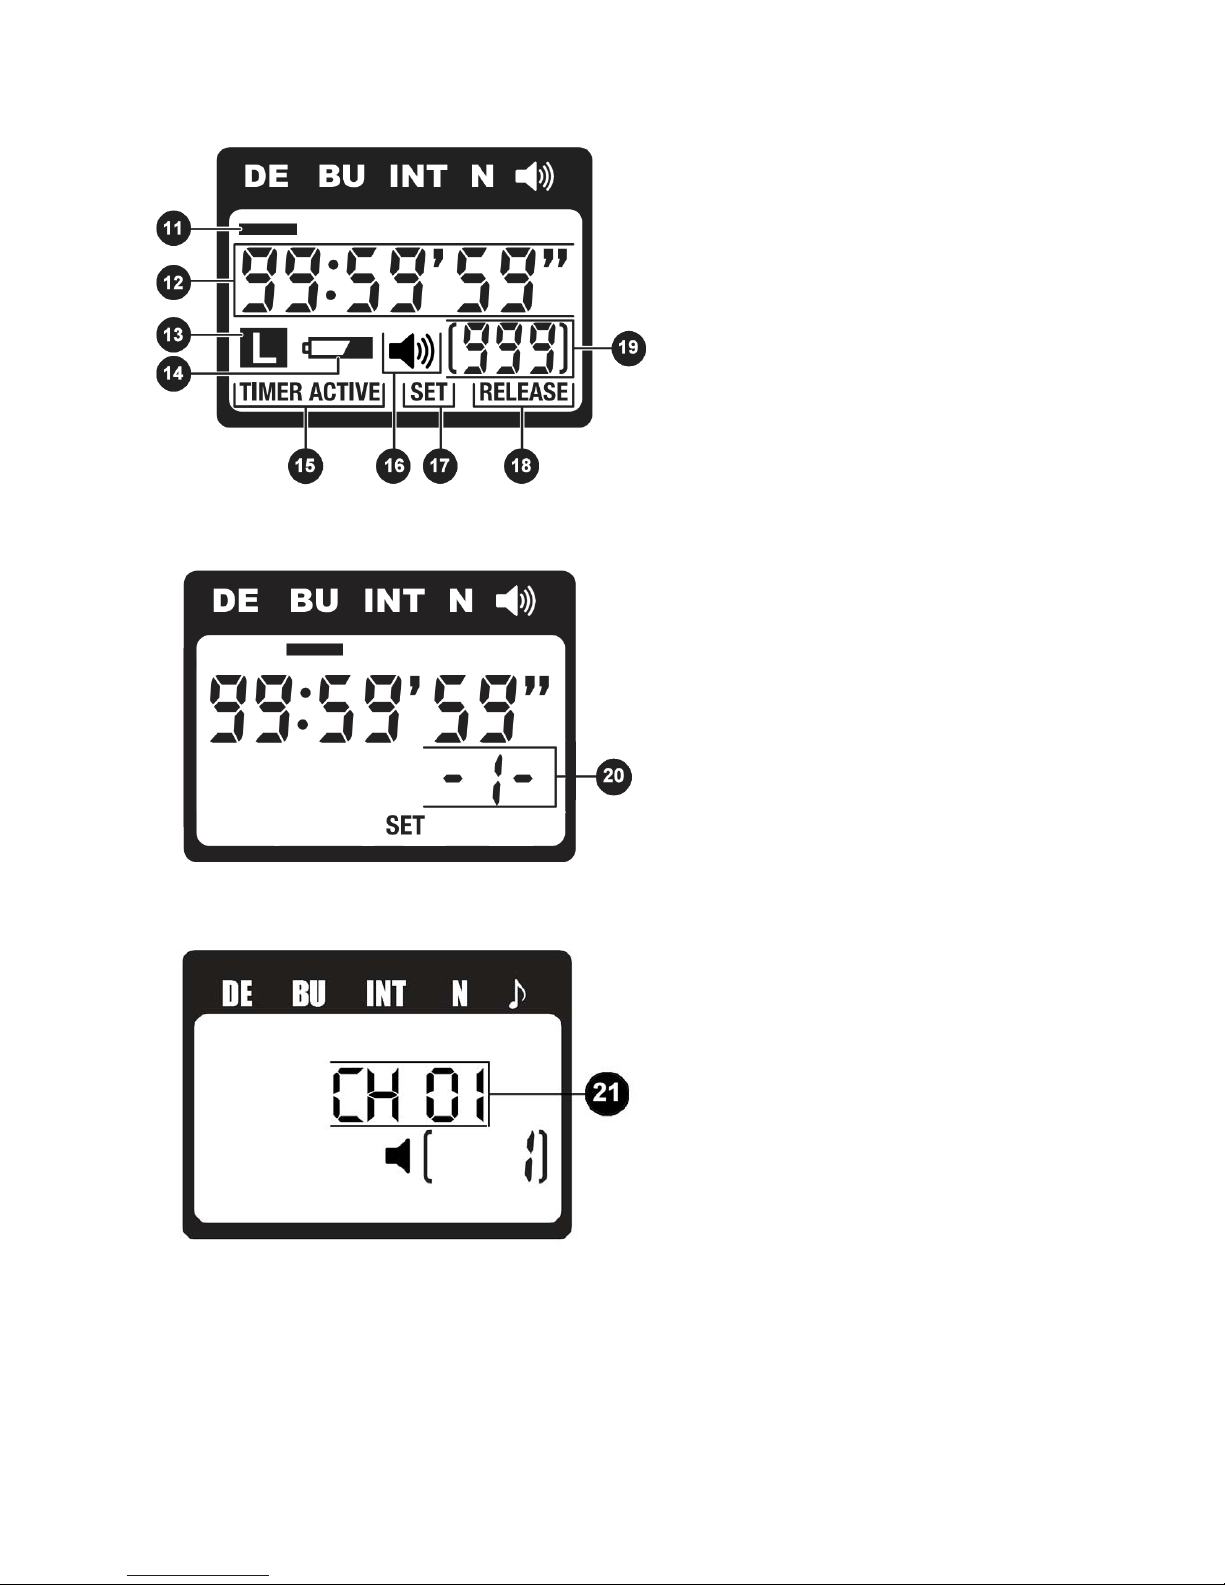
Channel setting of WT-868TX
1. Turn on the power; the channel is default as
the last time setting.
2. Use the arrow button to set the channel.
3. Press left or right button to move the selection
cursor until it is disappeared.
4. The channel section will display.
5. Press the SET button to go into the Channel
section, when the Channel number is flashing,
press the up or down button to increase or
decrease.
6. Press the SET button at any time to complete
the operation and display the new setting for
the selected item.
7. The channel of transmitter and receiver should
be the same for shooting effectively.
Channel setting of WT-868RX
1. Turn on the power; the channel is default as
the last time setting.
2. Press channel Increase button or channel
reduce Button to set the channel.
3. After press one of these buttons 2 seconds,
the receiver will save the current channel as
default channel.
4. The channel of transmitter and receiver should
be the same for shooting effectively.

WT-868TX connected with the camera using as wired timer
*Wired operation requires the use of a JJC Shutter Release Cable to fit your camera.
(NOT INCLUDED. SEPARATE PURCHASE REQUIRED.)

Connecting the WT-868TX:
Turn the camera and WT-868TX off.
Remove the remote socket cover from the camera.
Insert the shutter release plug into the remote socket of camera.
Insert the input plug into the ACC socket of WT-868TX.
Turn the camera and WT-868TX on.
Now you can start program the function and enjoy the timer trigger.
Disconnecting the WT-868TX:
Turn the camera and WT-868TX off.
Disconnect the shutter release plug from the camera body.
Replace the remote socket cover.
Disconnect the input plug from the WT-868TX.

WT-868RX connected with the camera using as wireless timer

Connecting the WT-868RX:
Turn the camera and WT-868RX off.
Fix the WT-868RX on the hot shoe of camera
Lock hot shoe fixed nut tightly when you fix it.
Loosen hot shoe fixed nut when you remove the WT-868RX. Do not forcibly pull it, in order to
avoid damage to the receiver and camera.
Remove the remote socket cover from the camera.
Insert the shutter release plug into the remote socket of camera.
Insert the input plug into the ACC socket of WT-868RX.
Turn the camera and WT-868RX ON.
Use the channel Increase or reduce button to select the channel to match the WT-868TX.
Now you can start program the function and enjoy the timer trigger.
After programming, press the stop/start button of the WT-868TX to send the data to the WT-868RX
and start the timer.
Disconnecting the WT-868RX:
Turn the camera and WT-868RX OFF.
Disconnect the shutter release plug from the camera body.
Replace the remote socket cover.
Disconnect the input plug from the WT-868RX.
Loosen hot shoe fixed nut to remove the WT-868RX.

WT-868TX Automatic Function Description (Wired and Wireless):
Automatic Timer Function, Choose the Delay / Self Timer (DE), BULB/Long Exposure (BU), Interval
Timer (INT) and number of shots for time interval photography exposure (Exposure Count (N)). Following
table is the setting about the camera shutter speed.
1. Camera Setting
a) Connect the WT-868TX or WT-868RX to the camera and turn ON.
b) Adjust the camera setting
Exposure Mode M (manual)
Shutter Speed BULB
Interval Timer OFF
Focus Mode Auto Focus or Manual
Continuous S (single frame)
2. Set Timer via WT-868TX
Press the SET button. The SET icon will flash in the Control Panel.
Adjust the following settings
Option Description Supported Setting
DE Just like the self timer on your camera. The WT-868TX
allows you to set any delay (in 1 second increments) up to
99 hours, 59 minutes and 99 seconds. 0s to 99hrs 59min 59s
BU It allows you to take time exposures up to 100 hours in
length. 0s to 99hrs 59min 59s
INT
The Interval Timer can be set to any time period up to 100
hours as well. If you set it to 10 minutes, for example, one
exposure will be taken every 10 minutes until either the film
runs out or the Exposure Count limit has been reached.
1s to 99hrs 59min 59s
N This setting permits you to set the number of exposures that
will be taken, up to 999 shots. 1 to 999 shots or -- (unlimited)
Speaker ON/OFF ON/OFF
Delay(DE), Exposure/BULB(BU) and Interval Settings (INT)
IMPORTANT:
Please ensure the Interval time is longer than Exposure timer at least 2 seconds.

Setting the Timer
Use the arrow button to set the timer. Press left or right to select, up or down to change. The current
selection is indicated by the selection cursor.
Press the SET button at any time to complete the operation and display the new setting for the
selected item. To view other setting, press the arrow button left or right. The current selection is
indicated by the selection cursor. Press the SET button to edit the current setting as described
above.
1.Delay/Self Timer (Time until shooting starts)
Hours
Minutes
Seconds
2. BULB/Long Exposure (Exposure Time)
Hours
Minutes
Seconds
3. Interval Timer (INT)
Hours
Minutes
Seconds
4.Number of Shots(N)

5.Speaker
To ensure correct operation, choose an interval at least two seconds longer than the exposure
time. When using autofocus, set the delay to two seconds or longer and choose an interval at
least two seconds longer than the exposure time to ensure that the camera has time to focus.
When using long exposure noise reduction, the interval should be at least twice the exposure
time.
Intervals of 00:00:00 will automatically be reset to 00:00:01 when the SET button is pressed to put
settings into effect.
To set the number of shots to - - (unlimited), select 1 and press the arrow button down or select 999 and
press the arrow button up.
After adjusting all setting, press the SET button to put the new settings ENABLE. A beep will sound (If the
speaker is ON) and the “SET” icon indicator will go out.

Start the timer
Wired Timer Remote Control
Press the START/STOP button. The timer will start and “TIMER ACTIVE” will flash in the control panel.
Between each shot, the control panel will show the time remaining until the next photograph is taken. If
the speaker is ON, a beep will sound three times at ONE-SECOND intervals before the shutter opens.
While the shutter is opened, the control panel will show the time remaining until the shutter closes, and
the release lamp and “RELEASE” indicator will flash at ONE-SECOND intervals. The number of shots
remaining will be updated each time a photograph is taken.
1. Flashes while timer is active
2. Between each shot :Time remaining until
next shot . While shutter is open: Time
remaining until shutter closes.
3. Number of shots remaining
4. Flashes while shutter is open

The Speaker and Release Lamp
The following illustration shows when a beep will sound ( ) and the release lamp flash ( ) with a delay
of 5s, exposure time of 4s, and an interval of 9s.
End Shooting
Shooting will end automatically when the selected number of shots has been taken. To end shooting
before all photographs have been taken, press the START/STOP button.
Wired remote control manual function description:
1. Turn OFF the WT-868TX. Remove the remote socket cover from the camera.
2. Connect the WT-868TX to the camera and turn the camera ON.
3. Select the M function and choose BULB of the camera.
4. Half press the shutter button for focus.
5. Fully press the shutter button for release shutter.
6. Slide the shutter button to the HOLD position. The camera locks the shutter.
7. Slide it to the opposite direction to release the lock.
8. Release the button to end shooting.
Background Light / Lock Button
Press the Background Light / Lock Button for 1 second to turn on the LED lamp of the control panel.
Press the Background Light / Lock Button for 2 seconds to enable the Button Lock.
Press the Background Light / Lock Button for 2 seconds to disable the Button Lock

Wireless Timer Remote Control
After complete the timer setting of the WT-868TX, Press the START/STOP button of the transmitter. The
transmitter will send all the setting data to the WT-868RX. Once the receiver get all the data, it will start
and “TIMER ACTIVE” will flash in the control panel of the receiver. Between each shot, the control panel
will show the time remaining until the next photograph is taken. If the transmitter speaker is ON, a beep
will sound three times at ONE-SECOND intervals before the shutter opens.
While the shutter is opened, the control panel will show the time remaining until the shutter closes, and
the release lamp and “RELEASE” indicator will flash at ONE-SECOND intervals. The number of shots
remaining will be updated each time a photograph is taken.
1. Flashes while timer is active
2. Between shots: Time remaining until next
shot.
While shutter is open: Time remaining until
shutter closes.
3. Number of shots remaining
4. Flashes while shutter is open

The Speaker and Release Lamp
The following illustration shows when a beep will sound ( ) and the release lamp flash ( ) with a delay
of 5s, and exposure time of 4, and an interval of 9s.
End Shooting
Shooting will end automatically when the selected number of shots has been taken. To end shooting
before all photographs have been taken, press the START/STOP button of the Transmitter.
Wireless remote control manual function description
1. Turn OFF the WT-868TX and WT-868RX. Remove the remote socket cover from the camera.
2. Connect the WT-868RX to the camera and turn the camera ON.
3. Turn ON the WT-868TX and WT-868RX.
4. Half press the shutter release button of the WT-868TX, the transmitter will send signal for focusing to
the receiver. The green indicator light will lit on the transmitter and receiver, and the camera is in the
focusing state until the release or full-press the button.
5. Full-press the shutter release button and transmitter will send signal of shooting. The red indicator
light will lit on the transmitter and receiver. The camera will release the shutter.
Attention:Lock the shutter release button manually is not usable for wireless remote control manual
function.
Background Light
Press the Channel Increase or Reduce button of WT-868RX to turn on background light of the control
panel.

Using the camera to select shutter speed
To take photographs at the shutter speed selected with the camera, adjust setting as follows:
CAMERA
Exposure mode M (manual) or S (shutter-priority auto)
Shutter speed Any
Interval timer OFF
Focus mode AF-C or M
Shooting mode S (single frame)
WT-868TX Exposure time O s
Interval Longer than camera shutter speed
*When using autofocus, please choose an interval at least two seconds longer than the camera shutter
speed to allow the camera have time to focus. When using long exposure noise reduction, choose an
interval at least double the camera shutter speed.
Table of contents
Other JJC Remote Control manuals
Popular Remote Control manuals by other brands

Mitsubishi Electric
Mitsubishi Electric PAR-SL94B-E installation manual

Teleco
Teleco RS433 Series quick start guide

Sony
Sony RM-VL600T operating instructions

Panasonic
Panasonic AW-RP50E operating instructions

clage
clage FX Next Operating and installation instructions

Magnavox
Magnavox MRU1300 - Universal Remote Control user guide