JLO HomeDock User manual

#######
HomeDock Music Remote™
DIGITAL LIFESTYLE OUTFITTERS
®

| 3
Contents
Quick Start 4
Included in the Box 6
etting Connected 7
The Music Remote 10
Setting Up Your Music Remote 11
Using the Music Remote 12
iPod + Music Remote Settings 14
Changing iPod Settings 14
Changing Music Remote Settings 14
Additional Features 15
Jukebox 15
Syncing to iTunes and Your Computer 15
Playing Videos 16
Tips + Troubleshooting 17
Tech Specs 20
Service + Support 21
Warranty 22
FCC Statement 23
2 | DLO HOMEDOCK MUSIC REMOTE USER MANUAL
© 2007 Digital Lifestyle Outfitte s
DLO logo, Digital Lifestyle Outfitters & HomeDock Music
Remote are trademarks of Digital Lifestyle Outfitters.
iPod is a registered trademark of Apple Inc. in U.S. and/
or other countries.
All Rights Reserved
Printed in Taiwan M-61000-070302-B

| 5
STEP 5 Remove the Music Remote from the Dock. On the main menu, select either
Artist or Playlist. Your Music Remote will automatically begin downloading
your iPod’s content. This may take a few minutes.
OTE: Do not press any button on the Music Remote while it is in the
process of downloading your iPod’s content. This will stop the download
process.
STEP 6 Scroll through your Playlists or Artists using the Music Remote and begin
controlling your iPod from anywhere in the house.
4 | DLO HOMEDOCK MUSIC REMOTE USER MANUAL
Quick Sta t
DLO HomeDock Music Remote Quick Start
Thanks for purchasing the DLO HomeDock Music Remote, the dock that leaves
your iPod on the stereo while you navigate your music on the display remote any-
where in the house.
We’ll get you started with these easy steps:
STEP 1 Plug the included AC power supply into any available AC power outlet,
and then connect the power supply to the Music Remote Dock.
STEP 2 Plug the included Audio Cable into the back of the Music Remote Dock
and then into the L/R inputs of any available input on your stereo receiver.
STEP 3 Charge the Music Remote battery by plugging it into the Music Remote
Dock. While the Music Remote is charging, the screen will flash a
Charging message. Once the Music Remote is fully charged, the screen
will display Charging Complete for a few moments and then go blank.
STEP 4 Dock your iPod in the Music Remote Dock. Then, adjust the Support Stand
to fit your particular iPod by sliding the support up or down. Your iPod will
start up in Music Remote Mode, as indicated by a check mark and OK to
disconnect message on the iPod screen.
OTE: In Music Remote Mode, the iPod Click Wheel is non-functional.

| 7
Getting Connected
Connecting Your HomeDock Music Remote
Setting up your HomeDock Music Remote is easy. There are several ways you can
use your Music Remote:
With your home stereo
To connect to a home stereo system, simply plug the included AC power adapter
into the back of the Music Remote Dock, then into any available AC power outlet.
Next, plug in the included Audio Cable into the back of the Music Remote Dock and
then into the corresponding L/R inputs on your stereo.
With a portable speaker system or other audio device
To connect to a powered speaker system or other audio device with an aux-in jack
or mini-jack, plug the included AC power adapter into the back of the Music
Remote Dock, then into any available AC power outlet. Next, plug in a standard 1/8”
6 | DLO HOMEDOCK MUSIC REMOTE USER MANUAL
Included in the Box
1
2
3
4
5
2
3
1
HOMEDOCK MUSIC REMOTE
MUSIC REMOTE DOCK
IPOD SUPPORT STAND
AUDIO CABLE
AC POWER ADAPTER
4
5
1
2
3
USB MINI PORT
5V DC POWER
AV OUTPUT
5V DC AV
12 3

| 9
8 | DLO HOMEDOCK MUSIC REMOTE USER MANUAL
mini-to-mini cable (available separately) into the back of the Music Remote Dock
and the other end into the aux-in jack on the speaker system or device.
Connect to your PC or Mac
Plug the included AC power adapter into the back of the Music Remote Dock, then
into any available AC power outlet. Use a standard A-to-B USB cable (available sep-
arately) to connect the Music Remote Dock to your home computer using the USB
mini port on the back of the unit.
Entertainment center and TV
Plug the included AC power adapter into the back of the Music Remote Dock, then
into any available AC power outlet. Next, plug in a standard A/V-to-mini cable
(available separately) into the back of the Music Remote Dock and the correspon-
ding A/V end into your stereo (audio) and TV (video, or video and audio if just using
the TV).

| 11
Setting Up Your Music Remote
STEP 1 After connecting your Dock, charging the
Music Remote and inserting your iPod,
press any button on the Music Remote to
power it on. The Music Remote will power
on into the ow Playing menu.
STEP 2 Using the Down Nav button, scroll down
to Settings and press the Right Nav button.
STEP 3 Download Lists is now highlighted. Press
the Menu button and your iPod will begin
synching with the Music Remote. This can
take several minutes, depending on the
amount of music on your iPod. When the
download process has completed, your
iPod’s Playlist and Artist information will
be captured on the Music Remote.
OTE: Do not press any button on the Music
Remote while it is in the process of down-
loading your iPod’s content. This will stop
the download process. Anytime you change
the content on your iPod by adding new
10 | DLO HOMEDOCK MUSIC REMOTE USER MANUAL
HomeDock Music Remote
The DLO HomeDock Music Remote features a full-function RF remote with a bright
OLED display that will control your iPod’s music anywhere. Its powerful range and
easy-to-read display make it the ideal companion for enjoying your iPod out loud.
MENU
RIGHT NAVIGATION/NEXT TRACKLEFT NAVIGATION/PREVIOUS TRACK
DISPLAY SCREEN
UP NAVIGATION/VOLUMEUP
DOWN NAVIGATION/VOLUME DOWN
1
Now Playing
Streamlined
Slow Runner
M
2
Music Remote
S
Artists
Jukebox
Settings
A
3
Settings
Download Lists
Shue
Display Timer
A

| 13
Anytime you wish to navigate back to the previous menu, simply press the Left Nav
button and the Music Remote will display the previous menu screen. To navigate to
the next menu, simply press the Right Nav button.
When you need to power your Music Remote On or Off, press and hold the Menu
button for a few seconds.
To check the strength of your Music Remote’s RF signal, go to Settings,About
and you will be able to view the RF Signal Indicator Bar
12 | DLO HOMEDOCK MUSIC REMOTE USER MANUAL
Artists or Songs, or you use another iPod with the HomeDock Music
Remote, you need to re-download your Lists.
Using the Music Remote
The Music Remote’s bright OLED display lets you navigate and select your iPod’s
music and other content. Just scroll to your desired selection using the Up or Down
Nav buttons, and make your selection using the Right Nav or Menu button. The
Music Remote will allow you to select your music by navigating through Playlists
and Artists.
You can control playback functions with the Music Remote including Play/Pause,
Fast Forward/Next Track, Rewind/Previous Track.
To adjust the volume, simply press the Volume Up or Volume Down buttons while on
the ow Playing screen.
In the ow Playing menu, pressing the Menu button will take you to the Main Menu.
Music Remote
Play/Pause
Artist
Playlist
N
About

| 15
Additional Featu es
Jukebox
The Music Remote has a Jukebox feature that allows you to select up to 10 songs
and play them on your iPod. In the Main Menu, select Jukebox. Next, select Song
#1, which will offer your Artist selections. Select an Artist, then select the song of
your choice. Repeat this process with up to 10 songs, then select Start Playing.
OTE: When you navigate out of the Jukebox, your selections will not be saved.
Syncing to iTunes and Your Computer
The HomeDock Music Remote will also act as a dock for your iPod to sync with
your computer and iTunes.
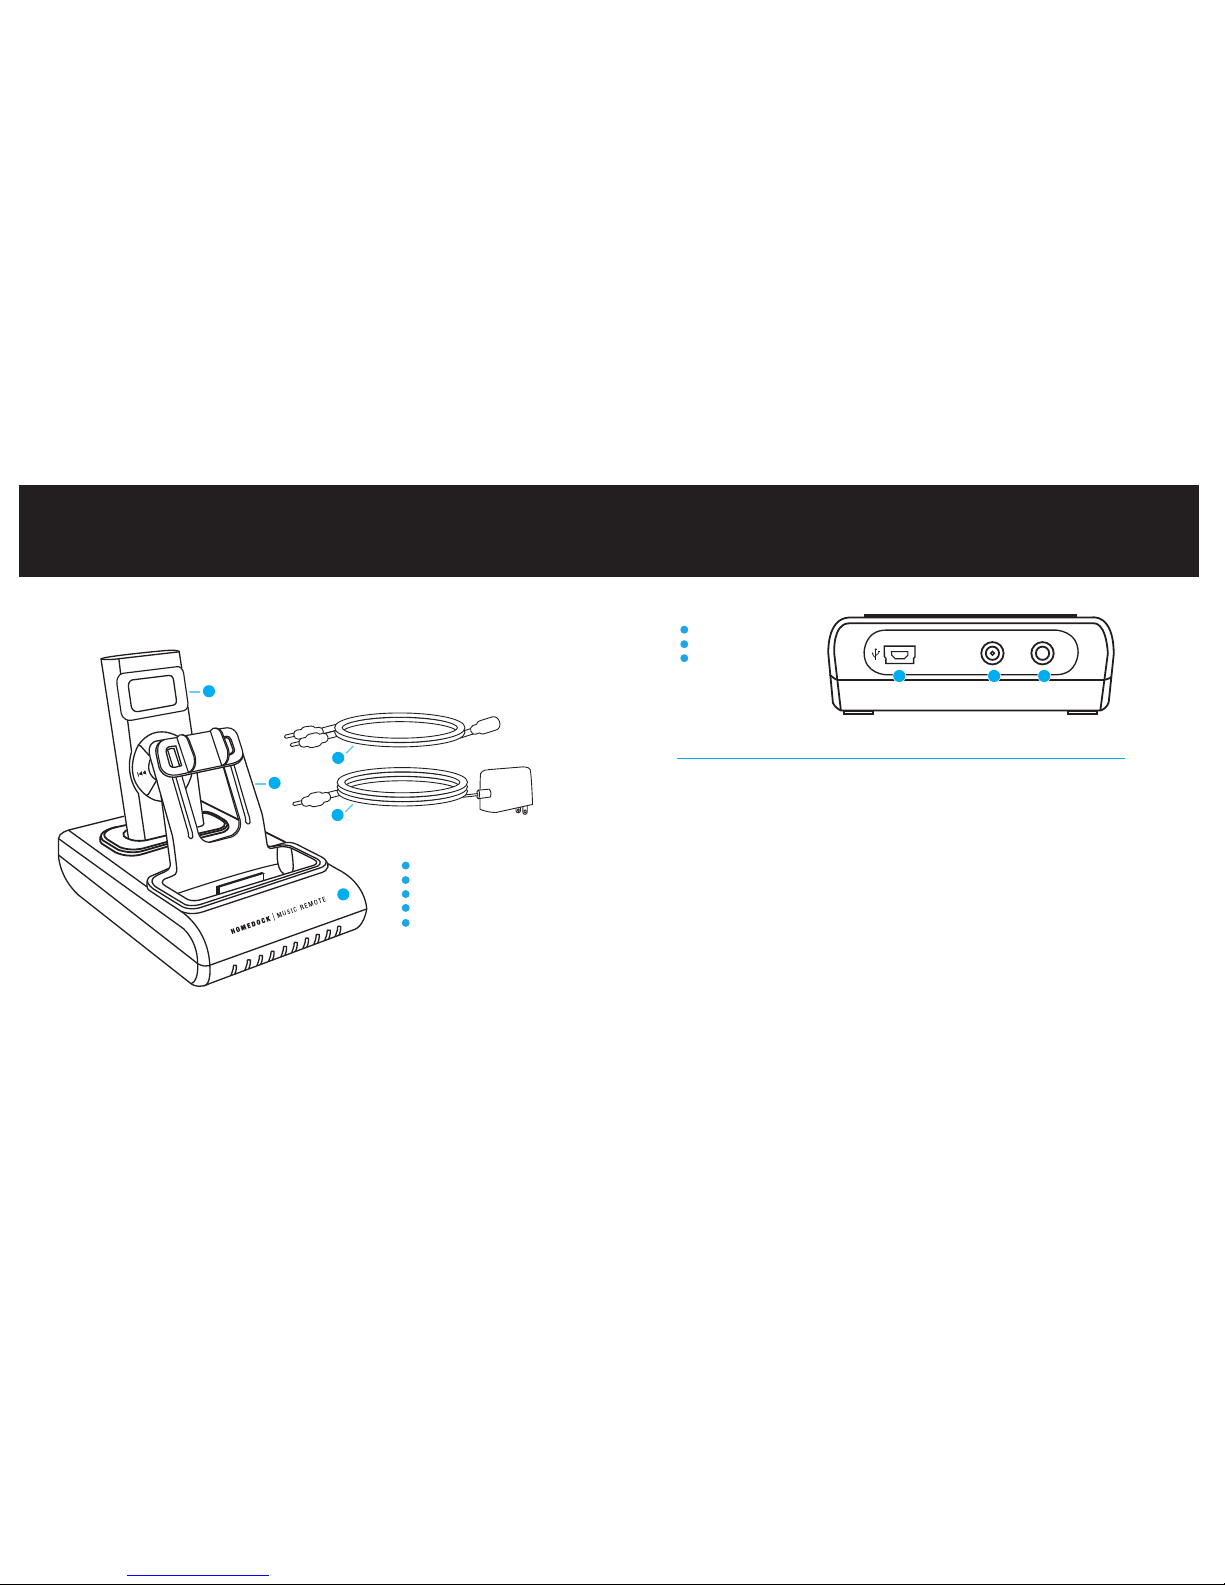
First, plug the included AC power adapter into the back of the Music Remote Dock,
then into any available AC power outlet. Next, plug in an A-to-B USB cable (avail-
able separately) to connect your Music Remote Dock unit to your home computer.
The Music Remote will sync and charge your iPod automatically. Do not use the
Music Remote control with your iPod while it is docked and syncing with your com-
puter. This will interrupt the syncing process.
To listen to your iPod using the Music Remote while it’s connected to your comput-
er, simply quit iTunes and use an the included Audio Cable or iPod audio cable to
connect to your computer’s speakers.
14 | DLO HOMEDOCK MUSIC REMOTE USER MANUAL
iPod + Music Remote Settings
The Music Remote lets you customize your iPod listening experience with multiple
settings. Just go to Settings on the Main Menu screen and select the settings that
are right for you.
Changing iPod Settings
•EQ lets you select the perfect audio setting for the type of music you’re enjoy-
ing. Choose from settings like Rock,Hip-Hop,Bass Booster,Jazz right from
your iPod’s EQ settings.
•Shuffle Songs will play back your music in random order.
Changing Music Remote Settings
•Display Timer lets you conserve your Music Remote’s energy by setting it to
sleep at either 30 seconds, 1 minute, or 2 minutes of inactivity. To quickly wake
up your Music Remote, simply press any of its control buttons.
•ow Playing Mode lets you set the display to show you either Song/Artist
information or Song/ ext Song information.
•iPod Mode disables your Music Remote’s iPod content navigation. In order to
control playback of iPod videos using the Music Remote (though you may not
navigate iPod videos using the Music Remote), you need to select iPod Mode.

| 17
Tips + T oubleshooting
My Music Remote does not select the correct track, and is unresponsive.
What is wrong?
You need to download your iPod content onto the Music Remote. To do this, navi-
gate to the Main Menu screen by pressing the Menu button. Scroll down to
Settings and press the Right Nav button. Select Download Lists from the Settings
menu and your Music Remote will begin downloading your iPod’s content. This can
take several minutes, depending on the amount of music on your iPod. When the
download process has completed, your Music Remote should have all of your iPod’s
music loaded and synced. Also, check to make sure your iPod is securely connect-
ed to the Music Remote Dock.
OTE: The Music Remote’s download process can be affected by outside RF inter-
ference. It is recommended that the download process be performed close to the
Music Remote Dock.
My Music Remote is showing the wrong Playlists or Artists.
Your Music Remote must be synchronized with the current iPod in the Music
Remote Dock. Select Download Lists from the Settings menu and your Music
Remote will begin downloading your iPod’s content.
16 | DLO HOMEDOCK MUSIC REMOTE USER MANUAL
Playing Videos
Your HomeDock Music Remote is designed to work with your iPod’s music content,
but it will also connect your iPod to a television and allow you to control video play-
back functions. To do this, connect the Music Remote to a television using an iPod
A/V cable (available separately). Then, under Settings on the Main Menu screen,
select iPod Mode to disable your Music Remote’s iPod content navigation. In order
to control playback of iPod videos using the Music Remote (though you may not
navigate iPod videos using the Music Remote), you need to select iPod Mode. Start
your video from the iPod itself, and then control playback functions using the Music
Remote after your video has started.

| 19
When I place my iPod into the Music Remote Dock, the iPod does not enter the
Music Remote Mode.
Be sure that your iPod contains recent firmware. Visit apple.com/ipod/download to
get the latest iPod software updates.
When I place my iPod into the Music Remote Dock, the iPod Click Wheel is no
longer functional.
Don’t worry, the Music Remote is working correctly and provides the same func-
tionality as the iPod Click Wheel.
My music sounds distorted and “fuzzy”.
The Music Remote lets you control the volume of your iPod’s music. However, it is
important that you find the correct balance between your Music Remote’s volume
setting and the speaker system, stereo, TV, computer or other audio device’s vol-
ume setting. Be sure to try different volume settings on your audio device until you
find the optimum balance.
I removed my iPod from the Dock and it still displays “OK to Disconnect”.
Return your iPod to the Dock and remove it after a few minutes. If this does not
work, you can also reset your iPod by holding down the Menu + Center buttons.
18 | DLO HOMEDOCK MUSIC REMOTE USER MANUAL
My Music Remote keeps displaying “Out of Range” and I cannot see my
iPod’s music.
First, ensure that your iPod is securely connected to the Music Remote Dock. This
is verified by the iPod screen displaying the Music Remote screen message OK to
disconnect. The Music Remote is a powerful RF remote that will function through
walls and other obstructions, but you may be out of range of the base unit or expe-
riencing some kind of outside interference. Move closer to the Music Remote Dock
to verify communication. (Once communication is well established, you can verify
distance and RF communication under About in the Settings menu). If these steps
do not work, or your Music Remote seems to be non-responsive, you should reset
the unit by pressing and holding the Menu button and Up av/Volume Up buttons
simultaneously for a few seconds until you see the DLO logo appear. Finally, the
Music Remote can be reset by pressing a needle or paper clip end into the reset
access hole on the bottom left side of the remote.
Do I need to download both lists (Artists and Playlists) separately?
No. Once you select Download Lists, both lists will automatically be downloaded
to your Music Remote.

| 21
Se vice + Suppo t
For more information, updates and tips, please visit our website at www.dlo.com
and click Support.
20 | DLO HOMEDOCK MUSIC REMOTE USER MANUAL
Tech Specs
Dock
AV Output (L/R audio, video): aux out jack
Power Input: 5 VDC, 1 amp
USB mini port
Operating Frequency: 915.92 MHz
Remote
Operating Frequency: 915.92 MHz
Battery: 3.3 Volt Rechargeable Lithium Ion. (not user serviceable)
Power Adapter
Power Adapter Input: 100-240VAC, 47-63 Hz
Power Adapter Output: 5 VDC, 1 amp
Cable
mini-to-RCA Stereo Audio

| 23
FCC Statement
Federal Communications Commission Interference Statement
This device complies with Part 15 of the FCC rules. Operation is subject to the following two conditions:
(1) This device may not cause harmful interference, and (2) this device must accept any interference received,
including interference that may cause undesired operation.
CAUTIO : The manufacturer is not responsible for any radio or TV interference caused by unauthorized modifica-
tions to this equipment. Any such modification could void the user’s authority to operate the equipment.
OTE: This equipment has been tested and found to comply with the limits for a Class B digital device, pursuant
to Part 15 of the FCC Rules. These limits are designed to provide reasonable protection against harmful interfer-
ence in a residential installation. This equipment generates, uses and can radiate radio frequency energy and,
if not installed and used in accordance with the instructions, may cause harmful interference to radio communi-
cations. However, there is no guarantee that interference will not occur in a particular installation. If this equip-
ment does cause harmful interference to radio or television reception, which can be determined by turning the
equipment off and on, the user is encouraged to try to correct the interference by one or more of the following
measures:
• Reorient or relocate the receiving antenna.
• Increase the separation between the equipment and receiver.
• Connect the equipment into an outlet on a circuit different from that to which the receiver is connected.
• Consult the dealer or an experienced radio/TV technician for help.
22 | DLO HOMEDOCK MUSIC REMOTE USER MANUAL
Wa anty
Digital Lifestyle Outfitters Limited Manufacturer’s Warranty
What This Warranty Covers. DLO (Digital Lifestyle Outfitters) warrants this product against defects in materials
and workmanship. This limited warranty applies only to products manufactured by or for DLO.
What This Warranty Does ot Cover. This warranty does not apply to damage caused by: (a) accident, abuse,
misuse, misapplication, ordinary wear, improper maintenance, failure to follow instructions, or products not man-
ufactured by or for DLO; and (b) aftermarket services (including upgrades and expansions).
How Long This Warranty Lasts. This warranty lasts for a period of ninety (90) days from the date of original retail
purchase.
What DLO Will Do. If a defect exists, DLO will exchange the product, at its option, with a product that is new or
has been manufactured from new or serviceable used parts and that is at least functionally equivalent to the orig-
inal product. DLO will warrant a replacement product against defects in materials and workmanship for a period
of ninety (90) days from the date of replacement.
How To Get Service. In order to be eligible for this warranty, you MUST register your purchase at
www.dlo.com/register within thirty (30) days of purchasing this product. If you believe that this product is defec-
tive in materials or workmanship, please e-mail cus[email protected]om with a brief description of the prob-
lem, for further instructions.
o Change To Warranty. No DLO reseller, agent or employee is authorized to make any modification, extension,
or addition to this warranty.
How State Law Applies. This warranty gives you specific legal rights, and you also may have other rights that
vary from state to state, or country.
Restrictions On Implied Warranties. All implied warranties, including, without limitation, warranties of mer-
chantability and fitness for a particular purpose, are limited in duration to the duration of this warranty. Some
states do not allow limitations on how long an implied warranty lasts, so the above limitation may not apply to
you.
Restrictions On Damages. DLO is not responsible for direct, special, incidental or consequential damages result-
ing from any breach of warranty or condition or under any other legal theory (including, without limitation, lost
profits; downtime; goodwill; damage to or replacement of equipment and property; failure to maintain the confi-
dentiality of data stored on the product; and any costs of recovering, reprogramming or reproducing any program
or data stored in or used with products manufactured by or for DLO). Some states and countries do not allow the
exclusion or limitation of incidental or consequential damages, so the above limitation or exclusion may not apply
to you
W1000-050803-B

Thanks for purchasing the DLO HomeDock Music Remote
Move with your music – not your iPod
DIGITAL LIFESTYLE OUTFITTERS • VISIT US AT WWW.DLO.COM • ©2007 DIGITAL LIFESTYLE OUTFITTERS
Table of contents