Jofemar J-2000 User manual

MNP11M01GB06 May 2007-Rev.4 Page: 1de 40
INGLES -ENGLISH
BLOCK OF EXCHANGEABLE TUBES
GUIDE MANUAL

MNP11M01GB06 May 2007-Rev.4 Page: 2de 40
Jofemar S.A.
Ctra. de Marcilla Km.2, 31350 Peralta. Navarra, Spain.
http: // www.jofemar.com Tel. +34 948 75 12 12 Fax +34 948 75 04 20
FWARNING
Read these instructions carefully before installing the compact:
-i Before connecting, make sure the voltage is correct.
-i Consult appendix 5of this manual to install thecompact.
-We recommend you to read this instruction manual before connecting the
compact.

MNP11M01GB06 May 2007-Rev.4 Page: 3de 40
INDEX:
1.-WORKING CONDITION 5
2.-SYMBOL OF THE INSTRUCTIONS MANUAL 5
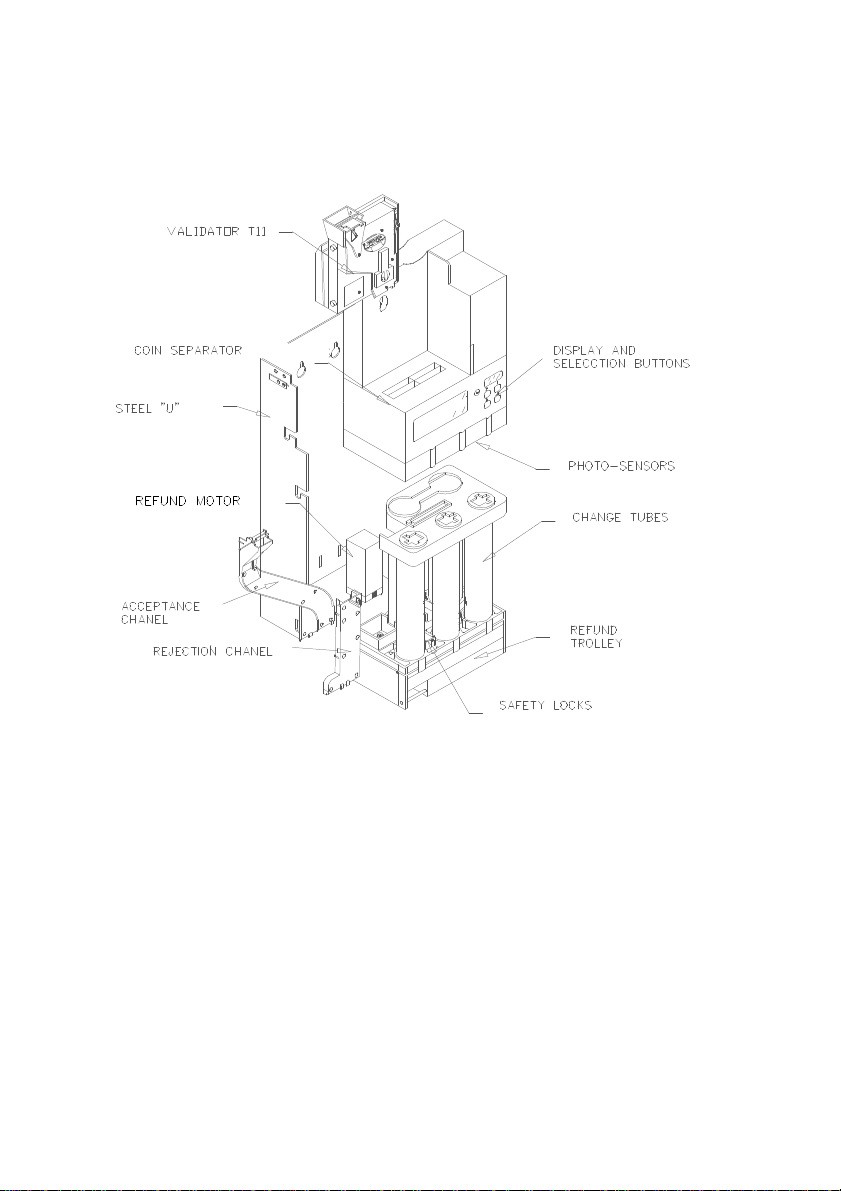
3.-INTRODUCTION TO MODEL J-2000. 6
T10 VALIDATOR. 6
COIN SEPARATOR 6
REFUND SLIDE: 7
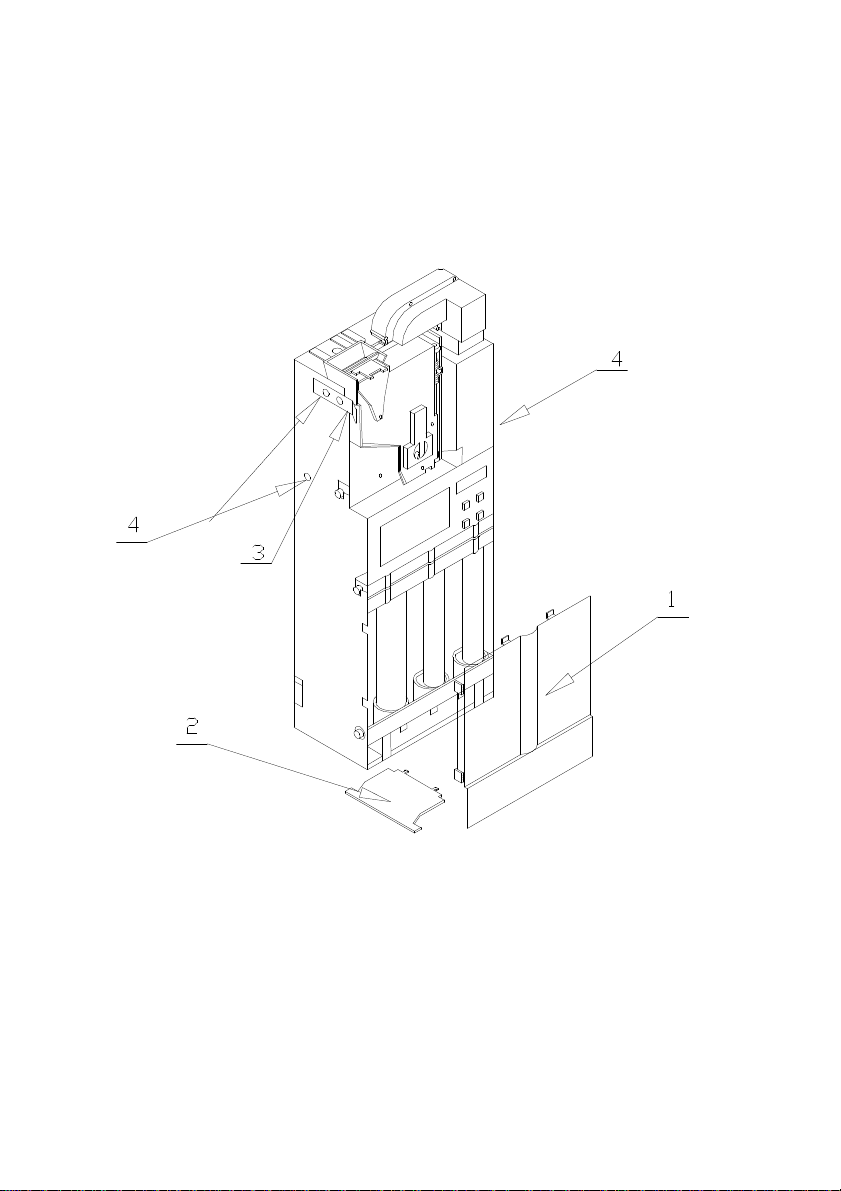
INSTALLATION OF THE COMPACT 7
CLEANING OF THE VALIDATOR. 8
COIN JAMS AND TUBE REPLACEMENT: 8
UPDATING THE PROGRAM: 10
USING THE SELECTION BUTTONS AND THE PROGRAMMING DISPLAY. 11
SELF-CHECK:… 13
SELF -CHECK 1: 13
SELF -CHECK 2: 13
SELF -CHECK 3: 13
SELF -CHECK 4 13
4.-PROGRAMMING ADDRESSES. ACCESS LEVELS. 14
"_00" MAXIMUM REFUND / MAXIMUM CREDIT. 15
“-101” TO “-199” PROGRAMMING PRICES 15
“1101” TO “1199” Nº OF VENDS FOR EACH PRICE 15
“X_21” COINS IN CHANGERS 15
“X_22” COINS PROGRAMMED INTO THE TUBES 16
“X_23” OTHER COINS INTO THE TUBES 16
“__24” RS232C OUTPUT OF SALES COUNT DATA TO THE PRINTER. 16
“__25” :LOADING THE CHANGERS. 17
FIRST RELOAD: 18
“__26” UNLOADING FROM CHANGERS. 18
“__27” : CONSULTING AND RESETTING BREAKDOWNS 19
“__28” : CLOCK/CALENDAR 21
“__29” : PROGRAMMING MAXIMUMS 21
“__30” PRICE RETENTION, PRICE DISPLAY AND VEND MODE. 21
“__31” : AUTOMATIC UNLOAD OF TUBES 23
“__34” OUT OF CHANGE CONDITION 23
“__35” OUT OF CHANGE LEVEL 23
“__38” INDIVIDUAL INHIBITION OF COINS AND TOKENS 23
“__42” DISCOUNT SALES 24
“__44” VALUE OF PROGRAMMABLE TOKENS 24
“__48” BASE CURRENCY 24
“__49” SCHEDULED PROMOTION 24
“__50” ACCESS CODE FOR THE SECOND LEVEL 25
INTRODUCTION OF THE CODE 25
CHANGING THE CODE 26
“__51” SELECTOR CHECK 26
“__52” TYPE OF PROTOCOL 26
“__53” COINS IN EXTERIOR TUBES 26
“__55” NOTE READER OPTIONS 26
“__56” INHIBITION OF NOTES 26
“__60” ACCESS CODE TO THIRD LEVEL 26

MNP11M01GB06 May 2007-Rev.4 Page: 4de 40
“__61” IDENTIFICATION NUMBER 26
“__62” DATE OF MANUFACTURE 27
“__63” COUNTRY CODE 27
“__64” NUMBER OF CONEXIONS OF THE COMPACT 27
“__65” PROTOCOL PROGRAMATION 27
“__66” NUMBER OF PRICES CONTROLLED BY THE COMPACT 27
“__67” REPROGRAMMING A NEW COIN 27
“__68” VERSION OF THE PROGRAMME 28
“__70” A “__81” SALES COUNTS 28
“__85” TOTAL NUMBER OF SALES 29
“__86” CLEARING SALES COUNTS 29
5.-TECHNICAL CHARACTERISTICS 29
PROGRAMMING SUMMARY: 30
CONNECTIONS FOR THE EXECUTIVE PROTOCOL 31
MDB CONNECTIONS: 31
SIZES OF AVAILABLE TUBES. 32
SAFETY LOCKS SIZE. 34
6.-TROUBLE SHOOTING: 35

MNP11M01GB06 May 2007-Rev.4 Page: 5de 40
1-WORKING CONDITION.
The compactcan work between 0 ºC up to 60 ºC.
2-SYMBOL OF THE INSTRUCTION MANUAL.
iThis symbol indicates that there are more information in another point of this
manual.
èThis symbol is in reference with programming.
FThis symbol notices that the text is very important.
This symbol notices that there isn´t to place something material in rubbish.
This symbol indicates recyclable material.

MNP11M01GB06 May 2007-Rev.4 Page: 6de 40
3.-INTRODUCTION TO MODEL J-2000.
The J-2000 validation group is an integrated system made up of an electronic coin
validator and a refund system for automatic vending machines with MDB or Executive
protocol. It consists of a electronic coin validator model T10, a 5 routes coin separator
and five self loading change tubes.
Its water protection system allows it to run in a hard environment.
This compact has also the possibility to dump the count data to a serial printer or
reprogram some of its options with the help of a PC computer.
T10 Validator.
The T10 is an electronic validator that can identify up to 15 coins or tokens. It has a
built in separating system with a coil that rejects or accepts the coins. It is powered by
12VDC through a connector to the control board.
Coin separator
This subsystem permits the routing of accepted coins by the T10 validator to reload
the five change tubes or the coin deposit. It has photo-sensors in the bottom to make
coin acceptance faster and detect coin jams in the top of change tubes.

MNP11M01GB06 May 2007-Rev.4 Page: 7de 40
Refund slide:
This is the system that makes it possible to extract coins from the bottom of each
change tube by a claw. It also has two safety locks to avoid the accidental falling of
the coin in the tubes.
F Installation of the compact
Verify that the compact is installed vertically and that the refund lever of the validator
is not activated by the lever of the machine.
Connect power to the compact. Verify that the coins programmed on address 22
correspond with the size of the tubes. Verify too if the protocol programmed on
address 65 it is correct. If the communication is running correctly you can see the
points of the interior display flashing.
Introduce at least three coins in each tube through address 25, as indicated on page
18 of this manual.
Introduce a coin and carry out a purchase (repeat this process with different coins and
channels of the machine).
Unload coins from the tubes (address 26) and verify that they fall correctly into the
refund drawer.

MNP11M01GB06 May 2007-Rev.4 Page: 8de 40
Cleaning of the validator.
Periodical cleaning of the walls and ramps of the validator, where the coins circulate,
with a rag or damp cloth is recommended.
Coin jams and tube replacement:
In
order to disassemble the compact follow the next steps:
-Unload completely the coins in the tubes.
-Disengage the front protector (1).
-Unscrew the coin deflector (2).
-Take off the coin validator lifting the clip placed on the left of the validator (3).
-Unscrew the three screws placed in the validator clip on the sides of the steel U.
When you have done this, put the compact laying on a horizontal surface and then lift
up the steel U as indicated on the figure. Then move the separator and display block
laterally to reach the tubes.

MNP11M01GB06 May 2007-Rev.4 Page: 9de 40
When you have made any changes , reassemble the compact in the reverse order,
making sure you pass the flat cable of the slide through the plastic guide (4).

MNP11M01GB06 May 2007-Rev.4 Page: 10 de 40
FUpdating the program:
IN COMPACT WITHOUT FLASH MEMORY:
If it is necessary to update the program to a new version you have to replace the
EPROM chip present in the control card. To do this you must move away the steel U,
as is indicate in the previous figure. Then carry out the next steps:
-Remove the screws that attach the water protection cover. (1)
-Disconnect the flat cable that joins the control board to the display board.
-Uncouple the flat cable of T10 validator (2).
-Then you can see the components side of the control card, where you can replace
the EPROM chip with the help of a flat screwdriver .
Before replacing the water protection cover check connecting the flat cable of the
display and extracting the validator flat cable (2).
-IN COMPACT WITH FLASH TECNOLOGY:
•RECORDING FROM PC:
To recording the programme from PC it is neccessary to have the next components:
nComunication cable RS-232, cod: 8800756.
nRecording programme memory flash: REPROYYXX.EXE.

MNP11M01GB06 May 2007-Rev.4 Page: 11 de 40
1.-To connect the cable comunications RS-232 to the output RS-232 from de
compact.
2.-To do the next steps:
a) To copy the programme that We want to record in the subdirectory \J2000
of the directory where is the programme REPROYYXX.EXE.
b) Execute the programme REPROYYXX.EXE ( YY letter mean the language and
XX mean the version). Enter in option FLASH-GRABAR-J2000, choose the
programme to record with extension H00, the other programme with extension
H01 will be loaded automatically.
3.-To connect supply to the compact from the machine.
4.-When the recording had finished in the screen of the computer appears J2000
RECORDING.
•RECORDING FRON THE CARD READER:
To recording the programme from the card reader it is neccessary to have the next
components:
* Recording card of 128 K, cod : 8590052.
* Tabletop card reader with the current version
1.-To copy the programme of extension H00 and H01 in the subdirectory \
j2000 in the directory where is the programe REPROYYXX.EXE.
2.-To load in the card the programe to be recorded, to do this execute the programe
REPROYYXX.EXE and in the menu choose TARJETA-GRABAR-J2000, and choose
the programe to be loaded.
3.-To connect the card reader to the compact.
4.-Introduce the card in the card reader.
5.-To connect the compact to supply.
6.-To begin the recording, and the two leds of the card reader will be switch off and
switch on alternately. When the red led is switch on only, the programming has
finished.
Using the selection buttons and the programming display.
The J-2000 compact has two operating modes, the coin acceptance and refund mode
and the program mode. In the first the compact is ready for the machine to carry out
sales (sell mode), in the second the operating options of the J-2000 can be modified
(program mode).
This compact has a 4 digit display and 4 selection buttons integrated
in the separator block, which allow the selection and visualisation of
the different addresses and their contents.
In sell mode the decimal points of status (thousands and hundreds)
that light alternately permitting the visualisation of the dynamic status
of the J-2000.

MNP11M01GB06 May 2007-Rev.4 Page: 12 de 40
-OFF: The J2000 is not receiving power.
-EITHER ONE LIT: The J-2000 is receiving power but the VMC is not communicating
with it.
-ALTERNATING: The VMC is communicating.
In sell mode the alternately flashing of the points of status of thousands, hundreds
and tens tell of the state of the communication between the J-2000 and the machine.
¬One point flashing at the thousands indicates that the compact is tracing the
peripherals.
-One point flashing at the hundreds indicates that the compact is tracing the coin
validator.
®One point at tens indicates that the compact is sending the credit command.
The digit 2 tell us about the state of the sale.
1: Selection detected.
2: Waiting for the end of the sale cycle.
3: Recording the sale.
In either communication protocols, when a coin was introduced or the escrow button
was pressed, the internal display will show this information in the hundreds:
0 Acceptance inhibited.
1 Refund asked for or refunding change.
2 Coin not recognised.
3 Coin accepted.
6 Coins jammed in the selector.
9 Synchronisation error.
The indication for coins rejected by inhibition (code “0” during the acceptance)
distinguishes between VMC and J-2000 inhibitions. Codes for each one are as follow:
-“0”: Coin has been inhibited by the VMC.
-“-0.”: Coin has been inhibited by the J-2000.
The indication for coins rejected by inhibition (code “0” during the acceptance)
distinguishes between VMC and J-2000 inhibitions. Codes for each one are as follow:
0 (fixed) Acceptance of coins inhibited by the machine.
0 (flashing) Acceptance inhibited by the control board.
Selection button “1” is used to enter the programming mode and to select the address
that you wish to consult or modify. If maintained pressed, the addresses change in an
inverse direction
Selection button “4” is used to return to the sale mode. In the case that it is not
pressed the J-2000 returns automatically to the sale mode after one minute from the
last action carried out.
Selection buttons “2” and “3” allow you to visualise and modify the contents of the
programming addresses.

MNP11M01GB06 May 2007-Rev.4 Page: 13 de 40
Self-check:
Each time that you return to sale mode from program mode, or when the compact is
turned on, a self check procedure is started. If an error is detected the display will
show the errors detected during 3 seconds, as a sequence of 1 2 of 3 depending the
problem that is producing this error.
Thousands Hundreds Tens Units
Self -check 1: i
1: At units indicates that a coil in the coin separator is broken. The number of the coil
broken will appear in the address 1_27.
1: At tens a claw of the refund trolley is broken. The number of the tube broken will
appear in the address 2_27.
1: At hundreds a photo-sensor of the coin separator is covered. It’s possible to know
which at the address 3_27.
1: At thousands there is a error in the coin validator. The code of the error will appear
on the address 4_27.
Self -check 2: i
2: At units the motor of the refund trolley is broken or has had a jam. To clear the
error go into the address 5_27.
2: At tens the escrow motor is broken. To clear the error go into address 6_27.
2: At hundreds a coin has gone to a wrong tube. To clear the error go into the address
7_27.
2: At thousands a coil of the safety locks was unplugged. To clear the error go into
the address 8_27.
Self -check 3: i
3: At units shows that prices are unprogrammed.
3: At tens shows that there is an error in tokens values.
3: At hundreds shows that notes are unprogrammed.
3: At units shows that coins in the tubes are unprogrammed.
Self -check 4: i
4: At units shows a error in exterior tubes dispenser.

MNP11M01GB06 May 2007-Rev.4 Page: 14 de 40
4.-PROGRAMMING ADDRESSES.ACCESS LEVELS.
Not all of the addresses of the programming mode are directly accessible, nor are
they available in all models. They are divided into three access levels. To access the
addresses of the second level a code must be introduced in address 50 (or address
60 if you want to get into the third level).
Some addresses will appear only when the compact is running under one of the two
protocols available (MDB or Executive). To select the protocol you have to go to
address 65.
: This address appears when the compact is running under Executive
protocol (address 65 at 0).
: This address appears when the compact is running under MDB protocol (
address 65 at 1).
Some addresses can be shown at a level, but can only be modified at a greater level.
The addresses that can be accessed in the first level are the following:
101 to 199: Price programming. è
21 : Coins in the change tubes. è
25 : Reloading the change tubes. è
27 : Consulting and resetting breakdowns. è
50 : Access code to the second level. è
68: Version of programme. è
The addresses that can be accessed in the second level (including those that belong
to the first level) are the following:
00: Maximum recovery/maximum credit.
1101 a 1199: Nº of sales of each price. è
22 : Coin programmed in the tubes. è
23: Other coins programmed in the tubes. è
24 : Configuration of RS232 to the printer. è
26 : Unloads from change tubes. è
28 : Clock / calendar. è
29 : Programming of maximums at tubes. è
30 : Retention and display of prices. Mode of sale. è
31 : Automatic unload from change tubes. è
34 : Coins inhibited when out of sale mode. è
35 : Number of coins to go into out of sale mode. è
38 : Inhibition of individual coins and tokens. è
42 : Sales with discount. è
44 : Tokens value. è
48 : Base currency. è
49 : Promotion schedule. è
51 : Checking of the validator. è
52 : Type of protocol. è
53 : Coin in external tubes. è
55 : Note reader options. è
56 : Note reader inhibitions. è

MNP11M01GB06 May 2007-Rev.4 Page: 15 de 40
60 : Access code to third level. è
61 : Identification number. è
62 : Date of manufacture. è
63 : Country code. è
64 : Number of connections of the compact. è
65 : Protocol selection: MDB or Executive. è
66: Number of prices controlled by the compact in retention mode. è
67: Reprogramming a new coin in the compact. è
70 a 81 : Sales counters. è
85 : Number of sales. è
86 : Erasing of counters. è
PROGRAMMING ADDRESSES ACCES LEVELS
"_00" MAXIMUM REFUND / MAXIMUM CREDIT.
"1_00" The value programmed at this address represents the maximum value of
which a refund is allowed.
"2_00" This value is used to establish the maximum credit that can be accumulated
when is in multiple vend or the compact is in not retention mode.
To change this value the second level must be accessed. At the second level (right-
hand point of the display lit), pressing “3” will indicate the value programmed.
Pressing “3” again increase the digit select. Pressing “2” will select the next digit.
“-101” to “-199” PROGRAMMING PRICES
Addresses “-101” to “-199” allows the price programming of the different sale
channels. When the compact is running in no prices retention mode, this address will
not appear. When passing from no retention mode to retention, the prices will appear
programmed with a value of 9999.
If a price is programmed to zero this indicates a free (of charge) sale.
IF NO PRICE IS DIFFERENT FROM ZERO THE COMPACT WILL NOT ACCEPT
CREDIT
“1101” to “1199” Nº OF VENDS FOR EACH PRICE
When the J-2000 works in price retention, the number of sales made from each one
of the prices can be consulted at these addresses. Each address has two fields:
In field 1, pressing “3” the compact will show the number of partials vends for this
price.
In field 2, pressing “3” the compact will show the number of total vends for this price .
Pressing “1” the compact will return to the address.
“X_21” COINS IN CHANGERS
The number of coins stored in the tube change tubes can be consulted in this
address.
By pressing “2” we can select the change tube and pressing “3” we can see the
number of coins.
1_21: Nº of coins in tube 1.

MNP11M01GB06 May 2007-Rev.4 Page: 16 de 40
.....
5_21: Nº of coins in tube 5.
If we observe that the quantity is flashing on selecting a tube, this indicates that there
is a possibility that the count does not coincide with the actual number of coins in the
tube.
To solve this problem, access to second level and enter in this address. Press “2”
until the flashing tube is found. Pressing “3” we can see the number of coins of this
tube. Pressing “3” again the compact will place the maximum number of coins in this
tube. Then unload the tube in the address 26 until the count of coins become zero.
When the number of coins is desprogrammed, a error will also appear on address
9_27.
If the compact is running under MDB protocol there will be a gap of 3 coins between
the number of coins showed in this address and the number of coins showed at the
VMC, because the compact leaves three coins as security minimum.
“X_22” COINS PROGRAMMED INTO THE TUBES
This address has 5 fields. In this address you can program the value of the coins to fill
the change tubes. Once the address is reached pressing “2” will select the number of
field. Address 3_22 is related to tube 3 and so on.
If we are into the address pressing “3” will show the coin now programmed in this
tube. Pressing “2” will select the coin to fill this tube.
If there are different coins with the same value, the newer will appear marked with the
units decimal point.
If it is desired to program no coin in a tube, program the value “----” as the coin
selected in that tube.
Before changing the coin selected to fill a tube, check you have selected the correct
tube size.
“X_23” OTHER COINS INTO THE TUBES
This address is used if there are two different coins that are routed to the same tube.
This address is only available in some countries. This address is programmed in the
same way as address 22 is. Fields not used on this address must be programmed at
a value of “----”.
For example, if in one country there are two different 5 c coins and two different 10 c
coins and both of them have the same physical size, you can route the coins to the
tubes in the next way:
Tube 1 Tube 2 Tube 3 Tube 4 Tube 5
Address 22: White 5 c White 10 c 20 C 50 C 50 C
Address 23: Yellow 5 c Yellow 10 c ---- ---- ----
“__24” RS232C OUTPUT OF SALES COUNT DATA TO THE PRINTER.
This address allows the operator of the vending machine to obtain tickets with the
information of the sales counts.

MNP11M01GB06 May 2007-Rev.4 Page: 17 de 40
Information is transmitted through the RS232C interface with a speed of 1200 or 110
baud.
The RS232C interface is connected to a 400 mm, 4 line, screened cable that has a
standard 9 Pin Sub -D connector.
Printer J-2000 Pin Colour
RXD TXD 2Black
DTR DTS 4White
Ground Ground 5Yellow/Green
Power 12Vdc 9Green
This address has 5 fields:
“0_24”: Selection of a long or short ticket. For a long ticket program “0” at this
address and “1” for a short ticket.
“1_24” : Selection for communication type. Programming “0”, we will have
communication at a speed of 1200 baud, 8 data bits and 1 stop bit. Programming “1”
we will have communication at a speed of 110 baud, 7 data bits and 1 stop bit.
“2_24” : Selection of the language of the ticket. There are three available tickets:
Value Language
0Spanish
1French
2English
“3_24” : Use this address to program if the compact will test the DTR line of the
printer. Programming “1” the compact will check the DTR line, and programming “0”
the compact will not check the DTR line.
“4_24” :Selection of deleting partial count data after a RS232 output. Programming
“1” will delete count data, and programming “0” will not delete the partial count data.
The selection of this options should be made without having the printer connected.
Tickets can be obtained outside the programming mode, by simply connecting the
printer.
If the address 3_24 is programmed as “1” and the DTR line is switched off, the
compact will wait until the DTR line is switched on. If more than five seconds pass the
transmission will be aborted.
F “__25” :LOADING THE CHANGERS.
This address allows the loading of the tube change tubes. Once the display shows
that this address has been reached, it is enough to insert coins in the selector, it will
only accept those destined to self load until they fill up the tubes.
If some tubes are empty the refund trolley will be placed in a middle position to avoid
the edge of the coins being loaded catching in the groove of the claw causing jams.
This address also shows the value of the coins contained in the tubes.
-Pressing “2” will show the value of the money contained in the tubes.
-Pressing “3” will show the value of the money loaded through this address at the
moment. If we go into and out of this address the value will be cleared.

MNP11M01GB06 May 2007-Rev.4 Page: 18 de 40
FIRST RELOAD: If all the tubes are totally empty, when this
address is reached the refund trolley will be
placed in the middle left position and the only
coins accepted will be those programmed to
the 2,3 and 4 tubes. Each time that the count
of coins in some of these tubes amounts to 3
coins, the slide will move removing the claw of
the tube.
If when the slide is moving the tubes 2,3 and 4
have at least one coin, the slide will be placed
in a middle right position and the compact will
then accept coins programmed in the tubes 1
and 5, moving the trolley again when any of
this tubes reach a value of 3 coins.
It’s strongly recommended to reload through
this address when one tube is totally empty at
least the 3 first coins of the tube. If you try to
fill it up when the compact is in normal sale
mode (or when filling through the VMC
options) you can cause a jam.
Do not manually reload the tubes !!!
“__26” UNLOADING FROM CHANGERS.
If the display is showing “__26” and we press “3” the display will show “----”. Pressing
“2” the trolley will unload a coin from each tube.
If we are in the direction indicative and we press “2” we can see the next fields in this
address:
0_26: Will program the possibility to reach address 26 directly outside of the program
mode by pressing “2” “3” or “4”. If this function isn’t desired this option must be
programmed to 0.
On programming 2 in this option will be possible to unload coins from the three first
tubes directly in sale mode by pressing “2” “3” or “4”:
Key 234
Tube 123
If address 0_26 is programmed to 3 it works like programmed to 1 but in these case
the contest of this field can´t be changed if it isn´t in the second level of programming.
If the compact is running under the MDB protocol on programming 3 in this option the
compact will omit the inhibition orders from the VMC. This allows us to unload the
tubes at any moment. The compact will no give information to the VMC about the
unloading of the tubes.
1_26:Consult and unload coins from tube 1. Pressing “3” the compact will show the
number of coins in the tube. Each time “2” is pressed a coin will be dispensed.
.....
5_26: Consult and unload coins from tube 3.

MNP11M01GB06 May 2007-Rev.4 Page: 19 de 40
Although its possible to do, it is not recommend to allow the compact in normal sale
mode to have a tube with a number of coins less than the security level (3 coins). For
this reason it is not recommended to completely unload any of the tubes.
If a tube it’s totally empty it’s recommended to load to the security level through
address 25.
“__27” : CONSULTING AND RESETTING BREAKDOWNS
This address allows the consulting of
error codes generated by the self check
of the compact. To go to over the 10
fields we use the button “2”. To show the
value of one field we use “3”.
To clear the breakdown we have to press “2” again. The value showed in the field will
be the sum of the errors detected. For example, if the address 3_27 shows a 9, the
photo sensors of tubes 1 and 4 will be covered. The tubes are named as follows:
The error codes showed in each field are:
1_27: Breakdown in the separator coils.
1: Coil 1 broken.
2: Coil 2 broken.
4: Coil 3 broken.
8: Coil 4 broken.
16: Coil 5 broken
This error will be marked when a coin did not reach the tube or when the electrical
connection of the coil is broken.
2_27: Breakdown in the claws of the refund trolley.
1: Coil or claw 1 broken.
2: Coil or claw 2 broken.
4: Coil or claw 3 broken.
8: Coil or claw 4 broken.
16: Coil or claw 5 broken.
This error will also appear when:
-The coin programmed in the address 22 isn’t correct.
-There is an error in the count of coins in the tube.
-There isn’t a good electrical connection to the coil.
-A jam has happened when dispensing coins from this tube.
-The safety lock of this tube is broken.

MNP11M01GB06 May 2007-Rev.4 Page: 20 de 40
3_27: Photo-sensors of the tubes are covered:
1: Sensor of tube 1 is covered.
2: Sensor of tube 2 is covered.
4: Sensor of tube 3 is covered.
8: Sensor of tube 4 is covered.
16: Sensor of tube 5 is covered.
Errors of this address will be self cleared when the sensor is uncovered. Errors in this
address are normally caused by coins jammed at the top of the tube.
4_27: Shows the sum of the error codes in the coin validator. The possible error
codes are:
1: Photo -sensor or T10 coil broken.
2: Synchronism error.
5_27: Shows “1” if the refund motor is broken. If the compact is running under
executive protocol and the refund motor is broken when a refund is being made, the
compact changes to multiple vend to avoid clearing the credit that hasn’t been
refunded. When this error is marked, check the value of the address 2_30.
6_27: Shows “1” when a error is detected in the escrow system.
7_27: Shows the error code caused by a coin that has not followed the intended
routing. The value showed is the sum of the calculated route and the detected route.
The values of the tubes are:
1: For tube 1.
2: For tube 2.
4: For tube 3.
8: For tube 4.
16: For tube 5.
8_27: This field shows the breakdowns in the coils of the safety locks of the refund
trolley. If a safety lock is broken, the compact will also mark as broken the tubes
controlled by the lock.
1: Coil 1 broken-> Breakdown detected in the lock of tubes 1 and 2.
2: Coil 2 broken-> Breakdown detected in the lock of tubes 4 and 5.
3: Coil 1 and 2 broken-> Breakdown detected in the lock of tubes 1,2,4 and 5.
9_27: Shows error detected in the programming options of the compact:
1: Prices are unprogrammed.
2: Tokens are unprogrammed.
4: Notes are unprogrammed.
8: Programming options unprogrammed.
16: Coins to tubes are unprogrammed.
In program mode the address that has caused the deprogramming will be shown
flashing.
A_29: Shows the error in exterior tubes.
1: Error in exterior tube number 1.
2: Error in exterior tube number 2.
Table of contents
Popular Industrial Equipment manuals by other brands

Festo
Festo EGSL operating instructions

Ohio Medical
Ohio Medical Sure-Trap Overflow Safety Trap Instructions for use

EASTMAN
EASTMAN Kodak X-Omatic 4 installation instructions

Huawei
Huawei LUNA2000-200KWH-2H1 Smart String ESS user manual

Rodix
Rodix FEEDER CUBE FC-40 Plus Series Adjustments and Set Up

Aerotech
Aerotech PRO560LM Series Hardware manual