JOHNSON HEALTH TECH. Tempo Fitness T106 User manual

6
www.johnsonhealthtec
h.com.au
USER
MANUAL
A brand of Johnson Health Tec
h
6

1
Contents
PAGE 1 - IMPORTANT SAFETY INSTRUCTIONS
PAGE 4 - ASSEMBLY LIST
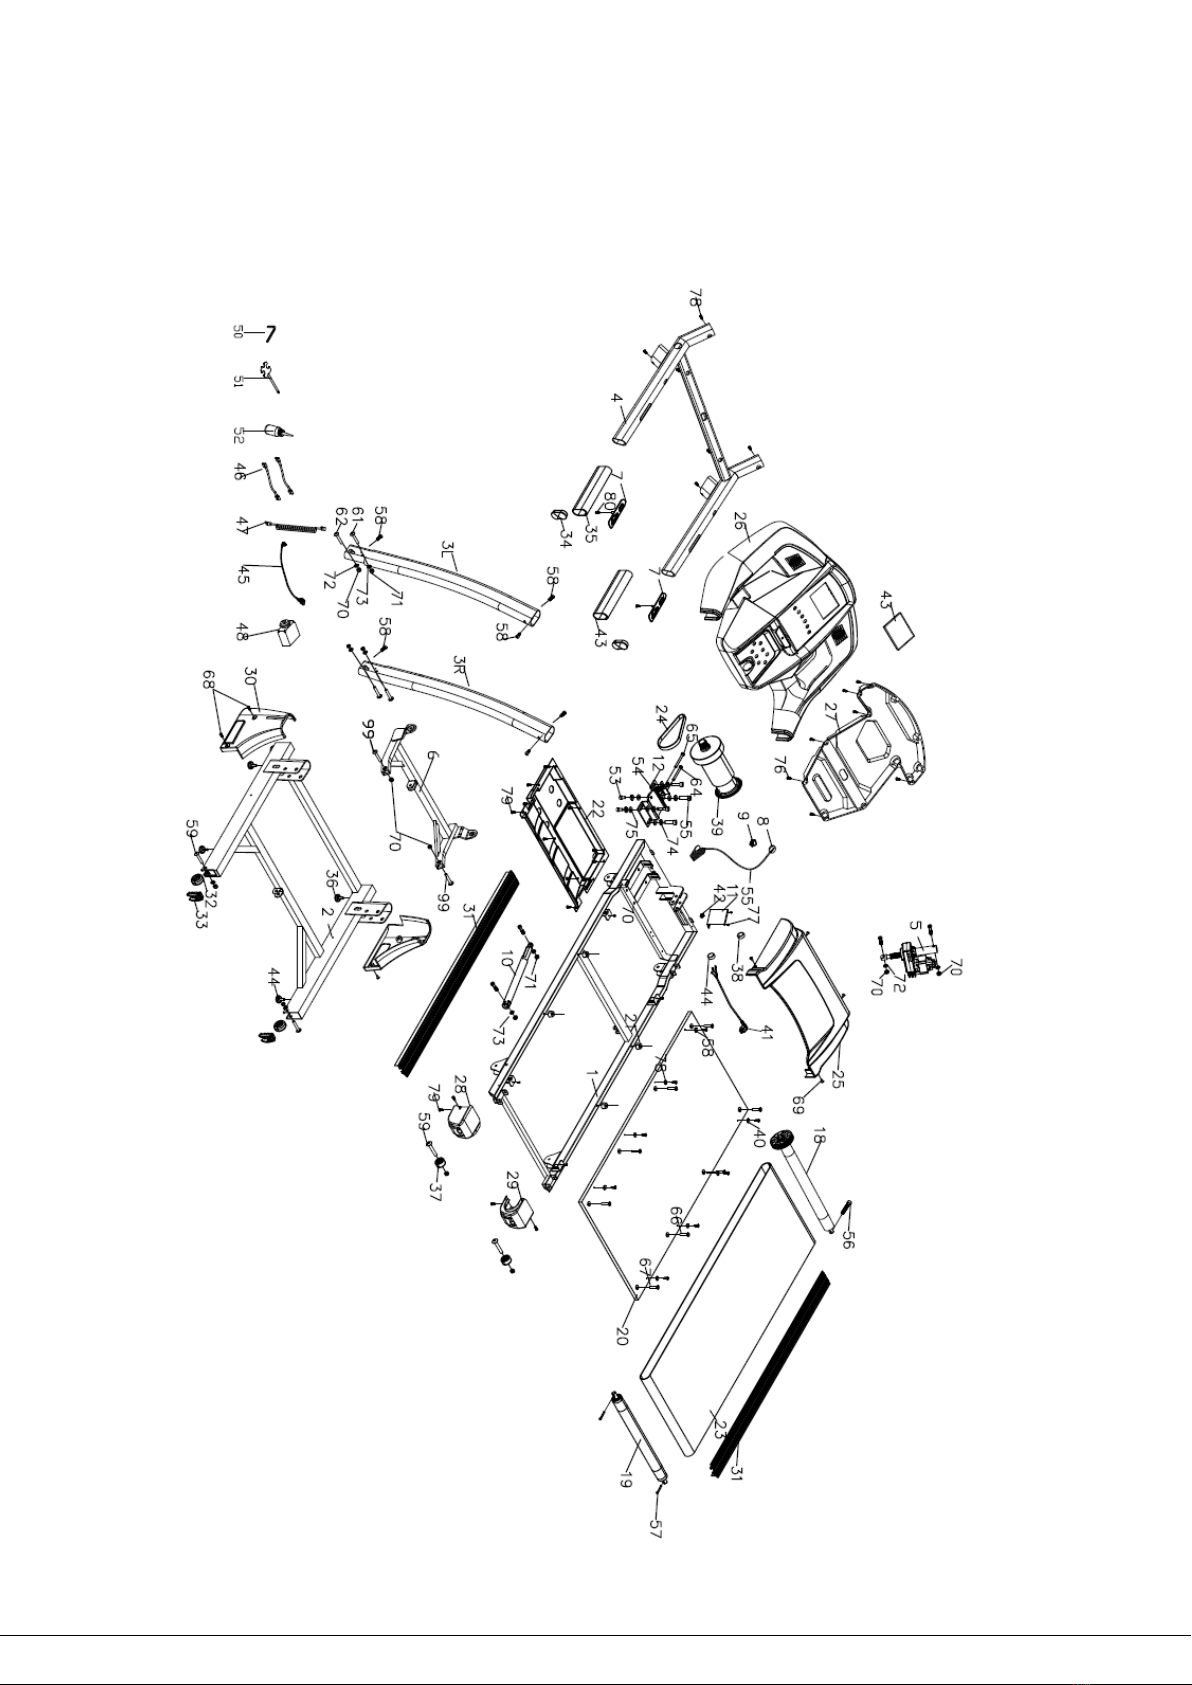
PAGE 6 - PRODUCT PARTS LIST
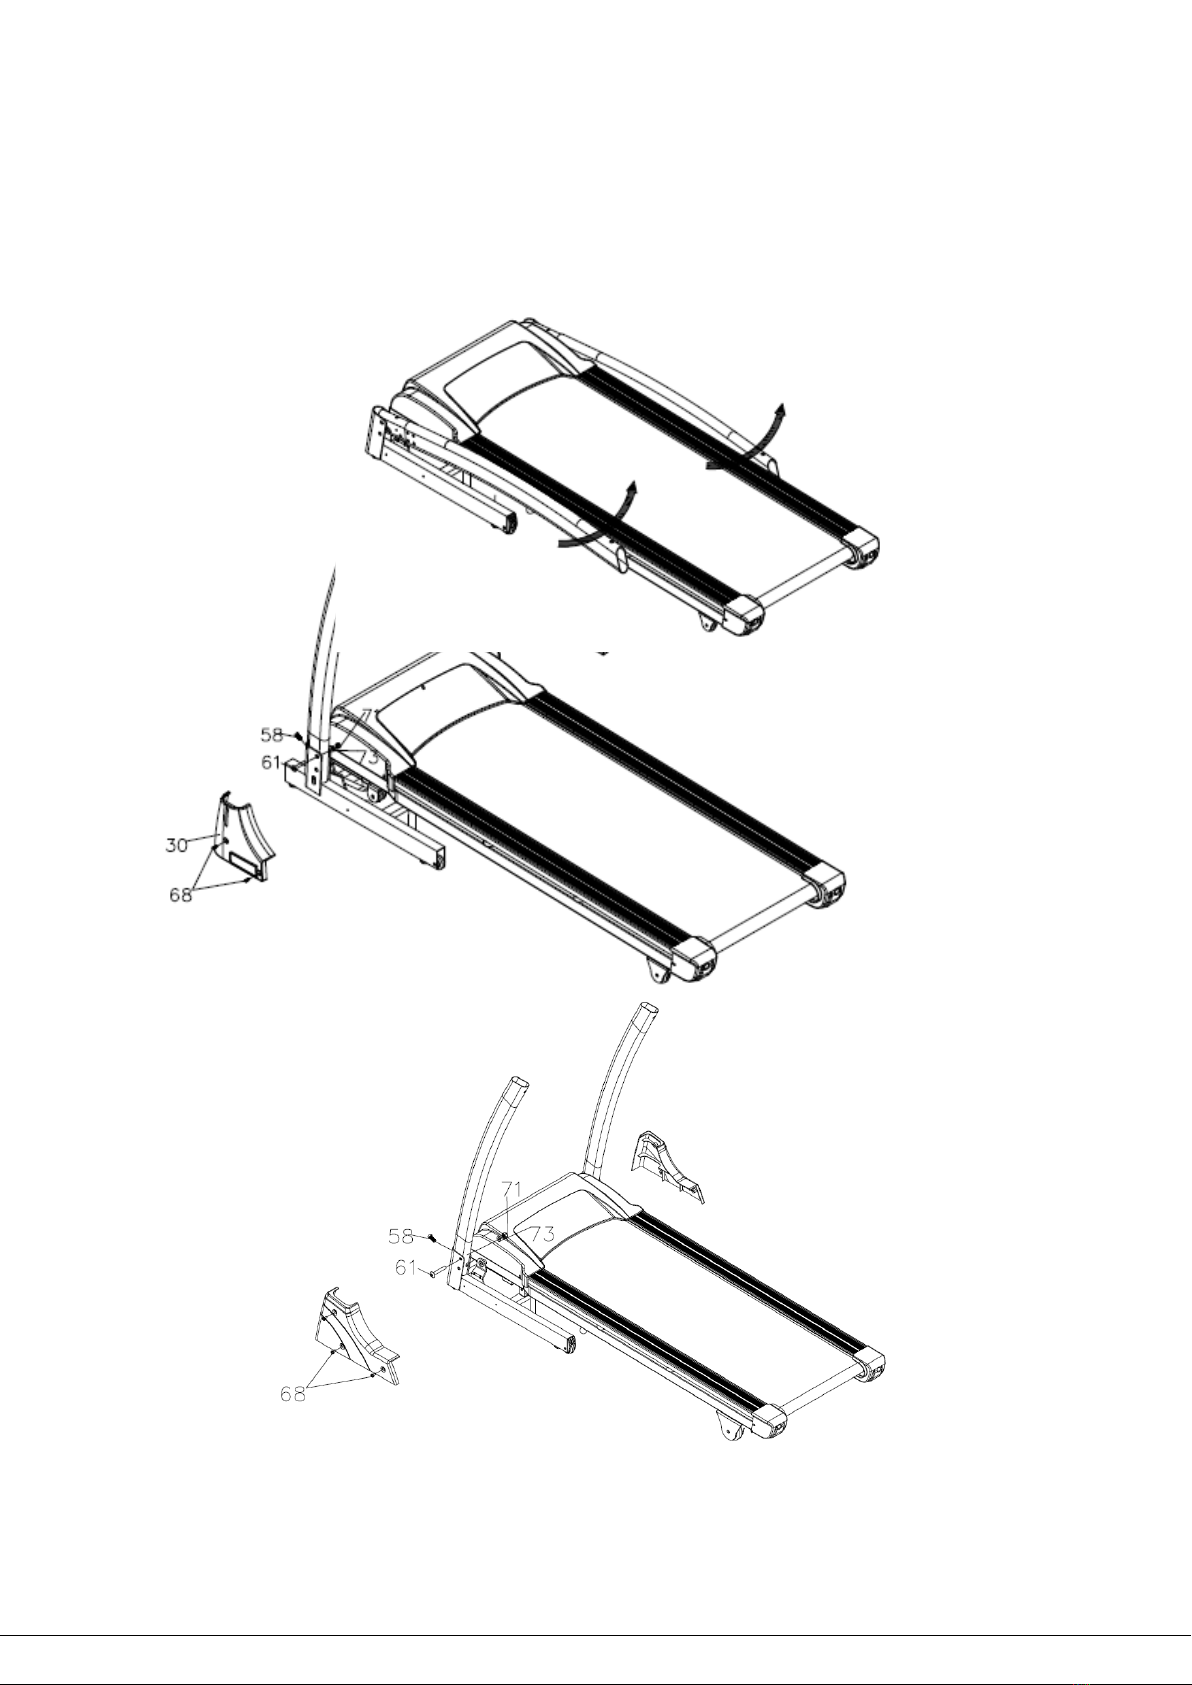
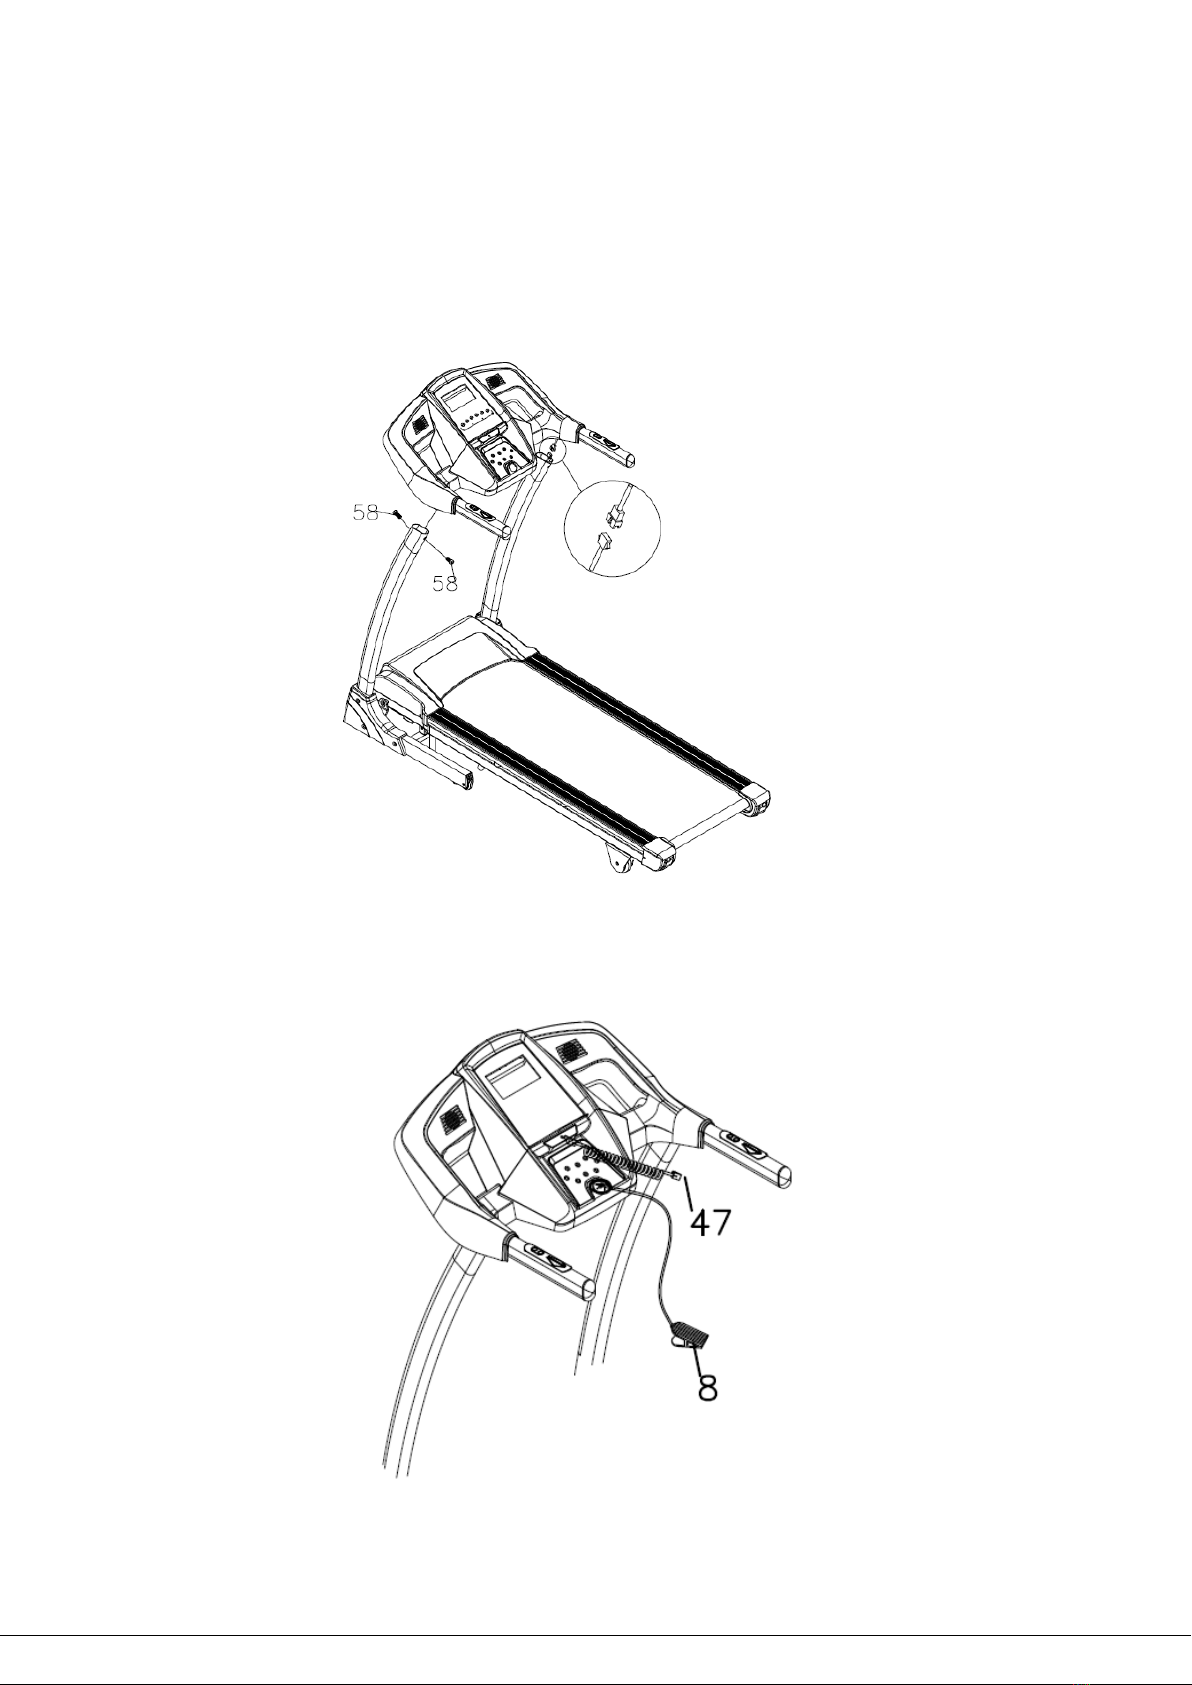
PAGE 7 – PRODUCT ASSEMBLY INSTRUCTIONS
PAGE 10 – PRODUCT DESCRIPTION
PAGE 15- ROUTINE MAINTENANCE
IMPORTANT SAFETY INSTRUCTION
Before using the treadmill please read the below:
A. Ensure the plug is grounded and the treadmill is well connected before usage. The socket should have a
dedicated circuit, avoid using power boards.
B. Before using the treadmill check that the treadmill is operating correctly.
C. When starting, the user must stand on the side rails.
D. Always attach the safety key clip to your clothing before starting your workout.
E. Press the start key to start the treadmill.
F. User can adjust speed and incline according to demand.
G. After exercise, take off the safely key or press the stop key to stop the treadmill.
H. When you finish your exercise, switch the treadmill off at the switch at the rear of the treadmill.
Safety Note
a) Use the treadmill indoors on a level surface. Keep the treadmill away from excessive moisture and dust.
b) Before running, please wear appropriate sportswear and sports shoes
c) Children should keep away from the machine to prevent accidents.
d) This treadmill is recommended for maximum usage of 2 hours continuously. Otherwise it may cause
damage and decrease the normal life span of the motor, controller, bearings, running belt, running board.
And periodical maintenance is necessary, or your warranty maybe void
e) When running, please make sure the room is ventilated
f) When running, the treadmill should be placed one meter away from a wall.
g) When using the treadmill, if the user feels unwell, please stop running and consult a doctor.
h) After using silicone oil, you must place it out of reach of children
i) If any problem occurs, user shall notify the local distributor for help and solution.
Warning
In order to reduce accidents or injuries to others, please follow below instructions:
1. Please make sure the clothing is well buttoned and well zipped before running.
2. Children should always keep away from the machine .
3. Don’t use the treadmill outdoors.
4. Unplug the power cord before moving the treadmill.
5. Lower the incline to its lowest setting before moving the treadmill.
6. The treadmill is intended for one-person usage per time.
7. It requires a 220~240 V AC, 50/60 Hz mains supply. Do not use any other supply.
8. The treadmill should be used in 10 AMP’s circuit only.
9. If you feel the following sensation (dizziness, chest pain or nausea), stop running immediately and
consult your doctor
Retain this owner’s manual for future reference
Read and follow all instructions in this owner’s manual.

2
Warning
Grounding Instruction
The products must be grounded first. If malfunction or breakdown occurs, grounding will provide a path of
least resistance for electric current to reduce the risk of electric shock. The product is equipped with an
equipment-grounding conductor and a grounding plug. The plug must be plugged into an appropriate outlet
that is properly installed and grounded in accordance with all local codes and ordinances.
Danger – Improper connection of the equipment-grounding conductor can result in a risk of
electric shock. Check with a qualified electrician or serviceman if you doubt whether the product is properly
grounded. Do not modify the plug provided with the product – if it will not fit the outlet, have a proper outlet
installed by a qualified electrician
The product is for use on normal 220V-240V circuit and contains a plug that looks like the one illustrated in
the figure below. Make sure the product is connected to an outlet configuration as the plug. No adapter should
be used with the product.
PRE-ASSEMBLY CHECK LIST
Round head hex bolt
M8*15 6pcs
Cross head hex bolt
M4*10 6pcs
Round head hex bolt
M8*45 2pcs
Nut M8 2pcs
Flat washer∮9*∮
16*t1.6 2pcs
Allen wrench 1pc
Screw driver 1pc
SILICONE 1pc
Main frame
Console
Manual &Screw bag
Manual
Screw
bag

3
Exploded drawing

4
Parts list
NO.
Name
QTY.
NO.
Name
QTY.
1
Main frame
1
53
Hexagon socket head cap screws
2
2
Base frame
1
54
Hexagon socket head cap screws
2
3L
Left upright tube
1
55
Hexagon socket head cap screws
2
3R
Right upright tube
1
56
Hexagon socket head cap screws
1
4
Electronic watch stand
1
57
Hexagon socket head cap screws
2
5
Incline motor
1
58
Large flat head socket hexagon screw
6
6
Incline bracket
1
59
Large flat head socket hexagon screw
4
7
Handle pulse
2
60
Large flat head socket hexagon screw
1
8
Security Lock
1
61
Large flat head socket hexagon screw
2
9
Power switch
1
62
Large flat head socket hexagon screw
2
10
Gas spring
1
63
Large flat head socket hexagon screw
2
11
Control PCB Board
1
64
Hex bolt
1
17
pipe stopper
65
Hex bolt
1
18
Front roller
1
66
Cross recessed countersunk head screw
4
19
Rear roller
1
67
Cross recessed countersunk head screw
4
20
Running board
1
68
Cross groove round head screw
6
21
Running board cushion
4
69
Cross groove large flat head screw
4
22
Blister baseplate
1
70
Locknut
6
23
Running belt
1
71
Locknut
8
24
V-belt
1
72
Flat washer
4
25
Motor cover
1
73
Flat washer
13
26
Computer upper cover
1
74
Spring washer
6
27
Computer back cover
1
75
Flat washer
5
28 Left rear corner protection 1 76
Cross groove large flat head self-tapping
screw
10
29 Right rear corner protection 1 77
Cross groove washer head self-drilling
screw
2
30 Base cover 2 78
Cross groove round head self-tapping
screw
20
31 Plastic edge strip 2 79
Cross groove washer head self-drilling
screw
18
32 Transport wheel 2 80
Cross groove large flat head self-tapping
screw
2
33 Transport wheel tube plug 2
34 Semi-elliptic inner tube plug 2
35
Handrail gloves
2
36
Flat foot pad
4
37
wheel
2
38
Ring protect wire plug
2
39
DC motor
1
40 edge strip fixed sheet 8
41
Power cord
1
42
wire clip
1
43
Display PCB
1
44
Magnetic ring
1
45
Signal wire
1
46
Single line
2
47
MP3 line
1
48
Over-load protection
1
50
Allen wrench
1
51
Cross open-end wrench
1
52
Oil bottle
1

5
Assembly steps
STEP 1:
Take out every part and tool set and lay flat on the floor. Lift up the upright tube as per the arrow
direction. Be careful not press the computer wire when unfolding.
STEP 2:
Use the screw M8*15(58),M8*45(61)and nut M8(71)with spacer(73)to fix the tube,then
use screw M4*10(68)fix the side cover(30)。

6
STEP 3.
Connecting the Signal wire in the right-hand tube (As shown below),and use the screw
M8*15(58)fix the console stand on the tube.
STEP 4.
Put on the safety key and MP3 line.

7
Before use
Starting the treadmill
LOCATION
Place the treadmill on flat floor before use.
POWER SUPPLY
Ensure that the power lead is plugged into a suitable, live, mains socket.
ON/OFF SWITCH
1. Ensure that the SAFETY KEY is attached to the console.
2. To start the treadmill, set the ON/OFF switch located on the front of the treadmill , to the
ON position.
3. To start using the treadmill, stand on each side rail.
5 Attach the SAFETY CLIP to your clothing at waist level.
6 Follow the user manual to start using the treadmill.
Adjustments
BELT ADJUSTMENT INSTRUCTION
Use Allen key:
Run the treadmill at approximately 5KMPH
If the belt tends to “drift” to the right, turn the left belt tension
bolt anti-clockwise. We recommend adjustments of a 1/4 turn
at a time. If the belt continues to “drift” to the right after
adjustment, turn the right belt tension bolt clockwise a 1/4 turn
at a time until the belt runs straight.
If the belt tends to “drift” to the left, turn the right belt tension
bolt anti-clockwise a 1/4 turn at a time. If the belt continues to
“drift” to the left, adjust the left belt tension bolt clockwise until
the belt runs straight.
If the belt appears to be loose, tighten both bolts evenly by a
1/4 turn. If it appears tight, loosen both bolts evenly a 1/4 turn.
To reduce the friction (sticking) of the walking belt and
minimise wear, a silicone lubricant may be applied directly to
the walking board and the underside of the belt.
Note: The lubricant may be applied whenever
sticking occurs. To apply, simply lift up the running
board and spray the lubricant onto the running
board and the underneath of the running belt.
Motor belt adjustment
The treadmill Motor belt has already been adjusted before
leaving the manufacturer. However, it may require further
adjustment after extended use as slipping may occur. User
can adjust the motor strap as below:
1) Turn the bolt counter-clockwise with the wrench.
2) When the motor strap recovers to be tight and not slipping,
it should be OK to continue to use.
Left tension bolt
Right tension bolt
Motor
belt

8
Note: You have to clean the strap and pulley groove regularly.
Attaching the safety key
Attach the SAFETY KEY to the console before turning the machine on. Attach the clip to your
clothing at your waist before beginning your workout. If the SAFETY KEY disconnects during use,
the treadmill will slow down and stop. Also an intermittent beep will occur and the console will
show”---”.
Using the treadmill
Console

9
Window displayer
1. Speed: Display the present speed
2. Time: Display the time of manual mode or count backward time under the program and
mode
3. Distance:Display the accumulative distance under the manual and program mode or count
backwards distance of the mode working
4. Calorie: Display the accumulative calories under the manual and program mode or count
backwards calories of the mode working
5. Heart rate: detected heart rate, the heart mark flashing, and display pulse value.
Quick and short cut keys
1. Quick Key is illustrated on the panel:
Quick speed “3,6,9”, Quick incline “3,6,9”
“Prog”, “Mode”, “Incline+,Incline-”, “Speed + ”, “Speed - ”,
2. Shortcut key for handlebar:
“Speed + ”, “Speed - ”,“Incline+”, “Incline-”
Parameter
Voltage
AC:220~240V60Hz
Max load
110Kg
Running area
420*1250
Max power
1.75HPP
Speed Display
1.0~14.0Km/h
Safety
Remove the Safety key, the treadmill will stop slowly. The console will stop working. Also an
intermittent beep will occur and the console will show”---”
Program & Mode
Turn on the power and attach the safety key before entering the modes.
1. Manual mode
A. Attached the safety key, Press the ”Start” button, buzzer sounds bi-bi-bi and speed window
countdown from 3 to 1,then treadmill will start run.
B. Treadmill will record the parameter and window will refresh showing the current dates,
C. Shortcut key for speed can adjust the exact speed
D. Press the “stop” button, treadmill will stop slowly.
E. When the running time over 99:59 minutes, treadmill do not stop, time will clear and will re-
start from zero.
2. “Mode”:
A. Press “Mode” key, the window will start blinking to advise you to select the mode being
“ time ,distance, calories”, adjust the setting by the key “speed +” & “speed - ”,press “start”
key to enter the mode and treadmill will start to run.
B. Treadmill will record the parameter and window will refresh showing the current data,
C. Press the “stop” button, treadmill will stop slowly.
D. Treadmill stop running and display will show “END” when the training exercise reach to your
setting value.
3. “Prog.”:

10
System including 9 built-in program (see below chart)
A. When standby, press the button “Prog”, distance window will show “POX”, time window
blinking displayer, you can adjust the setting value of time by “speed +” “speed - ”,press the
“start” key and treadmill will start.
B. Treadmill will record the parameter and window refresh showing the current data,
C. Press the “stop” button, treadmill will stop slowly.
D. Treadmill stop running and displayer show “END” when finished the setting value.
Window display for the above are:
Item
Initiatory
Initiatory default setting
setting limits
Setting Range
Time(M:S)
0:00
30:00
5:00-99:00
0:00-99:59
Speed (KM/H)
0
N/A
N/A
1.0-14
Distance (KM)
0:00
1.00
1.00-99.00
0.00-99.9
Heart rate(M)
P
N/A
N/A
40-199
Calorie(C)
0
50
20-999
0-999
Preset Program:
Each program is divided into 10 segments, each time segment has the equivalent speed, details
as follow chart.
Note:To reset all values, disconnect and reconnect the SAFETY KEY.
Note: This is a guide only and performance will depend on the fitness and condition
(health) of the person using the treadmill.
Time
Program Set / 10 = the time on each segment
1 2 3 4 5 6 7 8 9 10
P1
SPEED
3
3
6
5
5
5
4
4
4
3
INCLINE
1
2
3
3
1
2
2
3
2
2
P2
SPEED
3
3
4
4
5
5
5
6
6
4
INCLINE
1
2
3
3
2
2
3
4
2
2
P3
SPEED
3
3
5
6
7
8
6
4
3
3
INCLINE
1
2
2
3
1
2
2
2
2
1
P4
SPEED
3
6
6
6
8
8
8
3
3
3
INCLINE
2
2
3
3
2
2
4
6
2
2
P5
SPEED
2
5
6
7
8
8
7
7
3
3
INCLINE
1
2
4
3
2
2
4
5
2
1
P6
SPEED
2
10
10
8
8
7
3
3
2
2
INCLINE
2
2
6
2
3
4
2
2
2
1
P7
SPEED
3
4
5
6
7
8
7
6
4
3
INCLINE
4
5
6
6
9
9
10
12
6
3
P8
SPEED
3
8
6
9
8
8
8
3
10
3
INCLINE
3
5
4
4
3
4
4
3
3
2
P9
SPEED
2
4
6
8
8
8
7
7
3
3
INCLINE
3
5
3
4
2
3
4
2
3
2

11
Physical fat test
(
FAT
)
Under the condition of standby, you can enter into FAT test system by pressing the
“program” button,The window will display “FAT”. You can set the parameter by pressing
“model” button( 1--gender, 2-age ,3-height, 4-weight) ,You can reset the data by
pressing “SPEED+”,“SPEED-”.It will display “5” after setting, Hold the handle pulse to
check the height and weight whether reach the standard. The physical test is only
measuring the relation between height and weight, not body proportions,FAT can suit
male and female, It offers information with other health indicator. 18-23, means too thin
once below18, it means too fat among 23 to 28, it would be obesity once you exceed 29.
Specification range as follows.(The data only for reference, not for medical use.)
01 Sex 01 male 02 female
02 Age 10------99
03 Height 100----200
04 Weight 20-----150
05 FAT ≤18 under weight
FAT = (18---23) Normal weight
FAT = (23---28) Over weight
FAT ≥29 Obesity
Folding & Unfolding & Moving
Folding / Unfolding
Your treadmill can be folded up to save space when not in use. Stand behind the treadmill and
begin to raise the deck.
a) Before folding the treadmill, make sure the treadmill is off power and unplugged from
the socket.
b) When the unit was folded as photo, please put it down according to below introduction:
Please hold the frame (part A),pull out the spring pull pin(show as below photo)put
down the running board until you hear a “CLICK”. It is FINISHED.
C) If you need to fold the treadmill, please follow the below introduction.
Hold the frame, pull out the spring pull pin , Uplift the running board until you hear a“CLICK”
It is Finished.
Moving
While moving the treadmill, the user must make sure that:
1.It is in the lowest incline position;
2.The power is turned off;
3.The plug is pull out of the socket;
When the above 3 points are completed, user
Should hold the end of running board, lift the
treadmill forward or backward to the suitable
location, then slowly lay the deck down on ground.

12
WARNING: To prevent injury, make sure you have a firm hold of the deck before
folding or building.
NOTE: Do not hold the belt as it may slip during the lifting process.
WARNING: To prevent injury, ensure the deck is securely locked in position, before
attempting to move the treadmill.
WARNING: To prevent injury, ensure the deck is securely locked in position, before
attempting to move the treadmill.
WARNING: Unplug the treadmill before moving.
WARNING: To prevent injury, keep the children away from the treadmill.
FAQ
※
Main body
Problem
Possible reason
Method
Treadmill don’t
work
a. Unplugged
Plug it into the socket
b. Safety key is
not in place.
Place the safety key in
place on the console.
Treadmill don’t
work
c. Signal cable is
disconnected or
connected
improperly.
Check the input signal cable
of the console and other
signal cable.
d. Power is not
turned on
Check the power cable.
e. Fuse blew out.
Replace a new fuse.
The moving of
running belt is
not smooth.
a. Lubrication is
not enough.
Add to some lubrication.
b .Running belt is
too tight
Adjust the running belt.
Running belt is
slipping.
a. Running belt is
too loose.
Adjust the running belt
b. Driving Belt is
too loose.
Adjust the driving belt.

13
※
Console
Error
code E01 E02 E03 E04 E05
E06
1:E01:
A: E01: Communication error between the console and controller when start machine.
B: Solution:
Check the 4 core wire connection between console and the controller whether
unconnected or damaged. if the connecting line is firm, replace the IC board or the
controller board to check whether it is the problem of the controller, or not, replace the
console or IC if also appears E01.
2:E02:
A: E02: Controller does not detect the voltage of the wires of DC motor
B: Solution:
Check the positive and negative wires on the motor to see if the connection is firm with
the terminals of controller. if connection is ok, please check all the components of
controller to see if there is any damaged like power tube, or replace the controller or
motor.
3:E03:
A: E03: the controller cannot detect the speed feedback signal when motor running.
B: Solution:
1)check the motor to see if it starts, if it runs but then stops and shows E03, Please check
whether the optical sensor is plugged disconnected or damaged. If all is in order
change the optical sensor or replace controller and IC board.
2)If the motor does not run and shows E03 when starting, please check whether the motor
is jammed or damaged..
4:E04:
A: Incline self-learning fault
B: Check incline motor sensor wire and AC wire are inserted correctly; AC wire is correctly
inserted according to the identify in the incline motor; make sure the incline motor wire is
not damaged; after checking, press the button on controller, then start self-learning
again.
5:E05:
A: E05: The current is larger than the current protection when the motor is running
B: Solution:
Check whether the motor is abnormal or damaged; check whether there is any objects
under the running belt、roller lead the rotational resistance increase. If there’s no problem,
please replace the controller.
If any other questions, please ask help from local distributors or our after-sales service
department.
5:The console display “— — —”:
A: “— — —”stands for the console cannot received the signal from the safety lock.
B: Solution: Check the safety magnet is in the correct position. Open the console cover, Check
the safety switch line if plug is firm, Safety switch board is damaged or Safety switch fixed
position is offset.

14
Maintenance
Advice of Lubrication
After using the running belt for a period of time, the running belt must be lubricated by special lubrication.
Less than 3 times per week: once every 5 months
From 4 to 7 times per week: once every 2 months
More than 7 times per week: once every month
Note: Moderate volume of lubrication is needed to increase the life span of the treadmill, but instead of
excess
How to add Lubrication
a. Check the lubrication: Stop the treadmill and fold it up, user could check the
underneath center of the running board. If it feels damp that is OK. Otherwise you
should add some lubrication.
b. Add the lubrication: Simply lift up the running board and spray the lubricant between
running belt and the underneath of the running board.
b. After adding, put down the running board and start the treadmill with the speed 1Km/h for
several minutes to enable the belt to absorb the lubrication.
Guidelines
Conditioning Guidelines
The following guidelines will help you to plan your exercise program. Remember that proper
nutrition and adequate rest are essential for successful results.
WARNING: Before beginning this or any exercise program, consult your doctor. This is
especially important for people over the age of 35 or those with health problems.
WHY EXERCISE?
Exercise has been proven essential for good health and general wellbeing. Regular
exercise will:
• Relieve tension and stress
• Provide enjoyment and fun
• Stimulate the mind
• Help maintain stable weight
• Control appetite
• Boost self-image
• Improve muscle tone and strength
• Improve flexibility
• Lower blood pressure

15
5
• Relieve insomnia
Beginners Guidelines
If you’re beginning an exercise program, you should check with your doctor if:
You have been diagnosed with heart problems, high blood pressure or other medical
conditions.
You have not exercised for over a year.
If you are over 35 and do not currently exercise.
You are pregnant.
You have diabetes.
You have chest pain, or experience dizziness or fainting spells.
You are recovering from an injury or illness.
WORKOUT TIPS
Always perform stretching exercises both before and after your workout.
Start slowly, doing too much or too soon can lead to injuries.
If you are sore or tired, give yourself a few extra days to recover.
HOW TO BEGIN
Start with two or three 15 minute sessions per week with a rest day between work-outs.
Warm-up for 5 to 10 minutes with gentle movements like walking or swinging your arms in a
circle and then stretch the muscles that you’ll use during your workout.
Increase the pace and resistance to a little harder than comfortable and exercise as long as you
can. You may only be able to exercise for a few minutes at a time, but that will change quickly if
you exercise regularly.
End each workout with a 5-minute cool down period at a gradually reducing pace. You should
then stretch the muscles you’ve just worked to prevent injury and cramp.
Increase your workout time by a few minutes each week until you can work continuously for 30
minutes per session.
Don’t worry about distance or pace.
For the first few weeks, focus on endurance and conditioning.
Stretching Tips
Before running, user should do 5-10 minute’s warm-up exercise
as followings:
Toe touches
Slowly bend forward from your waist, letting your back and
shoulder relax as you stretch toward your toes. Reach down
as far as you can and hold for 15 seconds.
Hamstring stretches
Sit with your right leg straight in front of you. Straighten your
leg out while trying to hold on to your outstretched leg with
your hand. Starting up with your back straight. Slowly exhale
and try to bring your chest to the knee of your outstretched
leg. Hold, then repeat on the other side for 15 seconds.
Calf/Achilles stretch
Lean against a wall with your left leg in front of the right and your
arms forward. Keep your right leg straight and the left foot on
the floor; then bend the left leg and lean forward by moving
your hips toward the wall. Hold, then repeat on the other side
for 15 seconds.
Quadriceps stretch
With one hand against a wall for balance, reach behind you and
pull your right foot up. Bring your heel as close to your buttocks
as possible. Hold for 15 counts and repeat with left foot up.

16
Inner thigh stretch
Sit with the soles of your feet together with your knees pointing
outward. Pull your feet as close into your groin as possible.
Gently push your knees toward the floor. Hold for 15 counts.
Please retain you receipt as proof of purchase
For all After Sales Service enquiries please contact:
http://au.corporate.johnsonhealthtech.com/content/support
Tempo Fitness Cardio
Frame 5 years
Drive Motor (Tread Only) 2 years
Generator (Bike, Elliptical) 2 years
Parts 1 years
Labor 1 years
WARRANTY:
SERVICE:

AUTHORIZED TEMPO FITNESS DISTRIBUTOR
Johnson Health Tech Australia
78 Logis Boulevard
Dandenong South VIC 3175
johnsonhealthtech.com.au
© 2018 Johnson Health Tech Australia.
All Rights Reserved.
Product specifications subject to change without notice.
Table of contents
Other JOHNSON HEALTH TECH. Treadmill manuals

JOHNSON HEALTH TECH.
JOHNSON HEALTH TECH. TP-HB-8306N User manual

JOHNSON HEALTH TECH.
JOHNSON HEALTH TECH. Matrix T101-05 User manual

JOHNSON HEALTH TECH.
JOHNSON HEALTH TECH. HORIZON T5.1 User manual

JOHNSON HEALTH TECH.
JOHNSON HEALTH TECH. Matrix 5x User manual

JOHNSON HEALTH TECH.
JOHNSON HEALTH TECH. T8000E User manual