Jon-Don PM-EZS-EA User manual

© 2013 Copy Rights Reserved Jon-Don, Inc.
Safety, Operation and Maintenance
Manual with Parts List
Please read before use!
100 CFM, 804 Watt Motor
Important Information and Safety Instructions
Register your Machine at www.jondon.com
Serial No:
EZ Spot Extractor
REGISTER
YOUR
MACHINE
ONLINE!
Reliable Power
Fastest Pick-Up
Safe & Easy to Use
Innovative Design
Super Lightweight
Patented Features
Model No. PM-EZS-EA
Please ll out the following information:
Model No:
Serial No:
Distributor Name:
Distributor Phone No:
Date of Purchase:
EZ Spot Extractor
By Jon-Don, Inc.
400 Medinah Road, Roselle, IL 60172
Phone: 800-556-6366 | Fax: 888-344-6878
www.jondon.com

(2) 3-Gallon Spot Extractor 3-Gallon Spot Extractor (11)
Dear Valued Customer,
Congratulations on the purchase of your 3-Gallon Spot Extractor carpet and upholstery
machine! The world of carpet cleaning is becoming more high-tech and competitive and
we strive to provide you with the most innovative products. Our Spot Extractor is yet
another example of this, bringing a new dimension to carpet and upholstery cleaning with
its cutting-edge features, quality and value.
Please review this manual, paying careful attention to the Safety Instructions section.
Keep in mind that any unnecessary damage, neglect or abuse of this machine will void
your warranty. You can be condent that simple maintenance will ensure that your Spot
Extractor provides quality performance for many years to come.
If warranty questions arise, please consult your manual or contact your distributor.
Should you have any questions regarding maintenance, replacing parts or ordering parts,
please call an authorized distributor.
Before you begin using your Spot Extractor, thoroughly review the Owner’s Manual.
Again, congratulations on the purchase of your 3-Gallon Spot Extractor carpet and
upholstery machine!
8.0 Machine Parts List
Drawing No. Item ID Item Description Qty. Needed
1 SP-3-ST-BLKGRAN Black Granite 3-Gallon Solution Tank 1.00
2 SP-3-R-BLUGRAN 3-Gallon Recovery Tank - Blue Granite 1.00
3 10-0383 6-32 x 1/4” Phil Pan Screw 6.00
4 10-0400-D Latch for Sniper 1.00
5 10-0412 C-Channel for Spotter Handle 2.00
6 10-0414 Rivet for Spotter Handle 4.00
7 10-0384 .125 Thick Nylon Washer 4.00
8 10-0385 .06 Thick Nylon Washer 4.00
9 10-0074 Flat Washer #8 SAE 5.00
10 10-0216 Allen Head Screw for Backpack 4.00
11 10-0379 8-32 x 3/8” Screw 4.00
12 10-0405 1-1/2” PVC SCH40 Slip Thread 1.00
13 10-0302-A Hatch Cover Gasket for Spotter 1.00
14 10-0416-A 1-1/2” Black ABS Stand Pipe 0.60
15 10-0304 Spotter Cap and Float Assembly 1.00
16 10-0419 Screw for Spotter Hatch 6.00
17 SP-3-H-BLK 3-Gallon Spotter Black Handle 1.00
18 10-0406 Nylon Barb 90 1/8” NPT 1/4” 2.00
19 80-0017-2 Bulk Head tting for Spotter 1.00
20 10-0403 1/8” Brass Female Coupler 1.00
21 10-0402 1/8” Male QD 1.00
22 10-0434 Threaded Hose for Spotter 2.50
23 10-0407 1/8” Strait Nylon Barb NPT 4.00
24 10-0845-2 1/8” Strainer for Spotter 1.00
25 10-0300 55 psi Pump for Spotter 1.00
26 10-0301 L Bracket for Spotter 1.00
27 10-0435 Oetiker Clamp 4.00
28 10-0303 Roller Blade Wheel for Spotter 2.00
29 10-0387 5/16” x 1” Spotter Wheel Bolt 2.00
30 10-0022 Shoulder and Waist Belt Screw 1.00
31 10-0017 Deector Screw 1.00
32 10-1028 Bottom Base Plate for Spotter 1.00
33 10-0492 Screw for Plates on Spotter 2.00
34 10-0014 Motor Screw 2.00
35 10-0380 10-32 x 3/8” Screw 2.00
36 10-1024 Motor Mount Plate for Spotter 1.00
37 10-0354 3-Gallon Spotter Motor 1.00
38 10-0386 Stamped Motor Screen 1.00
39 10-1030 Spotter Motor Gasket 1.00
40 10-0027-A Strain Relief Nut 1.00
41 10-1026 Switch Plate for 3-Gallon w/ Heat 1.00
42 10-0027 Pigtail Strain Relief 1.00
43 10-0448 20-Foot Spotter Cord 1.00
44 10-0025 On/Off Switch 2.00
45 10-0400-C Keeper Latch for Spotter 1.00

(10) 3-Gallon Spot Extractor 3-Gallon Spot Extractor (3)
7.0 Machine Schematic Drawing
Table of Contents
New Equipment Warranty.................................................................................4
Returned Material Authorization (RMA) Procedure ........................................5
1.0 Safety Instructions .....................................................................................5
2.0 Set-Up / Prepare Unit for Use....................................................................5
3.0 Problem Solving.........................................................................................6
4.0 Grounding Instructions ..............................................................................7
5.0 Wiring Diagram .........................................................................................8
6.0 Hoses and Hand Tool Drawing and Parts List. ..........................................9
7.0 Machine Schematic Drawing...................................................................10
8.0 Machine Parts List ...................................................................................11

(4) 3-Gallon Spot Extractor 3-Gallon Spot Extractor (9)
New Equipment Warranty
Lifetime on roto-molded body, 5-years on vacuum motor, pump and all electrical parts.
Warranty Policy
All equipment is inspected and tested before shipping from the manufacturer. All
parts are warranted to be new and free from defects in workmanship and material,
under normal use to the original retail purchaser. This warranty limits manufacturer’s
liability for defects in workmanship or materials for replacement of defective parts only.
Manufacturer accepts no liability for incidental or consequential damages arisen from
the use of any equipment, defective or not. This warranty is in lieu of all expressed or
implied warranties and is extended only to the original retail purchaser. Manufacturer
sales and service representatives are not authorized to waive or alter the terms of this
warranty, or to increase the obligations of the manufacturer under the warranty. Parts
replaced or repaired under this warrant are warranted for the remainder of the original
warranty period.
Freight charges and travel charges to and from the service provider shall be covered for
ninety (90) days from the purchase date. After the ninety (90) day period, these freight
charges shall be paid by the equipment owner, subject to manufacturer discretion. Certain
circumstances may require additional consideration. No travel charges shall be covered
after ninety (90) days.
Manufacturer covers up to 1-year (365 days) of service labor at manufacturer’s calculated
hourly labor rate/repair time when performed by a manufacturer’s authorized service
provider. Ultimately, labor reimbursement costs are at the discretion of the manufacturer.
After 1-year, original retail purchaser is responsible for all labor costs with no
manufacturer reimbursement.
Manufacturer charges a 15% restocking fee for any items that are being returned to stock.
Items must be new, unused and free of damage. Only good for up to 1-year (365 days).
After 1-year, manufacturer does not accept the return of any item(s) for a reimbursed
price.
Authorized warranty replacement parts need to come directly from the manufacturer. Any
use of any other parts will void warranty. Jon-Don, Inc. does not reimburse for parts used
by the customer that were not supplied directly for the machine under warranty.
6.0 Hoses and Hand Tool Drawing and Parts List
Schematic Drawing
Parts List
Drawing No. Item No. Item Description Qty. Needed
1 10-0505 4” Stainless Steel Hand Tool
with Clear View Head 1.00
2 10-0463 Black Slip Hose Cuff for Spotter 2.00
3 50-1007 7-Foot Black Hose for Spotter 1.00
4 10-0474 1/8” Female QD for Spotter 1.00
5 10-0475 Solution Hose for Spotter 1.00
6 10-0388 Velcro Strap 1.00
7 10-0402 1/8” Male QD for Stainless Steel Hand Tool 1.00
8 10-0403 1/8” Brass Female Coupler 1.00
9 10-0506 Valve Clamp for Stainless Steel Hand Tool 1.00
10 10-0504 Valve for Stainless Steel Hand Tool 1.00
11 10-0502 Jet for Stainless Steel Hand tool 1.00

(8) 3-Gallon Spot Extractor 3-Gallon Spot Extractor (5)
5.0 Wiring Diagram
CAUTION – Electrical wire colors may vary. Determine start and end point of
each wire to conrm connection point.
Returned Material Authorization (RMA) Procedure
Original purchaser must contact the manufacturer to follow correct RMA/warranty
procedures. Must include a copy of RMA Sheet enclosed in the box with returned item.
No returns shall be authorized unless the proper RMA procedures are followed. It is the
responsibility of the distributor to repair the customer’s equipment as soon as possible. If
the distributor does not have the facilities to repair the equipment, it may be shipped or
taken to an authorized service center for repair.
Customer must contact the manufacturer prior to working on or changing out any
parts, etc. Manufacturer must issue an RMA Sheet containing approved labor time and
replacement parts. Do not send parts or equipment back to manufacturer without an RMA
Number and approval. No labor will be paid for, nor part costs paid for or reimbursed
that have not been previously approved by the manufacture. All warranty work must
be approved and authorized to qualify and appropriate warranty procedures must be
followed.
1.0 Safety Instructions
WARNING: PLEASE READ AND SAVE! FOLLOW THESE PRECAUTIONS
WHEN USING YOUR SPOT-XTRACT.
• DO NOT operate this unit if any part of the unit appears to be damaged.
• DO NOT operate if ground plug is broken.
• DO NOT operate if the unit is in standing water.
• DO NOT use volatile substances or operate where volatile substances exist.
• DO NOT service while unit is running or connected to electricity. Unplug the unit!
• DO NOT use water more than 120 degrees Fahrenheit.
• DO NOT use solvents with this unit.
• DO NOT use as a dry vacuum.
• DO NOT use unit unless completely assembled.
• Use only liquid detergents. Powders do not fully dissolve and damage motor.
• Always us defoamer. Foam will suspend moisture particles that damage motor.
2.0 Set-Up / Prepare Unit for Use
DO NOT EXPOSE TO RAIN. STORE INDOORS.
• All spot extractors – no matter what the time of year – are shipped with antifreeze
in the pump and solution lines. Prior to rst use, ll the tank with one quart of warm
water. Attach the hose and using the hand tool, ush out the system by spraying the
one quart of water through the pump.
• Attach the 1-1/2 inch vacuum hose and the brass quick disconnect.
• Fill the base unit (the recovery tank must be removed) with warm water (less than
100 degrees Fahrenheit). Fill to approximately 4 inches from the top. Use a liquid
detergent made for carpet cleaning or upholstery. Read and mix to the dilution ratios
as directed.

(6) 3-Gallon Spot Extractor 3-Gallon Spot Extractor (7)
2.0 Set-Up / Prepare Unit for Use Continued
• NEVER run the vacuum only with the pump on for more than 3 minutes. Water/
solution needs to run through pump at all times to keep the pump cool while in use.
Failure to do so will void the warranty.
• Be sure to replace any lters back into the machine prior to use.
• Do not use citrus acid, buterol or harsh degreasers inside the machine.
Vacuum Shut-Off
The spot extractor is designed with a vacuum restrictor to reduce
the vacuum when the recovery tank is full. When the vacuum is
restricted, the liquid will not travel up the nozzle of the hand tool.
The motor speeds up (the sound of the motor will change) and this
is your warning to dispose of recovered solution. The restrictor is a
foam oat that slides up and down the vacuum tube in the recovery
tank as shown in the photo to the right.
Following Each Use
Remove the vacuum hose from the upper body, un-clip,
rotate latch on the back of the unit and remove the upper
section of the spotter. Dispose of the used solution by
pouring the solution out of the vacuum inlet (not the
hatch cover) into the toilet or janitor’s closet sink.
3.0 Problem Solving
Never operate this spot extractor when the equipment is not performing as expected
or when any part is visibly damaged. When repair is needed, take the equipment to an
authorized service center.
Spotter will not run
• Check power connection. Move the grounded plug to an outlet that is working. Verify
that the plug is working by plugging in another electrical component such as lamp,
hair dryer or drill.
• Inspect the power cord for damage.
Loss of vacuum
• Make sure the oat is at the bottom of the unit. Open the screw cap and push the oat
down.
• Check that the hose cuff is securely attached to the front of the extractor.
Loss of solution pressure
• Verify that the pump is on. Remove jet from end of hand tool and press trigger on
wand.
• Clean the solution intake in the solution tank. Check quick-disconnect for debris.
• If pump is still not working, seek authorized repair services.
4.0 Grounding Instructions
DANGER: IMPROPER GROUNDING METHOD CAN RESULT IN A RISK OF
ELECTRIC SHOCK.
Electrical equipment must be grounded. If the machine should malfunction or breakdown,
grounding provides a path of least resistance for electrical current to reduce the risk
of electric shock. The spot extractor is equipped with a cord containing a grounding
conductor and grounding plug. The plug must be inserted into an appropriate outlet that is
properly installed and grounded in accordance with all local codes and ordinances.
If repair or replacement of the cord or plug is necessary, DO NOT connect the grounded
wire to a at bed terminal. The grounding wire is the wire with insulation and an outer
green surface, with or without yellow stripes.
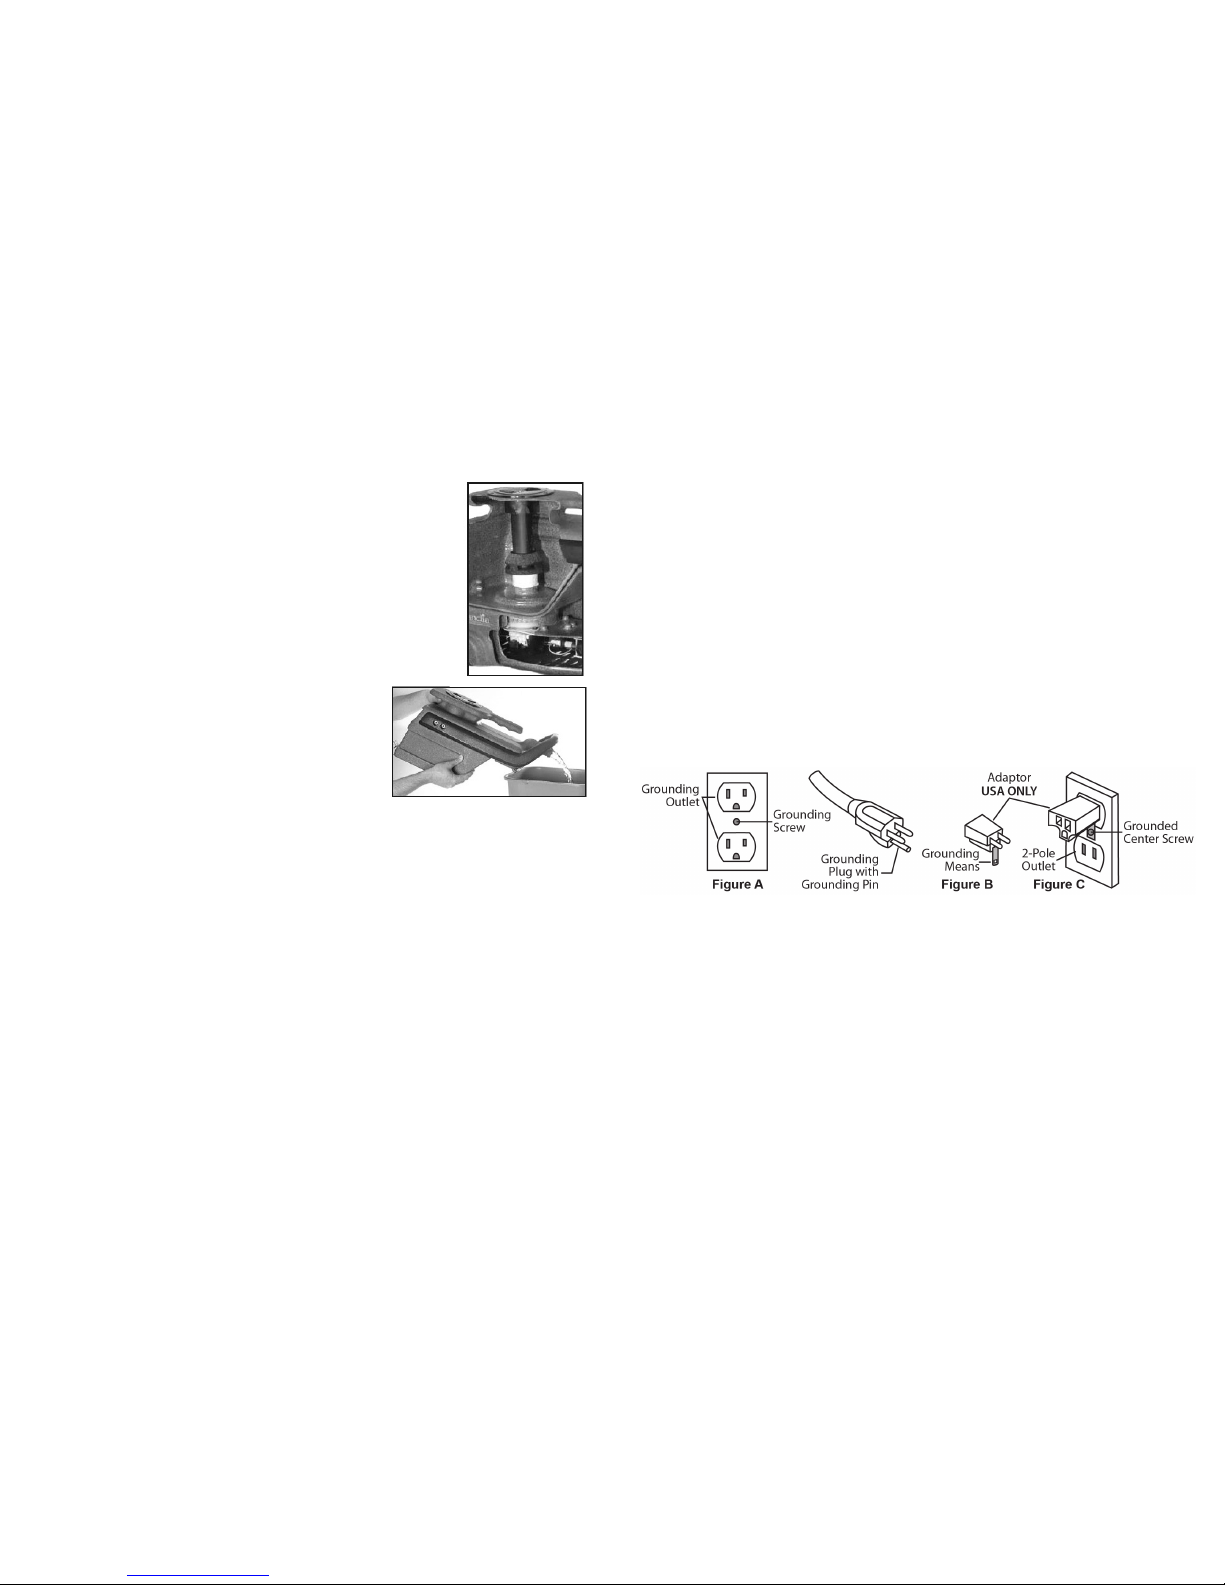
Grounding Method
The electric equipment is for use on a normal 120 volt circuit. It has a grounded plug
that ts the outlet illustrated in Figure A. If a properly grounded outlet is not available,
a temporary adapter, such as the adapter illustrated in Figure B and C, may be used to
connect the plug into a 2-pole outlet, as shown in Figure C.
The temporary adapter should be used only until a properly grounded outlet, Figure A,
can be installed by a qualied electrician. The green colored rigid ear lug or grounding
means extending from the adapter must be connected to a permanent ground, such as
a properly grounded outlet box cover. Whenever the adapter is used, it must be held in
place by its grounding means and a metal screw, as shown in Figure C.
WARNING:
Improper connection of the equipment grounding conductor can result in a risk of electric
shock. Check with a qualied electrician or service person if you are in doubt as to
whether the outlet is properly grounded. DO NOT modify the plug provided with the
equipment. If it will not t into the outlet, have a proper outlet installed by a qualied
electrician.
NOTE: In Canada, the use of a temporary adapter is not permitted by the Canadian
Electrical Code.
Table of contents
Other Jon-Don Floor Machine manuals
Popular Floor Machine manuals by other brands

Motor Scrubber
Motor Scrubber M3 user manual

Tennant
Tennant F6 Owner/operator and parts manual

Kärcher
Kärcher BR 530 BAT operating instructions

Tennant
Tennant 5500 Complete Operator and parts manual

U.S. Products
U.S. Products COBRA-300H operating instructions

Powr-Flite
Powr-Flite Predator PAS20 Operators manual and parts lists