Journey Perfect Sleep Chair User manual

PRODUCT MANUAL
®
®
www.shopjourney.com

2
®
SAFETY GUIDELINES
2
Safety Guidelines
The symbols below are used in the owner’s manual and/or on the product
to identify warnings and notify you of important safety information. Make sure
you read and understand them completely.
WARNING! Indicate(s) a hazardous situation which, if not
avoided, could result in death or serious injury. This icon is
represented as a black symbol on a yellow triangle with a
black border.
MANDATORY! Failure to perform mandatory actions could
cause personal injury and/or equipment damage. This icon
is represented as a white symbol on a blue dot with a white
border.
PROHIBITED! Indicate(s) an action(s) that should not be
performed under any circumstance. Failure to adhere could
cause personal injury and/or equipment damage. This icon is
represented
as a black symbol with a red circle and red slash.
Safety Symbols
The symbols below identify warnings, mandatory actions, and prohibited
actions. They can be found in the owner’s manual and/or on the product. Make
sure you understand all safety labels before operating the product. Do not remove
safety labels from your product.
Read and follow
owner’s manual!
Pinch/Crush Point
Hazard!
Transformer
Crush Hazard!
Fire Hazard!
Child and/or Pet
Crush Hazard!
Adult, Child and/
or Pet Tip Over
Hazard!

3
®
SAFETY GUIDELINES
3
Safety Guidelines
Class II Device!
Indoor use only!
Do Not Smoke!
Electrical hazard!
Do not dispose in trash!
Batteries required!

4
®
WARNING
4
MANDATORY
READ THIS MANUAL FIRST BEFORE INSTALLING
OR OPERATING YOUR PERFECT SLEEP CHAIR.
Your chair has been engineered from the leg levelers up to
provide the ultimate in strength and reliability. Great care has been taken
to provide you with total comfort and safety. Journey Health & Lifestyle
thoroughly inspects and tests each unit prior to shipment.
WARNING
Your Perfect Sleep Chair is a medical device. Therefore, you are
required to exercise caution when operating it to ensure your
personal safety and that of others around you. The following
are rules for the safe operation of your Perfect Sleep Chair.
Care should be taken in the unpacking of this unit, so as not to
cause injury to persons or damage to the unit. Dispose of all plastic
bags and covers, as they can be a smothering hazard to small children.
Do not allow children or pets near the chair while the
chair is operating.
Do not allow children to play with or operate the
chair at any time.
Hand control should be unplugged and placed out of
the reach of children when the chair is not in use.
Do not flop down into the chair when getting into it, or while it is in
its lift position. Flopping down into the chair will damage it and could
cause personal injury.
Do not allow anyone to sit on your lap, or on the arm of the chair, or on
the footrest while in or operating the chair, as it may cause tipping and
could result in personal injury.
Do not place fingers or hands between the seat cushion and the inside
arm of the chair while sitting in the chair or when the chair is in
operation or plugged into a power source.
Do not retrieve fallen objects from inside or under the chair while the
chair is plugged into a power source.
Do not operate the chair if there are any persons,
pets or other obstructions under or in front of the
footrest, under the chair or behind the chair.
Do not position yourself, child and/or pet too high on
the chair while the chair back is reclined. This can
cause a tip over hazard. Make sure you are properly
fitted for the lift chair prior to operating the chair.

5
®
WARNING
5
Do not smoke while operating, sitting or resting in the chair.
To reduce risk of electrical shock, do not immerse any of the
electrical components into a liquid, or spill any liquids onto electrical
components. Do not open any of the electrical components. There are
no serviceable parts.
Warranty will be void if any of the electrical components are opened by
other than a qualified service person.
Make sure the chair is placed at the specified distance from a wall/
corner (page 7). Failure to do so can damage the chair and will void
the warranty.
Do not use any type of electrical extension cord to plug your
chair into an electrical outlet. Make sure that all electrical
products and their wires are positioned away from your chair
as the metal lift frame mechanism could crush them and
create a fire hazard and/or may cause personal injury.
Do not operate your lift chair while intoxicated or taking medications
that impair your mental or physical abilities to operate the chair safely.
Consult with your doctor about any medications you are taking that
may affect the safe operation of the chair.
Do not operate this product if you have any medical conditions that
result in limited, debilitating mental or physical capacity. You should
consult your doctor before using this product.
Consult with your physician regarding using the Trendelenburg
position.
Placing the lift chair in the center of a room or too far away from a wall
will create a tripping hazard, because the power wires for the lift chair
will be crossing main traffic areas in the residence.
Leakage from the 9 VDC backup batteries can result in property
damage. Periodically inspect and replace the batteries. Read the
“Battery Back Up System” and “Care and Maintenance” sections in
this manual.
If the lift chair user is unconscious or sleeping,the hand control
may inadvertently become activated in a way that may force the
user out of the chair.
Should you ever encounter a problem with the operation of
your Perfect Sleep Chair, discontinue all use of the product upon
discovery of the problem. Contact Journey Customer Service to
arrange service.
Exceeding the stated weight limit listed in this manual can result
in instability of the chair, causing a potential tip over hazard.

6
®
WARNING
6
Consult the owner’s manual of the chair and a physician to determine if
you are capable of moving or lifting the chair, as this will cause serious
injury if not done properly.
Verify that all objects including hands and fingers are not between
the arm of the chair and the open compartment before closing the
compartment as this will result in property damage or serious injury.
This is an electrical device and will be impacted by any power failure.
To operate this chair properly, you must read and understand the
intended use of the product, and overall operation of the chair as
misuse, or lack of proper training may lead to serious injury.
Use extreme care when unpacking, assembling, and disassembling of
this unit, so as not to cause injury to persons or damage to the unit.

7
®
INSTRUCTIONS
7
L.E.D. light
L.E.D. light
From motor
To outlet
115-120V A.C.
DC Power
Bottom view of
Transformer
Transformer
Plug
Install two 9 volt batteries in
transformer for battery backup
(See page 10)
(batteries included for your
convenience)
Wall
Side
View
Corner
To p
View
26" 26" 26"
3. Place the chair in the desired
position in the room, keeping it 26"
away from the wall. If placing the
chair into a corner, keep it 26"
from the wall as shown.
INSTRUCTIONS FOR THE PERFECT SLEEP CHAIR
1. Remove the transformer from the transformer box (located behind the lower
outside back) and install two 9 volt alkaline batteries into the sockets on the
transformer. Place transformer on the floor behind the chair.
2. Plug the transformer into a 115-120V 60Hz A.C. outlet and connect the power
cable from the chair into the transformer as shown. Power cable is located under
the chair attached to the motor shaft with white zip tie. Remove zip tie, extend
cable under and out behind the chair.
4. Adjust the leg levelers on the bottom of the chair if necessary to level the chair.
Some high pile carpets can obstruct the footrest operation by rubbing against it.
Raise the levelers to a height above the pile.
Distance required from the wall when reclined:
Wall: 26 inches - Corner: 26 inches

8
®
AUTODRIVE
8
AutoDrive HAnD Control operAtion
1. Getting into your chair. While standing next to your chair, press button
(S7) and raise the chair to a height you can sit against. This height will vary
from person to person depending on the individual’s needs. Raise the chair
high enough so you do not have to flop down into the chair. Flopping down
into the chair will damage it and could cause personal injury. Press
button (S5). As the chair continues downward, adjust yourself into a position
that is comfortable to you. Continue holding button until chair is in the seated
position (chair firmly on the floor), then release the button. You can also press
buttons (S6, S8, S9, S10) and the chair will move to those positions.
2. Getting out of your chair. Press button (S7) and raise the chair to a height
that enables you to easily stand. Release the button. Return the chair to the
seated position (S5) (chair firmly on the floor) after getting out of the chair, so
children, pets or obstructions do not get under the chair. Repeat no. 1 when
you want to sit down.
MiCro ADjustMents
1. To recline the back of the chair,
press button (S1) and hold until the
back reaches the desired position.
Then release the button.
2. To bring the back of the chair to
an upright position, press button
(S2) and hold until the back reaches
the desired position. Then release the
button.
3. To raise the foot rest and seat, press
button (S3) and hold until the foot rest
reaches the desired position. Then
release the button.
4. To lower the foot rest and seat, press
button (S4) and hold until the footrest
closes. Then release the button.
Note: The motors are set to shut off
when they reach their fully extended
or fully retracted position if the
selected button is not released. If you
should go past your desired position,
select the button to bring you back to
your desired position. You can repeat
the process as often as you like.

9
®
PROGRAMMING
9
p
rogrAMMing
tHe
M
eMory
B
uttons
s5, s6, s8
AnD
s10
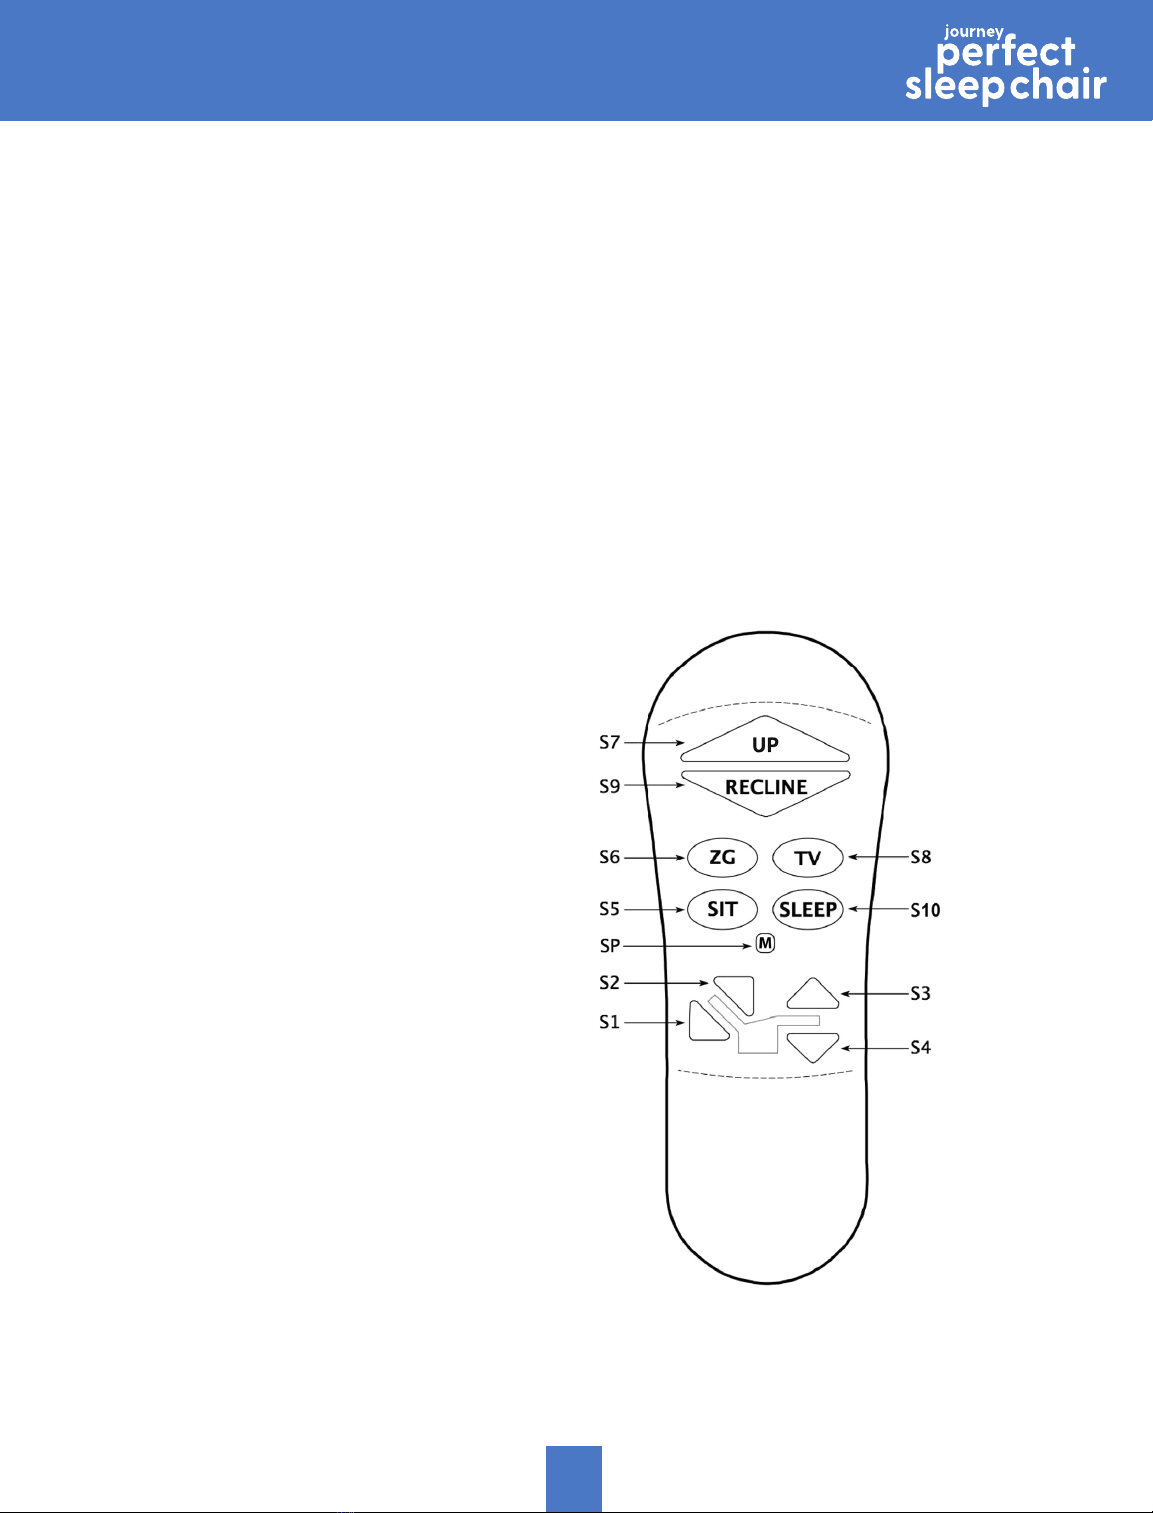
Press one of the preprogrammed buttons (S5, S6, S8, S10) and hold until the
chair stops. Press buttons (S1 thru S4) to micro adjust those positions to suit
your needs. Use the following procedure to reprogram (S5, S6, S8, S10) buttons
after you have the chair in your desired position.
1. Press and hold program button (SP). The back light goes off while pressed.
2. In about 3 seconds the backlight will start flashing (one flash)
3. Within 5 seconds, press one of the memory buttons (S5, S6, S8, S10) to save
the position to the button pressed. The back light will return to non-flashing
position indicating that the new position is stored.
If a programmable memory button is not pressed within 5 seconds, or a non-
programmable button is pressed, then the programming sequence is aborted and
you will need to repeat steps 1 to 3 above. You may reprogram the memory
buttons as often as you like.
FACtory reset
Resets all the programmed buttons (S5, S6, S8 and S10) back to the factory
settings.
1. Press and hold program button (SP). The backlight goes off while button is
pressed.
2. In about 4 seconds the backlight will start flashing.
3. Within 5 seconds, press button (S1). The backlight will change to non-flashing.
4. Within another 5 seconds, press button (S4). Factory reset is done.
If button (S1) is not pressed within 5 seconds, or a different button is pressed,
then the programming sequence is aborted and you’ll need to repeat steps 1 to
4 above.
HAnD Control DisABle
Hand control disable, disables all functions on the hand control.
1. To disable, press and hold the program button (SP) for 4 seconds until the
backlight starts flashing. Then press button (S7).
2. To enable, press and hold the program button (SP) for 4 seconds until the
backlight starts flashing. Then press button (S7).
FunCtion loCk
Should you ever want to limit the button function of your hand control, you can
use the function lock feature to disable all button function except for buttons (S7
and S9).
1. To lock function, press and hold the program button (SP) for 4 seconds until
the backlight starts flashing.
2. Press button (S1), press button (S2), press button (S3), press button (S6).
3. To unlock function, press and hold the program button (SP) for 4 seconds until
the backlight starts flashing.
4. Press button (S1), press button (S2), press button (S3), press button (S6).

10
®
BATTERY BACK UP SYSTEM
10
Battery Back Up System
Your Perfect Sleep Chair comes with a battery back up system so the chair can
return to the seated position in the event of a household power failure. A fresh
set of standard 9V batteries have enough energy to bring the chair to a seated
position from the recline position. The batteries do not have enough energy nor are
they intended to operate the chair for a prolonged period of time in the absence of
standard household voltage (120 volt, 60 Hz). Batteries should be replaced
after a single use. Batteries should be changed semi-annually (such as with
smoke alarm batteries). For your convenience, an initial set of batteries is
provided for your use. It is the user’s responsibility to ensure that fresh batteries
are used in the battery back up system. To help ensure the longest life of the
batteries, users are encouraged to not allow the remotes to become wedged in
between the seat cushions and the chair as this may activate the backlights on
the remote and create a slow drain of the batteries. (See installation page 7.)
Power Indication
Your Perfect Sleep Chair is equipped with a back lit hand control. This light
illuminates green when any button on the hand control is pressed
indicating power to the hand control.
Your Perfect Sleep Chair also comes with a power indicator light on the
transformer and on the power cord connecting the motor to the transformer.
The lights illuminate green constantly, indicating power from the outlet to the
transformer and the motor. The lights have been provided to help you identify
electrical disconnects, should they occur, and to help your provider to diagnose
electrical problems, should they occur.
Should the chair not operate and the lights are out, check all electrical connections
to the chair. Make sure everything is plugged in properly and there is power to
the outlet into which the chair is plugged (see installation on page 7 for electrical
connections). Should you ever encounter a problem with the operation of
your Perfect Sleep Chair and the lights are on, such as mechanical
problems or one light is out, discontinue all use of the product upon
discovery of the problem and contact Journey Customer Service. They will be
able to resolve problems and take care of proper factory service if needed. You
will need to be prepared to answer some basic questions about your chair, such
as model and serial number. The model and serial number are located on the back
of the hand control and the rear of the lift frame. Customer service will ask you
questions about your power indicator lights, such as which one is out. Prior
to calling customer service, check all the electrical connections to the chair.
Make sure everything is plugged in properly and there is power to the outlet
into which the chair is plugged (see installation on page 7 for electrical
connections).

11
®
WARRANTY
11
CONSUMER LIMITED LIFETIME AND SEVEN YEAR WARRANTY
PERFECT SLEEP CHAIR MODELS
Journey Health & Lifestyle warrants this chair to original consumer only, against defects in material
or workmanship as follows:
LIFETIME WARRANTY
Journey Health & Lifestyle warrants for the lifetime of the chair by the original consumer to repair or replace at
their option the Lift Mechanism, Chair Frame and Recline Mechanism. Labor to replace these parts is
subsidized on all models for three years.
Journey Health & Lifestyle,shall not be responsible or obligated to pay for any cost or expense for
examination of any warranted parts nor is Journey Health to pay for costs for transportation, handling and
packaging of the parts or components.
THREE YEAR PARTS WARRANTY
Journey Health & Lifestyle warrants the electrical parts of this chairagainst defects to original consumer only,
for a period of three years from the date of original purchase by a consumer. Labor to replace these parts is
subsidized for one year on all models.
We shall not be responsible or obligated to pay for any costs or expenses for examination of any
warranted parts nor is Journey Health & Lifestyle to pay cost for transportation, handling and packaging
of the parts or components.
LIMITED WARRANTY FOURTH THROUGH SEVENTH YEAR
During the period beginning with the expiration of the full three year parts warranty offered above and
continuing through the seventh year after date of original purchase by a consumer, we will warrant the
electrical parts on the following pro-rated basis. Year 4 earns a 35% discount off suggested retail price. Year
5 earns a 25% discount, year 6 a 15% discount and year 7 a 5% discount. By way of example, a part costing
$100.00 that needs replacement in year 4 would cost $65.00. Journey Health & Lifestyle shall not be
responsible or obligated to pay for any costs or expense for examination and/or service of any
warranted part or to pay for costs of transportation, handling and packaging of the chair and/or parts
or components.
TERMS APPLICABLE TO WARRANTY
We will, at our option, repair and/or replace the defective parts and/or components provided that the
warranty parts have not been subject to misuse, abuse or improper service by the consumer, have not been
damaged in transit or handling and/or have not been altered or repaired by unauthorized representatives.
This warranty does not include costs for unnecessary service calls, i. e., in-home service calls solely for the
purpose of educating the consumer about the product, or finding an unsatisfactory power connection, etc.
Exceeding the weight capacity of the chair will void the warranty. Fabric shading cannot be guaranteed for
replacement parts or replacement chairs.
The Perfect Sleep Chair weight capacity is 375 lbs.
WARRANTY EXCLUSION
Journey Health & Lifestyle does not provide warranty for the batteries. Batteries are a consumable item
that can drain, even without use, over time.
In the event that the product does not conform to this warranty at any time while this warranty is
in effect, w
w
e
e
will correct the defect in conformity with the Consumer Limited Lifetime and Seven
Year Warranty. THE LIMITED LIFETIME AND SEVEN YEAR WARRANTY SET FORTH ABOVE IS THE SOLE
AND ENTIRE WARRANTY PERTAINING TO THE PRODUCT AND IS IN LIEU OF AND EXCLUDES
ALL OTHER WARRANTIES OF ANY NATURE WHATSOEVER, WHETHER EXPRESSED, IMPLIED,
OR ARISING BY OPERATION OF LAW INCLUDING, BUT NOT LIMITED TO ANY IMPLIED
WARRANTIES OF MERCHANTABILITY OR FITNESS FOR A PARTICULAR PURPOSE. THIS WARRANTY DOES
NOT COVER OR PROVIDE FOR THE REIMBURSEMENT OR PAYMENT OF INCIDENTAL
OR CONSEQUENTIAL DAMAGES.
Some states do not allow this exclusion or limitation of incidental damages so the above limitation
or exclusion may not apply to you.
Journey Health & Lifestyle shall not be liable for any incidental or consequential damage or loss not
contained in this Warranty.
This warranty gives you specific legal rights, and you may also h ave other rights, which may vary from
state to state.
All warranty claims must be approved by Journey Health & Lifestyle before any service is performed.
Warranty is valid in all 50 states, Canadian Provinces and Puerto Rico.

12
®
CARE AND MAINTENANCE
12
#
CARE AND MAINTENANCE
Your Perfect Sleep Chair will require routine maintenance checks. By
following these maintenance checks, you can make sure your chair gives
you years of trouble-free operation. If you have any questions or
concerns regarding your chair’s care and maintenance, contact your
provider.
9Before cleaning your chair, consult customer service for the proper types
of cleaner and cleaning methods.
9Keep all electrical components free from moisture and liquid spills.
Intended for indoor use only.
9Periodically inspect all wiring harnesses to make sure they are not cut,
damaged, frayed, or disconnected. If damage of any type is present,
unplug the chair and contact your provider.
9Periodically check all fasteners for tightness, wear, and corrosion. If any
of these are present, unplug the chair and contact your provider.
Warning: Be careful of pinch points and sharp metal parts (wear
gloves).
9Replace the batteries after one use. Replace the batteries yearly, even if
they were not used. Batteries are intended for one use only!
PERFECT SLEEP CHAIR POSITIONS
Your Perfect Sleep Chair offers a wide range of body positioning, so you can
choose the position that best suits your needs. The Perfect Sleep Chair
accomplishes this by providing four primary motions: three recline, one
lift and combinations of those motions, allowing you to settle into your
favorite comfort position. Shown below are some of the positions. There are
many to choose from. You may stop your Perfect Sleep Chair at one of the
positions shown or anywhere in between just by releasing the buttons on the
hand control when the chair reaches the position you desire
Drawings are for illustration purpose only
TV Watching 1 Zero Gravity Like

13
®
FOR YOUR RECORDS
CAUTION
Do not allow children to play on this mechanized
furniture or operate the mechanism.
Leg rest folds down on closing so that a child could
possibly be injured.
Always leave chair in a sitting position. Keep hands
and feet clear of mechanism. Only the occupant
should operate it.
MSWARB-510-JH_04.19.2022
Please fill in your Perfect Sleep Chair information below. This
information will be useful in the event that you should ever need to
contact customer service concerning your chair.
Date of Purchase _____________________________________________
Model ______________________________________________________
Serial Number _______________________________________________
For your reCorDs
6800 Paragon Place, Ste. 520
Richmond, VA 23230
1-800-958-8324
www.shopjourney.com
®

If you have any questions, call us at our toll free number:
1-800-958-8324
®
or visit www.shopjourney.com
®
Other manuals for Perfect Sleep Chair
1
Table of contents
Other Journey Indoor Furnishing manuals
Popular Indoor Furnishing manuals by other brands

Multimo
Multimo SIMPLE 120 manual

Westfield
Westfield CHESTERFIELD 18301 Assembly instruction

Sauder
Sauder Boone Mountain 416562 manual

Wren Kitchens
Wren Kitchens BASE UNIT 600 Built Under Oven Housing Assembly guide

Sauder
Sauder 403785 Assembly instructions

fantastic furniture
fantastic furniture COMO manual

MARCKERIC
MARCKERIC CRIS 3P3H 11603 Assembly lnstructions

Walker Edison
Walker Edison BR36ELR4D Assembly instructions

Primacoustic
Primacoustic Saturna installation manual

Studio Designs
Studio Designs Paws & Purrs 61009 Assembly instructions

Lightolier
Lightolier Lytespan PLD120 specification

YOTRIO
YOTRIO Target Martti FRS60725 Assembly instructions