JUGS Sports JUGS Gun User manual

OWNERS MANUAL
SAVE THIS MANUAL
Instructions for
The JUGS Gun™
Sports Radar
Part No. R2050
Radar Gun Instructions.10-2018.indd 1 9/27/18 11:20 AM

Table of Contents
Welcome to JUGS Sports .............................................. 3
About This Manual .................................................... 3
1 Safety Information ............................................... 4
2 Receiving Inspection ............................................. 5
3 Getting Started ................................................6
3.1 Introduction .............................................. 6
3.2 Battery Charging ......................................... 6
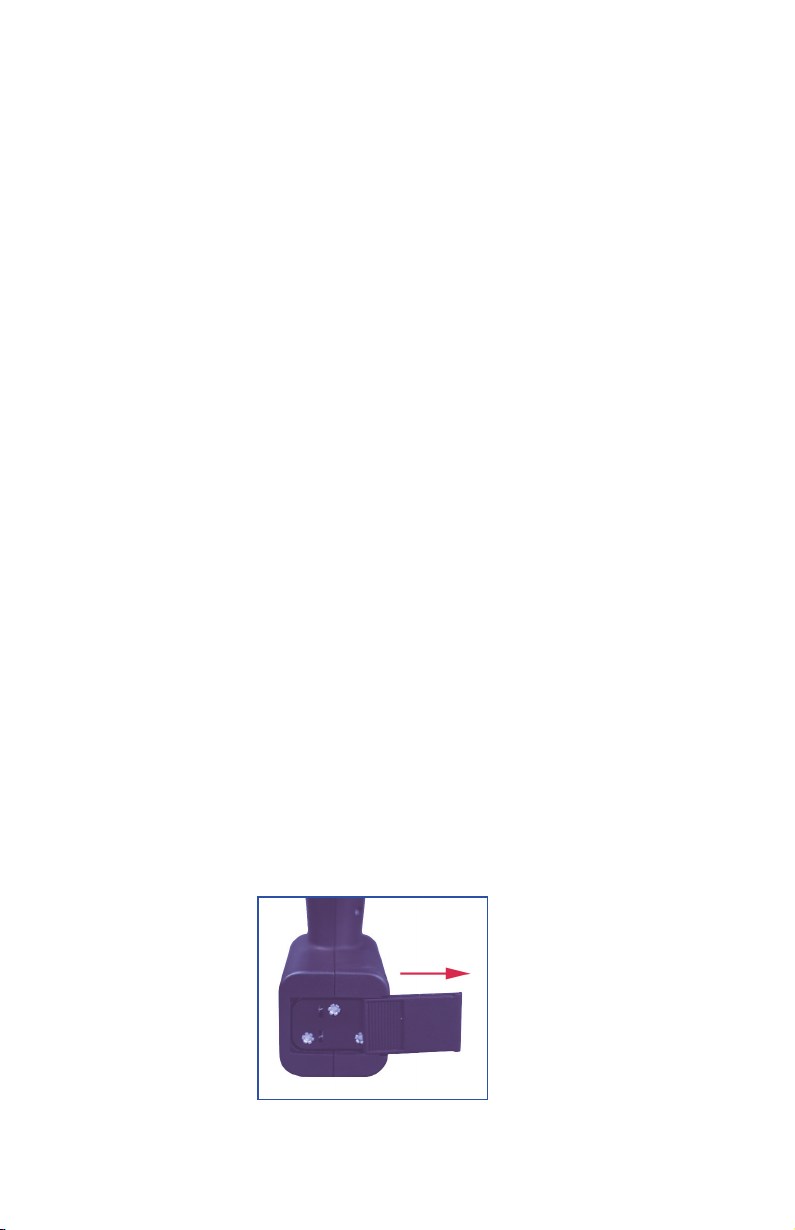
3.3 Removing The Battery Holder.............................. 6
3.4 Battery Installation ........................................ 7
3.5 Inserting The Holder Into The JUGS Gun™.................. 7
3.6 Charging The Batteries .................................... 8
3.7 Charging Status Indicator (LED)............................ 9
3.8 Battery Run Time .........................................10
3.9 Replacing Batteries ...................................... 10
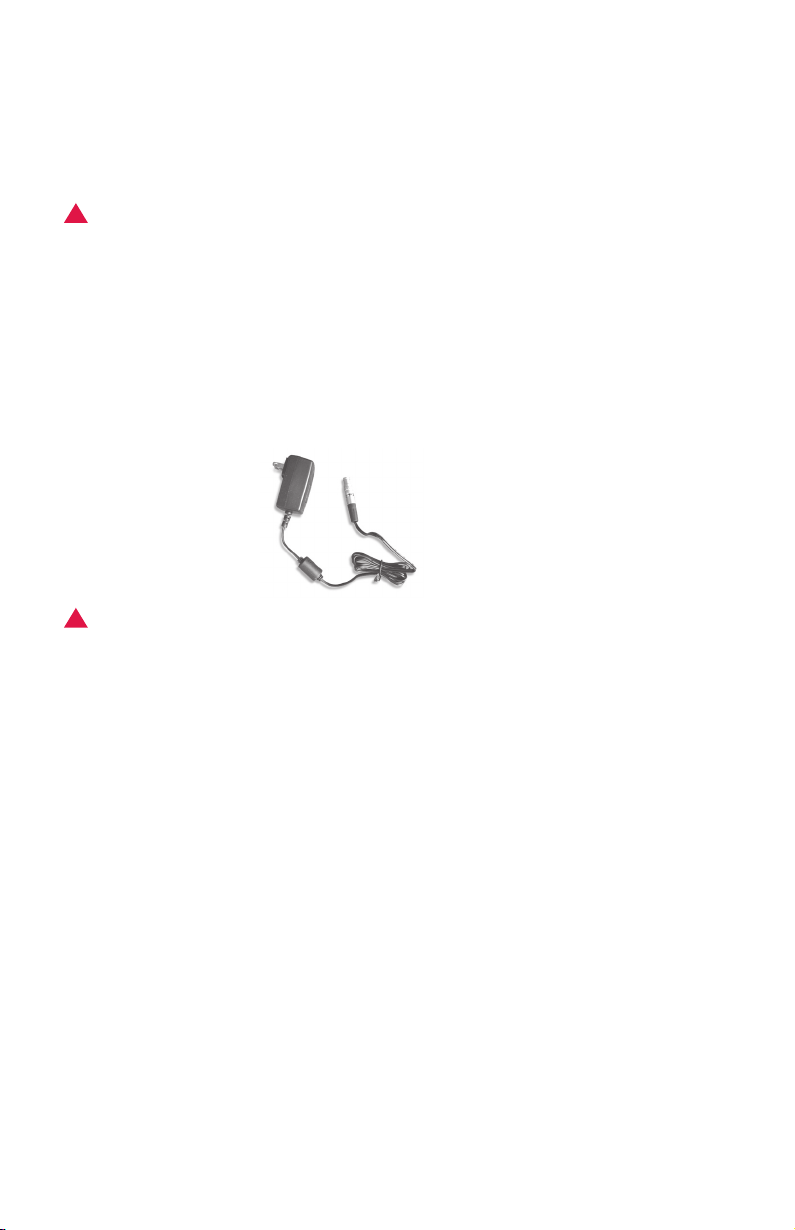
3.10 Connecting The Power Cord ..............................10
3.11 Plug In The Power Cord ..................................10
3.12 Control Panel Functions ..................................11
4 Components ....................................................11
4.1 Control Buttons Overview ................................ 11
4.2 Display ..................................................12
4.2.1 Number Segments ....................................... 12
4.2.2 Status Indicator Icons ....................................12
4.3 Trigger ..................................................14
4.4 Auto Mode...............................................14
4.5 Mounting Conguration..................................14
5 Operating Modes ..............................................15
5.1 Menu ...................................................15
5.2 Recall ....................................................16
6 Clocking a Speed Reading .....................................17
6.1 Fast Mode................................................17
1
Radar Gun Instructions.10-2018.indd 2 9/27/18 11:20 AM

6.2 Last Mode ...............................................17
6.3 Fast/Last Mode...........................................18
6.4 Continuous Speed Mode .................................18
6.5 Auto Speed Mode ........................................19
7 Serial Output Mode.............................................19
8 Performance Tips ...............................................19
8.1 How Radar Works ........................................19
8.2 Interference Sources and Remedies.......................20
8.2.1 Angular Interference (Cosine Error Eect) .................20
8.2.2 Electromagnetic Interference (EMI) .......................21
8.2.3 Feedback Interference....................................21
8.2.4 Radio Frequency Interference (RFI)........................21
8.2.5 Scanning ................................................21
8.2.6 Environmental Conditions ................................21
9 Care, Cleaning, and Storage ...................................21
10 Frequently Asked Questions (FAQ) .............................22
11 Specifications ..................................................23
11.1 Antenna Parameters K-Band ..............................23
11.2 Environment .............................................23
11.3 Speed Range Parameters .................................23
11.4 Power Consumption Parameters.......................... 23
12 Communications Port ...........................................24
13 Warranty .......................................................24
14 Service Return Procedure .......................................25
15 How to Order Additional Products and Accessories..............26
2
Radar Gun Instructions.10-2018.indd 3 9/27/18 11:20 AM

Welcome to JUGS Sports
Thank you for choosing The JUGS Gun™Handheld Sports Radar—a
highly advanced sports radar device that will reward you with years of
dependable service. The JUGS Gun™incorporates high performance and long
range, with many leading features. We urge you to study this manual before
using The JUGS Gun™so you can maximize the benets of this sophisticated
radar device. We believe you will be pleasantly surprised by its features and
advantages.
—JUGS Sports
About This Manual
This manual contains valuable information to help you set up, use
and maintain your radar, so you can extend its life and keep it at peak
performance. Please take a moment to read through it, and keep it handy
for future reference.
Note the following symbols in this manual:
!WARNING Indicates a warning message about safety precautions.
Please read it carefully.
!CAUTION Indicates a helpful tip or precaution to note.
OPTIONAL Indicates section refers to optional equipment.
3
Radar Gun Instructions.10-2018.indd 4 9/27/18 11:20 AM

1. Safety Information
All service needs should be referred back to JUGS Sports.
!WARNING
• Do not over voltage the radar—it can damage the unit!
• When replacing batteries in The JUGS Gun™you should replace all 6
with new batteries even if you suspect that only one cell is defective.
• Use rechargeable Nickle-Metal-Hydride batteries only.
• The JUGS Gun™is designed to operate o of conventional +12 VDC
from the power cable or to operate at +7.2 VDC from the internal
batteries. Over voltage to the power cable or incorrect batteries can
cause damage.
!CAUTION
• Opening The JUGS Gun™(other than battery replacement)
automatically voids any warranty still in eect. There are no user
serviceable parts inside.
• Do not expose The JUGS Gun™to excessive moisture. Never submerge
the device. Violation of these guidelines may void the warranty.
• Do not drop The JUGS Gun™on hard surfaces since damage could
occur. Units damaged by dropping or abuse are not covered for
warranty repair.
4
Radar Gun Instructions.10-2018.indd 5 9/27/18 11:20 AM

2. Receiving Inspection
• When you receive your JUGS Gun™, inspect all components for freight
damage that might have happened during shipping.
• Notify the freight company immediately of any damage, preferably
while the driver is present. Record the damage on the bill of lading and
keep a record of the problems or damage.
• The package should include the following pictured items along with
this Owner’s Manual.
The JUGS Gun™
6 NiMH Batteries
Nylon Carrying Case
Charger
and Cord
5
Radar Gun Instructions.10-2018.indd 6 9/27/18 11:20 AM

3. Getting Started
3.1 Introduction
The JUGS Gun™stationary radar gives you the option to track objects
approaching or receding. Features such as Recall allow you to select and
review up to 5 previous events. Fast/Last adds additional exibility by
allowing you to set The JUGS Gun™to display either the fastest speed
measured and/or the last speed measured. Other features are selectable
through the menu option.
3.2 Battery Charging
The JUGS Gun™is designed to operate o of six (6) rechargeable Nickel-
Metal-Hydride batteries (or o the optional DC power cord). When you
rst receive your radar, the batteries will need to be charged for the rst
time before using. Once batteries have been charged if you do not use the
JUGS Gun™for 3-4 weeks, you will want to recharge the batteries before
use in order to get the full run time. To charge batteries for the rst time or
to replace the batteries follow steps 3.6 to 3.7.
3.3 Removing the Battery Holder
The battery holder is located inside the handle of The JUGS Gun™and is
accessed by means of a sliding door. When rst received the holder should
already have batteries installed, if not then you will need to remove the
holder and load it with batteries. To remove the battery holder slide the
battery cover to the right until the battery holder is released as shown in
Figure 3.3. The door can be completely removed from the slide.
Figure 3.3
6
Radar Gun Instructions.10-2018.indd 7 9/27/18 11:20 AM

3.4 Battery Installation
Insert the batteries into the battery holder following the polarity guide
that is on the inside of the battery holder (Figure 3.4a). When properly
loaded the battery holder will look like the example in Figure 3.4b.
!CAUTION Note that the negative side of each battery goes to the
spring contacts of the battery holder .
3.5 Inserting the Holder into The JUGS Gun™
The battery holder is designed so that it can only make contact with the
power connections inside the gun if the holder is slid into the gun in the
correct way. If you look closely at the holder you will see that there is a
positive and negative terminal on it. These need to be inserted into the gun
with the terminals located at the top as shown in the picture below.
Figure 3.4a Figure 3.4b
Figure 3.5
7
8
Radar Gun Instructions.10-2018.indd 8 9/27/18 11:20 AM

Once the batteries have been properly loaded into the holder and the
holder has been inserted into the handle of the gun then the door can be
put back in place and slid closed.
!CAUTION If the holder has been placed incorrectly into the handle
the door can not be put back in place and closed .
3.6 Charging the Batteries
The JUGS Gun™comes with a charger and cord. When you receive your
JUGS Gun™, charge the batteries until fully charged.
!CAUTION You must only use rechargeable batteries.
3.7 Charge Status Indicator (LED)
The status of the charge can be determined by the Charge Status Indicator
LED located on the bottom of the handle (See gure 3 .7). The table below
denes the status.
• Fast blinking green light = checking battery condition
• Medium blinking green light = charging battery
• Solid green light = charged
• Solid red light = charging error
The normal charging sequence is fast blink for 60 seconds, medium blink
until batteries are fully charged (approximately 1 hours for fully discharged
batteries) and solid green once batteries are charged. The gun can be left
to charge indenitely. The charging circuit will automatically shut o once
charging is complete.
8
Radar Gun Instructions.10-2018.indd 9 9/27/18 11:20 AM

!CAUTION Best performance from your batteries is obtained when
recharged at temperature between 50oF (10oC) and 113oF
(45oC). Recharging outside of that temperature range may
result in reduced battery life or incomplete charging.
Figure 3.7
9
10
Radar Gun Instructions.10-2018.indd 10 9/27/18 11:20 AM

3.8 Battery Run Time
How long The JUGS Gun™can operate between recharges depends upon
several factors including the milliamp hour (mAh) capacity of the batteries,
age of the batteries, and how The JUGS Gun™is used. Generally a set of 6
new 2500 mAh batteries fully charged should run for approximately 1 week
between recharges given normal use.
3.9 Replacing Batteries
When replacing the batteries with new ones remember to use only
rechargeable Nickel-Metal-Hydride (NiMH) batteries and to replace ALL the
batteries at the same time even if you suspect that only one battery is bad.
Follow the instructions listed in steps 3.2 through 3.7 for proper installation
and charging when replacing batteries.
3.10 Connecting the Power Cord
If you choose to run o the power cord instead of the internal batteries,
connect the power cord to the receptacle on the bottom of The JUGS Gun™
being sure to properly align the plug on the power cord to the connector
on the bottom of The JUGS Gun™(See gure 3 .8). The JUGS Gun™
automatically will switch from the internal batteries to the power cord for
power when the unit is turned on.
OPTIONAL 3.11 Plug In the Optional Power Cords
Two optional power cords are available from JUGS for your convenience.
The R2016 is for use with 12VDC power outlets such as a vehicle receptacle.
Figure 3.8
9
10
R2016
Radar Gun Instructions.10-2018.indd 11 9/27/18 11:20 AM

3.12 Control Panel Functions
The operation of The JUGS Gun™is controlled by the ve-button key pad
and the trigger.
4. Components
4.1 Control Buttons Overview
Looking at the control buttons from left to right the buttons have the
following functions:
MENU: The MENU button lets you view the options you can
change. Repeatedly pressing the MENU button advances through
the programmable features.
SEL: The select (SEL) button lets you choose the settings in each of
the menu options. To change a menu option, press the SEL button.
PWR: The PWR button turns the power on and o.
RCL: When the recall button is pressed the unit enters recall mode
if the following are true:
• The unit must not be transmitting.
• The unit must not be holding an event.
MODE: Use the Mode button to select the desired operational
mode. Repeatedly pressing the Mode button rotates through the
four operational selections “FAST/LAST”, “FAST” only, “LAST” only.
Figure 4.1
Faceplate Display and Control Buttons
11
Radar Gun Instructions.10-2018.indd 12 9/27/18 11:20 AM

4.2 Display
4.2.1 Number Segments
The three large digits (888) on the left show the target’s speed. The three
small digits on the right show the last speed depending on the mode
setting you have selected or the recall level when the recall button is
pressed. (See Figure 4.2a).
4.2.2 Status Indicator Icons
The following icons can appear at the top and bottom of the display
screen and describe the following conditions: .
POWER: When PWR appears, the power is on. After a brief
diagnostics test that shows all of the segments and icons to be
operational the screen will display the icons that represent the
features that have been selected and the segments will show
dashes indicating that the radar is ready to read speeds.
FAST: Indicates that the unit is set to display the FAST speed in the
left window. The FAST icon only is displayed.
LAST: Indicates that the unit is set to display the LAST speed in the
right window. The LAST icon only is displayed.
FAST/LAST: Indicates that the unit is set to display the FAST speed in
the left window and the LAST speed in the right window. Both the
FAST and LAST icons are displayed. (See Figure 4.2b).
Figure 4.2a
Display during power up
Figure 4.2b
Display indicating fast/last mode has been chosen and unit is ready to read speeds.
12
Radar Gun Instructions.10-2018.indd 13 9/27/18 11:20 AM

XMIT: Indicates that the radar is transmitting.
HOLD: Indicates the system is not transmitting.
ERROR: Indicates that the radar has detected an internal hardware
error which can aect the operation of the radar device. You should
turn the gun o and back on. If the problem persists, contact JUGS
Sports at 800-547-6843.
MPH: The radar displays speeds in miles-per-hour (mph), MPH
does not appear in the display—it is the default setting.
KPH: The radar displays speeds in kilometers-per-hour (km/h), KPH
appears in the display.
BAT LO: A “bAt Lo” message indicates that your batteries (or your
separate battery pack) may be low on power. (See Figure 4.2c). The
system will not transmit or display any new speeds while the low
batteries message appears, and if the system is displaying a locked
speed, the speed will remain locked. The “bat Lo” message will be
displayed when the battery voltage drops below +8.2 volts when
operating from the power cord or +6.3V when operating from the
internal batteries .
Figure 4.2c
Low Battery Indicator
13
14
Radar Gun Instructions.10-2018.indd 14 9/27/18 11:20 AM

4.3 Trigger
The radar transmits and receives microwave energy when you pull the
trigger. To measure the speeds, pull and hold the trigger. When you want
to lock a speed, release the trigger.
4.4 Auto Mode
To measure speeds automatically without using the trigger mode, simply
click the trigger once and release. The JUGS Gun™will automatically record
a speed then clear after the designated hold time indicated in the menu.
Default time is ve seconds.
4.5 Mounting Configurations
The radar is designed for hand-held operation. Optionally, you can mount
it to a standard camera tripod.
14
Radar Gun Instructions.10-2018.indd 15 9/27/18 11:20 AM

5. Operating Modes
The MENU and SEL buttons on The JUGS Gun™control panel let you review
and change programmable settings. The radar gun will remember the
settings you last set when it is turned o and will power up with them.
The RCL button can be set to display up to the last 5 events. A detailed
explanation of these controls follows:
5.1 Menu
You can use the factory default settings or you can select your own settings.
To select a setting, repeatedly press the MENU button until the setting you
want to change appears. Then press the select (SEL) button to advance
through the selections for that setting. When you have made your selection,
release the buttons and your new settings will be in eect. If neither MENU
or SEL is pressed after 2 seconds, the radar gun will return to normal oper-
ating mode, capturing whatever settings you have selected to that point.
Figures 5 .1 shows the menu setting choices.
SPEED RANGE (SPd): The Spd option lets you choose between two speed
ranges:
High Range 31-143 mph (50-230 kph)
When the high range is selected the word“hi” will show in the display. The
high setting is utilized for the majority of ball sports and is the default range.
Low Range 5-140 mph (8-225 kph)
When the low range is selected the word “Lo” will show in the display. The
low setting may be selected to record speeds lower than 31 mph (50 kph)
such as in a carnival setting.
Figure 5.1a
Menu Settings
15
16
Radar Gun Instructions.10-2018.indd 16 9/27/18 11:20 AM

!CAUTION If The JUGS Gun™is in low speed mode and you are trying
to measure high speed targets, there is a greater chance
that the radar will lock onto the speed of the pitcher’s arm
or the speed of the bat swing.
HOLD (HLd): The HLd option lets you set the length of time that the
locked reading will show in the display window. The default setting is “5”.
BACKLIGHT (BL): This turns on and o the LCD backlight. The backlight is
used to illuminate the display in low light conditions. The default setting is
“ O N ”.
SPEED UNITS (Su): Speed units allow the user to switch from MPH (miles per
hour) to KPH (kilometers per hour).
5.2 Recall
The JUGS Gun™can store up to 5 events (5 trigger pulls and releases with a
speed being detected). Each press of the recall button steps back through
the speeds that have been stored. The speed is shown in the left hand side
of the window and the recall level is displayed in the right hand side of
the window. Recall will not scroll through the last ve recordings unless
“HOLD” is indicated in the lower left hand corner of the display (gure 5.2).
• r1 indicates 1 event ago
• r2 indicates 2 events ago
• r3 indicates 3 events ago
• r4 indicates 4 events ago
• r5 indicates 5 events ago
The FAST speed corresponding to the recall level is displayed in the left
window.
To clear the recall events turn The JUGS Gun™o and back on.
Figure 5.2
Example showing a speed that was stored 3 events ago.
16
Radar Gun Instructions.10-2018.indd 17 9/27/18 11:20 AM

!CAUTION The unit will exit recall mode after the recall button is NOT
pressed for 2 seconds.
The unit will exit recall mode if the unit begins transmitting.
6. Clocking A Speed Reading
The JUGS Gun™ detects targets moving either toward or away from it. The
radar measures the true release speed with an accuracy of +1 display unit,
approximately 12 inches (30 centimeters), from the pitcher’s hand before
the pitch loses speed. For the most accurate reading, stand to one side
of the catcher and point the gun toward the pitch so the radar beam is
parallel to the direction of the ball. Also, you can stand behind the pitcher
to position the radar. The radar will detect speeds within a 300 feet (91
meters) range. However, when the gun is closer to the release pitch, the
speed reading is more accurate.
The radar gun operates in five modes: Fast, Last, Fast/Last,
Continuous and Auto.
6.1 Fast Mode (Fast icon only shows in display)
In this mode, The JUGS Gun™will display the pitch-release speed (the
speed of the ball as it leaves the pitcher’s hand). To activate the radar
beam, pull the trigger. The JUGS Gun™will display the fastest out of the
range of speeds it detects in the left hand side of the window. To lock the
speed reading release the trigger. The speed will show in the window for
the length of hold time that has been set.
6.2 Last Mode (Last icon only shows in display)
In this mode The JUGS Gun™will display the catch speed (speed of the ball
when it is caught). To activate the radar beam, pull the trigger. The JUGS
Figure 6.1
Example showing a speed of 78 mph in the FAST mode
17
18
Radar Gun Instructions.10-2018.indd 18 9/27/18 11:20 AM

Gun™will display the last speed out of the range of speeds it detects in
the right hand side of the window. To lock the speed reading release the
trigger. The speed will show in the window for the length of hold time that
has been set.
6.3 Fast/Last Mode (Fast and Last icons show in display)
In this mode The JUGS Gun™will display the Fast speed in the left hand side
of the window and the Last speed in the right hand side of the window. To
active the radar beam, pull the trigger. To lock the speed readings release
the trigger. The speeds will show in the window for the length of hold time
that has been set.
6.4 Continuous Speed Mode (No Fast or Last icons show)
In this mode, The JUGS Gun™continuously displays the speeds until you
release the trigger. When the trigger is released the last speed showing in
the display will be the speed that is locked. The speed will show in the
window for the length of hold time that has been set .
Figure 6.2
Example showing a speed of 33 mph in the LAST mode
Figure 6.3
FAST speed of 78 mph and LAST speed of 33mph
Figure 6.4
Example showing a 78 mph speed in Continuous mode
18
Radar Gun Instructions.10-2018.indd 19 9/27/18 11:20 AM

6.5 Auto Speed Mode
In Auto mode, The JUGS Gun™automatically records and displays the
speeds without using the trigger. Simply pull the trigger twice to activate
Auto Mode. The lower left screen will change from“HOLD” to “XMIT.”The
recorded speed will show in the window for the length of hold time that
has been set. To return to trigger mode, simply pull the trigger once.
7. Serial Output
The JUGS Gun™has an RS232 communications port on the bottom of the
handle. Using a custom RS232 communications cable, you can connect
the radar and transmit data to display signs or to a PC for recording and
analyzing speed data. Figure 7 illustrates the location. The port format is:
ASCII, 1200 Baud, One (1) Start bit, Eight (8) Data bits, One (1) Stop bit, No
parity .
8. Performance Tips
Understanding potential radar interference and what to do when it occurs
can greatly increase the radar’s performance.
8.1 How Radar Works
Determining a target’s speed begins with the radar gun transmitting a
beam of microwave energy (radio waves) at an approaching or departing
object. When energy from this beam strikes an object, such as a baseball, a
small amount of the beam is reected back to the antenna. The reflected
signal frequency shifts by an amount proportional to the speed of the
object. This is known as the Doppler eect. The radar device then
determines the object’s speed from the dierence in frequency between
the reected and transmitted signal.
Figure 7
Port location as shown on The JUGS Gun™
19
Radar Gun Instructions.10-2018.indd 20 9/27/18 11:20 AM
Table of contents
Popular Radar manuals by other brands

Hyundai Mobis
Hyundai Mobis MAR120 user manual

Houston Radar
Houston Radar DR500 Installation and user manual

Endress+Hauser
Endress+Hauser Micropilot FMR51 operating instructions

Hesai
Hesai PandarQT user manual

Dahua Technology
Dahua Technology DH-PFR4K-B240 user manual

Endress+Hauser
Endress+Hauser Micropilot M FMR245 operating instructions