Juicebox Magic Power 2.0 User manual

You’ve just received
A Magic
Power 2.0 BATTERY!
HERE’S HOW TO BEST
ENJOY IT:

We want you to love your battery.
We want you to love our company.
We will help in any way we can:
support@juicebox.direct
1

To charge, connect the wall charger to the Magic Power’s DC
port. When charging, the charge symbol () will appear on the dis-
play and the charge percentage will slowly rise. The battery takes
about two hours to reach full charge from 1%. The Magic Power
can also be charged via a Micro USB cable. This charging method
can take several hours, however.
The included quick release mount can be attached to the camera
or any accessory with a standard 1/4-20 insert, present on virtually
all camera cages and most other camera mounting accessories.
For frequent relocation of the Magic Power, we recommend the
use of an adjustable camera clamp, which can be easily attached
to rail rods, tripods, monopods, etc.
To attach the Magic Power to the quick release mount, simply slide
the Magic Power’s quick release plate, located on the back of
the battery, onto the quick release mount and secure it by locking
the red tab in the upward position. To release, slide the red tab
downward.
Setup
Slide downward into mount
Lock
Unlock
Fasten to camera,
cage or other accessory
NOTE: It is highly recommended that the Magic Power 2.0 battery
be fully charged before being stored for an extended period of
time. Because this battery has active USB ports, storing the battery
at a low charge for several weeks or more can completely drain
and damage the internal battery cells.
2

operation
To power a compatible camera, connect the Magic Power’s DC
port to the camera’s DC input using the appropriate Juicebox
dummy battery or power cable. Tap the Magic Power’s power but-
ton to turn on the battery. While in use, the Magic Power will display
the wattage output that is being used by the connected device(s).
The Magic Power’s maximum continuous output is 50 watts.
A second device can be powered simultaneously, such as a eld
monitor, with the use of a DC splitter cable, available here:
juicebox.direct/product/jbsc-03
While in use, the Magic Power will charge the connected cam-
era’s primary (internal or mounted) battery while also powering the
camera itself. The Magic Power will power camera with or without
a primary battery installed in the camera’s battery compartment.
The Magic Power’s components are:
1. DC Port: 12V/2A for compatible cameras
2. USB Port 1: 5v/2.1A output
3. USB Port 2: QC 2.0 quick charging output (5V, 9V, 12V)
NOTE: Only one USB output can be used at a time.
4. Micro USB Input: Charge the Juicebox with a micro USB cable
5. Display Screen: Displays voltage, capacity, wattage
6. Power Button: Power on (power off is automatic)
3

Frequently asked questions
How does the Magic Power 2.0 mount to my camera rig?
The Magic Power 2.0 has a built-in quick release plate and, in the
box, includes a corresponding quick release mount. This quick
release mount will attach to any standard camera cage via an
included 1/4-20 screw. It will also attach to a rail support system
with a standard 1/4-20 rod clamp, available at all major photo/
video retailers.
For easy mounting of the Magic Power 2.0 to a camera stabilizer
(tripod, gimbal, etc), we recommend the use of a standard 1/4-20
rod clamp. These easily clamp onto most stabilzers.
The quick release plate, built into the Magic Power 2.0, locks onto
the included quick release mount. This system allows for a secure
mounting of the Magic Power 2.0 and a very quick and easy at-
tachment and detachment of the battery to your camera rig.
Can I power multiple devices with the Magic Power 2.0 at the same
time?
The Magic Power 2.0 is capable of outputting up to 2.0 amps
continuously and can run most 12V cameras and eld monitors in
combination. As long as the total power draw does not exceed
2.0 amps, the Magic Power 2.0 is capable of powering multiple
devices simultaneously.
In order to simultaneously connect two devices to the Magic Power
2.0, Juicebox offers a DC splitter cable, which splits the battery’s
DC output. You can view the Juicebox DC Splitter Cable product
page here: http://juicebox.direct/product/jbsc-03/
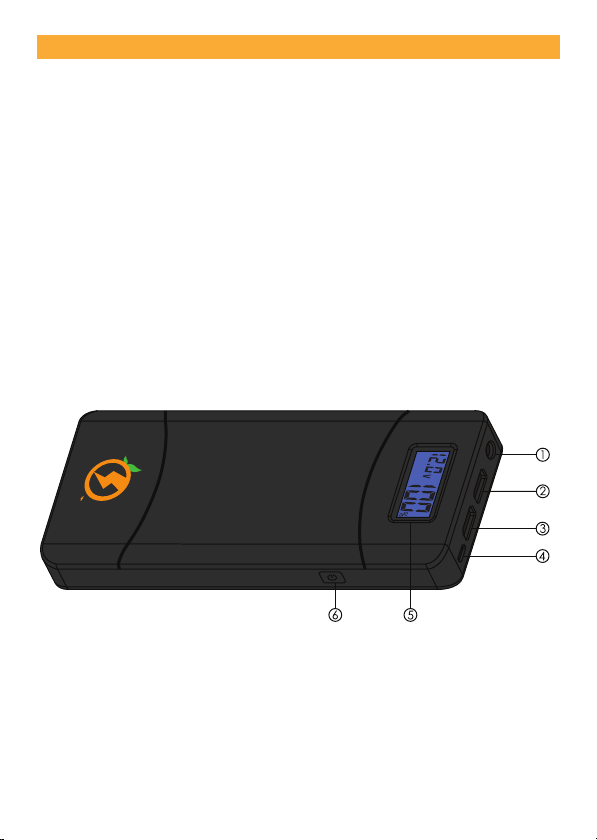
How do I power the Magic Power 2.0 on and off?
The Magic Power 2.0 is powered on with a single press of the ON
button located on the side of the battery. Once powered on, the
Magic Power 2.0 will continue to power/charge the connected
device until the Magic Power 2.0 is either disconnected or runs out
of power. Pressing the ON button a second time will not turn off the
Magic Power 2.0. To turn off the Magic Power 2.0, simply discon-
nect any devices from its power ports.
4

My Magic Power 2.0 battery will not power on or accept a charge.
What can I do?
The Magic Power 2.0 battery has an active circuit and requires a
minimum level of power to turn on or even accept a charge via
the battery’s DC input. If your battery has been in storage for an
extended period of time or has been drained completely and will
not power on or accept a charge, typically, the battery can be
revived by charging through the battery’s micro-USB input. Once
the Magic Power 2.0 has received several percentage points
of charge through the micro-USB input, it can then be charged
through the DC input and used as usual.
If charging your battery through the micro-USB input does not solve
Can I charge the Magic Power 2.0 with a different charger?
Yes, the Magic Power 2.0 can be charged with a micro USB char-
ger, though this charge method can take several hours. It can also
be charged with any 14V AC adapter that has a 5.5 x 2.1mm male
DC connection.
What other devices are compatible with the Magic Power 2.0?
Aside from compact cameras, there are many other lm pro-
duction devices that are compatible with the Magic Power 2.0,
including most small eld monitors and recorders, audio recorders
and follow focus units.
Check your device’s documentation. If it is able to accept 12V (or
5V USB power) and does not draw more than 2 amps, the Magic
Power 2.0 should be capacble of powering the unit.
The output on the Magic Power 2.0 is a female 5.5 x 2.1mm DC
jack. Many small eld monitors and audio recorders also utilize a 5.5
x 2.1mm DC input. Again, check your device’s documentation to
see what type of power input is available. To help you make these
connections, we have many power cables and adapters available
on our website, juicebox.direct.
5

Specifications
Model No. JBMP-02S
Accessories DC Charger, Car Charger, Quick Release
Plate, 1/4-20 Screw, Allen Wrench
Capacity 15600mAh, 57.7Wh
Net Weight 1.0 lbs. / 458 grams
Cell Type Lithium Ion ICR18650
Input Micro USB Port: 5V, 2.1A Max.
DC Port: 13V-20V, 3A Max.
Output USB Port 1: 5V, 2.1A
USB Port 2 (QC 2.0): 5V, 9V, 12V, 2.1A
DC Port: 12V, 2A
Circuit Protection Over-voltage, under-voltage, over-current,
over-temperature, short-circuit
Efciency 5V/2A≈93%, 9V/2A≈95%, 12V/2A≈97%
Charge Time Micro USB (2.1A) Charger: 8.5 Hours
Included DC Wall Charger: 2 Hours
Storage Time Recommended recharge after 90 days
If a malfunction occurs, the Magic Power battery output will shut
off automatically in order to protect the battery and connected
devices. One of the following error codes will be displayed:
• OV: Over-voltage protection
• UV: Under-voltage protection
• OC: Over-current protection
• OT: Over-temperature protection
In this case, the Magic Power will need to be reset, either by dis-
connecting and waiting for the battery to power off or by connect-
ing the battery to the wall charger.
For more troubleshooting information and FAQ, please visit:
juicebox.direct/support
Troubleshooting
6

juicebox.direct
This manual suits for next models
1
Table of contents
Other Juicebox Camera Accessories manuals
Popular Camera Accessories manuals by other brands

Slide Kamera
Slide Kamera ROAD JIB user manual

Viltrox
Viltrox EF-NEX Mount instructions

ORION TELESCOPES & BINOCULARS
ORION TELESCOPES & BINOCULARS Tritech II-M instruction manual

OSEE
OSEE HCM-700 user manual

Atmos
Atmos E 341 operating instructions

EnerSys
EnerSys PowerSafe ASSEMBLY, INSTALLATION, OPERATION & MAINTENANCE MANUAL