juju Eat & Play V2 User manual

Eat & Play V2
User Manual
Multifunctional Baby High Chair
(Usable from 6 months up to 3 years)
EN RO BG HU PL

Page 2
A1&A9
A3 A19 x 8
A6
A10 x 2
A20
A21
Part list / Componente / Съставки / Összetevők / Elementy
A1
A3
A2
A4
A5
A6
A7
A13
A14
A15
A16
A18
A17
A19
A8
A9
A10
A11
A12

Page 3
B1
B2
B3
A10 A10

Page 4
A12 A5 A11
A4 A19 x 8
A11
A4
B4
B5

Page 5
B6.1 B6.2
B6
B7.1
B7.2
A7
B7
A16
B8
1
32

Page 6
1
B9
A20
B10
2
3
A16
A16
B11

Page 7
B12
A1. Backrest
A2. Safety belt
A3. Right handrail of seat
A4. Joint plastic B of table
A5. Right foot
A6. Left handrail of seat
A7. Washable tray
A8. Protection
A9. Base
A10. Joint plastic A of chair
A11. Table
A12. Left foot
A13. Backrest adjuster button
A14. Joint plastic A of chair
A15. Drawer
A16. Tray hooks
A17. Cover
A18. Tray
A19. Plastic nut*16
A20. Table cover x 4
A21. Screw driver
Part list

Page 8
EN
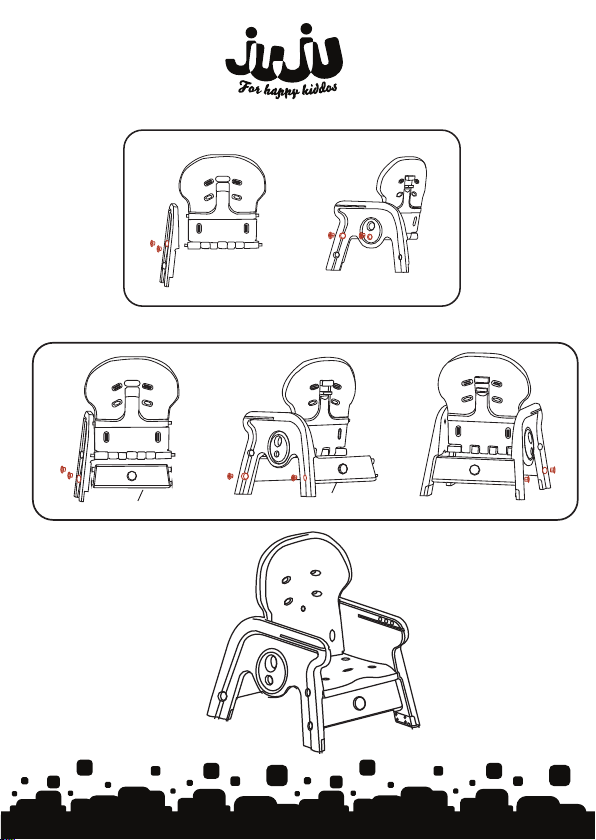
Assembling instructions
Insert the two screws into the two corresponding holes and fix the left side of the seat
as in the figure B1. Tighten the screws using part A21.
Attach the two A10 plastic parts, one at the front and one at the back of the seat. Then
fix the right side of the seat in the same way as the left one. Make sure that the plastic
nut are screwed in and locked tight. (Figure B2).
The seat should look like in the figure B3. Shake the seat from side to side after assembly
and make sure it is properly fixed .
Step1: Install the high chair
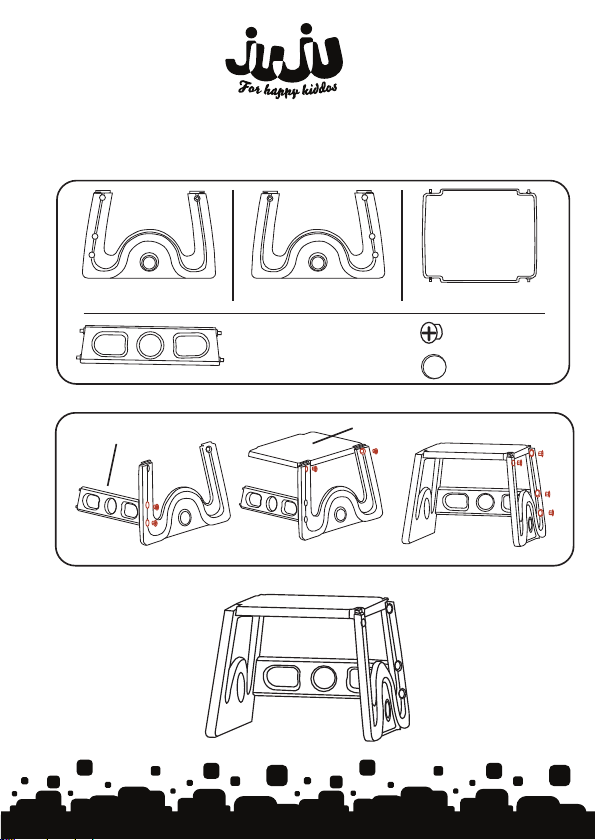
Step 2: Install the table
Insert the part A4 as well as the table top (A11) into the corresponding holes of the right
foot as shown in figure B4. Tighten the plastic nuts firmly without forcing. Connect the
left leg of the table and tighten the screws well without forcing. Fig. B4
The table should look like in the figure B5. Shake the table from side to side after
assembly and make sure it is properly fixed .
Step 3. Install the front legs of the chair towards the two protruding squares on
the table as in figure B6.1 by pressing the 2 side buttons in turn. Attach the chair to the
table as in figure B6.2. Pull the chair up to make sure it is securely fastened.
Step 4. Install the protection (A8) on the tray
While holding the ptrotection (A8), push it into the slot on the back of the tray. It is
correctly installed when a "click" sound is heard. (Fig B7)
Step 5. Install the tray
While holding the adjustment button, which is under the tray, with one hand as in
Fig. B8, align the 2 rails with the arms of the seat and then push the tray forward
until it reaches the correct position. It is fixed when a "click" sound is heard. The
tray is double, so the top can be removed and can be easily cleaned.
Step 6. Adjust the backrest
Pull the backrest adjuster button A13 as shown in figure B9.

Page 9
Caution: To prevent the child from slipping out of the high chair, make sure
the safety belts are used at all times.
1. Carrefuly adjust the seat belts on each side until they fit the child.
2. Insert the 2 small side safety buckles into the master central buckle until you
hear the "click" sound.
3. To open the buckle, press the middle button of the center buckle and
the buckles will pop up automatically. (Fig. B12)
IMPORTANT! READ
CAREFULLY AND KEEP FOR
FUTURE REFERENCE
Keep plastic covering away from children to
avoid suffocation
1. Never leave the child unattended.
2. Always use the restraint system.
3. Falling hazard: Prevent your child from climbing on the product.
Step 7. Pay attention before using the game table: cover the four slots in the corners
of the table with the 4 protective table covers A20 as in fig B10.
Step 8. The tray can be fixed (and stored) by the game table hooks as in fig (B11)
Step 9. Adjust the safety belt

Page 10
11. To avoid damp mildew, please keep the high chair in dry and ventilated
place when do not use it.
12. For the dust on the surface of the high chair, wipe the harness, fabric and
plastic parts with a damp sponge and dry in ventilation place.
13. If accidentally drop food or drink onto harness, remove the harness, rinse
with warm water and dry in ventilation place.
14. Please refer to the washing instructions if clean the fabric cover.
15. It’s normal that slight fading may occur when washing for the first time.
Washing instructions
Hand washable
water temperature
below 30℃
Do not bleach Do not dry Do not iron
Do not use solvents, chemical cleaners or lubricants on any part of this product.
4. Do not use the product unless all components are correctly fitted and adjusted.
5.
. Be aware of the risk of open fires and other sources of strong heat in the vicinity of
the product.
6. Be aware of the risk of tilting when your child can push its feet against a table or
any other structure.
7. Not to use the product until the child can sit up unaided.
8. Not to use the product if any part is broken, torn or missing.
9. Statement:This product is suitable for children who can sit up unaided. Do not use
for children over 3 years old or over 15 kgs.
10. The child should wear a properly fixed and adjusted safety harness at
all times.

Page 11
RO
Instrucțiuni de montare
Pasul 1. Montarea scaunului
Introduceți cele două șuruburi în cele două găuri corespunzătoare și fixati laterala stangă
a scaunului ca in figura B1. Strângeți șuruburile folosind piesa A21. Fixați cele 2
componente A10 din plastic una in partea din fața și una in partea din spate a scaunului.
Apoi, fixați partea dreaptă a scaunului la fel ca cea stangă. Asigurați-vă că șuruburile din
plastic sunt stranse ferm fară a forța strangerea lor. (Figura B2).
Scaunul trebuie sa arate ca in figura B3. Miscați scaunul dintr-o parte în alta după
asamblare si asigurați-vă că este fixat corespunzator.
A1. Spătar
A2. Centuri de siguranță
A3. Șină dreapta
A4. Plăcuța plastic măsuță
A5. Picior dreapta
A6. Șină stânga
A7. Tăviță detașabila
A8. Opritor
A9. Șezut
A10. Plăcuța plastic scaun
A11. Tăblie masă
A12. Picior stanga
A13. Buton reglare spătar
A14. Plăcuța plastic scaun
A15. Sertar
A16. Carlig tăvița
A17. Husă
A18. Tăviță
A19. Piulițe plastic *16
A20. Capace protecție x 4
A21. Disc de inșurubare
Componente

Page 12
Pasul 7. Atenție: inainte de a folosi masa de joc: acoperiți cele patru fante din colturile
masutei cu cele 4 capace de protectie A21 ca in fig B10.
Pasul 8. Tavița poate fi prinsa (si depozitata) de carligele mesei de joc ca in fig (B11)
Pasul 9. Ajustarea centurilor de siguranță
Atenție: Pentru a evita alunecarea copilului din scaunul de masă, asigurați-vă că
centurile sunt folosite permanent
1. Ajustati centurile pe fiecare parte până când sunt potrivite copilului.
2. Inserati cele 2 catarame mici laterale in catarama mare centrala până cand auziți
sunetul "click".
3. Pentru a desface catarama, apasati butonul din mijlocul cataramei centrale si
cataramele se vor desface automat. (Fig B12)
Ținând butonul de ajustare cu o mana ca in Fig B8, se aliniaza cele 2 șine cu braţele
scaunului și apoi impingeți tăvița in față până ajunge in poziția corecta. Se fixeaza in
momentul in care auziți sunetul "click". Tăvița este dubla, partea de deasupra se poate
scoate și poate fi curățată ușor.
Pasul 5. Montarea tăviței
Pasul 4. Instalarea opritorului contra alunecarii accidentale a copilului
Ținând cu mâna opritorul, impingeți - l in lacasul de pe spatele tăviței. In momentul in
care este instalat se aude un sunet "click". (Fig B7)
Pasul 6. Reglarea spătarului
Trageți de mecanismul de reglare A13 al spatarului ca in figura B9.
Pasul 3. Potriviți picioarele din fața ale scaunului pe locurile prevazute de pe tablia
mesei ca in figura B6.1 apăsand pe rand cele 2 butoane laterale. Atasați scăunelul de
măsuța ca in figura B6.2. Trageți de scăunel in sus pentru a vă asigura ca este bine fixat.
Pasul 2: Montarea mesei
Introduceți componenta A4 precum și tablia mesei (A11) in găurile corespunzatoare de
la piciorul drept ca in figura B4. Strângeți piulitele din plastic ferm fară a forța
strangerea lor. Conectați și piciorul stang al mesei si strangeți șuruburile bine fară a
forța. Fig B4
Măsuța trebuie sa arate ca in figura B5. Miscați măsuța dintr-o parte în alta după
asamblare și asigurați-vă că este fixată corespunzator.

Page 13
8. Daca observați ca lipesc componente ale scaunului ori acestea au suferit
daune, va rugam sa nu utilizați produsul.
9. Atenție: Produsul este destinat copiilor capabili să stea in picioare fără ajutor.
A nu se utiliza pentru copii cu vârsta peste 3 ani sau greutatea de peste 15 kg.
10. Vă rugăm să vă asigurați că centurile sunt CORECT potrivite și stranse pe toata
perioada utilizarii scaunului.
5. Țineți la distanța fata de foc sau alte surse de caldura pentru a evita eventuale
pericole.
6. Fiți atenți la riscul de înclinare atunci când copilul dumneavoastra se
poate împinge cu picioarele de masă sau orice alt obiect.
7. Nu utilizați scaunul in cazul in care copilul nu poate sta singur in el.
4. Nu utilizați produsul decât dacă toate componentele sunt montate si reglate corect.
3. Pentru a evita pericolul de cădere, nu lăsați copilul să se cațăre pe produs.
Pentru a evita riscul sufocării păstrați
pungile de plastic departe de copii
1. Nu lăsați niciodată copilul nesupravegheat.
2. Folosiți întotdeauna sistemul de centuri de siguranță.
IMPORTANT! CITIȚI CU
ATENȚIE ȘI PĂSTRAȚI
INSTRUCȚIUNILE PENTRU
CONSULTARI ULTERIOARE
ATENȚIE!

Page 14
Instrucțiuni de spălare
A nu se folosi
înălbitor
Nu curățați
chimic
Spălare de mană;
Nu utilizați solvenți, detergenți chimici sau lubrifianți pe nici una din componentele
acestui produs.
temperatura apei
sub 30 ℃
12. Curățați toate piesele cu apă caldă și săpun delicat care nu ataca materialele. Lasați-le
sa se usuce intr-un loc aerisit.
13. Dacă ati scapat alimente sau băuturi pe centuri, scoateti-le, clătiți cu apă caldă și
lasați-le sa se usuce intr-un loc aerisit.
14. Vă rugăm să consultați instrucțiunile de spălare din acest manual dacă doriti sa
curățați husa scaunului.
15. Este normal să se producă o ușoară estompare a culorii la prima spălare.
11. Pentru a evita riscul de mucegai, vă rugăm să păstrați scaunul de masa într-un loc
uscat și aerisit atunci când nu il utilizați.
Nu călcați

Page 15
BG
Съставки
A1. Облегалка
A2. Предпазни колани
A3. Дясна релса
A4. Пластмасова плочка
масичка
A5. Десен крак
A6. Лява релса
A7. Тавичка
A8. Спирач
A9. Седалка
A10. Пластмасова плочка столче
A11. Плот на маса
A12. Ляв крак
A13. Бутон за регулиране на
облегалка
A14. Пластмасова плочка
столче
A15. Чекмедже
A16. Щипка тавичка
A17. Тапицерия
A18. Тавичка
A19. Пластмасови гайки *16
A20. Защитни капаци x 4
A21. Диск за завинтване
Инструкции за монтаж
Стъпка 1. Монтиране на столчето
Поставете двата винта в двата съответни отвора и фиксирайте лявата страна на
столчето, както е показано на фигура Б1. Затегнете винтовете, като използвате
част A21.
Фиксирайте 2 пластмасови компонента A10, единият в предната част, а другият в
задната част на столчето. После, фиксирайте дясната част на столчето както
лявата. Уверете се, че пластмасовите винтове са здраво затегнати, без да се
насилва затягането им. (Фигура Б2).
Столчето трябва да изглежда като на фигура Б3. Разместете столчето от една на
друга страна след монтажа и се уверете, че е правилно фиксирано.
Стъпка 2: Монтиране на масата
Поставете компонент A4, както и плота на масата(A11) в съответните отвори в
десния крак, като на фигура Б4

Page 16
Затегнете здраво пластмасовите гайки, без да се насилва затягането им. Свържете
и левия крак на масата и затегнете добре винтовете без да насилвате. Фиг. Б4
Масичката трябва да изглежда като на фигура Б5. Разместете масичката от една на
друга страна след сглобяване и се уверете, че е закрепена подходящо.
Стъпка 3. Поставете предните крака на столчето на местата, предвидени в
плота на масата като на фигура Б6.1, натискайки подред 2-та странични бутона.
Прикрепете столчето към масичката като на фигура Б6.2. Издърпайте столчето
нагоре, за да се уверите, че е добре закрепено.
Стъпка 4. Монтиране на спирача срещу случайно
подхлъзване на детето
Държейки с ръка спирача, натиснете го в слота, който е на гърба на тавичката.
Когато бъде монтиран, ще се чуе звук „щракване” (Фиг. Б7)
Стъпка 5. Монтиране на тавичката
Държейки бутона за регулиране с едната ръка като на фиг. Б8, се изравняват 2-те
релси с ръкавите на столчето, а после натиснете тавичката отпред докато стигне
до правилна позиция. Фиксира се в момента, когато чуете звук „щракване".
Тавичката е двойна, горната част може да се извади и може да се почисти лесно.
Стъпка 6. Регулиране на обиколката
Издърпайте механизма за регулиране A13 на облегалката като на фигура B9.
Стъпка 7. Внимание: преди да използвате масата за игра: покрийте четирите
отвора в ъглите на масичката с 4-те защитни капаци A21 като на фиг. Б10.
Стъпка 8. Тавичката може да се захване (и да се съхранява) за щипките на
масата за игра като на фиг. (B11)
Стъпка 9. Регулиране на предпазните колани
Внимание: За да избегнете подхлъзване на детето от столчето за маса, уверете се,
че коланите се използват постоянно
1. Регулирайте коланите от всяка страна докато пасват на детето.
2. Поставете 2-те малки странични катарами в голямата централна катарама
докато чуете звук "щракване".
3. За да отключите катарамата, натиснете бутона в средата на централната
катарама и катарамите ще се отключат автоматично. (Фиг. Б12)

Page 17
За да избегнете риск от задушаване, дръжте
найлоновите торбички далеч от децата
ВАЖНО! ! ПРОЧЕТЕТЕ
ВНИМАТЕЛНО И
ЗАПАЗЕТЕ ИНСТРУКЦИИТЕ
ЗА ПОСЛЕДВАЩА
КОНСУЛТАЦИЯ
ВНИМАНИЕ!
1. Никога не оставяйте детето без наблюдение.
2. Винаги използвайте системата на предпазните колани.
3. За да избегнете опасност от падане, не оставяйте детето да се катери по
продукта.
4. Използвайте продукта само, ако всички компоненти са монтирани и
регулирани правилно.
5. Дръжте далеч от огън или от други източници на топлина, за да избегнете
евентуални опасности.
6. Внимавайте, има риск от накланяне, когато детето ви може да се избута с
краката на масата или всеки друг обект.
7. Не използвайте столчето, ако детето не може да стои само в него.
8. Ако забележите, че липсват части от столчето или те са били повредени, моля,
не използвайте продукта.

Page 18
9. Внимание: Продуктът е предназначен за деца, които могат да стоят изправени
самостоятелно. Да не се използва за деца на възраст над 3 години или с тегло над
15 кг.
10. Моля, уверете се, че коланите са ПРАВИЛНО подходящи и стегнати през
цялото време на използване на столчето.
11. За да избегнете риска от мухъл, моля, съхранявайте столчето за маса на сухо и
проветриво място, когато не го използвате.
12. Почиствайте всички части с топла вода и нежен сапун, който не вреди на
материалите. Оставете ги да изсъхнат на проветриво място.
13. Ако сте изпуснали храна или напитки по коланите, извадете ги, изплакнете ги
с топла вода и ги оставете да изсъхнат на проветриво място.
14. Моля, консултирайте се с инструкциите за пране в това ръководство, ако
искате да почистите тапицерията на столчето.
15. Нормално е цветът да избелее леко при първото изпиране.
Инструкции за пране
Ръчно пране;
температура на
водата под 30 ℃
Не използвайте
белина
Не почиствайте
химически
Не гладете
Не използвайте разтворители, химически детергенти или смазочни масла върху
нито един от компонентите на този продукт.

HU
Page 19
Összetevők
A1. Háttámla
A2. Biztonsági övek
A3. Jobb sin
A4. Műanyag asztallap
A5. Jobb láb
A6. Bal sin
A7. Etetőlap
A8. Leállitó
A9. Ülés
A10. Műanyag széklemez
A11. Etetőtábla
A12. Bal láb
A13. Háttámla beállitó gomb
A14. Ülés műanyag tábla
A15. Fiók
A16. Etetőlap horog
A17. Védőhuzat
A18. Etetőlap
A19. Műanyag anyák *16
A20. Védőburkolatok x 4
A21. Csavarozó tárcsa
Szerelési utasítások
1. lépés. Az ülés felszerelése
Helyezze be a két csavart a két megfelelő furatba, és rögzítse az ülés bal oldalát a B1
ábrán látható módon. Nyomja össze a csavarokat az A21-es darab segítségével.
Rögzítse a 2 műanyag A10 alkatrészeket egyiket az ülés elejére és a másikat az ülés
hátához. Ezután rögzítse az ülés jobb oldalát, mint a bal oldalt. Győződjön meg arról,
hogy a műanyag csavarok szorosak, anélkül, hogy a meghúzást erőltetné. (B2. ábra).
Az etetőasztalnak úgy kell kinéznie, mint a B3 ábra. Az ülést az összeszerelés után
egyik oldalról a másikra mozgassa, és győződjön meg arról, hogy megfelelően van
rögzítve.
2. lépés: Az asztal szerelése
Helyezze be az A4-es komponenst és az asztalasztalt (A11) a jobb láb megfelelő
furataiba a B4 ábrán látható módon. Nyomja össze a műanyag anyákat anélkül, hogy
eröltesse őket. Csatlakoztassa az asztal bal lábát, és eröltetés nélkül szorosan húzza
meg a csavarokat mint a B4. Ábra.
Az asztalnak úgy kell kinéznie, mint a B5 ábra. Mozgassa az asztalt egyik oldalról a
másikra az összeszerelés után, és győződjön meg arról, hogy megfelelően rögzített.

Page 20
3. lépés. Az ülés elülső lábait az asztalon lévő ülésekkel párosítsa a B6.1 ábrán
látható módon, egyenként megnyomva a 2 oldalsó gombot. Csatlakoztassa az
etetőszéket a B6.2 ábrán látható módon. Húzza fel az ülést, hogy biztosan biztosan
rögzítve legyen.
4. lépés. A leállitás beszerelése a gyermek véletlen kicsúszása
ellen
Fogja a leállitót a kezével, tolja be a tálca hátulján lévő dobozba. Amikor el van jól
helyezve, a " kattanás " hang hallható. (B7. ábra)
5. lépés. A tálca felszerelése
A beállítógombot egyik kezével tartva, mint a B8 ábrán, igazítsa a két sínt az ülés
karjaihoz, majd tolja előre a tálcát, amíg el nem éri a megfelelő pozíciót. Amikor el van
jól helyezve, a " kattanás " hang hallható. A tálca dupla, a felső rész eltávolítható és
könnyen tisztítható.
6. lépés. A háttámla beállítása
Húzza meg a háttámla A13 beállító mechanizmusát a B9 ábrán látható módon.
7. lépés. Figyelem: az asztal használata előtt: fedje le az asztal sarkaiban lévő négy
nyílást a 4 A21 védősapkával, mint a B10 ábrán.
8. lépés. A tálca az asztal horgoi által kiakasztható (és tárolható) (B11)
9. lépés. A biztonsági öv beállítása
Figyelem: Annak elkerülése érdekében, hogy a gyermek lecsússzon az etetőszékről,
ügyeljen arra, hogy a biztonsági öveket mindig használja
1. Állítsa be a biztonsági öveket mindkét oldalon, amíg azok alkalmasak a gyermek
számára.
2. Helyezze be a 2 kis oldalsó csatot a nagy központi csatba, amíg meg nem hallja a
"kattanás" hangot.
3. A csat meglazításához nyomja meg a csat közepén lévő gombot, és a csatok
automatikusan meglazulnak. (B12 ábra)
This manual suits for next models
3
Table of contents
Languages:
Other juju High Chair manuals