JUKI HZL-K85 User manual

INSTRUCTION MANUAL
使用说明书
사용 설명서
COMPUTER SEWING MACHINE
电脑缝纫机
컴퓨터 미싱
HZL-K85/K65
HZL-K85
HZL-K65

1
“IMPORTANT SAFETY INSTRUCTIONS”
“WARNING
-
To reduce the risk of burns, re, electric shock, or injury to persons: ”
1.“Do not allow to be used as a toy. Close attention is necessary when this appliance is used by or near
children.”
2.“Use this appliance only for its intended use as described in this manual. Use only attachments
recommended by the manufacturer as contained in this manual.”
3.“Never operate this appliance if it has a damaged cord or plug, if it is not working properly, if it has been
dropped or damaged, or dropped into water. Return the appliance to the nearest authorized dealer or
service center for examination, repair, electrical or mechanical adjustment.”
4.“Never operate the appliance with any air openings blocked. Keep ventilation openings of the sewing
machine and foot controller free from the accumulation of lint, dust and loose cloth.”
5.“Keepngersawayfromallmovingparts.Specialcareisrequiredaroundthesewingmachineneedle.”
6.“Always use the proper needle plate. The wrong plate can cause the needle to break.”
7.“Do not use bent needles.”
8.“Donotpullorpushfabricwhilestitching.Itmaydeecttheneedlecausingittobreak.”
9.“Switch the sewing machine off ("O") when making any adjustments in the needle area, such as
threading needle, changing needle, threading bobbin, or changing presser foot and the like.”
10.“Always unplug sewing machine from the electrical outlet when removing covers, lubricating, or when
making any other user servicing adjustments mentioned in the instruction manual.”
11.“Never drop or insert any object into any opening.”
12.“Do not use outdoors.”
13.“Do not operate where aerosol (spray) products are being used or where oxygen is being
administered.”
14.“To disconnect, turn all controls to the off (“O”) position, then remove plug from outlet.”
15.“Do not unplug by pulling on cord. To unplug, grasp the plug, not the cord.”
“SAVE THESE INSTRUCTIONS”
“This sewing machine is intended for household use only.”
Use only foot controller JF-1000 with your HZL-K85 and HZL-K65.
“When using an electrical appliance, basic safety precautions should always be followed, including the
following.”“Read all instructions before using this sewing machine.”
“DANGER
-
To reduce the risk of electric shock:”
1.“This sewing machine should never be left unattended when plugged in. Always unplug this sewing
machine from the electric outlet immediately after using and before cleaning.”
● Do not expose
machine to direct
sunlight or humid
atmosphere.
● Do not use thinner
or other similar
solvents to clean
machine.
● This sewing machine will stop due to safety
mechanism to prevent the machine from
overheating, when it sews slowly and for
a long time. In this event, Start and Stop
button will beep and blink in red.
● Use this product in a temperature between
5 and 40 degree Celsius. If temperature is
extremely low, this sewing machine may
not work properly.
Stop!
The sewing machine will
return to working
condition after about 10
minutes.
As the microcomputer(s), semi-conductor(s) and precise wiring board(s) is built in this sewing
machine,please pay attention that the following condition(s) may occur.

2
重要保护措施
重要安全提示
警告
-
减少灼烧、火灾、电击或人身伤害
1. 本机不允许被当作玩具。当儿童使用或靠近机器时,必须加以关注。
2. 本机器的功能仅限于本手册规定的范围之内。仅可使用本手册中生产厂商推荐的附件。
3. 当发生以下情况时 :机器电源线或插头损坏、机器工作不正常、机器被摔过或已损坏,或机器已 进过水,
则绝对不可 以使用机器。应将机器送到距离最近的授权销售商或售后服务中心作检查、 修理及电气或机械
的调整。
4. 当空气口被堵塞时,绝对不可以使用机器。应保持缝纫机的通风,并且保持脚踏控制器的清洁, 防止棉绒、
灰尘和零 布的堆积。
5. 手指应远离运动的部件,机针周围应特别注意。
6. 应保证使用合适的针板。使用不适当的针板会引起机针折断。
7. 不要使用弯曲的机针。
8. 缝纫时不要推或拉缝料,否则会引起机针折断。
9. 在机针作调整时,如机针穿线、更换机针、梭芯穿线或更换压脚等类似的操作,机器的电源开关 应置于
"0" 位
10. 当机器卸下外壳、加油、或进行使用手册中规定的保养和调整工作时,必须拔下电源插头。
11. 机器开口处绝对不能扔进或插入任何物体。
12. 不要在户外使用机器。
13. 正使用喷雾产品或充满氧气的地方禁止使用机器。
14. 如欲切断电源,须先将所有控制器调整到 "0" 位,然后拔下插头。
15. 不要拉住电线拔插头。拔插头应抓住插头,而不是电线
记住这些说明
本机仅限于家庭使用
使用本机器时,应遵守基本的安全防护措施,包括下列各项 :
危险
-
减少电击的可能性
1. 当接上电源时,机器必须有人照看。机器使用后以及清洁前,必须拔下电源插头
2. 更换照明灯前必须拔下电源插头,并且使用相同规格的 15W 灯泡
● 不要将缝纫机直接暴露在阳光或潮湿环境中 ● 不要使用稀释剂或类似溶剂清洁缝纫机。
● 当缝纫机长时间缓慢工作时,由于防止缝纫机
温度过高的安全机构的作用,此缝纫机将停止
工作。在此情况下,启动和停止按钮将不亮。
● 在 5 到 40 摄氏度的环境中使用此产品。如果
温度过低,此缝纫机可能无法正常工作。
Stop!
大约 10 分钟后,缝纫机
将重返工作状态。
由于此缝纫机装有微电脑、半导体和精密线路板,请注意下列情况的发生。

3
“안전에 관한 중요한 수칙”
“경고 - 화상 , 화재 , 감전 또는 인명 상해등의 위험을 줄이기 위하여 :”
1. “이 기기를 장난감으로 사용하지 않도록 해 주십시요 . 어린이들이 주위 가까이에 있을 때에는 주의가
필요합니다 .”
2. “본 제품은 사용 설명서에 나온 목적으로만 사용해 주십시요 . 이 사용 설명서에 나와 있는 생산업체에서 추천하는
아타치 먼트만 사용해 주십시요 .”
3. “본 제품에 코드나 플러그가 파손 되거나 정상적으로 작동하지 않고 떨어뜨리거나 파손 또는 침수되었을 경우 ,
가까운 판매점이나 서비스센터에서 검사 , 수리 또는 기계적인 조정 작업을 위해 가지고 가시기 바랍니다 .
4. “화기가 되지 않는 곳에서는 작업을 하지 마십시요 . 미싱의 통풍구와 속도 조절 발판은 실 보푸라기 , 먼지와
풀어진 천 등이 쌓이지 않도록 해야 합니다 .”
5. “모든 움직이는 부분에 손가락을 조심하십시요 . 미싱 바늘주위에는 특별한 주의가 필요로 합니다 .”
6. “항상 알맞은 침판을 사용하십시요 . 잘못된 침판을 사용 할 경우 바늘이 부러질 수 있습니다 .”
7. “구부러진 바늘을 사용하지 마십시요 .”
8. “바느질 중 천을 당기거나 밀지 마십시요 . 바늘이 부러지게 하는 원인이 될 수 있습니다 .”
9. “바늘 부근에서 조정하고 있을 때는 전원 스위치를 OFF(’ O’ ) 로 하십시요 . 실을 꿰거나 바늘 교환 , 보빈 실감기 ,
노루발 교환시 같은 방식으로 전원스위치를 OFF 로 하십시요 .”
10. “미싱 커버를 벗기거나 윤활 급유를 할 때 , 기타 사용 설명서에 언급되어 있는 조정 작업을 할 때에는 반드시
전원코드를 뺀 상태에서 하십시요 .”
11. “열리는 곳에는 어떠한 물체도 떨어 뜨리거나 집어 넣지 마십시요 .”
12. “본 제품을 옥외에서 사용하지 마십시요 .”
13. “에어로졸 ( 스프레이 ) 제품이 사용되거나 산소가 투여되는 곳에서는 본 제품을 사용하지 마십시요 .”
14. “미싱을 끄려면 스위치를 ‘O’ 의 위치로 돌려주고 플러그를 벽의 콘센트에서 뽑아 주십시요 .”
15. “코드를 잡고 플러그를 뽑지 마십시요 . 플러그를 빼려면 코드가 아닌 플러그를 잡고 뽑아 주십시요 .”
“이 설명서를 잘 보관하여 사용하십시요 .”
“본 미싱은 가정용으로만 사용하십시요 .”
속도조절 발판은 HZL-K85 와 HZL-K65 에 있는 JF-1000 으로만 사용하십시요 .
“미싱을 안전하게 사용하기 위해 기본적인 주의사항을 따라 주시기 바랍니다 .”
“사용에 앞서 모든 주의 사항을 읽어 주십시요 .”
“위험 - 감전의 위험을 줄이기 위해 :”
1. “ 본 제품은 플러그가 꽂혀진 채 절대로 자리를 비우지 마십시요 . 미싱의 사용후나 미싱 청소 직전에는 언제나
플러그를 뽑아 주십시요 .”
● 직사광선이나 습도가 높은 곳에서 노출하지
마십시요 .
● 신나 또는 이와 비슷한 용해제로 미싱을 닦지
마십시요 .
● 본 미싱은 천천히 또는 장시간 사용하시면 열이
발생하게 되는데 , 과열을 방지하기 위하여
안전장치가 작동되여 미싱이 정지됩니다 .
이럴 경우 출발 , 정지 버튼에 불이 들어 오지
않습니다 .
● 섭씨 5~40 도 사이에서 사용하십시요 . 온도가
아주 낮으면 작동이 제대로 되지 않습니다 .
Stop!
이 미싱은 약 10 분후 작업이
가능하게 자동회복됩니다 .
본 미싱은 마이크로 컴퓨터 , 반도체 부품 및 정밀한 전자 회로를 내장하고 있어 아래와 같은 경우가
발생할 수 있습니다 . 주의하여 주십시요 .

4
MEMO

5
CONTENTS / / 목차
CONTENTS 目 录
Important safe guards······························································1
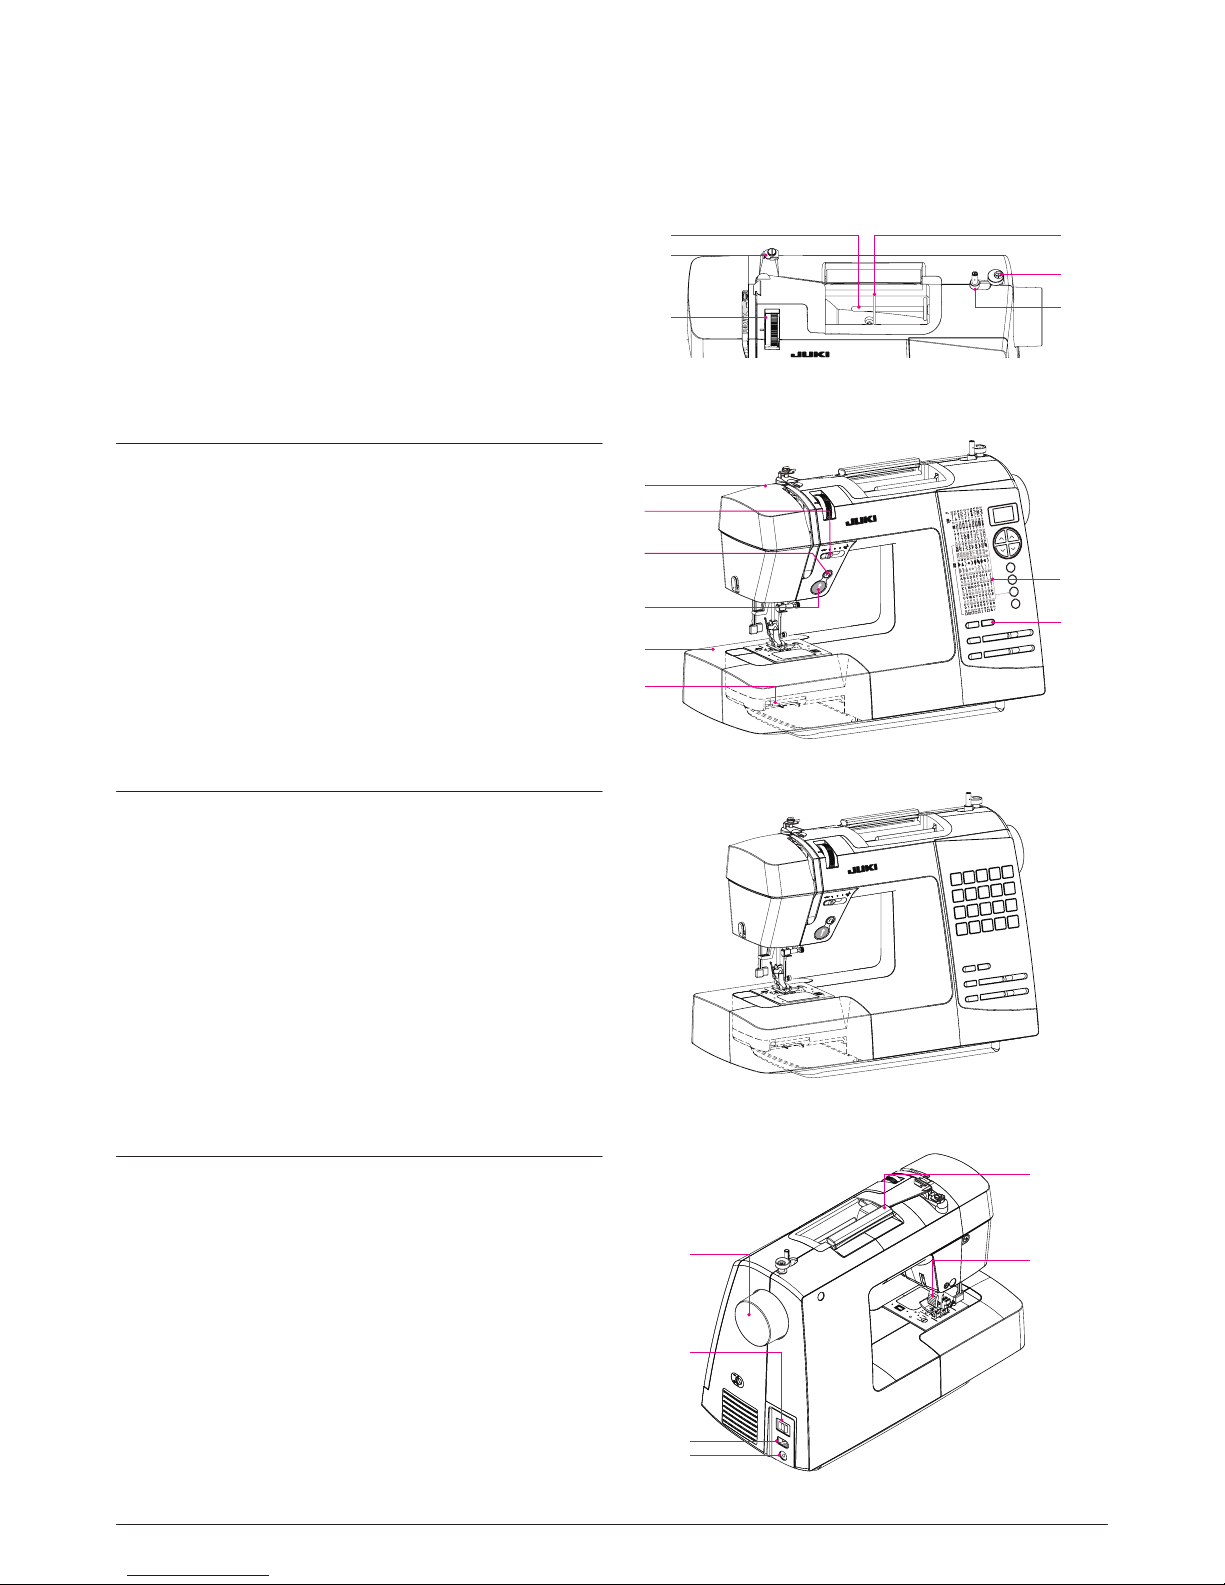
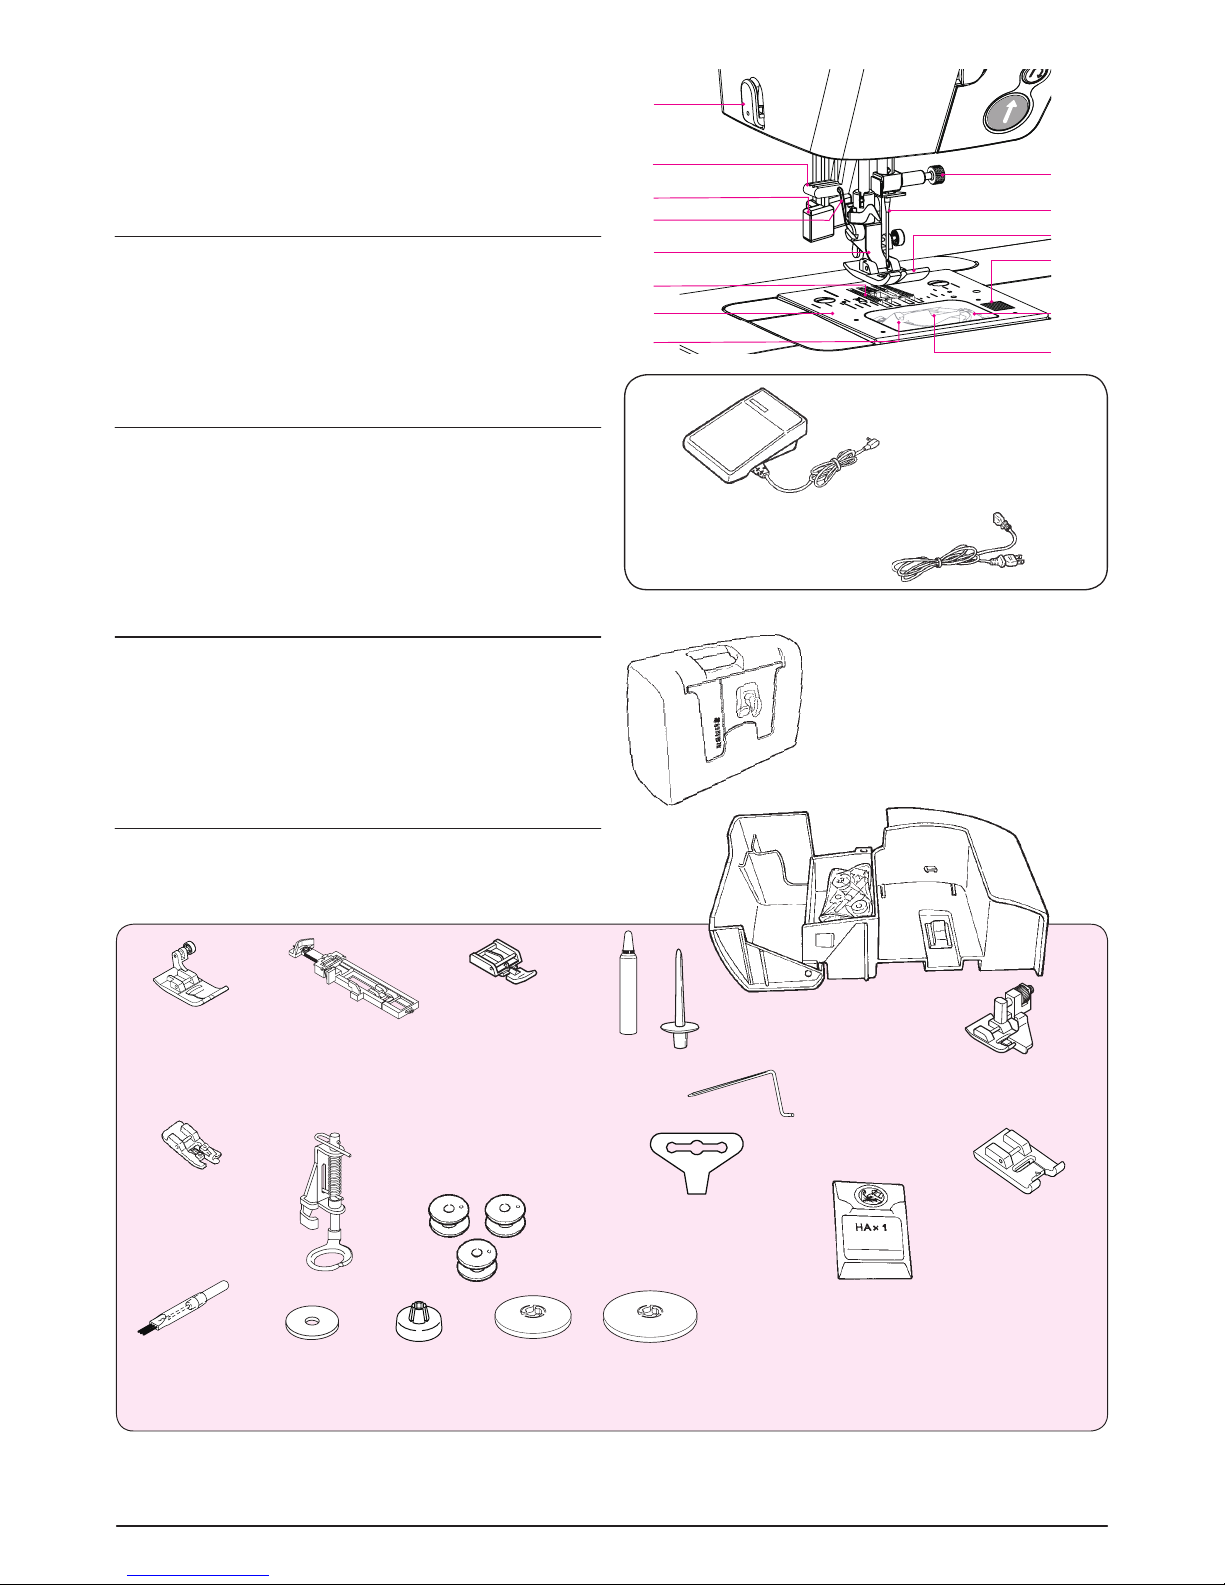
Principal parts······································································ 6,7
Accessories············································································7
Major functions ·································································· 8-13
Winding the bobbin····························································14-16
Placing bobbin in the case
Threading the machine·······················································17-19
Automatic needle threader / Pulling up the bobbin thread
Changing the presser foot ······················································20
Attaching the needle······························································21
Types of feet and their applications ·····································22,23
How to adjust stitch shape ·····················································23
How to adjust thread tension ··················································24
Fabric, thread and needle table ···········································25,26
How to adjust stitch length(manually) ··································27,28
Straight stitch ···································································29,30
Straight stitch on strechy fabric
Automatic lock stitch ·························································31-34
Manual lock stitch and sewing start on heavy fabric
Zigzag stitch ·········································································35
How to adjust stitch width (manually) ······································36
Overcasting ··········································································37
Reinforced stretch stitch ························································38
Automatic buttonholes·······················································39-41
Bartacking········································································42,43
Darning stitch ·······································································44
Quilting stitch ·······································································45
Patchwork ············································································46
Inserting zippers································································47-50
Lapped insertion / Centered insertion
Blindstitch········································································51,52
Quilting attachment,Quilt guide···············································53
Optional parts ···································································54-61
Invisible zipper foot /Manual buttonhole foot
Rolled hemming foot / Even feed foot / Smooth foot
Maintenance(Cleaning)···························································62
Performance check list·······················································63-66
목차
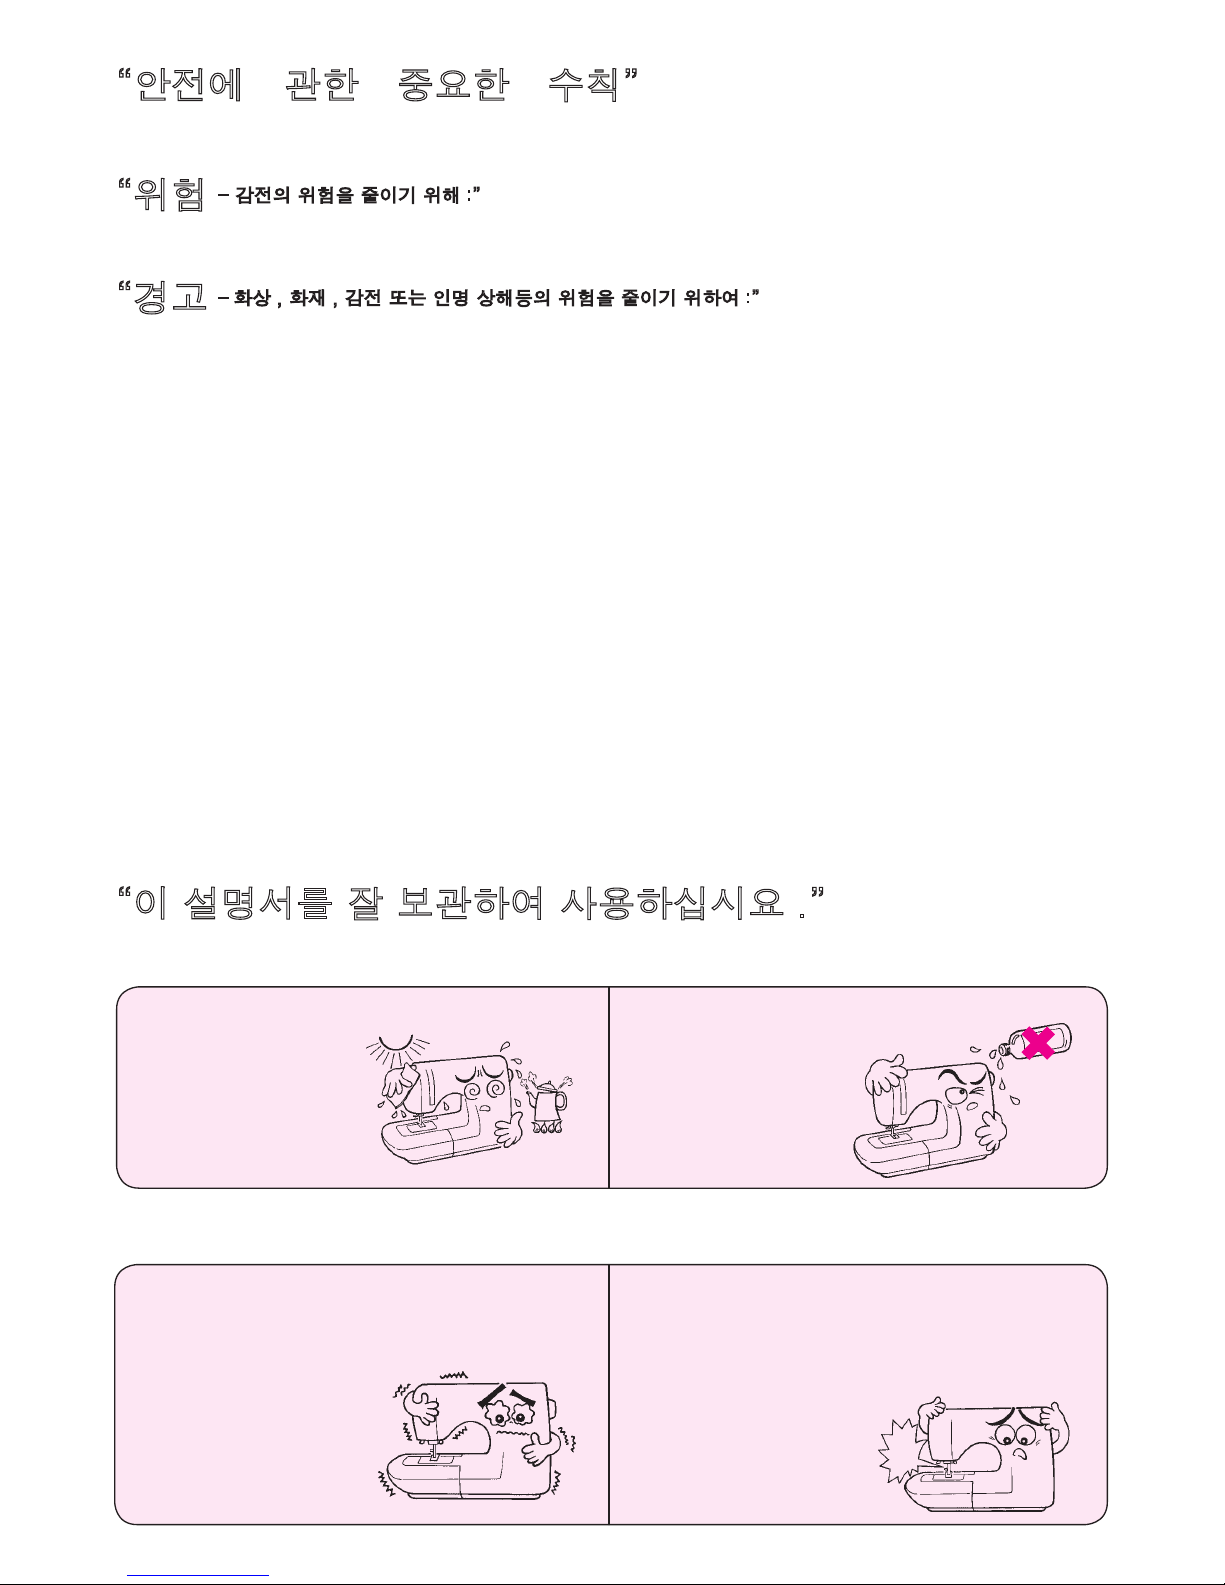
안전에 관한 중요한 수칙 ····························································3
주요 부품 ·············································································6,7
악세사리 ·················································································7
주요 기능 ···········································································8-13
보빈 실감기 ······································································14-16
북집에 보빈 놓기
실꿰기··············································································17-19
자동 바늘 실꿰기 / 보빈 실 위로 잡아 당기기
노루발 교환하기 ····································································· 20
바늘 설치 ·············································································· 21
노루발 종류와 응용 ···························································· 22,23
스티치 모양의 조작방법 ··························································· 23
실장력 조절방법 ····································································· 24
천 , 실 및 바늘 표 ······························································· 25,26
땀 길이 조절 방법 ( 수동 ) ···················································· 27,28
직선 박기 ········································································· 29,30
늘어나는 천에서의 원단 직선박기
자동 간맺기 (lock stitch) ·····················································31-34
수동 간맺기와 두꺼운 천 박기 시작
지그재그 스티치 ····································································· 35
땀폭 조절 방법 ( 수동 ) ····························································· 36
오버캐스팅 ············································································ 37
직선 강화 재봉 ······································································· 38
자동 단추구멍 ···································································39-41
바텍 (Bartacking) ······························································· 42,43
다닝 (Darning) 스티치 ······························································ 44
퀼트 스티치 ··········································································· 45
패치워크 ··············································································· 46
지퍼 달기 ·········································································47-50
겹삽입 / 중심 삽입
블라인드 스티치 ································································ 51,52
퀼트 어타치먼트 , 퀼트 가이드 ·················································· 53
옵션 부속 ·········································································54-61
투명 지퍼노루발 / 수동 단추구멍 노루발
말아박기 노루발 / 워킹풋 노루발 / 스무스 노루발
유지관리 ( 청소 ) ····································································· 62
작동 체크 리스트 ·······························································63-66
目录
重要安全提示··························· 2
主要部件···························· 6,7
附件······························· 7
主要功能····························8-13
绕底线···························· 14-16
安装梭芯
穿面线···························· 17-19
针自动穿线 / 引底线
更换压脚·····························20
安装机针·····························21
压脚的形式及其应用······················ 22,23
如何调节线的张力·························24
选择合适面料的缝线和机针的方法················ 25,26
如何调节针距(手动)····················· 27,28
直线缝···························· 29,30
伸缩布料的直线缝
自动倒缝··························· 31-34
手动倒缝及在厚料上开始缝纫
曲折缝······························35
如何调节针迹宽度(手动)·····················36
包边缝······························37
伸缩加固缝····························38
自动锁眼··························· 39-41
打结····························· 42,43
织补缝······························44
绗缝线迹·····························45
拼缝·······························46
装拉链···························· 47-50
侧缝部位装拉链 / 中置部装拉链
暗缝····························· 51,52
绗缝附件 , 绗缝导线器·······················53
附件····························· 54-61
隐蔽压脚 / 手动锁眼压脚 / 卷边压脚
上送料压脚 / 防滑压脚
清洁保养 ( 扫除 )·························62
故障排除··························· 63-66

6
Principal Parts /
1. Spool pin
2. Bobbin thread guide
3. Thread tension dial
4. Thread spool cap
5. Bobbin winding regulator
6. Bobbin winder
7. Face cover
8. Speed controller
9. Reverse stitch button
10. Start/Stop button
11. Auxiliary bed
1. 线架棒
2. 绕底线导向
3. 面线调节旋钮
4. 挡线帽
5. 绕线调节器
6. 绕线轴
7. 机头罩盖
8. 速度控制捏手
9. 倒缝按钮
10. 开 / 关按钮
11. 辅助缝台
1. 실패핀
2. 보빈 ( 밑 ) 실 감기 안내
3. 실장력 조절 다이얼
4. 실패 캡
5. 실감기 조절기
6. 실감기 축
7. 면판
8. 스피드 콘트롤러
9. 되돌려 박기 버튼
10. 시작 / 정지 버튼
11. 보조 베드
12. 톱니 다운 레버
12. Drop feed lever
13.Automatic lock stitch button
14. Stitch selection panel
15. Handwheel
16. Light / Power switch
17. Power cord receptacle
18. Foot controller receptacle
19. Handle
20. Presser foot lever
12. 下送料调节杆
13. 自动倒缝按钮
14. 线迹选择面板
15. 飞轮
16. 照明灯 / 电源开关
17. 电源插座
18. 脚踏控速器插头插入口
19. 拎手
20. 抬压脚扳手
13. 자동 되돌려 박기 버튼
14. 스티치 선택 판넬
15. 핸드휠 ( 푸리 )
16. 전등 / 전원 스위치
17. 전원 코드 소켓
18. 속도조절 발판 소켓
19. 손잡이
20. 노루발 올림 레버
HZL-K85
HZL-K65
20
17
16
15
19
18
13
8
7
11
9
10
12
14
6
1
2
3
5
4
主要部件
주요 부품

7
1. Thread Cutter
2. Needle threader
3. Buttonholing lever
4. Presser foot release lever
5. Presser foot shank
6. Feed dog
7. Needle plate
1. 割线刀
2. 穿线扳手
3. 锁眼扳手
4. 压脚更换扳手
5. 压脚架
6. 送布牙
7. 针板
1. 사절 칼
2. 실꿰기 레버
3. 단추구멍 레버
4. 노루발 분리 레버
5. 노루발 자루
6. 톱니
7. 침판
8. Bobbin case
9. Needle clamp
10. Needle
11. Presser foot
12. Hook cover release button
13. Hook cover
14. Bobbin
8. 内梭
9. 针固定螺钉
10. 机针
11. 压脚
12. 旋梭盖板开启键
13. 旋梭盖板
14. 梭芯
8. 보빈 케이스
9. 바늘 고정 나사
10. 바늘
11. 노루발
12. 가마 뚜껑 개폐 버튼
13. 가마 뚜껑
14. 보빈
Foot controller
속도 조절 발판
Electric power cord
전원 코드
· You can keep instruction manual at hard
case.
·
· 사용설명서는 하드케이스에
보관하십시요 .
Standard presser foot (A)
표준 노루발 (A)
Buttonhole foot (E)
단추 구멍노루발 (E)
Zipper foot (B)
지퍼 노루발 (B) Blindstitch presser foot (D)
블라인드 스티치 노루발 (D)
T-shape screw-driver
T- 모양 드라이버
Bobbins (3)
보빈 (3)
Overcasting foot (C)
오버 캐스팅 노루발 (C)
Quilting attachment
퀼팅 노루발
Spool pin
실패핀
Quilt guide
퀼트 가이드
Seam ripper
리퍼/솔
Auxiliary Bed
보조 베드
Accessories /
* These items are equipped with machine.
* 机器安装了下列装置。
* 이 악세사리들은 기본세팅입니다 .
Needle pack
바늘 팩
HA×1 No.11 2P
No.14 1P
( )
HA×1 No11×2
No14×1
()
Oiler
油壶
급유기
Spool cap(medium)
线轴帽(中)
실패 캡 ( 중 )
Spool pin felt disc
插线钉毡盘
실패 핀 펠트 디스크
Spool cap(large)
线轴帽(大)
실패 캡 ( 대 )
Manual buttonhole foot(I)
手动锁眼压脚(I)
수동 단추구멍 (I)
For K85 only
仅适用于 K85 型
K85 에만 있음
Spool cap(small)
线轴帽(小)
실패 캡 ( 소 )
*
**
1
2
3
4
5
6
7
8
9
10
11
12
13
14
脚踏控速器
电源线
附件
标准压脚(A) 锁眼压脚(E)
可以把使用说明书放入缝纫机的机头罩里
线架杆 辅助缝台
拉链压脚(B)
暗缝压脚(D)
梭芯(3)包边压脚(C)
拆线刀
T- 型螺丝刀
机针包
绗缝压脚
绗缝导杆
악세사리

8
Major functions /
Type of Stitch patterns and operation (Operation/indication panel)
花样和操作类型(操作 / 显示面板)
패턴 종류 및 조작 표시 판넬
HZL-K85
Automatic lock stitch button(reverse stitch)
自动锁缝按钮
자동 되돌려 박기 버튼
Stitch length adjusting lever
缝迹长度调节杆
땀 길이 조절 레버
Zigzag width adjusting lever
지그재그 폭 조절 버튼
Stitch length manual adjustment button
缝迹长度手动调节钮
땀 길이 수동 조절 버튼
Zigzag width manual adjustment button
曲折缝宽手动调节钮
지그재그 폭 수동 조절 버튼
Automatic lock stitch button(reinforcement stitch)
自动锁缝按钮
자동 땀 맺음 스티치 버튼
Needle up/doun button
机针上下调节按钮
바늘 상 / 하 정지 버튼
Shift key
转换键
쉬프트 (Shift) 키
Clear key
清除键
클리어 (Clear) 키
Memory key
存储键
메모리 키
Pattern number selection button
花样号码选择钮
패턴 번호 선택 버튼
Pattern No. / stitch length / Zigzag width indicator
花样号码 / 缝迹长度 / 曲线缝宽显示器
패턴 번호 / 땀길이 / 지그재그 폭 화면
* When turning on the machine, straight stitch "00" (center needle position) will be automatically chosen.
* Choose the pattern No. you want to sew by pushing the pattern No. selection button.
Example) When you want to choose (No.23) _ 1. Press twice of upper left side (number of tens).
2. Press three times of upper right side (number of units).
* 启动机器时,会自动选择直线缝线迹“00”(中心机针的位置)。
* 按下花样选择按钮来选择想缝制的花样。
例)如果想选择 (No.23) _ 1. 按左上选择键 2 次(十位数字)
2. 按右上选择键 3 次(个位数字)
主要功能
曲线缝宽调节杆
주요 기능
* 미싱을 켜면 , 직선 박기 스티치 “00” 이 자동으로 선택되여집니다 .
* 여러분이 원하는 패턴을 패턴 선택 버튼을 눌러서 선택하십시요 .
예 ) ( N o . 2 3 ) 패턴을 선택 하려면 , 1. 윗쪽 왼쪽 버튼을 두번 누른다 . (10 단위 숫자 조절 )
2. 윗쪽 오른쪽 버튼을 세번 누른다 . (1 단위 숫자 조절 )

9
How to use Memory key / Clear key / Shift key
메모리키 / 클리어 키 / 쉬프트 키 사용방법
Memory key :
存储键 :
Clear key :
清除键 :
Shift key :
转换键 :
Press this key when storing the selected letters or patterns (30 to 99)
into memory . Letters and patterns can be stored into memory up to 40.
Press it every time after you choose the letter or pattern.
按此键,将选择的字母或花样(30-99)存入存储器。最多可存储 40 个
数字和花样。每次选择字母或花样后都应按下存储键。
Letters and patterns stored in memory can be deleted from the rear
part of them. When keeping the button pressed, all stored memory can
be deleted.
可以用此键来清除放在存储器中的字母和花样。
按住此键,所有的记忆将被清除。
Press this key when you want to choose the lower patterns from pattern
No.30 to 78. (The lamp will be lit)
想要选择 No.30-78 下面的花样时,按此键。(指示灯亮)。
This sewing machine has stitch
patterns for stretchy fabric such
as knitted fabric, jersey and so
on.
이 미싱은 니트나 저지 이외의
신축성 있는 천을 위한 패턴도
가지고 있습니다 .
Stitch patterns for stretchy fabrics
신축성 있는 천을 위한 패턴
Straight stitch for elastic
고무줄 직선 스 티 치
3-step zigzag stitch
3- 스텝 지그재그 스티치
Blind stitch for elastic
고무밴드를 위한 블라인드 스티치
Stretch reinforcing stitch
스트레치 보강 스티치
如何使用存储键 / 清除键 / 转换键
本机有用于伸缩布料,如针织布料针
织物等的花样。
伸缩布料的花样
弹性缝料直线缝
伸缩加固缝
3 步曲折缝
弹性缝料暗缝
HZL-K85
메모리 키 :
(Memory key)
글자나 패턴 (30 - 90) 을 저장하려면 이 키를 누르십시요 .
글자나 패턴은 40 개까지 메모리로 저장됩니다 .
글자나 패턴을 선택한 후에 매번 키를 누르십시요 .
클리어 키 :
(Clear key)
메모리에 저장된 글자나 패턴은 제일 끝부터 지워집니다 .
버튼을 계속 누르고 있으면 저장된 모든 메모리가 지워집니다 .
쉬프트 키 :
(Shift key)
패턴번호 30 에서 78 까지 아래쪽 패턴 ( 소문자 포함 ) 을 원하시면 이
키를 누르시면 됩니다 .

10
HZL-K65
Pattern
花样
패턴
Automatic lock stitch button(reverse stitch)
自动倒缝按钮
자동 되돌려 박기 버튼
Automatic lock stitch button(reinforcement stitch)
自动锁式线迹按钮
자동 맺음 스치티 버튼
Stitch length adjusting lever
针距调节杆
땀길이 조절 레버
Zigzag width adjusting lever
曲折缝宽度调节杆
지그재그 폭 조절 레버
Stitch length manual adjustment button
手动针距调节按钮
스티치 길이 수동 조절 버튼
Zigzag width manual adjustment button
手动曲折缝宽度调节按钮
지그재그 수동 조절 버튼

11
Major Functions /
■ Foot controller
Push Foot controller plug into
lower receptacle at right end of
machine.
During use of foot controller,
Start and Stop Button is
nonusable.
■ Power cord
Push power cord plug [1] into
upper receptacle at right end of
machine.
Plug [2] into electric outlet.
■ Mains power and light switch
■ 电源开关和照明等开关
■ 전원 및 전등 스위치
● Torunthe machinepressfoot
controller. The harder you
press, the faster machine will
sew. To stop machine, remove
foot from controller.
● 使用机器脚踏控速器。压力越大,
机器的速度越高。将脚从控速器
上移开,则机器停止。
● 속도 조절발판을 더 강하게
밟을 수록 더 빠르게 미싱이
돌아갑니다 .
발판에서 발을 떼면 미싱은
멈추게 됩니다 .
■ 电源线
将电源线插头(1)插入
机器右边底部上面的插座里。
插头(2)插入电源插座
■ 전원 코드
미싱의 오른쪽 끝에 미싱
연결부 윗구멍에 전원코드
플러그 [1] 을 꽂으십시요 .
전기 출구 속에 플러그 [2] 를
꽂으십시요 .
■ 速度控制器
将速度控制器插头插入机
器右边底部的插入口。
■ 속도 조절 발판
미싱 오른쪽 끝의 미싱연결부 아래 구멍에 속도 조절
발판을 꽂으십시요 .
속도 조절 발판을 사용 할 때 시작 및 정지 버튼은 사용 할
수 없습니다 .
ON
OFF
主要功能
[1]
[2]
주요 기능

12
■ Start/stop button
Press the button for start. Push
it again to stop sewing. Needle
will stop at its lowest position.
■ Presser foot lever
(a) Presser foot goes up.
(b) Presser foot comes down.
■ 压脚扳手
(a) 抬起压脚
(b) 放下压脚
■ 노루발 레버
(a) 노루발 올림
(b) 노루발 내림
■ Speed controller
You can adjust Maximum
sewing speed.
■ Reverse stitch button
Push it manually to secure the
stitches at sewing-start and end
of seam. If you push this button
at sewing-end, needle will stop
at its highest position.
■ 速度控制捏手
可以调节缝纫速度。
■ 속도 조절 장치
미싱속도를 천천히 또는 빠르게
조절할 수 있습니다 .
■ 倒缝按钮
在缝纫开始和结束时,用手按一下按钮,可进行倒缝。
如果在缝纫结束时按下,机针会在最高位停住。
■ 되돌려 박기 버튼
미싱의 재봉의 시작과 끝에서 실이 풀리지 않게 수동으로
버튼을 누릅니다 .
미싱 재봉 끝에서 버튼을 누르면 바늘이 최상 위치에서
정지합니다 .
■ 开 / 关按钮
按一下按钮,机器开始缝纫。
再次按一下按钮,机器停止缝纫。
机针处于最低位
■ 시작 / 정지 버튼
재봉을 멈추려면 그 버튼을
다시 누르십시요 . 바늘은
하정지로 멈출 것 입니다 .
(a)
(b)
Slower
천천히
Faster
빠르게
变慢 变快

13
(a)
(b)
■ Free arm
Draw the auxiliary bed to the
left side.
■ 辅助缝台
可以将辅助缝台从左边拉出。
■ 프리암
좌측으로 보조함을 빼냅니다 .
■ Drop feed dog
The feed dog should be
lowered for special sewing
techniques, such as free
motion embroidery.
The feed dog must be always
up for normal sewing. The
drop feed lever is on the front
of the free arm. Slide the lever
either to the right (down) [1] or
the left (up) [2]. To bring up the
feed dog, turn the handwheel
after sliding lever to the left.
■下送料
在一些特殊缝纫时,如自由运动绣花,需要将送料牙放下。
在一般缝纫时,送料牙应总是处于上面的位置。
将送料牙调节杆置于辅助缝台的前面将调节杆向右(此时
送布牙处于特殊缝纫状态)(1),或左(此时送布牙处于一
般缝纫状态)(2)滑动。如想提升送料牙,则应转动飞轮,
将调节杆滑动至左边。
■ 톱니
톱니를 밑으로 내리면 프리모션 자수와 같은 특수 재봉을
하실 수 있습니다 .
톱니는 일반 재봉을 위해 위로 올라가 있습니다 .
톱니 레바가 프리암 전면에 있습니다 .
레버를 우측 (1) 으로 밀면 밑으로 좌측 (2) 으로 밀면 위로
올라갑니다 .
좌측으로 레버를 밀고나서 핸드휠을 돌리면 톱니가
올라옵니다 .
■ Thread tension dial
(a) To increase the needle
thread tension.
(b) To decrease the needle
thread tension.
■ 面线张力调节旋钮
(a) 增强线的张力
(b) 降低线的张力
■ 실 장력 다이얼
(a) 바늘 실 장력 증가
(b) 바늘 실 장력 감속
[1]
[2]

14
Winding the Bobbin /
● Winding the bobbin
●
● 보빈 ( 밑 ) 실 감기
* When you turn on the power to the machine under the bobbin winding
condition, the machine will beep.
* 如果在绕底线的状态下,电源被打开,则会发出 PiPi 的声音。
* 보빈 실감기 상태에서 전원을 켜면 , 미싱은 신호음이 납니다 .
Bobbin thread guide
보빈 ( 밑 ) 실 감기 가이드
Bobbin winding regulator
보빈 감기 조절기
Bobbin winder
보빈 실 감기
■ Open the hook cover.
Caution:
Turn off the machine before opening the hook cover.
■ 打开旋梭盖板
警告 :
打开旋梭盖板前,必须关闭机器
■ 가마 커버를 엽니다 .
주 의 :
가마 커버를 열기 전에 전원 스위치를 꺼주십시요 .
1
2■ Take out the bobbin.
■ 取出梭芯
■ 보빈을 빼냅니다 .
■ Place the thread spool and cap onto the spool pin.
Select the spool cap that matches the circumference of
the thread spool to be used.
■ 将线团及挡线帽放入
线架棒 选择适合线团架子大小的挡线帽
■ 실패를 넣고 실패 핀에 켑을 끼웁니다
사용할 실패와 맞는 실패 캡을 선택하십시요 .
3
Thread spool cap (large / medium)
线轴帽(大 / 中)
실패 캡 ( 대 / 중 )
Large spool
큰 실패
Thread spool cap (Small)
실패 캡 ( 소 )
Small spool
작은 실패
绕底线
绕底线
绕底线导向 绕线轴
绕线调节器
线轴帽(小)
挡线帽(小)
线轴(大)
보빈 ( 밑 ) 실 감기

15
5
4■ Thread the bobbin thread
guide.
Put the thread with both hands
around the thread guide so
that it winds clockwise.
■ Set the bobbin on the
bobbin winder.
Press the bobbin toward the
bobbin winding regulator.
■ 将梭芯安装在绕线轴上
将梭芯推入绕线调节器
■ 보빈실감기에 보빈을
세팅합니다 .
보빈을 보빈 감기 조절기
쪽으로 눌러 끼웁니다 .
■ Start winding the bobbin.
Upon completion of winding
the bobbin, press the start /
stop button again.
■ 开始绕底线
在完成绕线后,再次按一下开
/ 关按钮
■ 보빈 실 감기를 시작합니다 .
보빈 감기가 끝나면 시작 / 정지버튼을 다시 누릅니다 .
■ Push the bobbin back to the
left.
Cut an excess thread and take
out the bobbin.
■ 将梭芯推回到左侧
剪去多余的线,并取出梭芯
■ 좌측으로 보빈을 누릅니다 .
잔사를 자르고 보빈을
빼냅니다 .
■ 绕底线导向穿线
用双手将线按顺时针方向
给绕底线导向穿线。
■ 보빈 실감기 가이드에 실을
넣으세요 .
실을 우측으로 돌려 양손으로
보빈 실감기 가이드에서 시계
반대방향으로 걸어 줍니다 .
8
■ Bobbin winding mode
When bobbin winder is in its
working position, start stop
button will change to orange.
When bobbin winding condition,
needle will not move.
■ 绕线模式
绕线器处于工作状态,启动 / 停止按钮将变成黄色。在绕
线状态下,机针将无法移动。
■ 보빈 감기 모드
보빈 감기가 준비가 되면 시작 / 정지 버튼이 오렌지
색으로 변합니다 .
보빈 감기 조건이 설정 되면 바늘을 움직이지 않습니다 .
Bobbin winder
보빈 실감기
Bobbin winding
regulator
보빈 실감기
조절기
绕线轴
绕线调节器
6
7

16
■ Put the bobbin in the
bobbin case.
Place the bobbin so that thread
winds counterclockwise.
■ Thread the bobbin case.
Put the thread [1] and place
thread on groove [2] and draw
the thread to rear of machine.
■ 梭芯穿线
将线穿过(1),绕过槽(2)
顺着往后拉。
■ 보빈케이스에 실꿰기
[1] 에서 실을 걸고 [2] 홈에
올려 놓고 미싱 뒤쪽으로 잡아
당깁니다 .
■ Close the hook cover.
■ 关闭旋梭盖板
■ 투명 플라스틱 가마케이스를
닫으십시요 .
■ 将梭芯放入内梭
■ 보빈케이스 ( 속가마 ) 안에
보빈을 넣습니다 .
시계 반대 방향으로 실을
감도록 보빈을 넣습니다 .
910
11
[1]
[2]
● Adjusting the bobbin thread guide
●
● 보빈 실 가이드 조절
In the case where the bobbin is unevenly
wound with thread according to the type of
thread, the bobbin thread guide has to be adjusted.
由于线的不同 , 当绕线偏向梭芯一侧时 , 可进行调节
실 종류에 따라서 보빈실 균형이 맞지 않을때 보빈 실
가이드로 조정합니다 .
Move the bobbin thread guide up or
down to adjust so that the bobbin is
evenly wound with thread.
对绕线导向按图示进行调整 ,
使梭芯绕线上下均匀。
보빈실 가이드를 상하로 움직여
보빈실이 균형있게 감기도록
조정합니다 .
●● ●
绕底线的调节

17
Threading The Machine /
Be sure to turn off the machine before threading.
在穿线前,必须关闭电源
실꿰기 전에 반드시 미싱 전원을 꺼주십시요 .
CAUTION:
警告 :
주 의 :
* Be sure to raise the presser foot before threading.
* 실을 꿰기전에 노루발을 꼭 올려주십시요 .
* 在穿线前,必须将压脚抬起。
[4]
[3]
[2]
Take-up
실채기
[2]
[3]
[2]
■ Raise the presser foot lever. ■ Draw the thread through
the groove and pull it
downward.
■ Pass the thread around [3],
then pull it upward.
■ 将线绕过(3),然后向上拉
■ [3] 으로부터 실을 위로 잡고
당기십시요 .
■ 将线进入槽子后往下拉
■ 홈에 넣은 다음 실을 잡고
밑으로 내리십시요 .
■ Thread the thread guide.
■ 抬起压脚扳手
■ 穿过线导向
■ 노루발 레버를 올리십시요 .
■ 실가이드에 실을 거세요 .
24
3
[5]
[6]
1
[1]
穿面线
挑线杆
미싱 ( 윗 ) 실 꿰기 / Inrijgen van de machine

18
[4]
■ Thread the thread to take-up
[4], then pull it downward. ■ Thread the hook.
Push threading lever all the
way down and a hook will go
through eye of needle.
Pass thread in front of needle
and below hook.
■ 穿线钩穿线
将穿线扳手压到最低 , 则穿线
钩子将穿过针眼 , 然后将线从
机针前钩子下方穿过。( 线会
自动地挂在线钩上。)
■ 후크에 실꿰기
실꿰기 레바를 제일 밑에까지
눌러서 내리면 실은 실꿰기
후크가 바늘눈을 통과하여
잡아 챌 것입니다 .
실을 바늘 앞쪽 , 후크아래로
통과시키십시요 .
■ Raise the needle threader.
Release the lever, and the
needle will be threaded.
If thread is threaded to the
needle eye , release a finger
off a thread tip.
■ Draw out thread.
Draw out thread through
needle eye by approximately
10 cm.
■ 将线拉出
将穿入的线从针眼中拉出约
10cm
■ 실을 잡아 당깁니다 .
실을 바늘 눈에서 약 10cm
정도 잡아 빼냅니다 .
■ 抬起穿线扳手
释放穿线扳手,机针完成穿线。
线穿过针眼后,移开线端的手
指。
■ 실꿰기 레버를 놓습니다 .
레버를 놓고 후크에 걸려 있던 실이 바늘 귀에 꿰여
집니다 .
■ 将线穿过挑线杆(4),然后往
下拉
■ [4] 의 실채기에 실을 꿰고
밑으로 잡아 당기세요 .
■ Draw the thread behind [5]
from the right.
■ 将线从右侧钩入(5)
■ [5] 는 우측에서 끼워서
걸어줍니다 .
■ Lower the presser foot.
Raise the needle.
Then, lower the needle
threader and thread (A).
■ 放下压脚
按下穿线扳手。然后按下穿线
扳手(A)将线挂住。
■ 바늘실꿰기를 내립니다 .
바늘을 올립니다 .
그리고 나서 바늘 실꿰기와
실 [A] 를 아래로 내립니다 .
5
6
[5]
Automatic Needle Threader
자동 바늘 실꿰기
* Check to be sure that the needle is in its highest position.
* 바늘이 제일 높은 위치에 있는지 확인하십시요 .
2
4
1
3
Hook
鉤
후크
Take-up
실채기
[A]
挑线杆
针自动穿线
* 检查确认机针是否在最高位

19
Pulling Up The Bobbin Thread
보빈 ( 밑 ) 실 끌어 올리기
■ Lightly hold the needle
thread with ngers.
■ 用手指轻轻拉住面线
■ 바늘 ( 윗 ) 실을 가볍게
잡습니다 .
■ Turn the handwheel toward
you.
The needle moves up and
down to draw up the bobbin
thread from the bobbin.
■ Pull both the needle and
bobbin threads out by 10 cm.
Pass them under presser foot
toward back of machine.
■ 将面线和底线各拉出 10cm
将面线和底线放在压脚下向后
拉出。
■ 윗실과 아랫실을 10cm 정도 잡아 빼냅니다 .
윗실 , 아랫실을 노루발 밑으로 보내고 뒷쪽으로
빼냅니다 .
■ 朝自己的方向转动飞轮
机针作上下运动,将底线从梭
芯中拉出。
■ 핸드휠을 자기쪽으로 돌립니다 .
바늘이 상하로 움직여지면서 보빈으로부터 보빈실을 잡아
당깁니다 .
1
2
3
引底线
Other manuals for HZL-K85
2
This manual suits for next models
1
Table of contents
Other JUKI Sewing Machine manuals

JUKI
JUKI DLN-415 User manual

JUKI
JUKI TL-2200QVP Mini User manual

JUKI
JUKI MO-654 User manual

JUKI
JUKI MF-7900D/UT59 User manual

JUKI
JUKI LBH-1795AN User manual

JUKI
JUKI DLN-9010A-SH User manual

JUKI
JUKI MO-644D User manual

JUKI
JUKI DU-1181 Quick start guide

JUKI
JUKI DDL-9000B User manual

JUKI
JUKI DLM-5400N-7 User manual