JUKI PS-800-12080 User manual

PS-800-12080
INSTRUCTION MANUAL

i
CONTENTS
1. SPECIFICATIONS..................................................................................................................... 1
2. CONFIGURATION..................................................................................................................... 2
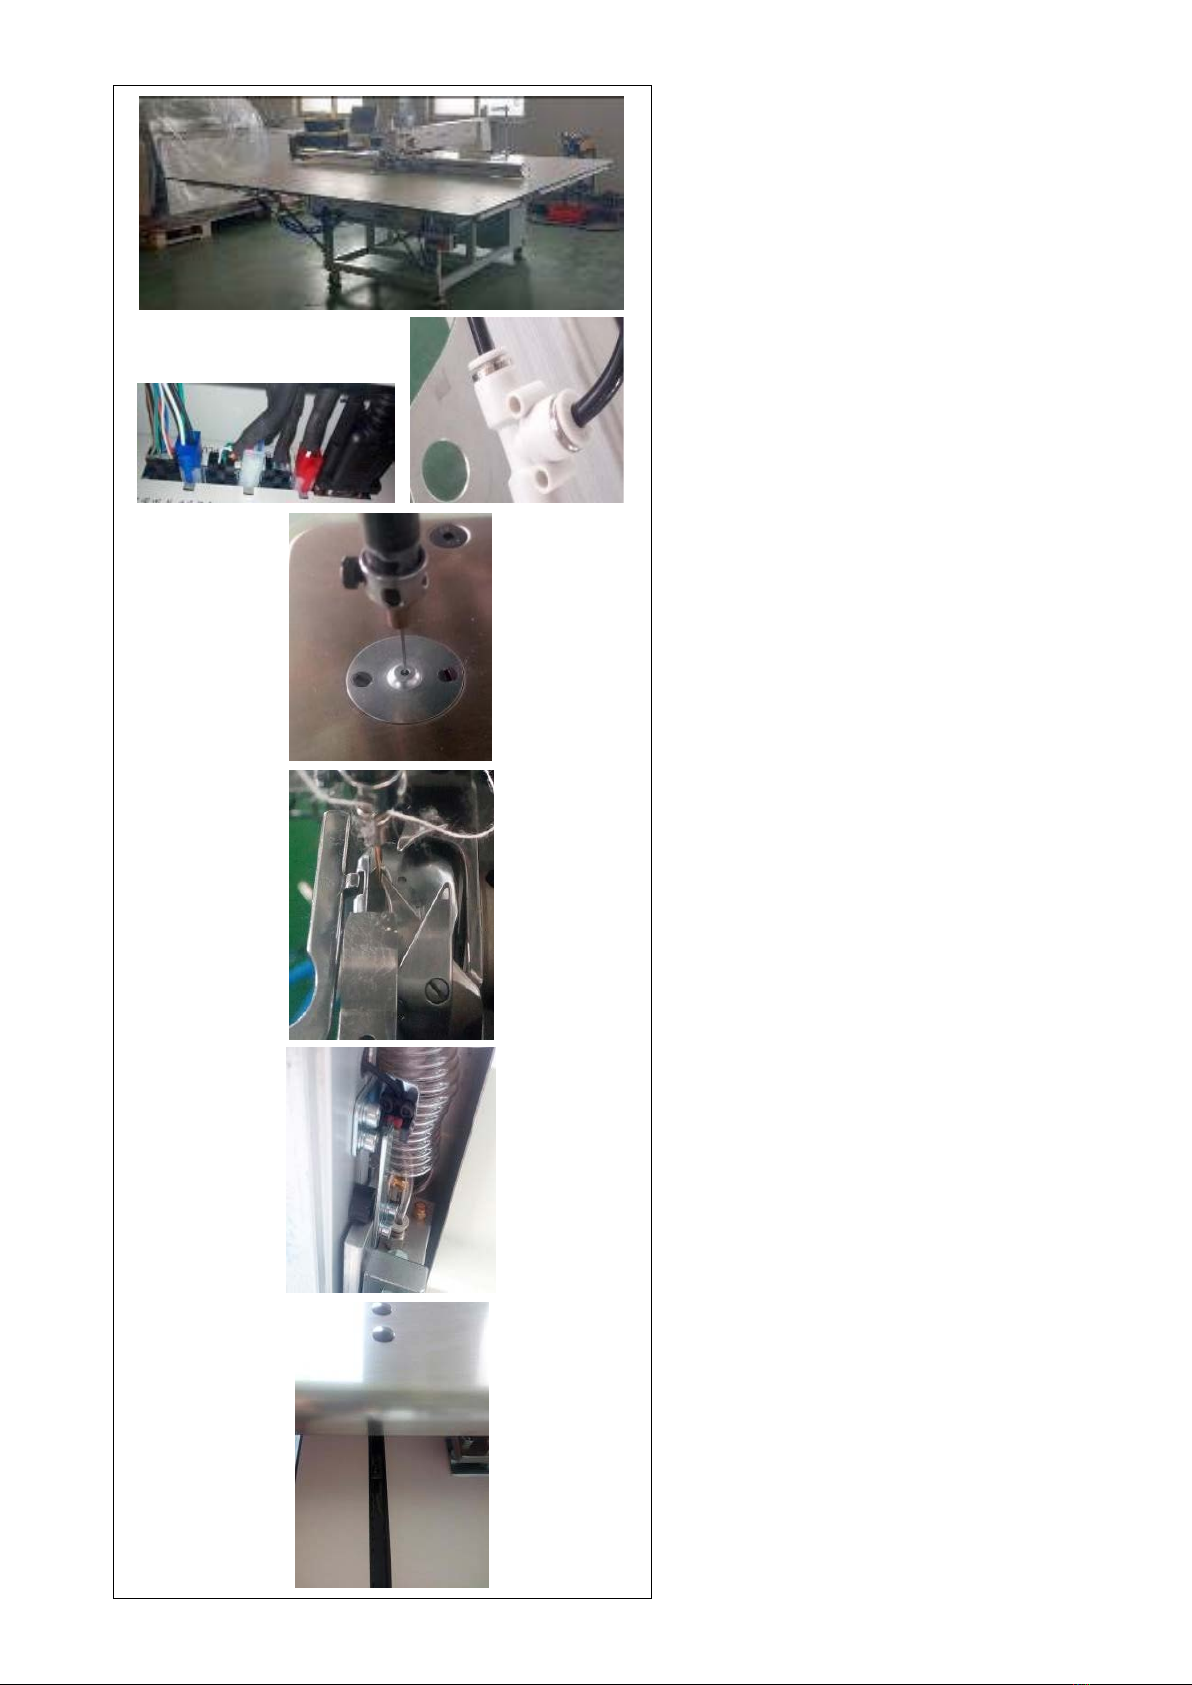
3. INSTALLATION ......................................................................................................................... 3
3-1. Setting up the sewing machine ....................................................................................................3
3-2. Installing the air hose ....................................................................................................................9
3-3. Cautions for the compressed air supply (source of supply air) facility .................................10
3-4. Installing the bobbin winder device ...........................................................................................11
3-5. Precautions for installation of the machine ..............................................................................11
4. PREPARATION OF THE SEWING MACHINE........................................................................ 12
4-1. Lubricating method and check of the oil quantity....................................................................12
4-2. Attaching the needle....................................................................................................................13
4-3. Threading the machine head ......................................................................................................14
4-4. Bobbin replacement procedure..................................................................................................15
4-5. Adjusting the thread tension ......................................................................................................16
4-6. Adjusting the thread take-up spring and the thread breakage detector plate .......................17
4-7. Adjusting the thread take-up stroke...........................................................................................17
4-8. Needle-to-hook relationship........................................................................................................18
4-9. How to wind a bobbin..................................................................................................................19
4-10. Adjusting the needle bar height..................................................................................................20
4-11. Adjusting the position of the thread trimmer ............................................................................21
4-12. How to attach / remove the cylinder lifting plate ......................................................................23
4-13. How to conrm the amount of oil (oil splashes) in the hook...................................................24
4-14. Adjusting the amount of oil in the hook.....................................................................................25
4-15. Adjusting the needle hole in the throat plate and the needle ..................................................26
4-16. Setting the mechanical origin .....................................................................................................27
4-17. Adjusting the disk presser pressure ..........................................................................................28
4-18. Adjusting the thread end position at the beginning of sewing................................................29
4-19. Adjusting the electronic intermediate presser stroke ..............................................................30
4-20. Adjusting the function for holding the thread by blowing air upward ....................................31
4-21. Making a template ........................................................................................................................32
4-22. Preparation for sewing ................................................................................................................34
4-23. Conguration of the operation panel .........................................................................................36
4-24. Maintenance mode.......................................................................................................................38
4-25. List of parameters ........................................................................................................................39
4-26. List of error codes........................................................................................................................45
5. MAINTENANCE OF SAWING MACHINE............................................................................... 50
5-1. Troubles and corrective measures (Sewing conditions)..........................................................55

– 1 –
1. SPECIFICATIONS
1 Sewing area (X,Y)(mm) 1200 × 800
2 Feed motion of feeding frame Intermittent feed (2-shaft drive by stepping motor)
3 Needle bar stroke 39.5 mm
4 Max. sewing speed 3,000 sti/min (When stitching pitch is 3 mm or less)
For other stitch pitches and numbers of revolutions, refer to Fig. 1.
5 Settable stitch length 0.5 to 12.7 mm
6 Needle DB×1 #8 (#7 to #14), DP×5 #8 (#7 to #14)
To be chosen according to the model.
7 Hook Double-capacity full-rotary hook
8 Intermediate presser stroke 4 mm (Standard)
9 Lift of intermediate presser 20 mm
10 Lift of disc presser 15 mm
11 Memory of pattern data Max. 999 patterns
12 Max. 999 patterns
13 Program input method USB
14 Data format DXF.AI.PLT.DST
15 Main shaft servomotor power 550W
16 Power consumption 470VA
17 Input voltage 220V ± 10%
18 Mass (gross mass) 750 kg
19 Dimensions 2,250 mm (W) × 2,185 mm (L) × 1,250 mm (H)
20 Operating temperature range
21 Operating humidity range 35 to 85 % (No dew condensation)
22 Storage temperature range
23 Storage humidity range 20 to 85 % (No dew condensation, 85 % applies to the case
24 Air pressure used 0.5 to 0.6 MPa
25 Needle highest position stop facility After the completion of sewing, the needle can be brought up to
its highest position.
26 Noise -
Equivalent continuous emission sound pressure level (LpA) at the
workstation :
A-weighted value of 78.0 dB ; (Includes KpA = 2.5 dB) ; accord-
27 Lubricating oil
grease No. 2
Type and number: Lithium base 2# grease
Stitch pitch and the sewing speed
Number Stitch pitch Sewing speed
1 2.8 mm 2,800 sti/min
2 3.0 mm 2,500 sti/min
3 4.0 mm 2,200 sti/min
4 5.0 mm 1,800 sti/min
Note: The sewing machine must not run at the maximum number of revolutions continuously for more than
15 minutes. The number of revolutions may vary even if the pitch is consistent due to the change in the
needle and material.
Fig. 1

– 2 –
2. CONFIGURATION
❶Machine head
❷Table
❸X-axis feed mechanism
❹Y-axis feed mechanism
❺Cassette clamp device
❻Operation panel
❼Air control box
❽Electrical control box
❾Power switch (also used as the emergency
stop switch)
Thread stand
Bobbin winder device
❶
❷
❸
❻
❾
❼
❺
❹
❽

– 3 –
3. INSTALLATION
3-1. Setting up the sewing machine
3-1-1. Unpacking
1) Lift up clamp ❶as shown in the picture.
2) Firstly remove upper cover ❷. Then,
remove the covers of the remaining four
surfaces.
If the clamp is not lifted up suf-
ciently, unpacking will not be
smoothly carried out.
❶
rear caster seats ❸of the sewing ma-
chine.
❷
❸

– 4 –
feed mechanism from the crate.
Cut the cable clip band to detach
the sewing machine parts.
* Insert the claw of
a folk lift here.
place with a folk lift. (Sewing machine
weighs 640 kg)
7) Turn the casters to check to make sure
that the sewing machine is levelled. Also
make sure that the sewing machine is
placed steadily with little wobbling.
Turn red pad ❹
❹
* Necessary tools are contained in the ac-
cessory box.

– 5 –
3-1-2. Setting up the X feed mechanism
and the table
1) Detach the package.
nut you have detached in the accessory
box.
❺. Tighten the
screws that are placed under the rubber
plugs with a wrench. Then, attach rubber
plugs ❺.
❺
4) Move the clamp to the center of the X
feed mechanism before removing six nuts
in order to prevent the clamp from inter-
fering with screws when attaching them.
5) Take care not to allow the screws from
-
taching the nuts.
Put the nuts you have removed in the
accessory box.
Pin
* Store the tools in the accessory box.
Align the pin with
the pin hole.

– 6 –
3-1-3. Setting up the table
1) Loosen the thumb screw as shown in Fig.
I when setting up the left table, right table
and front table (center).
2) Tighten the nuts and screws that are ex-
clusive to the aluminum frame as shown
in Figs. II and III when setting up the front
table (left) and the front table (right).
Fig. I
Fig. II
Fig. III

– 7 –
3-1-4. Setting up the switches, bobbin
winder and switch button (asm.)
* Necessary tools are contained in the ac-
cessory box.
1) Secure the power switch plate to the alu-
minum frame of the front table (right) with
two Phillips head screws A.
Secure power switch Cto the plate with
two Phillips head screws B.
2) Secure switch button (asms.) Fto the
aluminum frame of the front table (right)
with T screws Eand nuts D.
Secure three switch buttons so that they
point upward.
AB
C
DE
F
3) Secure the bobbin winder to the alumi-
num plate of the front table (right) with T
screw Eand nut D.
DEDE

– 8 –
3-1-5. Check points and precautions be-
fore turning the power ON
1) Inspect the levelness of the sewing ma-
chine.
2) Inspect that the electric components and
pneumatic components of the sewing
machine have been securely assembled.
3) Inspect the alignment between the needle
entry point and the center of needle hole
in the throat plate of the sewing machine.
4) Detach the throat plate and inspect the
relation between the needle and the hook.
the X feed origin detection sensor and the
detection plate.
smoothly.

– 9 –
3-2. Installing the air hose
1)
❶.
WARNING :
Check to be sure that the air hose is fully inserted into the air cock before supplying the air to the
machine so as to prevent the air from being blown directly to the human body. Then, carefully open
the air cock.
2) Adjustment of air pressure
Pull up air regulating knob ❷. Then, turn it to
adjust the air pressure to 0.5 - 0.55 MPa.
Then, push down air regulator knob ❷.
Pull up air regulating knob ❸. Then, turn it to
adjust the air pressure to 0.5 - 0.55 MPa.
Then, push down air regulator knob ❸.
❷: Adjustment of the air pressure of the entire
sewing machine
❸: Adjustment of the air pressure of the disk
presser
❶
❷
❸

– 10 –
3-3. Cautions for the compressed air supply (source of supply air) facility
As large as 90 % of failures in pneumatic equipment (air cylinders, air solenoid valves) are caused by "con-
taminated air."
such "contaminated air" is used without taking any measures, it can a cause of troubles, inviting reduction in
productivity due to mechanical failures and reduced availability.
Be sure to install the standard air supply facility shown below whenever the machine provided with pneumat-
ic equipment is used.
Mist separator
Standard air supply facility to be prepared by the user
Standard equipment supplied by JUKI
Air compressor
Auto-drain
Auto-drain
After cooler
Air tank
Main line lter
Air dryer Quality of the air supply
When the supply air contains a considerable amount of moisture
Ambient environment
When our machine is installed at a place where the temperature greatly
changes in the morning and in the evening from that in the daytime or
freeze is like to occur.
In the aforementioned cases, be sure to install an air dryer.
When the supply air contains a considerable amount of carbon
and dust
(Most troubles in the air solenoid valves are caused by carbon.)
Be sure to install a mist separator.
Filter regulator
Air solenoid valve
Air cylinder
Cautions for main piping
• Be sure to slope main piping by a falling gradient of 1 cm per 1 m in the direction of air ow.
• If the main piping is branched o, the outlet port of the compressed air should be provided at
the top part of the piping using a tee in order to prevent drain settling inside the piping from
owing out.
• Auto drains should be provided at all lower points or dead ends in order to prevent the drain
from settling in those parts.

– 11 –
3-4. Installing the bobbin winder device
❶
❷
❸
1) Insert bobbin winder disk mounting bar ❶into
hole ❷in the bobbin winder and secure with nut
❸.
3-5. Precautions for installation of the machine
1. Depending on the size of
template, the sewing ma-
chine may extend beyond
the sewing machine table
in X direction. Take care not
to allow the machine to hit
against someone standing
near the table to cause inju-
ry.
2. Be sure to secure a space
as wide as 500 mm or more
around the sewing machine
table (i.e., both in lateral and
longitudinal directions).
Sewing machine table Template
2180mm
420mm
2285mm
115mm 115mm

– 12 –
4. PREPARATION OF THE SEWING MACHINE
4-1. Lubricating method and check of the oil quantity
1. Do not use any oil other than the spec-
ied oil. After the completion of lubri-
cation, securely attach the rubber plug
and cylinder lifting plate to their original
positions.
2. When you put the sewing machine into
use for the rst time after delivery or
after having disused it for a long time,
replenish the hook with a small amount
of oil in advance.
WARNING :
Turn OFF the power before starting the work so as to prevent accidents caused by abrupt start of the
sewing machine.
Max
Min
❶
❷
1) Detach cylinder lifting plate ❶.
❷from the oil tank.
3) Fill the oil tank with the accessory oil (or the spec-
4) The adequate oil amount is obtained when the
oil surface stays between the oil tank indications
"Min" and "Max".

– 13 –
4-2. Attaching the needle
WARNING :
Turn OFF the power before starting the work so as to prevent accidents caused by abrupt start of the
sewing machine.
❶
❷
❷
❸
❸
❹
1) Loosen screw ❶to remove the needle.
Be sure to hold the needle so that its
groove ❷faces toward blade point ❸of
the rotary hook.
2) Tighten screw ❶.
In the case of replacing the needle with a
needle which diers in specications, be
sure to re-adjust the distance from the
rotary hook to the needle. If you neglect
this re-adjustment, the problems listed
below can occur.
1. Stitch skipping
2. Thread fray
3. Breakage of blade point of hook
4. Breakage of needle

– 14 –
4-3. Threading the machine head
WARNING :
Turn OFF the power before starting the work so as to prevent accidents caused by abrupt start of the
sewing machine.
❶
❷
1) Put sewing machine thread ❶on thread stand ❷.
Lastly, draw out thread end through needle eyelet
by 50 to 60 mm.

– 15 –
(3) Installing the bobbin case
1) Place the bobbin case in the hook with its knob A
tilted and fully push it into the hook until you hear
it click.
❶.
If it is not fully inserted, bobbin case ❸
may slip o during sewing.
If the bobbin ❷is installed in the bobbin
case orienting the reverse direction, the
bobbin thread pulling out will result in an
inconsistent state.
(2) Installing the bobbin
1) Set the bobbin ❷into bobbin case ❸in the direc-
2) Pass the thread through thread slit Bof bobbin
case ❸, and pull the thread as it is. By so doing,
the thread will pass under the tension spring and
be pulled out from thread hole C.
3) Pull out the thread by 5 cm from thread opening C.
Check the position of your hands and the
locations of goods before opening / clos-
ing cover ❶so as to prevent the goods
from being caught under the cover and
to prevent bodily injury.
In addition, do not push cover ❶with
your hands placed on it.
(1) Removing the bobbin case
1) Open cover ❶. Then, the bobbin can be
changed.
Aof bobbin case ❸, and remove the
bobbin case ❸and the bobbin ❷.
4-4. Bobbin replacement procedure
WARNING :
Turn OFF the power before starting the work so as to prevent accidents caused by abrupt start of the
sewing machine.
50mm
B
❸
❷
C
❶
❸
❷
A

– 16 –
4-5. Adjusting the thread tension
(1) Adjusting the needle thread tension
Thread tension controller No. 1 ❶
When the tension disk of thread tension controller
No. 2 ❸is loosened, such a small tension as to
control the thread trimmer has to remain. The re-
maining tension is produced by tension controller
❶. It is possible to determine the length of thread
trailing from the needle after automatic thread
trimming by adjusting nut ❷of the thread tension
controller. The length of thread trailing from the
needle is reduced by turning nut ❷clockwise (+).
It is increased by turning nut ❷counterclockwise
(-).
Thread tension controller No. 2 ❸
The tension (applied to the thread coming from
the needle) controlled with thread tension con-
troller No. 2 ❸should be set as low as possible
so that the needle thread and bobbin thread are
interlaced together at the center of material thick-
ness (Fig. A). If the thread tension is excessively
high when sewing a light-weight material, the ma-
terial may become wrinkled or thread may break.
The tension applied to the thread coming from the
needle is increased by turning nut ❹clockwise
(+).
It is decreased by turning nut ❹counterclockwise
(-).
Fig. A: Threads are interlaced together accurately at
the center of material thickness.
Fig. B: Needle thread tension is too low or bobbin
thread tension is too high.
thread tension is too low.
(2) Adjusting the bobbin thread tension
1) Turn tension adjusting screw ❺clockwise (in
direction C) to increase or counterclockwise (in
direction D) to reduce the bobbin thread tension.
The bobbin case will come down slowly by its
-
ure.
A
B
❺
❶
❷
❸
❹
Fig. A
Fig. B
Fig. C

– 17 –
4-6. Adjusting the thread take-up spring and the thread breakage detector plate
4-7. Adjusting the thread take-up stroke
1) Adjusting the stroke
Loosen setscrew ❷. Turn thread tension con-
troller ❸. Turning it clockwise will increase the
stroke of the thread take-up spring ❶and the
thread drawing amount will increase.
2) Adjusting the pressure
To change the pressure of the thread take-up
spring ❶, insert a thin screwdriver into the slot of
thread tension post ❹while screw ❷is tightened,
and turn it. Turning it clockwise will increase the
pressure of the thread take-up spring ❶. Turning
it counterclockwise will decrease the pressure.
3) Adjusting the thread breakage detector plate
Loosen setscrew ❻. Adjust the position of thread
breakage detection plate ❺so that the contact
depth between thread breakage detection plate
❺and thread take-up spring ❶becomes 0 to 0.2
mm.
1) When sewing heavy-weight materials, move
thread guide ❶to the left (in direction A) to
increase the length of thread pulled out by the
thread take-up.
2) When sewing light-weight materials, move thread
guide ❶to the right (in direction B) to decrease
the length of thread pulled out by the thread take-
up.
3) Normally, thread guide ❶is positioned in a way
that the center of elongated hole is aligned with
the center of the screw.
Adjust so that thread breakage detector
plate ❶does not touch any adjacent
metallic parts other than thread take-up
spring ❷. If the thread breakage detec-
tion plate comes in contact with any oth-
er metal part, a maloperation can occur.
❶
BA
❷
❶❺
❹
❻
❸

– 18 –
1) Lift the needle bar from its lower dead point by
2.9 ± 0.3 mm. In this state, adjust the needle bar
height and the hook position.
2) When observing from the front face of the sewing
machine, the blade point of hook seems to over-
lap with the center of needle.
3) When observing from the side face of the sewing
machine, the clearance provided between the
blade point of hook and the scarf of needle is 0.05
to 0.2 mm.
4-8. Needle-to-hook relationship
If thread breakage occurs, the thread can
be tangled in the hook. In such a case,
remove the thread being tangled in the
hook carefully. Then, re-start sewing.
WARNING :
Turn OFF the power before starting the work so as to prevent accidents caused by abrupt start of the
sewing machine.
(1) Needle and hook, and angle setting
0.05 to 0.2 mm
Front face Side face
2.9 ± 0.3 mm
(2) Position of the needle and the inner hook holder
setting QEP value displayed on the operation
panel becomes 570 to 575.
Longitudinal position of the inner hook holder and
needle: The front end of needle is aligned with the
inner hook.
Lateral position of the inner hook holder and needle:
The rightmost end of projection of inner hook holder
is aligned with the right side of needle.
Other manuals for PS-800-12080
2
Table of contents
Other JUKI Sewing Machine manuals

JUKI
JUKI LK-1900A User manual

JUKI
JUKI LU-1510N Quick start guide

JUKI
JUKI DDL-8100e User manual

JUKI
JUKI CP-180 User manual

JUKI
JUKI AK-157 User manual

JUKI
JUKI MO-104D User manual

JUKI
JUKI HZL-70HW-B User manual

JUKI
JUKI TL-2010Q User manual

JUKI
JUKI MEB-3200 Series User manual

JUKI
JUKI DSC-246 User manual