Jumbo 25118 User manual

Read instructions carefully before assembly
ITEM NO. 25118
GENERAL WARRANTY TERMS
The product has a twelve (12) month warranty on materials and workmanship. The warranty
requires that the garage was properly installed in accordance with these operating instructions.
The warranty does not cover damage caused by incorrect installation, or damage caused by snow,
wind or storm. The buyer assumes responsibility for all risks and liability arising from his repairs or
changes to the original product or the spare parts he has installed on it.
CAUTION!
-Observe local climatic conditions. Climatic factors can affect the durability of product.
-Never stay in the garage during a thunderstorm or storm, and make sure that no children
can enter the garage.
-The garage and anchoring are designed to withstand winds of up to 13 m / s. Place in a
sheltered place.
-The garage is designed to be anchored to fixed ground. Never erect on porous ground
without proper anchoring.
-Do not hang any objects on the frame tubes. The frame must not be subjected to
additional stress and the structure of the frame must not be modified.
-The structure of the garage cannot withstand heavy snow loads.
-Remove snow from roof immediately or garage may collapse. WARRANTY DOES NOT
COVER DAMAGES CAUSED BY WEATHER CONDITIONS.
-No flammable substances may be used or handled inside the garage. Do not light a fire
inside the garage. Welding in the garage is prohibited. Do not use heaters inside the
garage.
SAFETY INSTRUCTIONS
-Keep the work area clean when assembling garage.
-Make sure that the working conditions are good during assembling. Under no
circumstances should you start assembling the garage in windy conditions.
-Carefully check the contents of the package and that no parts of the garage have been
damaged.
-If parts of the garage are damaged, use only parts obtained from the importer as spare
parts. Other spare parts will void the warranty.
-Keep children and animals away from the garages during assembling.
-Use appropriate protective equipment and tools when assembling the garage.
-Always wear impact-resistant goggles during assembly.
-Do not attempt to move the garage during or after assembly

2
-Avoid using the garage during extreme conditions. If the weather conditions become
severe, at least remove the tarpaulin from the garage. The importer / seller will not
compensate for damage caused by a storm or weather conditions.
-Proper anchoring of the garage is most important safety measure, this is always in the
responsibility of the buyer.
WARNING: The issues and instructions covered in this manual may not cover all
possible situations and circumstances. The user must understand the use of
common sense and caution in assembling, anchoring, and using the carage.
ASSEMBLY
1) After opening the packing box, check that all the parts are in the box and sort them according to
the list so that the assembly is flexible and easy.
2) Find a flat sheltered place for the garage. Never install a garage in the immediate vicinity of
another building. Please note that snow may fall from another building on top of the tarpaulin and
may cause a collapse. The warranty does not cover collapses caused by snow.
3) It is advisable to have 1-2 persons helping while assembling.
4) ANCHORING:
There are several different ways to anchor a garage.
The garage can be anchored from the corners with the included anchoring pins. In addition, we
recommend making additional anchors using ground screws, cement blocks, anchoring wedges or
concrete weights.
The best result is obtained by making a gravel bed for the garage and installing ground screws
under the vertical pipes and bolting the pipes to the ground screws. Another option is to install or
cement blocks under the vertical pipes and bolt the garage pipes to them. In addition, it would be
good to install at least 200kg of extra weight in each corner.
5) Start the assembly by joining the arch pieces of the garage together. Use the structure diagram
at the end of this manual. When the arches of the garage are ready, attach the horizontal support
pipes to the arches. You can then install the other side of the garage vertical pipes.
6) Make sure that the parts lock properly and all the quick locks snap into their holes.
7) Fasten with bolts during assembly, and finally tighten carefully.
8) Lift the roof cover over the frame so that it is in approximately the correct position.
9) Now you should lift other side up and assemble vertical pipes.
10) Tighten the roof cover in place by threading the rubber loops through the sail rings and around
the pipe.
11) Continue in the same way by attaching the wall and door covers. Install the door cover cords.
12.) The hem of the sides can be secured separately to the ground.
Check all bolts and fastenings and then garage is ready for use.

3
Lesen Sie die Bedienungsanleitung vor der Montage und Benutzung.
PRODUKT 25118
ALLGEMEINE GARANTIEBEDINGUNGEN
Das Produkt hat eine Garantie von zwölf (12) Monaten auf Material und Verarbeitung. Die
Garantie setzt voraus, dass der Baldachin gemäß der Bedienungsanleitung ordnungsgemäß
zusammengebaut wird. Die Garantie deckt keine Schäden ab, die durch unsachgemäße Montage
oder durch Schnee, Wind oder Sturm verursacht wurden. Der Käufer übernimmt die
Verantwortung für alle Risiken und Haftungen, die sich aus Reparaturen oder Änderungen am
Originalprodukt oder den daran montierten Ersatzteilen ergeben.
WARNUNG!
-Beachten Sie die örtlichen klimatischen Bedingungen. Die Klimafaktoren können die
Lebensdauer des Baldachins beeinflussen.
-Bleiben Sie niemals während eines Gewitters oder Sturms unter dem Baldachin und stellen
Sie sicher, dass sich keine Kinder unter dem Baldachin aufhalten.
-Der Baldachin und die Verankerung sind für Windgeschwindigkeiten bis zu höchstens 13
m/Sek ausgelegt. Bauen Sie den Baldachin an einer geschützten Stelle auf.
-Der Baldachin ist so konzipiert, dass er auf festem Boden verankert werden kann. Bauen
Sie den Baldachin niemals auf porösem Boden ohne Verankerung auf.
-Es dürfen keine Gegenstände an die Rahmengestänge aufgehängt werden. Der Rahmen
darf nicht zusätzlich belastet oder verändert werden.
-Der Baldachin hält keinen Schneelasten stand.
-Entfernen Sie den Schnee immer unmittelbar nach dem Schneefall vom Dach, da sonst
der Baldachin einstürzen kann. DIE GARANTIE DECKT KEINE SCHÄDEN DURCH
WETTERBEDINGUNGEN AB.
-Unter dem Baldachin dürfen keine brennbaren Substanzen verwendet oder gehandhabt
werden. Offenes Feuer und Schweißen unter dem Baldachin sind verboten. Unter dem
Baldachin dürfen keine Heizungen verwendet werden.
-Der Verkäufer/ Importeur haftet nicht für Schäden durch Schnee, Regen oder Sturm.
Sicherheitshinweise
-Halten Sie den Arbeitsbereich sauber.
-Stellen Sie sicher, dass während der Montage des Baldachins gute Arbeitsbedingungen
herrschen. Beginnen Sie unter keinen Umständen mit der Montage des Baldachins bei
starkem Wind.
-Überprüfen Sie sorgfältig den Inhalt der Verpackung, ob alle Teile vorhanden und in
Ordnung sind.
-Sollten Teile des Baldachins beschädigt werden, verwenden Sie nur die vom Importeur
erhaltene Teile als Ersatzteile. Die Garantie erlischt bei Verwendung von anderen
Ersatzteilen.
-Halten Sie Kinder und Tiere während der Montage des Baldachins fern.
-Beim Zusammenbau des Baldachins geeignete Schutzausrüstungen und Werkzeuge
benutzen.
-Tragen Sie bei der Montage immer eine schlagfeste Schutzbrille.

4
-Versuchen Sie nicht, den Baldachin während oder nach der Montage zu bewegen.
-Vermeiden Sie die Verwendung des Baldachins unter extremen Wetterbedingungen. Wenn
das Wetter schlecht werden sollte, entfernen Sie zumindest die Plane vom Baldachin. Der
Importeur / Verkäufer haftet nicht für Schäden, die durch Sturm oder Wetterbedingungen
verursacht wurden.
-Die ordnungsgemäße Verankerung des Baldachins liegt immer in der Verantwortung des
Käufers.
WARNUNG: Die in dieser Bedienungsanleitung behandelten Punkte und
Anweisungen decken eventuell nicht alle möglichen Situationen und Umstände
ab. Der Benutzer muss mit gesundem Menschenverstand und Vorsicht bei der
Montage, Verankerung und Benutzung des Baldachins vorgehen.
Montage des Baldachins
1.Überprüfen Sie nach dem Öffnen der Verpackung, ob alle Teile vorhanden sind und sortieren Sie
diese gemäß der Liste, damit die Montage fließend und einfach verläuft.
2. Suchen Sie für den Baldachin einen flachen, geschützten Platz. Montieren Sie ihn niemals in
unmittelbarer Nähe eines anderen Gebäudes. Beachten Sie, dass vom anderen Gebäude Schnee auf
den Baldachin herabstürzen und der Baldachin zusammenbrechen kann. Die Garantie gilt nicht für
durch Schnee verursachte Zusammenbrüche.
3. Es ist empfehlenswert, dass der Baldachin von mehreren Leuten gemeinsam aufgebaut wird.
4. VERANKERUNG DES BALDACHINS IN DER ERDE:
Es gibt mehrere Möglichkeiten, den Baldachin aufzubauen. Wir empfehlen die Verankerung
beispielsweise mit Schraubpfählen, druckimprägnierten, Brettern, Betonblöcken, Verankerungskeilen
oder Betongewichten. Das beste Ergebnis wird erzielt, wenn eine Kiesbasis für den Baldachin
hergestellt, Schraubpfähle unter den vertikalen Rohren installiert und die Rohre mit den Pfählen
verschraubt werden. Eine andere Möglichkeit besteht darin, druckimprägnierte Bretter oder
Betonblöcke unter den vertikalen Rohren zu installieren und die Überdachungsrohre mit diesen zu
verschrauben. Außerdem wäre es gut, in jeder Ecke mindestens 200 kg zusätzliches Gewicht
anzubringen.
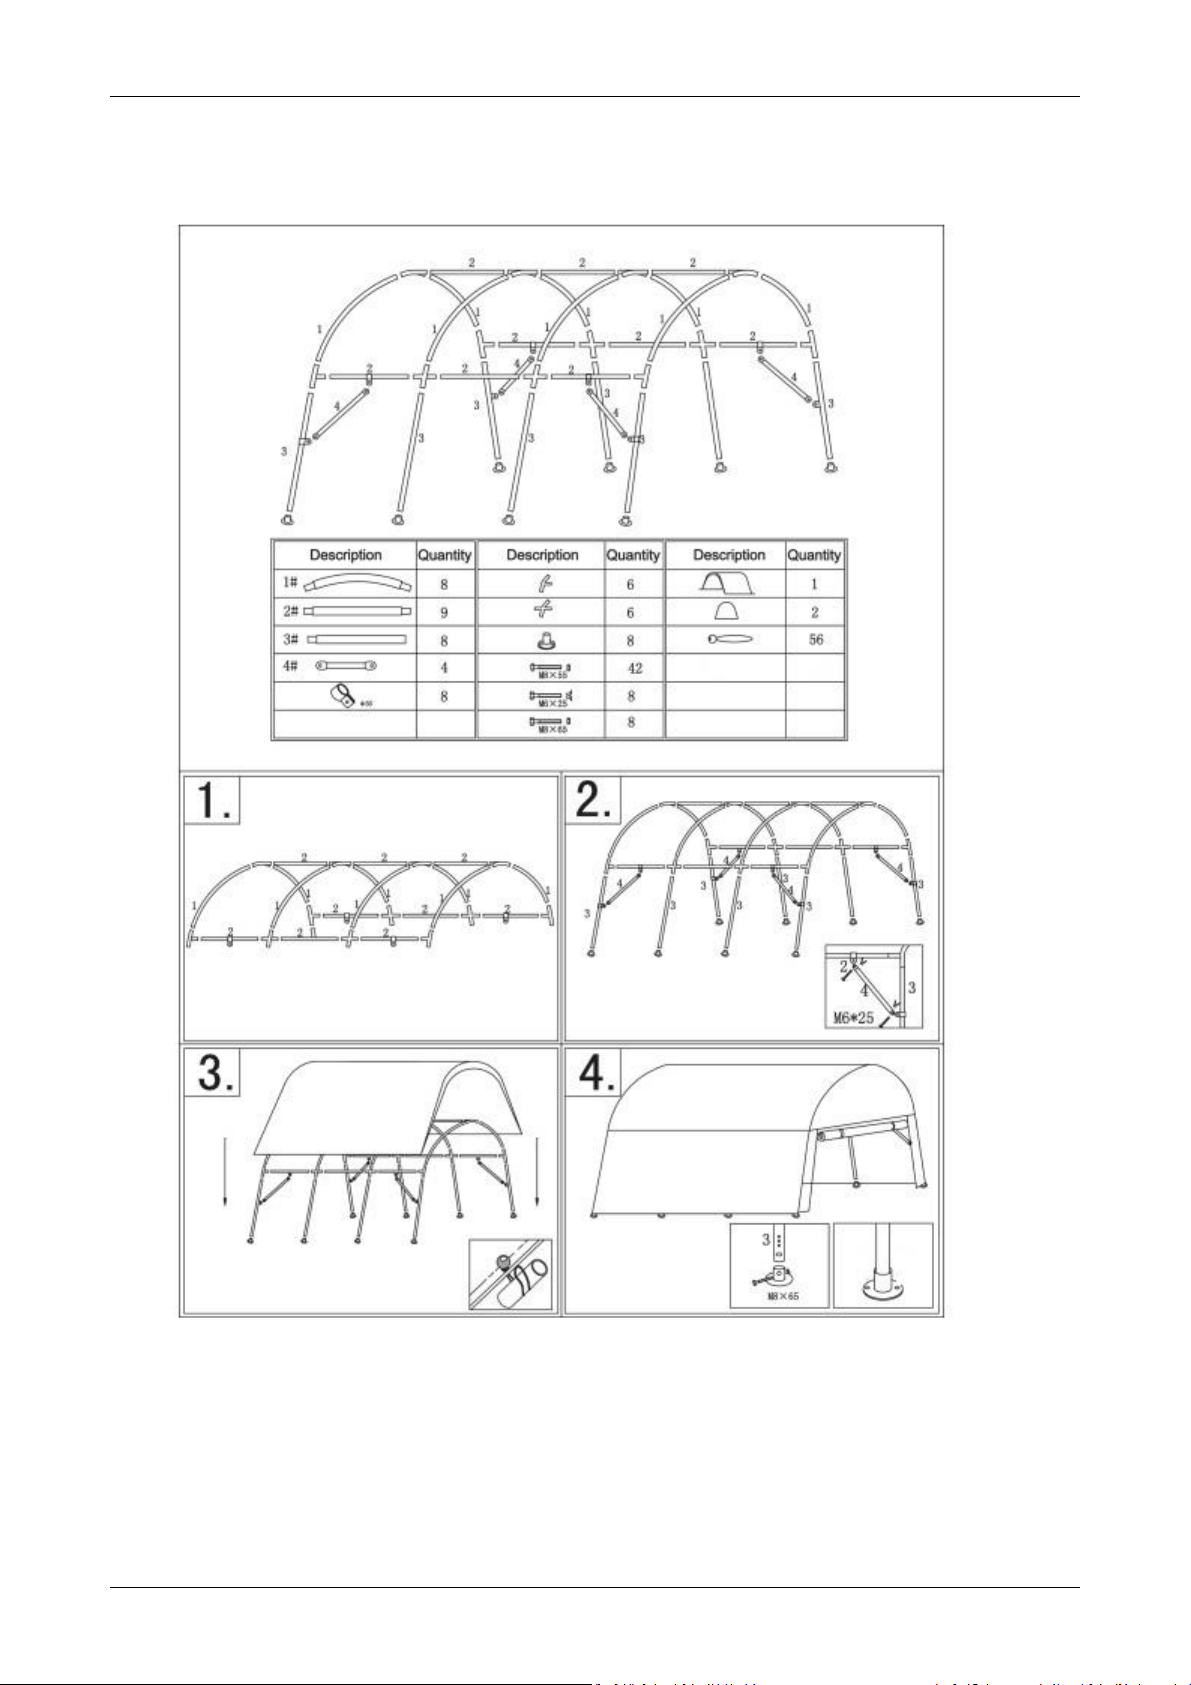
5.Beginnen Sie mit dem Aufbau, indem Sie die gewölbten Teile des Baldachins zusammenfügen. Als
Hilfe kann man die Zeichnung am Ende dieser Anleitung benutzen. Wenn die Bögen des Baldachins
fertig sind, befestigen Sie die horizontalen Stützrohre an den Bögen. Anschließend auf der anderen
Seite des Baldachins die vertikalen Rohre installieren.
6. Stellen Sie sicher, dass die Teile richtig einrasten und alle Schnellverschlüsse in ihren Löchern
einrasten.
7. Befestigen Sie die Befestigungselemente bei der Montage mit Schrauben und ziehen Sie
diese dann anschließend vorsichtig fest.
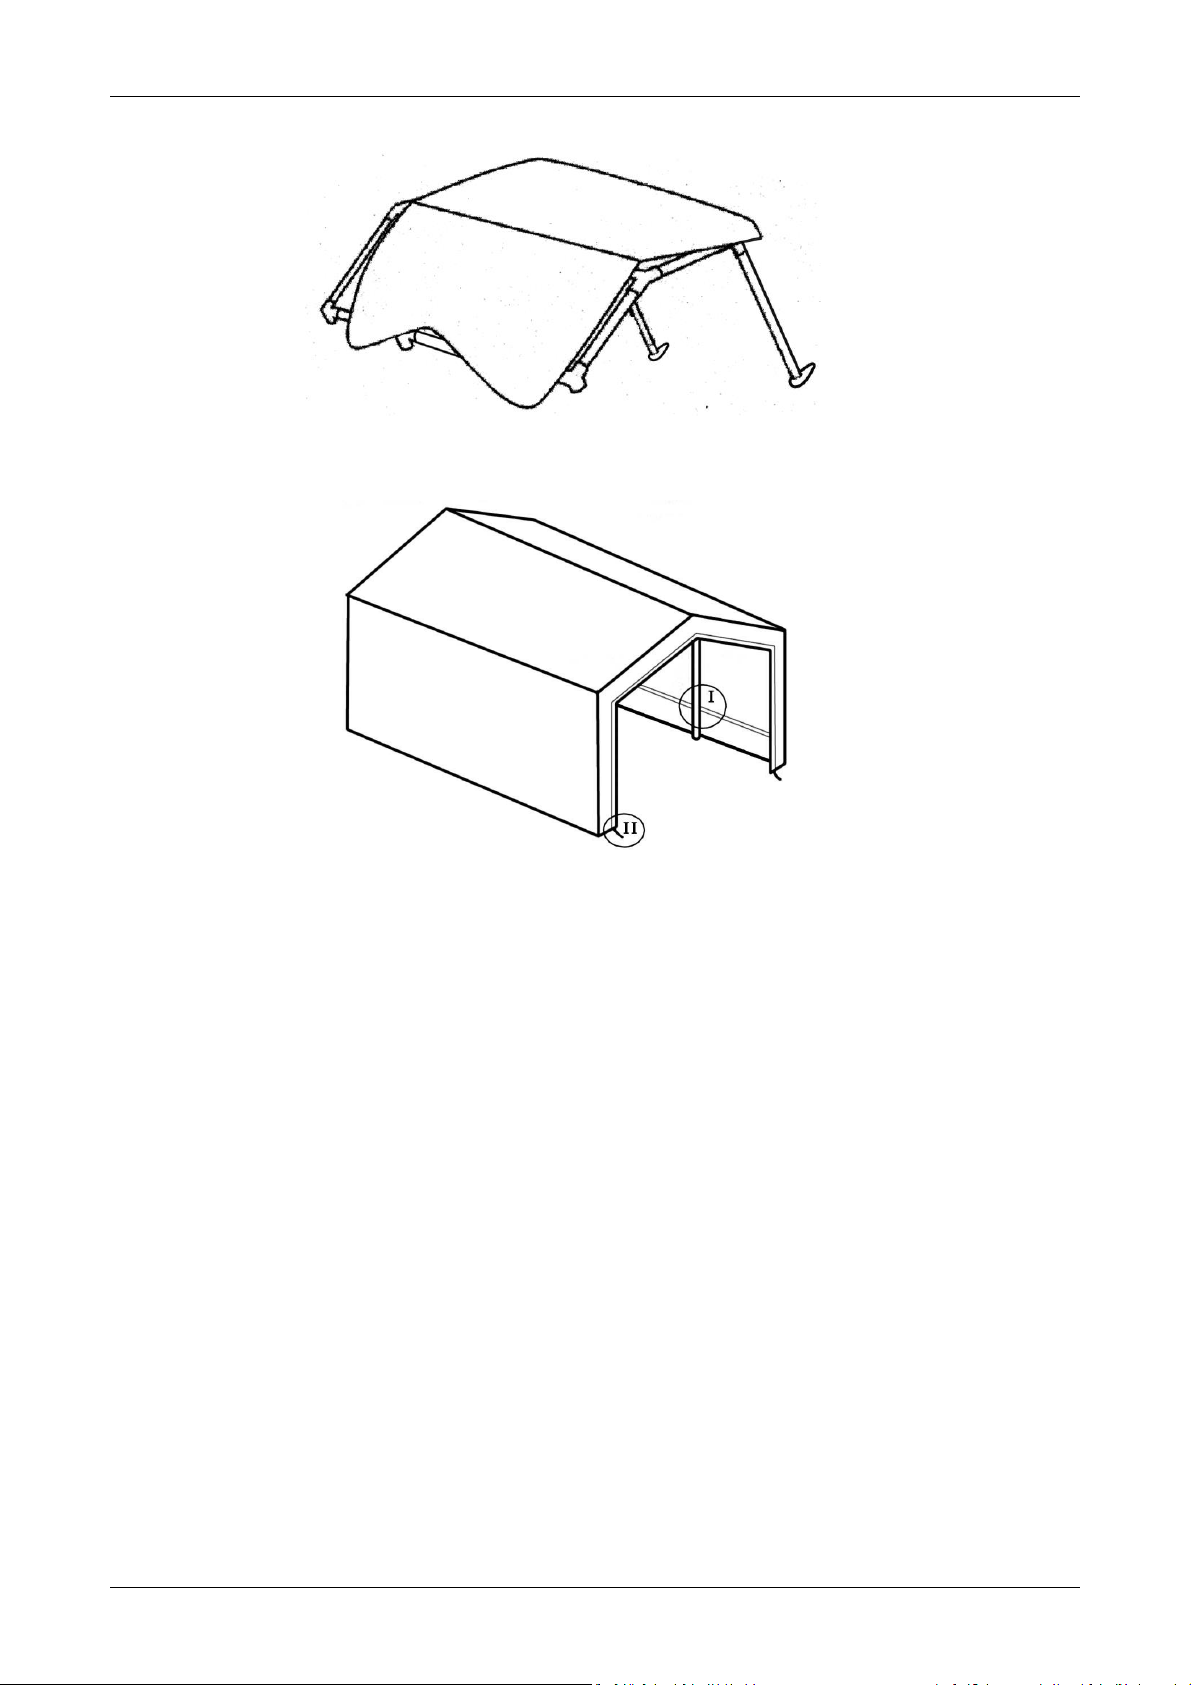
8. Heben Sie die Dachplane so über den Rahmen, dass sie ungefähr in der richtigen Position ist.
9. Ziehen Sie diese auf eine zweite Seite und montieren Sie die eine Seite der vertikalen Rohre.
10. Ziehen Sie die Dachplane fest, indem Sie die Gummischlaufen durch die Segelringe und um das
Rohr führen.
11. Fahren Sie auf die gleiche Weise fort, indem Sie die Wand- und Türplanen anbringen.
Befestigen Sie die Türschnüre.
12.Wenn Sie möchten, können Sie beispielsweise die Seitenschweller der Plane mit Kies am
Boden befestigen.
Überprüfen Sie alle Schlösser, Bolzen und Haken auf festen Sitz. Der Baldachin ist gebrauchsfertig.

5
Veuillez lire le mode d’emploi avant de monter et d’utiliser ce produit.
PRODUIT 25118
CONDITIONS GÉNÉRALES DE GARANTIE
Le produit possède une garantie de douze (12) mois pour les défauts de fabrication et de
matériau. La garantie implique que l’abri soit monté correctement conformément à ce mode
d’emploi. La garantie ne couvre pas les dommages liés à une installation erronée ou à la neige, au
vent ou aux tempêtes. L’acheteur se porte responsable de tous les risques et obligations de
dédommagement liés à ses réparations ou modifications du produit original ou aux pièces de
rechange installées par ses soins.
AVERTISSEMENT !
-Veuillez prendre en compte les conditions météorologiques locales. Les facteurs
climatiques peuvent influer sur la durée de vie de l’abri.
-Ne vous abritez jamais sous l’abri en cas d’orage ou de tempête et assurez-vous qu’aucun
enfant ne se trouve sous l’abri.
-L’abri et l’ancrage ont été conçus pour résister à des rafales de vent de 13 m/s maximum.
Placez l’abri dans un endroit protégé.
-L’abri a été conçu pour être ancré sur un terrain ferme. N’érigez jamais l’abri sur un terrain
accidenté sans ancrage adapté.
-Ne laisser pendre aucun objet aux tuyaux du châssis. Le châssis ne doit pas être surchargé,
et sa structure ne doit pas être modifiée.
-La structure de l’abri ne résiste pas à des charges de neige.
-Retirez la neige du toit de l’abri immédiatement après les chutes de neige, autrement
l’abri risque de s’écrouler. LA GARANTIE NE COUVRE PAS LES EFFONDREMENTS LIÉS AUX
CONDITIONS MÉTÉOROLOGIQUES.
-Ne manipuler aucun produit inflammable dans l’abri. Ne pas allumer de feu à l’intérieur de
l’abri. Il est interdit d’effectuer des soudures dans l’abri. Ne pas utiliser de réchaud à
l’intérieur de l’abri.
-Le vendeur/importateur ne se porte pas responsable des dommages liés à la neige, à la
pluie ou à une tempête.
Instructions de sécurité
-Maintenez la zone de travail propre.
-Assurez-vous que les conditions de travail soient bonnes pendant le montage. Ne
commencez sous aucun prétexte le montage de l’abri en cas de vent.
-Vérifiez soigneusement le contenu de l’emballage et que les pièces de l’abri sont intactes.
-Si des pièces de l’abri sont endommagées, utilisez uniquement des pièces obtenues auprès
de l’importateur comme pièces de rechange. Des pièces de rechange tierces annulent la
garantie.
-Maintenez les enfants et animaux à distance pendant le montage de l’abri.
-Utilisez des protections et des outils adaptés pendant l’installation de l’abri.
-Portez toujours des lunettes de protection résistantes aux chocs pendant l’installation.
-Ne tentez pas de déplacer l’abri pendant ou après son installation.

6
-Évitez d’utiliser l’abri en cas de conditions extrêmes. Si les conditions météorologiques
deviennent difficiles, démontez au moins la bâche recouvrant l’abri. L’importateur/vendeur
ne rembourse pas les dommages liés aux tempêtes ou conditions météorologiques
difficiles.
-Un ancrage correct de l’abri relève toujours de la responsabilité de l’acheteur.
AVERTISSEMENT :
Les points et instructions traités dans ces instructions ne peuvent couvrir toutes
les situations et conditions possibles. L’utilisateur doit faire preuve de bon sens
et de prudence lors du montage, de l’ancrage et de l’utilisation de l’abri.
Assemblage de l’abri
1) En ouvrant l’emballage, vérifiez que toutes les pièces se trouvent dans l’emballage et triez-les
conformément à la liste afin de rendre le montage le plus flexible et facile possible.
2) Cherchez un emplacement uniforme pour l’abri. N’installez jamais l’abri à proximité immédiate d’un
autre bâtiment. Veuillez prendre en compte que de la neige peut tomber depuis un autre bâtiment sur
l’abri et provoquer son effondrement. La garantie ne couvre pas les effondrements liés à la neige.
3) Il est préférable de monter l’abri à plusieurs.
4) ANCRAGE DE L’ABRI À LA TERRE
L’ancrage de l’abri peut être effectué de plusieurs manières différentes. Nous recommandons de faire
un ancrage avec, par exemple, des pieux vissés, des planches traitées par imprégnation, des dalles, des
coins d’ancrage ou des poids en béton.
Un socle en gravier permet d’obtenir un résultat optimal avec des pieux vissés sous les tuyaux
verticaux et en boulonnant les tuyaux aux pieux. Alternativement, on peut installer des planches
traitées par imprégnation sous les tuyaux verticaux ou bien des dalles et boulonner les tuyaux à l’abri.
En outre, il est recommandé d’installer un poids supplémentaire d’au moins 200 kg dans chaque coin.
5) Commencez le montage en joignant les pièces de l’arc de l’abri les unes aux autres. Aidez-vous du
schéma structurel se trouvant à la fin de ces instructions pour le montage. Une fois les arcs de l’abri
terminés, fixez les tuyaux vissés horizontaux à l’arc. Vous pouvez ensuite installer les tuyaux verticaux
de l’autre côté de l’abri.
6) Veillez à ce que les pièces se verrouillent correctement et que tous les mousquetons s’emboîtent
dans leur orifices.
7) Fixez les pièces de fixation avec des boulons pendant le montage et serrez soigneusement pour
terminer.
8) Soulevez le revêtement du toit au-dessus du cadre de manière à ce qu’ils soit grosso modo dans la
même position.
9) Soulevez à présent l’autre côté et installez les tuyaux verticaux de ce côté.
10) Serrez le revêtement du toit à sa place en enfilant les élastiques à travers les anneaux et autour du
tuyau.
11) Répétez cette opération pour fixer le mur et les revêtements de porte. Installez les cordes du
revêtement de porte.
12) Si vous le souhaitez, vous pouvez recouvrir les rebords latéraux de la bâche contre le sol avec du
gravier, par exemple.
Vérifiez tous les verrouillages et le serrage des boulons et des crochets. L’abri est prêt à l’utilisation.

7
Leggere le istruzioni d’uso prima di montare e usare il prodotto.
PRODOTTO 25118
CONDIZIONI GENERALI DI GARANZIA
Il prodotto è garantito per un periodo di dodici (12) mesi per i difetti dei materiali di costruzione e
lavorazione. Per avvalersi della garanzia la tettoia deve essere montata seguendo le presenti
istruzioni d’uso. La garanzia non copre eventuali guasti dovuti dalle negligenze nel montaggio né i
danni causati da neve, da vento o da tempeste. L’acquirente sopporta la responsabilità di tutti
rischi e richieste di risarcimento per danni derivati da riparazioni o modifiche del prodotto
originale da egli effettuate e da pezzi di ricambio da egli installati.
AVVERTIMENTO!
-Prendere in considerazioni le condizioni di meteo locali. Le condizioni atmosferiche
possono ridurre la vita utile del prodotto.
-Non sostare sotto la tettoia durante un temporale o una tempesta, e tenere i bambini
lontano dalla tettoia.
-La tettoia e gli elementi di ancoraggio sono disegnati per sopportare una velocità del vento
di 13 m/s al massimo. Installare la tettoia in un luogo riparato.
-La tettoia è disegnata per essere ancorata a un suolo stabile. Mai installare la tettoia a un
suolo poroso senza un opportuno ancoraggio.
-È vietato appendere oggetti ai tubi della struttura portante. La struttura non deve essere
caricata o modificata.
-La struttura della tettoia non sopporta il peso della neve.
-Rimuovere la neve subito alla fine della nevicata per evitare l’eventuale crollo della
tettoia. LA GARANZIA NON COPRE IL CROLLO CAUSATO DALLE CONDIZIONI
ATMOSFERICHE.
-L’uso e il trattamento di sostanze infiammabili sono vietati sotto la tettoia. Non accendere
il fuoco sotto la tettoia. È vietato effettuare lavori di saldatura sotto la tettoia. Non usare
riscaldatori sotto la tettoia.
-Il venditore/l’importatore non è responsabile per i danni causati da neve, da pioggia o da
tempeste.
Istruzioni di sicurezza
-Mantenere la zona di lavoro pulita.
-Assicurare ottimali condizioni di lavoro durante il montaggio. Mai iniziare il montaggio della
tettoia con il vento.
-Controllare il contenuto dell’imballaggio e l’integrità di tutti i componenti della tettoia.
-Nel caso in cui alcuni componenti siano danneggiati, usare solamente i pezzi di ricambio
consegnati dall’importatore. L’uso di altri pezzi di ricambio annulla la garanzia.
-Tenere i bambini e gli animali lontano dalla tettoia durante il montaggio.
-Utilizzare opportuni dispositivi di protezione individuale (DPI) e utensili durante il
montaggio.

8
-Utilizzare sempre occhiali di protezione resistenti agli urti durante il montaggio.
-Non tentare di spostare la tettoia durante il montaggio o successivamente.
-Evitare l’uso della tettoia in condizioni atmosferiche estreme. Nel caso in cui le condizioni
atmosferiche diventino molto estreme, rimuovere almeno il telo di copertura dalla tettoia.
L’importatore/il venditore non rimborserà il costo di eventuali danni causati da tempeste o
da condizioni atmosferiche.
-L’acquirente è sempre responsabile per l’opportuno ancoraggio della tettoia.
AVVERTIMENTO: Le situazioni descritte e le istruzioni date nel presente
documento non coprono tutte le eventuali situazioni e condizioni. L’utente
deve seguire buonsenso e prudenza durante il montaggio, l’ancoraggio e l’uso
della tettoia.
Montaggio della tettoia
1) Controllare che l’imballaggio contenga tutti i componenti e raggruppali seguendo l’elenco
indicato per facilitare il montaggio.
2) Installare la tettoia in un luogo riparato e uniforme. Mai installare la tettoia nelle immediate
vicinanze di un altro edificio. Dall’edificio adiacente potrebbe cadersi della neve che potrebbe
causare il crollo della tettoia. La garanzia non copre il crollo causato da neve.
3) È consigliato montare la tettoia in più persone.
4) ANCORAGGIO DELLA TETTOIA AL SUOLO:
Esistono diversi modi per ancorare la tettoia al suolo.
È consigliato utilizzare per l’ancoraggio, per esempio, dei pali di fondazione a vite, degli assi di
legno impregnati a pressione, dei lecablocchi, dei cunei di fissaggio o dei pesi di cemento.
La soluzione ottimale è fare una fondamenta di ghiaia, installare sotto i tubi verticali dei pali di
fondazione a vite e imbullonare i tubi ai pali. Un’alternativa è anche installare sotto i tubi verticali
degli assi di legno impregnati a pressione e imbullonare i tubi della tettoia ad essi. È inoltre
consigliato porre ad ogni angolo un peso ulteriore di almeno 200 kg.
5) Iniziare il montaggio unendo i componenti ad arco della tettoia. Fare riferimento al disegno
tecnico alla fine delle istruzioni. Una volta uniti gli archi della tettoia, attaccare ad essi i tubi
orizzontali. In seguito è possibile installare i tubi verticali dall’altro lato.
6) Assicurarsi che i componenti si blocchino correttamente e che tutte le chiusure rapide si
incastrino negli appositi fori.
7) Imbullonare i componenti di fissaggio durante il montaggio, e a fine montaggio serrare
attentamente i bulloni.
8) Posizionare il telo sopra la griglia più o meno in posizione finale.
9) Alzare anche l’altro lato e installare i tubi verticali dell’altro lato.
10) Stringere il telo a posizione finale infilando gli elastici negli anelli e intorno al tubo.
11) Montare la parete e i teli delle porte nello stesso modo. Attaccare le corde del telo della porta.
12) I lembi laterali del telo possono essere bloccati per esempio con la ghiaia.
Controllare e stringere, se necessario, le chiusure, i bulloni e i ganci. La tettoia è pronta ad essere
usata.

9

10
Table of contents
Languages:
Popular Tent manuals by other brands

Eureka
Eureka Lone Tree 3 Setup Instruction

REDVERZ
REDVERZ SOLO EXPEDITION Setup instructions

Magellan Outdoors
Magellan Outdoors FSMGCT4003 instruction manual

Coleman
Coleman Peak 1 9805-230 instruction manual

Arrow
Arrow 697.68221 Owner's manual & assembly instructions

Clas Ohlson
Clas Ohlson COMET 4 manual