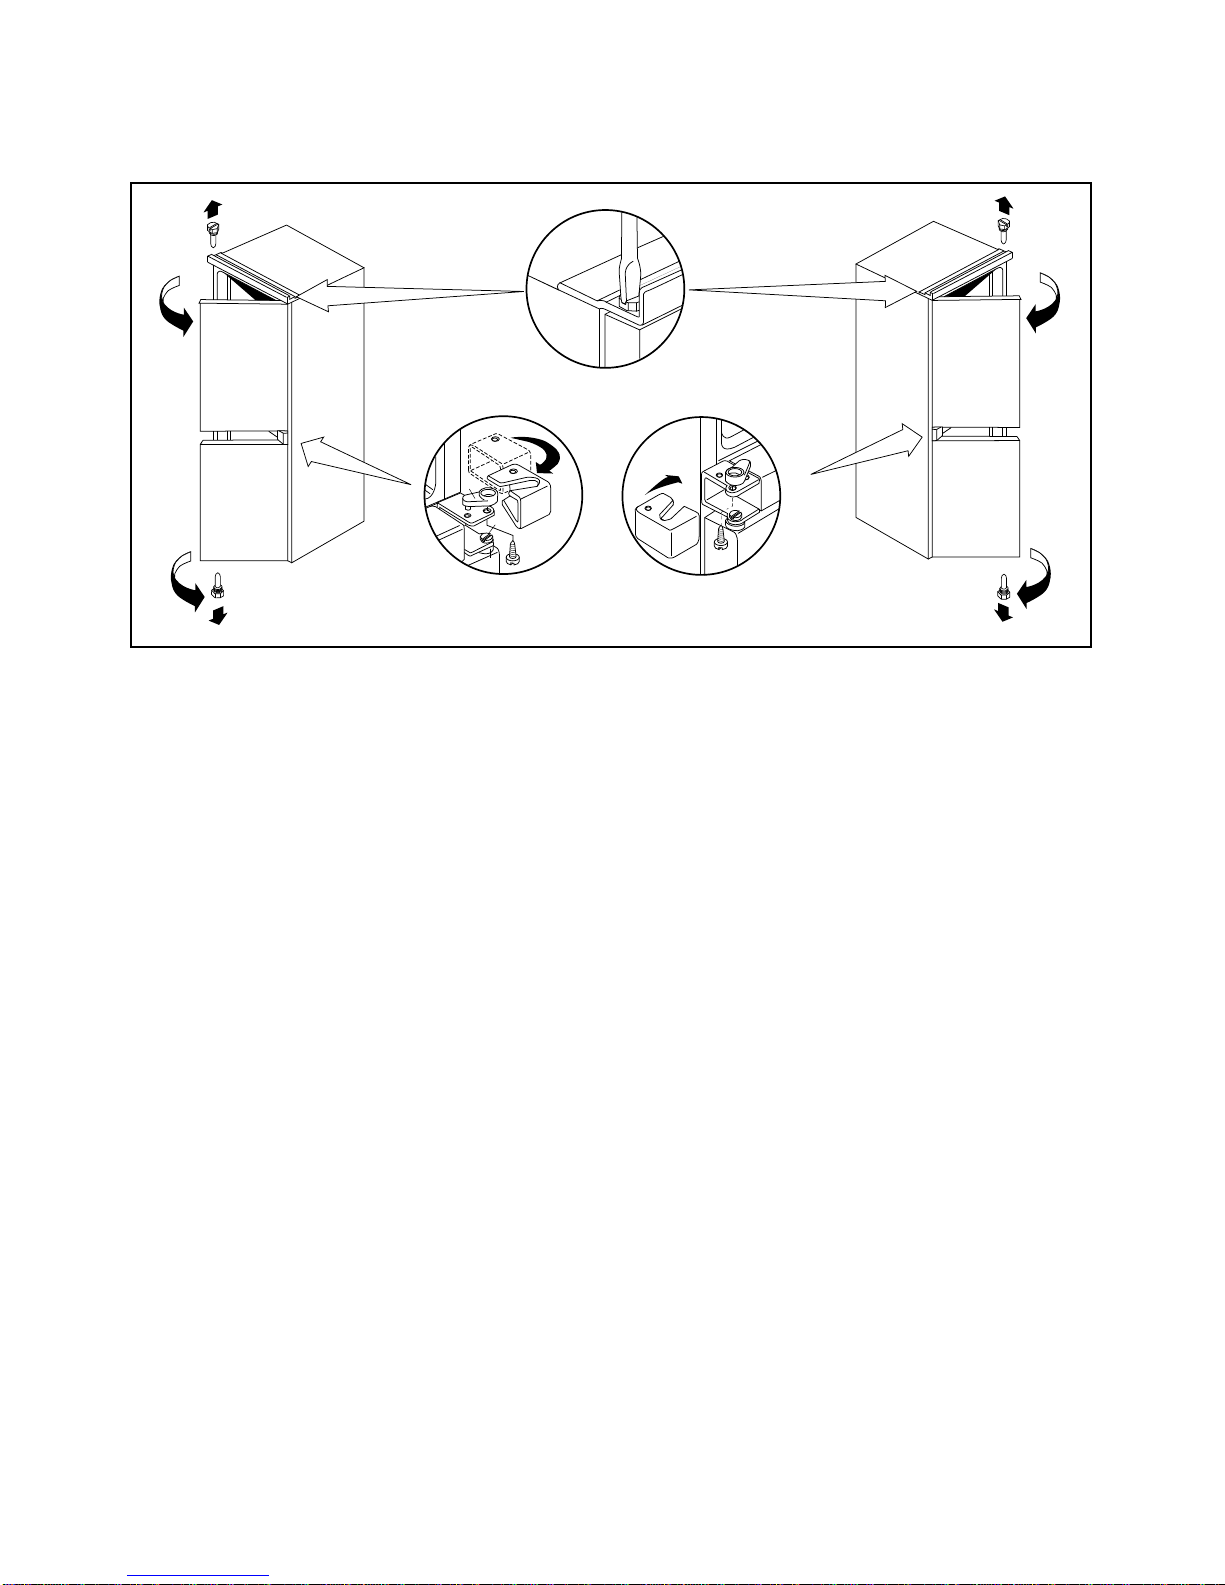
JUNO JKG6493 User manual

JKG 6493
GEBRAUCHSANWEISUNG
OPERATING INSTRUCTIONS
MODE D’EMPLOI
GEBRUIKSAANWIJZING
2222 001-81/1

13
CONTENTS
Warnings .................................page 14
Installation ................................page 15
Positioning ................................page 15
Electrical connection .............................page 15
Cleaning the interior .............................page 15
Door reversibility ..............................page 16
Building-in instructions ............................page 17
Use ...................................page 19
Control panel ...............................page 19
Use of the freezer ..............................page 19
Operation .................................page 19
Temperature regulation ............................page 19
Fast freezing ................................page 19
Warning light................................page 19
Freezing of fresh foods ............................page 20
Storage of commercially frozen food .......................page 20
Thawing .................................page 20
Use of the refrigerator.............................page 21
Storage of foods in refrigerator compartment.....................page 21
Positioning the door shelves ..........................page 21
Movable shelves ..............................page 21
Defrosting.................................page 22
Ice cube trays ...............................page 22
Maintenance ...............................page 23
Periodical cleaning..............................page 23
Idle periods ................................page 23
Replacing the interior light bulb .........................page 23
Something not working ...........................page 23
Printed on recycled paper

14
WARNINGS
It is most important that this instruction book
should be retained with the appliance for future
reference. Should the appliance be sold or trans-
ferred to another owner, or should you move
house and leave the appliance, always ensure that
the book is supplied with the appliance in order
that the new owner can be acquainted with the
functioning of the appliance and the relevant
warnings.
These warnings are provided in the interest of
safety. You must read them carefully before
installing or using the appliance.
“This appliance is designed to be operated by
adults. Children should not be allowed to tamper
with the controls or play with the appliance.
“Any electrical work required to install this appliance
should be carried out by a qualified electrician or
competent person.
“This appliance should be serviced by an authorized
Service Centre, and only genuine spare parts
should be used.
“It is dangerous to alter the specifications or modify
this appliance in any way.
“Care must be taken to ensure that the appliance
does not stand on the electrical supply cable.
“The domestic refrigerators and freezers are designed
to be used specifically for the storage of edible food-
stuffs only.
“Frozen food must not be re-frozen once it has been
thawed out.
“Manufacturers’ storage recommendations should
be strictly adhered to. Refer to relevant instructions.
“During normal operation, the condenser and
compressor at the back of the appliance heat up
considerably. For safety reasons, minimum ventila-
tion must be as shown in the relevant Figure.
Attention: keep ventilation openings clear of
obstruction.
“Before any cleaning or maintenance work is carried
out, be sure to switch off and unplug the appliance.
“If the appliance is transported horizontally, it is
possible that the oil contained in the compressor
flows in the refrigerant circuit. It is advisable to wait
at least two hours before connecting the appliance
to allow the oil to flow back in the compressor.
“The inner lining of the appliance consists of chan-
nels through which the refrigerant passes. If these
should be punctured this would damage the appli-
ance beyond repair and cause food loss. DO NOT
USE SHARP INSTRUMENTS to scrape off frost or
ice. Frost may be removed by using the scraper
provided. Under no circumstances should solid ice
be forced off the liner. Solid ice should be allowed
to thaw when defrosting the appliance. See defrost
instructions.
“Do not use a mechanical device or any artificial
means to speed up the thawing process other than
those recommended by the manufacturer.
“Do not place carbonated or fizzy drinks in the
freezer as it creates pressure on the container,
which may cause it to explode, resulting in damage
to the appliance.
“This appliance is heavy. Care should be taken when
moving it.
“Ice lollies can cause frost burns if consumed
straight from the appliance.
“This appliance contains hydrocarbons in its cooling
unit; maintenance and recharging must therefore
only be carried out by authorized technicians.
“Never use metal objects for cleaning your appliance
as it may get damaged.
“Under no circumstances should you attempt to
repair the appliance yourself. Repairs carried out by
inexperienced persons may cause injury or more
serious malfunctioning. Refer to your local Service
Centre, and always insist on genuine spare parts.
“This appliance does not contain gasses which
could damage the ozone layer, in either its
refrigerant circuit or insulation materials. The
appliance shall not be discarded together with
the urban refuse and rubbish. Avoid damaging
the cooling unit, especially at the rear near the
heat exchanger. Information on your local
disposal sites may be obtained from your
municipal authorities.
“Take utmost care when handling your appliance
so as not to cause any damages to the cooling
unit with consequent possible fluid leakages.
“The appliance must not be located close to radi-
ators or gas cookers.
“Avoid prolonged exposure of the appliance to
direct sunlight.
“There must be adequate ventilation round the
back of the appliance and any damage to the
refrigerant circuit must be avoided.
“For freezers only (except built-in models): an
ideal location is the cellar or basement.
“Do not use other electrical appliances (such as
ice cream makers) inside of refrigerating appli-
ances, unless they are approved for this
purpose by the manufacturer.

15
INSTALLATION
If this appliance featuring magnetic door seals is
to replace an older appliance having a spring lock
(latch) on the door or lid, be sure to make that
spring lock unusable before you discard the old
appliance. This will prevent it from becoming a
death-trap for a child.
Positioning
The appliance should be installed well away from
sources of heat such as radiators, boilers, direct sun-
light etc.; best performance is obtained with ambient
temperature between +18°C and +43°C (class T);
+18°C and +38°C (class ST); +16°C and +32°C (class
N); +10°C and +32°C (class SN).
The class of your appliance is shown on its rating
plate.
For building into kitchen units follow the special
“Building-in” instructions given.
Electrical connection
Before plugging in, ensure that the voltage and fre-
quency shown on the serial number plate correspond
to your domestic power supply.
Voltage can vary by ±6% of the rated voltage.
For operation with different voltages, a suitably sized
auto-transformer must be used.
The appliance must be earthed.
The power supply cable plug is provided with a con-
tact for this purpose.
If the domestic power supply socket is not earthed,
connect the appliance to a separate earth in compli-
ance with current regulations, consulting a specialist
technician.
The Manufacturer declines all responsibility if the
above safety precautions are not observed.
This appliance complies with EEC directive
number 87/308 of 2/6/87 relative to radio inter-
ference suppression.
This appliance complies with the following
E.E.C. Directives:
-73/23 EEC of 19.2.73 (Low Voltage Directive) and
subsequent modifications;
-89/336 EEC of 3.5.89 (Electromagnetic Compatibil-
ity Directive) and subsequent modifications.
Cleaning the interior
Before using the appliance for the first time, wash the
interior and all internal accessories with lukewarm wa-
ter and some neutral soap so as to remove the typical
smell of a brand-new product, then dry thoroughly.
Do not use detergents or abrasive powders, as these
will damage the finish.

16
Door reversibility (Fig. 1)
Fig. 1
P
P1 P1
P
C
D
C
B
A
D337
D
Right opening
Remove the pins (P) and (P1).
Left opening
Remove (P) from both sides and the door. Remove (A)
from the left side and (B-C-D) from the right side. Refit
(B-C-D) on the left side and (A) on the right side. Refit
the door and (P) on the left side. Remove (P1) from the
right side.

17
Building-in instructions
Housing dimensions
Height 1780 mm
Depth 550 mm
Width 560 mm
For safety reasons, minimum ventilation must be as
shown in Fig. 2:
Attention: keep ventilation openings clear of ob-
struction.
Fig. 2
Push appliance into housing until stop strip (A) touch-
es the kitchen unit.
Fig. 3
If after having carried out the operation described in
section 3 there is still some space left between the ap-
pliance and the kitchen unit, fit the trimming provided
together with the appliance on the stop strip (A).
Fig. 4
50 mm
min.
cm
2
200
200 cm
2
min.
D526
A
D023
D265
A
Open the door and push the appliance against the
side of kitchen furniture opposite to that of appliance
hinges.
Fasten the appliance with 4 screws provided in the kit
included with the appliance. Snap vent grill (C) and
hinge cover (D) into position.
Fig. 5
Press in the joint covers between the appliance and
the kitchen furniture.
Fig. 6
Apply covers (B) on joint cover lugs and into hinge
holes.
Fig. 7
D369
D
C
D098
D096
B

18
Position the runners (H) at the top and bottom of the
inside of the kitchen unit as shown in Fig. 8 and mark
the position of the external holes.
After preparing the holes, screw the runners to the
kitchen unit door using 3.5x16 mm screws.
Fig. 8
Open both the appliance door and that of the kitchen
unit to approx. 90°.
Place the little plates over the runners. Hold the doors
of the appliance and the unit together and mark the
holes.
Fig. 9
Remove the little plates and make the holes with a di-
am. of 2 mm. Replace the little plates over the runners
and screw in the screws provided (3.5x16 mm).
For the alignment of the kitchen unit door, if neces-
sary, use the clearance size of the slotted holes.
At the end of the procedure, check that the doors of
the appliance and the kitchen unit open properly.
Fig. 10
D094
20mm
H
8mm
PR34
PR35
In case of side fixing of the appliance, it will be suffi-
cient to loose the screws fixing the bracket (G) and to
position it as shown in Fig. 11.
Fig. 11
D397
G
G

19
USE
Control panel (Fig. 12)
Fig. 12
A. Thermostat knob (freezer compartment)
B. NORMAL/SUPER Switch
C. Warning light
D. SUPER operating control light
E. Pilot light
1
2
3
4
5
6
O
N
S
S
AEDC B
Use of the freezer
Operation
Insert the plug into the wall socket. The pilot light will
light up, indicating that the appliance is powered.
Turn the thermostat knob, clockwise, beyond the «O»
(STOP) position.
The appliance will start to operate.
To stop the appliance, turn the thermostat knob to po-
sition «O».
Temperature regulation
The temperature is automatically regulated and can
be increased to achieve a higher temperature (warm-
er) by rotating the thermostat knob toward lower set-
tings or reduced (colder) rotating the knob towards
higher settings.
However, the exact setting should be chosen keeping
in mind that the temperature inside the refrigerator de-
pends on:
room temperature;
how often the door is opened;
the quantity of food stored;
location of appliance.
A medium setting is generally the most suitable.
To stop operation, simply turn the thermostat knob to
position «O».
Fast freezing
To start fast-freezing food, turn the knob towards «S».
Pilot light (D) will come on.
Warning light
Warning light (C) lights up when the temperature in-
side the freezer compartment has increased to a value
which jeopardizes the long-term storage of food in the
compartment.
When the appliance is switched on for the first time or
when food is placed in the compartment for freezing,
it is normal for this light to remain on until the temper-
ature has reached the level required for correct
storage.

20
Freezing of fresh foods
To quick-freeze foods when the appliance has not
been in use, switch on the freezer and let it run on the
quick-freeze setting for at least three hours before
putting the food to be frozen in the compartment.
If instead the appliance is already in operation, it
should run on the quick-freeze setting for at least 24
hours before the foods are put in the freezer compart-
ment.
Once the foods have been placed in the freezer, the
freezing operation can be considered to be complete
24 hours later.
Once freezing is complete, the freezer should be reset
for «normal» storage use. Food to be frozen has to be
placed in the top basket.
The maximum amount of food which is freezable in 24
hours is indicated on the rating plate. This is to be
found in the refrigerator compartment on the bottom
left-hand side.
To help you get the best out of the freezing process,
here are a few hints:
Freeze only good-quality, fresh and well-cleaned
foods.
Split them into small portions to speed up freezing
and avoid having to thaw more food than you require.
It is in fact important to remember that once the foods
have thawed out, they deteriorate fast.
Another point to remember is that lean foods keep
better and longer than fatty foods. Salt too reduces
storages time.
Wrap the foods in foil or polythene film, ensuring that
the wrapping adheres closely to the food and is well
sealed. In this way, by avoiding contact with air, the
colour, flavour and nutritional value of the foods re-
main intact.
You should never freeze all at once a greater quan-
tity of foods than the maximum indicated on the
appliance’s rating plate.
During the freezing process, do not add further foods
for freezing and do not open the freezer door.
The foods for freezing should not be placed in contact
with already frozen foods, but put in the special freez-
ing basket. This will stop the temperature of already
frozen foods from rising.
Never put fizzy drinks in the freezer as they might well
burst.
In addition, never put hot foods or liquids in the freez-
er compartment and take care not to fill recipients up
to the brim if they are covered with a lid.
It is a good idea to mark the packs – or the cards on
the sliding drawers if your model has them – with the
date on which freezing started so that you can keep a
check on storage periods.
If accidental thawing occurs – due to a power cut for
example – the foods must be used up very quickly or
else cooked immediately and refrozen. If, however, the
power failure is relatively brief (from 6 to 8 hours) and
the freezer compartment is packed full, the frozen
foods will not suffer any damage.
On the inner freezer door you will find schematic
drawings of foods and animals indicating maximum
storage time (in months) possible from the time of
freezing.
Storage of commercially frozen food
To get the best out of your freezer, in the case of stor-
age of commercially frozen food you should ensure
that:
the products have been correctly stored by the retail-
er;
that there is only a very short time between when you
purchase the products and when you put them in the
freezer;
you do not store products for longer than the time
specified by the food manufacturer.
In addition, if the freezer has been out of use for some
time, before putting the products in the compartment
let the freezer run for at least two hours on the quick-
freeze (SUPER) setting. After this, reset the freezer for
normal storage use.
Avoid opening the door too frequently and when you
do open it, leave it open only for as long as is strictly
necessary.
A word of warning about ice lollies: they should not be
eaten straight out of the freezer as this might cause
cold burns.
If there happens to be a power failure do not open the
freezer door. If the freezer is completely full, frozen
products will not be affected. Otherwise they should
be used up very quickly.
Thawing
Before being used, deep-frozen and frozen food can
be thawed out either in the refrigerator compartment
or at room temperature, depending on the time availa-
ble for this operation.
Small pieces of food – such as hamburgers, cutlets,
chips, and fish fingers, for example – can be cooked
straight out of the freezer, without any intermediate
thawing operation. Clearly, cooking time will be mar-
ginally longer than in the case of thawed food.

21
Use of the refrigerator
Turn the thermostat knob on the interior of the cabinet
to a setting between 2 and 4, which is usually the
most appropriate. However, the exact setting should
be chosen keeping in mind that the temperature in-
side the refrigerator depends on:
room temperature;
how often the door is opened;
the quantity of food stored in the refrigerator;
location of appliance.
As in the case of the freezer, it might be necessary to
turn the knob to higher settings to obtain a lower re-
frigeration temperature or, vice versa, to lower settings
to increase the refrigeration temperature.
When the refrigerator is set for the coldest tempera-
tures, with a high surrounding room temperature, it
will probably be in constant use, with consequent
frosting of the back wall of the compartment. If this
does in fact occur, the knob should be set to obtain a
slightly higher temperature. In this way the refrigerator
automatically defrosts, with a considerable energy
saving.
To stop operation, simply turn the thermostat knob to
position «O».
The freezer compartment will remain operating.
Storage of foods in refrigerator compart-
ment
To achieve the best results with the refrigerator com-
partment, you should follow one or two very simple
rules:
Do not put warm foods or evaporating liquids in the
refrigerator.
Cover or wrap foods (particularly if they have a strong
smell or contain aromatic herbs).
Do not cover the shelves (grids) with paper or plastic
since this blocks circulation of air in the compartment.
Further hints for getting the best out of your refrigera-
tor are as follows:
Cooked foods, cold dishes, jellies, etc., should be well
covered;
Fruit and vegetables should be washed before being
stored;
Raw meat (of all types, including poultry) should be
stored in plastic bags.
Positioning the door shelves
To permit storage of food packages of various sizes,
the door shelves can be adjusted in height.
To make these adjustments proceed as follows:
Gradually pull the shelf in the direction of the arrows
until it comes free, then reposition as required.
Fig. 13
Movable shelves
The walls of the refrigerator are equipped with a series
of runners so that the shelves can be positioned as
desired.
Fig. 14
PR187
D351

22
Defrosting
Frost is automatically eliminated from the evaporator
of the refrigerator compartment every time the motor-
compressor stops.
The defrost water drains out through a trough (Fig. 15)
into a special container provided on top of the com-
pressor which is located at the back of the appliance.
Fig. 15
In the freezer compartment, instead the frost should
be removed with the special plastic scraper provided,
whenever the thickness exceeds 4 mm.
During this operation it is not necessary to switch off
the power or to remove the foods from the compart-
ment.
Do not use a mechanical device or any artificial means
to speed up the thawing process other than those rec-
ommended by the manufacturer.
If a thick layer of ice is formed it will be necessary to
carry out complete defrosting as following:
set the knob (A) to «O» or unplug the appliance from
the mains socket;
wrap frozen food in several layers of newspaper and
place the food packages in a cool place.
Leave the door open. Introduce the plastic scraper in
the appropriate seating as shown in Figure 16, place
underneath a basin to collect the defrost water. When
defrosting is completed, dry the interior thoroughly.
Fig. 16
Keep the scraper for future use.
D037
D068
Turn the knob (A) back to the desired position or re-
place the plug in the socket. After letting it run for two
or three hours on the quick-freeze setting, the appli-
ance is ready again for storing frozen food.
We particularly recommend that you periodically
clean the defrost-water drainage outlet, located in
the centre of the drainage groove in the refrigera-
tor compartment (Fig. 15) to prevent the defrost
water from overflowing on to foods stored in the
compartment. Use the special cleaner provided,
which you will find already inserted into the dis-
charge hole.
Ice cube trays
The refrigerator is provided with two ice cube trays.
These trays should be filled with drinking water and
then placed in the freezer compartment.
Do not use metal tools to remove the trays when they
are stuck-frozen inside the compartment.

23
MAINTENANCE
Unplug the appliance before carrying out any
maintenance operation.
Warning
This appliance contains hydrocarbons in its cooling
unit; maintenance and recharging must therefore only
be carried out by authorized technicians.
Periodical cleaning
Never use metal objects for cleaning your appliance
as it may get damaged.
Wash the interior of the appliance with lukewarm wa-
ter and sodium bicarbonate.
Idle periods
During periods when the appliance is not used, you
should take the following precautions:
remove the plug from the wall socket;
remove all food from the appliance;
defrost and clean the interior and all accessories;
leave the door slightly open, thus letting air circulate
and preventing the formation of mould and unpleasant
smells.
Replacing the interior light bulb
The light inside the refrigerator compartment is easy
to get at through the opening in the light holder.
If the light does not go on when the door is open,
check that it is screwed into place properly.
If it still does not light up, change the bulb.
The rating is shown on the light bulb cover.
Fig. 17
D206
SOMETHING NOT WORKING
If the appliance is not functioning properly check that:
the plug is firmly in the wall socket and the mains
power switch is on;
electricity is delivered; and controls are set to the cor-
rect position.
Furthermore:
If there are signs of presence of water on the bottom
of the cabinet check that the defrost water drain
opening is not obstructed (Fig. 15).
If your appliance is still not working properly after
making the above checks, contact your local dealer or
the nearest service centre.
To obtain fast service, it is essential that when you ap-
ply for it you specify the model & serial number of your
appliance which can be found on the rating plate lo-
cated inside the appliance at the bottom on the left
hand side.
Table of contents
Other JUNO Refrigerator manuals

JUNO
JUNO Le Maitre JKI1031 User manual

JUNO
JUNO JKU6038 User manual

JUNO
JUNO JCN12210S5 User manual

JUNO
JUNO JKG7491 User manual

JUNO
JUNO JKE 4435 User manual

JUNO
JUNO JKI 4455 User manual

JUNO
JUNO JGU6426 User manual

JUNO
JUNO JCU14510S5 User manual

JUNO
JUNO JRN 84181 User manual

JUNO
JUNO JKU2032 User manual
Popular Refrigerator manuals by other brands

Electrolux
Electrolux ER 8625 D Installation and instruction manual

Sanyo
Sanyo SR-1030 instruction manual

Silver King
Silver King SKR27A/CW Technical manual & replacement parts list

Zanussi
Zanussi DF 78/30 FF Instruction book

EVEREST REFRIGERATION
EVEREST REFRIGERATION EMGR5 owner's manual

Infiniton
Infiniton FG-1776.425 W70 NFT.MH instruction manual