Justfit MT80 User manual

MOTORIZED TREADMILL
ITEM NO: MT80
OWNER’S MANUAL
IMPORTANT: Read all instructions carefully before using this product. Retain this
owner’s manual for future reference.
The specifications of this product may vary from this photo and are subject to change
without prior notice.

Parts List
Accessories
Part Quantity
Description
1
2
3
4
1
1
1
1
Safety Lock(M12x50 ) 5 1
Audio Cable
6 2
End Cap
Computer Knob(M6x16 )
Red Emergency Stop Magnet
Part QuantityDescription
Hex Key
Technical Specifications
Product Name Motorized Treadmill
Voltage Rate
Rated Frequency
Rated Power
Maximum User Weight
220-240V
50/60HZ
1.0HP
110KG
1 2
34
5
6
Accessories
Control Panel
Spring Knob
Emergency Stop
Magnet
Hand Rail
End Cap
Running Belt
Safety Lock

Warning & Safety Information
Maintenance
1. Ensure that you read the manual carefully before attempting to assemble or use Power
Electric Treadmill.
2. The Power Electric Treadmill must be positioned on a firm flat surface.
3. The Power Electric Treadmill is designed for indoor use only. It is not to be used outdoors.
4. Do not position the Power Electric Treadmill on a deep thick carpet as air needs to be able
to circulate underneath.
5. Always wear the correct clothing when using the Power Electric Treadmill. Do not wear
loose or long clothing as this may get caught in the moving belt.
6. Always ensure that correct foot wear is worn.
7. Do not stand on the Power Electric Treadmill belt before operating. Position your feet on
either side of the Treadmill belt and as the motor starts step onto the treadmill. Do not step on
the belt if the Power Electric Treadmill is at full speed.
8. Before running on the Power Electric Treadmill make sure that the emergency cord is
attached to you. If the emergency magnet becomes detached from the control panel the
treadmill will then stop.
9. Do not allow children or pets near the Power Electric Treadmill when in use.
10. Children and elderly should only use the Power Electric Treadmill under adult supervision.
11. Always unplug the Power Electric Treadmill from the main power supply when not in use.
12. Regularly clean the Power Electric Treadmill after use. Remove any dust and sweat from
the handles and the running belt. Use a light soapy water mixture to clean the running belt.
NEVER USE A ROUGH CLEANING AGENT.
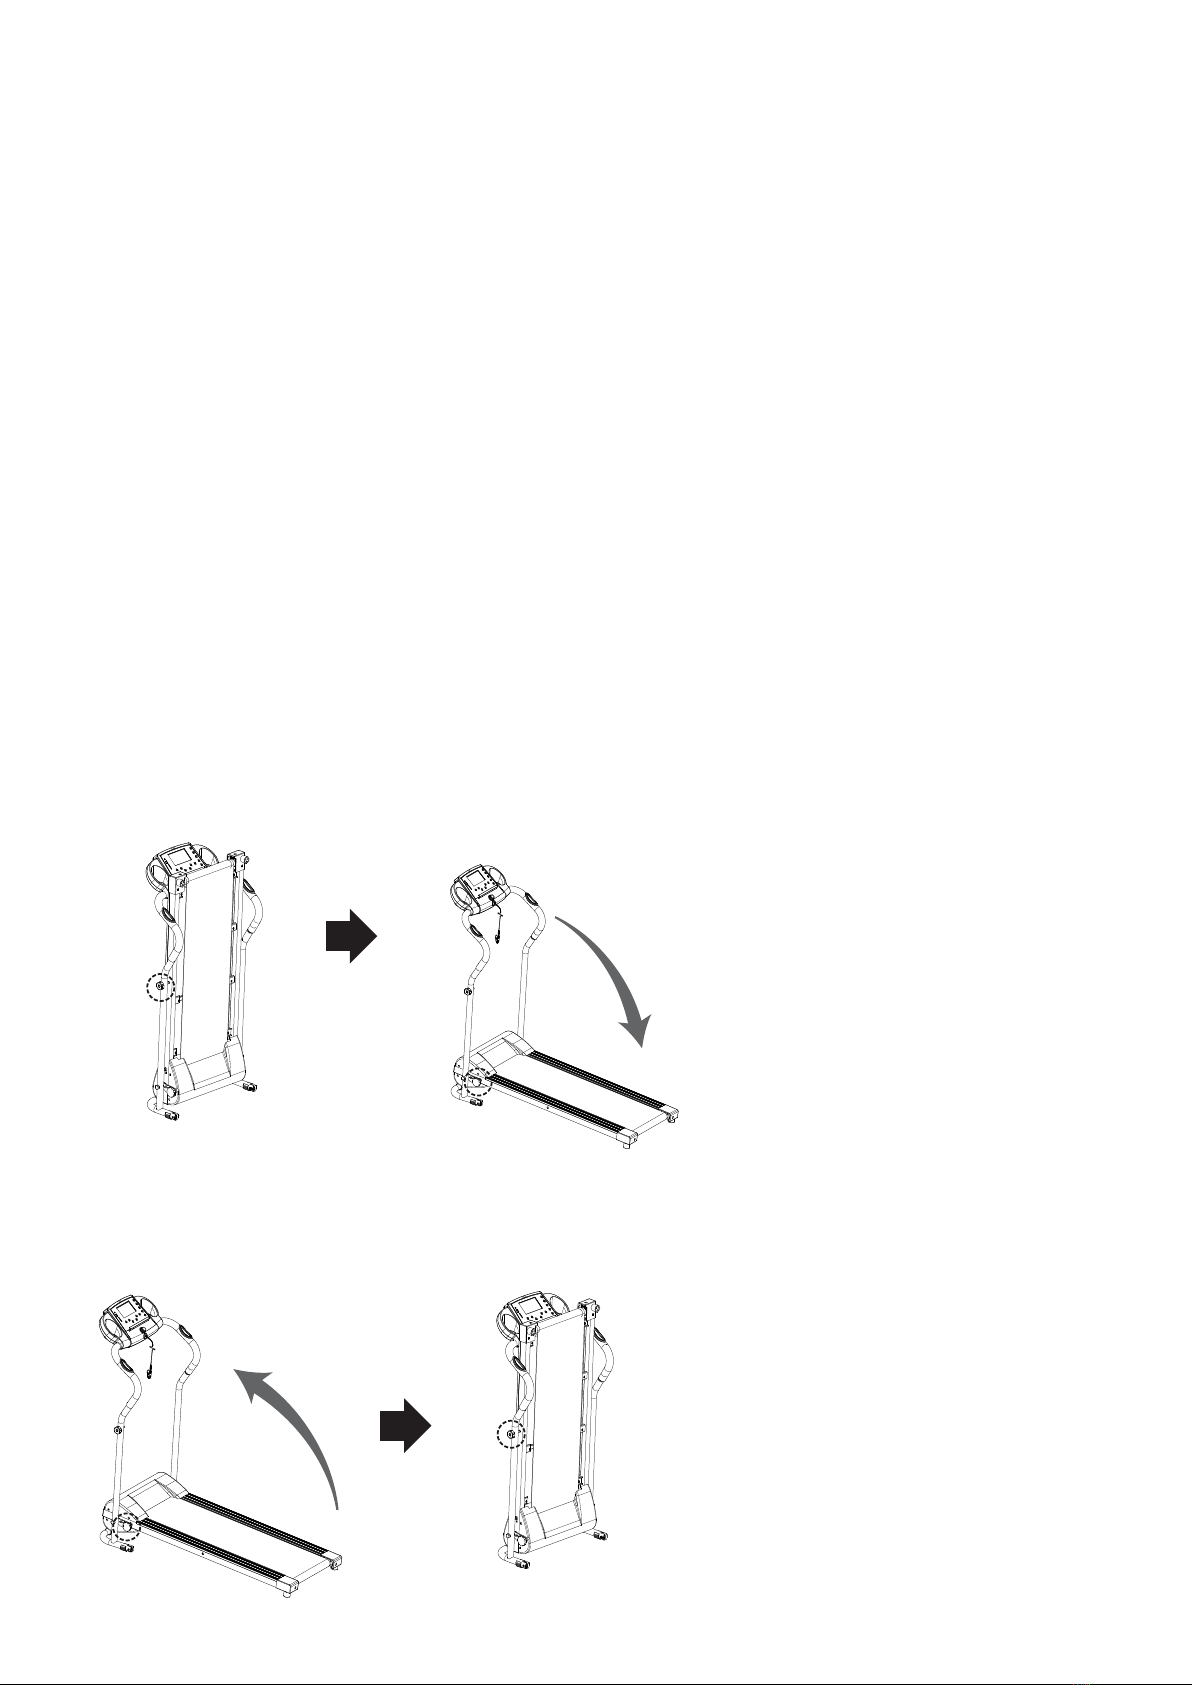
13. When the Power Electric Treadmill is not in use for an extended period fold away it away
and store in a clean dry place.
14. If any part of the electrical cable or plug is loose or becomes worn, do not use the Power
Electric Treadmill and have a qualified electrician inspect the problem.
15. The Power Electric Treadmill is not a toy and is not intended for use by persons (including
children) with any physical or mental conditions. The Power Electric Treadmill should not be
used by any person who has not read and understood the manual.
16. If the user has had any prior medical condition they should consult a doctor before use.
1. Before moving or cleaning your Power Electric Treadmill unplug it from the main power
supply.
2. Always clean the Power Electric Treadmill with a damp cloth avoiding the control panel.
DO NOT USE ROUGH CLEANING AGENTS.
3. Clean the power switch and control panel with a soft dry cloth. DO NOT USE A WET
CLOTH IN THESE AREAS.
4. Do not use your treadmill in wet, damp conditions or high dust areas as this can cause
damage to the Power Electric Treadmill.

ASSEMBLY INSTRUCTIONS
Step 1
Take out the treadmill from the shipping carton and place it on a level flat surface. Please
always use the aid of a second person when removing the treadmill from the shipping
c.
Discharge two screws and two rubber foot pads from treadmill frame
on treadmill frame, then fix the two end caps by foot pads and screws.
,assemble the two end caps
arton.
Pull out the Spring Knob
Spring Knob
and then carefully lower the main frame to the ground.
Tighten the Safety Lock
Safety Lock
by turning it in a clockwise direction into the holes on the base frame
and main frame.
Step 3
Step 2
Turn the Computer Console up or down to align the computer knob hole. Lock the
Computer Console in place by tightening the Computer Knob in a clockwise direction.

Before beginning a workout session ensure that the Safety Key is properly placed onto the
Computer Console
an article of your clothing.
or the treadmill can not run, and the Safety Clip is securely attached to
NOTE: Always stand on the side rails when you start the treadmill,
never start the treadmill while you are standing on the running belt.
OPERATING THE COMPUTER

FUNCTION BUTTONS:
START:
Press the START button to start training on different training mode.
STOP:
Press the STOP button to stop training on different training mode.
PROG (PROGRAM):
Press the PROG button to select the pre-set training program (P01-P16) mode before
training.
MODE:
Press the MODE button to select different functions (time, distance, or calories) for setting
exercise goals in manual program mode before training.
SPEED +(SPEED UP):
Press the SPEED +button to make upward adjustments for pre-setting
target training time, distance, or calorie in manual program mode before training.
Press the SPEED +button to make upward adjustments for pre-setting
target training time in pre-set training program (P01-P16) mode before training.
Makes speed adjustments during all training periods on different training modes.
The speed range is from 1.0 KPH to 10.0 KPH.
SPEED -(SPEED DOWN):
Press the SPEED -button to make backward adjustments for pre-setting target training
time, distance, or calorie in manual program mode before training.
Press the SPEED -button to make backward adjustments for pre-setting target training
time in pre-set training program (P01-P16) mode before training.
Makes speed adjustments during all training periods on different training modes.
The speed range is from 1.0 KPH to 10.0 KPH.
INSTANT SPEED:
Rotate the round speed knob to reach desired speed more quickly.
DISPLAY FUNCTIONS:
TIME: Displays your elapsed workout time in minutes and seconds. Press the START
button on the computer to begin exercising, the LCD window will countdown 3 seconds with
the LCD showing "3-2-1" before the running belt starts moving. The running belt starts
moving with an initial speed of 1.0 KPH. You may press the SPEED +or SPEED -
button on the computer console or handlebar to increase or decrease the running speed
during exercise. Time starts counting up from 0:00 to 99:59 per 1 second increment.
SPEED: Displays the current speed from the minimum 1.0 KPH to the maximum 10.0 KPH.
You may increase or decrease the speed by pressing the SPEED +or SPEED -button
on the computer console or handlebar.

Unfolding/folding the machine
1.Unfolding the machine
Pull out the spring knob,
put down the treadmill in the direc-
tion shown by the arrow, using the
safety lock to fix the treadmill
2.Folding the machine
Unlocked the safety lock,
folding up the treadmill, fix it with
spring knob
DISTANCE: Displays the accumulative distance travelled during workout. Press the
START button on the computer to begin exercising, the LCD window will countdown 3
seconds with the LCD showing "3-2- 1" before the running belt starts moving. The
running belt starts moving with an initial speed of 1.0 KPH. You may press the SPEED
+or SPEED -button on the computer console or handlebar to increase or decrease
the running speed during exercise. Distance starts counting up.
CALORIES: Displays the total calories burned during your workout. Press the START
button on the computer to begin exercising, the LCD window will countdown 3 seconds with
the LCD showing "3-2-1 " before the running belt starts moving. The running belt starts
moving with an initial speed of 1.0 KPH. You may press the SPEED +or SPEED -
button on the computer console or handlebar to increase or decrease the running speed
during exercise. Calorie starts counting up. (This data is a rough guide for comparison of
different exercise sessions and should not be used in medical treatment).
PULSE: Displays your current heart rate in beats per minute (BPM). To activate, grip the
hand pulse sensors during exercise and the pulse will display after 2-5 seconds. For a more
accurate reading, grip pulse sensors with both hands.

Tool:
Allen Wrench
BELT ADJUSTMENT
The running belt is pre-adjusted to the running deck at the factory, but after prolonged use
it can stretch and require readjustment. To adjust the belt, turn on the main power switch
of the treadmill and let the belt run at a speed of 5-6 KPH. Use the Allen Wrench
provided to turn the rear roller adjustment bolts in order to centre the belt. If the running
belt is shifting to the left, turn the left adjustment bolt 1/4 turn clockwise, and the running
belt should start to correct itself.
If the running belt is shifting to the right, then turn the right adjustment bolt 1/4 turn
clockwise, and the belt should start to correct itself. Keep turning the adjustment bolts until
the running belt is properly centered.
If the running belt is slipping during use, turn off and unplug the treadmill. Using the
Allen Wrench provided, turn both left and right rear roller adjustment bolts 1/4 turn
clockwise, then turn the main power switch back on and run the treadmill at a speed of
5-6 KPH. Run on to the running belt to determine if the belt is still slipping. Repeat this
procedure until the belt no longer slips.
Tool:
Allen Wrench
Tool:
Allen Wrench

Lubrication
Lubricating under the running belt will ensure superior performance and extend its life
expectancy. After the first 25 hours of use (or 2-3 months) apply some lubricant, and
repeat for every following 50 hours of use (or 5-8 months).
How to check running belt for proper lubrication
Lift one side of the running belt and feel the top surface of the running deck.
If the surface is slick to the touch, then no further lubrication is required.
If the surface is dry to the touch, apply some lubricant.
How to apply lubricant
Lift one side of running belt.
Pour some lubricant under the centre of the running belt on the top surface of the running
deck.
Run on the treadmill at a slow speed for 3 to 5 minutes to evenly distribute lubricant.
NOTE: DO NOT over lubricate running deck. Any excess lubricant that comes out should
be wiped off.
Lubricant
1 PC
EMERGENCY STOP
Before beginning a workout session ensure that the Emergency Stop Magnet is properly placed
onto the Computer Console and the Safety Clip is securely attached to an article of your
clothing. If you fall the clip will pull out the Emergency Stop Magnet from the Computer
Console and the running belt will stop immediately for emergency stop, helping to prevent
injury.
Replaced the Emergency Stop Magnet onto the Computer Console. Press the START button to
begin exercise again.
Red Emergency Stop Magnet

WARM UP AND COOL DOWN ROUTINE
The WARM-UP is an important part of any workout. The purpose of warming up is to
prepare your body for exercise and to minimize injuries. Warm up for two to five minutes
before aerobic exercising. It should begin every session to prepare your body for more
strenuous exercise by heating up and stretching your muscles, increasing your circulation
and pulse rate, and delivering more oxygen to your muscles.
COOL DOWN at the end of your workout, repeat these exercises to reduce soreness in
tired muscles. The purpose of cooling down is to return the body to its resting state at the
end of each exercise session. A proper cool-down slowly lowers your heart rate and
allows blood to return to the heart.
HEAD ROLLS
Rotate your head to the right for one count, you should feel a
stretching sensation up the left side of your neck. Then rotate your
head back for one count, stretching your chin to the ceiling and
letting your mouth open. Rotate your head to the left for one count,
then drop your head to your chest for one count.
SHOULDER LIFTS
Lift your right shoulder toward your ear for one count. Then lift your
left shoulder up for one count as you lower your right shoulder.
SIDE STRETCHES
Open your arms to the side and lift them until they are over your h
Reach your right arm as far toward the ceiling as you can for one
count. Repeat this action with your left arm.
ead.

HAMSTRING STRETCHES
Extend your right leg. Rest the sole of your left foot
against your right inner thigh. Stretch toward your toe
as far as possible. Hold for 15 counts. Relax and then
repeat with left leg.
TOE TOUCHES
Slowly bend forward from your waist, letting your back and
shoulders relax as you stretch toward your toes. Reach as far as
you can and hold for 15 counts.
INNER THIGH STRETCH
Sit with the soles of your feet together and your knees pointing
outward. Pull your feet as close to your groin as possible.
Gently push your knees toward the floor. Hold for 15 counts.
CALF/ACHILLES STRETCH
Lean against a wall with your right leg in front of the left and
your arms forward. Keep your left leg straight and the right
foot on the floor; then bend the right leg and lean forward by
moving your hips toward the wall. Hold, then repeat on the
other side for 15 counts.
QUADRICEPS STRETCH
With one hand against a wall for balance, reach behind you and pull
your right foot up. Bring your heel as close to your buttocks as
possible. Hold for 15 counts and repeat with left foot.

Android:
Download your favorite application from the Google PlayStore.
HOW TO USE:
1.Turn on the Bluetooth function of your mobile device.
2.Open the application on your device.
3.Click on in the main menu on the button,,Indoor “ to searth for available devices.
4.Choose the show device from the list to pair it.
Once the device is paired you can start using the application in diffrernt categories:
Quick Run
Map Mode
Target Mode
Please refer to the instructions inside the specific app download store or contact us.
iPad/iPhone:
Download your favorite application from the AppStore.
Check if your mobile device confirms the requirements for the
application.The requirements of each application are shown in
the Google PlayStore or AppStore.
Please understand that we are not able to offer you a complete operation guide of
application inside this manual, as the app will be updated from time. This process can
make changes to the operation or the design of the application.
Table of contents
Other Justfit Treadmill manuals