Juzisound Total SOLO Sampler MICRO User manual

Page 1 of 13
Juzisound
Total SOLO Sampler
M I C R O
Quick Start Guide
Version: 1.0
Juzisound Ltd
Address:
76 Bozhin Chulev str., 5897 Zgalevo, BULGARIA
Phone:
+359 887/69-47-09
Phone:
+359 887/69-47-10
E-mail:
juzisound[email protected]
Internet site:
www.juzisound.com

Page 2 of 13
Important Safety Instructions
WARNING
The lightning flash with arrowhead symbol within an equilateral triangle is
intended to alert the user to the presence of uninsulated “dangerous voltage”
within the product’s enclosure that may be of sufficient magnitude to consti-
tute a risk of electric shock to people.
CAUTION
The exclamation point within an equilateral triangle is intended to alert the
user to the presence of important operating and maintenance (servicing) in-
structions in the literature accompanying the product.
WARNING
When using electric products, basic safety precautions should always be taken, including the fol-
lowing:
Read these instructions.
Keep these instructions.
Heed all warnings.
Follow all instructions.
Do not use this apparatus near water.
Clean only with a dry cloth.
Install in accordance with the manufacturer’s instructions.
Do not install near any heat sources such as radiators, heat registers, stoves, or other apparatus
(including amplifiers) that produce heat.
Protect the power cord from being walked on or pinched particularly at plugs, convenience recep-
tacles, and the point where they exit from the apparatus.
Only use attachments/accessories specified by the manufacturer.
Unplug this apparatus during lightning storms or when unused for long periods of time.
Refer all servicing to qualified service personnel. Servicing is required when the apparatus has
been damaged in any way, such as power-supply cord or plug is damaged, liquid has been spilled
or objects have fallen over the apparatus, the apparatus has been exposed to rain or moisture, does
not operate normally, or has been dropped.
Do NOT modify this unit, alterations may affect performance, safety and/or international compli-
ance standards.
Always ensure adequate space for ventilation around the device.
Do not cover the apparatus with newspapers, tablecloths, curtains, etc., as these will impair venti-
lation and cause overheating.
Do not keep near the device open flame sources such as candles.
INSTRUCTIONS PERTAINING TO A RISK OF FIRE, ELECTRIC SHOCK, OR
INJURY TO PERSONS. SAVE THESE INSTRUCTIONS

Page 3 of 13
Additional Precautions
Please beware that the content of SD card can be irretrievably lost as a result of a malfunction, or
the improper operation of the unit. To protect yourself against the risk of losing important data,
we recommend that you periodically save a backup copy of SD card.
Use a reasonable amount of care when using the unit’s buttons or other controls; and when using
its jacks and connectors. Rough handling can lead to malfunctions.
Never strike or apply strong pressure to the display.
When disconnecting all cables, grasp the connector itself—never pull on the cable. This way you
will avoid causing shorts, or damage to the cable’s internal elements.
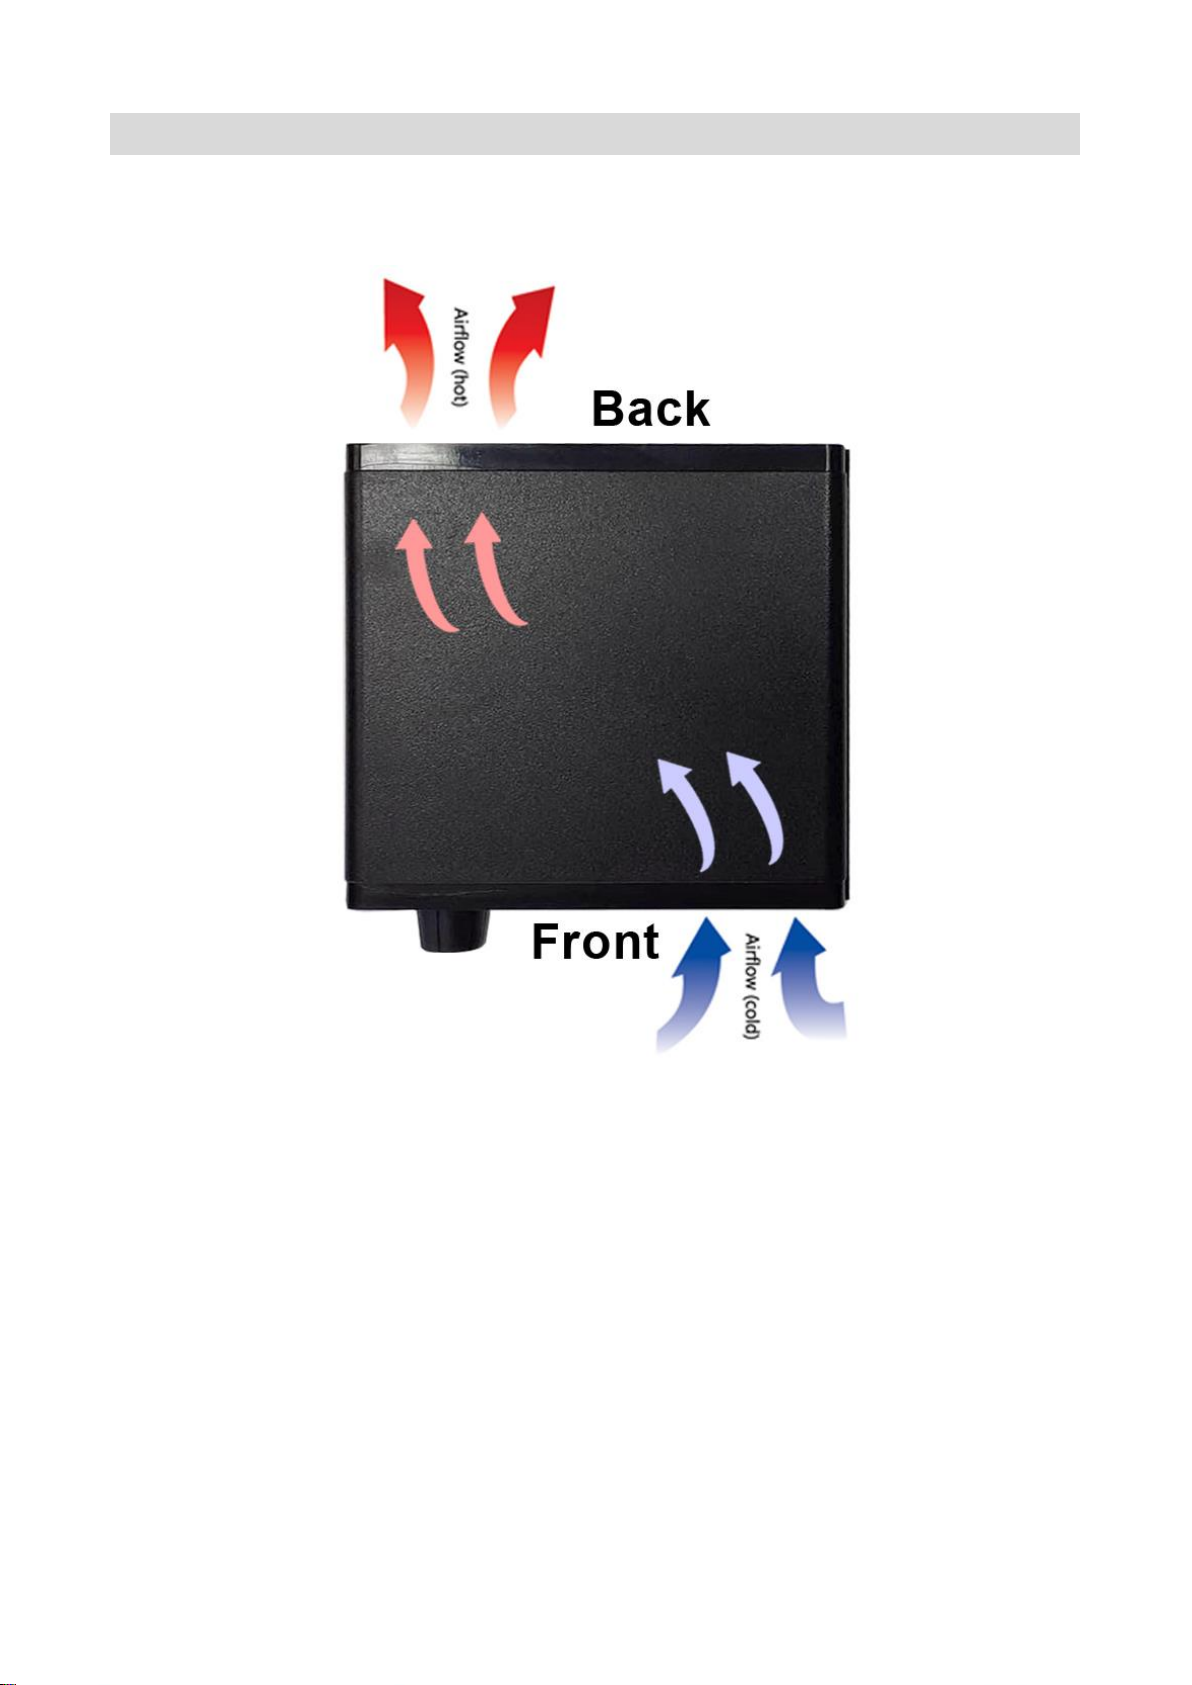
A small amount of heat will radiate from the unit during normal operation.
To avoid disturbing others nearby, try to keep the unit’s volume at reasonable levels. You may
prefer to use headphones, so you do not have to be concerned about those around you.
When you need to transport the unit, pack it in the box (including padding) that it came in, if
possible. Otherwise, you will need to use equivalent packaging materials.
Maintenance
For everyday cleaning wipe the unit with a soft, dry cloth or one that has been slightly dampened
with water. To remove stubborn dirt, use a cloth impregnated with a mild, nonabrasive detergent.
Afterwards, be sure to wipe the unit thoroughly with a soft, dry cloth.
Never use benzine, thinners, alcohol or solvents of any kind, to avoid the possibility of discolora-
tion and/or deformation.
Technical Support
If you are unable, with your dealer’s help, to solve problems you encounter with the Juzisound
MICRO Sampler, you may contact our technical support department in one of the following ways:
Tech support: (+359) 887-69-47-09 (Monday through Friday, 9 am to 5 pm EST)
Online support: [email protected].
Please provide the following information to help us solve your problem as quickly as possible:
The serial number of the sampler. This is printed on a sticker placed on the bottom of the device
itself. You must be able to supply this number to receive technical support.
A brief explanation of the problem, including the exact sequence of actions which cause it, and
the contents of any error messages which appear on the screen.
The version of your installed operating system. We’re not able to solve every problem
immediately, but a quick call to us may yield a suggestion for a problem which you might
otherwise spend hours trying to track down. If you have features or ideas you would like to see
implemented, we’d like to hear from you.

Page 4 of 13
Information for Users on Collection and Disposal of Old
Equipment
This symbol on the products, packaging, and/or accompanying documents means
that used electrical and electronic products should not be mixed with general
household waste.
For proper treatment, recovery and recycling of old products, please take them to
applicable collection points, in accordance with your national legislation and the
Directives 2012/19/EU.
By disposing of these products correctly, you will help to save valuable resources
and prevent any potential negative effects on human health and the environment
which could otherwise arise from inappropriate waste handling.
For more information about collection and recycling of old products, please contact your local mu-
nicipality, your waste disposal service or the point of sale where you purchased the items.
For business users in the European Union
If you wish to discard electrical and electronic equipment, please contact your dealer or supplier for
further information.
Information on Disposal in other Countries outside the European Union
This symbol is only valid in the European Union. If you wish to discard these items, please contact
your local authorities or dealer and ask for the correct method of disposal.
EU Compliance
Juzisound Total SOLO Sampler MICRO is CE compliant.
Note that any cables supplied with this equipment may be fitted with ferrite rings at each end. This is to
comply with the current regulations and these ferrites should not be removed.
Electromagnetic Compatibility
This product complies with the requirements of European Union’s Directive: 2014/30/EU
EN 55032:2015, Environment: Class B, EN 55035:2017, Environments: E1 - E4, EN 61000-3-2:2019, EN 61000-3-3:2013, EN
61000-4-2:2009, EN 61000-4-4:2012, EN 61000-4-5:2014, EN 61000-4-6:2014, EN 61000-4-8:2010, EN 61000-4-11:2020,.
Audio input and output ports are screened cable ports and any connections to them should be made using braid-screened cable and
metal connector shells in order to provide a low impedance connection between the cable screen and the equipment.
LVD
This product complies with the requirements of European Union’s Directive: 2014/35/EU.
RoHS notice
This product complies with the requirements of European Union’s Directive 2011/65/EU.
This device complies with part 15 of the FCC Rules. Operation is subject to the following two conditions: (1) This device may not
cause harmful interference, and (2) this device must accept any interference received, including interference that may cause
undesired operation.
This product has been tested and found to comply with the limit for a Class B Digital device, pursuant to Part 15 of the FCC rules.
These limits are designed to provide a reasonable protection against harmful interference in a residential environment. This
equipment generate, use and radiate radio frequency energy and, if not installed and used according to the instructions found in the
users manual, may cause interferences harmful to the operation to other electronic devices. Compliance with FCC regulations does
not guarantee that interferences will not occur in all the installations. If this product is found to be the source of interferences,
witch can be determined by turning the unit “OFF” and “ON”, please try to eliminate the problem by using one of the following
measures:
•Relocate either this product or the device that is affected by the interference.
•Use power outlets that are on different branch (circuit breaker or fuse) circuits or install AC line filter(s).

Page 5 of 13
Power Supply
Do not connect this unit to the same electrical outlet that is being used by an electrical appliance
that is controlled by an inverter or a motor (such as a refrigerator, washing machine, microwave
oven, or air conditioner). Depending on the way the electrical appliance is being used, power
supply noise may cause this unit to malfunction or may produce audible noise. If it is not practical
to use a separate electrical outlet, connect a power supply noise filter between this unit and the
electrical outlet.
To prevent malfunction and equipment failure, always make sure to turn off the power on all your
equipment before you make any connections.
Although the LCD and LEDs are switched off when the unit is turned off, this does not mean that
the unit has been completely disconnected from the source of power. If you need to turn off the
power completely, first turn off the unit’s switch, then unplug the power cord from the power out-
let. For this reason, the outlet you choose to connect the power cord’s plug to should be one that
is within easy reach and easily accessible.
Power Switch is only for functional switching of the device. It does not disconnect the device from
the mains.
Due to risk of electric shock, replacement of fuse and battery are performed only from an author-
ized dealer of the manufacturer or a person with similar qualifications.
International Power Supply Standard
230V / 50Hz
110V/ 60Hz
OK
Not OK
Use original power adapter
provided by Juzisound.
Use 110V to 220V Step Up Voltage Converter,
with a Power of 10 watts or more!
CAUTION
Risk of electric shock. DO NOT OPEN!
CAUTION: TO REDUCE THE RISK OF ELECTRIC SHOCK, DO NOT REMOVE
COVER (OR BACK). NO USER-SERVICEABLE PARTS INSIDE. REFER SERVICING
TO QUALIFIED SERVICE PERSONNEL.

Page 6 of 13
Device placement
Juzisound Total SOLO Sampler use active cooling system, with internal turbine fan. For cooling to
function properly, you must ensure at least 5 centimeters of free space in front and behind the unit.
Using the unit near power amplifiers (or other equipment containing large power transformers) may
induce hum. To alleviate the problem, change the orientation of this unit; or move it further away
from the source of interference.
This device may interfere with radio and television reception. Do not use this device in the vicinity
of such receivers.
Noise may be produced if wireless communication devices, such as cell phones, are operated in the
vicinity of this unit. Such noise could occur when receiving or initiating a call, or while convers-
ing. Should you experience such problems, you should relocate such wireless devices so they are
at a greater distance from this unit, or switch them off.
When moved from one location to another where the temperature and/or humidity is very different,
water droplets (condensation) may form inside the unit. Damage or malfunction may result if you
attempt to use the unit in this condition. Therefore, before using the unit, you must allow it to
stand for several hours, until the condensation has completely evaporated.
Do not put anything that contains water over this unit.
Also, avoid the use of insecticides, perfumes, alcohol, nail polish, spray cans, etc., near the unit.
Swiftly wipe down any liquid that spills on the unit using a dry, soft cloth.

Page 7 of 13
Basic controls and indicators of the sampler
Front panel
1. TFT display.
2. Potentiometer for adjusting the volume
of the headphones and the main outputs.
3. MIDI and AUDIO CLIP indicators.
4. SD card slot.
Buttons
MENU –Short pressed enters Fast Menu - If we are on the Main Page. If we are in any
menu: returns back, until it reaches the Main Page.
Long press, if we are on the Main Page - enters Main Menu. If we are in any menu: returns
directly to the Main Page.
ENTER –Short pressed: If we are in menus - Entering a submenu, or moving to the next
menu chapter.
Long press: If we are in the main page - MIDI LEARN. If we are in menus - return to the
previous point of the same menu until it reaches the first one.
PLUS/MINUS (+/-) –Move through the menu items, or if a parameter is selected, change
the parameter value.
Rear panel
1. Power IN (Use only 15v/0,4A AC adap-
tor provided by Juzisound)
2. USB Host connector, for connecting
USB MIDI keyboard or USB Mass Stor-
age.
3. Breath controller IN.
4. Breath polarity switch
5. MIDI in/out conector
6. AUDIO OUTS –6.3mm mono audio
jack. (L/R Phones is STEREO)
3
1
2
4
1
2
3
4
5
6

Page 8 of 13
Using a SD card
Carefully insert the SD card all the way in—until it is firmly in place.
Never touch the terminals of the USB flash drives. Also, avoid getting the terminals dirty.
SD cards are constructed using precision components; handle the SD cards carefully, paying
particular note to the following.
To prevent damage to the cards from static electricity, be sure to discharge any static electricity
from your own body before handling the SD cards.
Do not touch or allow metal to come into contact with the contact portion of the SD cards.
Do not bend, drop, or subject SD cards to strong shock or vibration.
Do not keep SD cards in direct sunlight, in closed vehicles, or other such locations.
Do not allow SD cards to become wet.

Page 9 of 13
Standard Connections
+
Connect Power Adapter to Power Input of sampler.
WARNING!!! Use only an original AC/AC adapter supplied by Juzisound! Using the
wrong adapter can damage your sampler!!!
Connect Breath Controller Headset to the Breath Input of the sampler. If not use Breath
Controller, skip this step.
Connect USB Numpad Keyboard to the USB Input of the sampler. If not use USB keyboard,
skip this step.
Connect MIDI OUT of the synthesizer or MIDI keyboard, which is master to the sampler to
the MIDI IN of the sampler. You can do this connection by MIDI cable (included).
Connect AUDIO Out L and Audio Out R of the sampler to 2 separate MONO input
channels of you MIXER or to one STEREO input channel. To to this, you need 2 mono
audio cables with Jack\Jack connectors (not included). If use 2 separate MONO channels
of you mixer, set PAN of both channels to max L/R position to listen STEREO sound.

Page 10 of 13
Avoid INCORRECTAudio Connection
+
Always connect the audio output of the sampler DIRECTLY to a mixing console, not through
the audio input of the synthesizer. In this picture audio connections are INCORRECT and
leads to a DRASTIC reduction in sound quality. The correct way is shown in previous
picture!
Audio Output Settings
Volume potentiometer is located on the front panel and controls the level of both the headphones
and the main audio outputs located on the rear panel. Headphone is designed to work with low-
impedance headphones.
CAUTION!
Excessive sound pressure from earphones and headphones can cause hearing
loss.

Page 11 of 13
Breath controller Connection
[Analog IN] connector on the rear panel of the
sampler is used to connect an analog controllers.
Analog controller means the following:
- breath controllers, volume or expression pedals,
simple potentiometers or any other type of
device, that produces an analog signal.
Analog input have hardware configurable
amplifier and offset settings, controled by
sampler menu. To connect analog controller,
use 3.5" stereo jack.
Pinout of connector is user adjustable, and possible configuration are shown in next images.
Analog input produce power for analog controller. Work voltage is +5V / 50 mA. Sampler have
power short cirquit protection, and manual switch for power polarity settings. To switch between 2
availabe power polarity scheme, move switch LEFT or RIGHT. Juzisound Breath
Controller work in LEFT position. If you select wrong scheme, or have short cirquit in cable,
sampler will stop power and produce error message on display. To restore power, simple press any
button of device or USB keyboard. This will clear error message, and restory power on connector.

Page 12 of 13
To use the built-in analog converter to drive an external device, you should use special Y-form
MIDI cable (optional). One end of this cable is plugged in sampler, but another is splitted to MIDI
IN and MIDI OUT. Connected MIDI OUT part of cable to MIDI IN of the synthesizer you want to
con-trol. If you want to control more than one external MIDI synthesizer, then you need to connect
MIDI THRU of the first controlled MIDI synthesizer to MIDI IN on the second, using normal MIDI
cable. If the external synthesizers are more than two, then you need to connect MIDI THRU of the
second to MIDI IN of the third and so to the end of the chain.
Extended MIDI Connector Functions
MIDI connector have same extendent function
like: combined MIDI IN/OUT, and power out
for Juzisound Accordeon MIDI systems.
Pinout:
1. +5 Volt power out for Juzisound Accordeon MIDI System. Alsu (MIDI OUT+).
2. GND power out for Juzisound Accordeon MIDI System.
3. MIDI OUT-. Connect trought 220 Ohm resistor to pin 1 (MIDI OUT+).
4. MIDI IN+. Optoisolated MIDI Input - positive.
5. MIDI IN-. Optoisolated MIDI Input - negative.
6. GND. Common GND of device.

Page 13 of 13
MIDI Y Cable Circuit
If MIDI IN and MIDI OUT are used simultaneously, a MIDI Y cable must be used. You can get it
from us or make according to the scheme attached below.
Table of contents
Other Juzisound Recording Equipment manuals