JVC KD-DV9406 User manual

1
KD-DV9406/KD-DV9405
Installation/Connection Manual
Manual Pemasangan/Penyambungan
GET0541-008A
[UN]
0408DTSMDTJEIN
EN, IN
ENGLISH
This unit is designed to operate on 12 V DC, NEGATIVE ground electrical systems. If your vehicle does
not have this system, a voltage inverter is required, which can be purchased at JVC car audio dealers.
WARNINGS
• DO NOT install any unit or wire any ca le in a location where;
– it may o struct the steering wheel and gearshift lever operations.
– it may o struct the operation of safety devices such as air ags.
– it may o struct visi ility.
• DO NOT operate the unit while driving.
• If you need to operate the unit while driving, e sure to look around carefully.
• The driver must not watch the monitor while driving.
If the parking rake is not engaged, “DRIVER MUST NOT WATCH THE MONITOR WHILE
DRIVING.” appears on the monitor, and no play ack picture will e shown.
– This warning appears only when the parking rake lead is connected to the parking rake
system uilt in the car.
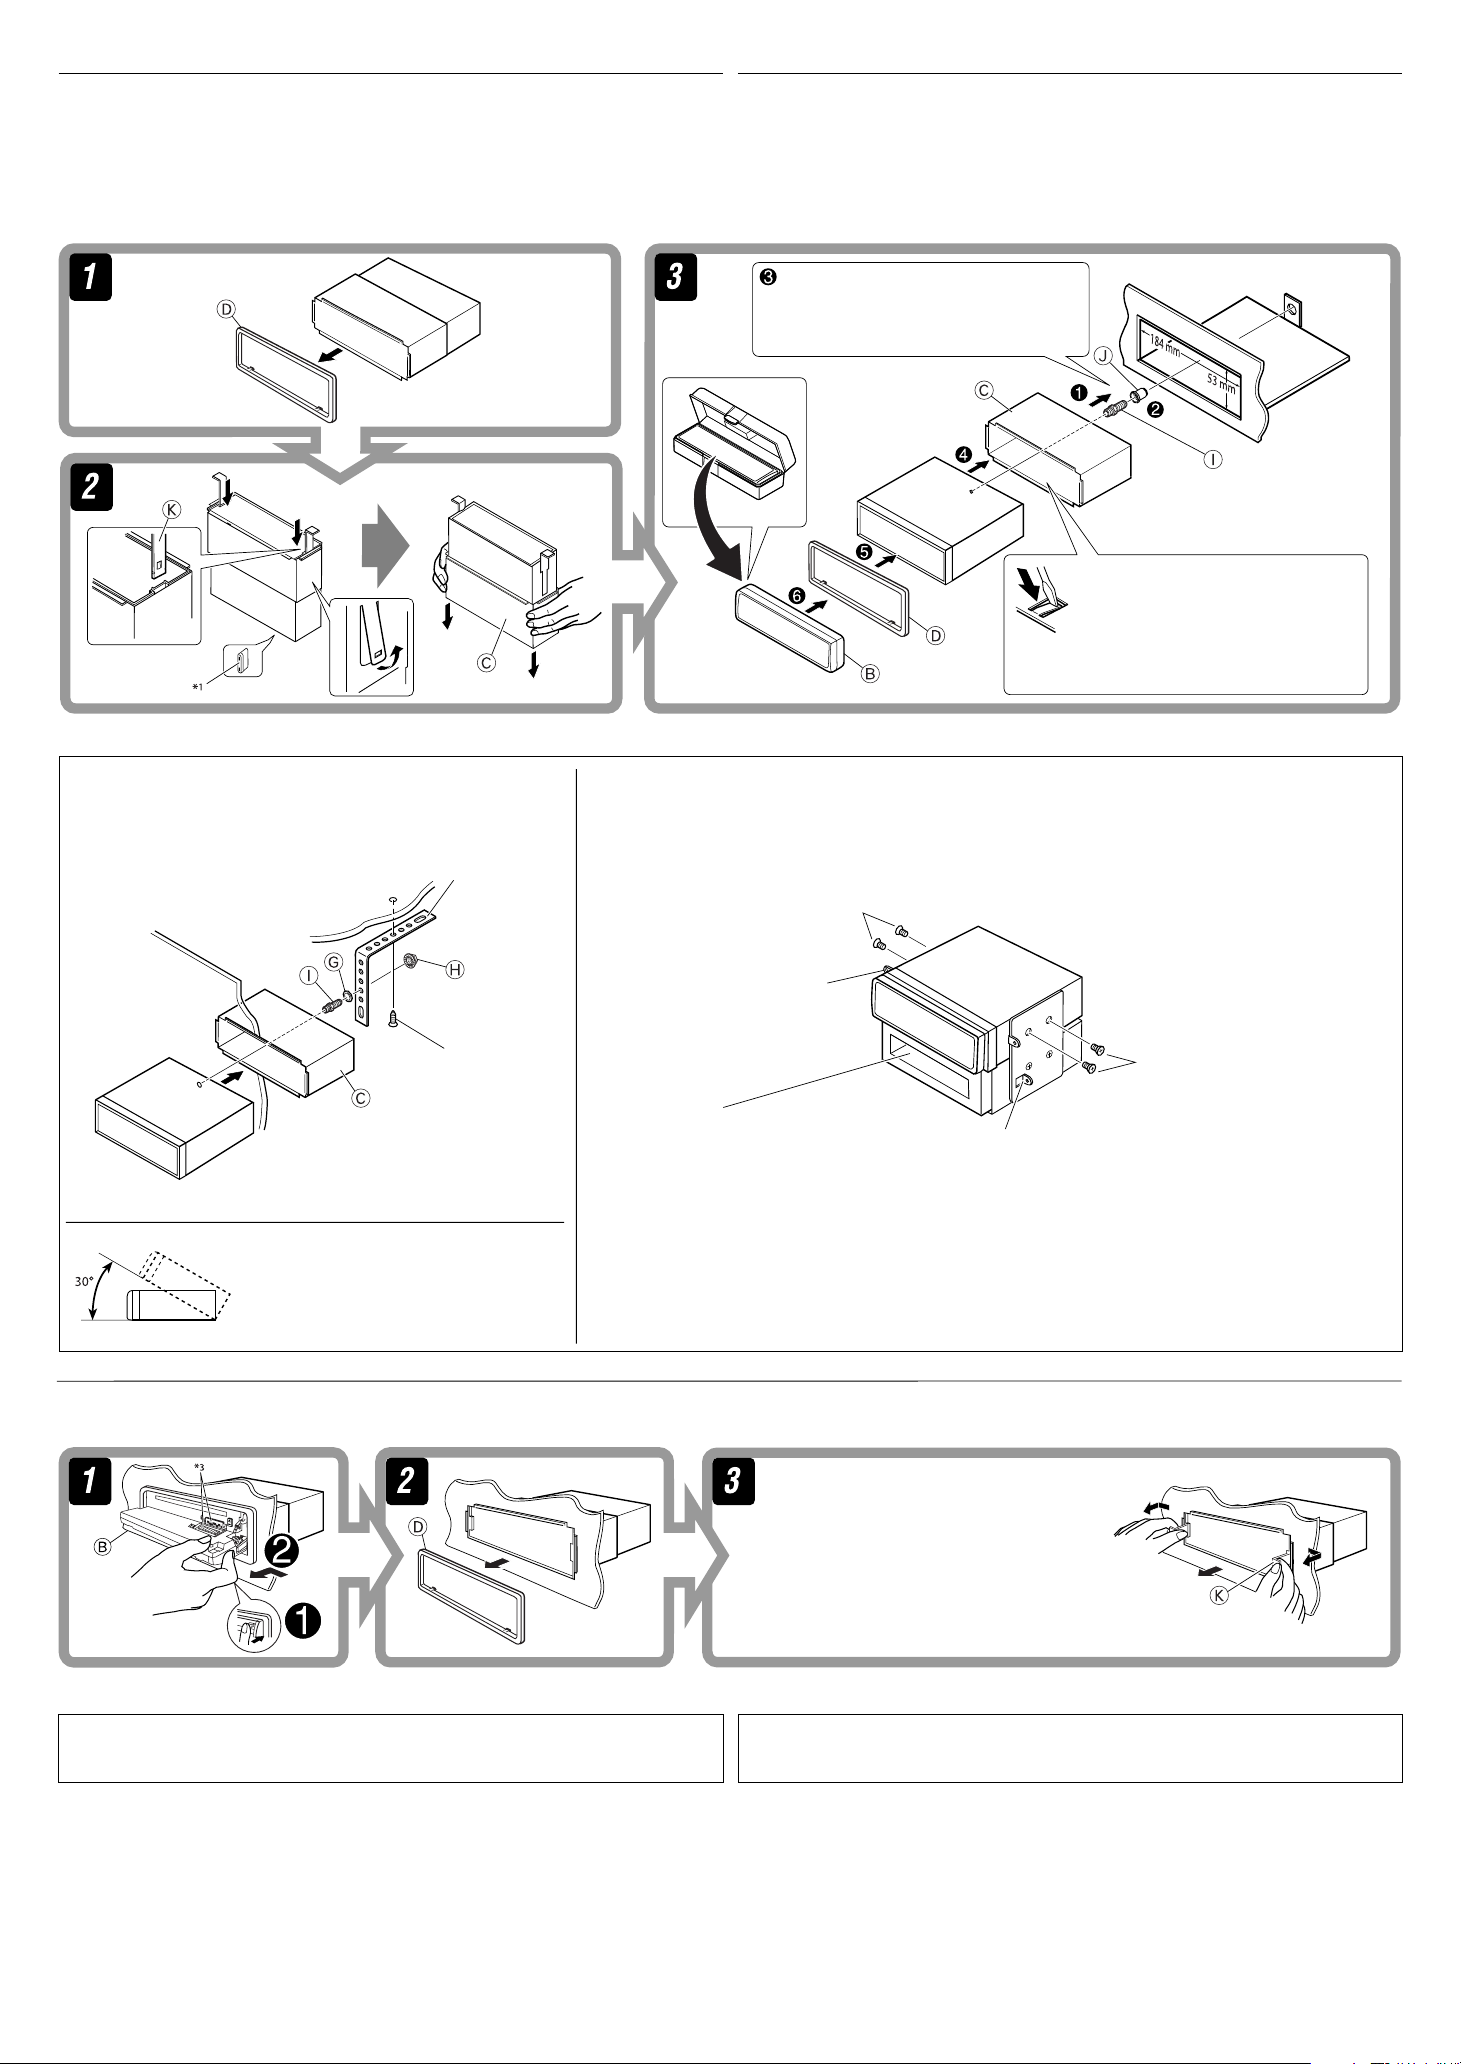
To prevent short circuits, we recommend that you disconnect the battery’s negative terminal and ma e all
electrical connections before installing the unit.
• Be sure to ground this unit to the car’s chassis again after installation.
Notes:
• Replace the fuse with one of the specified rating. If the fuse blows frequently, consult your JVC car audio
dealer.
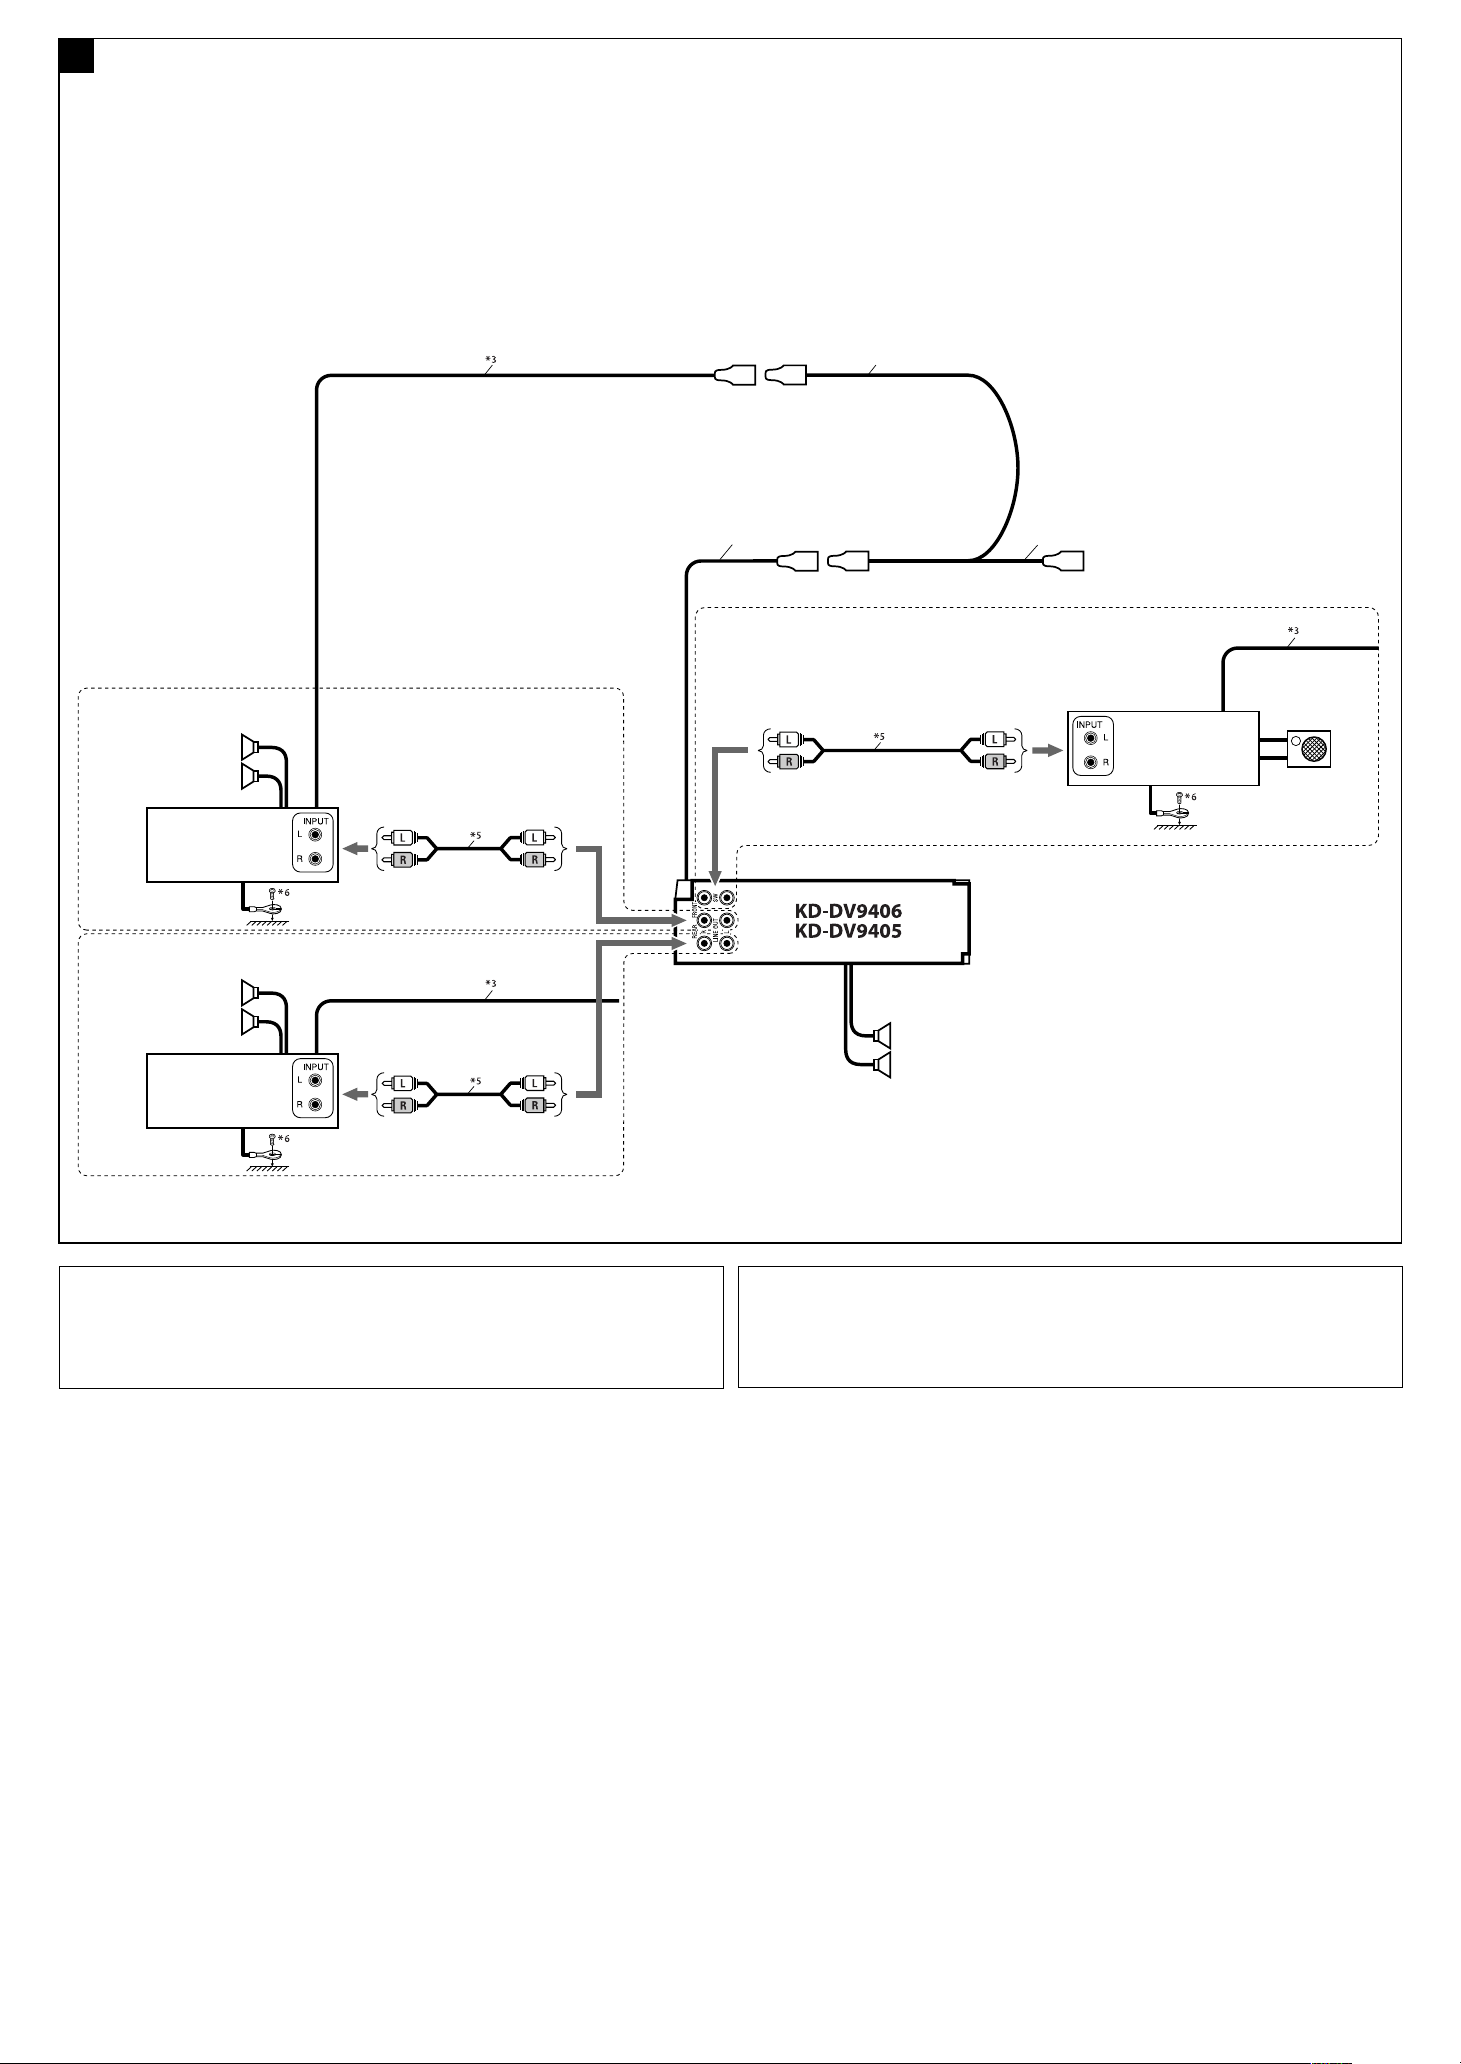
• It is recommended to connect spea ers with a maximum power of more than 50 W (both at the rear
and at the front, with an impedance of 4 Ω to 8 Ω). If the maximum power is less than 50 W, change
“Amp Gain” setting to prevent the spea ers from being damaged (see page 41 of the INSTRUCTIONS).
• To prevent short circuits, cover the terminals of the UNUSED leads with insulating tape.
• The heat sin becomes very hot after use. Be careful not to touch it when removing this unit.
© 2008 Victor Company of Japan, Limited
INDONESIA
Unit ini didisain untuk beroperasi hanya pada 12 V DC, sistem listrik tanah NEGATIVE. Jika kendaraan
anda tidak memiliki sistem ini, sebuah pembalik tegangan diperlukan, yang mana dapat dibeli di penyalur-
penyalur audio mobil JVC.
PERINGATAN
• JANGAN menginstal unit apa pun atau menjalin ka el apa pun pada lokasi di mana;
– ini dapat menghalangi pengoperasian roda kemudi dan tuas gigi persneling.
– ini dapat menghalangi pengoperasian alat pengaman seperti kantung udara.
– ini dapat menghalangi pandangan.
• JANGAN mengoperasikan unit sewaktu mengemudi.
• Jika Anda harus mengoperasikan unit sewaktu mengemudi, pastikan Anda melihat ke
sekeliling dengan hati-hati.
• Pengemudi tidak oleh menonton monitor selagi mengemudi.
Jika rem parkir tidak ekerja, “DRIVER MUST NOT WATCH THE MONITOR WHILE DRIVING.”
muncul pada monitor dan tidak ada gam ar putar ulang yang akan dipertunjukkan.
– Peringatan ini hanya muncul apa ila kawat rem parkir terhu ung ke sistem rem parkir yang
terpasang dalam mo il.
Untuk mencegah hubungan pendek, kami menyarankan anda memutuskan sambungan terminal negatif
baterai dan membuat semua sambungan-sambungan listrik sebelum memasang unit.
• Pastikan untuk mentanahkan unit ini ke casis mo il kem ali setelah pemasangan.
Catatan:
• Ganti sekring dengan voltase yang sudah ditetapkan. Jika sekring sering meledak, konsultasikan pada
penyalur audio mobil JVC anda.
• isarankan untuk menghubungkan speaker-speaker dengan maksimum power lebih dari 50 W (keduanya
di belakang dan di depan, dengan sebuah impedansi 4 Ω sampai 8 Ω). Jika maksimum power kurang
dari 50 W, ganti pengaturan “Amp Gain” (“PENAMBAH PENGUAT”) untuk mencegah speaker-speaker
dari kerusakan (lihat halaman 41 dari BUKU PETUNJUK).
• Untuk mencegah hubungan pendek, tutup ujung-ujung terminal-terminal yang TI AK IGUNAKAN
dengan pita isolasi.
• Pendingin menjadi sangat panas setelah digunakan. Hati-hati untuk tidak menyentuhnya ketika
memindahkan unit ini.
J
Rubber cushion
Bantalan karet
F
Crimp connector
Konektor kerut
G
Washer (ø5)
Perapat sambungan (ø5)
H
Loc nut (M5)
Mur kunci (M5)
I
Mounting bolt (M5 × 20 mm)
Baut bingkai (M5 × 20 mm)
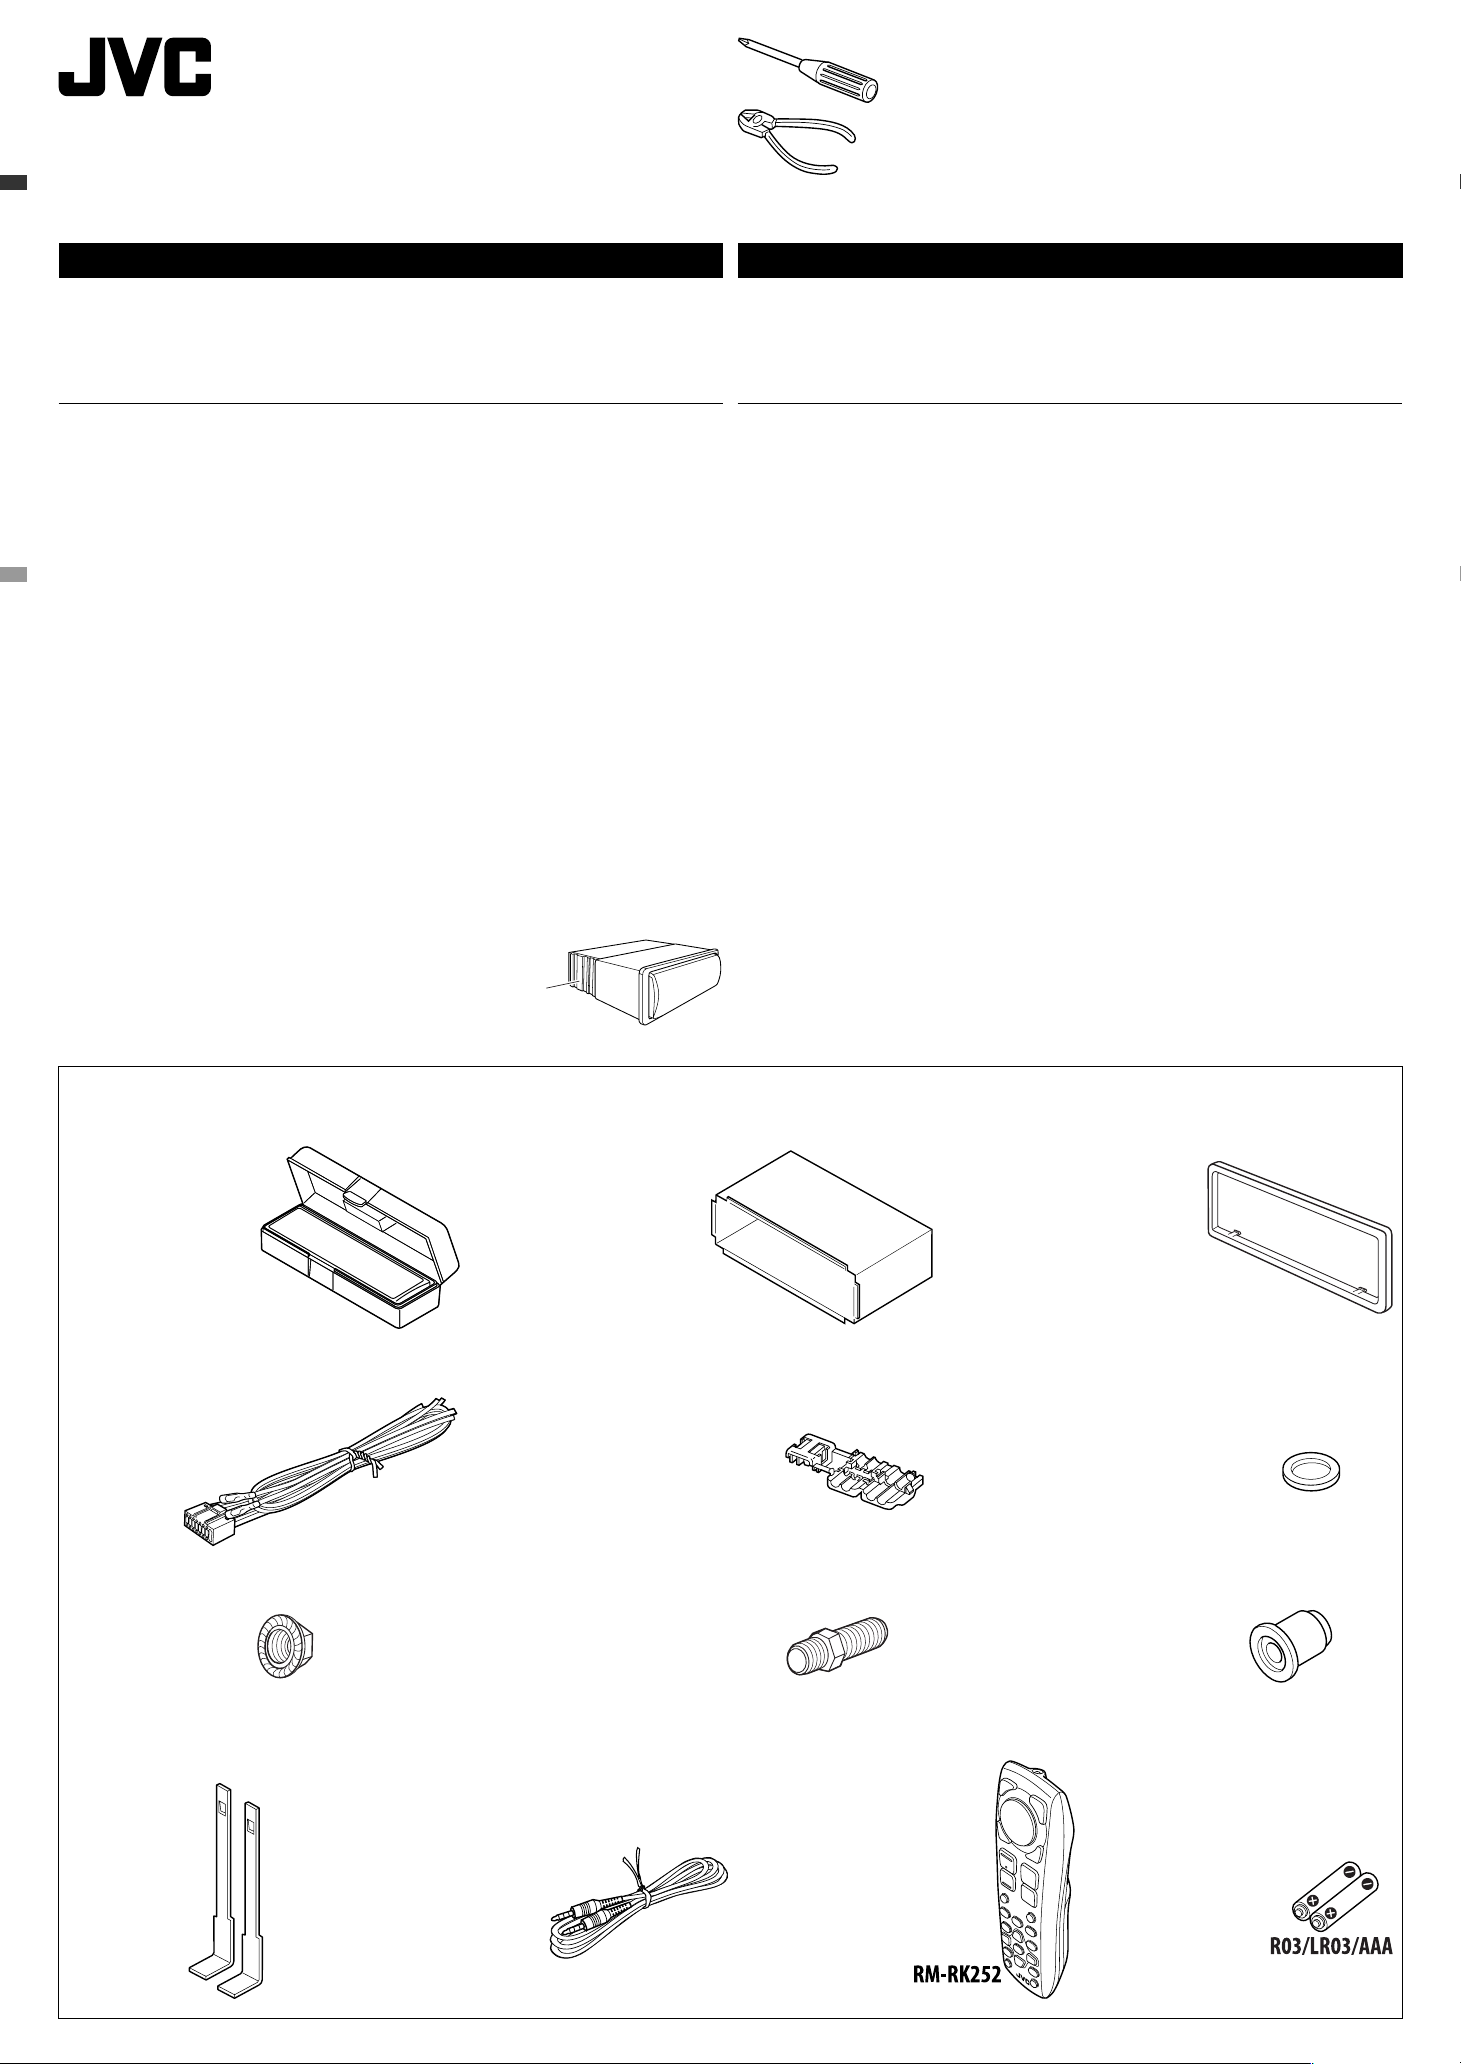
Parts list for installation and connection
If any item is missing, consult your JVC car audio dealer immediately.
K
Handles
Pegangan-pegangan
M
Remote controller
Remote kontrol
N
Batteries
Baterai
Daftar agian- agian untuk pemasangan dan penyam ungan
Jika ada item yang hilang, segera hubungi dealer audio mobil JVC anda.
A / B
Hard case/Control panel
Kotak keras/Panel kontrol
C
Sleeve
Selongsong
D
Trim plate
Plat rapi
E
Power cord
Kabel power
Heat sin
Pendingin
L
AV mini plug cable
Kabel steker mini AV
Instal1-3_DV9406_008A_3.indd 1Instal1-3_DV9406_008A_3.indd 1 22/4/08 12:56:07 PM22/4/08 12:56:07 PM

2
INSTALLATION (IN-DASH MOUNTING)
The following illustration shows a typical installation. If you have any questions or require information
regarding installation its, consult your JVC car audio dealer or a company supplying its.
• Ma e sure not to bloc the fan on the rear to maintain proper ventilation when installing the unit.
• If you are not sure how to install this unit correctly, have it installed by a qualified technician.
Removing the unit
Before removing the unit, release the rear section.
PEMASANGAN (BINGKAI-DALAM DASH)
Ilustrasi berikut menunjukkan sebuah tipe pemasangan. Jika anda mempunyai suatu pertanyaan atau
informasi yang diperlukan mengenai alat-alat pemasangan, konsultasikan pada penyalur audio mobil JVC
atau sebuah perusahaan yang mensuplai alat-alat.
• Pastikan tidak ada yang menghalangi kipas di bagian belakang untuk menjaga aliran udara yang baik
apabila memasang unit ini.
• Jika anda tidak yakin bagaimana memasang unit ini dengan benar, biarkan dipasang dengan teknisi yang
berkualitas.
Do the required electrical connections.
Lakukan penyambungan-penyambungan
listrik yang diperlukan.
Bend the appropriate tabs to hold the
sleeve firmly in place.
Bengkokkan pengait-pengait yang
tepat untuk menahan selongsong
secara kuat pada tempatnya.
*1 When you stand the unit, be careful not to damage the fuse on the rear.
*2 Not supplied for this unit.
*3 Avoid touching the connectors.
When installing the unit without using the sleeve / Ketika memasang unit tanpa
menggunakan selongsong
In a Toyota car for example, first remove the car radio and install the unit in its place.
alam sebuah kereta Toyota misalnya, pertama pindahkan radio mobil dan pasang unit tersebut ke dalam tempatnya.
When using the optional stay
/
Ketika menggunakan
penguat tam ahan
Note : When installing the unit on the mounting brac et, ma e sure to use the 8 mm-long screws. If longer screws
are used, they could damage the unit.
Catatan : Ketika memasang alat penerima pada breket bingkai, pastikan untuk menggunakan sekrup-sekrup panjang–
8 mm. Jika sekrup yang lebih panjang digunakan, maka dapat merusak unit.
*1 Ketika anda memberdirikan unit, hati-hati untuk tidak merusak sekring di belakang.
*2 Tidak disediakan untuk unit ini.
*3 Jangan sentuh konektor.
Install the unit at an angle of less than 30˚.
Pasang penerima pada suatu sudut kurang
dari 30˚.
Memindahkan unit
Sebelum memindahkan unit, lepaskan seksi belakang.
Insert the two handles, then pull them as
illustrated so that the unit can be removed.
Sisipkan kedua pemegang dan tarik unit
seperti yang diilustrasikan hingga unit dapat
dipindahkan.
Screw (option)
Sekrup (tambahan)
Stay (option)
Penguat (tambahan)
Fire wall
inding tahan api
Dashboard
Tempat alat pada bagian
depan
Brac et *2
Breket *2
Flat head screws (M5 × 8 mm) *2
Sekrup kepala rata (M5 × 8 mm) *2
Poc et
Kantong
Flat head screws (M5 × 8 mm) *2
Sekrup kepala rata (M5 × 8 mm) *2
Brac et *2
Breket *2
Instal1-3_DV9406_008A_3.indd 2Instal1-3_DV9406_008A_3.indd 2 15/4/08 3:12:26 AM15/4/08 3:12:26 AM

3
PRECAUTIONS on power supply and speaker connections:
• DO NOT connect the speaker leads of the power cord to the car attery; otherwise, the unit
will e seriously damaged.
• BEFORE connecting the spea er leads of the power cord to the spea ers, chec the spea er wiring in
your car.
TINDAKAN-TINDAKAN PENCEGAHAN pada suplai power dan
sam ungan-sam ungan speaker:
• JANGAN sam ungkan ujung-ujung speaker dari ka el power ke aterai mo il; se aliknya,
unit terse ut akan secara serius rusak.
• SEBELUM menyambung ujung-ujung speaker dari kabel power ke speaker-speaker, cek perkabelan
speaker dalam mobil anda.
To external components (see diagram )
Ke komponen eksternal (lihat diagram )
Light green
Hijau muda
VIDEO OUT
(see diagram / lihat diagram )
DIGITAL OUT
(see diagram / lihat diagram )
A
To par ing bra e, metallic body or chassis of the car
Ke rem parkir, logam body atau casis mobil
Before connecting: Chec the wiring in the vehicle carefully. Incorrect connection may cause serious
damage to this unit.
The leads of the power cord and those of the connector from the car body may be different in color.
1 Connect the colored leads of the power cord in the order specified in the illustration below.
2 Connect the antenna cord.
3 Finally connect the wiring harness to the unit.
Se elum penyam ungan: Cek perkabelan dalam mobil dengan hati-hati. Penyambungan yang
tidak benar mungkin menyebabkan kerusakan serius pada unit.
Ujung dari kabel power dan beberapa konektor dari bodi mobil mungkin berbeda dalam warna.
1 Sambungkan ujung berwarna dari kabel power dalam urutan spesifikasi pada ilustrasi di bawah.
2 Sambungkan kabel antena.
3 Akhirnya sambungkan dudukan kabel ke unit.
15 A fuse
Sekring 15 A
Blac
Hitam
Blue with white stripe
Biru dengan strip putih
Red
Merah
Yellow *5
Kuning *5
To metallic body or chassis of the car
Ke besi bodi atau casis dari mobil tersebut
Ignition switch
Saklar kontak
Fuse bloc
Blok sekring
To an accessory terminal in the fuse bloc
Ke sebuah terminal aksesoris dalam blok sekring
To the remote lead of other equipment (200 mA max.)
Ke ujung jauh dari peralatan lain (maksimum 200 mA)
To a live terminal in the fuse bloc connecting to the car battery
(bypassing the ignition switch) (constant 12 V)
Ke sebuah tempat terminal dalam blok sekring disambungkan ke
baterai mobil (abaikan saklar kontak) (konstant 12 V)
Rear ground terminal
Terminal tanah belakang
Left spea er (front)
Speaker kiri (depan)
Right spea er (front)
Speaker kanan (depan)
Left spea er (rear)
Speaker kiri (belakang)
Right spea er (rear)
Speaker kanan (belakang)
Purple
Ungu
Purple with blac stripe
Ungu dengan strip hitam
Green
Hijau
Green with blac stripe
Hijau dengan strip hitam
Gray
Abu-abu
Gray with blac stripe
Abu-abu dengan strip hitam
White
Putih
White with blac stripe
Putih dengan strip hitam
Typical connections / Ciri khas sam ungan-sam ungan
Antenna connector
Konektor antena
To the automatic antenna if any (250 mA max.)
Ke antena otomatis jika ada (maksimum 250 mA)
Blue
Biru
LINE IN
(see diagram / lihat diagram )
SW
(Subwoofer/Subwoofer)
(see diagram / lihat diagram )
LINE OUT
(see diagram / lihat diagram )
2nd AUDIO OUT
(see diagram / lihat diagram )
Orange with white stripe
Oranye dengan strip putih To car light control switch
Untuk saklar kontrol lampu mobil
*4 Not supplied for this unit.
*5 Before chec ing the operation of this unit prior to installation, this lead must be connected, otherwise power
cannot be turned on.
ELECTRICAL CONNECTIONS SAMBUNGAN-SAMBUNGAN LISTRIK
*4 Tidak disediakan untuk unit ini.
*5 Sebelum pengecekan pengoperasian dari unit ini sebelum pemasangan, ujung ini harus sudah dihubungkan,
selain itu power tidak dapat dihidupkan.
USB cable (see diagram )
Kabel USB (lihat diagram )
Instal1-3_DV9406_008A_3.indd 3Instal1-3_DV9406_008A_3.indd 3 15/4/08 3:12:29 AM15/4/08 3:12:29 AM

4
ENGLISH INDONESIA
B
Connecting the parking brake wire / Menyambung kabel rem parkir
When installing the monitor in a location where it can be seen by the driver
Connect the parking brake wire to the parking brake system built in the car.
When installing the monitor in a location where it cannot be seen by the driver
Connect the parking brake wire to metallic body or chassis of the car.
Connecting the crimp connector / Menyambung konektor kerut
C
Parking brake wire (light green)
Kabel rem parkir (hijau muda)
To metallic body or chassis of the car
Ke logam body atau casis mobil
Parking brake switch (inside the car)
Saklar rem parkir (di dalam mobil)
Parking brake
Rem parkir
Parking brake wire (light green)
Kabel rem parkir (hijau muda)
*1 Not supplied for this unit.
*2 To listen to disc playback sound while in Dual Zone operations (see page 5 of INSTRUCTIONS).
*1 Tidak disediakan untuk unit ini.
*2 Untuk mendengarkan suara disk yang diputar ulang sementara dalam pengoperasian Zona Dual (lihat
halaman 5 dari BUKU PETUNJUK).
Wire connecting the battery and the parking brake switch.
Kabel yang menyambungkan baterai dan saklar rem parkir.
Attach the parking brake wire to this point.
Pasal kabel rem parkir ke poin ini.
Contact the metallic part of the crimp to the wires inside.
Hubungkan bagian logam dari konektor kerut ke kabel-
kabel di dalam.
Pinch the crimp firmly.
Jepit konektor dengan kuat.
Ketika memasang monitor pada tempat yang dapat dilihat oleh pengemudi
Sambungkan kabel rem parkir ke sistem rem parkir yang terpasang tetap dalam mobil.
Ketika memasang monitor pada tempat yang tidak dapat dilihat oleh pengemudi
Sambungkan kabel rem parkir ke logam body atau casis mobil.
D
Audio/video control amplifier or the decoder
compatible with the multichannel digital sources
Amplifier kontrol audio/video atau decoder yang
kompatibel dengan sumber digital multi-saluran
KV-M 9010
9-INCH WIDESCREEN MONITOR *1
MONITOR LAYAR LEBAR 9 INCI *1
Digital optical cable *1 (only for DVD playback)
Kabel optik digital *1 (hanya untuk pemutaran DVD)
Video cord *1
Kabel video *1
Signal cord *1
Kabel sinyal *1
equired connections for DVD/AV-IN (video) playback / Koneksi yang diperlukan untuk pemutaran DVD/AV-IN (video)
KS-HP2 *1
Cordless headphones *2
Headphone tanpa kabel *2
or / atau
Rear side
Sisi belakang
Instal4-6_DV9406_008A_3.indd 4Instal4-6_DV9406_008A_3.indd 4 15/4/08 3:19:31 AM15/4/08 3:19:31 AM

5
E
Rear speakers
Speaker-speaker belakang
JVC Amplifier
Penguat JVC
Y-connector *4
Konektor Y *4
Remote lead (blue with white stripe)
Ujung jauh (biru dengan strip putih)
To the remote lead of other equipment
or automatic antenna if any
Ke ujung jauh dari peralatan lain atau
antena otomatis jika ada
Front speakers
Speaker-speaker depan
*3 Ujung jauh
*4 Tidak disediakan untuk unit ini.
*5 Kabel sinyal (tidak disediakan untuk unit ini).
*6 Pasangkan dengan kuat kabel tanah ke bodi besi atau ke casis dari mobil—pada tempat yang tidak dilapisi cat
(jika dilapisi cat, hilangkan cat sebelum memasang kabel). Kegagalan melakukan ini mungkin menyebabkan
kerusakan pada alat penerima tersebut.
*3 Remote lead
*4 Not supplied for this unit.
*5 Signal cord (not supplied for this unit).
*6 Firmly attach the ground wire to the metallic body or to the chassis of the car—to the place uncoated with paint
(if coated with paint, remove the paint before attaching the wire). Failure to do so may cause damage to the
unit.
Connecting the external amplifiers and subwoofer / Penyambungan penguat eksternal dan subwoofer
Front speakers
Speaker-speaker depan
JVC Amplifier
Penguat JVC
Subwoofer
Subwoofer
JVC Amplifier
Penguat JVC
You can connect amplifiers to upgrade your car stereo system.
• Connect the remote lead (blue with white stripe) to the remote lead of the other equipment so that it
can be controlled through this unit.
• For amplifier only:
Disconnect the speakers from this unit, connect them to the amplifier. Leave the speaker
leads of this unit unused.
– The line output level of this unit is kept high to maintain the hi-fi sounds reproduced from this unit.
When connecting an external amplifier to this unit, turn down the gain control on the external
amplifier to obtain the best performance from this unit.
Anda dapat menyambungkan penguat-penguat untuk meningkatkan sistem stereo mobil anda.
• Sambungkan ujung jauh (biru dengan strip putih) ke ujung jauh dari peralatan lain sehingga dapat
dikontrol melalui alat penerima ini.
• Hanya untuk amplifier:
Putuskan sambungan speaker-speaker dari alat penerima ini, sambungkan ini ke penguat. Biarkan
ujung speaker dari alat penerima ini tidak digunakan.
– Tingkat output saluran unit ini diatur ke high (tinggi) untuk mempertahankan suara hi-fi yang
direproduksi dari unit ini.
Bila menghubungkan amplifier eksternal ke unit ini, turunkan kontrol penambahan suara pada
amplifier eksternal untuk mendapatkan kinerja terbaik dari unit ini.
Instal4-6_DV9406_008A_3.indd 5Instal4-6_DV9406_008A_3.indd 5 15/4/08 3:19:34 AM15/4/08 3:19:34 AM

6
Connecting the external components / Menyambung komponen eksternal
F
iPod is a trademark of Apple Inc., registered in the U.S. and other countries. iPod adalah merek dagang dari Apple Inc., terdaftar di Amerika Serikat dan di negara-negara lain.
Bila menghubungkan komponen eksternal, rujuk juga buku petunjuk yang dibekalkan untuk komponen
dan adaptor.
PERINGATAN:
Sebelum menyambungkan komponen eksternal, pastikan bahwa unit sudah dimatikan.
Anda dapat menghubungkan komponen VC berikut ini ke jack CD changer.
Komponen JVC Nama Model
CD changer (CD-CH) CH-X1500, etc.
Anda juga dapat menghubungkan komponen berikut ini melalui berbagai adaptor VC.
• Kabel koneksi mungkin harus dibeli secara terpisah.
Komponen Adaptor Nama Model
iPod Adaptor interface untuk iPod KS-PD100
Audio player portabel dengan jack line output Adaptor line input KS-U57
Audio player portabel dengan jack stereo mini
3,5 mm
Adaptor AUX input KS-U58
To disconnect the connector / Untuk memutuskan konektor
Hold the connector tightly ( 1 ), then pull it out ( 2 ) .
Pegang erat konektor ( 1 ) lalu tarik keluar ( 2 ).
External component
Komponen eksternal
hen connecting the external components, refer also to the manuals supplied for the components and
adapters.
CAUTION:
Before connecting the external components, make sure that the unit is turned off.
You can connect the following JVC components to the CD changer jack.
JVC component Model name
CD changer (CD-CH) CH-X1500, etc.
You can also connect the following components through the various JVC adapters.
• Connection cords may need to be purchased separately.
Component Adapter Model name
iPod Interface adapter for iPod KS-PD100
Portable audio player with line output jacks Line input adapter KS-U57
Portable audio player with 3.5 mm stereo
mini jack
AUX input adapter KS-U58
You can also connect an external component to the LINE IN terminals on the rear of the unit using a
signal cord (not supplied).
Anda juga dapat menghubungkan komponen eksternal ke terminal LINE IN di belakang unit dengan
menggunakan kabel sinyal (tidak disediakan).
Signal cord (not supplied for this unit)
Kabel sinyal (tidak disediakan untuk unit ini)
LINE IN terminals
Terminal LINE IN
TROUBLESHOOTING
• The use blows.
* Are the red and black leads connected correctly?
• Power cannot be turned on.
* Is the yellow lead connected?
• No sound rom the speakers.
* Is the speaker output lead short-circuited?
• Sound is distorted.
* Is the speaker output lead grounded?
* Are the “–” terminals of L and R speakers grounded in common?
• Noise inter ere with sounds.
* Is the rear ground terminal connected to the car’s chassis using shorter and thicker cords?
• This unit becomes hot.
* Is the speaker output lead grounded?
* Are the “–” terminals of L and R speakers grounded in common?
• This unit does not work at all.
* Have you reset your unit?
PEMECAHAN MASALAH
• Sekring meledak.
* Apakah ujung-ujung merah dan hitam tersambung dengan benar?
• Power tidak dapat dihidupkan.
* Apakah ujung kuning sudah tersambung?
• Tidak ada suara dari speaker.
* Apakah ujung keluaran speaker terhubung pendek?
• Suara terdistorsi.
* Apakah ujung keluaran speaker sudah ditanahkan?
* Apakah terminal-terminal “–” dari speaker-speaker L dan R sudah ditanahkan secara umum?
• Berisik yang mengganggu suara-suara.
* Apakah terminal tanahan belakang tersambung ke casis mobil menggunakan kabel-kabel terpendek dan
tertebal?
• Unit menjadi panas.
* Apakah ujung keluaran speaker sudah ditanahkan?
* Apakah terminal-terminal “–” dari speaker-speaker L dan R sudah ditanahkan secara umum?
• Unit ini tidak bekerja secara keseluruhan.
* Apakah anda sudah reset (memasang kembali) unit anda?
CD changer jack /
Konektor CD changer
CD-CH / KS-PD100 /
KS-U57 / KS-U58
When connecting an external component / Apabila menghubungkan
komponen eksternal
USB devices / Perangkat USB
USB device
Perangkat USB
USB cable—approx. 1.2 m
Kabel USB—kira-kira 1,2 m
You cannot connect a computer to the USB ( ) cable from the rear of the unit. Anda tidak dapat menghubungkan komputer ke kabel USB ( ) dari bagian belakang unit ini.
Instal4-6_DV9406_008A_3.indd 6Instal4-6_DV9406_008A_3.indd 6 22/4/08 12:57:28 PM22/4/08 12:57:28 PM
Other manuals for KD-DV9406
3
This manual suits for next models
1
Table of contents
Other JVC Car Receiver manuals

JVC
JVC KD-X152M User manual

JVC
JVC KD-SX747 User manual

JVC
JVC KD-G505 User manual

JVC
JVC KD-G120 - Radio / CD Player User manual

JVC
JVC KS-F545 User manual

JVC
JVC KD-DB95BT User manual

JVC
JVC KD-R200 Parts list manual

JVC
JVC KW-XR810 User manual

JVC
JVC KD-G431E User manual

JVC
JVC KD-AHD59 - Radio / HD User manual