JVC KD-G432 User manual

ENGLISH
FRANÇAIS
CD RECEIVER
RÉCEPTEUR CD
KD-G432/KD-G431/
KD-SC402/KD-SC401
For installation and connections, refer to the separate manual.
Pour l’installation et les raccordements, se référer au manuel séparé.
INSTRUCTIONS
MANUEL D’INSTRUCTIONS
GET0410-003C
[EX/EU]
For canceling the display demonstration, see page 5.
Pour annuler la démonstration des affichages, référez-vous à la page 5.
Cover_KD-G431_003C_fff.indd 1Cover_KD-G431_003C_fff.indd 1 3/13/08 11:48:06 AM3/13/08 11:48:06 AM

2
ENGLISH
Caution on volume setting:
Discs produce very little noise compared with other
sources. Lower the volume before playing a disc
to avoid damaging the speakers by the sudden
increase of the output level.
How to reset your unit
• Your preset adjustments will also be erased.
How to forcibly eject a disc
• Be careful not to drop the disc when it ejects.
• If this does not work, reset your unit.
Thank you for purchasing a JVC product.
Please read all instructions carefully before operation to ensure your complete understanding and to obtain the best
possible performance from the unit.
IMPORTA T FOR LASER PRODUCTS
1. CLASS 1 LASER PRODUCT
2. CAUTIO : Do not open the top cover. There are no user serviceable parts inside the unit; leave all servicing to
qualified service personnel.
3. CAUTIO : Visible and/or invisible class 1M laser radiation when open. Do not view directly with optical
instruments.
4. REPRODUCTION OF LABEL: CAUTION LABEL PLACED OUTSIDE THE UNIT.
Warning:
If you need to operate the unit while driving be
sure to look ahead carefully or you may be involved
in a traffic accident.
Information for Users on Disposal of Old
Equipment
This symbol indicates that the product with
this symbol should not be disposed as general
household waste at its end-of-life. If you wish to
dispose of this product please do so in accordance
with applicable national legislation or other rules in
your country and municipality. By disposing of this
product correctly you will help to conserve natural
resources and will help prevent potential negative
effects on the environment and human health.
This unit is equipped with the steering wheel
remote control function.
• See the Installation/Connection Manual (separate
volume) for connection.
This symbol is only valid in
the European Union.
EN02-05_KD-G431_003A_f.indd 2EN02-05_KD-G431_003A_f.indd 2 9/21/06 11:18:38 AM9/21/06 11:18:38 AM

ENGLISH
3
The following marks are used to indicate...
: Built-in CD player operations.
: External CD changer operations.
: Indicator displayed for the
corresponding operation.
How to use the M MODE button
If you press M MODE, the unit goes into functions mode,
then the num er uttons and 5/∞ uttons work as
different function uttons.
Ex.: When num er utton 2 works as
MO (monaural) utton.
To use these buttons for their original functions
again after pressing M MODE, wait for 5 seconds
without pressing any of these uttons until the
functions mode is cleared or press M MODE again.
Detaching the control panel
Attaching the control panel
CONTENTS
Control panel ..................................
Getting started ................................ 5
Basic operations ................................................... 5
Radio operations ............................. 6
FM RDS operations ........................... 7
Searching for your favorite FM RDS programme
... 7
Disc operations ................................ 9
Playing a disc in the unit ..................................... 9
Playing discs in the CD changer ........................... 9
Sound adjustments .......................... 12
General settings — PSM .................. 13
DAB tuner operations ....................... 15
iPod operations ............................... 16
Other external component operations
.... 18
Remote controller — RM-RK50 ............. 19
Maintenance ................................... 20
More about this unit ........................ 21
Troubleshooting .............................. 2
Specifications .................................. 27
Note: Only for [EX] model users in UK and
European countries
For security reasons, a num ered ID card is provided
with this unit, and the same ID num er is imprinted on
the unit’s chassis. Keep the card in a safe place, as it will
help the authorities to identify your unit if stolen.
For safety...
• Do not raise the volume level too much, as this will
lock outside sounds, making driving dangerous.
• Stop the car efore performing any complicated
operations.
Temperature inside the car...
If you have parked the car for a long time in hot or cold
weather, wait until the temperature in the car ecomes
normal efore operating the unit.
EN02-05_KD-G431_003C_fff.indd 3EN02-05_KD-G431_003C_fff.indd 3 3/13/08 11:48:53 AM3/13/08 11:48:53 AM

4
ENGLISH
Parts identification
Control panel
Display window
1 Control dial
2 0 (eject) button
3 Loading slot
4 T/P (traffic programme/programme type) button
5 DISP (display) button
6 4 /¢ buttons
7 Display window
8 (standby/on attenuator) button
9 UX (auxiliary) input jack
p 5 (up) / ∞ (down) buttons
q SEL (select) button
w B ND button
e SRC (source) button
r Remote sensor
• You can control this unit with an optionally purchased
remote controller. For details, see pages 19 and 20.
• DO NO expose the remote sensor to strong light (direct
sunlight or artificial lighting).
t EQ (equalizer) button
y MO (monaural) button
u SSM (Strong-station Sequential Memory) button
i Number buttons
o RPT (repeat) button
; RND (random) button
a M MODE button
s (control panel release) button
d Disc information indicators—
T G (Tag information), (track/file), (folder)
f Playback source indicators—
CH: Lights up only when CD-CH is selected as the
playback source.
DISC: Lights up for the built-in CD player.
g Playback mode / item indicators—RND (random),
(disc), (folder), RPT (repeat)
h RDS indicators— F, REG, TP, PTY
j Tuner reception indicators—MO (monaural),
ST (stereo)
k S.B SS (super bass) indicator
l EQ (equalizer) indicator
/ Tr (track) indicator
z Source display / Volume level indicator / Time
countdown indicator
Main display
c Sound mode (iEQ: intelligent equalizer)
indicators—J ZZ, ROCK, HIP HOP, CL SSIC, POPS,
USER
EN02-05_KD-G431_003B_ff.indd 4EN02-05_KD-G431_003B_ff.indd 4 4/13/07 5:30:30 PM4/13/07 5:30:30 PM

ENGLISH
5
To drop the volume in
a moment (ATT)
To restore the sound, press
the button again.
To turn off the power
Basic settings
• See also “General settings — PSM” on pages 13 –15.
1
2
1 Canceling the display demonstrations
Sele t “DEMO,” then “DEMO OFF.”
2 Setting the clock
Sele t “CLOCK H” (hour), then adjust the hour.
Sele t “CLOCK M” (minute), then adjust the
minute.
Sele t “24H/12H,” then “24H” (hour) or “12H”
(hour).
3 Finish the procedure.
To check the current clock time while the
power is turned off
Clo k time is shown on the
display for about 5 se onds. See
also page 13.
Getting started
Basic operations
~ Turn on the power.
Ÿ
* You cannot select these sources if they are not
ready or not connected.
!
For FM/AM tuner
For DAB tuner
⁄ Adjust the volume.
@ Adjust the sound as you want. (See
page 12.)
Volume level appears.
VOL 20
EN02-05_KD-G431_003C_fff.indd 5EN02-05_KD-G431_003C_fff.indd 5 3/13/08 11:50:00 AM3/13/08 11:50:00 AM

6
ENGLISH
Storing stations in memory
You can preset six stations for each band.
FM station automatic presetting —
SSM (Strong-station Sequential
Memory)
1 Select the FM band (FM1 – FM3) you want to
store into
2
3
“SSM” flashes, then disappears when automatic
presetting is over.
Local FM stations with the strongest signals are
searched and stored automaticall in the FM band.
Manual presetting
Ex.: Storing FM station of 92.5 MHz into preset
number 4 of the FM1 band.
1
2
3
Radio operations
~
Ÿ
! Start searching for a station
When a station is received,
searching stops.
To stop searching, press the
same button again.
To tune in to a station manually
In step ! above...
1
2 Select a desired station frequency
When an FM stereo broadcast is hard to receive
Reception improves, but stereo effect will be lost.
To restore the stereo effect, repeat the same
procedure. “MONO OFF” appears and the MO indicator
goes off.
Lights up when receiving an FM stereo
broadcast with sufficient signal strength.
88.3
M
Lights up when monaural mode is activated.
MONO
SSM
92.5FM I
Preset number flashes for a while.
92.5P4
EN06-13_KD-G431_003A_f.indd 6EN06-13_KD-G431_003A_f.indd 6 9/21/06 11:21:37 AM9/21/06 11:21:37 AM

7
ENGLISH
Ÿ Select one of your favorite programme
types
or
Select one of the PTY codes (see
page 9)
! Start searching for your favorite
programme
If there is a station broadcasting
a programme of the same PTY
code as ou have selected, that
station is tuned in.
Storing your favorite programme
types
You can store six favorite programme t pes.
Preset programme types in the number buttons
(1 to 6):
1 Select a PTY code (see above)
2 Select the preset number (1 – 6) you want to
store into
Listening to a preset station
1
2 Select the preset station (1 – 6) you want
To check the current clock time while
listening to an FM (non-RDS) or AM station
• For FM RDS stations, see page 9.
FM RDS operations
What you can do with RDS
RDS (Radio Data S stem) allows FM stations to send an
additional signal along with their regular programme
signals.
B receiving the RDS data, this unit can do the
following:
• Programme T pe (PTY) Search (see the following)
• TA (Traffic Announcement) and PTY Standb
Receptions (see pages 8 and 14)
• Tracing the same programme automaticall
—Network-Tracking Reception (see page 8)
• Programme Search (see pages 9 and 14)
Searching for your favorite
FM RDS programme
You can tune in to a station broadcasting our favorite
programme b searching for a PTY code.
• To store our favorite programme t pes, see the
following.
~ The last selected PTY code
appears.
Frequency Ô Clock
Ex.: When “ROCK M” is selected
Continued on the next page
EN06-13_KD-G431_003A_f.indd 7EN06-13_KD-G431_003A_f.indd 7 9/21/06 11:21:40 AM9/21/06 11:21:40 AM

8
ENGLISH
To activate and select your favorite PTY code for
PTY Standby Reception, see page 14.
The PTY indicator either lights up or flashes.
• If the PTY indicator lights up, PTY Standb Reception
is activated.
• If the PTY indicator flashes, PTY Standb Reception is
not et activated.
To activate PTY Standb Reception, tune in to another
station providing these signals. The PTY indicator will
stop flashing and remain lit.
To deactivate the PTY Standby Reception, select
“OFF” for the PTY code (see page 14). The PTY indicator
goes off.
Tracing the same programme—
Network-Tracking Reception
When driving in an area where FM reception is not
sufficient enough, this unit automaticall tunes in to
another FM RDS station of the same network, possibl
broadcasting the same programme with stronger
signals (see the illustration below).
When shipped from the factor , Network-Tracking
Reception is activated.
To change the Network-Tracking Reception
setting, see “AF-REG” on page 13.
Programme A broadcasting on different frequenc areas
(01 – 05)
3 Repeat steps 1 and 2 to store other PTY
codes into other preset numbers
4 Finish the procedure
Using the standby receptions
TA Standby Reception
TA Standb Reception allows the unit to switch
temporaril to Traffic Announcement (TA) from an
source other than AM.
The volume changes to the preset TA volume level if
the
current level is lower than the preset level (see page 14).
To activate TA Standby Reception
The TP (Traffic Programme) indicator
either lights up or flashes.
• If the TP indicator lights up, TA Standb Reception is
activated.
• If the TP indicator flashes, TA Standb Reception is
not et activated. (This occurs when ou are listening
to an FM station without the RDS signals required for
TA Standb Reception.)
To activate TA Standb Reception, tune in to another
station providing these signals. The TP indicator will
stop flashing and remain lit.
To deactivate the TA Standby Reception
The TP indicator goes off.
PTY Standby Reception
PTY Standb Reception allows the unit to switch
temporaril to our favorite PTY programme from an
source other than AM.
EN06-13_KD-G431_003A_f.indd 8EN06-13_KD-G431_003A_f.indd 8 9/21/06 11:21:40 AM9/21/06 11:21:40 AM

9
ENGLISH
Automatic station selection—
Programme Search
Usuall when ou press the number buttons, the preset
station is tuned in.
If the signals from the FM RDS preset station are not
sufficient for good reception, this unit, using the AF
data, tunes in to another frequenc broadcasting the
same programme as the original preset station is
broadcasting.
• The unit takes some time to tune in to another
station using programme search.
• See also page 14.
To check the current clock time while
listening to an FM RDS station
PTY codes
NEWS, AFFAIRS, INFO, SPORT, EDUCATE, DRAMA,
CULTURE, SCIENCE, VARIED, POP M (music), ROCK M
(music), EASY M (music), LIGHT M (music), CLASSICS,
OTHER M (music), WEATHER, FINANCE, CHILDREN, SOCIAL,
RELIGION, PHONE IN, TRAVEL, LEISURE, JAZZ, COUNTRY,
NATION M (music), OLDIES, FOLK M (music), DOCUMENT
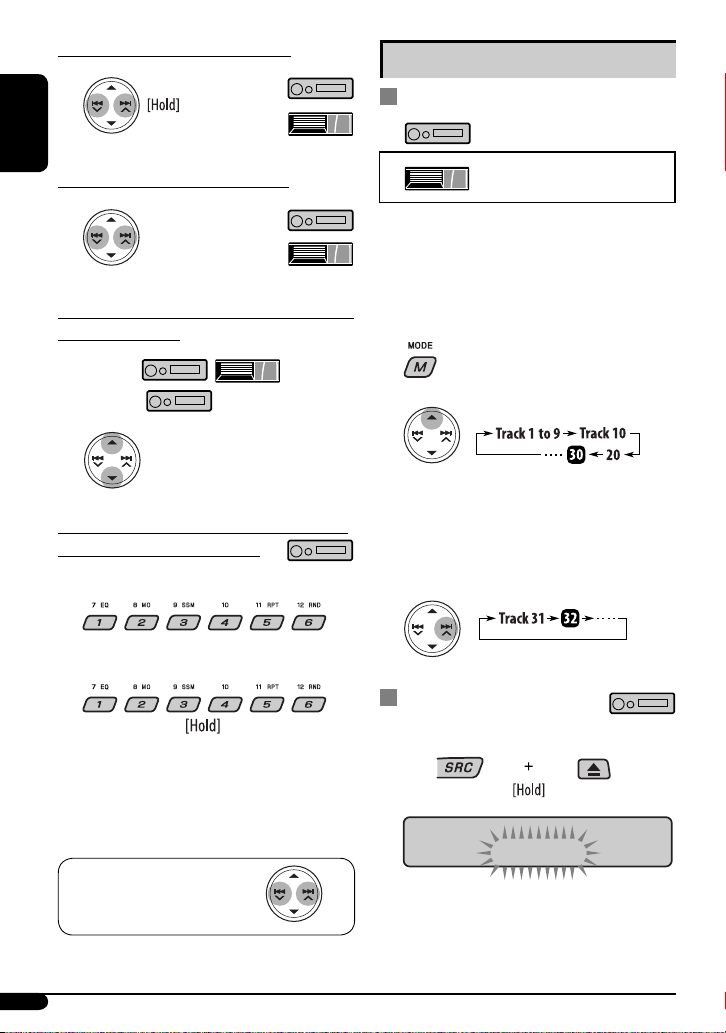
Disc operations
Playing a disc in the unit
All tracks will be pla ed repeatedl until ou change the
source or eject the disc.
Station name (PS) = Station
Frequency = Programme
type (PTY) = Clock = (back to
the beginning)
To stop play and eject the disc
• Press SRC to listen to another pla back
source.
Playing discs in the CD changer
All discs in the magazine will be pla ed repeatedl until
ou change the source.
• Ejecting the magazine will also stop pla ing.
~
* If you have changed the external input setting
to “EXT IN” (see page 14 , you cannot select the
CD changer.
Ÿ Select a disc
For disc number from 01 – 06:
For disc number from 07 – 12:
About MP3 and WMA discs
MP3 and WMA “tracks” (words “file” and “track” are
used interchangeabl ) are recorded in “folders.”
About the CD changer
It is recommended to use a JVC MP3-compatible CD
changer with our unit.
• You can also connect MP3-incompatible CD changers.
However, these units are not compatible with MP3
discs.
• You cannot use the CH-X99, CH-X100, and KD-MK
series CD changers with this unit.
• You cannot pla an WMA disc in the CD changer.
• Disc text information recorded in the CD Text can be
displa ed when a JVC CD Text compatible CD changer
is connected.
• For connection, see Installation/Connection Manual
(separate volume).
EN06-13_KD-G431_003A_f.indd 9EN06-13_KD-G431_003A_f.indd 9 9/21/06 11:21:41 AM9/21/06 11:21:41 AM

10
ENGLISH
To fast-forward or reverse the track
To go to the next or previous tracks
To go to the next or previous folders (only for
MP3 or WMA discs)
For MP3 discs:
For WMA discs:
To locate a particular track (for D) or folder
(for MP3 or WMA discs) directly
To select a number from 01 – 06:
To select a number from 07 – 12:
• To use direct folder access on MP3 WMA discs, it
is required that folders are assigned with 2-digit
numbers at the beginning of their folder names—
01, 02, 03, and so on.
To select a particular track in a
folder (for MP3 or WMA disc):
Other main functions
Skipping tracks quickly during play
Only possible on JV
MP3-compatible D changer
• For MP3 or WMA discs, you can skip tracks within the
same folder.
Ex.: To select track 32 while playing a track whose
number is a single digit (1 to 9)
1
2
Each time you press the button, you can skip 10
tracks.
• After the last track, the first track will be selected
and vice versa.
3
Prohibiting disc ejection
You can lock a disc in the loading slot.
To cancel the prohibition, repeat the same
procedure.
NO EJECT
EN06-13_KD-G431_003A_f.indd 10EN06-13_KD-G431_003A_f.indd 10 9/29/06 2:36:24 PM9/29/06 2:36:24 PM

11
ENGLISH
Changing the display information
While playing an audio CD or a CD
Text
While playing an MP3 or a WMA*2 disc
• When “TAG DI P” is set to “TAG ON” (see
page 14)
• When “TAG DI P” is set to “TAG OFF”
: Elapsed playing time with the current
track number
: Clock with the current track number
*1 If the current disc is an audio CD, “NO NAME” appears.
*2 Only for the built-in CD player.
*3 If an M 3/WMA file does not have Tag information,
folder name and file name appear. In this case, the
TAG indicator will not light up.
electing the playback modes
You can use only one of the following playback modes
at a time.
1
2 elect your desired playback mode.
7 Repeat play
Mode Plays repeatedly
TRK RPT : The current track.
FLDR RPT *1 : All tracks of the current folder.
DI C RPT *2 : All tracks of the current disc.
RPT OFF : Cancels.
7 Random play
Mode Plays at random
FLDR RND *1 : All tracks of the current folder,
then tracks of the ne t folder and
so on.
DI C RND : All tracks of the current disc.
MAG RND *2 : All tracks of the inserted discs.
RND OFF : Cancels.
*1 Only while playing an M 3 or a WMA disc.
*2 Only while playing discs in the CD changer.
EN06-13_KD-G431_003A_f.indd 11EN06-13_KD-G431_003A_f.indd 11 9/25/06 2:53:46 PM9/25/06 2:53:46 PM

12
ENGLISH
Sound adjustments
You can select a preset sound mode suitable to the
music genre (iEQ: intelligent equalizer).
1
2
Indication (For)
BAS*1 MID*2 TRE*3 S.BS*4
USER
(Flat sound) 00 00 00 OFF
ROCK
(Roc or disco music) +03 00 +02 ON
CLASSIC
(Classical music) +01 00 +03 OFF
POPS
(Light music) +02 +01 +02 OFF
HIP HOP
(Fun or rap music) +04 –02 +01 ON
JA
(Jazz music) +03 00 +03 OFF
*1 Bass
*2 Mid-range
*3 Treble
*4 Super bass
Preset values
Adjusting the sound
You can adjust the sound characteristics to your
preference.
1
2
Indication, [Range]
BAS*1 (bass), [–06 to +06]
Adjust the bass.
MID*1 (mid-range), [–06 to +06]
Adjust the mid-range frequencies sound level.
TRE*1 (treble), [–06 to +06]
Adjust the treble.
FAD*2 (fader), [R06 to F06]
Adjust the front and rear spea er balance.
BAL (balance), [L06 to R06]
Adjust the left and right spea er balance.
S.BS*1 (super bass), [S.BS ON or S.BS OFF], [01 to 05,
initial: 03]*3
Maintain the richness and fullness of the bass sound
regardless of how low you set the volume.
VOL (volume), [00 to 30 or 50*4]
Adjust the volume.
*1 When you adjust the bass, mid-range, treble, or super
bass, the adjustment you have made is stored for the
currently selected sound mode (iE ) including “USER.”
*2 If you are using a two-speaker system, set the fader
level to “00.”
*3 Range adjustment for super bass is adjustable only
when it is set to “S.BS ON.“
*4 Depending on the amplifier gain control setting. (See
page 14 for details.)
EN06-13_KD-G431_003A_f.indd 12EN06-13_KD-G431_003A_f.indd 12 10/16/06 5:27:48 PM10/16/06 5:27:48 PM

13
ENGLISH
Indications Item
( : Initial)
Selectable settings, [reference page]
DEMO
Display demonstration
• DEMO ON
• DEMO OFF
: Display demonstration will be activated automatically if no
operation is done for about 20 seconds, [5].
: Cancels.
CLK DISP *1
Cloc display
• ON
• OFF
:
Cloc time is shown on the display at all times when the power is
turned off
.
: Cancels; pressing DISP will show the cloc time for about
5 seconds when the power is turned off, [5].
CLOCK H
Hour adjustment
0 – 23 (1 – 12) [Initial: 0 (0:00)], [5].
CLOCK M
Minute adjustment
00 – 59 [Initial: 00 (0:00)], [5].
24H/12H
Time display mode
• 24H
• 12H
: See also page 5 for setting.
CLK ADJ *2
Cloc adjustment
• AUTO
• OFF
: The built-in cloc is automatically adjusted using the CT (cloc
time) data in the RDS signal.
: Cancels.
AF-REG *2
Alternative frequency/
regionalization
reception
• AF
• AF REG
• OFF
: When the currently received signals become wea , the unit
switches to another station (the programme may differ from the
one currently received), [8, 16].
• The AF indicator lights up.
: When the currently received signals become wea , the unit
switches to another station broadcasting the same programme.
• The AF and REG indicators light up.
: Cancels (not selectable when “DAB AF“ is set to “AF ON“).
You can change PSM (Preferred Setting Mode) items
listed in the table that follows.
1
2 Select a PSM item.
General settings — PSM
3 Adjust the PSM item selected.
4 Repeat steps 2 and 3 to adjust other PSM
items if necessary.
5 Finish the procedure.
Continued on the next page
EN06-13_KD-G431_003A_f.indd 13EN06-13_KD-G431_003A_f.indd 13 10/16/06 5:27:49 PM10/16/06 5:27:49 PM

14
ENGLISH
Indications Item
( : Initial)
Selectable settings, [reference page]
PTY-STBY*2
PTY standby
OFF, PTY
codes
: Activates PTY Standby Reception with one of the PTY codes, [9 .
TA VO *2
Traffic announcement
volume
VO 00 –
VO 30 or 50*3
[Initial: VOL 15
P-SEARCH*2
Programme search
• ON
• OFF
: Activates Programme Search, [9 .
: Cancels.
DAB AF*4
Alternative frequency
reception
• AF ON
• AF OFF
: Traces the programme among DAB services and FM RDS stations,
[8, 16 .
: Cancels.
DAB VO *4
DAB volume adjustment
VO –12
— VO +12
: [Initial: VOL 00 ; You can adjust the volume level of DAB tuner to
match the FM sound level and store it in memory.
DIMMER
Dimmer
• ON
• OFF
: Dims the display illumination.
: Cancels.
TE
Telephone muting
• MUTING 1/
MUTING 2
• OFF
: Select either one which mutes the sounds while using a cellular
phone.
: Cancels.
SCRO *5
Scroll
• ONCE
• AUTO
• OFF
: Scrolls the disc information once.
:
Repeats scrolling (at 5-second intervals).
: Cancels.
• Pressing DISP for more than one second can scroll the display
regardless of the setting.
EXT IN*6
External input
• CHANGER
• EXT IN
: To use a JVC CD changer, [9 , JVC DAB tuner, [15 , or an Apple
iPod, [16 .
: To use any other external component than the above, [18 .
AUX ADJ
Auxiliary input level
adjustment
A.ADJ 00
— A.ADJ 05
: Adjust the auxiliary input level to avoid the sudden increase
of the output level when changing the source from external
component connected to the AUX input jack on the control panel.
TAG DISP
Tag display
• TAG ON
• TAG OFF
: Shows the Tag information while playing MP3/WMA tracks, [11 .
: Cancels.
AMP GAIN
Amplifier gain control
• OW PWR
• HIGH PWR
: VOL 00 – VOL 30 (Select this if the maximum power of the
speaker is less than 50 W to prevent them from damaging the
speaker.)
: VOL 00 – VOL 50
EN14-27_KD-G431_003C_fff.indd 14EN14-27_KD-G431_003C_fff.indd 14 3/17/08 2:37:40 PM3/17/08 2:37:40 PM

ENGLISH
15
Indications Item
( : Initial)
Selectable settings, [reference page]
IF BAND
Intermediate frequency
band
• AUTO
• WIDE
: Increases the tuner selectivity to reduce interference noises
between close stations. (Stereo effect may be lost.)
: Subject to the interference noises from adjacent stations, but sound
quality will not be degraded and the stereo effect will remain.
*1 If the power supply is not interrupted by turning off the ignition key of your car, it is recommended to select “OFF” to
save the car’s battery.
*2 Only for F RDS stations.
*3 Depends on the amplifier gain control.
*4 Displayed only when DAB tuner is connected.
*5 Some characters or symbols will not be shown correctly (or will be blanked) on the display.
*6 Displayed only when one of the following sources is selected—F , A , CD, or AUX IN.
What is DAB system?
Digital Audio Broadcasting (DAB) can deliver digital
quality sound without any annoying interference
and signal distortion. Furthermore, it can carry text,
pictures, and data. When transmitting, DAB combines
several programmes (called “services”) to form one
“ensemble.” In addition, each “service”—called
“primary service”—can also be divided into its
components (called “secondary service”). A typical
ensemble has six or more programmes (services)
broadcast at the same time.
By connecting the DAB tuner, this unit can do the
following:
• Tracing the same programme automatically
—Alternative Frequency Reception (see “DAB AF” on
page 14).
It is recommended to use DAB tuner KT-DB1000
with your unit. If you have another DAB tuner,
consult your JVC IN-CAR ENTERTAINMENT dealer.
• Refer also to the Instructions supplied for your DAB
tuner.
~
Ÿ
! Start searching for an ensemble.
When an ensemble is received,
searching stops.
To stop searching, press the
same button again.
⁄ Select a service (either primary or
secondary) to listen to.
To tune in to an ensemble manually
Start searching for an ensemble, as in step ! above...
1
2 Select a desired ensemble frequency.
DAB tuner operations
EN14-27_KD-G431_003A_f.indd 15EN14-27_KD-G431_003A_f.indd 15 9/28/06 3:05:56 PM9/28/06 3:05:56 PM

16
ENGLISH
Storing DAB services in memory
You can preset six DAB services (primary) for each band.
1 Select a service you want (see steps ~ to ⁄
on page 15).
2 Select the preset number (1 – 6) you want to
store into.
uning in to a preset DAB service
1
2 Select the preset DAB service (primary)
number (1 – 6) you want.
If the selected primary service has some secondary
services, pressing the same button again ill tune
in to the secondary services.
racing the same programme—
Alternative Frequency Reception
You can keep listening to the same programme by
activating the Alternative Frequency Reception.
• While receiving a DAB service:
When driving in an area here a service cannot be
received, this unit automatically tunes in to another
ensemble or FM RDS station, broadcasting the same
programme.
P4 BAYERN 2
• While receiving an FM RDS station:
When driving in an area here a DAB service is
broadcasting the same programme as the FM RDS
station is broadcasting, this unit automatically tunes
in to the DAB service.
When shipped from the factory, Alternative Frequency
Reception is activated.
o deactivate the Alternative Frequency
Reception, see page 14.
o change the display information while
tuning to an ensemble
Service name = Ensemble name
= Channel number = Frequency
= Clock = (back to the beginning)
iPod operations
This unit is ready for operating an Apple iPod from the
control panel.
Before operating, connect the Interface adapter for
iPod—KS-PD100 (separately purchased) to the CD
changer jack on the rear of the unit.
• For connection, see Installation/Connection Manual
(separate volume).
• For details, refer also to the manual supplied ith the
interface adapter.
Caution:
Make sure to turn off this unit or turn off the
vehicle’s ignition s itch before connecting or
disconnecting the iPod.
Preset number flashes for a hile.
EN14-27_KD-G431_003C_fff.indd 16EN14-27_KD-G431_003C_fff.indd 16 3/13/08 11:57:10 AM3/13/08 11:57:10 AM

ENGLISH
17
Preparations:
Make sure “CHANGER” is selected for the external input
setting, see page 14.
~
Ÿ
Playback starts automatically from here it has
been paused previously.
! Adjust the volume.
⁄ Adjust the sound as you want. (See
page 12.)
• Make sure the equalizer on the iPod is
deactivated.
o pause playback
To resume playback, press
the button again.
o fast-forward or
reverse the track
o go to the next or
previous tracks
Selecting a track from the menu
1 Enter the main menu.
No the 5/∞/4 /¢ buttons ork as
the menu selecting buttons*.
2 Select the desired menu.
PLAYLIS Ô AR IS S Ô ALBUMS Ô
SONGS Ô GENRES Ô COMPOSER Ô
(back to the beginning)
3 Confirm the selection.
To move back to the previous
menu, press 5.
• If a track is selected, playback starts
automatically.
• If the selected item has another layer, you ill
enter the layer. Repeat steps 2 and 3 until the
desired track is played.
• Holding 4 /¢ can skip 10 items at
a time.
* The menu selecting mode will be canceled:
– If no operations are done for about 5 seconds.
– When you confirm the selection of a track.
EN14-27_KD-G431_003C_fff.indd 17EN14-27_KD-G431_003C_fff.indd 17 3/13/08 11:57:12 AM3/13/08 11:57:12 AM

18
ENGLISH
Selecting the playback modes
1
2 Select your desired playback mode.
7 Repeat play
ONE RP
Functions the same as “Repeat One” of the iPod.
ALL RP
Functions the same as “Repeat All” of the iPod.
RP OFF
Cancels.
7 Random play
ALBM RND*
Functions the same as “Shuffle Albums” of the iPod.
SONG RND/RND ON
Functions the same as “Shuffle Songs” of the iPod.
RND OFF
Cancels.
* Only if you select “A ” in “A BUMS” of the main
“MENU.”
o check other information while listening
to an iPod
Other external component
operations
You can connect an external component to...
• CD changer jack on the rear using Line Input
Adapter—KS-U57 (not supplied) or AUX Input
Adapter—KS-U58 (not supplied) for any other
components (except iPod).
• AUX (auxiliary) input jack on the control panel.
For connection, see Installation/Connection Manual
(separate volume).
For listening to the iPod, refer to pages 16 – 18.
Connecting an external component to the
AUX input jack
~ For selecting the external component
connected to...
• AUX input jack
• CD changer jack on the rear using KS-U57
or KS-U58
If “EXT IN” does not appear, see page 14 and
select the external input (“EXT IN”).
EN14-27_KD-G431_003C_fff.indd 18EN14-27_KD-G431_003C_fff.indd 18 3/13/08 11:57:13 AM3/13/08 11:57:13 AM

ENGLISH
19
Warning:
• Do not install any battery other than CR2025 or its
equivalent; otherwise, it may explode.
• Do not leave the remote ontroller in a pla e
(su h as dashboards) exposed to dire t sunlight
for a long time; otherwise, it may explode.
• Store the battery in a pla e where hildren annot
rea h to avoid risk of a ident.
• To prevent the battery from over-heating,
ra king, or starting a fire:
– Do not re harge, short, disassemble, heat the
battery, or dispose of it in a fire.
– Do not leave the battery with other metalli
materials.
– Do not poke the battery with tweezers or
similar tools.
– Wrap the battery with tape and insulate when
throwing away or saving it.
Main elements and features
1 (standby/on/attenuator) button
• Turns the power on if pressed briefly or
attenuates the sound when the power is on.
• Turns the power off if pressed and held.
Ÿ Turn on the connected component and
start playing the source.
! Adjust the volume.
⁄ Adjust the sound as you want. (See
page 1 .)
To check the other information while
listening to an external component
AUX IN or EXT IN Ô Clock
Remote controller — RM-RK50
This unit an be remotely ontrolled as instru ted here
(with an optionally pur hased remote ontroller). We
re ommend that you use remote ontroller RM-RK50
with your unit.
Installing the lithium coin battery
(CR 0 5)
Aim the remote controller directly at the remote
sensor on the unit. Make sure there is no obstacle
in between.
Continued on the next page
EN14-27_KD-G431_003A_f.indd 19EN14-27_KD-G431_003A_f.indd 19 9/29/06 2:39:01 PM9/29/06 2:39:01 PM

20
ENGLISH
Center holder
Maintenance
How to clean the connectors
Frequent detachment will deteriorate the connectors.
To minimize this possibility, periodically wipe the
connectors with a cotton swab or cloth moistened with
alcohol, being careful not to damage the connectors.
Moisture condensation
Moisture may condense on the lens inside the unit in
the following cases:
• fter starting the heater in the car.
• If it becomes very humid inside the car.
Should this occur, the unit may malfunction. In this
case, eject the disc and leave the unit turned on for a
few hours until the moisture evaporates.
How to handle discs
When removing a disc from its
case, press down the center holder
of the case and lift the disc out,
holding it by the edges.
• lways hold the disc by the edges.
Do not touch its recording surface.
When storing a disc into its case, gently insert the
disc around the center holder (with the printed surface
facing up).
• Make sure to store discs into the cases after use.
Connector
2 5 U (up) / D (down) ∞ buttons
• Changes the FM/ M/D B bands with 5 U.
• Changes the preset stations (or D B services)
with D ∞.
• Changes the folder of the MP3/WM discs.
• While playing an MP3 disc on an
MP3-compatible CD changer:
– Changes the disc if pressed briefly.
– Changes the folder if pressed and held.
• While listening to an pple iPod:
– Pauses or resumes playback with D ∞.
– Enters the main menu with 5 U.
(Now 5 U/D ∞/2 R/F 3 work as the menu
selecting buttons.)*
3 VOL – / VOL + buttons
• djusts the volume level.
4 SOUND button
• Selects the sound mode (iEQ: intelligent
equalizer).
5 SOURCE button
• Selects the source.
6 2 R (reverse) / F (forward) 3 buttons
• Searches for stations (or D B services) if pressed
briefly.
• Searches for D B ensembles if pressed and held.
• Fast-forwards or reverses the track if pressed and
held.
• Changes the tracks if pressed briefly.
• While listening to an iPod (in menu selecting
mode):
– Selects an item if pressed briefly. (Then, press
D ∞ to confirm the selection.)
– Skips 10 items at a time if pressed and held.
* 5 U : Returns to the previous menu.
D ∞ : Confirms the selection.
EN14-27_KD-G431_003C_fff.indd 20EN14-27_KD-G431_003C_fff.indd 20 3/13/08 12:00:25 PM3/13/08 12:00:25 PM
Other manuals for KD-G432
3
This manual suits for next models
3
Table of contents
Languages:
Other JVC Car Receiver manuals