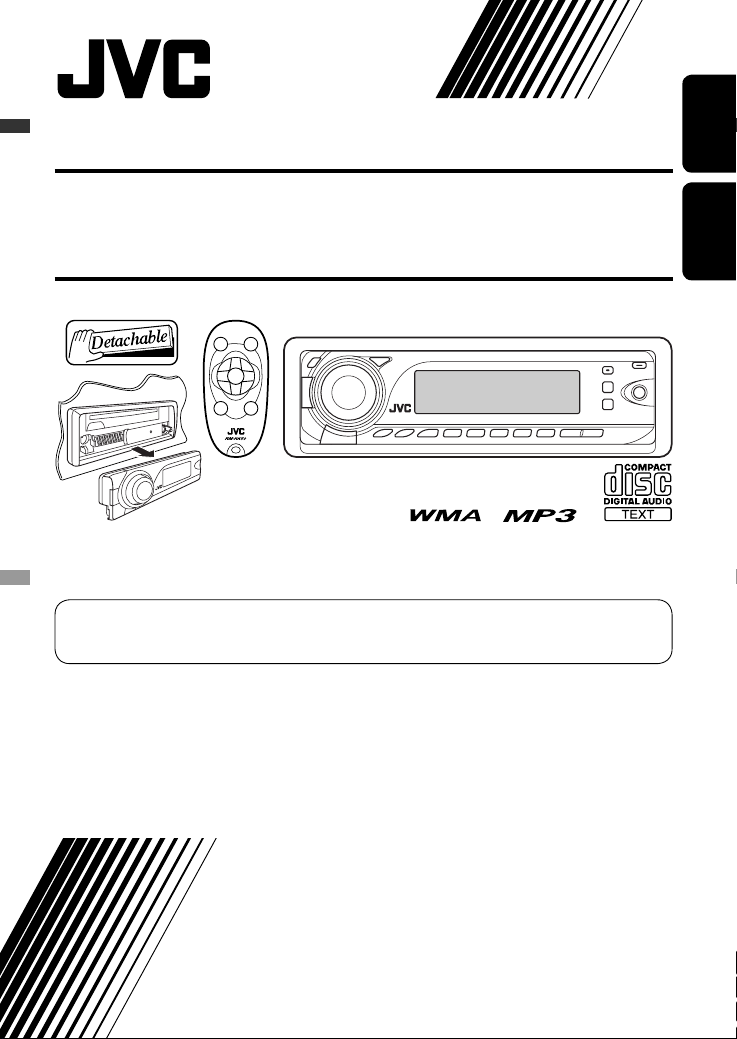
JVC KD-PDR55 User manual

ENGLISH
INDONESIA
CD RECEIVER KD-PDR55
ALAT PENERIMA CD KD-PDR55
For canceling the display demonstration, see page 6.
Untuk membatalkan tampilan demonstrasi, lihat halaman 6.
For installation and connections, refer to the separate manual.
Untuk instalasi dan penyambungan, lihat buku pedoman terpisah.
INSTRUCTIONS
BUKU PETUNJUK
GET0426-004A
[UN]
Cover_KD-PDR55_004A_f.indd 1Cover_KD-PDR55_004A_f.indd 1 10/26/06 12:23:47 PM10/26/06 12:23:47 PM

2
ENGLISH
Thank you for purchasing a JVC product.
Please read all instructions carefully before operation, to ensure your complete understanding and to obtain the best
possible performance from the unit.
IMPORTANT FOR LASER PRODUCTS
1. CLA 1 LA ER PRODUCT
2. CAUTION: Do not open the top cover. There are no user serviceable parts inside the unit; leave all servicing to
qualified service personnel.
3. CAUTION: Visible and/or invisible class 1M laser radiation when open. Do not view directly with optical
instruments.
4. REPRODUCTION OF LABEL: CAUTION LABEL, PLACED OUT IDE THE UNIT.
How to reset your unit
• Your preset adjustments will also be erased.
How to forcib y eject a disc
“PLEA E” and “EJECT” appear alternately on the display.
• Be careful not to drop the disc when it ejects.
• If this does not work, reset your unit.
Warning:
If you need to operate the unit while driving, be
sure to look ahead carefully or you may be involved
in a traffic accident.
Caution on vo ume setting:
Discs produce very little noise compared with other
sources. Lower the volume before playing a disc
to avoid damaging the speakers by the sudden
increase of the output level.
[European Union only]
EN02-07_KD-PDR55[U_UH]1.indd 2EN02-07_KD-PDR55[U_UH]1.indd 2 10/10/06 12:38:18 PM10/10/06 12:38:18 PM

ENGLISH
3
How to use the M MODE button
If you press M MODE, the unit goes into functions mode,
then the number buttons and 5/∞ buttons work as
different function buttons.
Ex.: hen number button 2 works as
MO (monaural) button.
To use these buttons for their original functions
again after pressing M MODE, wait for 5 seconds
without pressing any of these buttons until the
functions mode is cleared or press M MODE again.
Detaching the control panel
Attaching the control panel
CONTENTS
Control panel .................................. 4
Remote controller RM-RK50 ............. 5
Getting started ................................ 6
Basic operations ................................................... 6
Radio operations ............................. 7
Disc operations ................................ 8
Playing a disc in the unit ..................................... 8
iPod operations ............................... 10
Sound adjustments .......................... 12
General settings PSM .................. 13
External component operations ....... 15
Title assignment .............................. 15
More about this unit ........................ 16
Maintenance ................................... 20
Troubleshooting .............................. 21
Specifications .................................. 23
For safety...
• Do not raise the volume level too much, as this will
block outside sounds, making driving dangerous.
• Stop the car before performing any complicated
operations.
Temperature inside the car...
If you have parked the car for a long time in hot or cold
weather, wait until the temperature in the car becomes
normal before operating the unit.
EN02-07_KD-PDR55[U_UH]2.indd 3EN02-07_KD-PDR55[U_UH]2.indd 3 10/17/06 12:45:14 PM10/17/06 12:45:14 PM

4
ENGLISH
Parts identification
Display window
Control panel
1 SRC (source) button
2 B BAND button
3 (standby/on attenuator) button /
Control dial
4 SEL (select) button
5 Display window
6 5 (up) / ∞ (down) buttons
7 EQ (equali er) button
8 0 (eject) button
9 AUX (auxiliary) input jack
p (control panel release) button
q D DISP (display) button
w M MODE button
e MO (monaural) button
r SSM (Strong-station Sequential Memory) button
t Number buttons
y RPT (repeat) button
u RND (random) button
i 4/¢ buttons
o Remote sensor
DO NOT expose the remote sensor to strong light
(direct sunlight or artificial lighting).
; S.BASS (super bass) indicator
a DISC indicator
s Disc information indicators—
TAG (Tag information), (folder), (track/file)
d Sound mode (iEQ: intelligent equali er) indicators
—USER, ROCK, CLASSIC, POPS, HIP HOP, JAZZ
• lights up for the selected item.
f Tuner reception indicators—MO (monaural),
ST (stereo)
g EQ (equali er) indicator
h Playback mode / item indicators— RND (random),
(disc), (folder), RPT (repeat)
j Main display
k Tr (track) indicator
l Source display / Time countdown indicator
EN02-07_KD-PDR55[U_UH]f.indd 4EN02-07_KD-PDR55[U_UH]f.indd 4 11/8/06 3:26:21 PM11/8/06 3:26:21 PM

ENGLISH
5
Remote controller — RM-RK50
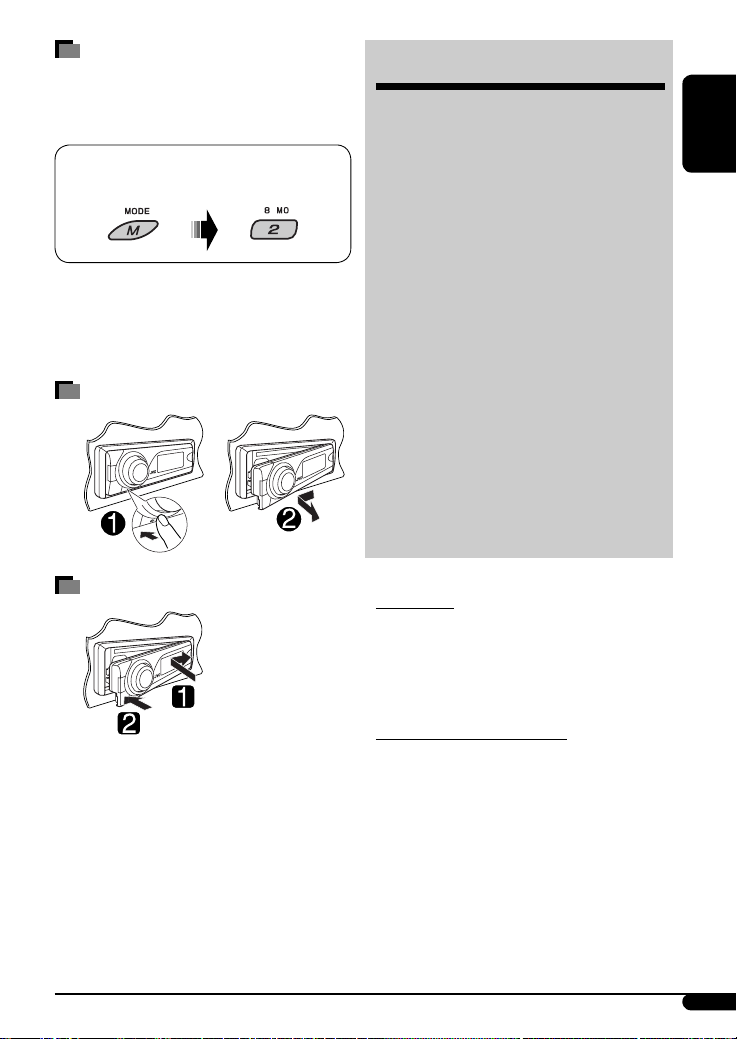
Installing the lithium coin battery
(CR2025)
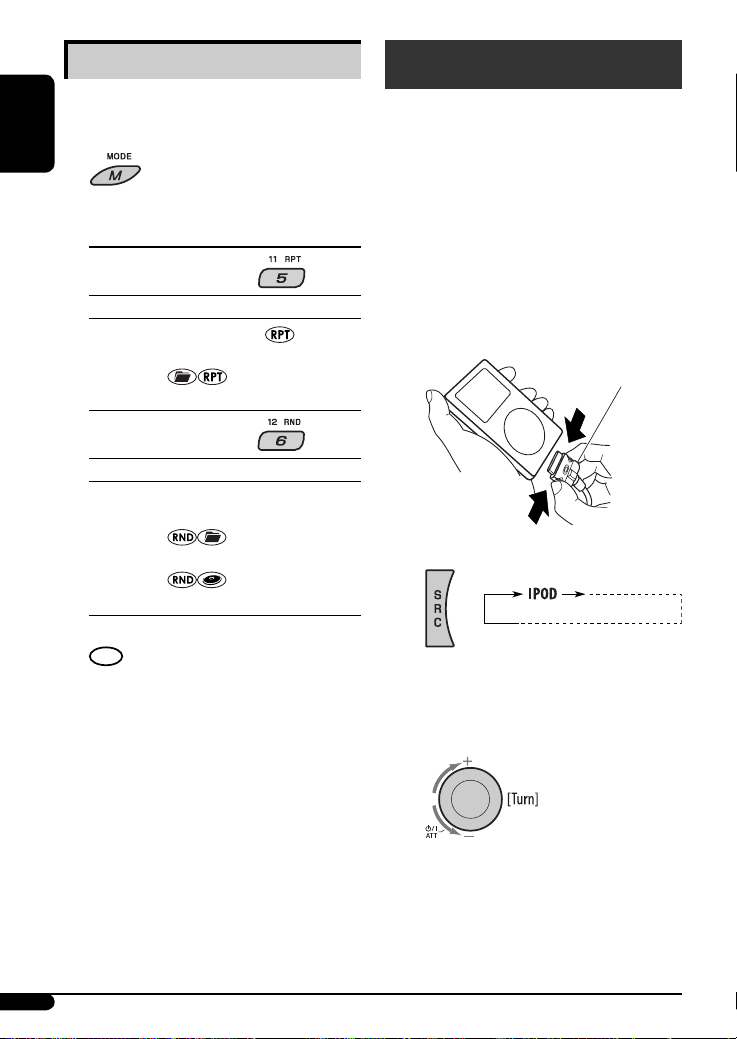
Aim the remote controller directly at the remote
sensor on the unit. Make sure there is no obstacle
in between.
arning:
• Do not install any battery other than CR2025 or
its equivalent; otherwise, it may explode.
• Do not leave the remote ontroller in a pla e
(su h as dashboards) exposed to dire t sunlight
for a long time; otherwise, it may explode.
• Store the battery in a pla e where hildren
annot rea h to avoid risk of a ident.
• To prevent the battery from over-heating,
ra king, or starting a fire:
– Do not re harge, short, disassemble, heat the
battery, or dispose of it in a fire.
– Do not leave the battery with other metalli
materials.
– Do not poke the battery with tweezers or similar
tools.
– Wrap the battery with tape and insulate when
throwing away or saving it.
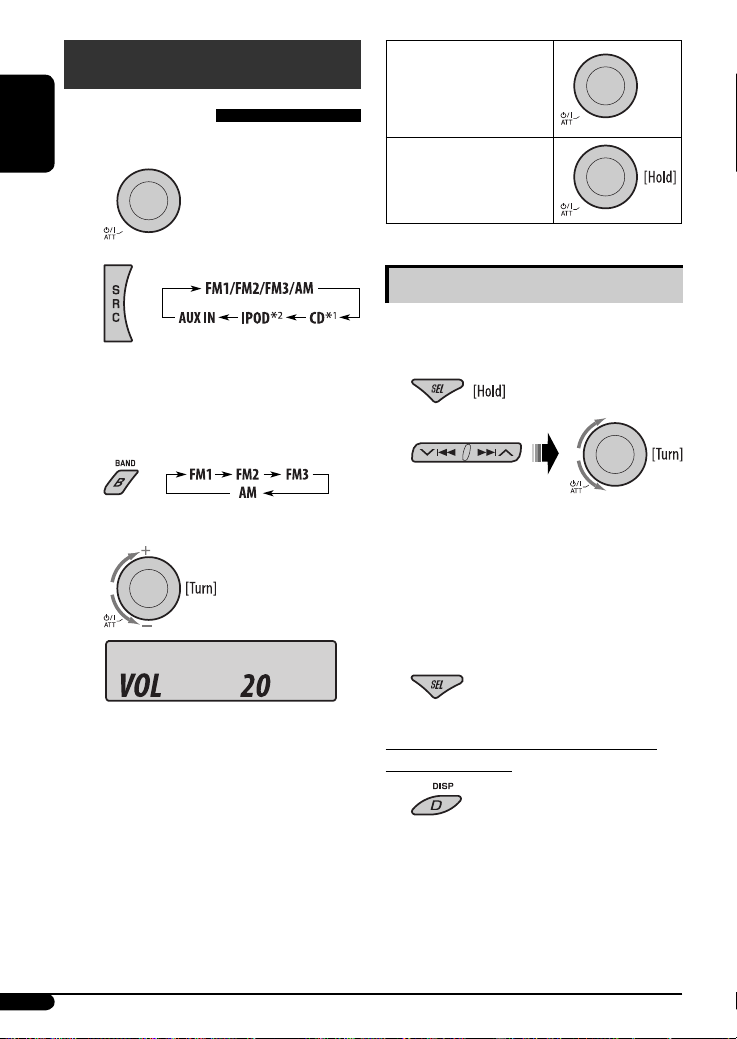
Main elements and features
1 (standby/on/attenuator) button
• Turns the power on if pressed briefly or
attenuates the sound when the power is on.
• Turns the power off if pressed and held.
2 5 U (up) / D (down) ∞ buttons
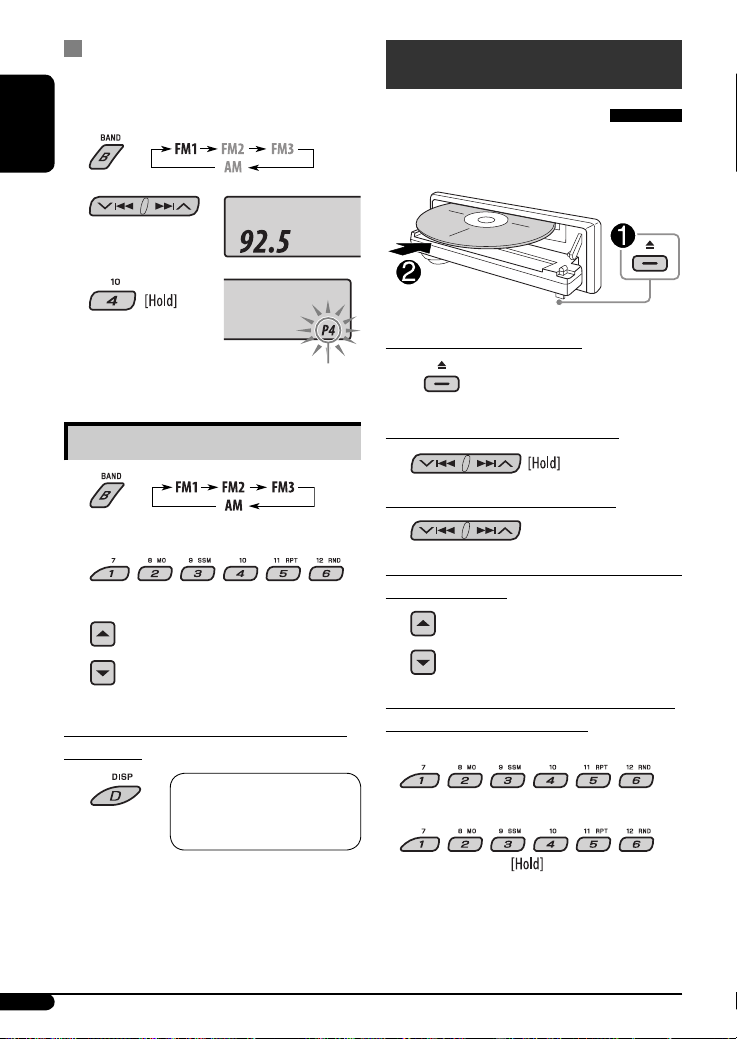
• Changes the FM/AM bands with 5 U.
• Changes the preset stations with D ∞.
• Changes the folder of the MP3/WMA dis s.
• While listening to an Apple iPod:
– Pauses or resumes playba k with D ∞.
– Enters the main menu with 5 U.
(Now 5 U/D ∞/2 R/F 3 work as the menu
sele ting buttons.)*
3 VOL – / VOL + buttons
• Adjusts the volume level.
4 SOUND button
•
Sele ts the sound mode (iEQ: intelligent equalizer).
5 SOURCE button
• Sele ts the sour e.
6 2 R (reverse) / F (forward) 3 buttons
• Sear hes for stations if pressed briefly.
• Fast-forwards or reverses the tra k if pressed and
held.
• Changes the tra ks if pressed briefly.
• While listening to an iPod (in menu sele ting
mode):
– Sele ts an item if pressed briefly. (Then, press
D ∞ to onfirm the sele tion.)
– Skips 10 items at a time if pressed and held.
* 5 U : Returns to the previous menu.
D ∞ : Confirms the selection.
EN02-07_KD-PDR55[U_UH]2.indd 5EN02-07_KD-PDR55[U_UH]2.indd 5 10/17/06 12:45:22 PM10/17/06 12:45:22 PM

6
ENGLISH
To drop the volume in
a moment (ATT)
To restore the sound, press
the button again.
To turn off the power
Basic settings
• See also “General settings — PSM” on pages 13 and
14.
1
2
1 Canceling the display demonstrations
Select “ EMO,” then “ EMO OFF.”
2 Setting the clock
Select “CLOCK H” (hour), then adjust the hour.
Select “CLOCK M” (minute), then adjust the
minute.
3 Finish the procedure.
To check the current clock time while the
power is turned off
Clock time is shown on the
display for about 5 seconds. See
also page 13.
Getting started
Basic operations
~ Turn on the power.
Ÿ
*1 You cannot select “CD” as the playback source
if there is no disc in the unit.
*2 “NO IPOD” appears if iPod is not connected.
! For F /A tuner
⁄ Adjust the volume.
@ Adjust the sound as you want. (See
page 12.)
Volume level appears.
EN02-07_KD-PDR55[U_UH]f.indd 6EN02-07_KD-PDR55[U_UH]f.indd 6 11/9/06 6:24:41 PM11/9/06 6:24:41 PM

ENGLISH
7
Radio operations
~
Ÿ
! Start searching for a station.
When a station is received, searching stops.
To stop searching, press the same button
again.
To tune in to a station manually
In step ! above...
1
2 Select a desired station frequency.
Lights up when receiving an FM stereo
broadcast with sufficient signal strength.
When an F stereo broadcast is hard to
receive
Reception improves, but stereo effect will be lost.
To restore the stereo effect, repeat the same
procedure. “MONO OFF” appears and the MO indicator
goes off.
Storing stations in memory
You can preset six stations for each band.
F station automatic presetting —
SS (Strong-station Sequential
emory)
1 Select the F band (F 1 – F 3) you want to
store into.
2
3
“SSM” flashes, then disappears when automatic
presetting is over.
Local FM stations with the strongest signals are
searched and stored automatically in the FM band.
Lights up when monaural mode is activated.
EN02-07_KD-PDR55[U_UH]f.indd 7EN02-07_KD-PDR55[U_UH]f.indd 7 11/9/06 6:24:43 PM11/9/06 6:24:43 PM

8
ENGLISH
Manual presetting
Ex.: Storing FM station of 92.5 MHz into preset
number 4 of the FM1 band.
1
2
3
Listening to a preset station
1
2 Select the preset station (1 – 6) you want.
or
To check other information while listening
to the radio
* If no name is assigned to a station, “NO NAME”
appears. To assign a title to a station, see page 15.
Disc operations
laying a disc in the unit
ll tracks will be played repeatedly until you change the
source or eject the disc.
To stop play and eject the disc
• Press SRC to listen to another
playback source.
To fast-forward or reverse the track
To go to the next or previous tracks
To go to the next or previous folders (only for
M 3 or WMA discs)
To locate a particular track (for CD) or folder
(for M 3 or WMA discs) directly
To select a number from 01 – 06:
To select a number from 07 – 12:
• To use direct folder access on MP3/WM discs, it
is required that folders are assigned with 2-digit
numbers at the beginning of their folder names—
01, 02, 03, and so on.
Preset number flashes for a while.
Clock = Station name* =
Frequency = (back to the
beginning)
EN08-15_KD-PDR55[U_UH]f.indd 8EN08-15_KD-PDR55[U_UH]f.indd 8 11/9/06 6:25:07 PM11/9/06 6:25:07 PM

9
ENGLISH
To select a particular track in a folder (for MP3 or
WM disc):
Other main functions
Skipping tracks quickly during play
• For MP3 or WM discs, you can skip tracks within the
same folder.
Ex.: To select track 32 while playing tracks whose
number is a single digit (1 to 9)
1
2
Each time you press the button, you can skip 10
tracks.
• fter the last track, the first track will be selected
and vice versa.
3
rohibiting disc ejection
You can lock a disc in the loading slot.
To cancel the prohibition, repeat the same
procedure.
Changing the display information
While playing an audio CD or a
CD Text
While playing an M 3 or a WMA track
• When “TAG DIS ” is set to “TAG ON”
(see page 14)
• When “TAG DIS ” is set to “TAG OFF”
: Clock with the current track number
: Elapsed playing time with the current
track number
: Corresponding indicator lights up on the
display
*1 If the current disc is an audio D, “NO NAME” appears.
*2 If an MP3/WMA file does not have Tag information,
folder name and file name appear. In this case, the
TAG indicator will not light up.
EN08-15_KD-PDR55[U_UH]f.indd 9EN08-15_KD-PDR55[U_UH]f.indd 9 11/9/06 6:25:09 PM11/9/06 6:25:09 PM

10
ENGLISH
Selecting the playback modes
You can use only one of the following playback modes
at a time.
1
2 Select your desired playback mode.
7 Repeat play
Mode Plays repeatedly
TRK RPT : The current track.
FLDR RPT * : All tracks of the current folder.
RPT OFF : Cancels.
7 Random play
Mode Plays at random
FLDR R D * : All tracks of the current folder, then
tracks of the next folder and so on.
DISC R D : All tracks of the current disc.
R D OFF : Cancels.
* Only while playing an MP3 or a WMA disc.
: Corresponding indicator lights up on
the display
iPod operations
You can play songs from an Apple i od through this
unit by connecting it with the supplied connection
cable for i od.
• Disconnecting the i od will also stop playback. ress
SRC to listen to another playback source.
• For connection, see Installation/Connection Manual
(separate volume).
• For details, refer also to the manual supplied with
your i od.
~ Connect an iPod.
If an iPod has been connected...
layback starts automatically from where it has
been paused previously.
Ÿ Adjust the volume.
! Adjust the sound as you want. (See
page 12.)
Connection cable for i od
EN08-15_KD-PDR55[U_UH]f.indd 10EN08-15_KD-PDR55[U_UH]f.indd 10 11/24/06 12:59:48 PM11/24/06 12:59:48 PM

11
ENGLISH
Caution:
• Avoid using the iPod if it might hinder your safety
driving.
• Make sure all important data has been backed up
to avoid losing the data.
To pause playback
To resume playback, press the button
again.
To fast-forward or reverse the track
To go to the next or previous tracks
Selecting a track from the menu
1 Enter the main menu.
Now the 5∞ 4¢ buttons work as
the menu selecting buttons*.
2 Select the desired menu.
LAYLIST Ô ARTISTS Ô ALBUMS Ô
SONGS Ô GENRES Ô COM OSER Ô
(back to the beginning)
3 Confirm the selection.
To move back to the previous menu,
press 5.
• If a track is selected, playback starts
automatically.
• If the selected item has another layer, you will
enter the layer. Repeat steps 2 and 3 until the
desired track is played (see page 19).
• Holding 4¢ can skip 10 items at
a time.
* The menu selecting mode will be canceled:
– If no operations are done for about 5 seconds.
– When you confirm the selection of a track.
Selecting the playback modes
1
2 Select your desired playback mode.
7 Repeat play
Mode layback functions (as on i od)
ONE R T : Same as “Repeat One.”
All R T : Same as “Repeat All.”
R T OFF : Cancels.
7 Random play
Mode layback functions (as on i od)
ALBM RND * : Same as “Shuffle Albums.”
SONG RND : Same as “Shuffle Songs.”
RND OFF : Cancels.
* Functions only if you select “A ” in “A BUMS” of
the main “MENU.”
: Corresponding indicator lights up
on the display
To check other information while listening
to an i od
EN08-15_KD-PDR55[U_UH]f.indd 11EN08-15_KD-PDR55[U_UH]f.indd 11 11/6/06 10:11:09 AM11/6/06 10:11:09 AM

12
ENGLISH
Sound adjustments
You can select a preset sound mode suitable to the
music genre (iEQ: intelligent equalizer).
Indication (For)
BAS*1MID*2TRE*3S.BS*4
USER
(Flat sound) 00 00 00 OFF
ROCK
(Roc or disco music) +03 00 +02 ON
CLASSIC
(Classical music) +01 00 +03 OFF
POPS
(Light music) +02 +01 +02 OFF
HIP HOP
(Fun or rap music) +04 –02 +01 ON
JAZZ
(Jazz music) +03 00 +03 OFF
*1 : Bass; *2 : Mid-range; *3 : Treble; *4 : Super bass
Ad usting the sound
You can adjust the sound characteristics to your
preference.
1
2
Preset values
Indication, [Range]
BAS *2 (bass), [–06 to +06]
Adjust the bass.
MID *2 (mid-range), [–06 to +06]
Adjust the mid-range frequencies sound level.
TRE *2 (treble), [–06 to +06]
Adjust the treble.
FAD *3 (fader), [R06 to F06]
Adjust the front and rear spea er balance.
BAL *4 (balance), [L06 to R06]
Adjust the left and right spea er balance.
S.BS *2 (super bass), [S.BS ON or S.BS OFF],
[01 to 05, initial: 03]*5
Maintain the richness and fullness of the bass sound
regardless of how low you set the volume.
SUB.W *1 (subwoofer), [00 to 08, initial: 04]
Adjust the subwoofer output level.
VOL (volume), [00 to 30 or 50 *6]
Adjust the volume.
*1 Displayed only when “L/O MODE” is set to “WOOFER”
(see page 14).
*2 When yo adj st the bass, mid-range, treble, or s per
bass, the adj stment yo have made is stored for the
c rrently selected so nd mode (iEQ) incl ding “USER.”
*3 If yo are sing a two-speaker system, set the fader
level to “00.”
*4 The adj stment will not affect the s bwoofer o tp t.
*5 Range adj stment for s per bass is adj stable only
when it is set to “S.BS ON.”
*6 Depending on the amplifier gain control setting. (See
page 14 for details.)
EN08-15_KD-PDR55[U_UH]f.indd 12EN08-15_KD-PDR55[U_UH]f.indd 12 11/20/06 1:48:05 PM11/20/06 1:48:05 PM

13
ENGLISH
You can change PSM (Preferred Setting Mode) items
listed in the table that follows.
1
2 Select a SM item.
3 Adjust the SM item selected.
General settings — PSM
4 Repeat steps 2 and 3 to adjust other SM
items if necessary.
5 Finish the procedure.
ontinued on the next page
Indications Item
( : Initial)
Setting, [reference page]
DEMO
Display demonstration
• DEMO ON
• DEMO OFF
: Display demonstration will be activated automatically if no
operation is done for about 20 seconds, [6].
: Cancels.
CLK DIS *1
Clock display
• ON
• OFF
: Clock time is shown on the display at all times when the power is
turned off.
: Cancels; pressing D DISP will show the clock time for about
5 seconds when the power is turned off, [6].
CLOCK H
Hour adjustment
1 – 12 [Initial: 1 (1:00)], [6]
CLOCK M
Minute adjustment
00 – 59 [Initial: 00 (1:00)], [6]
DIMMER
Dimmer
• AUTO
• ON
• OFF
: Dims the display when you turn on the headlights.
: ctivates dimmer.
: Cancels.
*1 If the power supply is not interrupted by turning off the ignition key of your car, it is recommended to select “OFF” to
save the car’s battery.
EN08-15_KD-PDR55[U_UH]1.indd 13EN08-15_KD-PDR55[U_UH]1.indd 13 10/10/06 12:38:38 PM10/10/06 12:38:38 PM

14
ENGLISH
Indications Item
( : Initial)
Setting, [reference page]
SCROLL *2
Scroll
• ONCE
• AUTO
• OFF
: Scrolls the track information once.
: Repeats scrolling (at 5-second intervals).
: Cancels.
• Pressing D DISP for more than one second can scroll the display
regardless of the setting.
L/O MODE
Line output mode
• REAR
• WOOFER
: Select if the RE R LINE OUT terminals are used for connecting the
speakers (through an external amplifier).
: Select if the RE R LINE OUT terminals are used for connecting a
subwoofer (through an external amplifier).
WOOFER *3
Subwoofer cutoff
frequency
• LOW
• MID
• HIGH
: Frequencies lower than 90 Hz are sent to the subwoofer.
: Frequencies lower than 135 Hz are sent to the subwoofer.
: Frequencies lower than 180 Hz are sent to the subwoofer.
AUX ADJ
uxiliary input level
adjustment
A.ADJ 00
– A.ADJ 05
: djust the auxiliary input level to avoid the sudden increase of the
output level when changing the source from external component
connected to the UX input jack on the control panel.
TAG DIS
Tag display
• TAG ON
• TAG OFF
: Shows the Tag information while playing MP3/WM tracks, [9].
: Cancels.
AM GAIN
mplifier gain control
• LOW WR
• HIGH WR
: VOL 00 – VOL 30 (Select this if the maximum power of the speaker
is less than 50 W to prevent damaging the speaker.)
: VOL 00 – VOL 50
IF BAND
Intermediate frequency
band
• AUTO
• WIDE
: Increases the tuner selectivity to reduce interference noises
between close stations. (Stereo effect may be lost.)
: Subject to interference noises from adjacent stations, but sound
quality will not be degraded and the stereo effect will remain.
*2 Some characters or symbols will not be shown correctly (or will be blanked) on the display.
*3 Displayed only when “L/O MODE” is set to “WOOFER.”
EN08-15_KD-PDR55[U_UH]1.indd 14EN08-15_KD-PDR55[U_UH]1.indd 14 10/10/06 12:38:38 PM10/10/06 12:38:38 PM

15
ENGLISH
External component
operations
You can connect an external component to the
AUX (auxiliary) input jack on the control panel.
~
Ÿ Turn on the connected component and
start playing the source.
! Adjust the volume.
⁄ Adjust the sound as you want. (See
page 12.)
To check other information while listening
to an e ternal component
Clock Ô AUX IN
Stereo mini plug
Portable MD player etc
Title assignment
You can assign names to 30 station frequencies (FM and
AM) and up to 8 characters for each station name.
1 Select FM/AM.
2 Show the title entry screen.
3 Assign a title.
1 Select a character.
2 Move to the ne t (or previous) character
position.
3 Repeat steps 1 and 2 until you finish
entering the title.
4 Finish the procedure.
To erase the entire title
In step 2 above...
EN08-15_KD-PDR55[U_UH]f.indd 15EN08-15_KD-PDR55[U_UH]f.indd 15 11/20/06 1:50:34 PM11/20/06 1:50:34 PM

16
ENGLISH
More about this unit
Basic operations
Turning on the power
• By pressing SRC on the unit, you can also turn on the
power. If the source is ready, playback also starts.
Turning off the power
• If you turn off the power while listening to a track,
playback starts from where it has been stopped
previously, ne t time you turn on the power.
General
• If you change the source while listening to a disc or
an iPod, playback stops.
Ne t time you select “CD” or “IPOD” as the playback
source, playback starts from where it has been
stopped/paused previously.
• After ejecting a disc or disconnecting an iPod,
“NO DISC” or “NO IPOD” appears and you cannot
operate some of the buttons. Insert another disc,
reconnect an iPod, or press SRC to select another
playback source.
Tuner operations
Storing stations in memory
• During SSM search...
– All previously stored stations are erased and
stations are stored newly.
– Received stations are preset in No. 1 (lowest
frequency) to No. 6 (highest frequency).
– When SSM is over, the station stored in No. 1 will
be automatically tuned in.
• When storing a station manually, the previously
preset station is erased when a new station is stored
in the same preset number.
Disc operations
Caution for DualDisc playback
• The Non-DVD side of a “DualDisc” does not comply
with the “Compact Disc Digital Audio” standard.
Therefore, the use of Non-DVD side of a DualDisc on
this product may not be recommended.
General
• This unit has been designed to reproduce CDs/CD
Te ts, and CD-Rs (Recordable)/CD-RWs (Rewritable)
in audio CD (CD-DA), MP3 and WMA formats.
• When a disc is inserted upside down, “PLEASE” and
“EJECT” appear alternately on the display. Press 0 to
eject the disc.
• MP3 and WMA “tracks” (words “file” and “track” are
used interchangeably) are recorded in “folders.”
• While fast-forwarding or reversing on an MP3 or
WMA disc, you can only hear intermittent sounds.
Playing a CD-R or CD-RW
• Use only “finalized” CD-Rs or CD-RWs.
• This unit can play back only files of the same type
which are first detected if a disc includes both audio
CD (CD-DA) files and MP3/WMA files.
• This unit can play back multi-session discs; however,
unclosed sessions will be skipped while playing.
• Some CD-Rs or CD-RWs may not play back on this
unit because of their disc characteristics, or for the
following reasons:
– Discs are dirty or scratched.
– Moisture condensation occurs on the lens inside
the unit.
– The pickup lens inside the unit is dirty.
– CD-R/CD-RW on which the files are written with
“Packet Write” method.
– There are improper recording conditions (missing
data, etc.) or media conditions (stained, scratched,
warped, etc.).
• CD-RWs may require a longer readout time since the
reflectance of CD-RWs is lower than that of regular
CDs.
EN16-23_KD-PDR55[U_UH]f.indd 16EN16-23_KD-PDR55[U_UH]f.indd 16 10/27/06 3:57:59 PM10/27/06 3:57:59 PM

ENGLISH
17
• This unit cannot play back the following files:
– MP3 files encoded with MP3i and MP3 PRO format
– MP3 files encoded in an inappropriate format
– MP3 files encoded with Layer 1/2
– WMA files encoded with lossless, professional, and
voice format
– WMA files which are not based upon Windows
Media® Audio
– WMA files copy-protected with DRM
– Files which have the data such as AIFF, ATRAC3,
etc
• The search function works but search speed is not
constant
Ejecting a disc
• If the ejected disc is not removed within 15 seconds,
the disc is automatically inserted again into the
loading slot to protect it from dust Playback starts
automatically
iPod operations
Controllable iPod Software version
iPod with dock connector
(3rd Generation)
2 3 or later
iPod with Click Wheel
(4th Generation)
3 1 or later
iPod mini 1 4 or later
iPod photo 1 2 or later
iPod nano 1 0 or later
iPod with Video
(5th Generation)
1 0 or later
• If your iPod software version is older than those
mentioned above, you may not be able to control the
iPod properly Update your iPod to the latest software
version before using it with this unit
– You can check the software version of your iPod
from “About” in the “Setting” menu of the iPod
– For details about updating your iPod, visit
<http://www apple com>
• Do not use the following CD-Rs or CD-RWs:
– Discs with stickers, labels, or a protective seal stuck
to the surface
– Discs on which labels can be directly printed by an
ink jet printer
Using these discs under high temperatures or high
humidities may cause malfunctions or damage to the
unit
Playing an MP3/WMA disc
• This unit can play back MP3/WMA files with the
extension code < mp3> or < wma> (regardless of
the letter case—upper/lower)
• This unit can show the names of albums, artists
(performer), and Tag (Version 1 0, 1 1, 2 2, 2 3, or
2 4) for MP3 files and for WMA files
• This unit can display only one-byte characters No
other characters can be correctly displayed
• This unit can play back MP3/WMA files meeting the
conditions below:
– Bit rate: 8 kbps — 320 kbps
– Sampling frequency:
48 kHz, 44 1 kHz, 32 kHz (for MPEG-1)
24 kHz, 22 05 kHz, 16 kHz (for MPEG-2)
– Disc format: ISO 9660 Level 1/ Level 2, Romeo,
Joliet, Windows long file name
• The maximum number of characters for file/folder
names vary among the disc format used (includes 4
extension characters—< mp3> or < wma>)
– ISO 9660 Level 1: up to 12 characters
– ISO 9660 Level 2: up to 31 characters
– Romeo: up to 128 characters
– Joliet: up to 64 characters
– Windows long file name: up to 128 characters
• This unit can recognize a total of 512 files, of 200
folders, and of 8 hierarchies
• This unit can play back files recorded in VBR (variable
bit rate)
Files recorded in VBR have a discrepancy in elapsed
time display, and do not show the actual elapsed
time Especially, after performing the search function,
this difference becomes noticeable
Continued on the next page
EN16-23_KD-PDR55[U_UH]f.indd 17EN16-23_KD-PDR55[U_UH]f.indd 17 11/15/06 2:55:21 PM11/15/06 2:55:21 PM

18
ENGLISH
Title assignment
• If you try to assign titles to more than 30 station
frequencies, “NAMEFULL appears. Delete unwanted
titles before assignment.
General settings—PSM
• “AUTO setting for “DIMMER may not work correctly
on some vehicles, particularly on those having a
control dial for dimming.
In this case, change “DIMMER setting to any other
than “AUTO.
• If you change the “AMP GAIN setting from
“HIGH PWR to “LOW PWR while the volume level
is set higher than “VOL 30, the unit automatically
changes the volume level to “VOL 30.
• When you turn on this unit, the iPod is charged
through this unit.
• While the iPod is connected, all operations from the
iPod are disabled. Perform all operations from this
unit.
• While connecting an iPod with Video:
– No video shows on the iPod’s display or the
external monitor (only the audio part is available).
– It is not possible to browse video files on the
“Video“ menu. (If you connect the iPod during
playback or pausing of a video file, resuming
playback will not work.)
• iPod shuffle is not controllable.
• You can control the iPod from this unit when “JVC or
“ appears on the iPod display.
• The songs order displayed on the selecting menu of
this unit may differ from the iPod.
• If playback is stopped, select a track from the
selecting menu or press ∞.
• The text information may not be displayed correctly.
– Some characters such as accented letters cannot be
shown correctly on the display.
– Depends on the condition of communication
between the iPod and the unit.
• If the text information includes more than 8
characters, it scrolls on the display. This unit can
display up to 40 characters.
EN16-23_KD-PDR55[U_UH]f.indd 18EN16-23_KD-PDR55[U_UH]f.indd 18 11/8/06 3:29:00 PM11/8/06 3:29:00 PM

ENGLISH
19
Hierarchical structure of file searching when an iPod is connected
EN16-23_KD-PDR55[U_UH]f.indd 19EN16-23_KD-PDR55[U_UH]f.indd 19 11/8/06 3:28:50 PM11/8/06 3:28:50 PM

20
ENGLISH
Maintenance
How to clean the connectors
Frequent detachment will deteriorate the connectors.
To minimize this possibility, periodically wipe the
connectors with a cotton swab or cloth moistened with
alcohol, being careful not to damage the connectors.
Moisture condensation
Moisture may condense on the lens inside the unit in
the following cases:
• After starting the heater in the car.
• If it becomes very humid inside the car.
Should this occur, the unit may malfunction. In this
case, eject the disc and leave the unit turned on for a
few hours until the moisture evaporates.
How to handle discs
When removing a disc from its
case, press down the center holder
of the case and lift the disc out,
holding it by the edges.
• Always hold the disc by the edges. Do not touch its
recording surface.
When storing a disc into its case, gently insert the
disc around the center holder (with the printed surface
facing up).
• Make sure to store discs into the cases after use.
Center holder
To keep discs clean
A dirty disc may not play correctly.
If a disc does become dirty, wipe it with
a soft cloth in a straight line from center
to edge.
• Do not use any solvent (for e ample, conventional
record cleaner, spray, thinner, benzine, etc.) to clean
discs.
To play new discs
New discs may have some rough spots
around the inner and outer edges. If
such a disc is used, this unit may reject
the disc.
To remove these rough spots, rub the edges with a
pencil or ball-point pen, etc.
Warped disc
Sticker Sticker residue
Stick-on label
Do not use the following discs:
Connector
Unusual shape
Single CD (8 cm disc)
EN16-23_KD-PDR55[U_UH]2.indd 20EN16-23_KD-PDR55[U_UH]2.indd 20 10/17/06 12:46:22 PM10/17/06 12:46:22 PM
Table of contents
Languages:
Other JVC Car Receiver manuals
Popular Car Receiver manuals by other brands

Alpine
Alpine TDA-7572R owner's manual

Aurora Design
Aurora Design AAC/MP3 User's operation manual

Blaupunkt
Blaupunkt Monte Carlo MP28 Operating and installation instructions

Clarion
Clarion VZ509 Owner's manual & installation manual

Kenwood
Kenwood KDC-BT530U instruction manual

Panasonic
Panasonic CQDVR592U - AUTO RADIO/CD/DVD PL operating instructions