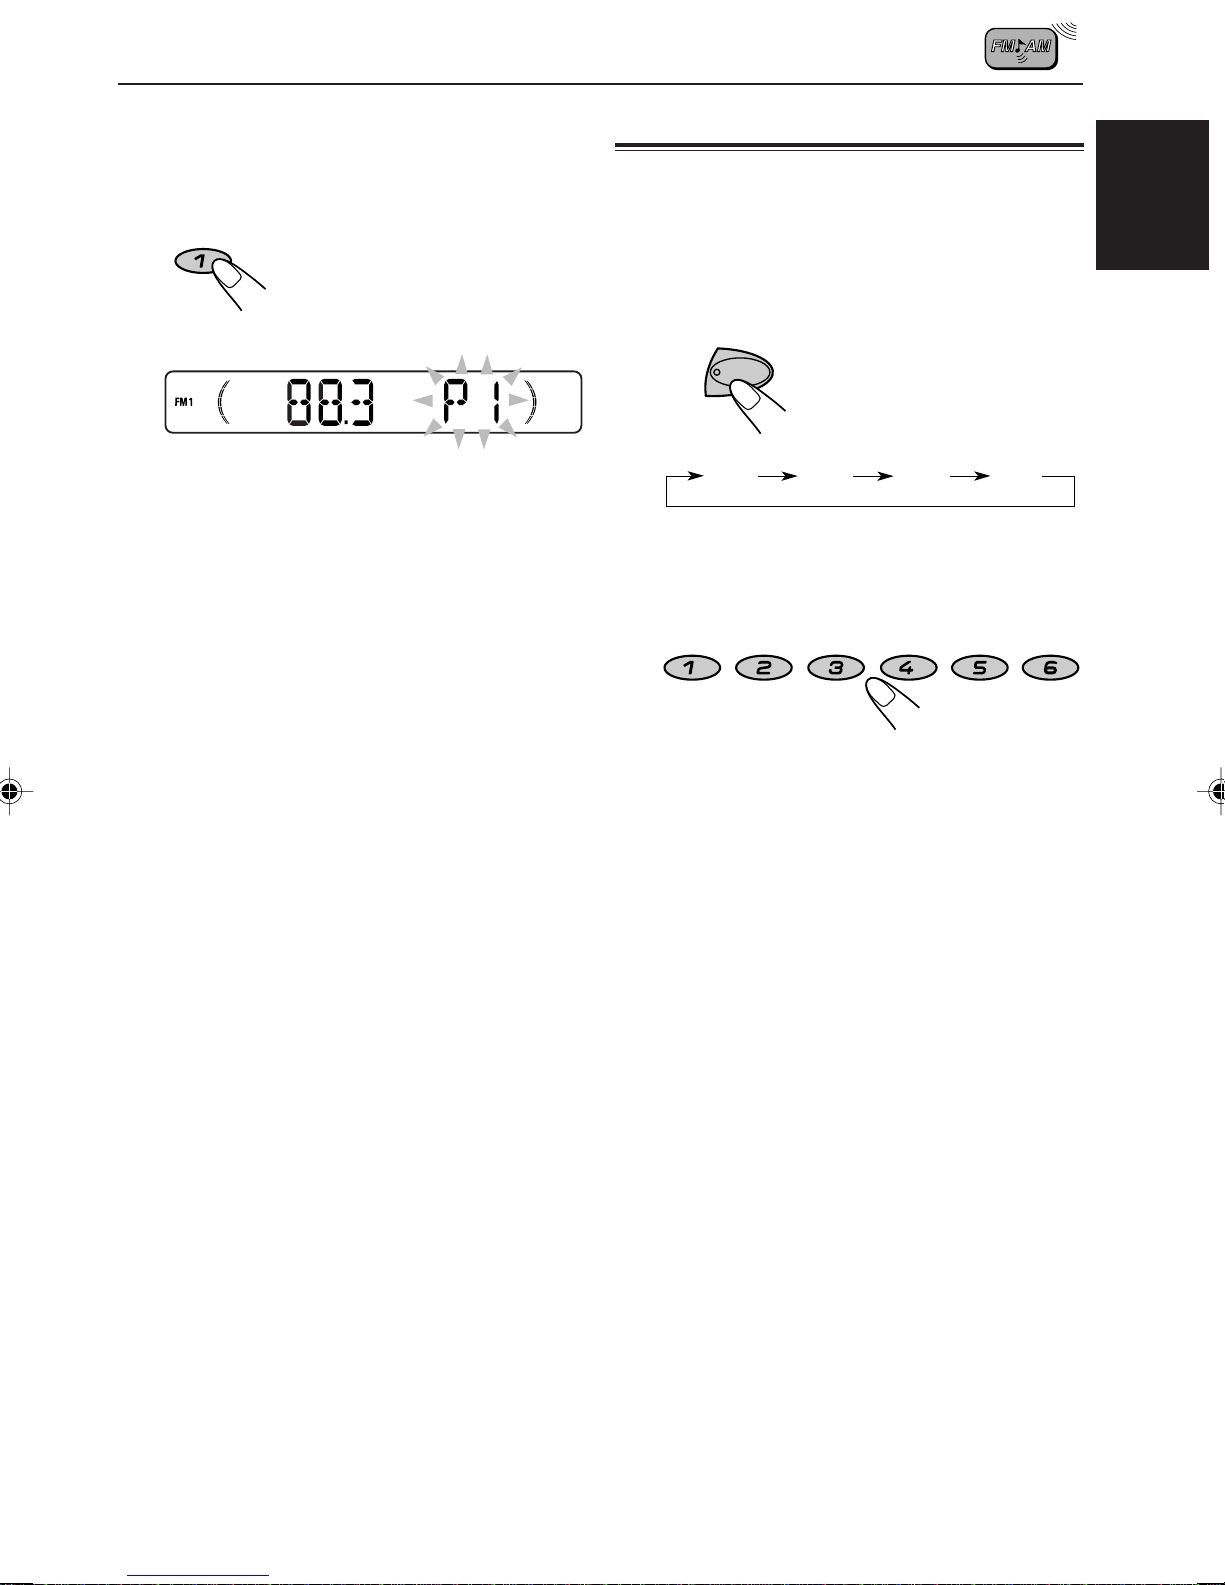
JVC KS-FX732R User manual

KS-FX772R/KS-FX732R
GET0062-001A
[E/EX]
INSTRUCTIONS
BEDIENUNGSANLEITUNG
MANUEL D’INSTRUCTIONS
GEBRUIKSAANWIJZING
CASSETTE RECEIVER
CASSETTEN-RECEIVER
RADIOCASSETTE
RADIO/CASSETTESPELER
ENGLISH
DEUTSCH
NEDERLANDS
FRANÇAIS
For installation and connections, refer to the separate manual.
Für den Einbau und die Anschlüsse siehe das eigenständige Handbuch.
Pour l’installation et les raccordements, se référer au manuel séparé.
Bijzonderheden over de installatie en aansluiting van het apparaat vindt u in de desbetreffende
handleiding.
CD CHANGER CONTROL
SEL
TP/PTY
DISP
SSM
¢
4
FM/AM
TAPE
CD-
CH
DAB
SCM
MODE
78910 11 12
RND
RPT
MO
KS-FX772R
CD CHANGER CONTROL
SEL
TP/PTY
DISP
SSM
¢
4
FM/AM
TAPE
CD-
CH
DAB
SCM
MODE
78910 11 12
RND
RPT
MO
KS-FX732R
KS-FX772R
KS-FX732R
COVERKS_FX772R[E]001A.pm5 27/12/01, 5:21 PM3

2
ENGLISH
How to reset your unit
Press and hold both the SEL (select) and (standby/on/attenuator) buttons at the same
time for several seconds.
This will reset the built-in microcomputer.
Note:
Your preset adjustments – such as preset channels or sound adjustments – will also be erased.
(standby/on/attenuator)
SEL (select)
How to use the number buttons:
If you press MODE, the unit goes into functions mode and the number buttons work as different
function buttons.
«
To use these buttons as number buttons again after pressing MODE, wait for 5 seconds
without pressing any number button until the functions mode is cleared.
• Pressing MODE again also clears the functions mode.
MODE
8 9 10 11 127
RNDRPTMO
EN02_04KSFX772R_FX732R[E]f.pm5 12/14/01, 7:52 PM2

3
ENGLISH
CONTENTS
Thank you for purchasing a JVC product.Please read all instructions carefully before operation,
to ensure your complete understanding and to obtain the best possible performance from the unit.
BEFORE USE
*
For safety....
• Do not raise the volume level too much, as this will
block outside sounds, making driving dangerous.
• Stop the car before performing any complicated
operations.
*
Temperature inside the car....
If you have parked the car for a long time in hot or
cold weather, wait until the temperature in the car
becomes normal before operating the unit.
Note:
For security reasons, a numbered ID card is provided with this unit, and the same ID number is imprinted on
the unit’s chassis. Keep the card in a safe place, as it will help the authorities to identify your unit if stolen.
How to reset your unit............................... 2
How to use the number buttons................ 2
LOCATION OF THE BUTTONS ............ 4
Control panel ........................................... 4
BASIC OPERATIONS ...................... 5
Turning on the power ................................ 5
RADIO BASIC OPERATIONS ............. 6
Listening to the radio ................................ 6
Storing stations in memory....................... 8
Tuning in to a preset station ..................... 9
RDS OPERATIONS ........................ 10
What you can do with RDS....................... 10
Other convenient RDS functions and
adjustments........................................... 14
TAPE OPERATIONS ....................... 17
Listening to a cassette.............................. 17
Finding the beginning of a tune ................ 18
Other convenient tape functions............... 18
SOUND ADJUSTMENTS .................. 20
Adjusting the sound ................................. 20
Using the sound control memory (SCM) ... 21
Storing your own sound adjustments ....... 22
OTHER MAIN FUNCTIONS ............... 23
Setting the clock ...................................... 23
Selecting the color of the display window .. 24
Changing the general settings (PSM) ...... 24
Detaching the control panel...................... 27
CD CHANGER OPERATIONS ............. 28
Playing CDs ............................................. 28
Selecting CD playback modes.................. 29
EXTERNAL COMPONENT OPERATIONS .. 30
Playing an external component ................ 30
DAB TUNER OPERATIONS ............... 31
Tuning in to an ensemble and one of the
services ................................................. 31
Storing DAB services in memory ............. 32
Tuning in to a preset DAB service ............ 33
TROUBLESHOOTING...................... 34
MAINTENANCE ............................ 36
SPECIFICATIONS .......................... 37
EN02_04KSFX772R_FX732R[E]f.pm5 12/14/01, 7:52 PM3

4
ENGLISH
CD CHANGER CONTROL
SEL
TP/PTY
DISP
SSM
¢
4
FM/AM
TAPE
CD-
CH
DAB
SCM
MODE
78910 11 12
RND
RPT
MO
wi
qo
124
3569
y
r
tue
8
;f
hkj l/
z
asd
g
p
7
LOCATION OF THE BUTTONS
Control panel
1(standby/on/attenuator) button
2TP (traffic programme)/
PTY (programme type) button
3SEL (select) button
4Display window
5Cassette compartment
60(eject) button
7CD-CH (CD changer) button
8FM/AM button
•
Also functions as DAB button.
9TAPE 23 button
p¢/4buttons
•
Also function as SSM buttons when pressed
together.
q+/– buttons
wDISP (display) button
eMO (monaural) button
rRPT (repeat) button
tRND (random) button
yNumber buttons
uMODE button
iSCM (sound control memory) button
o(control panel release) button
Display window
;SCM (sound control memory) indicator
aFM band indicator (FM1, FM2, FM3)
sMain display
dTuner reception indicators
MO (monaural), ST (stereo)
fLOUD (loudness) indicator
gRND (random) indicator
hAM band indicator
jCD-CH (CD changer) indicator
kTAPE indicator
lVolume (or audio) level indicator
/RDS indicators
AF, REG, PTY, TP
z RPT (repeat) indicator
Display window
EN02_04KSFX772R_FX732R[E]f.pm5 12/14/01, 7:52 PM4

5
ENGLISH
BASIC OPERATIONS
Turning on the power
1
Turn on the power.
Note on One-Touch Operation:
When you select a source in step 2 below, the
power automatically comes on.You do not have
to press this button to turn on the power.
2
Select the source.
To operate the tuner (FM or AM),
see pages 6 – 16.
To operate the tape,
see pages 17 – 19.
To operate the CD changer,
see pages 28 – 29.
To operate the external component,
see page 30.
To operate the DAB tuner,
see pages 31 – 33.
CD CHANGER CONTROL
SEL
TP/PTY
DISP
SSM
¢
4
FM/AM
DAB
SCM
MODE
78910 11 12
RND
RPT
MO
TAPE
CD-
CH
2
13
To increase the volume.
To decrease the volume.
FM/AM
TAPE
CD-
CH
DAB
3
Adjust the volume.
4
Adjust the sound as you want.
(See pages 20 – 22.)
To drop the volume in a moment
Press briefly while listening to any
source.“ATT” starts flashing on the display, and
the volume level will drop in a moment.
To resume the previous volume level, press the
button briefly again.
To turn off the power
Pressand hold formorethanonesecond.
Note:
When you use this unit for the first time, set the built-in
clock correctly, see page 23.
Volume level indicator
Volume level appears.
EN05_05KSFX772R_FX732R[E]f.pm5 12/14/01, 7:53 PM5

6
ENGLISH
RADIO BASIC OPERATIONS
Listening to the radio
You can use either automatic searching or manual
searching to tune in to a particular station.
Searching a station automatically:
Auto search
1
Select the band (FM1 – 3, AM).
Note:
This receiver has three FM bands (FM1, FM2,
FM3).You can use any one of them to listen to an
FM broadcast.
2
Start searching a station.
When a station is received, searching
stops.
To stop searching before a station is received,
press the same button you have pressed for
searching.
DISP
SSM
¢
4
FM/AM
DAB
SCM
MODE
78910 11 12
RND
RPT
MO
TAPE
CD-
CH
TP/PTY
CD CHANGER CONTROL
SEL
FM/AM
DAB
FM1 FM2 FM3 AM
4
¢
To search stations of higher
frequencies.
To search stations of lower
frequencies.
Selected band
appears.
EN06_09KSFX772R_FX732R[E]f.pm5 12/14/01, 7:54 PM6

7
ENGLISH
Searching a station manually:
Manual search
1
Select the band (FM1 – 3, AM).
Note:
This receiver has three FM bands (FM1, FM2,
FM3).You can use any one of them to listen to an
FM broadcast.
2
Press and hold ¢or 4until
“M (manual)” starts flashing on the
display.
3
Tunein toa station youwant while “M”
is flashing.
• If you release your finger from the button,
the manual mode will automatically turn off
after 5 seconds.
• If you hold down the button, the frequency
keeps changing (in 50 kHz intervals for FM
and 9 kHz intervals for AM – MW/LW) until
you release the button.
When an FM stereo broadcast is hard to
receive:
1Press MODE to enter the functions mode
while listening to an FM stereo broadcast.
2Press MO (monaural), while still in the
functions mode, so that the MO indicator lights
up on the display.
When the MO indicator is lit on the display, the
sound you hear becomes monaural but the
reception will be improved (the ST indicator
goes off).
To restore the stereo effect, repeat steps 1 and
2 so that the MO (monaural) indicator goes off.
FM/AM
DAB
FM1 FM2 FM3 AM
4
¢
4
¢
To tune in to stations of
lower frequencies.
To tune in to stations of
higher frequencies.
MODE
MO
Selected band appears.
EN06_09KSFX772R_FX732R[E]f.pm5 12/14/01, 7:54 PM7

8
ENGLISH
Storing stations in memory
You can use one of the following two methods to
store broadcasting stations in memory.
• Automatic preset of FM stations: SSM (Strong-
station Sequential Memory)
• Manual preset of both FM and AM stations
FM station automatic preset: SSM
You can preset6localFM stations in eachFMband
(FM1, FM2 and FM3).
1
Select the FM band (FM1 – 3) you want
to store FM stations into.
2
Press and hold both buttons for more
than 2 seconds.
Local FM stations with the strongest signals are
searched and stored automatically in the band
number you have selected (FM1, FM2 or FM3).
These stations are preset in the number buttons —
No.1(lowestfrequency)to No.6(highestfrequency).
When automatic preset is over, the station stored
in number button 1 will be automatically tuned in.
Manual preset
You can preset up to 6 stations in each band (FM1,
FM2, FM3 and AM) manually.
Ex.: Storing an FM station of 88.3 MHz into the
preset number 1 of the FM1 band
1
Select the band (FM1 – 3, AM) you
want to store stations into (in this
example, FM1).
2
Tune in to a station (in this example,
of 88.3 MHz).
FM/AM
DAB
FM1 FM2 FM3 AM
4
¢
“SSM” appears, then disappears when automatic
preset is over.
FM/AM
DAB
FM1 FM2 FM3 AM
4
¢
To tune in to stations of
lower frequencies.
To tune in to stations of
higher frequencies.
EN06_09KSFX772R_FX732R[E]f.pm5 12/14/01, 7:54 PM8

9
ENGLISH
3
Press and hold the number button (in
this example, 1) for more than 2
seconds.
4
Repeat the above procedure to store
other stations into other preset
numbers.
Notes:
• A previously preset station is erased when a new
station is stored in the same preset number.
• Preset stations are erased when the power supply to
thememorycircuit is interrupted (forexample,during
battery replacement).If this occurs,presetthestations
again.
7
“P1” flashes for a few seconds.
Tuning in to a preset station
You can easily tune in to a preset station.
Remember that you must store stations first.If you
have not stored them yet, see “Storing stations in
memory” on pages 8 and 9.
1
Select the band (FM1 – 3, AM).
2
Select the number (1 – 6) for the preset
station you want.
8 9 10 11 127
RNDRPTMO
FM/AM
DAB
FM1 FM2 FM3 AM
EN06_09KSFX772R_FX732R[E]f.pm5 12/14/01, 7:54 PM9

10
ENGLISH
RDS OPERATIONS
What you can do with RDS
RDS (Radio Data System) allows FM stations to
send an additional signal along with their regular
programme signals. For example, the stations
send their station names, as well as information
about what type of programme they broadcast,
such as sports or music, etc.
Another advantage of RDS function is called
“Enhanced Other Networks.” By using the
Enhanced Other Networks data sent from a
station, you can tune in to a different station of a
different network broadcasting your favourite
programmeor traffic announcement while listening
to another programme or to another source such
as tape.
By receiving the RDS data, this unit can do the
following:
• Tracing the same programme automatically
(Network-Tracking Reception)
• Standby Reception of TA (Traffic Announcement)
or your favourite programme
• PTY (Programme Type) search
• Programme search
• And some other functions
Tracing the same programme
automatically (Network-Tracking
Reception)
When driving in an area where FM reception is
not good, the tuner built in this unit automatically
tunes in to another RDS station, broadcasting the
same programme with stronger signals. So, you
can continue to listen to the same programme in
its finest reception, no matter where you drive.
(See illustration on page 11.)
Two types of the RDS data are used to make
Network-Tracking Reception work correctly — PI
(Programme Identification) and AF (Alternative
Frequency).
Without receiving these data correctly from the
RDS station you are listening to, Network-Tracking
Reception will not operate.
To use Network-Tracking Reception
You can select the different modes of network-
tracking reception to continue listening to the
same programme in its finest reception.
When shipped from the factory, “AF” is selected.
•AF: Network-Tracking Reception is
activated with Regionalization set
to “off.”
With this setting, the unit
switches to another station within
the same network when the
receiving signals from the current
station become weak. (In this
mode, the programme may differ
from the one currently received.)
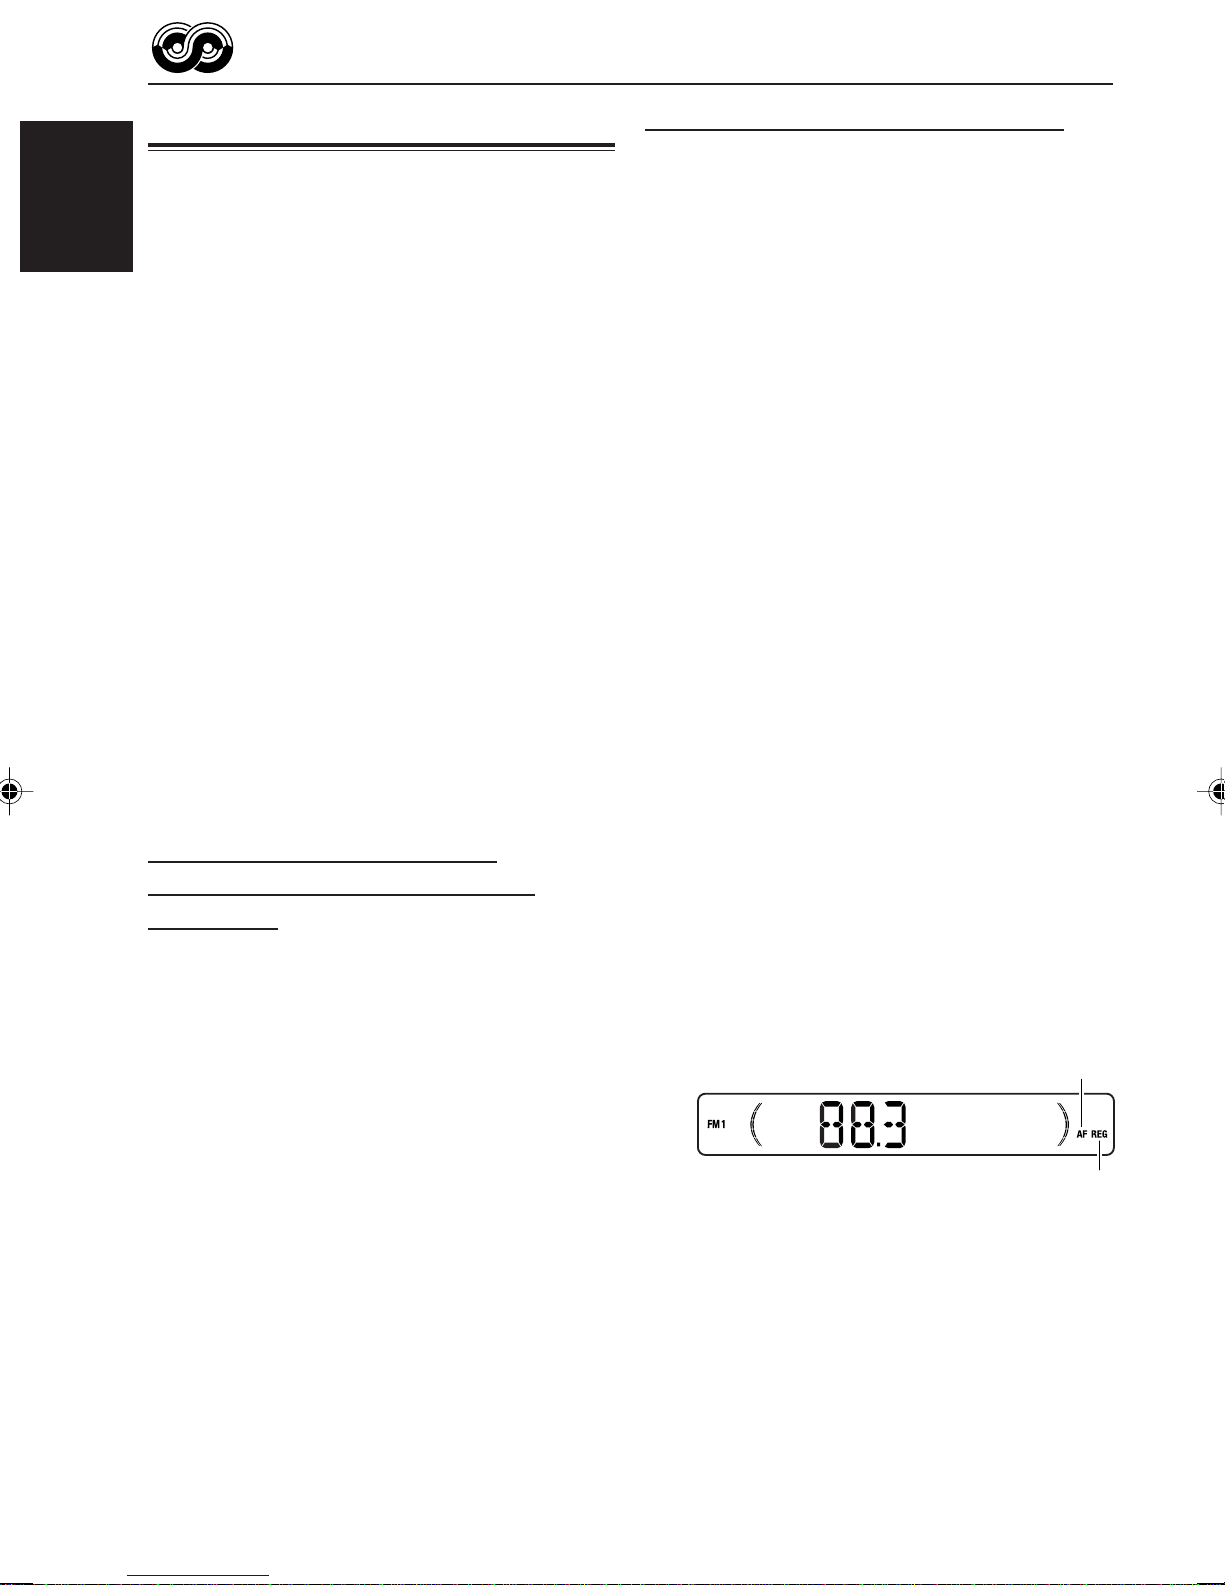
The AF indicator lights up but the
REG indicator does not.
• AF REG: Network-Tracking Reception is
activated with Regionalization set
to “on.”
With this setting, the unit
switches to another station, within
the same network, broadcasting
the same programme when the
receiving signals from the current
station become weak.
Both the AF indicator and the
REG indicator light up.
• OFF: Network-Tracking Reception is
deactivated.
Neither the AF indicator nor the
REG indicator lights up.
REG indicator
AF indicator
EN10_16KSFX772R_FX732R[E]f.pm5 12/14/01, 7:54 PM10

11
ENGLISH
Using TA Standby Reception
TA Standby Reception allows the unit to switch
temporarily to Traffic Announcement (TA) from the
current source (another FM station, tape or other
connected components).
•TA Standby Reception will not work if youarelistening
to an AM station.
Press TP/PTY to activateTA Standby Reception.
7When the current source is FM, the TP
indicator either lights up or flashes.
• If the TP indicator lights up, TA Standby
Reception is activated.
If a station starts broadcasting a traffic
announcement, “TRAFFIC” appears on the
display, and this unit automatically tunes in
to the station.The volume changes to the
preset TA volume level (see page 15) and
the traffic announcement can be heard.
•If the TP indicator flashes, TA Standby
Reception is not yet activated since the
station being received does not provide the
signals used for TA Standby Reception.
To activate TA Standby Reception, you need
to tune in to another station providing these
signals.
Press ¢or 4to search for such
a station.
When a station providing these signals is
tuned in, the TP indicator stops flashing and
remains lit. Now TA Standby Reception is
activated.
7When the current source is other than FM,
the TP indicator lights up.
If a station starts broadcasting a traffic
announcement, “TRAFFIC” appears on the
display, and this unit automatically changes
the source and tunes in to the station.
To deactivate the TA Standby Reception, press
TP/PTY again.
SEL
4
¢
1
Press and hold SEL (select) for more
than 2 seconds so that one of the
PSM items appears on the display.
(PSM: see page 25.)
2
Select “AF REG (alternative
frequency/Regionalization
reception)” if not shown on the
display.
3
Select the desired mode – “AF,”
“AF REG” or “OFF.”
4
Finish the setting.
SEL
Programme 1
broadcasting
on frequency D
Programme 1
broadcasting
on frequency C
Programme 1
broadcasting
on frequency B
Programme 1
broadcasting
on frequency A
Programme 1
broadcasting
on frequency E
The same programme can be received on
different frequencies.
TP/PTY
EN10_16KSFX772R_FX732R[E]f.pm5 12/19/01, 10:39 AM11

12
ENGLISH
Using PTY Standby Reception
PTY Standby Reception allows the unit to switch
temporarily to your favourite programme (PTY:
ProgrammeType)from thecurrentsource(another
FM station, tape or other connected components).
•PTY Standby Reception will not work if you are
listening to an AM station.
You can select your favourite programme type for
PTY Standby Reception.
When shipped from the factory, PTY Standby
Reception is turned off.(“OFF”is selected for PTY
Standby Reception.)
1
Press and hold SEL (select) for more
than 2 seconds so that one of the
PSM items appears on the display.
(PSM: see page 25.)
2
Select “PTY STBY (standby)” if not
shown on the display.
3
Select one of the twenty-nine PTY
codes. (See page 16.)
Selected code name
appears on the display
and is stored into
memory.
• To cancel the PTY
Standby Reception,
select “OFF.”
SEL
4
¢
4
Finish the setting.
SEL
7When the current source is FM, the
PTY indicator either lights up or flashes.
• If the PTY indicator lights up, PTY
Standby Reception is activated.
If a station starts broadcasting the
selected PTY programme, this unit
automatically tunes in to the station.
•If the PTY indicator flashes, PTY
Standby Reception is not yet activated
since the station being received does
not provide the signals used for PTY
Standby Reception.
To activate PTY Standby Reception,
you need to tune in to another station
providing these signals.
Press ¢or 4to search for
such a station.
When a station providing these signals
is tuned in, the PTY indicator stops
flashing and remains lit. Now PTY
Standby Reception is activated.
7When the current source is other than
FM, the PTY indicator lights up.
If a station starts broadcasting the
selected PTY programme, this unit
automatically changes the source and
tunes in to the station.
To deactivate the PTY Standby Reception,
select “OFF” in step 3 on the left column.The
PTY indicator disappears.
EN10_16KSFX772R_FX732R[E]f.pm5 12/14/01, 7:55 PM12

13
ENGLISH
Searching your favorite programme
You can search any one of the PTY codes. In
addition, you can store your 6 favorite programme
types in the number buttons.
When shipped from the factory, the following 6
programme types have been stored in the number
buttons (1 to 6).
To store your favorite programme types, see
below.
To search your favorite programme type, see
page 14.
To store your favorite programme types
1
Press and hold TP/PTY for more than
2 seconds.
2
Select one of the twenty-nine PTY
codes. (See page 16.)
Selected code name
appears on the display.
3
Press and hold the number button for
more than 2 seconds to store the PTY
code selected into the preset number
you want.
“MEMORY ” and the selected code name
alternates on the display.
4
Press and hold TP/PTY for more than
2 seconds.
8 9 10 11 127
RNDRPTMO
TP/PTY
The last selected PTY code appears.
POP M
123
ROCK M EASY M
456
CLASSICS AFFAIRS VARIED
TP/PTY
EN10_16KSFX772R_FX732R[E]f.pm5 12/14/01, 7:55 PM13

14
ENGLISH
Other convenient RDS functions
and adjustments
Automatic selection of the station
when using the number buttons
Usually when you press the number button, the
preset station is tuned in.
However, whenthepreset stationisan RDS station,
something different will happen.If the signals from
that preset station are not sufficient for good
reception, this unit, using the AF data, tunes in to
another frequency broadcasting the same
programme as the original preset station is
broadcasting. (Programme search)
• The unit takes some time to tune in to another
station using Programme search.
Toactivateprogrammesearch,followtheprocedure
below.
• See also “Changing the general settings (PSM)”
on page 24.
1Press and hold SEL (select) for more than 2
seconds so that one of the PSM items appears
on the display.
2Press ¢or 4to select
“P(Programme)-SEARCH.”
3Press + to select “ON.”
Now programme search is activated.
4Press SEL (select) to finish the setting.
To cancel programme search, repeat the
same procedure and select “OFF” in step 3 by
pressing –.
To search your favorite programme type
1
Press and hold TP/PTY for more than
2 seconds while listening to an FM
station.
2
Select one of the PTY codes.
3
Press ¢or 4to start PTY
search for your favourite programme.
TP/PTY
The last selected PTY code appears.
Ex.: When “ROCK M” is selected
8 9 10 11 127
RNDRPTMO
• If there is a station broadcasting a programme of
the same PTY code as you selected, that station
is tuned in.
• If there is no station broadcasting a programme
of the same PTY code as you selected, the
station will not change.
Note:
In some areas, the PTY search will not work correctly.
OR
EN10_16KSFX772R_FX732R[E]f.pm5 12/14/01, 7:55 PM14

15
ENGLISH
Changing the display mode while
listening to an FM station
You can change the initial indication on the display
to station name (PS NAME), station frequency
(FREQ) or clock time (CLOCK) while listening to
an FM RDS station.
• See also “Changing the general settings (PSM)”
on page 24.
1Press and hold SEL (select) for more than 2
seconds so that one of the PSM items appears
on the display.
2Press ¢or 4to select “DISPMODE
(display mode).”
3Press + or – to set to the desired indication (“PS
NAME,” “FREQ” or “CLOCK”).
4Press SEL (select) to finish the setting.
Note:
By pressing DISP (display), you can change the display
while listening to an FM RDS station.
Eachtime you press the button,the following information
appears on the display:
•Then, the display goes back to the original indication
in several seconds.
Setting the TA volume level
You can preset the volume level for TA Standby
Reception. When a traffic programme is received,
thevolumelevel automaticallychanges tothepreset
level.
• See also “Changing the general settings (PSM)”
on page 24.
1Press and hold SEL (select) for more than 2
seconds so that one of the PSM items appears
on the display.
2Press ¢or 4to select “TA VOL
(volume).”
3Press + or – to set to the desired volume.
You can set it from “VOL 00” to “VOL 50.”
4Press SEL (select) to finish the setting.
Automatic clock adjustment
When shipped from the factory, the clock built in
this unit is set to be readjusted automatically using
the CT (Clock Time) data in the RDS signal.
If you do not want to use automatic clock
adjustment, follow the procedure below.
• See also “Changing the general settings (PSM)”
on page 24.
1Press and hold SEL (select) for more than 2
seconds so that one of the PSM items appears
on the display.
2Press ¢or 4to select “AUTO ADJ
(adjustment).”
3Press – to select “OFF.”
Now automatic clock adjustment is canceled.
4Press SEL (select) to finish the setting.
To reactivate clock adjustment, repeat the same
procedure and select“ON”in step 3 by pressing +.
Note:
You must stay tuned to the same station for more than 2
minutes after setting “AUTO ADJ”to “ON.” Otherwise,
the clock time will not be adjusted. (This is because the
unit takes up to 2 minutes to capture the CT data in the
RDS signal.)
Station name
(PS NAME)
Station frequency
(FREQ)
Programme type
(PTY)
Clock time
(CLOCK)
EN10_16KSFX772R_FX732R[E]f.pm5 12/14/01, 7:55 PM15

16
ENGLISH
PTY codes
NEWS: News
AFFAIRS: Topical programmes expanding
on current news or affairs
INFO: Programmes which impart advice
on a wide variety of topics
SPORT: Sport events
EDUCATE: Educational programmes
DRAMA: Radio plays
CULTURE: Programmes on national or
regional culture
SCIENCE: Programmes on natural science
and technology
VARIED: Other programmes like comedies
or ceremonies
POP M: Pop music
ROCK M: Rock music
EASY M: Easy-listening music
LIGHT M: Light music
CLASSICS: Classical music
OTHER M: Other music
WEATHER: Weather information
FINANCE: Reports on commerce, trading,
the Stock Market, etc.
CHILDREN: Entertainment programmes for
children
SOCIAL: Programmes on social activities
RELIGION: Programmes dealing with any
aspect of belief or faith, or the
nature of existence or ethics
PHONE IN: Programmes where people can
express their views either by
phone or in a public forum
TRAVEL: Programmes about travel
destinations, package tours, and
travel ideas and opportunities
LEISURE: Programmes concerned with
recreational activities such as
gardening, cooking, fishing, etc.
JAZZ: Jazz music
COUNTRY: Country music
NATION M: Current popular music from
another nation or region, in that
country’s language
OLDIES: Classic pop music
FOLK M: Folk music
DOCUMENT: Programmes dealing with factual
matters, presented in an
investigative style
EN10_16KSFX772R_FX732R[E]f.pm5 12/14/01, 7:55 PM16

17
ENGLISH
TAPE OPERATIONS
Listening to a cassette
You can play back type 1 (normal) tapes.
1
Insert a cassette into the cassette
compartment. The unit turns on and
tape play starts
automatically.When one
side of the tape reaches
its end during play, the
other side of the tape
automatically starts
playing. (Auto Reverse)
Note on One-Touch Operation:
When a cassette is already in the cassette
compartment, select tape as the source by
pressing TAPE 23 to start tape play.
2
Select the tape direction.
Each time you press
TAPE 23, the tape
direction changes to
forward ( ) and
reverse ( ) alternately.
To stop play and eject the cassette
Press 0.
Tape play stops and the cassette automatically
ejects from the cassette compartment.The source
changes to the previously selected one.
If you change the source, tape play also stops
(without ejecting the cassette this time).
• You can eject the cassette while the unit is turned
off by pressing 0.
To fast-forward or rewind a tape
To stop fast forward or rewind at any position
on the tape, press TAPE 23.
Tape play starts from that position on the tape.
Notes:
•When one side of the tape reaches its end during
play, the other side of the tape automatically starts
playing. (Auto Reverse)
•When the tape reaches its end while fast-forwarding,
the tape direction will be changed automatically.
Press
¢for more than
1 second to fast-forward the tape.
When the tape reaches its end, the
tape is reversed and playback starts
from the beginning of the other side.
Press 4
for more than
1 second to rewind the tape.
When the tape reaches its end,
playback of the same side starts.
SEL
DISP
SSM
¢
4
FM/AM
DAB
SCM
MODE
78910 11 12
RND
RPT
MO
TAPE
CD-
CH
TP/PTY
CD CHANGER CONTROL
4
¢
TAPE
EN17_19KSFX772R_FX732R[E]f.pm5 12/14/01, 7:56 PM17

18
ENGLISH
SEL
Finding the beginning of a tune
Multi Music Scan allows you to automatically start
playback from the beginning of a specified tune.
You can specify up to 9 tunes ahead of or before
the current tune.
During playback
Specify how many tunes ahead of or
before the current tune the one you want
is located.
Each time you press the buttons, the number
changes up to ±9.
When the beginning of the specified tune is
located, playback starts automatically.
Notes:
•While locating a specified tune:
– If the tape is rewound to its beginning, playback
starts from the beginning of that side.
– If the tape is fast-forwarded to the end, it is
reversed and played from the beginning of the
other side.
•In the following cases, the Multi Music Scan
function may not operate correctly:
– Tapes with tunes having long pianissimo passages
(very quiet parts) or non-recorded portions
between tunes.
– Tapes with short non-recorded sections.
– Tapes with high level of noise or humming
between tunes.
– Tapes with tunes recorded at low recording levels.
Press 4to locate a tune
before the current tune on the
cassette.
4
¢
Press ¢to locate a tune
ahead of the current tune on the
cassette.
4
¢
Other convenient tape functions
Skipping the blank portions on the tape
You can skip blank portions between the tunes
(Blank Skip).
When this function is on, the unit skips blank
portions of 15 seconds or more, fast-forwards to
the next tune, then starts playing it.
• See also “Changing the general settings (PSM)”
on page 24.
1
Press and hold SEL (select) for more
than 2 seconds so that one of the
PSM items appears on the display.
(PSM: see page 25.)
2
Press ¢or 4to select
“B. SKIP (blank skip).”
3
Press + to select “ON.”
Now Blank Skip is
activated.
4
Finish the setting.
To cancel Blank Skip, repeat the same procedure
and select “OFF” in step 3 by pressing –.
SEL
EN17_19KSFX772R_FX732R[E]f.pm5 12/14/01, 7:56 PM18

19
ENGLISH
Playing the current tune repeatedly
You can play the current tune repeatedly (Repeat
Play).
1Press MODE to enter the functions mode
while playing a tune you want to hear over
again on a cassette.This unit enters the
functions mode.
2Press RPT (repeat), while still in the functions
mode, so that the RPT indicator lights up on
the display.
When the tune has been played, the tape is
automatically rewound to the beginning of that
tune and the same tune will be played again.
To cancel Repeat Play, repeat steps 1 and 2
again so that the RPT indicator goes off.
Note:
In the following cases, Blank Skip and Repeat Play
may not operate correctly:
– Tapes with tunes having long pianissimo passages
(very quiet parts) or non-recorded portions during
tunes.
– Tapes with short non-recorded sections.
– Tapes with high level noise or humming between
tunes.
– Tapes with tunes recorded at low recording levels.
MODE
11
RPT
Lights up when Repeat Play is turned on.
Prohibiting cassette ejection
You can prohibit cassette ejection and “lock” a
cassette in the cassette compartment.
Press and hold TAPE 23 and 0(eject) for more
than 2 seconds.
“NO EJECT” flashes on the display for about 5
seconds, and the cassette is “locked.”
To cancel the prohibition and “unlock” the
cassette, press and hold TAPE 23 and 0(eject)
for more than 2 seconds again.
“EJECT OK” flashes for about 5 seconds, and this
time the cassette is “unlocked.”
Note:
If you press 0while cassette ejection is prohibited,
the cassette will not be ejected.
TAPE
EN17_19KSFX772R_FX732R[E]f.pm5 12/14/01, 7:56 PM19

20
ENGLISH
1
Select the item you want to adjust.
Each time you press the
button, the adjustable items
change as follows:
Indication To do: Range
BAS Adjust the bass. –06 (min.)
|
+06 (max.)
TRE Adjust the treble. –06 (min.)
|
+06 (max.)
FAD* Adjust the front R06 (Rear only)
and rear speaker |
balance. F06 (Front only)
BAL Adjust the left L06 (Left only)
and right speaker |
balance. R06 (Right only)
LOUD Boost low and high
frequencies to
produce a well-
balanced sound
at low volume
level.
VOL Adjust the volume. 00 (min.)
|
50 (max.)
*If you are using a two-speaker system, set the fader
level to “00.”
SOUND ADJUSTMENTS
Adjusting the sound
You can adjust the sound characteristics to your
preference.
2
Adjust the level.
Note:
Normally, the +/– buttons work as the volume control.
So you do not have to select “VOL” to adjust the
volume level.
VOL
(volume)
LOUD
(loudness)
BAS
(bass)
TRE
(treble)
FAD
(fader)
BAL
(balance)
LOUD ON
|
LOUD OFF
SEL
To decrease the level.
To increase the level.
EN20_22KSFX772R_FX732R[E]f.pm5 12/14/01, 7:57 PM20
This manual suits for next models
2
Table of contents
Other JVC Car Receiver manuals

JVC
JVC KD-APD38 User manual

JVC
JVC FX-335TN User manual

JVC
JVC KD-AR5500 User manual

JVC
JVC KS-F525 User manual

JVC
JVC GET0669-001A User manual

JVC
JVC EXAD KD-LHX502 User manual

JVC
JVC KD-DV7302 User manual

JVC
JVC KD-APD49 - CD/AM/FM/MP3/WMA Receiver User manual

JVC
JVC KS-FX722R User manual

JVC
JVC KW-AV71BT Guide