manuals.online logo
Brands
  1. Home
  2. •
  3. Brands
  4. •
  5. JVC
  6. •
  7. Car Receiver
  8. •
  9. JVC KW-XC406 Guide

JVC KW-XC406 Guide

KW-XC406/KW-XC405
Installation/Connection Manual
Manual Pemasangan/Penyambungan
GET0327-010A
[UN]
0406DTSMDTJEIN
EN, IN
ENGLISH
This unit is designed to operate on 12 V DC, NEGATIVE ground electrical systems. If your
vehicle does not have this system, a voltage inverter is required, which can be purchased at
JVC car audio dealers.
Parts list for installation and connection
The following parts are provided for this unit. If any item is missing, consult your JVC car
audio dealer immediately.
TROUBLESHOOTING
• The fuse blows.
* Are the red and black leads connected correctly?
•Power cannot be turned on.
* Is the yellow lead connected?
•No sound from the speakers.
* Is the speaker output lead short-circuited?
•Sound is distorted.
* Is the speaker output lead grounded?
* Are the “–” terminals of L and R speakers grounded in common?
•Noise interfere with sounds.
* Is the rear ground terminal connected to the car’s chassis using shorter and thicker cords?
•Unit becomes hot.
* Is the speaker output lead grounded?
* Are the “–” terminals of L and R speakers grounded in common?
•This unit does not work at all.
* Have you reset your unit?
1
INDONESIA
Alat penerima ini didisain untuk beroperasi hanya pada 12 V DC, sistem listrik tanah
NEGATIVE.Jika kendaraan anda tidak memiliki sistem ini, sebuah pembalik tegangan
diperlukan, yang mana dapat dibeli di penyalur-penyalur audio mobil JVC.
Battery
Baterai
Remote controller
Pengontrol jauh
Binding screws (M5 ×8 mm)
Sekerup jepit (M5 ×8 mm)
Power cord
Kabel power
Daftar bagian-bagian untuk pemasangan dan penyambungan
Bagian-bagian berikut disediakan untuk alat penerima ini. Jika ada item yang hilang, segera
hubungi dealer audio mobil JVC anda.
© 2006 Victor Company of Japan, Limited
PEMECAHAN MASALAH
•Sekring meledak.
*Apakah ujung-ujung merah dan hitam tersambung dengan benar?
•Power tidak dapat dihidupkan.
*Apakah ujung kuning sudah tersambung?
•Tidak ada suara dari speaker.
*Apakah ujung keluaran speaker terhubung pendek?
•Suara terdistorsi.
*Apakah ujung keluaran speaker sudah ditanahkan?
*Apakah terminal-terminal “–” dari speaker-speaker L dan R sudah ditanahkan secara umum?
•Berisik yang mengganggu suara-suara.
*Apakah terminal tanahan belakang tersambung ke casis mobil menggunakan kabel-kabel
terpendek dan tertebal?
•Alat penerima menjadi panas.
*Apakah ujung keluaran speaker sudah ditanahkan?
*Apakah terminal-terminal “–” dari speaker-speaker L dan R sudah ditanahkan secara umum?
•Alat penerima ini tidak bekerja secara keseluruhan.
*Apakah anda sudah reset (memasang kembali) alat penerima anda?
PRECAUTIONS on power supply and speaker connections:
•DO NOT connect the speaker leads of the power cord to the car battery; otherwise,
the receiver will be seriously damaged.
•BEFORE connecting the speaker leads of the power cord to the speakers, check the
speaker wiring in your car.
TINDAKAN-TINDAKAN PENCEGAHAN pada suplai power dan
sambungan-sambungan speaker:
• JANGAN sambungkan ujung-ujung speaker dari kabel power ke baterai mobil;
sebaliknya, alat penerima tersebut akan secara serius rusak.
•SEBELUM menyambung ujung-ujung speaker dari kabel power ke speaker-speaker, cek
perkabelan speaker dalam mobil anda.
When installating the unit in a Nissan car
Apabila memasang unit dalam mobil Nissan
Fix the supplied plate as illustrated.
Pasang pelat yang tersedia seperti digambarkan.
Plate for use with a Nissan car
Pelat untuk digunakan dengan mobil Nissan
Plate for use with a Nissan car
Pelat untuk digunakan dengan mobil
Nissan
Flat countersunk screws (M5 ×8 mm)
Sekerup benaman datar (M5 ×8 mm)
Install1-2_KW-XC406_5[UN]1.indd 1Install1-2_KW-XC406_5[UN]1.indd 1 3/29/06 12:26:01 PM3/29/06 12:26:01 PM
2
INSTALLATION (IN-DASH MOUNTING)
The following illustration shows a typical installation. However, you should make adjustments
corresponding to your specific car. In this case consult the manual included with the installation
kit (option).
In some case, depending of the type and the model of your car, it is not possible to install the
unit into the center console.
If you have any questions or require information regarding installation kits, consult your JVC car
audio dealer or a company supplying kits.
• If you are not sure how to install this unit correctly, have it installed by a qualified technician.
Before installing the unit
• When mounting the unit, be sure to use the screws provided, as instructed. If other screws are
used, there is a possibility that parts could become loose or damaged.
•When tightening screws or bolts be careful not to pinch any connection cord.
1Remove the audio system originally installed together with the mounting brackets.
Note: Be sure to keep all the screws and parts removed from your car for future use.
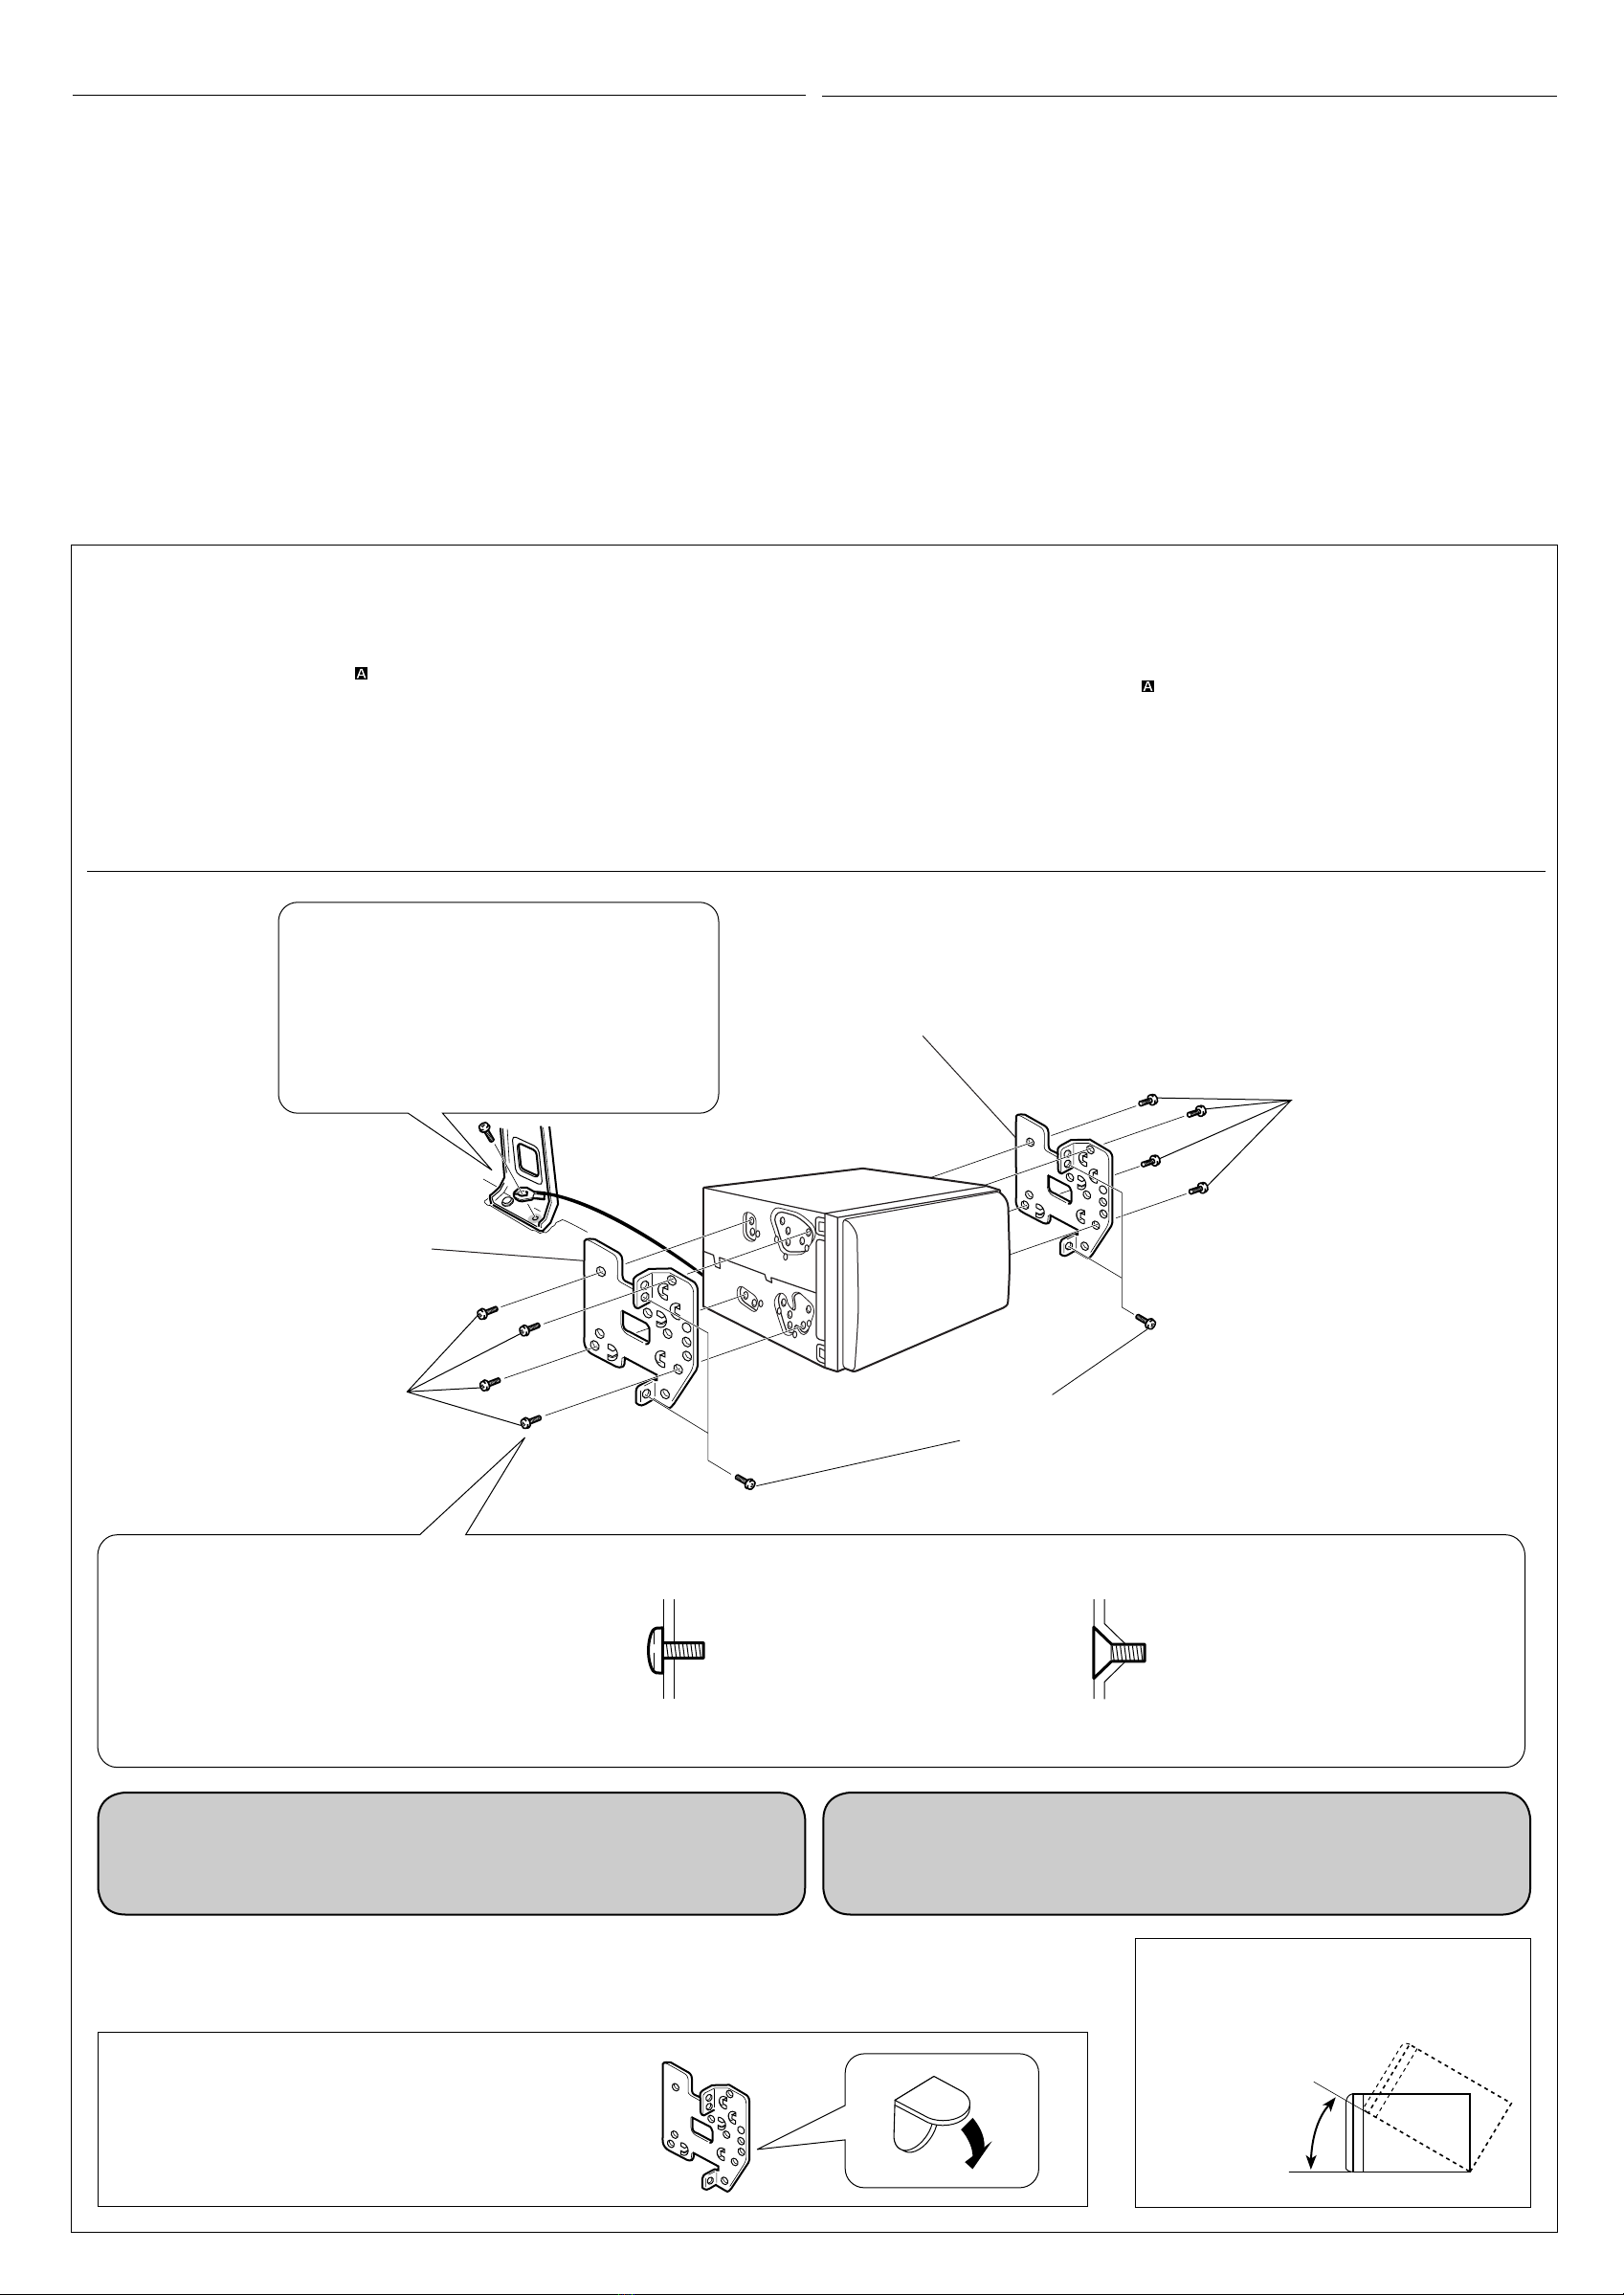
2Attach the mounting brackets (removed from the car), to this unit (see below).
3Connect the wires (see diagram ).
4Fix this unit to the car using the screws removed in step 1.
•See “Caution”below.
The following example shown is for installation in a Toyota. For more details, consult
your JVC car audio dealer.
Securely connect the ground wire to the metal body
of the car using the screw originally fixed to the
metal body of the car.
Hubungkan kawat ground dengan kencang ke bodi
logam mobil dengan menggunakan sekerup yang
tadinya dipasang ke bodi logam mobil.
Mounting bracket removed from the car
Braket montasi dilepaskan dari mobil
Screws supplied for this unit
Sekerup disediakan untuk unit ini
Mounting bracket removed from the car
Braket montasi dilepaskan dari mobil
Screws supplied for this unit
Sekerup disediakan untuk unit ini Screw removed from the car in step 1
Sekerup yang dilepaskan dari mobil pada langkah 1
Install the unit at an angle of less than 30°.
Pasang penerima pada suatu sudut kurang
dari 30˚.
Less than 30˚
Kurang dari 30˚
If there is an interfering tab on the mounting bracket, bent it flat.
Jika ada tonjolan yang mengganggu braket pemasangan, tekuk
sehingga rata.
PEMASANGAN (BINGKAI-DALAM DASH)
Ilustrasi berikut menunjukkan sebuah tipe pemasangan. Namun, Anda harus melakukan
penyetelan yang sesuai pada mobil tertentu. Dalam hal ini, lihat buku petunjuk yang disertakan
dengan kit instalasi (opsional).
Dalam beberapa kasus, tergantung pada jenis dan model mobil, tidaklah dimungkinkan untuk
menginstal unit ke konsol tengah.
Jika anda mempunyai suatu pertanyaan atau informasi yang diperlukan mengenai alat-alat
pemasangan, konsultasikan pada penyalur audio mobil JVC atau sebuah perusahaan yang
mensuplai alat-alat.
•Jika anda tidak yakin bagaimana memasang alat penerima ini dengan benar, biarkan
dipasang dengan teknisi yang berkualitas.
Sebelum memasang unit
•Apabila memasang unit, pastikan Anda menggunakan sekrup yang tersedia sebagaimana
yang diinstruksikan. Jika menggunakan sekerup yang lain, ada kemungkinan bagian itu
menjadi longgar atau rusak.
•Sewaktu mengencangkan sekrup atau baut, hati-hati, jangan sampai menjepit kabel
sambungan yang manapun.
1Lepaskan sistem audio yang semula diinstal bersama dengan pemasangan braket.
Catatan: Pastikan Anda menyimpan semua sekerup dan komponen yang dilepaskan dari
mobil untuk penggunaan nantinya.
2Pasangkan braket montasi (yang dilepaskan dari mobil) ke unit ini (lihat di bawah).
3Hubungkan kabel kawat (lihat diagram ).
4Pasang unit ini ke mobil dengan menggunakan sekerup yang dilepaskan pada langkah 1.
•Lihat “Awas”di bawah.
Berikut adalah contoh pemasangan pada mobil Toyota. Untuk rincian lebih lanjut,
tanyakan kepada penyalur audio mobil JVC.
Caution:
To install the mounting brackets to the unit, use only the supplied screws (M5 x 8 mm).
If you use any screw longer than 8 mm, the unit can be damaged.
Awas:
Untuk menginstal braket pemasangan ke unit, gunakan hanya sekerup yang disediakan
(M5 x 8 mm).
Jika Anda menggunakan sekerup yang lebih panjang dari 8 mm, unit bisa rusak.
Screws supplied for this unit:
Sekerup disediakan untuk unit ini:
Select the proper screw type, fitting to your car.
Pilih tipe sekerup yang sesuai, pasangkan ke mobil Anda.
Binding screws (M5 ×8 mm)
Sekerup jepit (M5 ×8 mm)
Flat countersunk screws (M5 ×8 mm)
Sekerup benaman datar (M5 ×8 mm)
Install1-2_KW-XC406_5[UN]f.indd 2Install1-2_KW-XC406_5[UN]f.indd 2 3/30/06 5:49:09 PM3/30/06 5:49:09 PM
3
ENGLISH INDONESIA
ATypical Connections / Ciri khas sambungan-sambungan
Before connecting: Check the wiring in the vehicle carefully. Incorrect connection may cause
serious damage to this unit.
1Connect the colored leads of the power cord in the order specified in the illustration below.
2Connect the antenna cord.
3Finally connect the wiring harness to the unit.
Sebelum penyambungan: Cek perkabelan dalam mobil dengan hati-hati. Penyambungan
yang tidak benar mungkin menyebabkan kerusakan serius pada alat penerima.
1Sambungkan ujung berwarna dari kabel power dalam urutan spesifikasi pada ilustrasi di
bawah.
2Sambungkan kabel antena.
3Akhirnya sambungkan dudukan kabel ke alat penerima.
2
1
3
To external components
(see diagram )
Ke komponent eksternal
(lihat diagram )
15 A fuse
Sekring 15 A
Line out (see diagram )
Keluaran (lihat diagram )
Black
Hitam
Yellow*2
Kuning*2
Red
Merah
Orange with white stripe
Oranye dengan strip putih
Blue with white stripe
Biru dengan strip putih
Blue
Biru
*1Not included for this unit.
*1Tidak disediakan untuk alat
penerima.
To metallic body or chassis of the car
Ke besi bodi atau casis dari mobil tersebut
To a live terminal in the fuse block connecting to the car battery
(bypassing the ignition switch) (constant 12 V)
Ke sebuah tempat terminal dalam blok sekring disambungkan ke
baterai mobil (abaikan saklar kontak) (konstant 12 V)
To an accessory terminal in the fuse block
Ke sebuah terminal aksesoris dalam blok sekring
To the automatic antenna if any (250 mA max.)
Ke antena otomatis jika ada (maksimum 250 mA)
*2Before checking the operation of this unit prior
to installation, this lead must be connected,
otherwise power cannot be turned on.
*2Sebelum pengecekan pengoperasian dari alat
penerima ini sebelum pemasangan, ujung ini
harus sudah dihubungkan, selain itu power
tidak dapat dihidupkan.
Right speaker (rear)
Speaker kanan (belakang)
Left speaker (rear)
Speaker kiri (belakang)
Right speaker (front)
Speaker kanan (depan)
Left speaker (front)
Speaker kiri (depan)
White with black stripe
Putih dengan strip
hitam
White
Putih
Gray with black stripe
Abu-abu dengan strip
hitam
Gray
Abu-abu
Green with black stripe
Hijau dengan strip hitam
Green
Hijau
Purple with black stripe
Ungu dengan strip hitam
Purple
Ungu
To the remote lead of other equipment (200 mA max.)
Ke ujung jauh dari peralatan lain (maksimum 200 mA)
To car light control switch
Ke saklar kontrol lampu mobil
Ignition switch
Saklar kontak
Fuse block
Blok sekring
ELECTRICAL CONNECTIONS
To prevent short circuits, we recommend that you disconnect the battery’s negative terminal and
make all electrical connections before installing the unit.
• Be sure to ground this unit to the car’s chassis again after installation.
Notes:
• Replace the fuse with one of the specified rating. If the fuse blows frequently, consult your
JVC car audio dealer.
•If noise is a problem...
This unit incorporates a noise filter in the power circuit. However, with some vehicles, clicking
or other unwanted noise may occur. If this happens, connect the unit’s rear ground terminal
(see connection diagram) to the car’s chassis using shorter and thicker cords, such as copper
braiding or gauge wire. If noise still persists, consult your JVC car audio dealer.
•It is recommended to connect to the speakers with maximum power of more than 50 W (both
at the rear and at the front, with an impedance of 4Ωto 8 Ω). If the maximum power is less
than 50 W, change “AMP GAIN”setting to prevent the speakers from being damaged (see
page 21 of the INSTRUCTIONS).
•The heat sink becomes very hot after use. Be careful not to touch it when removing this unit.
SAMBUNGAN-SAMBUNGAN LISTRIK
Untuk mencegah hubungan pendek, kami menyarankan anda memutuskan sambungan terminal
negatif baterai dan membuat semua sambungan-sambungan listrik sebelum memasang alat
penerima.
•Pastikan untuk mentanahkan alat penerima ini ke casis mobil kembali setelah
pemasangan.
Catatan:
•Ganti sekring dengan voltase yang sudah ditetapkan. Jika sekring sering meledak,
konsultasikan pada penyalur audio mobil JVC anda.
•Jika ada masalah suara desis...
Unit ini dilengkapi dengan filter desis dalam sirkuit daya. Namun, pada beberapa kendaraan,
mungkin ada bunyi klik atau suara desis yang tidak diinginkan. Jika ini terjadi, hubungkan
terminal tanah belakang unit (lihat diagram sambungan) ke casis mobil dengan
menggunakan kabel yang lebih pendek dan lebih tebal, seperti kabel lilitan tembaga atau
kabel kawat gauge. Jika suara desis masih timbul, tanyakan kepada dealer audio mobil JVC
Anda.
•Disarankan untuk menghubungkan speaker-speaker dengan maksimum power lebih dari
50 W (keduanya di belakang dan di depan, dengan sebuah impedansi 4 Ωsampai 8 Ω).
Jika maksimum power kurang dari 50 W, ganti pengaturan “AMP GAIN” (“PENGUATAN
PENGUAT”) untuk mencegah speaker-speaker dari kerusakan (lihat halaman 21 dari BUKU
PETUNJUK).
•Pendingin menjadi sangat panas setelah digunakan. Hati-hati untuk tidak menyentuhnya
ketika memindahkan alat penerima ini.
Heat sink
Pendingin
Rear view
Tampak Samping Belakang
Install3-4_KW-XC406_5[UN]f.indd 3Install3-4_KW-XC406_5[UN]f.indd 3 3/30/06 5:50:48 PM3/30/06 5:50:48 PM
4
Connecting the external amplifiers / Penyambungan penguat eksternal
B
You can connect amplifiers to upgrade your car stereo system.
• Connect the remote lead (blue with white stripe) to the remote lead of the other equipment
so that it can be controlled through this unit.
• Disconnect the speakers from this unit, connect them to the amplifier. Leave the
speaker leads of this unit unused.
Anda dapat menyambungkan penguat untuk meningkatkan sistem stereo mobil anda.
•Sambungkan ujung jauh (biru dengan strip putih) ke ujung jauh dari peralatan lain sehingga
dapat dikontrol melalui alat penerima ini.
•Putuskan sambungan speaker-speaker dari alat penerima ini, sambungkan ini ke
penguat. Biarkan ujung speaker dari alat penerima ini tidak digunakan.
Connecting the external components / Menyambung komponen eksternal
C
CD Changer / CD changer
Remote lead
Ujung jauh
Y-connector (not supplied with this unit)
Konektor Y (tidak disediakan untuk alat penerima ini)
To the remote lead of other equipment or automatic antenna if any
Ke ujung jauh dari peralatan lain atau antena otomatis jika ada
JVC Amplifier
Penguat JVC
Remote lead (Blue with white stripe)
Ujung jauh (Biru dengan strip putih)
Front speakers
Speaker-speaker
depan
*5Connecting cord supplied for your CD changer
*5Kabel penghubung disediakan untuk CD changer anda
CAUTION / PERINGATAN:
•Before connecting the external components, make sure the unit is turned off.
•Sebelum menyambungkan komponen eksternal, pastikan bahwa alat penerima
sudah dimatikan.
3.5 mm stereo mini plug
Steker mini stereo 3.5 mm
CD changer jack
Konektor CD changer
*4Firmly attach the ground wire to the metallic body or to
the chassis of the car—to the place uncoated with paint
(if coated with paint, remove the paint before attaching
the wire). Failure to do so may cause damage to the unit.
*4Pasangkan dengan kuat kabel tanah ke bodi besi atau
ke casis dari mobil—pada tempat yang tidak dilapisi
cat (jika dilapisi cat, hilangkan cat sebelum memasang
kabel). Kegagalan melakukan ini mungkin menyebabkan
kerusakan pada alat penerima tersebut.
*3Signal cord (not supplied for this unit)
*3Kabel sinyal (tidak disediakan untuk alat penerima ini)
JVC Amplifier
Penguat JVC
Rear speakers
Speaker-speaker
belakang
Front speakers
Speaker-speaker depan
Apple iPod®or JVC D. player / Apple iPod®atau JVC D. player
• Set “CHANGER” for the external input setting (See page 21 of the INSTRUCTIONS.) / Aturlah “CHANGER” untuk pengaturan input eksternal (Lihat halaman 21 dari BUKU PETUNJUK.)
Apple iPod (separately purchased)
Apple iPod (dibeli terpisah)
• Set “EXT INPUT”for the external input setting (See page 21 of the INSTRUCTIONS.) / Aturlah “EXT INPUT”untuk pengaturan input eksternal (Lihat halaman 21 dari BUKU PETUNJUK.)
Other external component / Komponen eksternal lainnya
You can connect an iPod or a D. player using an interface adapter (not supplied)—KS-PD100 (for
iPod) or KS-PD500 (for D. player).
Anda dapat menghubungkan iPod atau D. player dengan menggunakan adaptor antarmuka (tidak
disediakan)—KS-PD100 (untuk iPod) atau KS-PD500 (untuk D. player).
External component
Komponen eksternal
You can connect an external component using a line input adapter, KS-U57 or KS-U58 (not supplied).
Anda dapat menghubungkan komponen eksternal dengan menggunakan adaptor line input, KS-U57 or KS-U58 (tidak disediakan).
JVC CD changer
CD changer JVC
CD changer jack
Konektor CD
changer
CD changer jack
Konektor CD
changer
*6Signal cord (not supplied for this unit)
*6Kabel sinyal (tidak disediakan untuk alat penerima ini)
JVC D. player (separately purchased)
JVC D. player (dibeli terpisah)
iPod is a trademark of Apple Computer, Inc.,
registered in the U.S. and other countries.
iPod adalah merek dagang dari Apple
Computer, Inc., terdaftar di Amerika Serikat
dan di negara-negara lain.
External component
Komponen eksternal
Install3-4_KW-XC406_5[UN]f.indd 4Install3-4_KW-XC406_5[UN]f.indd 4 3/31/06 2:54:56 PM3/31/06 2:54:56 PM

Other manuals for KW-XC406

1

This manual suits for next models

1

Other JVC Car Receiver manuals

JVC EXAD KD-SHX851 User manual

JVC

JVC EXAD KD-SHX851 User manual

JVC KW-AVX730 User manual

JVC

JVC KW-AVX730 User manual

JVC KD-AVX1 Guide

JVC

JVC KD-AVX1 Guide

JVC KD-R616 Guide

JVC

JVC KD-R616 Guide

JVC KD-R521 Guide

JVC

JVC KD-R521 Guide

JVC KD-G120 - Radio / CD Player User manual

JVC

JVC KD-G120 - Radio / CD Player User manual

JVC KD-G425 User manual

JVC

JVC KD-G425 User manual

JVC CD Receiver KD-G632 User manual

JVC

JVC CD Receiver KD-G632 User manual

JVC KD-LH300UC User manual

JVC

JVC KD-LH300UC User manual

JVC KD-SH9101 User manual

JVC

JVC KD-SH9101 User manual

JVC KD-S743R User manual

JVC

JVC KD-S743R User manual

JVC KD-AR270 - Radio / CD User manual

JVC

JVC KD-AR270 - Radio / CD User manual

JVC KD-SH9101 User manual

JVC

JVC KD-SH9101 User manual

JVC KD-R680S User manual

JVC

JVC KD-R680S User manual

JVC KD-SHX705 User manual

JVC

JVC KD-SHX705 User manual

JVC KW-R910BT User manual

JVC

JVC KW-R910BT User manual

JVC Arsenal KD-AHD39 User manual

JVC

JVC Arsenal KD-AHD39 User manual

JVC KD-S71R User manual

JVC

JVC KD-S71R User manual

JVC KD-S100 - CD Receiver Guide

JVC

JVC KD-S100 - CD Receiver Guide

JVC KW-NSX1 Guide

JVC

JVC KW-NSX1 Guide

JVC KD-DB56 User manual

JVC

JVC KD-DB56 User manual

JVC EXAD KD-NX901 User manual

JVC

JVC EXAD KD-NX901 User manual

JVC KW-AVX716 User manual

JVC

JVC KW-AVX716 User manual

JVC KD-G724 Guide

JVC

JVC KD-G724 Guide

Popular Car Receiver manuals by other brands

Dual XDMR7700 Installation & owner's manual

Dual

Dual XDMR7700 Installation & owner's manual

Farenheit DVD-22T owner's manual

Farenheit

Farenheit DVD-22T owner's manual

Pioneer DEH-P600UB - Premier Radio / CD quick start guide

Pioneer

Pioneer DEH-P600UB - Premier Radio / CD quick start guide

Panasonic CQ-D1703N operating instructions

Panasonic

Panasonic CQ-D1703N operating instructions

Pioneer DEH-P550MP installation manual

Pioneer

Pioneer DEH-P550MP installation manual

Boss Audio Systems 634U user manual

Boss Audio Systems

Boss Audio Systems 634U user manual

LG LAC2900RNP manual

LG

LG LAC2900RNP manual

Dual Electronics Corporation DCPA901 Installation & owner's manual

Dual Electronics Corporation

Dual Electronics Corporation DCPA901 Installation & owner's manual

ESX Vision Naviceiver VNS720 FI-DUCATO installation guide

ESX

ESX Vision Naviceiver VNS720 FI-DUCATO installation guide

Dual XDVDN8190 Installation & owner's manual

Dual

Dual XDVDN8190 Installation & owner's manual

Rockford Fosgate RFX9700CD instruction manual

Rockford Fosgate

Rockford Fosgate RFX9700CD instruction manual

Kenwood Z910DVD[K] instruction manual

Kenwood

Kenwood Z910DVD[K] instruction manual

Kenwood KDC-419/X459 Service manual

Kenwood

Kenwood KDC-419/X459 Service manual

Kenwood DDX6023BT instruction manual

Kenwood

Kenwood DDX6023BT instruction manual

DP Audio Video DP316 manual

DP Audio Video

DP Audio Video DP316 manual

Bogen CDR1 user manual

Bogen

Bogen CDR1 user manual

Marantz Melody Media M-CR603 Service manual

Marantz

Marantz Melody Media M-CR603 Service manual

Kenwood KDC-BT8041U instruction manual

Kenwood

Kenwood KDC-BT8041U instruction manual

manuals.online logo
manuals.online logoBrands
  • About & Mission
  • Contact us
  • Privacy Policy
  • Terms and Conditions

Copyright 2025 Manuals.Online. All Rights Reserved.