JVC KW-XG506S User manual

ENGLISH
INDONESIA
CD RECEIVER KW-XG506S
ALAT PENERIMA CD KW-XG506S
For canceling the display demonstration, see page 4.
Untuk membatalkan tampilan demonstrasi, lihat halaman 4.
INSTRUCTIONS
BUKU PETUNJUK
GET0539-001A
[UN]
Cover_XG506S_001A_1.indd 1Cover_XG506S_001A_1.indd 1 8/22/07 12:53:08 PM8/22/07 12:53:08 PM

ENGLISH
2
Please read all instructions carefully before operation, to ensure your complete understanding and to obtain the best
possible performance from the unit.
IMPORTANT FOR LASER PRODUCTS
1. CLASS 1 LASER PRO UCT
2. CAUTION: o not open the top cover. There are no user serviceable parts inside the unit; leave all servicing to
qualified service personnel.
3. CAUTION: Visible and/or invisible class 1M laser radiation when open. o not view directly with optical
instruments.
4. REPRO UCTION OF LABEL: CAUTION LABEL, PLACE OUTSI E THE UNIT.
[European Union only]
For safety...
• o not raise the volume level too much, as this will
block outside sounds, making driving dangerous.
• Stop the car before performing any complicated
operations.
Temperature inside t e car...
If you have parked the car for a long time in hot or cold
weather, wait until the temperature in the car becomes
normal before operating the unit.
Warning:
If you need to operate the unit while driving, be sure to
look around carefully or you may be involved in a traffic
accident.
EN02-07_XG506S_001A_1.indd 2EN02-07_XG506S_001A_1.indd 2 8/22/07 12:51:47 PM8/22/07 12:51:47 PM

ENGLISH
3
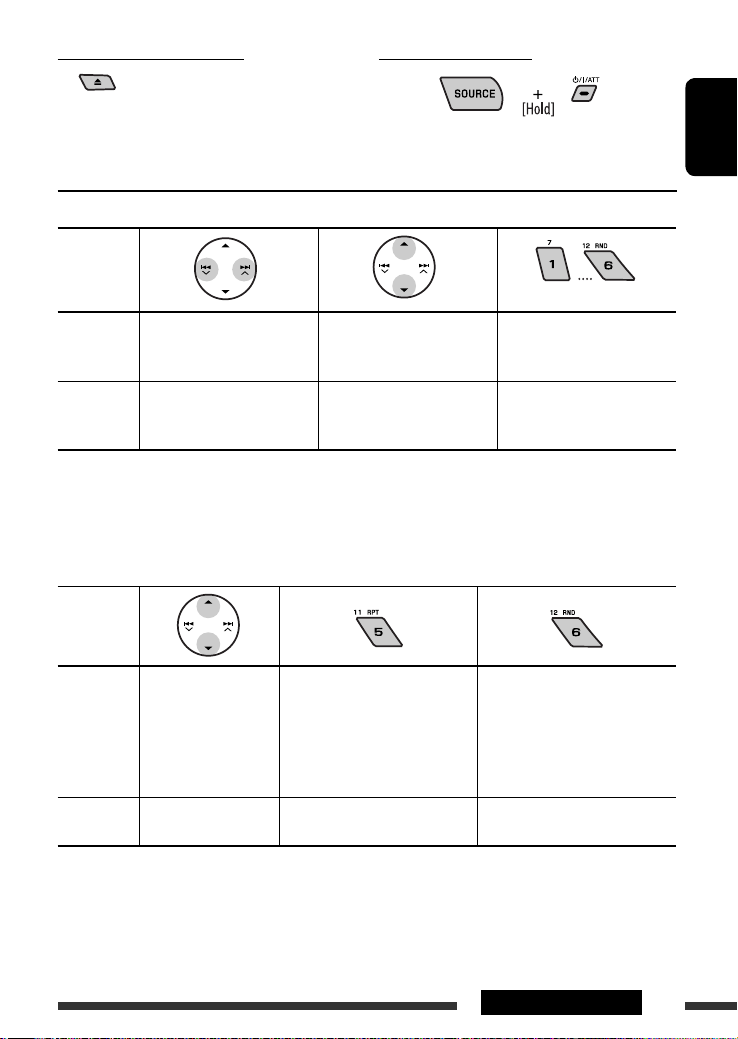
How to reset your unit
• Your preset adjustments will also be erased.
How to forcibly eject a disc
• Be careful not to drop the disc when it ejects.
• If this does not work, reset your unit.
How to use t e MODE button
If you press MO E, the unit goes into functions
mode, then the number buttons and 5/∞ buttons
work as different function buttons.
[Within 5 seconds...]
CONTENTS
INTRODUCTIONS
Preparation ...................................... 4
OPERATIONS
Basic operations ................................ 5
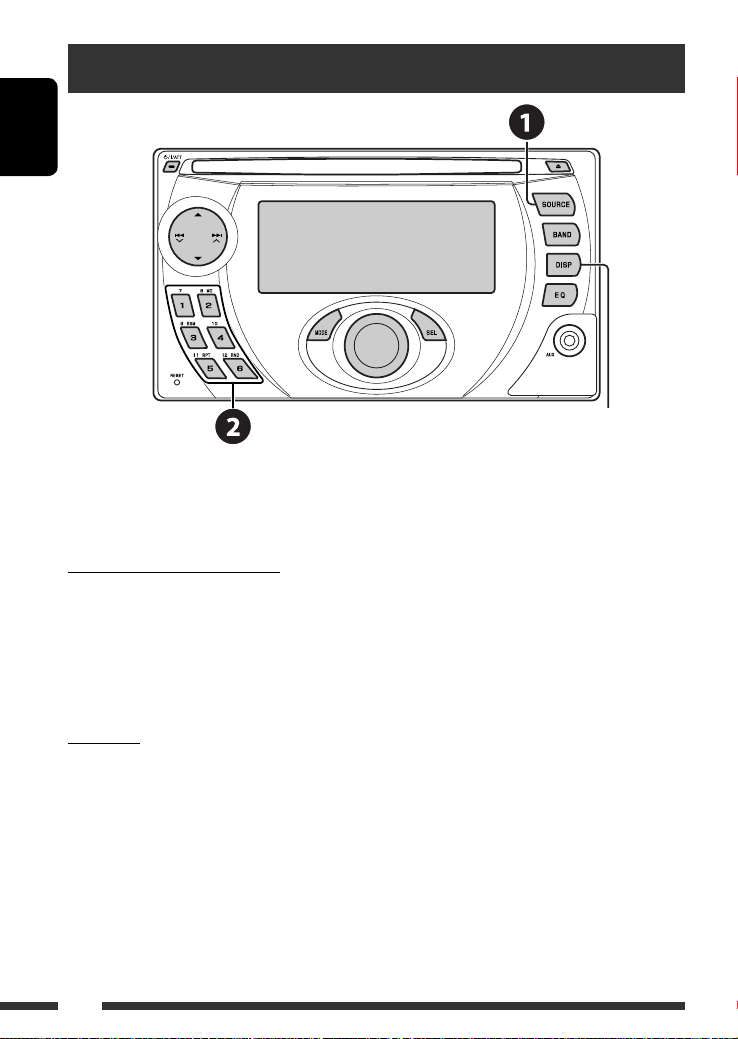
• Using t e control panel ................ 5
Listening to t e radio ......................... 7
Disc operations .................................. 8
EXTERNAL DEVICES
Listening to t e CD c anger ................ 10
Listening to t e iPod .......................... 12
Listening to t e ot er external
components ...................................... 13
SETTINGS
Selecting a preset sound mode ............ 15
General settings — PSM ..................... 16
Assigning titles .................................. 18
REFERENCES
Maintenance ..................................... 19
More about t is unit .......................... 20
Troubles ooting ................................ 22
Specifications .................................... 25
EN02-07_XG506S_001A_1.indd 3EN02-07_XG506S_001A_1.indd 3 8/22/07 12:51:50 PM8/22/07 12:51:50 PM

ENGLISH
4INTRODUCTIONS
Preparation
Cancel t e display demonstration and set t e clock
• See also page 17.
~ Turn on the power.
Ÿ Enter the PSM settings.
! ] ⁄ Cancel the display de onstrations
Select “ EMO,” then “ EMO OFF.”
Set the clock
Select “CLOCK H” (hour), then adjust the hour.
Select “CLOCK M” (minute), then adjust the minute.
@ Finish the procedure.
Caution on volume setting:
iscs produce very little noise compared with other sources. Lower the volume before playing a disc to avoid
damaging the speakers by the sudden increase of the output level.
When the power is turned off: Check the current clock time
When the power is turned on: Change the display information
EN02-07_XG506S_001A_1.indd 4EN02-07_XG506S_001A_1.indd 4 8/22/07 12:51:51 PM8/22/07 12:51:51 PM

ENGLISH
5OPERATIONS
Basic operations
Using t e control panel
1 • FM/AM: Select preset station.
• CD/CD-CH: Select folder.
• IPOD: Enter the main menu/Pause playback/
Confirm selection.
2 • Turn on the power.
• Turn off the power [Hold].
• Attenuate the sound (if the power is on).
3 • FM/AM: Search for station.
• CD/CD-CH: Select track.
• IPOD: Select track.
4 Loading slot
5 isplay window
6 Select the source.
FM/AM = CD * = CD-CH */IPOD * (or EXT IN)
= AUX IN = (back to the beginning)
* You cannot select these sources if they are not
ready or not connected.
7 Eject disc.
8 Select the bands.
9 Reset button
p • FM/AM: Select preset station.
• CD/CD-CH: Select folder/track/disc (for C
changer).
q Enter functions mode.
Press MO E, then one of the following buttons
(within 5 seconds)...
MO : Turn on/off monaural reception.
SSM : Automatic station presetting [Hold].
RPT : Select repeat play.
RND : Select random play.
5 / ∞ : Skip 10 tracks.
w Volume control [Turn].
e • Enter the PSM settings [Hold].
• Adjust the sound mode.
r Select the sound mode.
t AUX (auxiliary) input jack
y Change the display information.
EN02-07_XG506S_001A_1.indd 5EN02-07_XG506S_001A_1.indd 5 8/22/07 12:51:51 PM8/22/07 12:51:51 PM

ENGLISH
6
Display window
1 Playback source indicators
2 Track information indicators
3 Main display
(Menu, playback information)
4 Tuner reception indicators
5 Playback mode/item indicators
(Random/Repeat)
6 • Spectrum analyzer meter
• Volume level indicator
7 Sound mode indicators
8 Equalizer indicator
9 Loudness indicator
p Analyzer indicator
q Clock indicator
w Track indicator
e Source display/Preset No./Track No./Folder No./
isc No.
EN02-07_XG506S_001A_1.indd 6EN02-07_XG506S_001A_1.indd 6 8/22/07 12:51:51 PM8/22/07 12:51:51 PM

ENGLISH
7OPERATIONS
Listening to the radio
Change the display infor ation
~ Select “FM/AM.”
Ÿ Select the bands.
! Search for a station to listen—Auto Search.
Manual Search: Hold either one of the buttons until “M” flashes on the display, then press it repeatedly.
* If no title is assigned to a station, “ O AME” appears. To assign a title to a station, see page 18.
Select preset station.
W en an FM stereo broadcast is ard
to receive
1
2
Reception improves, but stereo effect will be lost.
• MO indicator lights up.
FM station automatic presetting —
SSM (Strong-station Sequential
Memory)
You can preset up to six stations for each band.
1
2
Lights up when receiving an FM stereo
broadcast with sufficient signal strength.
Continued on the next page
EN02-07_XG506S_001A_1.indd 7EN02-07_XG506S_001A_1.indd 7 8/22/07 12:51:52 PM8/22/07 12:51:52 PM

ENGLISH
8
3
Local FM stations with the strongest signals are
searched and stored automatically in the FM band.
Manual presetting
Ex.: Storing FM station of 92.5 M z into preset number
4 of the FM1 band.
1
2
3
Disc operations
Insert the disc.
Playback starts automatically.
Change the display information
• MP3/WMA: Album name/performer (folder name *1) = Track
title (file name *1) = Elapsed playing time and Current track
number = (back to the beginning)
• Audio CD/CD ext: Disc title/performer *2 = Track title *2 =
Elapsed playing time and Current track number = (back to the
beginning)
*1 If the file does not have Tag information
or “TAG DISP” is set to “TAG OFF” (see
page 18 , folder name and file name
appear. TAG indicator will not light up.
*2 “NO NAME” appears for an audio CD.
EN08-13_XG506S_001A_1.indd 8EN08-13_XG506S_001A_1.indd 8 8/22/07 12:52:08 PM8/22/07 12:52:08 PM

ENGLISH
9OPERATIONS
Prohibiting disc ejection
o cancel the prohibition, repeat the same
procedure.
To stop play and eject the disc
• Press SOURCE to listen to another
playback source.
Pressing (or holding) the following buttons allows you to...
Disc type
(Number buttons) *1
MP3/WMA
Press: Select track
Hold: Reverse/fast-forward
track
Select folder Locate particular folder
directly *2
Audio CD/
CD ext
Press: Select track
Hold: Reverse/fast-forward
track
—
Locate particular track directly
*1 Press to select number 1 to 6; hold to select number 7 to 12.
*2 It is required that folders be assigned with 2-digit numbers at the beginning of their folder names—01, 02, 03, and
so on.
After pressing MODE, press the following buttons to...
Disc type
MP3/WMA
Skip 10 tracks (within
the same folder)
RK RP :
Repeat current track
FLDR RP :
Repeat current folder
FLDR RND:
Randomly play all tracks of
current folder, then tracks of
next folders
DISC RND:
Randomly play all tracks
Audio CD/
CD ext
Skip 10 tracks RK RP :
Repeat current track
DISC RND:
Randomly play all tracks
• To cancel repeat play or random play, select “RP OFF” or “RND OFF.”
EN08-13_XG506S_001A_1.indd 9EN08-13_XG506S_001A_1.indd 9 8/22/07 12:52:11 PM8/22/07 12:52:11 PM

ENGLISH
10
Listening to the CD changer
It is recommended to use a JVC MP3-compatible CD changer with your unit. You can connect a CD changer to the CD
changer ack on the rear of the unit. See also page 14.
• You can only play conventional CDs (including CD Text) and MP3 discs.
Before connecting the CD changer
• To prevent short circuits, it is recommended to disconnect the car battery’s negative terminal and make all
electrical connections before connecting the CD changer.
• When mounting this unit into your car, be sure to use the screws provided.
• When tightening screws or bolts, be careful not to pinch any connection cord.
• If you are not sure how to connect the CD changer correctly, consult your car dealer or have it installed by a
qualified technician.
Preparation
Make sure “CHANGER” is selected for the external input setting, see page 17.
~ Select “CD-CH.”
Ÿ Select a disc to start playing.
Press: For selecting disc number 1 – 6.
Hold: For selecting disc number 7 – 12.
Change the display information
(see page 8)
EN08-13_XG506S_001A_1.indd 10EN08-13_XG506S_001A_1.indd 10 9/3/07 5:28:45 PM9/3/07 5:28:45 PM

ENGLISH
11EXTERNAL DEVICES
Pressing (or holding) the following buttons allows you to...
Disc type
Press: Select track
Hold: Reverse/fast-forward track
Select folder
Press: Select track
Hold: Reverse/fast-forward track —
After pressing MODE, press the following buttons to...
Disc type
Skip 10 tracks (within
the same folder)
RK RP :
Repeat current track
FLDR RP :
Repeat all tracks of current folder
DISC RP :
Repeat all tracks of the current
disc
FLDR RND:
Randomly play all tracks of
current folder, then tracks of
next folders
DISC RND:
Randomly play all tracks of
current disc
MAG RND:
Randomly play all tracks of the
inserted discs
Skip 10 tracks RK RP :
Repeat current track
DISC RP :
Repeat all tracks of the current
disc
DISC RND:
Randomly play all tracks of
current disc
MAG RND:
Randomly play all tracks of the
inserted discs
• To cancel repeat play or random play, select “RP OFF” or “RND OFF.”
EN08-13_XG506S_001A_1.indd 11EN08-13_XG506S_001A_1.indd 11 8/22/07 12:52:12 PM8/22/07 12:52:12 PM

ENGLISH
12
Selecting a track from the menu
1 Enter the main menu.
• This mode will be canceled if no
operations are done for about
5 seconds.
Listening to the iPod
Change the display information
Before operating, connect a JVC interface adapter for iPod, KS-PD100 (separately purchased) to the CD changer
jack on the rear of this unit. See also page 14.
Preparations
Make sure “C ANGER” is selected for the external input setting, see page 17.
~ Select “IPOD.”
Ÿ Select a song to start playing.
2 Select the desired menu.
PLAYLIS Ô AR IS S Ô ALBUMS Ô SONGS
Ô GENRES Ô COMPOSER Ô (back to the
beginning)
EN08-13_XG506S_001A_1.indd 12EN08-13_XG506S_001A_1.indd 12 8/22/07 12:52:12 PM8/22/07 12:52:12 PM

ENGLISH
13EXTERNAL DEVICES
Continued on the next page
3 Confirm the selection.
• To move back to the previous menu, press 5.
• If a track is selected, playback starts
automatically.
• olding 4 /¢ can skip 10 items at
a time.
Pause playback
• To resume playback, press the button
again.
Press: Select tracks
Hold: Reverse/fast-forward track
After pressing MODE, press the following buttons to...
ONE RP :
Functions the same as “Repeat One.”
ALL RP :
Functions the same as “Repeat All.”
ALBM RND *:
Functions the same as “Shuffle Albums.”
SONG RND:
Functions the same as “Shuffle Songs.”
• To cancel repeat play or random play, select
“RP OFF” or “RND OFF.”
* Functions only if you select “ALL” in “ALBUMS” of the
main “MENU.”
Listening to the other external components
Portable audio player, etc.
Stereo mini plug (not supplied)
EN08-13_XG506S_001A_1.indd 13EN08-13_XG506S_001A_1.indd 13 8/22/07 12:52:12 PM8/22/07 12:52:12 PM

ENGLISH
14 EXTERNAL DEVICES
You can connect an external component to:
• CD changer jack on the rear using the following adapters:
– Line Input Adapter—JVC S-U57
– AUX Input Adapter—JVC S-U58
Make sure “EXT IN” is selected for the external input setting, see page 17.
• AUX (auxiliary) input jack on the control panel.
~ Select “EXT IN” or “AUX IN.”
Ÿ Turn on the connected component and start playing the source.
! Adjust the olume.
⁄ Adjust the sound as you want (see pages 15 and 16).
Unit
CD changer jack
Concept diagram of the external device connection
AUX input jack on the control panel
JVC CD changer, [10]
Apple iPod, [12]
(see page 17 of the
”EXT IN” setting)
(see page 17 of the
”EXT IN” setting)
: Adapter (separately purchased)
Portable audio player, etc., [13]
Signal cord
3.5 mm stereo mini plug
Connection cord supplied for the CD changer
EN14-19_XG506S_001A_1.indd 14EN14-19_XG506S_001A_1.indd 14 9/3/07 5:56:24 PM9/3/07 5:56:24 PM

ENGLISH
15SETTINGS
Selecting a preset sound mode
Indication (For)
BAS
(bass)
MID
(mid range)
TRE
(treble)
LOUD
(loudness)
USER (Flat sound) 00 00 00 OFF
ROCK (Rock or disco music) +03 00 +02 ON
CLASSIC (Classical music) +01 00 +03 OFF
POPS (Light music) +02 +01 +02 OFF
HIP HOP (Funk or rap music) +04 –02 +01 ON
JAZZ (Jazz music) +03 00 +03 OFF
Preset alues
EN14-19_XG506S_001A_1.indd 15EN14-19_XG506S_001A_1.indd 15 8/22/07 12:52:34 PM8/22/07 12:52:34 PM

ENGLISH
16
Adjusting the sound
1
2 Adjust the le el.
BAS *1 (bass)
Adjust the bass.
–06 to +06
MID *1 (mid range)
Adjust the mid range frequencies
sound level.
–06 to +06
TRE *1 (treble)
Adjust the treble.
–06 to +06
FAD *2 (fader)
Adjust the front and rear speaker
balance.
R06 to F06
BAL *3 (balance)
Adjust the left and right speaker
balance.
L06 to R06
LOUD *1 (loudness)
Boost low and high frequencies to
produce a well balanced sound at low
volume level.
LOUD ON or
LOUD OFF
SUB.W (subwoofer)
Adjust the subwoofer output level.
00 to 08,
initial: 04
VOL (volume)
Adjust the volume.
00 to 30
(or 50) *4
*1 When you adjust the bass, mid-range, treble, or
loudness, the adjustment you have made is stored
for the currently selected sound mode (iEQ) including
“USE .”
*2 If you are using a two-speaker system, set the fader
level to “00.”
*3 The adjustment will not affect the subwoofer output.
*4 Depending on the amplifier gain control setting. (See
page 18 for details.)
General settings — PSM
You can change PSM (Preferred Setting Mode) items
listed in the table on pages 17 and 18.
1 Enter the PSM settings.
2 Select a PSM item.
3 Select or adjust the selected PSM item.
4 Repeat steps 2 and 3 to adjust other PSM
items if necessary.
5 Finish the procedure.
EN14-19_XG506S_001A_1.indd 16EN14-19_XG506S_001A_1.indd 16 8/22/07 12:52:34 PM8/22/07 12:52:34 PM

ENGLISH
17SETTINGS
Continued on the next page
Indication Item
( : Initial)
Setting, [reference page]
DEMO
Display
demonstration
• DEMO ON
• DEMO OFF
: Display demonstration will be activated automatically if no
operation is done for about 20 seconds, [4].
: Cancels.
SCREEN
Spectrum analyzer
screen
METER 1, METER 2,
METER 3, METER 4,
METER 5, SAVER 1,
SAVER 2, OFF
: You can select the different spectrum analyzer screen during
playback.
METER 1 – METER 5: The spectrum analyzer meter changes
according to the audio input level.
SAVER 1 – SAVER 2: The spectrum analyzer meter changes the
pattern repeatedly.
OFF: Cancels.
CLK DISP *1
Clock display
• ON
• OFF
: Clock time is shown on the display at all times when the power is
turned off.
: Cancels; pressing DISP will show the clock time for about
5 seconds when the power is turned off, [4].
CLOCK H
Hour adjustment
1 – 12AM,
1 – 12PM
: Initial: 1 (1:00AM), [4].
CLOCK M
Minute adjustment
00 – 59 : Initial: 00 (1:00AM), [4].
DIMMER
Dimmer
• AUTO
• ON
• OFF
: Dims the display when you turn on the headlights.
: Activates dimmer.
: Cancels.
TEL
Telephone muting
• MUTING 1/
MUTING 2
• OFF
: Select either one which mutes the sounds while using a cellular
phone.
: Cancels.
• Playback pauses/mutes while telephone muting is working.
SCROLL *2
Scroll
• ONCE
• AUTO
• OFF
: Scrolls the track information once.
: Repeats scrolling (at 5 second intervals).
: Cancels. (Holding DISP can scroll the display regardless of the
setting.)
WOOFER
Subwoofer cutoff
frequency
• LOW
• MID
• HIGH
: Frequencies lower than 95 Hz are sent to the subwoofer.
: Frequencies lower than 140 Hz are sent to the subwoofer.
: Frequencies lower than 185 Hz are sent to the subwoofer.
EXT IN *3
External input
• CHANGER
• EXT IN
: To use a JVC CD changer, [10], or an Apple iPod, [12].
: To use any other external component than the above, [13].
*1 If the power supply is not interrupted by turning off the ignition key of your car, it is recommended to select “OFF” to
save the car’s battery.
*2 Some characters or symbols will not be shown correctly (or will be blanked) on the display.
*3 Displayed only when one of the following sources is selected—FM, AM, CD, or AUX IN.
EN14-19_XG506S_001A_1.indd 17EN14-19_XG506S_001A_1.indd 17 8/22/07 12:52:35 PM8/22/07 12:52:35 PM

ENGLISH
18 SETTINGS
Indication Item
( : Initial)
Setting, [reference page]
AUX ADJ
Auxiliary input
level adjustment
A.ADJ 00 —
A.ADJ 05
: Adjust the auxiliary input level accordingly, to avoid the sudden increase
of the output level when changing the source from external component
connected to the AUX input jack on the control panel.
TAG DISP
Tag display
• TAG ON
• TAG OFF
: Shows the tag while playing MP3/WMA tracks.
: Cancels.
AMP GAIN
Amplifier gain
control
• LOW PWR
• HIGH PWR
: VOL 00 – VOL 30 (Select if the maximum power of each speaker is less
than 50 W to prevent damaging the speaker.)
: VOL 00 – VOL 50
IF BAND
Intermediate
frequency band
• AUTO
• WIDE
: Increases the tuner selectivity to reduce interference noises between
adjacent stations. (Stereo effect may be lost.)
: Subject to interference noises from adjacent stations, but sound quality
will not be degraded and the stereo effect will remain.
Assigning titles
You can assign titles to 30 station frequencies (FM and
AM) and up to 8 characters for each title.
~ Select “FM/AM.”
Ÿ Show the title entry screen.
! Assign a title.
1 Select a character (see page 22).
2 Move to the next (or previous) character
position.
3 Repeat steps 1 and 2 until you finish
entering the title.
⁄ Finish the procedure.
To erase the entire title
In step Ÿ on the left...
(Exit from the
setting.)
EN14-19_XG506S_001A_1.indd 18EN14-19_XG506S_001A_1.indd 18 8/22/07 12:52:35 PM8/22/07 12:52:35 PM

ENGLISH
19
REFERENCES
Moisture condensation
Moisture may condense on the lens inside the unit in
the following cases:
• After starting the heater in the car.
• If it becomes very humid inside the car.
Should this occur, the unit may malfunction. In this
case, eject the disc and leave the unit turned on for a
few hours until the moisture evaporates.
How to handle discs
When remo ing a disc from its
case, press down the center holder
of the case and lift the disc out,
holding it by the edges.
• Always hold the disc by the edges. Do not touch its
recording surface.
When storing a disc into its case, gently insert the
disc around the center holder (with the printed surface
facing up).
• Make sure to store discs into the cases after use.
To keep discs clean
A dirty disc may not play correctly.
If a disc does become dirty, wipe it with
a soft cloth in a straight line from center
to edge.
• Do not use any solvent (for example, conventional
record cleaner, spray, thinner, benzine, etc.) to clean
discs.
Center holder
To play new discs
New discs may have some rough spots
around the inner and outer edges. If
such a disc is used, this unit may reject
the disc.
To remove these rough spots, rub the edges with a
pencil or ball point pen, etc.
Warped disc
Sticker Sticker residue
Stick on label
Do not use the following discs:
Unusual shape
Maintenance
Single CD (8 cm disc)
EN14-19_XG506S_001A_1.indd 19EN14-19_XG506S_001A_1.indd 19 8/22/07 12:52:36 PM8/22/07 12:52:36 PM

ENGLISH
20
General
Turning on the power
• By pressing SOURCE on the unit, you can also turn on
the power. If the source is ready, playbac also starts.
Turning off the power
• If you turn off the power while listening to a disc, disc
play will start from where playbac has been stopped
previously, next time you turn on the power.
FM/AM
Storing stations in memory
• During SSM search...
– Received stations are preset in No. 1 (lowest
frequency) to No. 6 (highest frequency).
– When SSM is over, the station stored in No. 1 will
be automatically tuned in.
• When storing stations, the previously preset stations
are erased and stations are stored newly.
Disc
Caution for DualDisc playback
• The Non-DVD side of a “DualDisc” does not comply
with the “Compact Disc Digital Audio” standard.
Therefore, the use of Non-DVD side of a DualDisc on
this product may not be recommended.
General
• This unit has been designed to reproduce CDs/CD
Texts, and CD-Rs (Recordable)/CD-RWs (Rewritable)
in audio CD (CD-DA), MP3 and WMA formats.
• When a disc is inserted upside down, “PLEASE” and
“EJECT” appear alternately on the display. Press 0 to
eject the disc.
• While fast-forwarding or reversing on an MP3 or
WMA disc, you can only hear intermittent sounds.
More about this unit
E ecting a disc
• If the ejected disc is not removed within 15 seconds,
the disc is automatically inserted again into the
loading slot to protect it from dust. Playbac starts
automatically.
• After ejecting a disc, “NO DISC” appears and you
cannot operate some of the buttons. Insert another
disc or press SOURCE to select another playbac
source.
Playing a CD-R or CD-RW
• Use only “finalized” CD-Rs or CD-RWs.
• This unit can play bac only files of the same type
which are first detected if a disc includes both audio
CD (CD-DA) files and MP3/WMA files.
• This unit can play bac multi-session discs; however,
unclosed sessions will be s ipped while playing.
• Some CD-Rs or CD-RWs may not play bac on this
unit because of their disc characteristics, or for the
following reasons:
– Discs are dirty or scratched.
– Moisture condensation occurs on the lens inside
the unit.
– The pic up lens inside the unit is dirty.
– CD-R/CD-RW on which the files are written with
“Pac et Write” method.
– There are improper recording conditions (missing
data, etc.) or media conditions (stained, scratched,
warped, etc.).
• CD-RWs may require a longer readout time since the
reflectance of CD-RWs is lower than that of regular
CDs.
• Do not use the following CD-Rs or CD-RWs:
– Discs with stic ers, labels, or a protective seal stuc
to the surface.
– Discs on which labels can be directly printed by an
in jet printer.
Using these discs under high temperatures or high
humidities may cause malfunctions or damage to the
unit.
EN20-25_XG506S_001A_1.indd 20EN20-25_XG506S_001A_1.indd 20 8/22/07 12:52:51 PM8/22/07 12:52:51 PM
Table of contents
Languages:
Other JVC Car Receiver manuals

JVC
JVC KD-G395 User manual

JVC
JVC KD-HDR71BT User manual

JVC
JVC KW-AVX640 Manual

JVC
JVC KD-S21 User manual

JVC
JVC KD-SX8350 User manual

JVC
JVC KD-SX780 User manual

JVC
JVC KD-AR7500 - Radio / CD User manual

JVC
JVC KD-DV4202 User manual

JVC
JVC KD-AVX40 - DVD Player With LCD monitor Guide

JVC
JVC DVD/CD Receiver KD-DV7307 User manual

JVC
JVC GET0188-001A User manual

JVC
JVC KD-DV5506 User manual

JVC
JVC KD-DV5301 User manual

JVC
JVC KD-SX883 User manual

JVC
JVC KD-AVX1 Guide

JVC
JVC KD-R336 User manual

JVC
JVC KS-FX850R User manual

JVC
JVC KD-R800 - 30K Color-Illumination Single-DIN CD... User manual

JVC
JVC GET0321-001A User manual

JVC
JVC KS-FX470 User manual