2
INSTALLATION (IN-DASH MOUNTING)
The following illustration shows a typical installation. However, you should make adjustments
corresponding to your specific car. If you have any questions or require information regarding
installation kits, consult your JV car audio dealer or a company supplying kits.
• If you are not sure how to install this unit correctly, have it installed by a qualified technician.
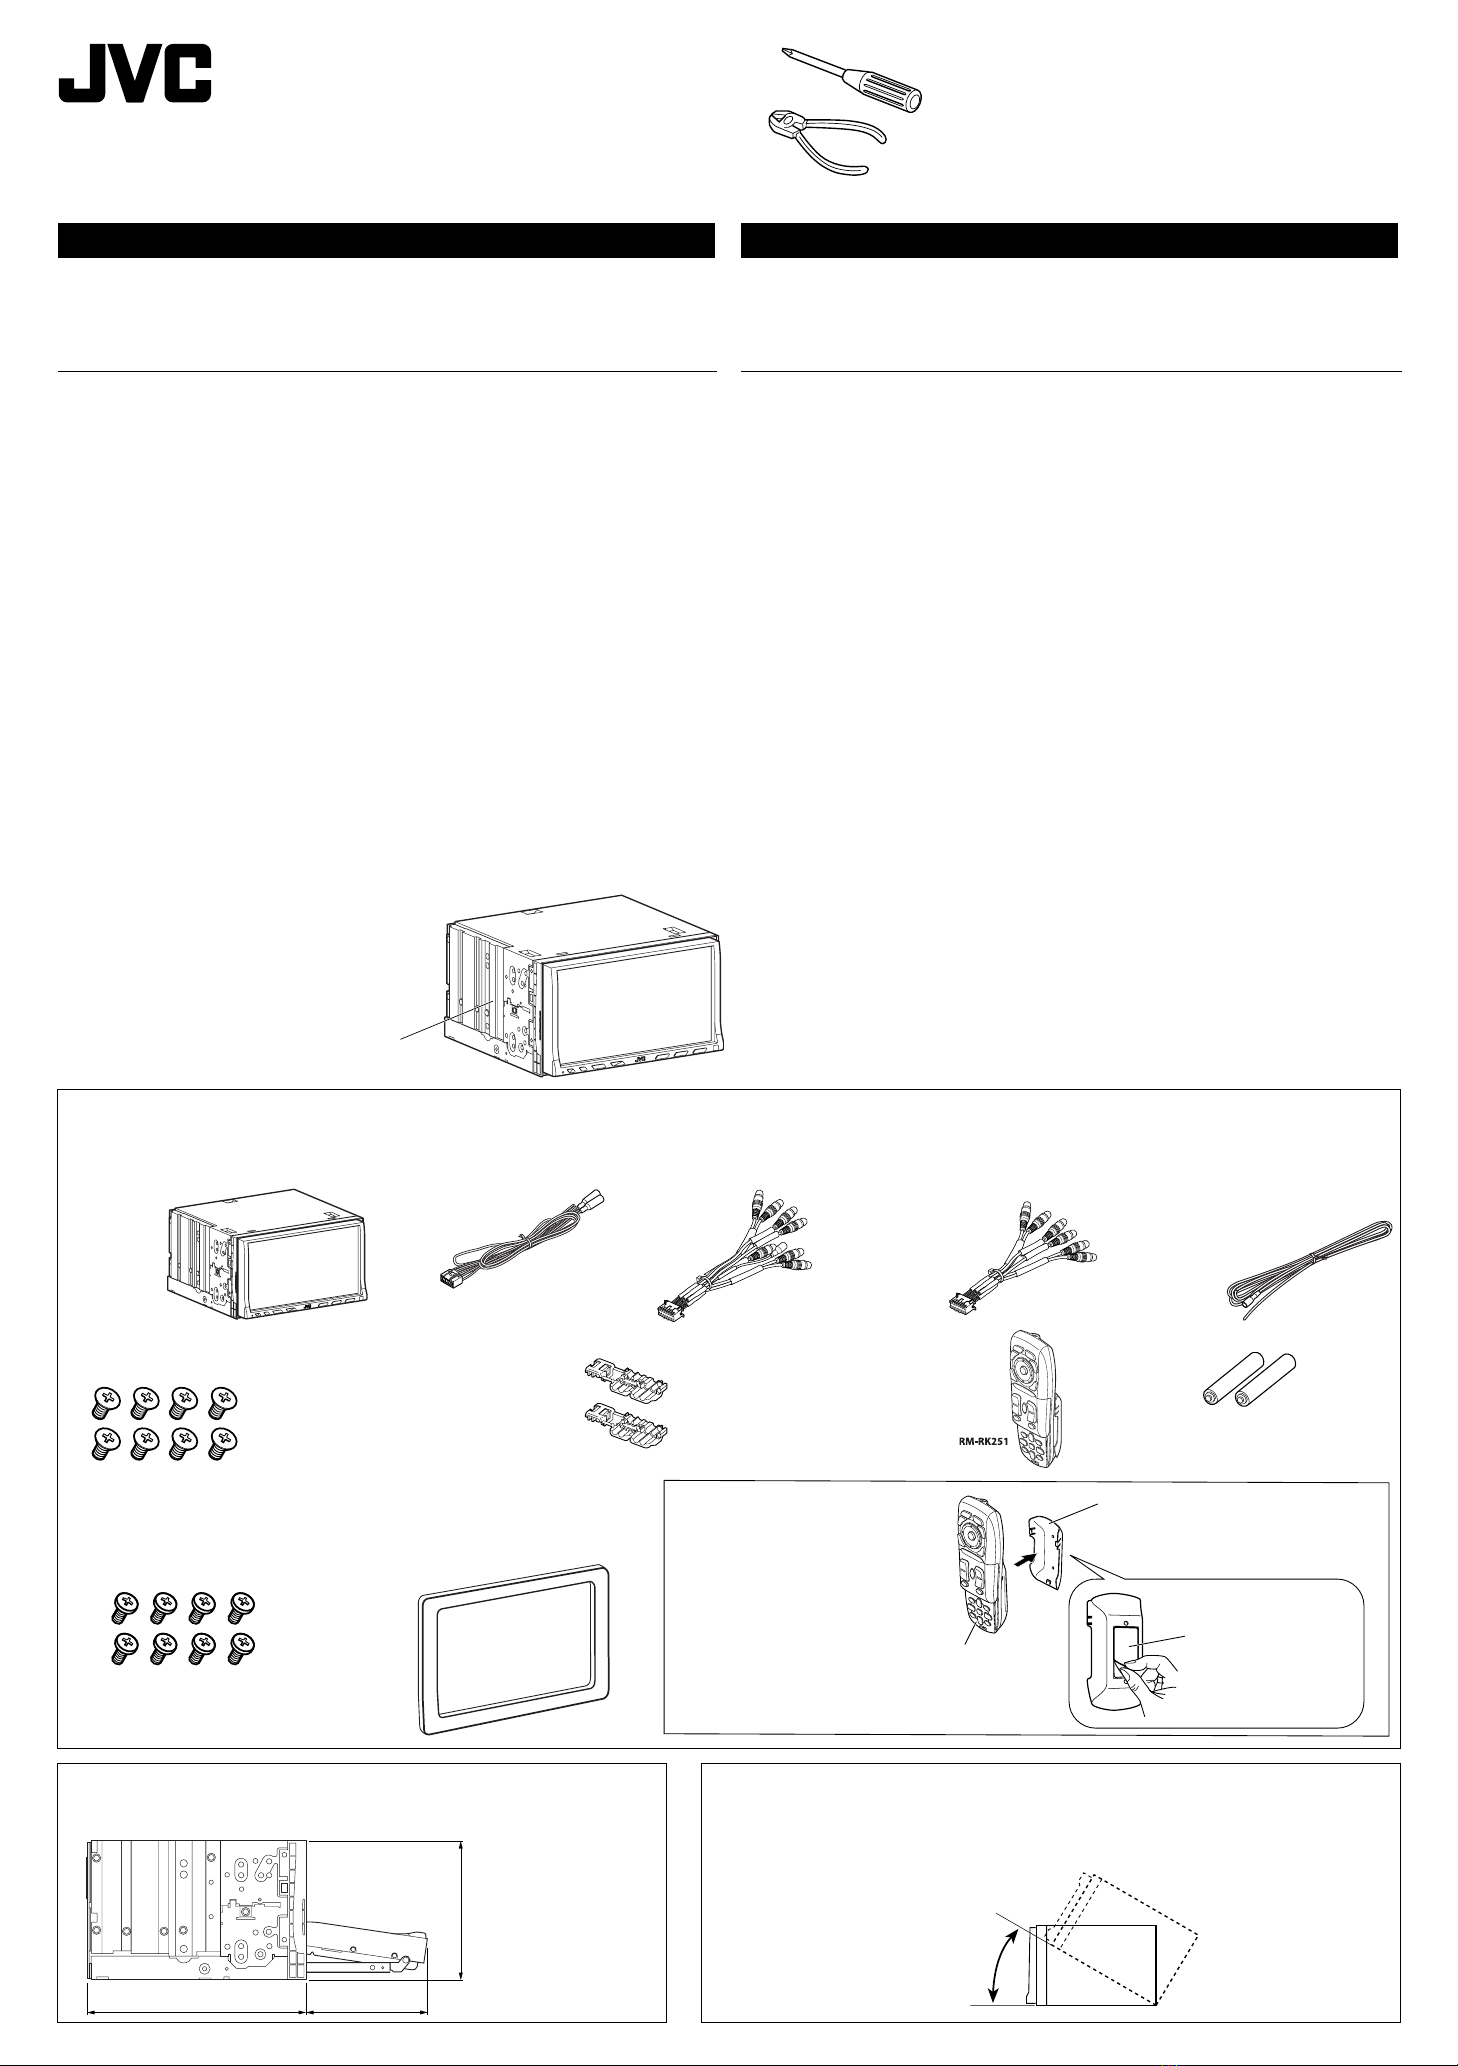
Before installing the unit
• When mounting the unit, be sure to use the screws provided, as instructed. If other screws are used,
parts could become loose or damaged.
• When tightening screws or bolts, be careful not to pinch any connection cord.
• Make sure not to block the fan on the rear panel to maintain proper ventilation when installed.
1 Remove the audio system originally installed in the car, together with its mounting brackets.
Note: Be sure to keep all the screws and parts removed from your car for future use.
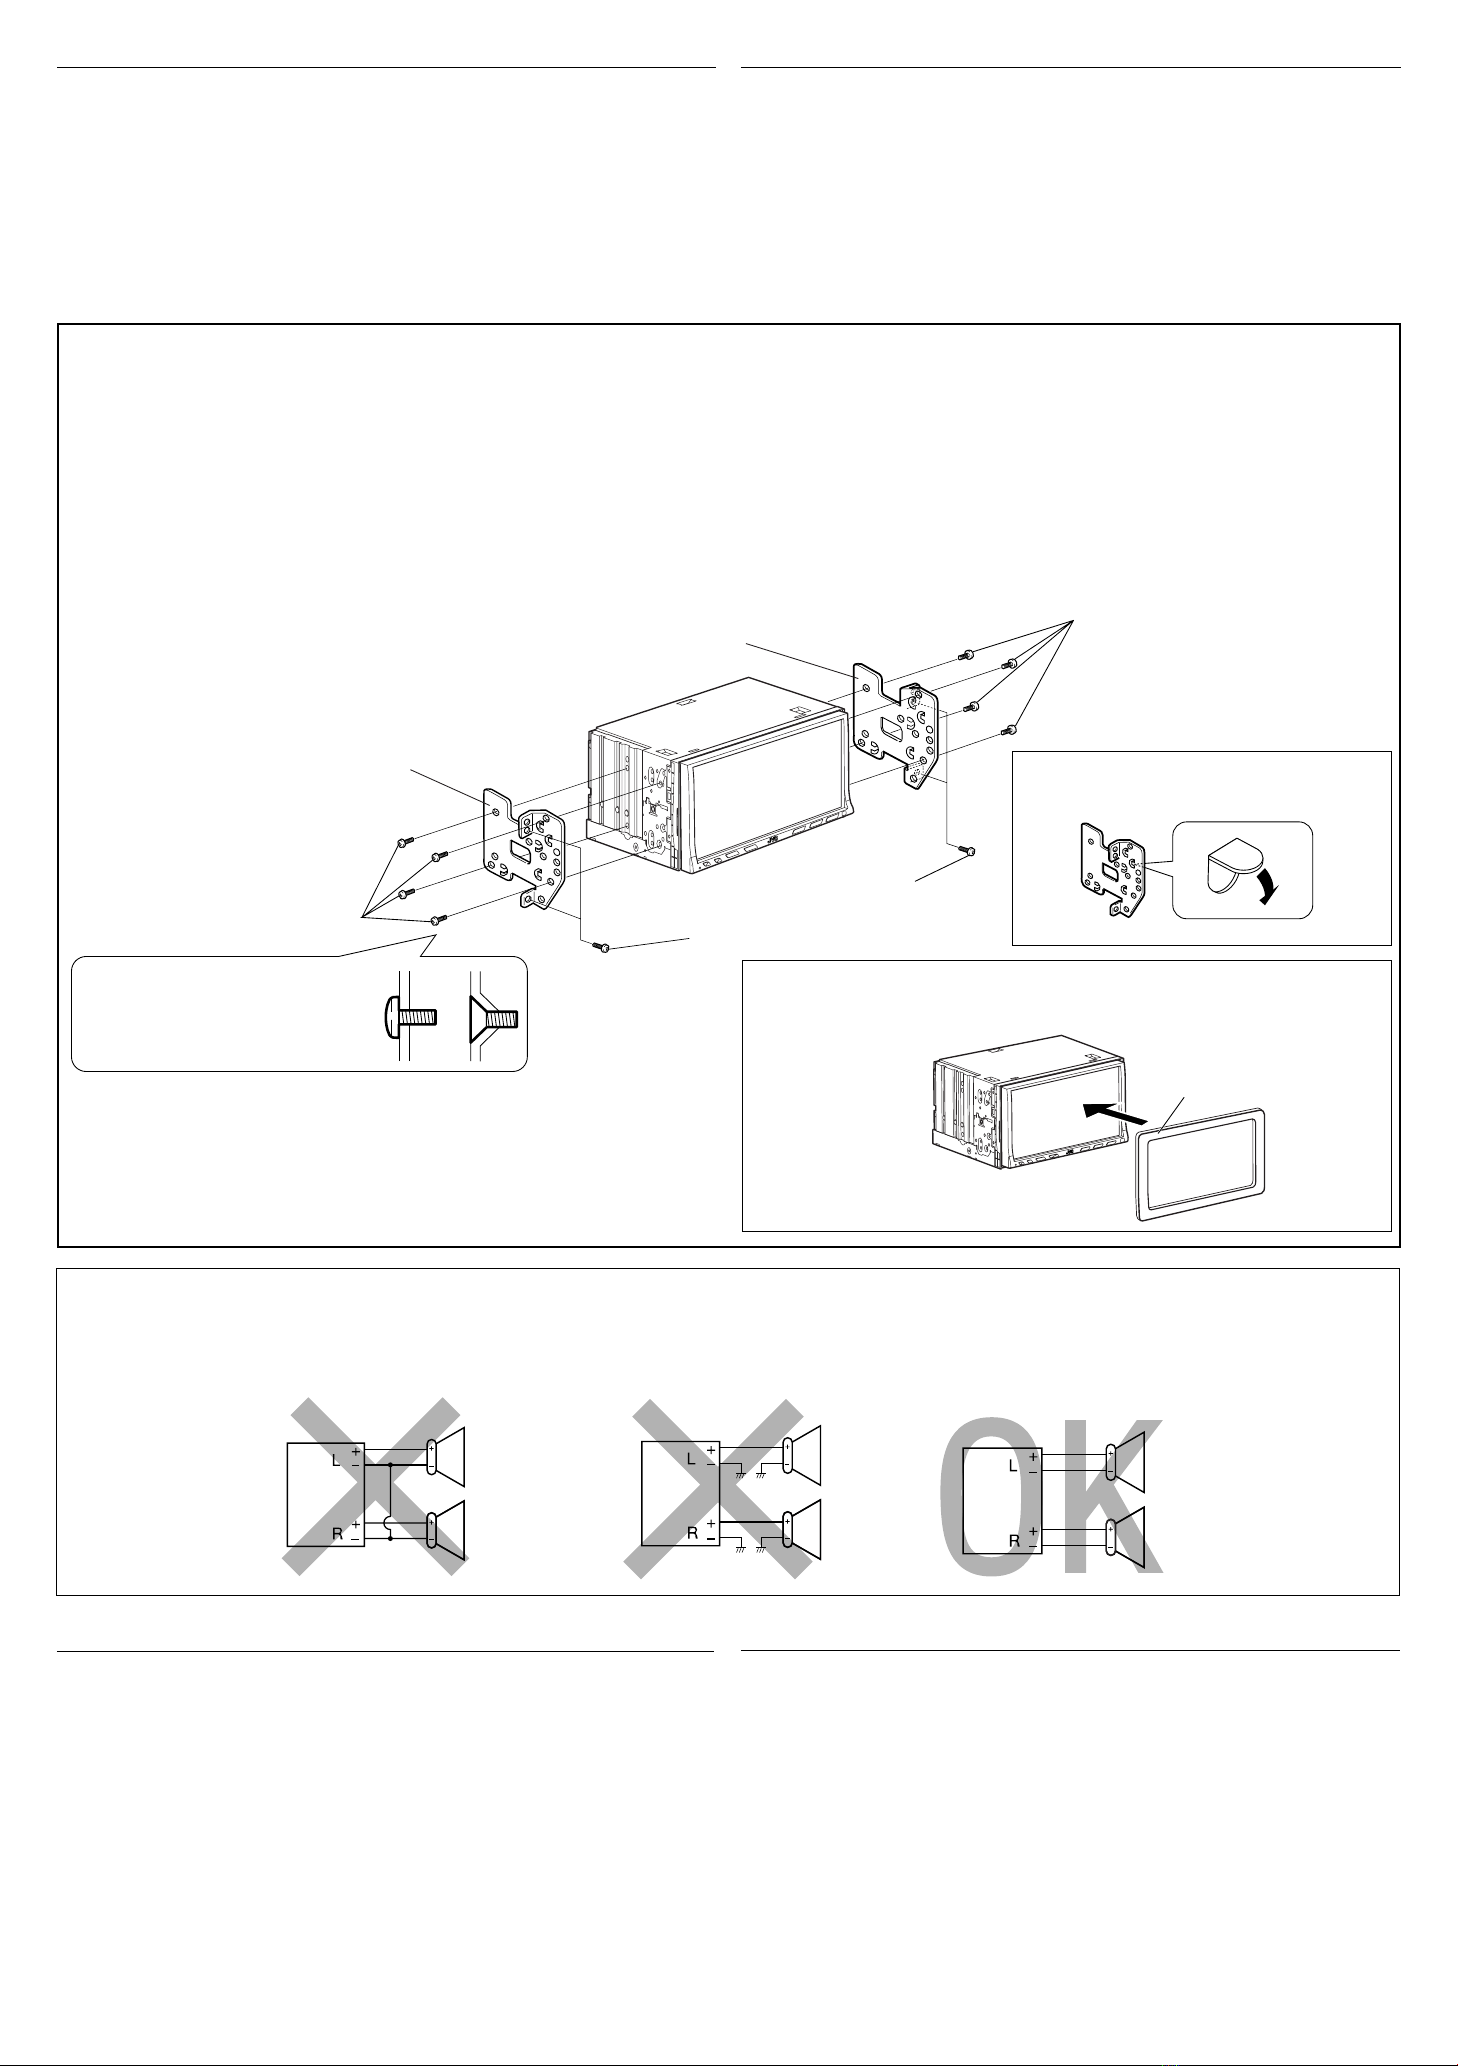
2 Attach the mounting brackets (removed from the car), to this unit (see below).
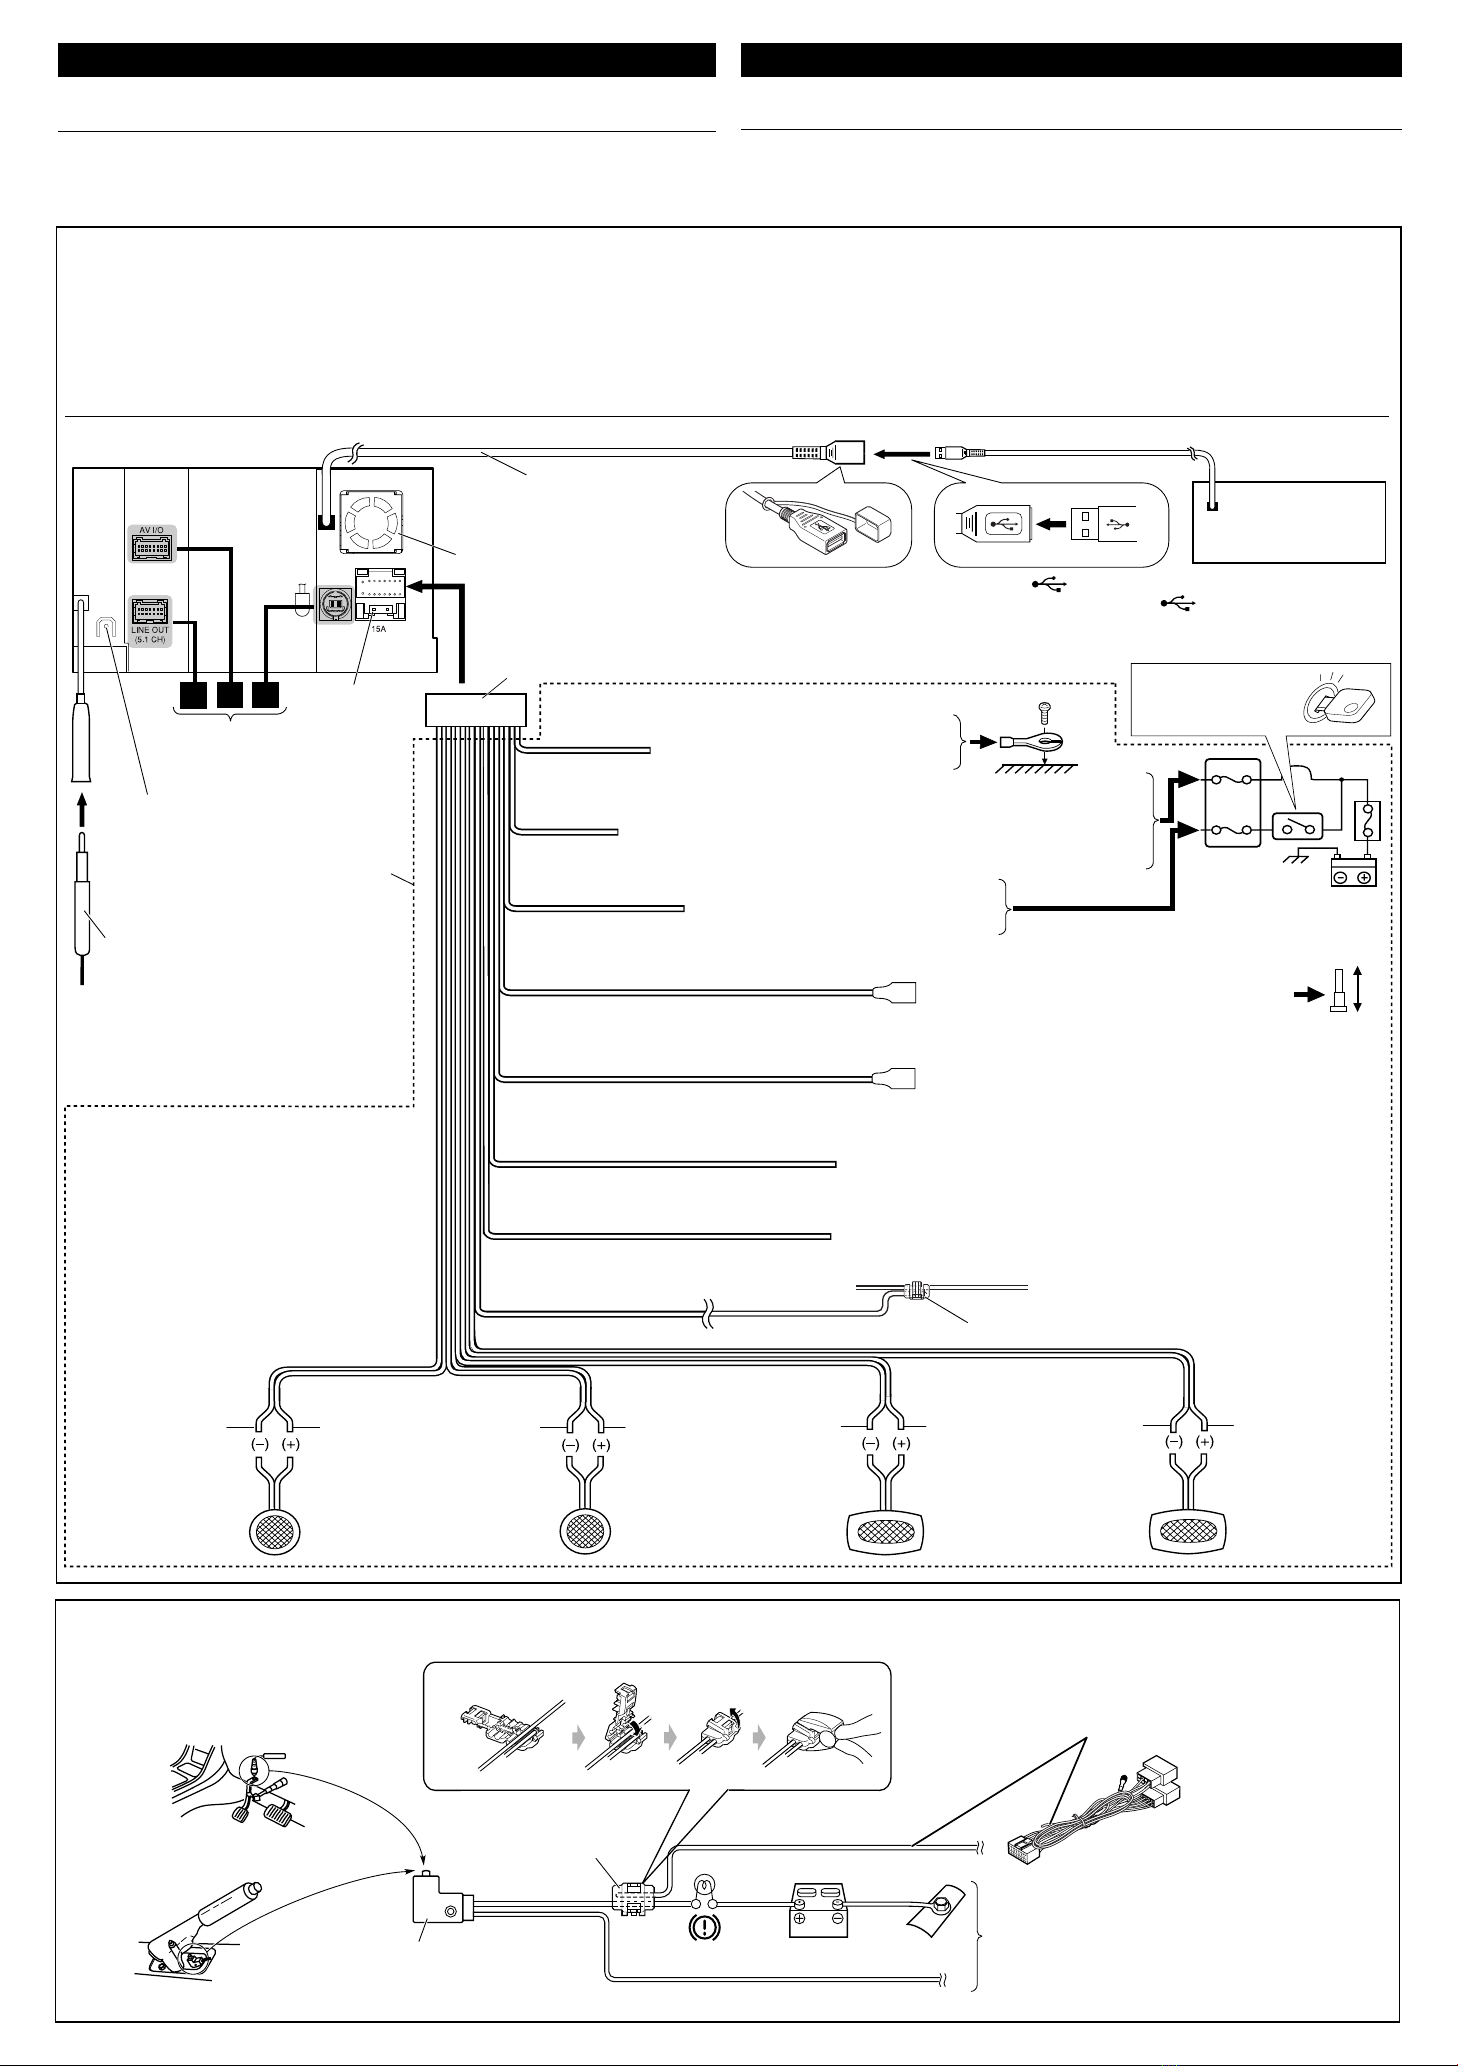
3 Connect the supplied cords.
• See page 3 for the power cord connection.
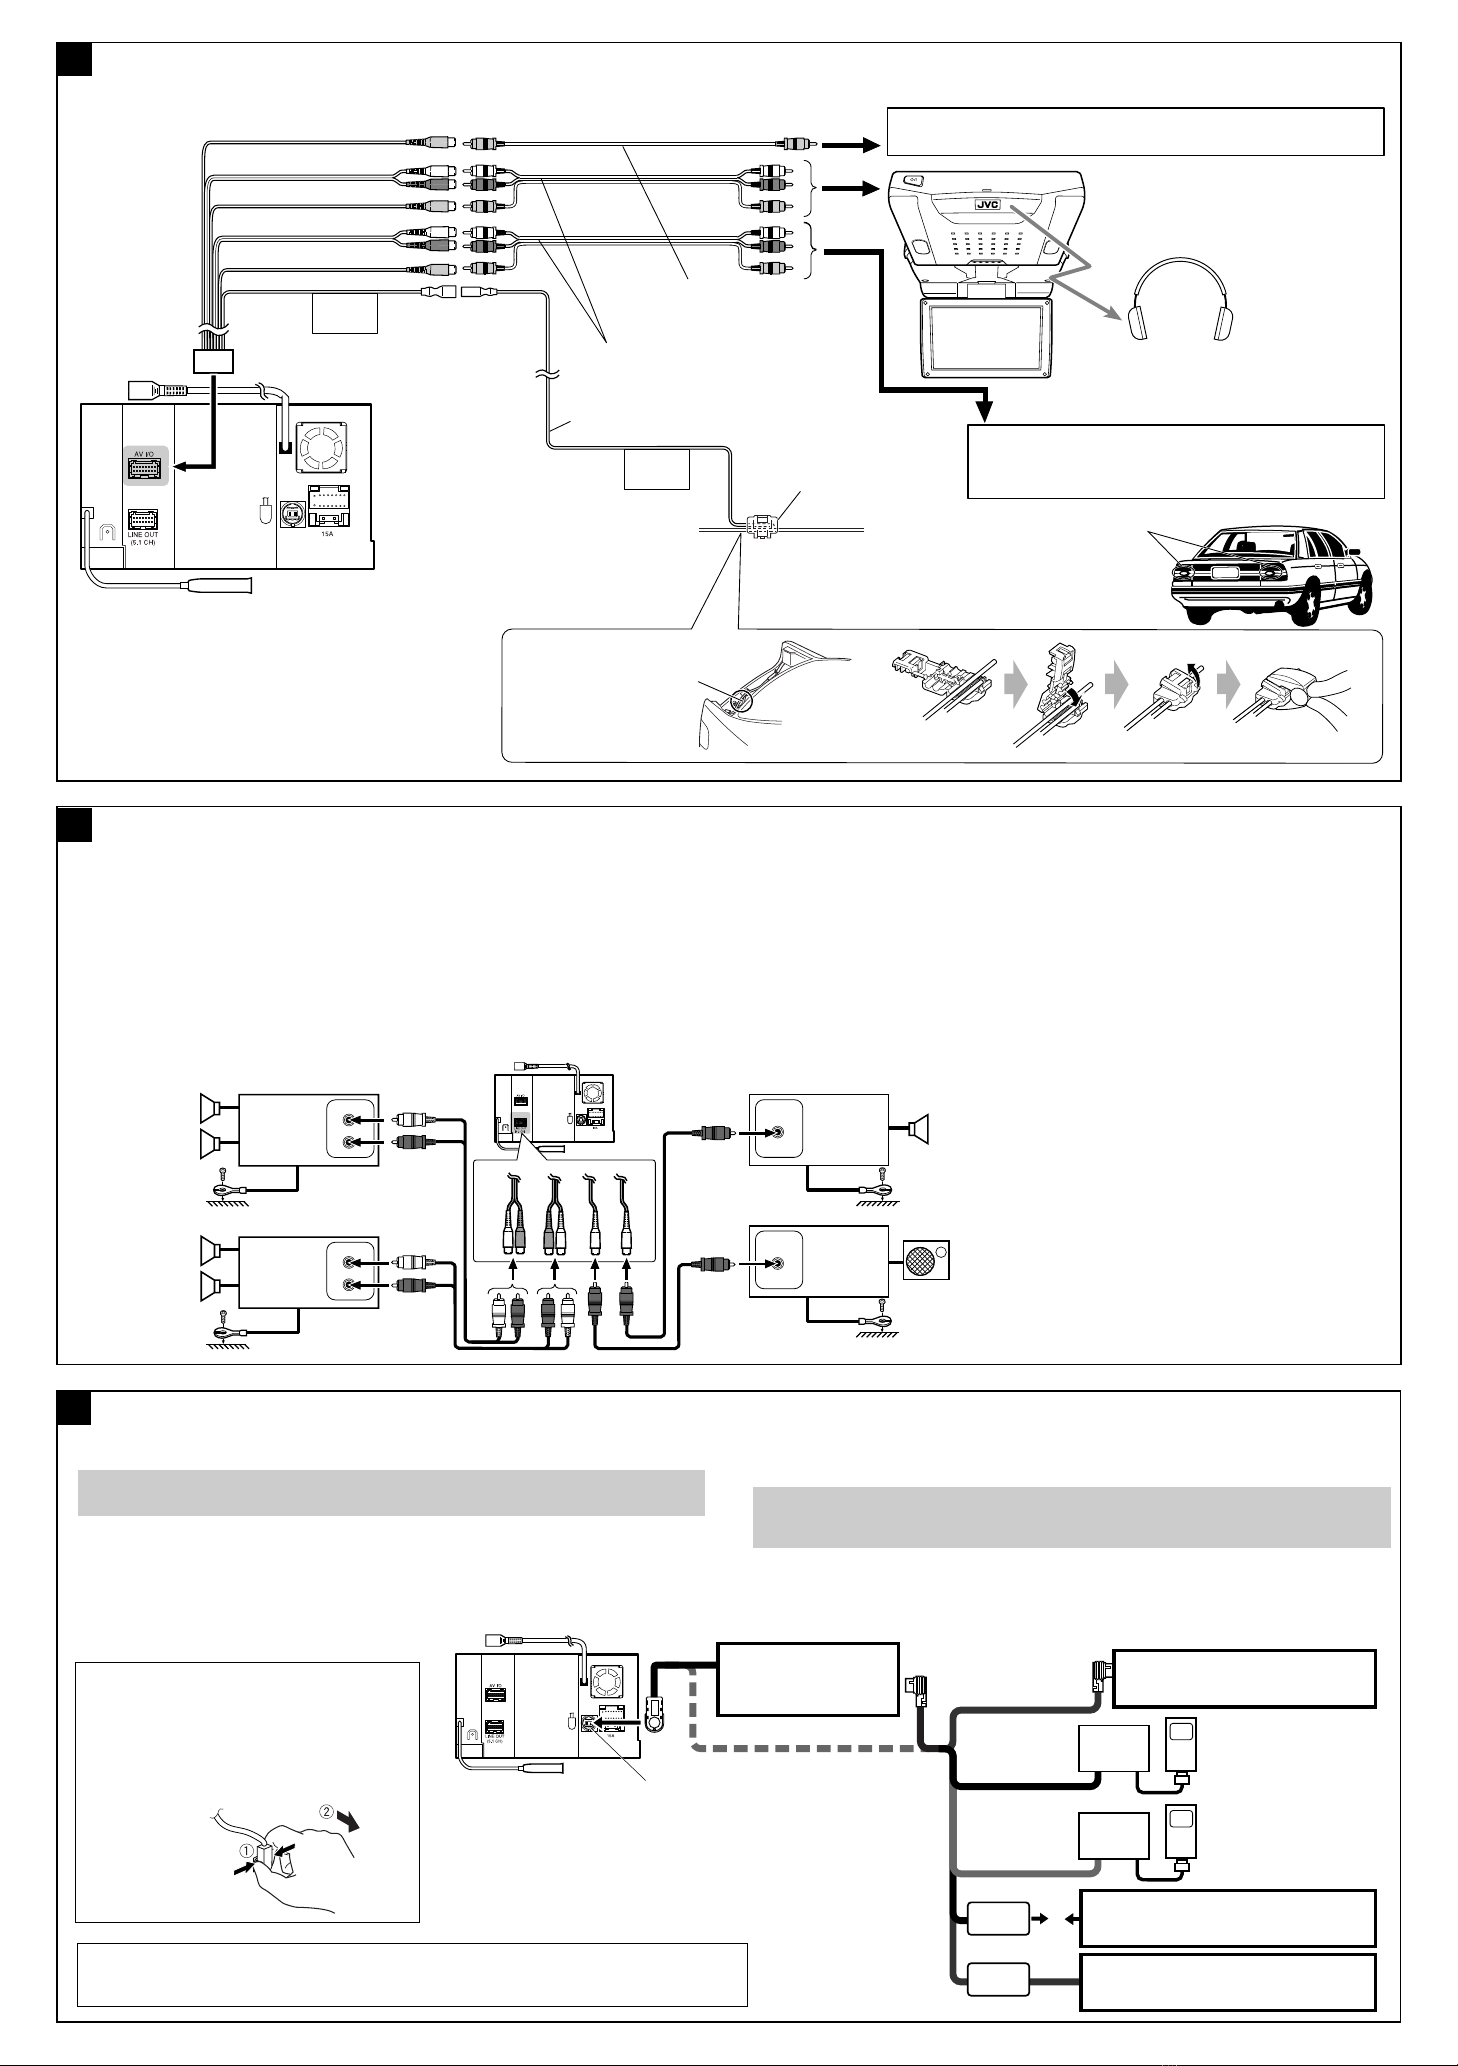
• See page 4 for the LINE IN (5.1 H) and AV I/O cord connections.
4 Install this unit using the screws removed in step 1.
The following example is for installation in a Toyota car. For more details, consult your JV car audio
dealer.
If necessary, restore the protruding tabs.
Jika perlu, pasang kembali tab yang menonjol keluar.
Screws removed from the car in step 1
Sekrup-sekrup yang dilepaskan dari
mobil pada langkah 1
Supplied screws
Sekrup-sekrup yang disediakan
Mounting bracket removed from the car
Braket montasi dilepaskan dari mobil
Mounting bracket removed from the car
Braket montasi dilepaskan dari mobil
Supplied screws
Sekrup-sekrup yang disediakan
Select the appropriate type fitting to your
audio system space.
Pilih tipe sambungan yang sesuai untuk
ruang sistem audio Anda.
Note : When installing the unit on the mounting bracket, make sure to use the supplied screws
(M5 x 8 mm). If longer screws are used, they could damage the unit.
Catatan : Apabila memasang alat penerima pada braket montasi, pastikan Anda menggunakan
sekrup-sekrup yang disediakan (M5 8 mm). Jika menggunakan sekrup-sekrup yang lebih
panjang, bisa merusak alat penerima.
PEMASANGAN (DALAM BINGKAI TEMPATNYA)
Ilustrasi berikut menunjukkan pemasangan yang khas. Namun, Anda harus melakukan penyesuaian pada
mobil tertentu. Jika ada pertanyaan atau perlu informasi mengenai kit pemasangan, tanyakan kepada
penyalur audio mobil JVC atau perusahaan yang menyediakannya.
• Jika Anda tidak tahu pasti cara memasang unit ini dengan benar, serahkan pemasangan kepada
teknisi yang memenuhi syarat.
Sebelum memasang unit
• Apabila memasang unit, pastikan Anda menggunakan sekrup-sekrup yang tersedia sebagaimana
yang diinstruksikan. Jika menggunakan sekrup lain, komponen bisa menjadi longgar atau rusak.
• Sewaktu mengencangkan sekrup-sekrup atau baut, hati-hati, jangan sampai menjepit kabel
sambungan yang manapun.
• Pastikan tidak ada yang menghalangi kipas pada panel belakang untuk menjaga aliran udara yang
baik apabila kipas ini dipasang.
1 Copot sistem audio yang aslinya terpasang dalam mobil berikut braket montasi.
Catatan: Pastikan Anda menyimpan semua sekrup-sekrup dan komponen yang dilepaskan dari
mobil untuk penggunaan di kemudian hari.
2 Pasangkan braket montasi (yang dilepaskan dari mobil) ke unit ini (lihat di bawah).
3 ubungkan kabel yang disediakan.
• Lihat halaman 3 mengenai hubungan kabel listrik.
• Lihat halaman 4 mengenai sambungan kabel LINE IN (5.1 CH) dan AV I/O.
4 Pasang unit ini dengan menggunakan sekrup-sekrup yang dilepaskan pada langkah 1.
Berikut adalah contoh pemasangan pada mobil Toyota. Untuk rincian lebih lanjut, tanyakan kepada
penyalur audio mobil JVC.
PRECAUTIONS on power supply and speaker connections:
• DO NOT connect the speaker leads of the power cord to the car battery; otherwise, the unit
will be seriously damaged.
• BEFORE connecting the speaker leads of the power cord to the speakers, check the speaker wiring in
your car.
TROUBLESHOOTING
• The fuse blows.
* Are the red and black leads connected correctly?
• Power cannot be turned on.
* Is the yellow lead connected?
• No sound from the speakers.
* Is the speaker output lead short-circuited?
• Sound is distorted.
* Is the speaker output lead grounded?
* Are the “–” terminals of L and R speakers grounded in common?
• Noise interfere with sounds.
* Is the rear ground terminal connected to the car’s chassis using shorter and thicker cords?
• Unit becomes hot.
* Is the speaker output lead grounded?
* Are the “–” terminals of L and R speakers grounded in common?
• This unit does not work at all.
* Have you reset your unit?
PEMECAHAN MASALAH
• Sekring meledak.
* Apakah ujung-ujung merah dan hitam tersambung dengan benar?
• Power tidak dapat dihidupkan.
* Apakah ujung kuning sudah tersambung?
• Tidak ada suara dari speaker.
* Apakah ujung keluaran speaker terhubung pendek?
• Suara terdistorsi.
* Apakah ujung keluaran speaker sudah ditanahkan?
* Apakah terminal-terminal “–” dari speaker-speaker L dan R sudah ditanahkan secara umum?
• Berisik yang mengganggu suara-suara.
* Apakah terminal tanahan belakang tersambung ke casis mobil menggunakan kabel-kabel
terpendek dan tertebal?
• Alat penerima ini menjadi panas.
* Apakah ujung keluaran speaker sudah ditanahkan?
* Apakah terminal-terminal “–” dari speaker-speaker L dan R sudah ditanahkan secara umum?
• Alat penerima ini tidak bekerja secara keseluruhan.
* Apakah anda sudah reset (memasang kembali) alat penerima anda?
TINDAKAN-TINDAKAN PENCEGA AN pada suplai power dan sambungan-sambungan
speaker:
• JANGAN sambungkan ujung-ujung speaker dari kabel power ke baterai mobil; sebaliknya,
alat penerima tersebut akan secara serius rusak.
• SEBELUM menyambung ujung-ujung speaker dari kabel power ke speaker-speaker, cek
perkabelan speaker dalam mobil Anda.
When installing the unit in a Nissan car
Apabila memasang unit dalam mobil Nissan
Plate for use with a Nissan car
Pelat untuk digunakan dengan
mobil Nissan
Install_AVX800-008A[UN]f.indd 2Install_AVX800-008A[UN]f.indd 2 21/2/07 3:09:42 pm21/2/07 3:09:42 pm