Page 4
XL-FV323TN
LVT0126-001A
23
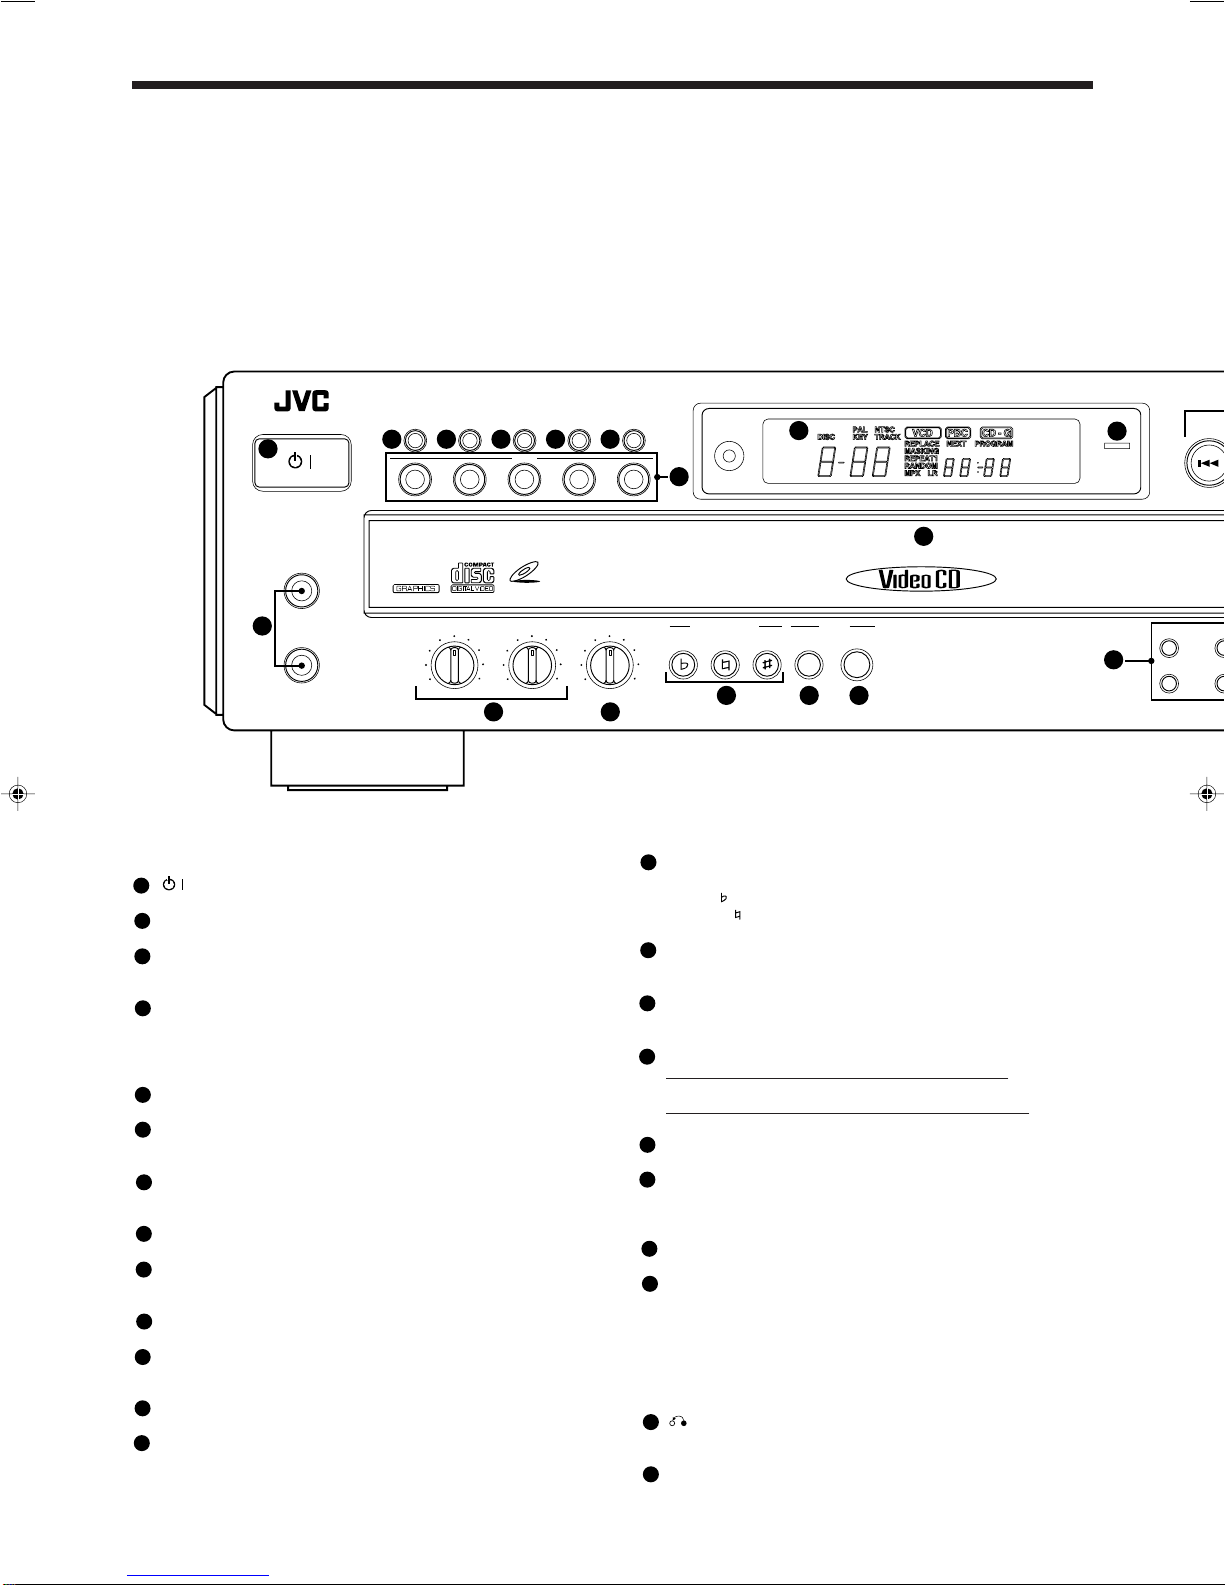
OVERVIEW OF CONTROLS
The following is an explanation of the the basic function of controls
on the front panel of the Player and the remote control. The function
of some controls may be restricted in actual use depending on the
on-going operations. The remote control has fifteen (15) unique
function buttons in addition to those on the player.
Front panel
(Controls marked (R) have equivalents on the remote control.)
/
button (R)
Turns the power on and off.
PBC ON/OFF button
SelectsOnorOffofthePlaybackControlfunctionofthevideoCD.
MPX button (R)
Activates the multiplex function, which switches to NORMAL
(stereo), L-ch monaural and R-ch monaural.
PROGRAM button (R)
Any desired sequence of tracks can be programmed with the
number keys and the +10 button.
The program button cannot be used while the Playback Control
function is activated.
DISC SKIP button
Switches the selected disc from 1 to 5, then back to 1.
EXCHANGE button
Opensthedisctraytochangethediscswhicharenotbeingplayed
back.
DISC buttons (R)
To select a disc, press the desired disc number (1-5). The unit
searches for the selected disc and playback starts automatically.
Display window
Shows information about the status of operation.
STANDBY indicator (Red)
Lights when the power cord is connected and the power is turned
off.TheSTANDBYindicator is not lit when the player is turned on.
DISC1 to DISC5 trays (R)
Used to load discs. To insert/remove one or up to 5 discs.
MIC jacks (1, 2)
Used for connecting microphones (1, 2). The jacks correspond to
MIC 1 to 2 volume knobs.
MIC1, MIC2 knobs
Adjustsvolumeofthemicrophone corresponding toMICnumber.
DIGITAL ECHO knob
Adjusts the degree of the echo effect for the microphone (1, 2)
voice.
KEY CONTROL buttons (R)
Transposes the music key.
DOWN button: used to flatten by a half tone.
NORMAL button: returns to original key tone.
UP # button: used to sharpen by a half tone.
BOOK SEARCH button (R)
Retrieves video segments which you marked with a bookmark.
(See page 14.)
BOOK MARK button (R)
Places a “bookmark” at video segments you want to find later for
almost instant replay. (See page 14.)
4/ ¢PREV / NEXT buttons (R)
During operation with the Playback Control function
Invokes previous or next screen.
During operation without the Playback Control function
Skipsforwardorbackwardquicklyfromcurrenttrackbeingplayed.
7(STOP) button (R)
Stops play.
8STILL (PAUSE) button (R)
Temporarily suspends playing. Video motion freezes and audio
reproduction stops. Pressing the button repeatedly advances the
picture frame-by-frame. (Video CD only)
3SELECT (PLAY) button (R)
Starts to play the disc.
Number keys (1 to 10, +10) (R)
Usedtospecify a track number for playing,changing,or program-
ming. To operate numbers above ten (10), press the +10 button
once. The number keys (1 to 10) are then assigned the numbers
11to20insteadof1 to 10. Themaximumkeynumberassignment
is 99.InPBCfunctionoperation, thenumberkeysareadditionally
utilizedfortheselectionofmenuitems.See page17“Operationof
Playback Control function”.
RETURN button (R)
Utilized for operation with the PBC function. This button is used to
return to a menu screen during play.
0OPEN/CLOSE buttons
Usedthe0(OPEN/CLOSE)buttontoopenandclosethedisctray.
STANDBY/ON
XL-FV323 VIDEO CDPLAYER
MIC 1
MIC 2
PBC ON/OFF MPX PROGRAM
DISC
DISC SKIP EXCHANGE PREV NEXT
1
6
2
7
3
8
DOWN NORMAL UP SEARCH
BOOKKEY CONTROL MARK
MIN MAX
MIC 1
MIN MAX
MIC 2
MIN MAX
DIGITAL ECHO
/
VIDEO CD
P
312 45
123456 8
10
11
12 13
9
14 15 16
17
21
7
1
2
3
4
5
6
7
8
9
10
11
12
13
14
15
16
17
19
18
20
21
22