JVC LT-17X576 User manual

LT-17X576
3X576
LCD FLAT TELEVISION INSTRUCTIONS
TELEVISEUR A ECRAN PLAT – LCD MANUEL D’INSTRUCTIONS
ENGLISH
FRANÇAIS
LT-23X576
5030057131
0305TNH-TU

Important Safety Precautions
CAUTION
RISK OF ELECTRIC SHOCK
DO NOT OPEN
CAUTION : To reduce the risk of electric shock. Do not remove
cover (or back). No user serviceable parts inside.
Refer servicing to qualified service personnal
The lightning flash with arrowhead symbol, within
an equilateral triangle is intended to alert the user
to the presence of uninsulated "dangerous voltage"
within the product's enclosure that may be of sufficient
magnitude to constitute a risk of electric shock to
persons.
The exclamation point within an equilateral triangle is
intended to alert the user to the presence of important
operating and maintenance (servicing) instructions in
the literature accompanying the appliance.
WARNING: TO PREVENT FIRE OR SHOCK HAZARDS, DO NOT EXPOSE THIS TV
SET TO RAIN OR MOISTURE.
CAUTION:
TO INSURE PERSONAL SAFETY, OBSERVE THE FOLLOWING RULES
1. Operate only from the power source specified on the unit.
REGARDING THE USE OF THIS UNIT.
2. Avoid damaging the AC plug and power cord.
3. Avoid improer installation and never position the unit where good
ventilation is unattainable.
4. Do not allow objects or liquid into the cabinet opening.
5. In the event of trouble, unplug the unit and call a service technician. Do
not attempt to repair it yourself or remove the rear cover.
Changes of modifications nor approved by JVC could void the warranty.
* When you don't use the TV set for a long period of time, be sure to
disconnect both the power plug from the AC outlet and antenna for your
safety.
* To prevent electric shock do not use this polarized plug with an extension
cord, receptacle or other outlet unless the blades can be fully inserted to
prevent blade exposure.
IMPORTANT RECYCLING INFORMATION
This product has a fluorescent lamp that contains a small amount of mercury. It also
contains lead in some components. Disposal of the materials may be regulated in your
community due to environmental considerations. For disposal or recycling information,
please contact your local authorities, or the Electronic Industries Alliance:
http://www.eiae.org
1
ENGLISH

IMPORTANT SAFETY INSTRUCTIONS
1. Read these instructions.
2. Keep these instructions.
3. Heed all warnings.
4. Follow all instructions.
5. Do not use this apparatus near water.
6. Clean only with dry cloth.
7. Do not block any ventilation openings. Install in accordance with the manufacturer's instructions.
8. Do not install near any heat sources such as radiators, heat registers, stoves, or other apparatus
(including amplifiers) that produce heat.
9. Do not defeat the safety purpose of the polarized or grounding-type plug.
A grounding type plug has two blades and a third grounding prong.
The wide blade or the third prong are provided for your safety. If the provided
plug does not fit into your outlet, consult an electrician for replacement of the obsolete outlet.
10. Protect the power cord from being walked on or pinched particularly at plugs, convenience
receptacles, and the point where they exit from the apparatus.
11. Only use attachments/accessories specified by the manufacturer.
12. Use only with a cart, stand, tripod, bracket, or table sprecified by the manufacturer, or sold with
the apparatus. When a cart is used, use caution when moving the cart/apparatus combination to
avoid injury from tip-over.
13. Unplug this apparatus during lightning storms or when unused for long periods of time.
14. Refer all servicing to qualified service personnel. Servicing is required when the apparatus
has been damaged in any way, such as power-supply cord or plug is damaged, liquid has been
spilled or objects have gallen into the apparatus, the apparatus has been exposed to rain or
moisture, does not operate normally, or has been dropped.
15. Apparatus shall not be exposed to dripping or splashing and no objects fill with liquids, such
as vases, shall be placed on the apparatus.
s!SANh%.%2'934!2¤vPARTNER
*6#HASDETERMINEDTHATTHIS
PRODUCTORPRODUCTMODELMEETSTHE
h%.%2'934!2¤vGUIDELINESFORENERGY
EFFICIENCY
A polarized plug has two blades with wider than the other.
2
FCC Notice:
Note: This equipment has been tested and found to comply with the limits for a Class B
digital device, pursuant to Part 15 of the FCC Rules. These limits are designed to provide
reasonable protection against harmful interference in a residential installation. This
equipment generates, uses and can radiate radio frequency energy and, if not installed
and used in accordance with the instructions, may cause harmful interference to radio
communications. However, there is no guarantee that interference will not occur in a
particular installation. If this equipment does cause harmful interference to radio or television
reception, which can be determined by turning the equipment off and on, the user is
encouraged to try to correct the interference by one or more of the following measures:
– Reorient or relocate the receiving antenna.
– Increase the separation between the equipment and receiver.
– Connect the equipment into an outlet on a circuit different from that to which the receiver is
connected.
– Consult the dealer or an experienced radio/TV technician for help.

Thank you for buying this JVC LCD flat television.
To make sure you understand how to use your new TV, please read this manual thoroughly before you begin.
(“LCD” stands for Liquid Crystal Display.)
WARNING
Always use the provided AC adapter and power cord.
WARNING: TO PREVENT FIRE OR SHOCK HAZARD, DO NOT EXPOSE THIS APPLIANCE TO RAIN OR
MOISTURE.
WARNING
• Fingers may be trapped under the TV causing injuries. Hold the TV at the
bottom in the middle, and do not allow it to tilt up or down.
• The TV may fall causing injuries. Hold the bottom of the stand with your
hand and tilt the TV up and down.
CAUTION:
• Operate only from the power source (AC 120V, 60 Hz).
• Avoid damaging the AC plug, AC adapter and power cord.
• When you are not using this unit for a long period of time, it is
recommended that you disconnect the power cord from the
main outlet.
• Do not allow children to hang from the TV, place their elbows on the TV
or lean against the TV. Doing so may cause the TV to fall over and lesd
to injuires.
• only
•
CAUTION ON HEATING OF AC ADAPTER:
•In using, the AC adapter get heat on the sunface of case. • Don't be covered with any material on case of AC adapter
It is normal, not defective. while it is in operation.
CAUTION:
• To avoid electric shock or damage to the unit, first firmly
insert the small end of the power cord into the AC Adpater
unit it is no longer wobbly, and then plug the larger end of
power cord into an AC outlet.
NOTES:
• The rating plate (serial number plate) and safety caution
are on the back of the main unit.
are on its upper and lower sides.
• The rating information and safty causion of the AC Adapter
• Illustration of LT-17X576
3
ENGLISH

Failure to take the following precautions may cause damage to the television or remote control.
DO NOT block the TV’s ventilat ion openings or holes.
(If the ventilation openings or holes are blocked by a newspaper or cloth, etc., the heat may not be able to get out.)
DO NOT place anything on top of the TV.
(such as cosmetics or medicines, flower vases, potted plants, cups, etc.)
(If water or liquid is allowed to enter this equipment, fire or electric shock may be caused.)
DO NOT place any naked flame sources, such as lighted candles, on the TV.
DO NOT subject the TV to direct sunlight.
Cleaning the screen
Thescreeniscoatedwithaspecialthinfilm to reduce reflection. If this film is damaged, uneven colors, discoloration, scratches,
and other problems that can not be repaired may occur. Pay attention to the following when handling the screen.
• Do not use glue or adhesive tape on the screen.
• Do not write on the screen.
• Do not allow the screen to come in contact with any hard objects.
• Do not allow condensation to form on the screen.
• Do not use alcohol, thinner, benzene or other solvents on the screen.
• Do not rub the screen hard.
Point defects
LCDs use collections of fine pixels to display images. While there is no problem with more than 99.99% of these pixels, please
understand that a very small number of pixels may not light or may light all the time.
Distance recommendations
Avoid improper installation and never position the unit where good
ventilation is impossible.
When installing this TV, distance recommendations must be maintained
between the set and the wall, as well as inside a tightly enclosed area or
piece of furniture.
Keep to the minimum distance guidelines shown for safe operation.
The surface of the TV screen is easily damaged. Be very careful with it when handling the TV.
Should the TV screen become soiled, wipe it with a soft dry cloth. Never rub it forcefully.
Never use any cleaner or detergent on it.
If there is a fault, unplug the unit and call a service technician. Do not attempt to repair it yourself or remove the rear cover and the
200 mm 200 mm
50 mm
150 mm 150 mm
DO NOT allow objects or liquid into the cabinet openings.
AC adapter.
4

CONTENTS
Setting up your TV..................................6
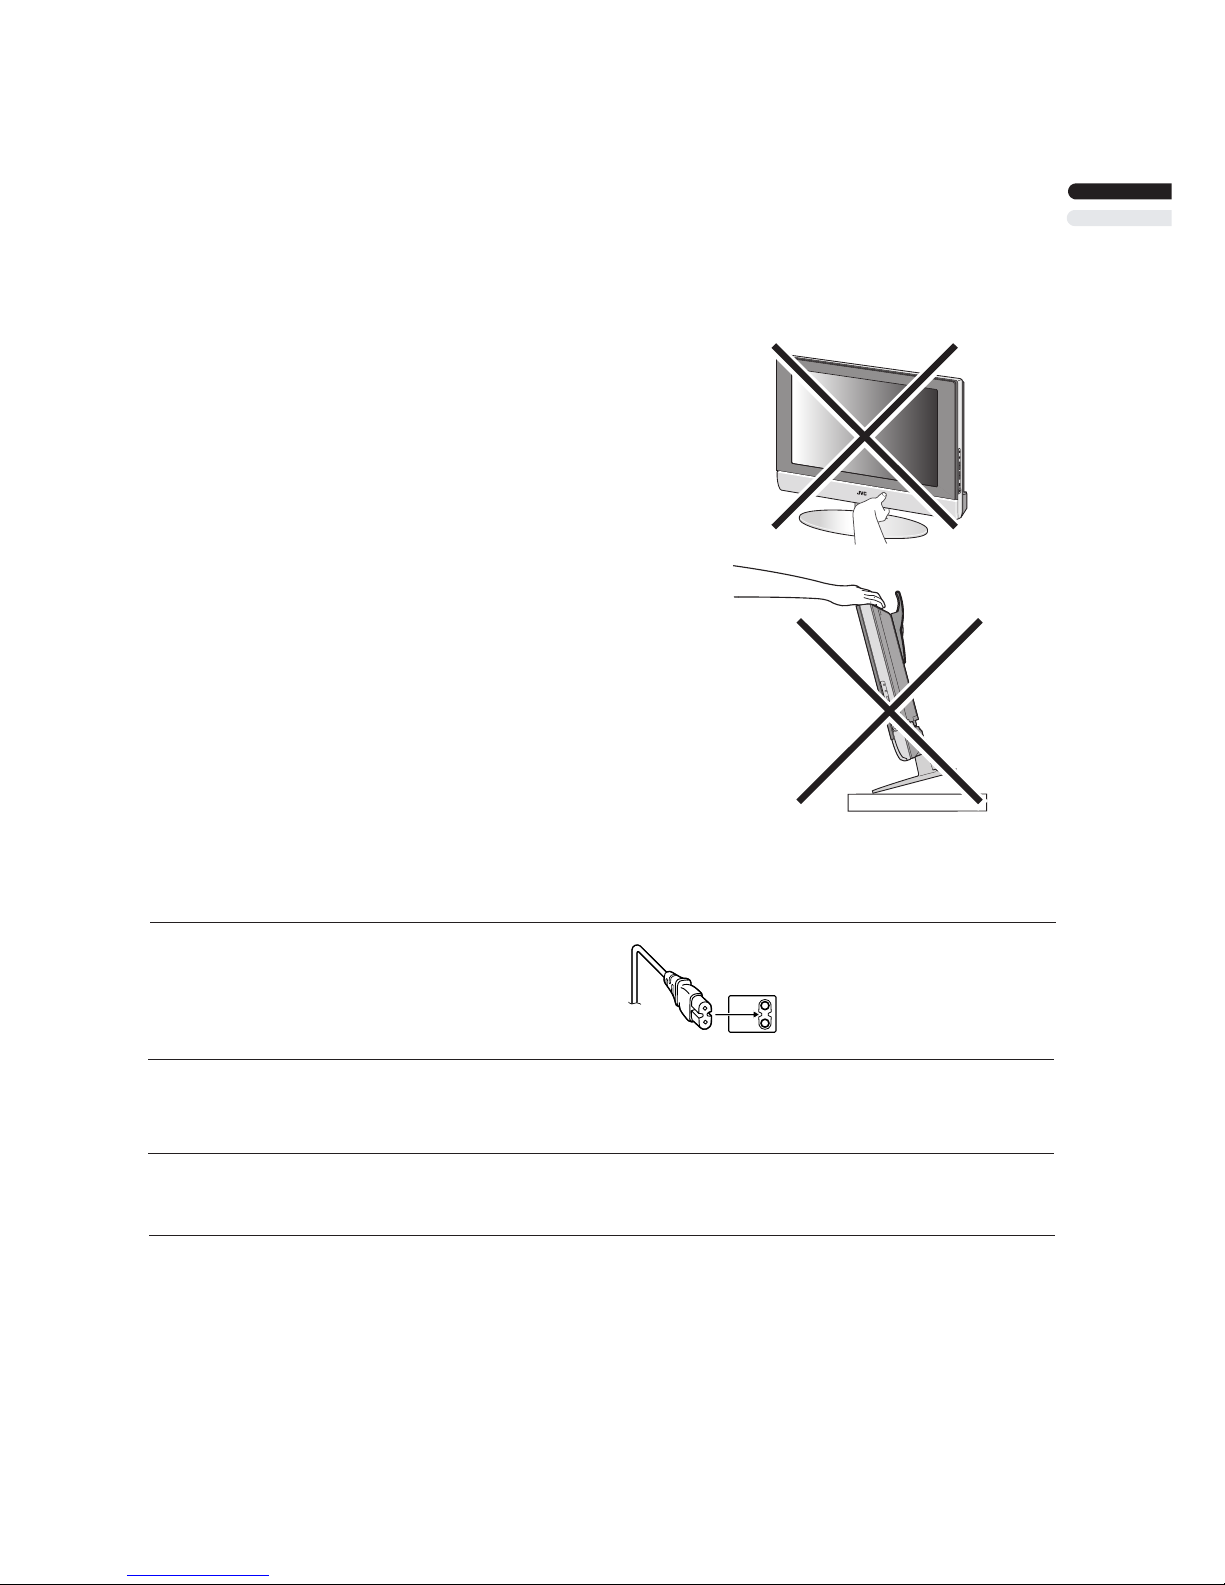
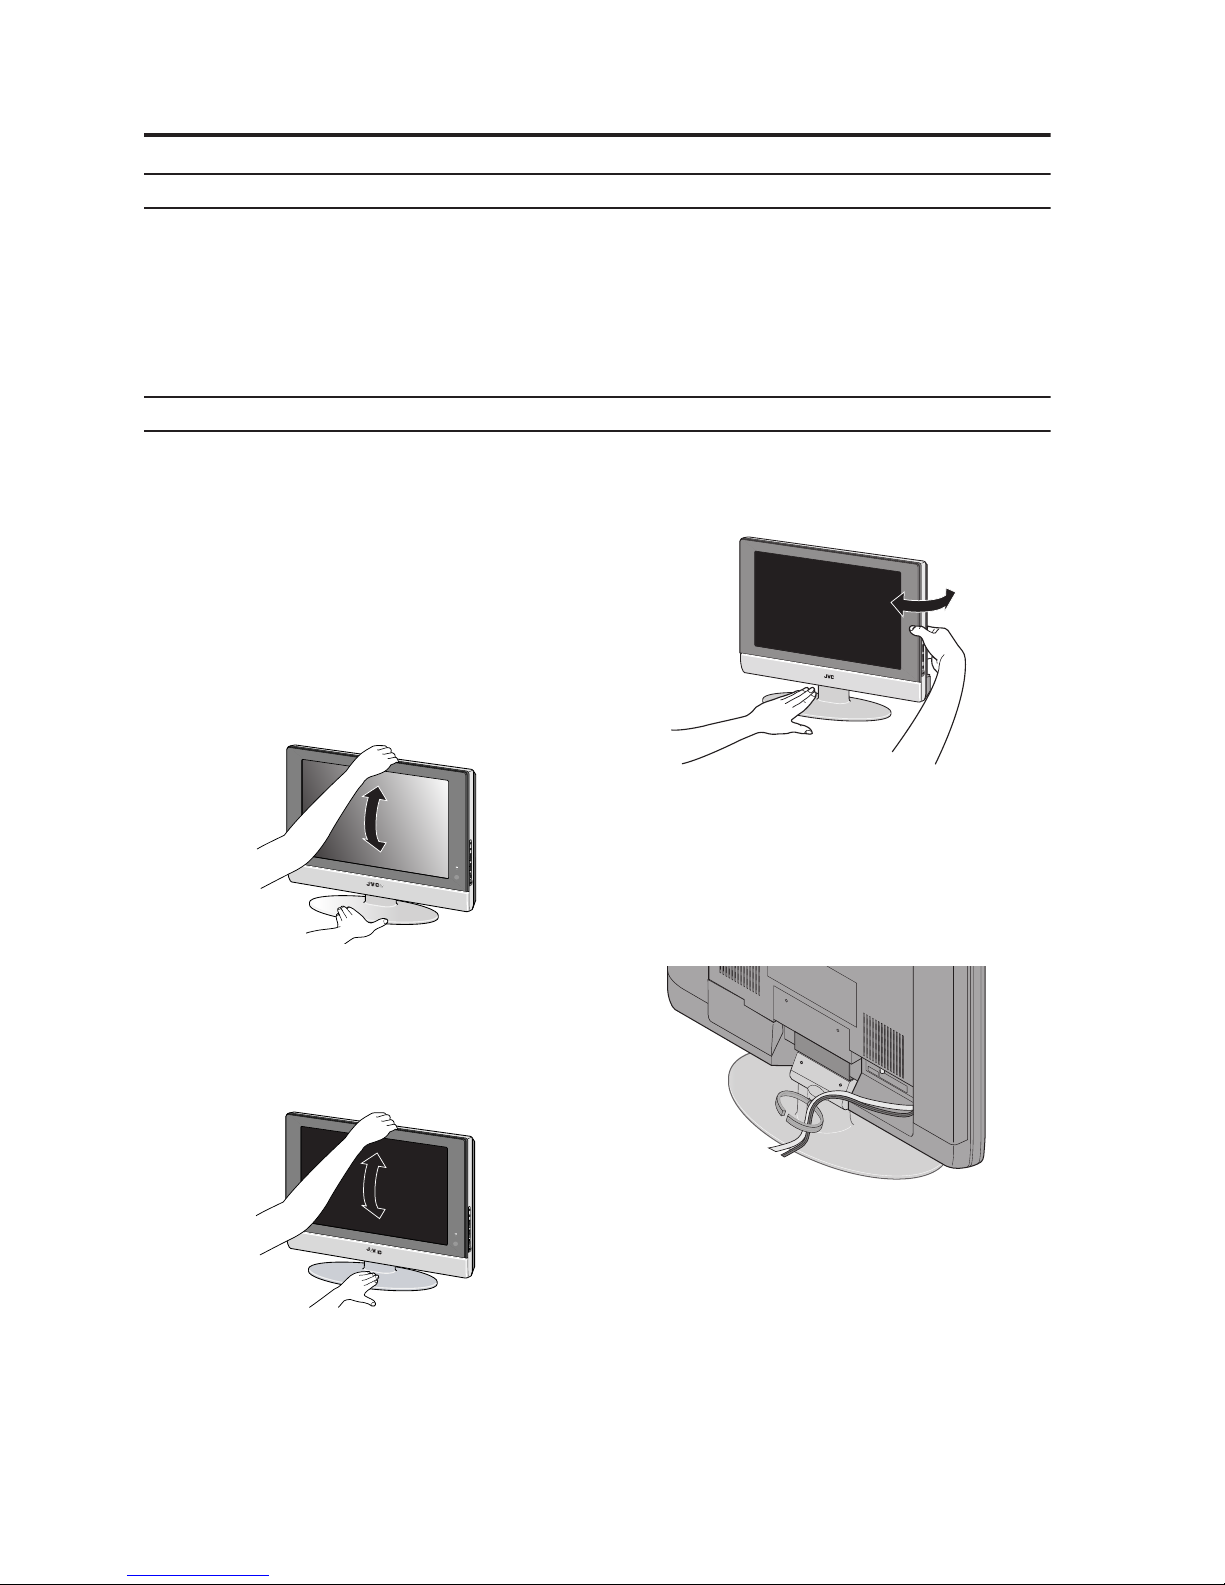
Installation..........................................................6
Using the stand ..................................................6
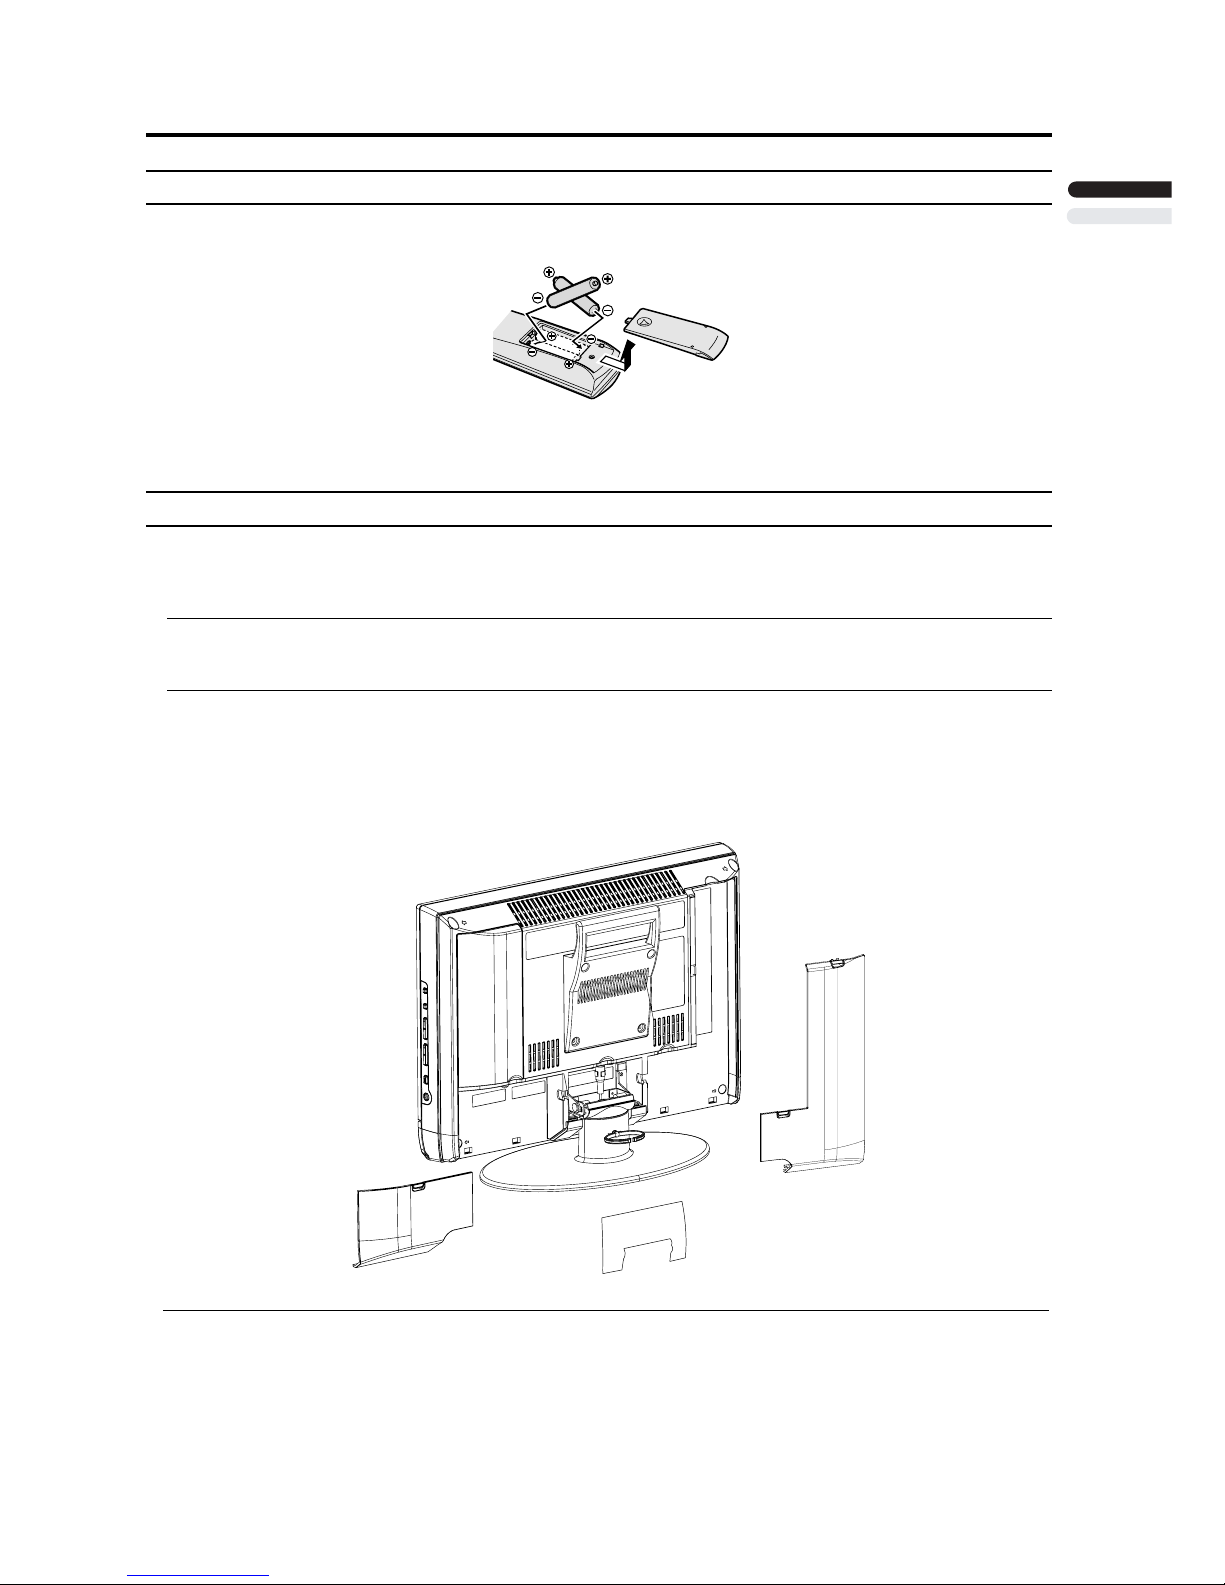
Putting the batteries into the Remote control.....7
Remove the terminal cover ................................7
Connecting the aerial and video cassette
recorder (VCR)...................................................8
Connecting the power cord to the AC outlet ......8
TV buttons and functions ......................9
Turn the TV on from standby mode ...................9
Choose a TV channel ........................................9
Watch images from external devices .................9
Adjust the volume ..............................................9
Using the Menu..................................................9
Remote control buttons and
functions............................................10
Turn the TV on or off from standby mode ........10
Choose a TV channel ......................................10
Adjust the volume ............................................11
Watch images from external equipment ..........11
ZOOM function.................................................12
Operating a JVC brand VCR or DVD player ....13
Using the TV’s menu............................14
Basic operation ................................................14
PICTURE SETTING................................15
VIDEO STATUS ..............................................15
Picture Adjustment...........................................15
COLOR TEMPERATURE.................................15
SOUND SETTING ................................. 16
Sound Adjustment........................................... 169
...................................... 169
FEATURES............................................ 17
NOISE MUTING .............................................. 17
FRONT PANEL LOCK .................................... 17
INITIAL SETUP...................................... 18
LANGUAGE .................................................... 18
AUTO TUNER SETUP ....................................18
Additional preparation......................... 23
Connecting external equipment ...................... 248
Troubleshooting ...................................25
Specifications....................................... 29
HYPER SURROUND
Sleep timer funtion ..........................................12
RESET..............................................................15
VIDEO STATUS...............................................12
AUTO SHUT OFF ........................................... 17
PC MENU............................................... 21
PC PICTURE POSITION................................. 21
PC PICTURE................................................... 21
SOUND............................................................ 21
Displaying the source information.....................11
CHANNEL SUMMARY.....................................18
PC support mode list........................................ 22
CLOSED CAPTION .........................................19
V-CHIP .............................................................19
SET LOCK CODE ............................................20
MTS (Multi-Channel Television Sound)............11
Using the PC PIP function ..............................13
C.C. (Closed Caption)......................................12
Initial Setup.........................................................8
ENGLISH
5
MEMO.....................................................30

6
Setting up your TV
Installation
Cautions for installation
• Install the TV in a corner on a wall or on the floor so as to keep cords out of the way.
• The TV will generate a slight amount of heat during operation. Ensure that sufficient space is available around the TV to allow
satisfactory cooling. See “Distance recommendations” on page 4.
Using the stand
This TV comes with a Table Top Stand already
attached.
This stand can be used to adjust the direction of the TV
screen 5° up, 10° down, and 20° to the left or right.
Tilt the TV up and down:
While holding the bottom of the stand with one hand, use
your other hand to hold the middle of the top of the TV and
slowly tilt the TV up and down.
• As a safety measure, the stand is constructed so that it
requires a certain amount of force to tilt the TV.
Rotate the TV to the left and right:
While holding the bottom of the stand with one hand, use
your other hand to hold the edge of the panel and slowly
adjust the direction of the TV screen.
Cable holder
A cable holder which is used to keep the connection cables
tidy is attached to the back of the stand.
cable holder
LT-17X576
LT-23X576
Tilt slowly
Hold down steadly in front of center on stand
Tilt slowly
Hold down steadly

Setting up yourTV
Putting the batteries into the Remote control
Use two AA/R6 dry cell batteries.
Insert the batteries from the -end, making sure the +and -polaritiesare correct.
• Follow the warnings printed onthe batteries.
• Battery life is about six months to one year, depending on your frequency of use.
• The batteries we supply are only for setting up and testing your TV, please replace them as soon as you need to.
• If the remote control does not work properly, replace the batteries.
Remove the terminal cover
There are connection terminals behind the covers of the rear of the TV. Remove the cover before
connecting a DVD o
ENGLISH
r VCR.
The covers can be removed by removing the hook at the top and then pulling out while lifting slightly. To replace the covers,
first connect the hook at the bottom of the cover to the TV and then insert the hook at the top.
• Leave the covers off if they do not fit properly. Do not force to replace the covers. Doing so may cause damages of the
connection cables and the covers.
• Leave these covers off when mounting the TV on a wall.
7
•100mm mount based on VESA regulation is equipped. As for the wall mounting unit, please consult your dealer.
•The handle and the stand can be left by loosing the screws with a screwdriver when mounting the TV on a wall.
• Spread a soft cloth on a flat table and then place the TV on the cloth with the screen facing downwards when you leave the
handle and the stand.

without terminal covers
VCR
Aerial
To Aerial Output
To Aerial Intput
75-ohm Coaxial Cable
75-ohm
Coaxial
Cable
B
1
B
A
A
DCIN
(12V)
PCIN
D-SUB
15PIN
75
(VHF/UHF)
Ө
DCIN
(19V)
PCIN
D-SUB
15PIN
INPUT 2
S-VIDEO
VIDEO
AUDIO
OVER
L
R
Y
Pb
Pr
AUDIO
L
R
COMPONENT
VIDEO
INPUT 1
INPUT 2
S-VIDEO
VIDEO
AUDIO
OVER
L
R
Y
Pb
Pr
AUDIO
L
R
COMPONENT
VIDEO
INPUT 1
PC
AUDIO
IN
DCIN
(12V)
PCIN
D-SUB
15PIN
75
(VHF/UHF)
Ө
DCIN
(19V)
PCIN
D-SUB
15PIN
INPUT 2
S-VIDEO
VIDEO
AUDIO
OVER
L
R
Y
Pb
Pr
AUDIO
L
R
COMPONENT
VIDEO
INPUT 1
PC
AUDIO
IN
• To connect the PC, please see "Connecting the PC"
• The connectin
on page
g cables are not pro
24.
vided.
• For further details, refer to the manuals provided with
the
Settin
dev
g up your TV
ices to be connected.
If you are connecting a VCR, follow
in the diagram below.
If you are not connecting a VCR, fo
Connecting the aerial and video
llow .
cassette recorder (VCR)
Connecting the power cord to the AC
outlet
•
•
R
T
e
o
m
connect
ove
more equ
the AC
i
p
pment, please see “Connecting
l
external
ug from
equipm
th
ent” on page
e outle
23.
t to completely
disconnect the TV fr
If
om the po
you are conn
wer
ect
supp
ing
ly.
a AC adapter, follow
in the diagram below.
• Connect to the TV and to the AC outlet.
(AC 120 V, 60 Hz)
Caution
• Operate only from the power source
8
C
When the television is first turned on, the INITIAL SETUP menu will appear.
INITIAL SETUP
First in beginning, please select the LANGUAGE and do AUTO TUNER SETUP.
: SELECT
INITIAL SETUP
LANGUAGE ENG/FRAN/ESP/
AUTO TUNER SETUP
OK : OPERATE
CLOSED CAPTION
V-CHIP
SET LOCK CODE
CHANNEL SUMMARY
ʒᄾ
• As for setting Language and Auto
Tuner Setup, see page 18.
• When you do not perform AUTO TUNER
SETUP, the INITIAL SETUP menu will
appear every time you turn the power on.

9
TV buttons and functions
1
2Remote control sensor
3
4
MENU button
5
INPUT OK button
6
VOLUME button
7
CHANNEL button
8Headphone jack (mini jack)
Turn the TV on from standby mode
Press the POWER button to turn the TV on from
standby mode
• Check that the AC plug on the power cord from the TV
is connected to correctly AC outlet.
Choose a TV channel
Press the CHANNEL buttons to choose a
program number
Watch images from external devices
Press the INPUT button to choose an INPUT
terminal
Adjust the volume
Press the VOLUME buttons
The volume level indicator appears.
Using the Menu
Use the MENU button.
Refer to “Using the TV’s menu” (see page 14) for details of
using the menu.
Standby botton
1
2
Power lamp
PC
PC
TV mode EXT modes
Last
Program
number
VIDEO-2
VIDEO-1
ENGLISH
3
4
5
6
7
8
l
l

10
Remote control buttons and functions
Turn the TV on or off from standby
mode
1 Make sure to set the VCR/TV/DVD switch to the
TV position.
• You cannot turn the TV on or off when the VCR/TV/
DVD switch is set to the VCR or DVD position.
2 Press the POWER button to turn on or off.
When the TV is turned on, the power lamp lights Green.
• The power can be turned on by pressing the TV
• Check that the AC plug on the power cord from the
TV is connected to AC outlet.
Choose a TV channel
Use the number buttons:
Enter the program number of the channel
using the number buttons.
Example:
•12 press 1and 2
Use the CHANNEL buttons:
Press the CHANNEL buttons to choose
the program number you want.
1Muting bu
VIDEO STATUS button
tton
2Number buttons
3 ASPECT button
C.C. button
4
DISPLAY button
5
6
7
/buttons
8
9
CHANNEL buttons
10
VCR/DVD/PIP control buttons
11
buttons
12
POWER button
13
VCR/TV/DVD switch
14
MTS button
button
15
16 MENU button
17
OK
BACK
button
18
buttons
19 button
20
SLEEP TIMER button
/
/
INPUT
POWER
100+
INPUT
SLEEP
TIMER
MTS
ASPECT
C.C.
CHANNEL
PC PIP
PIP MOVE
TOP MENU
SIZE SOUND
RM-C1880
VOLUME
DISPLAY BACK
MUTING
VIDEO
STATUS
1
2
3
4
5
6
7
8
9
10
11
12
13
14
15
16
17
18
19
20
VOLUME buttons
button
•
6 press 0 and 6
•123 press 100+ and 2 and 3

11
Remote control buttons and function
Adjust the volume
Press the VOLUME buttons to adjust the volume.
The volume indicator appears and the volume changes as
you press the VOLUME buttons.
Muting the sound
Press the muting button to turn off the
sound.
Pressing the muting button again restores the previous
volume level.
Watch images from external equipment
Use the INPUT button:
Press the INPUT button to choose an VIDEO
terminal.
Displaying the source information
You can display the source information on the screen.
Press the DISPLAY button to display the
source information.
changes the display as
follows:
• The source information switched by DISPLAY button.
• The source type :
TV/VIDEO-1/VIDEO-2/PC
Pressing the DISPLAY button
In the PC mode:
If following message appears, the power lamp blinks in
amber and the TV goes in to reduced power mode.
- "NO SIGNAL"
- "CABLE NO INSERT"
- "OUT OF RANGE"
See "Troubleshooting" on page 25 for detials of this messages.
or
Signal source
01
STEREO
VIDEO-1
TV
EXT
No Display
or
Signal source
TV
EXT
No Display
PC
PC
TV mode EXT modes
Last
Program
number
VIDEO-2
VIDEO-1
ENGLISH
MTS (Muti-Channel Television Sound)
MTS technology allows several audio signals to be broadcast
at once, giving you a choice in what you wish to hear with a TV
program. In addition to mono or stereo sound, an MTS broadcast
may also include a second audio program(SAP).
• Keep the TV in stereo mode to get the best sound quality. The
Press MTS button to switch STEREO/SAP/MONO.
sound will work in stereo mode even if a certain broadcast is in
mono sound only.
• Choose the mono setting to reduce excessive noise on a certain
channel or broadcast.
• Selecting SAP will allow you to hear an alternative soundtrack,
if one is available.
• MTS unavailable if your television's input source is in VIDEO-1,
VIDEO-2.

Remote control buttons and functions
12
ASPECT function
You can change the screen size according to the picture
aspect ratio. Choose the optimum one from the following
ASPECT modes.
Choose the ASPECT mode
1Press the ASPECT buttton to display the aspect
mode
Adjusting the visible area of the picture
If subtitles or the top (or bottom) of the picture are cut off,
you can adjust the visible area of the picture manually.
1PresstheASPECT button
The ASPECT is displayed in OSD.
2While it is displayed, press the buttons to
change the position of the picture
• You cannot adjust the visible area in REGULAR or
FULL mode.
/
• When the PANORAMA and CINEMA mode appears
arrows on top and bottom to move the screen.
Sleep timer function
The Sleep Timer can turn the TV off for you after you fall
asleep. Program it to work in intervals of 10 minites, for
a total time of up to 120 minutes.
Press the sleep timer button.
VIDEO STATUS
Press the VIDEO STATUS button.
You can choose one of five VIDEO STATUS to adjust
the picture settings automatically.
DYNAMIC:
Heightens contrast and sharpness.
STANDARD:
Standardizes picture adjustment.
THEATER:
Softens contrast and sharpness.
GAME:
Normal contrast and sharpness.
C.C. (Closed Caption)
Use the C.C. (Closed Caption) button to select the mode of
closed caption.
Press the C.C. buttton to switch OFF/CAPTION/TEXT.
• See page 18 when you set the caption/text mode.
PANORAMA
HD PANORAMA - This ratio stretches
the High-Definition 16:9 aspect image to
eliminate the black side bars.
CINEMA ZOOM - This ratio stretches
the High-Definition 16:9 aspect image to
eliminate the black surrounding bars.
REGULAR - The regular ratio is used
when you want to watch a 4:3 broadcast
or recorded program without modifying the
original picture to fit the dimensions of your
16:9 screen. The 4:3 picture will fill the
screen from top to bottom, while black bars
will appear to fill up the remaining space
along the picture’s sides. The 4:3 picture
will be centered within the boundaries of the
16:9 screen.
PANORAMA - With this ratio a normal
4:3 aspect picture is stretched to fit the
dimensions of the 16:9 aspect screen.
CINEMA - This ratio “zooms in” on the
center part of a 4:3 aspect picture, blowing
it up to fill the 16:9 screen.
FULL - This is the ratio to use when
watching 16:9 High-Definition broadcasts.
REGULAR when the broadcast is NTSC, 480i, 480p.
• You can choose PANORAMA, CINEMA, FULL or
You can choose HD PANORAMA or CINEMA ZOOM,
or FULL when the broadcast is HD (1080i or 720p).

Remote control buttons and functions
13
Operating a JVC brand VCR or DVD
player
These buttons will operate a JVC brand VCR or DVD
player. Pressing a button that looks the same as the device’s
original remote control button has the same effect as the
original remote control.
1 Set the VCR/TV/DVD switch to the VCR or DVD
position
VCR:
When you are using a VCR, set the switch to the VCR
position. You can turn the VCR on or off with the
Standby button.
DVD:
When you are using a DVD player, set the switch to the
DVD position. You can turn the DVD player on or off
with the Standby button.
2 Press the VCR/DVD Control Button to control
your VCR or DVD player
• If your device is not made by JVC, these buttons will
not work.
• Even if your device is made by JVC, some of these
buttons may not work, depending on the device you
are using.
• You can use the CHANNEL-/+ buttons to choose a TV
channel the VCR will receive, or choose the chapter
the DVD player plays back.
• Some models of DVD player use the CHANNEL-/+
buttons for both operating the fast forward/backward
functions and for choosing the chapter.
• Set the VCR/TV/DVD switch to the TV position
when you turn the TV on or off.
To use DVD MENU button
Some DVDs allow you to select the disc contents using the
menu. When you playback these DVDs, you can select the
subtitle language and sound-track language, etc. by using
the DVD menu.
1Press DVD MENU button during play back
The DVD menu appears on the screen.
•Press DVD MENU button again to resume playback
at the scene when you pressed the button.
2 Press or buttons to select the desired
item
3Press OK button
The menu continues to another screen.
Repeat steps 2 and 3 to set additional items if any.
/
/
ENGLISH
-
Using the PC PIP function
A PC picture and TV or a video program from an
external device can be watched at the same time.
1Press
thePIP button.
2Presst
heMOVE button to change the position of
sub-picture
3Press the SIZE buttonto change
Pi
th
ctur
e sub-picture
e in picture m
size
ode
Cancel the PIP function
Main-
pict
Change sub-picture position
ure
Main-
picture
Sub-
picture
Picture in picture mode
Change sub-picture size
Main-
picture
Main-
picture
Sub-
picture
Sub-
picture
4Presst
heSOUND button to choose the sound
MAIN : Main picture's sound
PIP : Sub picture's sound

14
Using the TV’s menu
This TV has a number of functions you can operate using
menus. To use all your TV’s functions, you need to
understand the basic menu operating techniques fully.
Operation with the buttons on the TV
You can also operate the menus using the buttons on the
front panel of the TV.
The menu will disappear after about two minutes if no
operation is performed.
Press the BACK button on the remote control or the
MENU button on the TV.
press the MENU button on the TV several times.
Basic operation
1 Press the MENU button to display the MENU (main
menu)
2 Press thebuttons to choose a menu
title, and press the OK button
The menu appears.
To return to the previous menu:
To exit
Press the MENU button on the remote control or
a menu instantly:
/
buttons while the menu is
3Press the buttons to choose a function
• For details of the functions in the menus, see the
following pages.
4 Press the buttons to choose the setting of
that function
• If you want to operate a function which appears only
with its name, follow the descriptions of that function
on the following pages.
• The display appearing at the bottom of a menu shows
you a button on the remote control that you can use
when you operate a chosen function.
5 Press the OK button to complete the setting
The menu disappears.
disappear if you press the
CHANNEL -/+ buttons, the AV button or the number
displayed.
/
/
: SELECT
MENU
PICTURE
SOUND
FEATURES
OK : OPERATE
INITIAL SETUP
POWER
100+
INPUT
SLEEP
TIMER
MTS
ASPECT
C.C.
CHANNEL
PC PIP
PIP MOVE
TOP MENU
SIZE SOUND
RM-C1880
VOLUME
DISPLAY BACK
MUTING
VIDEO
STATUS
/
/
OK • The menu will be
MENU button
buttons
buttons
INPUT/OK button
/
/
l
l

15
PICTURE SETTING
Refer to “Using the TV’s menu” (see page 14) for details of
displaying the menu.
VIDEO STATUS
You can choose one of five VIDEO STATUS to adjust the
DYNAMIC:
Heightens contrast and sharpness.
STANDARD:
Standardizes picture adjustment.
THEATER:
Softens contrast and sharpness.
Picture Adjustment
You can change the picture settings of each PICTURE
MODE mode as you like.
PICTURE:
You can adjust the levels of black and white on TV screen,
:lower
: higher
BRIGHT:
You can adjust the overall brightness of the TV picture
:darker
: brighter
DETAIL:
You can adjust the level of fine detial displayed in the picture.
:softer
:sharper
COLOR:
You can make all the colors in the TV picture appear either
: lighter
: deeper
TINT:
You can adjust the levels of red and green in your TV picture.
:reddish
:greenish
COLOR TEMPERATURE
You can select one of two COLOR TEMPERATURE modes
(two tones of white) to adjust the white balance of the picture.
Since white is the color which is used as a reference for all
the other colors, changing the COLOR TEMPERATURE
mode affects the appearance of all the other colors on the screen.
HIGH:
A bluish white. Using this mode when watching bright
pictures allows you to enjoy a more vivid and bright picture.
LOW:
A reddish white. Using this mode when watching films
allows you to enjoy colors that are characteristic of films.
ENERGY SAVER MODE:
You can adjust the back light.
: darker
: lighter
RESET
You can reset the picture settings you have chosen to the
GAME:
Normal contrast and sharpness.
: SELECT
PICTURE
VIDEO STATUS STANDARD
TINT
COLOR
PICTURE
BRIGHT
DETAIL
ENERGY SAVER MODE
COLOR TEMPERATURE HIGH
: OPERATE
RESET
more vivid or subtle.
giving you a darker or brighter picture overall.
with the Bright control.
ENGLISH
default in each video status.
picture settings automatically.
You can also set the setting you like in each video status.

SOUND SETTING
Refer to “Using the TV’s menu” (see page 14) for details of
displaying the menu.
Sound Adjustment
You can adjust the sound to your liking.
BASS:
You can adjust the low tone of the sound.
: weaker
: strong
TREBLE:
You can adjust the high tone of the sound.
: weaker
: strong
When the bar is in center of BASS, TREBLE and
NCE:
You can adjust the volume balance between the left and
right speaker.
: turn the left speaker’s volume level up.
: turn the right speaker’s volume level up.
16
HYPER SURROUND:
You can enjoy Surround sound with a “live” effect by using
ON: HYPER SURROUND function is turned on.
OFF: HYPER SURROUND function is turned off.
the HYPER SURROUND functions.
: SELECT
SOUND
BASS
TREBLE
BALANCE
HYPER SURROUND OFF
: OPERATE
BALANCE, become yellow.
BALA
•

17
FEATURES
Refer to “Using the TV’s menu” (see page 14) for details of
displaying the menu.
NOISE MUTING
You can set the TV to automatically change to a blue screen
and mute the sound if the signal is weak or absent, or when
there is no input from an external device.
ON:
This function is turned on.
OFF:
This function is turned off.
FRONT PANEL LOCK
This allows you to lock the keys on the front of the TV, so
that a child may not accidentally change your viewing
preferences.
AUTO SHUT OFF
shut off when received no signal after 9 minutes.
When the AUTO SHUT OFF mode is on, the TV will
FEATURES
NOISE MUTING OFF
: SELECT : OPERATE
FRONT PANEL LOCK OFF
AUTO SHUT OFF OFF
ENGLISH

18
INITIAL SETUP
Refer to “Using the TV’s menu” (see page 14) for details of
displaying the menu.
LANGUAGE
The language in which you want the onscreen menus to
appear.
/
/
2he and buttons to choose the
ress
t
1he buttons to choose the CHANNEL
SUMMARY and press to OPERATE.
ress
t
P
1 Select TUNER MODE and press the buttons
to switch AIR/CABLE
2 Select START and press the button to
start channel programming.
/
/
that you want. Then press 0 button to lock or
In auto tuner setup, the TV automatically scans through all
Select LANGUAGE and press the buttons
to choose the language.
/
ENG/FRAN/ESP/
AUTO TUNER SETUP
available channels.
CHANNEL SUMMARY
CH NO. SCAN
01
02
03
04
05
06
07
08
09
10
CH NO. SCAN
11
12
13
14
15
16
17
18
19
20
:SELECT OK : OPERATE
After scanning, the CHANNEL SUMMARY menu appear,
and the channel with program signal will be marked by
mark .
CHANNEL SUMMARY
CH NO. SCAN
01
02
03
04
05
06
07
08
09
10
CH NO. SCAN
11
12
13
14
15
16
17
18
19
20
:SELECT OK : OPERATE
CHANNEL
SU
MMARY
CH NO. SCAN
01
02
03
04
05
06
07
08
09
10
CH NO. SCAN
11
12
13
14
15
16
17
18
19
20
: SELECT OK : OPERATE
/
to enable or disable the channel by mark .
You can delete channels from the scan by removing the
" ". If any channels were missed during auto setup and
you wish to add them, you may by placing an " " next
to the channel number.
: SELECT
INITIAL SETUP
LANGUAGE ENG/FRAN/ESP/
AUTO TUNER SETUP
OK : OPERATE
CLOSED CAPTION
V-CHIP
SET LOCK CODE
CHANNEL SUMMARY
ʒᄾ
AUTO TUNER SETUP
TUNER MODE CABLE
: SELECT : OPERATE
START
CHANNEL SUMMARY
խ֮
When a viewer attempts to watch a blocked channel, this
message appears:
NO. - - - -
THIS CHANNEL IS LOCKED BY
CHANNEL GUARD.
PLEASE ENTER LOCK CODE BY
10 KEY PAD TO UNLOCK IT.
To watch a channel that you have locked, enter the Lock
Code using the 10 key pad. If the wrong code is entered,
Channel Guard Message
the message "INVALID LOCK CODE!" will flash on
screen.
The channel cannot be accessed until the correct lock code
is entered.
• Once a channel has been locked, it will remain unlocked
• See also "SET LOCK CODE", page 20.
NOTE :
until the television is turned off.
P/
/
3 Press the and buttons to choose the
unlock channel by mark.
CHANNEL that you want. Then press OK button
/

CLOSED CAPTION
Many broadcasts now include an onscreen display of
dialog called closed captions. Some broadcasts may also
include displays of additional information in text form.
Your TV can access and display this information using
the closed caption feature.
CLOSED CAPTION
CAPTION CC1
: SELECT : OPERATE
TEXT T1
Select CAPTION or TEXT and press the buttons
to select a caption (CC1 to CC4) or text channel
/
(T1 to T4).
INITIAL SETUP
V-CHIP
Your TV is equipped with V-Chip technology which enables
you to block channels or content that you feel to be inappropriate
for children, based on US and Canada rating guidelines.
You can customize the V-Chip settings of your television to
match your personal tastes.
Programs are created for very young viewers and should be
US V-Chip Ratings :
U.S. PARENTAL RATING SYSTEMS
Programs with the following rating are appropriate
for children.
•TV Y is Appropriate for All Children
suitable for all ages, including chlidren ages 2 - 6.
Most parents would find such programs suitable for chlidren 7
•TV Y7 is Appropriate for Older Children
and above. These programs may contain some mild fantasy
violence or comedic violence, which children should be able to
discern from reality.
19
ENGLISH
Most parents would find these programs suitable for all age
•TV G stands for General Audience
groups. They contain little or no violence, no strong language,
and little or no sexual dialog or situations.
Programs with the following rating are appropriate
for entire audience.
May contain some, but not much, strong language, limited
•TV PG Parental Guidance Suggested
violence, and some suggestive sexual dialog or situations.
It id recommended that parents watch these programs
first, or with their children.
Programs contain some material that may be unsuitable for
•TV 14 Parents Strongly Cautioned
children under the age of 14 including possible intense
violence, sexual situations, strong coarse language, or
intensely suggestive dialog. Parents are cautioned against
These programs are specifically for adults and may be
•TV MA Mature Audiences Only
unsuitable for anyone under 17 years of age. TV MA
programs may have extensive V, S, L, or D.
unattended viewing by children under 14.
1 Press 0 to enter the V-Chip setting menu.
3 Select SET US TV RATINGS and press the
buttons to turn on or turn off the lock.
/
S
ET
US
TV RATIN
GS
TV-MA TV-14 TV-P
G
TV-
G
TV-Y7 TV-
Y
V/FV
S
L
D
FINISH
_ _ _ _ _ _
_ _ _ _
_ _ _
_ _ _
_ _
For example. To block viewing of all TV 14 shows,
move the cursor to the top row of that column and
add a lock icon. Once you've put a lock on the top
everything in that column is automatically locked.
SET US TV RATINGS
TV-MA TV-14 TV-PG TV-G TV-Y7 TV-Y
V/FV
S
L
D
FINISH
_ _ _ _ _
_ _ _
_ _
_ _
_
Viewing Guidelines
In additional to the rating categories explained above, information on specific kinds of
content are also supplied with the V-Chip rating. These types of content may also be
blocked. The content types are:
V/FV is for VIOLENCE/FANTASY VIOLENCE
Sstands for SEXUAL CONTENT
Lstands for strong LANGUAGE
Dstands for suggestive DIALOG
V-CHIP
SET US TV RATINGS
: SELECT : OPERATE
SET MOVIE RATINGS
V-CHIP ON
2Select V-CHIP and press the button to turn
/
on or turn off V-CHIP function.
This manual suits for next models
1
Table of contents
Other JVC Flat Panel TV manuals

JVC
JVC LT-26B60SU User manual

JVC
JVC InteriArt LT-17C50BJ User manual

JVC
JVC 0505TNH-II-IM User manual

JVC
JVC LT-20DJ5SFR User manual

JVC
JVC 1203TNH-II-IM User manual

JVC
JVC InteriArt LT-20C70BU User manual

JVC
JVC HD-58DL8U User manual

JVC
JVC 0310SCT-NF-MT User manual

JVC
JVC LT-37DS6BJ User manual

JVC
JVC GGT0372-001A-H User manual

JVC
JVC GGT0362-001A-H User manual

JVC
JVC LT-20A55SU Mounting instructions

JVC
JVC LT-37M70BU User manual

JVC
JVC 1008WKT-NF-MT User manual

JVC
JVC LT-20A60SU User manual

JVC
JVC InteriArt LT-20A56SJ User manual

JVC
JVC LT-42R10BU/PP User manual

JVC
JVC LT-20B70BE Quick start guide

JVC
JVC AV-21V115 User manual

JVC
JVC LT-37ED91G User manual