JVC NX-PB15V User manual

DVD PORTABLE
SYSTEM
NX-PB15V
SUPER VIDEO
LVT2191-002A
[US/UX/A]
INSTRUCTIONS
EN_NX-PB15V[USUXA].indb 1EN_NX-PB15V[USUXA].indb 1 11.8.30 11:29:11 AM11.8.30 11:29:11 AM

2
Avoid moisture, water, dust, and high temperatures
• Do not place the unit in moist or dusty places.
• If water gets inside the unit, turn off the power and remove the plug
from the wall outlet, then consult your dealer. Using the unit in this
state may cause a fire or electrical shock.
• Do not expose the unit to direct sunlight or place it near a heating
device.
Notes on installation
• Select a place which is level, dry and neither too hot nor too cold—
between 5˚C and 35˚C.
• Do not install the unit in a place subject to vibrations.
• Do not put heavy objects on the unit.
To prevent malfunction or damage to the unit
• Do not insert any metallic objects, such as wires, hairpins, coins, etc.
into the unit.
• Do not block the vents.
Notes on using the unit
• When moving the unit, hold the display panel so that it does not open.
Do not carry the unit with the display panel open.
• Before moving the unit, be sure to remove iPod, disc, USB mass
storage class device, and SD card, then disconnect the power cord.
There are no user-serviceable parts inside. If anything goes wrong,
unplug the power cord and consult your dealer.
In this manual...
• The remote control buttons are used for explaining the operations
unless mentioned otherwise. However, if the unit has the same or
similar button names, they can also be used for the operations.
• “[ ]” means the button name.
Ex.) [MENU]: MENU button
• “File” and “track,”“group” and “folder” are used interchangeably.
Precautions
Notes on the power cord
• When you go away for an extended period of time, remove the plug
from the wall outlet.
• When unplugging the unit from the wall outlet, always pull the plug,
not the power cord.
• Do not handle the power cord with wet hands.
• Disconnect the power cord before cleaning the unit or moving the
unit.
• Do not alter, twist or pull the power cord, or put anything heavy on it,
which may cause fire, electric shock, or other accidents.
IntroductionIntroduction
EN_NX-PB15V[USUXA].indb 2EN_NX-PB15V[USUXA].indb 2 11.8.30 11:29:12 AM11.8.30 11:29:12 AM

3
To prevent the unit from falling down
Use the stand on the bottom of the unit to prevent the unit from falling
down before use.
CAUTION: Proper Ventilation
To avoid risk of electric shock and fire, and to prevent damage, locate
the apparatus as follows:
1. Front: No obstructions and open spacing.
2. Sides/Top/Back: No obstructions should be placed in the areas
indicated by the dimensions in the illustration.
3. Bottom: Place on the level surface. Maintain an adequate air path
for ventilation by placing on a stand with a height of 10 cm or
more.
Front view Side view
Introduction ............................2
Getting started........................4
Preparing FM antenna...................... 4
Connecting a TV......................................4
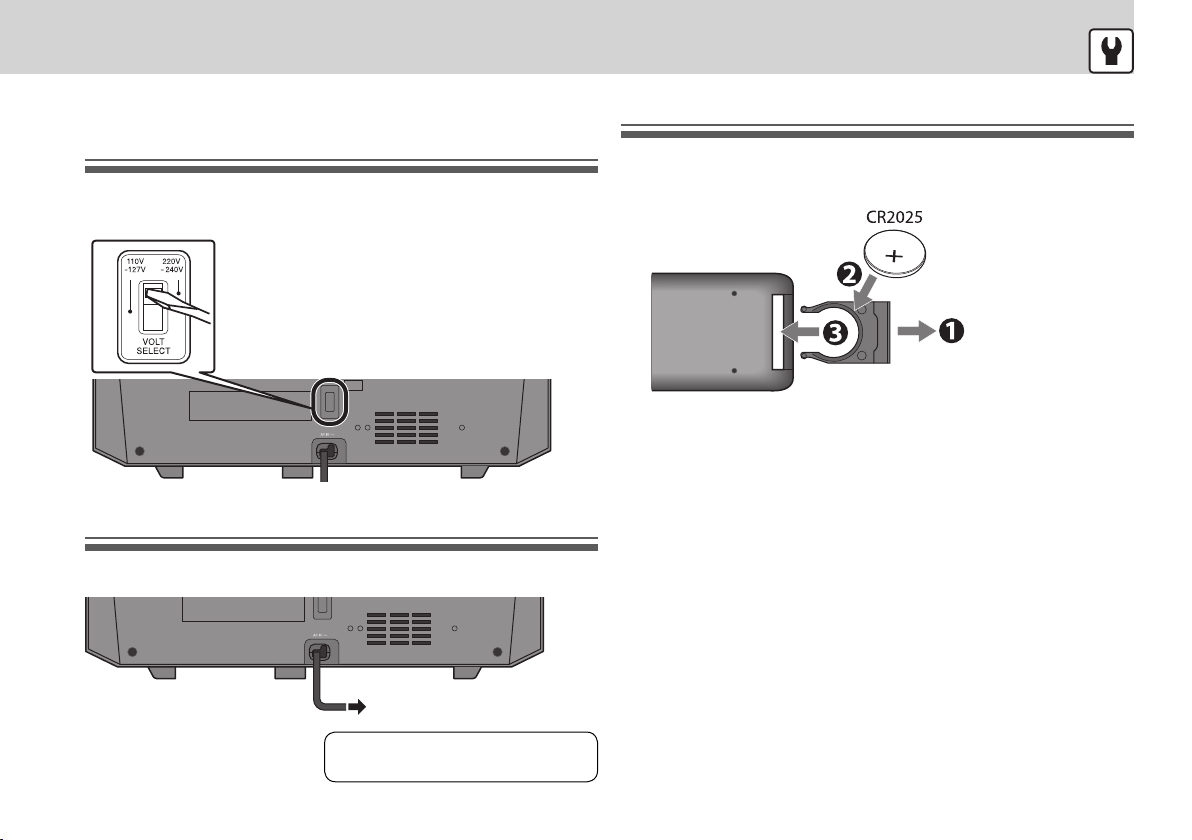
Setting the voltage selector ........... 5
Connecting power cord................... 5
Preparing remote control................ 5
Basic operation .......................6
Fade Muting ......................................... 7
Operating the monitor of the
main unit.................................. 8
Selecting a source .............................. 8
Setting the monitor of the main
unit .......................................................... 8
Setting the clock.....................9
Setting the clock................................. 9
Switching the time display format
(24 hour/12 hour)............................... 9
Playing iPod...........................10
Connecting an iPod device...........10
Compatible iPod models ...............10
Playback operations........................10
Menu operations ..............................11
Playing DVD/CD/USB/SD......12
Placing a disc......................................12
Connecting a USB mass storage
class device.........................................12
Inserting an SD card........................12
Playback operations........................13
Resume play.......................................13
Displaying the on-screen bar.......13
Various playback for DVD/CD/
USB/SD....................................14
Using the disc menu........................14
Selecting the audio track/subtitle
language/view angle ......................14
Playback using the control screen
.................................................................14
Slow-motion playback....................15
Frame-by-frame playback .............15
Time search/Chapter search.........15
Repeat play.........................................15
Random Play ......................................16
Program Play......................................16
Playing still picture (JPEG file)......17
Listening to the FM radio/
External device......................18
FM radio...............................................18
External device..................................19
Setting a setup menu ..........20
Adjusting the sound/Setting
the Timer ................................22
Adjusting the sound........................22
Sleep Timer.........................................22
Daily Timer ..........................................23
References..............................24
Playable disc/file types........26
Troubleshooting ...................28
Specifications ........................31
ContentsContents
EN_NX-PB15V[USUXA].indb 3EN_NX-PB15V[USUXA].indb 3 11.8.30 11:29:12 AM11.8.30 11:29:12 AM

4
• Connect the unit directly to a TV or a monitor without routing
through a video cassette recorder (VCR) or an HDD/DVD recorder.
Otherwise, picture distortion may occur during playback. Connecting
an integrated TV/VCR system to the unit may also interfere with your
viewing.
• For cathode-ray tube television (CRT): The speakers of the unit are not
magnetically shielded. If the unit has been installed near the TV, keep
the unit away from TV. Otherwise, color distortion may occur on the
TV.
Preparing FM antenna
Extend the FM antenna so that you can obtain the best reception.
• If the unit or antenna is located near the window, you may be able to
obtain the best reception since the unit can receive sufficient signal.
• Make sure the antenna conductor does not touch any other terminals,
connecting cords or the power cord. Also, keep the antenna away
from metallic parts of the unit, connecting cords, and the AC power
cord. Otherwise, it could cause poor reception.
Connecting a TV (only when viewing the
picture/video on the TV)
You can view the picture/video played back by this unit (except the still
pictures of iPod) on the TV or monitor connected to the unit. Connect
the video input jack of the TV to the VIDEO OUT jack of the unit with the
video cord (supplied).
• The unit does not export some of the setting menu screens such as
LCD, clock, and timer setups from the video output. It does not export
any signals when an analog audio source is played back.
• To change the aspect ratio for the picture output to the TV, refer to
page 20.
• To change the TV system between NTSC and PAL, refer to page 20.
FM antenna
Getting startedGetting started Connect the power cord after all other connections have been made.
Video cord
(supplied)
TV
To the video input
terminal
EN_NX-PB15V[USUXA].indb 4EN_NX-PB15V[USUXA].indb 4 11.8.30 11:29:13 AM11.8.30 11:29:13 AM

5
Setting the voltage selector
(not applicable for Australia)
Before plugging in, select the voltage range for your area with the
voltage selector by using a screwdriver or a similar tool.
Connecting power cord
Be sure to connect the power cord to a wall outlet after all other
connections have been made.
Set the clock before using this
unit (refer to page 9).
To wall outlet
CAUTION for mains (AC) line
BEFORE PLUGGING IN, do check that your mains
(AC) line voltage corresponds with the position
of the voltage selector switch provided on the
outside of this equipment and, if different, reset
the voltage selector switch, to prevent from a
damage or risk of fire/electric shock.
Main unit (rear)
Connect the power cord after all other connections have been made.
Preparing remote control
When you use the remote control for the first time, pull out the insulation
sheet.
To replace the battery in the remote control
Caution
Danger of explosion if battery is incorrectly replaced.
Replace only with the same or equivalent type.
• Store the battery in a place where children cannot reach.
If a child accidentally swallows the battery, consult a doctor
immediately.
• To prevent the battery from overheating, cracking, or starting a fire:
– Do not recharge, short, disassemble or heat the battery or dispose
of it in a fire.
– Do not leave the battery with other metallic materials.
– Wrap the battery with tape and insulate when throwing away or
saving it.
– Do not poke the battery with tweezers or similar tools.
• Dispose of battery in the proper manner, according to federal, state,
and local regulations.
• The battery (battery pack or battery installed) shall not be exposed to
excessive heat source such as sunshine, fire or the like.
• If a wall outlet does not
match the AC plug, use the
supplied AC plug adaptor (not
supplied for Saudi Arabian
and Australian models).
EN_NX-PB15V[USUXA].indb 5EN_NX-PB15V[USUXA].indb 5 11.8.30 11:29:13 AM11.8.30 11:29:13 AM

6
2
1
3
2-131
Number to select Buttons to press
5
15
125
Basic operationBasic operation
1Turn on the power
• The power can also be turned on at the selected source by pressing one of the [6] buttons for the target
source on the remote control.
2Select a source
• Remote: Press [6] for the target source. For selecting "FM" and "AUDIO IN," press [FM/AUDIO IN]. Each
time you press the button, the source alternates between "FM" and "AUDIO IN."
• Main unit: Press [SOURCE] repeatedly until the source you want is selected, then press [ENTER]. (For
details, refer to "Selecting a source" on page 8.
• You can also select the source by pressing [2] [3] ([ ][ ] on the main unit), then [ENTER].
3Adjust the volume
• Adjusts the volume within the range of 0 to 32.
• To turn off the power, press[]. The STANDBY lamp is turned on.
• When using the remote control, point it at the remote sensor directly.
[ENTER]
[ENTER]
( )
( )
How to select a number
using the remote control
EN_NX-PB15V[USUXA].indb 6EN_NX-PB15V[USUXA].indb 6 11.8.30 11:29:14 AM11.8.30 11:29:14 AM

7
Fade Muting
• To restore the volume, press again.
Remote sensor
STANDBY lamp
2-2• DO NOT turn off the unit with the volume set to an extremely high
level.
EN_NX-PB15V[USUXA].indb 7EN_NX-PB15V[USUXA].indb 7 11.8.30 11:29:15 AM11.8.30 11:29:15 AM

8
Setting the monitor of the main unit
1Display the monitor setting screen
2Select the menu for setting the monitor
3Adjust the value
• To return to the playback screen, press [LCD SET] or one of the source
buttons on the remote control. To return to the home screen, press
[SOURCE] on the main unit.
• To initialize the “LCD Set/Clock/Timer” settings, press [LCD SET], then
select “System” =“Default” =“Restore.”
Selecting a source
When the power is turned on, the source selecting screen (home screen)
is displayed on the monitor of the main unit.
1Press [SOURCE] repeatedly to select the source
you want.
Each time you press the button, tab selection moves to right.
2Press [6] to enter the source screen.
Playback starts.
• To return to the source selecting screen (home screen), press [SOURCE]
on the main unit.
iPod
DVD/CD
USB SD FM
AUDIO IN
iPod
Music
Video
Play Mode
Shue Songs
Now Playing
LCD Set Clock Timer System
16:9
Brightness
Contrast
Color
LCD Screen
Operating the monitor of the main unitOperating the monitor of the main unit
or
The selected item
lights blue.
• The adjustable item lights yellow.
• When “iPod”
is selected as
the source,
this screen is
displayed.
“LCD Set”
EN_NX-PB15V[USUXA].indb 8EN_NX-PB15V[USUXA].indb 8 11.8.30 11:29:15 AM11.8.30 11:29:15 AM

9
5Finish the clock setting by adjusting the minute
value of the last position
To return to the playback screen, press [LCD SET] or one of the source
buttons on the remote control. To return to the home screen, press
[SOURCE] on the main unit.
• The clock may gain or lose 1 to 2 minutes per month. You may need to
readjust the clock periodically.
• If a power failure occurs, the clock loses its settings. You need to set
the clock again.
• To display the time on the monitor of the main unit, press [DISPLAY]
after setting the clock (the time indication disappears in 5 seconds).
Switching the time display format
(24 hour/12 hour)
1Select “Time Format” in step 2of “Setting the
clock” on the left column
2Select the time format
Press [2] [3] to select “24H” or “12H.”
3Confirm the entry
Press [ENTER]
To return to the playback screen, press [LCD SET] or one of the source
buttons on the remote control. To return to the home screen, press
[SOURCE] on the main unit.
Setting the clock
1Display the clock setting screen
2Select “Time Set”
3Select “AM” or “PM”
The selected part lights yellow.
4Adjust the value for “Hour,” and “Minute”
LCD Set Clock
Time Set 00:00
Time Format 24H
Timer System
“Time Set”
“Time Format”
or
Setting the clockSetting the clock
• When “Time Format“ is set
to “24H,“ “AM“ or “PM“ is not
displayed. Go to step 4.
or
“Clock”
The selected item
lights blue.
Repeat this procedure.
EN_NX-PB15V[USUXA].indb 9EN_NX-PB15V[USUXA].indb 9 11.8.30 11:29:16 AM11.8.30 11:29:16 AM

10
Connecting an iPod device
Be careful not to injure your fingertips or damage the terminal of the
direct dock.
• Take the iPod protect case off before connecting.
• Connect the iPod firmly.
• Refer to page 24 for more about connecting an iPod.
Compatible iPod models
Made for Audio Video
iPod nano (3rd, 4th, 5th, 6th generation)
iPod nano (2nd generation) —
iPod nano —
iPod touch (2nd, 3rd, 4th generation)
iPod touch
Made for Audio Video
iPod classic
iPod video (5th generation)
Playback operations
Playback starts, and menu of the iPod appears.
To pause Press [iPod 6] during playback
To select the track Press [¢]or [4]
To fast-forward a track Press and hold [¢]
To fast-reverse a track Press and hold [4]
iPod
Music
Video
Play Mode
Shue Songs
Now Playing
Playing iPodPlaying iPod
iPod
You cannot send any data to the iPod from the unit.
• It is not necessary to
use the dock adaptor
for some iPod models
(iPod nano 6th
generation, etc.).
• When detaching the
dock adaptor from the
dock, pull up the dock
adaptor with your
fingernail or sharp
pointed tool using the
slot.
Dock adaptor
(supplied with the
iPod or sold in Apple
inc.)
EN_NX-PB15V[USUXA].indb 10EN_NX-PB15V[USUXA].indb 10 11.8.30 11:29:17 AM11.8.30 11:29:17 AM

11
Menu operations
To select a menu item
To go back to the previous item, press [2].
• The menus displayed on the screen differ depending on iPod models.
• Operate iPod touch itself as follows to adjust the settings or to use the
applications:
- Press the home button.
- Select the application icons on the home screen.
• Sound distortion may occur when playing back audio sources with
high recording levels. If distortion occurs, it is recommended to turn
off the equalizer of iPod.
• For information on operating the iPod, see the instruction manual for
iPod.
Viewing the video/picture from iPod
Select “Video” \item \a desired file, then press
[ENTER]
• The items displayed on the screen differ depending on iPod models.
Selecting play modes
The currently selected play mode is shown below "Play Mode" on the
menu screen. (Ex. "Shuffle songs")
Shuffle play
Select “Play Mode” \“SHUFFLE” \one of the
following, then press [ENTER]
ALBUM Plays back all tracks in the current album at random
SONG Plays back all tracks in the iPod at random
OFF Cancels
Repeat play
Select “Play Mode” \“REPEAT” \one of the
following, then press [ENTER]
ALL Repeats all tracks in the iPod
ONE Repeats the current track
OFF Cancels
Display the current song information
You can check the album name, artist name, and song name.
Select “Now playing," then press [ENTER].
EN_NX-PB15V[USUXA].indb 11EN_NX-PB15V[USUXA].indb 11 11.8.30 11:29:18 AM11.8.30 11:29:18 AM

12
Placing a disc
Pull the display panel of the main unit down forward then place a disc
into the holder.
• When opening or closing the display panel, support the unit by hand
to prevent it from falling down.
• When placing a disc, be sure to place a disc with the label side facing
forward.
• Close the display panel before you start playback.
• “NO DISC” appears when no disc is placed to the unit.
• When placing or removing a disc, take enough care not to touch the
pickup lens.
• Do not open the display panel during playback; otherwise, the
rotating disc may hurt your fingers, etc.
Connecting a USB mass storage class device
<Side view of the main unit>
• Refer to page 24 for more about connecting a USB mass storage class
device.
Inserting an SD card
<Side view of the main unit>
• When removing the SD card, push it in and then pull it out.
• Refer to page 25 for more about inserting an SD card.
Playing DVD/CD/USB/SDPlaying DVD/CD/USB/SD
Caution for the monitor of the main unit
• When opening or closing the display panel, open it slowly not to
damage the monitor by hitting it to the table or floor. You cannot send any data to the disc, USB mass storage class
device, or SD card from the unit.
Compatible USB device
You can connect only USB mass storage class devices which stores
audio files using Microsoft® Windows Media Player®.
It is impossible to connect the Digital Audio Player which stores the
audio file using any other application than the above.
Label side
EN_NX-PB15V[USUXA].indb 12EN_NX-PB15V[USUXA].indb 12 11.8.30 11:29:18 AM11.8.30 11:29:18 AM

13
Playback operations
To play a disc
To pause a disc Press [DVD/CD 6] during playback
To pause a USB mass
storage class device
Press [USB 6] during playback
To pause an SD card Press [SD 6] during playback
To select a track Press [¢]or [4]
• To start playback from the desired
track, press the number button. (To
select a number, refer to page 6.)
To fast-forward a track Press and hold [¢]
• The search speed changes as x2, x4,
x8, x20.
To fast-reverse a track Press and hold [4]
• The search speed changes as x2, x4,
x8, x20.
To select a group
(MP3/WMA/JPEG only)
Press [2]or [3]
To stop playback Press [7]
• To restore normal playback, press [6] for the target source (DVD,
USB, SD).
Resume play
This unit stores the stopped point. When you start playback again, it
starts from the stopped point.
During playback...
Press [7]once
• To clear the stored track (or chapter), press [7]while “RESUME” is
displayed.
Displaying the on-screen bar
You can check the source information and playback status using the
on-screen bar.
/ Title (1/7) / Chapter (1/06) (current /total number)
Track (1/26) (current/total number in the folder)
Playback time indication
/ Audio language / Subtitle language
Angle
/ Audio format
Repeat mode
Playing back a disc with PBC (VCD/SVCD)
• To remove the on-screen bar, press [ON SCREEN] repeatedly.
To play a USB mass
storage class device
To play an SD card
Ex.: DVD Video
EN_NX-PB15V[USUXA].indb 13EN_NX-PB15V[USUXA].indb 13 11.8.30 11:29:19 AM11.8.30 11:29:19 AM

14
Selecting the audio track/subtitle
language/view angle
During playback, press one of the buttons on the
table below repeatedly to use the desired function
Selecting the
audio language
or audio track
This function can be used for DVD
Video/DVD-VR/VCD/SVCD/DivX files.
Selecting the
subtitle language
This function can be used for DVD
Video/DVD-VR/SVCD/DivX files.
Selecting the
view angle (Hold)
This function can be used only for
DVD Video.
Playback using the control screen
After you select the source, the control screen appears automatically in
the following cases:
• When the unit detects MP3/WMA files.
• When playback of JPEG/MPEG-1/MPEG-2/DivX files is stopped.
Various playback for DVD/CD/USB/SDVarious playback for DVD/CD/USB/SD
Using the disc menu
<For DVD Video>
1Display the menu
2Select the menu
• To go back to the previous menu, press [MENU].
<For VCD/SVCD with Play Back Control (PBC)>
You can play VCD/SVCD from its menu using the Play Back Control (PBC).
While the disc menu is displayed...
Press the number button to select an item on the
menu
• To select a number, refer to page 6.
• To move to the next/previous page of the current menu, press [¢]
or [4].
• To cancel Play Back Control (PBC), press [MENU].
Select a track you want to play by pressing [¢][4]or the number
buttons.
• To reactivate Play Back Control (PBC), press [MENU] again.
or (Hold)
EN_NX-PB15V[USUXA].indb 14EN_NX-PB15V[USUXA].indb 14 11.8.30 11:29:20 AM11.8.30 11:29:20 AM

15
Time search/Chapter search
You can move to a particular point by specifying the elapsed playing
time or by selecting chapter number using the on-screen bar.
1Display the setting bar
Press [ON SCREEN] three times
2Move the cursor to the time (or chapter)
indication
Press [2][3] repeatedly
3Specify the time (or chapter)
Press the number button (to select a number, refer to page 6.)
4Start playback
Perform step 2 and 3 repeatedly, then press [ENTER]
Repeat play
During playback...
Each time you press the button, the repeat modes change as follows.
• The selectable repeat modes differ depending on the disc/file.
REP 1 Repeats the current track
REP DIR Repeats the current group (MP3/WMA/JPEG only)
REP ALL Repeats all tracks
• Repeat play cannot be used during playback of PBC (VCD/SVCD).
• “REP DIR” cannot be used during program playback.
(Canceled)
1Current playing file / 2Folder list / 3File list
4Track information / 5File type
Press [5] [∞] [2] [3] repeatedly to select a file, then
press [ENTER]
• If different types of playable files (audio/still picture/moving picture)
are contained, select a file type to play. (See below.)
Selecting the file type
Press [2] [3] repeatedly to move the cursor, then
press [ENTER]
The files of the selected type are listed on the control screen.
Slow-motion playback
While playback is paused...
Press [3]
Each time you press the button, the playback speed changes as follows.
Frame-by-frame playback
The picture is played back frame by frame.
While playback is paused...
Press [5] repeatedly
1Audio file
2Still picture
3Moving picture
Cursor
1/2 1/3 1/4 1/5 1/6 1/7 1/8 Play
REP : REP 1
(Normal
playback)
EN_NX-PB15V[USUXA].indb 15EN_NX-PB15V[USUXA].indb 15 11.8.30 11:29:21 AM11.8.30 11:29:21 AM

16
Various playback for DVD/CD/USB/SDVarious playback for DVD/CD/USB/SD
Random play
During playback...
Playback starts in random order. Random play stops automatically after
all tracks have been played.
• You cannot go back to the previous tracks using [4]during Random
play.
• To stop Random play, press [RANDOM] again then select “RANDOM
OFF.”The playback starts in the normal order from the currently
playing track.
Program play
You can use program play while plaing music, still pictures and DVD
Video.
1 Select a source and stop playback
2Display the program setting screen
3Select the program number you want to store the
track into
4Select a track number
• For DVD Video, select a title number and chapter number.
5Repeat steps
3and 4
• You can select up to 16 tracks.
• To erase the entire program, press [5] [∞] [2][3]to select
“CLEAR”, and press [ENTER].
6Start program playback
Playback starts in the programmed order.
• Program play also starts by pressing [DVD/CD 6], [USB 6], or
[SD 6].
• Program play cannot be used for DVD-VR
• To select a number, refer to page 6.
“PLAY”
EN_NX-PB15V[USUXA].indb 16EN_NX-PB15V[USUXA].indb 16 11.8.30 11:29:22 AM11.8.30 11:29:22 AM

17
• You can also select a file using the number buttons. (To select a
number, refer to page 6.)
• To select a folder, press [2] to move the cursor to the folder list,
and press [5] [∞] and then [ENTER].
3Start playback
Slide-show playback starts. Playback stops automatically after all
pictures contained on the disc/USB mass storage class device/SD
card have been played.
• Playback also starts by pressing [DVD/CD 6], [USB 6] or
[SD 6].
• Repeat play or Random play can also be used for still pictures.
(Refer to pages 15 and 16.)
• To pause slide-show playback, press [DVD/CD 6], [USB 6], or
[SD 6].
• To cancel slide-show playback and select the file manually, press
[4] [¢].
Reflecting or rotating images
During playback of the still picture or while playback is paused...
[5]The image reflects
vertically. [2]The image rotates to left
by 90 degrees.
[∞]The image reflects
horizontally. [3]The image rotates to right
by 90 degrees.
• Press [ENTER] to return to the normal display. The slide-show playback
starts again.
Editing the program
While playback is stopped...
1Select the program number of the track you want
to replace
Press [PRGM] to display the program setting screen, and press [5]
[∞] [2][3].
• To add a track at the end of the program, move the cursor to the
last program number.
2Perform step
4in the left column to select a new
track
• To erase a programed track, press the number button [0] a few times.
• To erase the entire program, press [7].
Playing still picture (JPEG file)
• No audio signal of other source is emitted during still picture playback.
1Select still picture for the file type
Press [2] [3]repeatedly to select still picture for file type on the
control screen (refer to page 14), and press [ENTER].
The files of still picture are listed on the control screen.
2Select a file in the list
The thumbnail of the selected file is
displayed on the control screen.
EN_NX-PB15V[USUXA].indb 17EN_NX-PB15V[USUXA].indb 17 11.8.30 11:29:23 AM11.8.30 11:29:23 AM

18
Selecting a station
1Press [FM/AUDIO IN] to select “FM” as the source
2Start searching
The unit starts searching for the stations automatically, and the
station search stops when a station of sufficient signal strength is
found.
• To stop the search manually, press [2][3]again.
• When you press the button repeatedly, the frequency changes.
Storing stations automatically in the unit
(Auto Preset)
• You can preset up to 20 FM stations.
FM radio
The unit starts searching for stations automatically, and stores them into
the preset numbers.
• Searching stops automatically when the unit has finished searching
for all receivable stations, or 20 stations have been stored.
Storing stations manually in the unit
(Manual Preset)
1Display the preset number while listening to the
target station
2Select a preset number
Radio
Stereo
FM 87.50 MHz
Searching...
Listening to the FM radio/External deviceListening to the FM radio/External device
Radio
Stereo
FM 87.50 MHz
Sel 05
AUDIO IN
(Hold)
(Hold) Radio
Stereo
FM 87.50 MHz
Sel 01
EN_NX-PB15V[USUXA].indb 18EN_NX-PB15V[USUXA].indb 18 11.8.30 11:29:24 AM11.8.30 11:29:24 AM

19
3Store the preset station
“Save XX” (“XX”is the preset number) is displayed on the screen.
• Press the button within 5 seconds after selecting the preset
number.
Tuning in to a preset station
Press [¢] or [4]
Improving the reception
If an FM stereo broadcast is hard to listen to, you can improve the
reception by switching to monaural mode.
• When the monaural mode (Mono) is activated, the reception is
improved. However, the stereo effect is lost.
• To restore stereo reception, press [FM MODE] to turn off “Mono.”
External device
Connecting an external device
Connect an external device using a stereo mini plug cord (not supplied).
• Be sure to turn down the volume before connecting the unit and
external device.
<Side view of the main unit>
Playing an external device
Press [FM/AUDIO IN] repeatedly to select “AUDIO IN”as the source, then
start playback of the connected external device.
• Refer to the instruction manual of the external device.
• When the volume from the connected external device is too small to
listen to, turn up the volume of the external device.
AUDIO IN
Canceled (no indication)
EN_NX-PB15V[USUXA].indb 19EN_NX-PB15V[USUXA].indb 19 11.8.30 11:29:24 AM11.8.30 11:29:24 AM

20
Setting an item
• Setup menu can be used only when “DVD/CD,”“USB,”or “SD” is selected
as the source.
1Display the setup menu
• If a disc or file is playing,
playback is paused.
2Select an item
3Confirm the item
• To exit the setup menu, press [SET UP] again.
Setup menu items
____(underlined): initial setting
Menu Item Contents
TV SYSTEM You can select the TV system.
NTSC or PAL
Menu Item Contents
TV TYPE You can select the monitor type
to match the connected external
monitor when you play back a
picture recorded for wide-screen
televisions.
• By selecting “AUTO” mode, the
color system of the unit changes
automatically to match the color
system of the picture.
4:3 PS/4:3 AUTO PS
(Pan Scan conversion)
For a conventional (4:3) TV. The
picture is zoomed in to fill the screen
vertically and the left and right sides
of the picture are cut off.
4:3 LB/4:3 AUTO LB
(Letter Box conversion)
For a conventional (4:3) TV. Displays
a wide-screen picture to fit the
width of the TV screen keeping the
aspect ratio.
16:9/16:9 AUTO
(Wide-screen television)
Select this when the aspect ratio
of your wide-screen TV is fixed to
16:9. Displays a 4:3 picture to fit the
length of the TV screen keeping the
aspect ratio.
Setting a setup menuSetting a setup menu
TVSYSTEM
TVTYPE
DEFAULT
1Menu / 2Items in the menu
EN_NX-PB15V[USUXA].indb 20EN_NX-PB15V[USUXA].indb 20 11.8.30 11:29:25 AM11.8.30 11:29:25 AM
Table of contents
Other JVC TV DVD Combo manuals