JZBRAIN WG500B 1080P User manual

1
WG500B 1080P
USER MANUAL

2
Congratulations on your purchase of this high quality night vision device. Use this device to view
your surroundings in low light conditions or even in complete darkness with the built-in infrared
light. You can even take pictures and video using the device which can be stored on a TF card.
This device can also be used to take photos and video during the day. Use the supplied A/V cable
to view your images on a television or download the images to your computer using the supplied
USB cable. Also includes a neck strap and handy storage pouch.
Package Includes
1 x Night Vision Binoculars 1 x Carrying Case
1 x 64GB TF Card 1 x Power Bank Band
1 x Neck Strap 1 x AV Output Cable
1 x USB Cable 1 x Cleaning Cloth
1 x User Manual
Over View

3
Parts overview:
1. Ocular 9. TV out
2. Power button 10. Battery cover
3. IR button 11. Objective lens focus
4. Zoom button 12. Objective lens
5. Mode button 13. Infrared filter
6. Snap button 14. IR illuminator
7. USB port 15. Infrared zoom
8. TF card slot 16. Tripod adapter

4
Battery Installation
Open battery compartment and install the 8XAA batteries being sure to follow the polarity markings
inside the battery compartment.
Close the battery cover.
Inserting / Removing the TF card
Insert the TF card into the TF card port and push until it locks in place.
To remove the installed TF card, please push the TF card inward to release it.
Storage capacity: 8GB or above is recommended
Instructions for Use
Power On: Press the power button still for about 2 seconds to start the Night Vision Device.
Taking a Photo: Press the [MODE] button and selecting the capture photo mode. The icon
will appear in the top left corner of the screen. Press the [SNAP] button to take photos.
Taking Video: Press the [MODE] button and select the video mode. The icon will appear in
the top left corner of the screen. Press the [SNAP] button to start recording video and press the
[SNAP] button again to stop recording.
Watching Stored Videos and Photos: Press the [MODE] button and select playback mode.
Deleting Stored Videos and Photos: In playback mode, press the [SNAP] button. You will be
given the option to play or to delete the image and video.
Turning off the Night Vision device
Press the power button to the right side for 2 seconds to turn off the Night Vision device.

5
Focusing the image
Target the object you would like to view and turn the focusing ring located just below the objective
lens until the image on the screen is sharp and clear.
Key functions
LCD display information.
Your screen display in photo mode
【MODE】
Toggles between Video / Photo / Playback / Menu
【SNAP】
In video mode: Press to take video. To stop recording, press this button again.
In photo capture mode: Press to take photo.
In playback mode: Press to Play or delete the video.
In Menu mode: Press to select.
【ZOOM】
In video mode: Press to zoom out.
In photo capture mode: Press to zoom out.
In playback mode: Press to select the next picture or video
In menu mode: Press to select the previous menu listing.
【IR】
In Video/Photo mode: Press to turn on the infrared light. With each additional
click, the IR brightness will increase
In playback mode: Press to select the previous photo or video.
In menu mode: Press to select the next menu listing.

6
1
Icon displaying that you are in Photo Mode
2
Brightness of IR from 1 to 5 (while plugging in USB power supply the IR brightness
from 1 to 7)
3 Remain capacity quantity
4 Digital zoom
5
Battery power
6
Backlight from 1 to 15
You r screen display in video mode
1 Icon displaying that you are in Video Mode
2 Brightness of IR from 1 to 5(while plugging in USB power supply the IR brightness
from 1 to 7)
3 Remaining time of recording
4 Digital zoom
5 Battery power
6 Backlight from 0 to 15

7
Your screen display during menu mode
Format SD
Select to format the TF card
Power Save
Power off mode :The NV can be set to automatically shut down when not
operating after the selected period of time.

8
Date
ZOOM: UP IR: DOWN SNAP: OK
Time
ZOOM: UP IR:DOWN SNAP:OK
Flicker
TV Standard
The video output mode can be set to NTSC (North America) or PAL
(Europe)

9
Language
LCD Backlight
Can set the backlight from 0 to 15
Date/Time Tag
When you choose on, the date/time will be showed in the picture or
video.
Version
The software version of the device

10
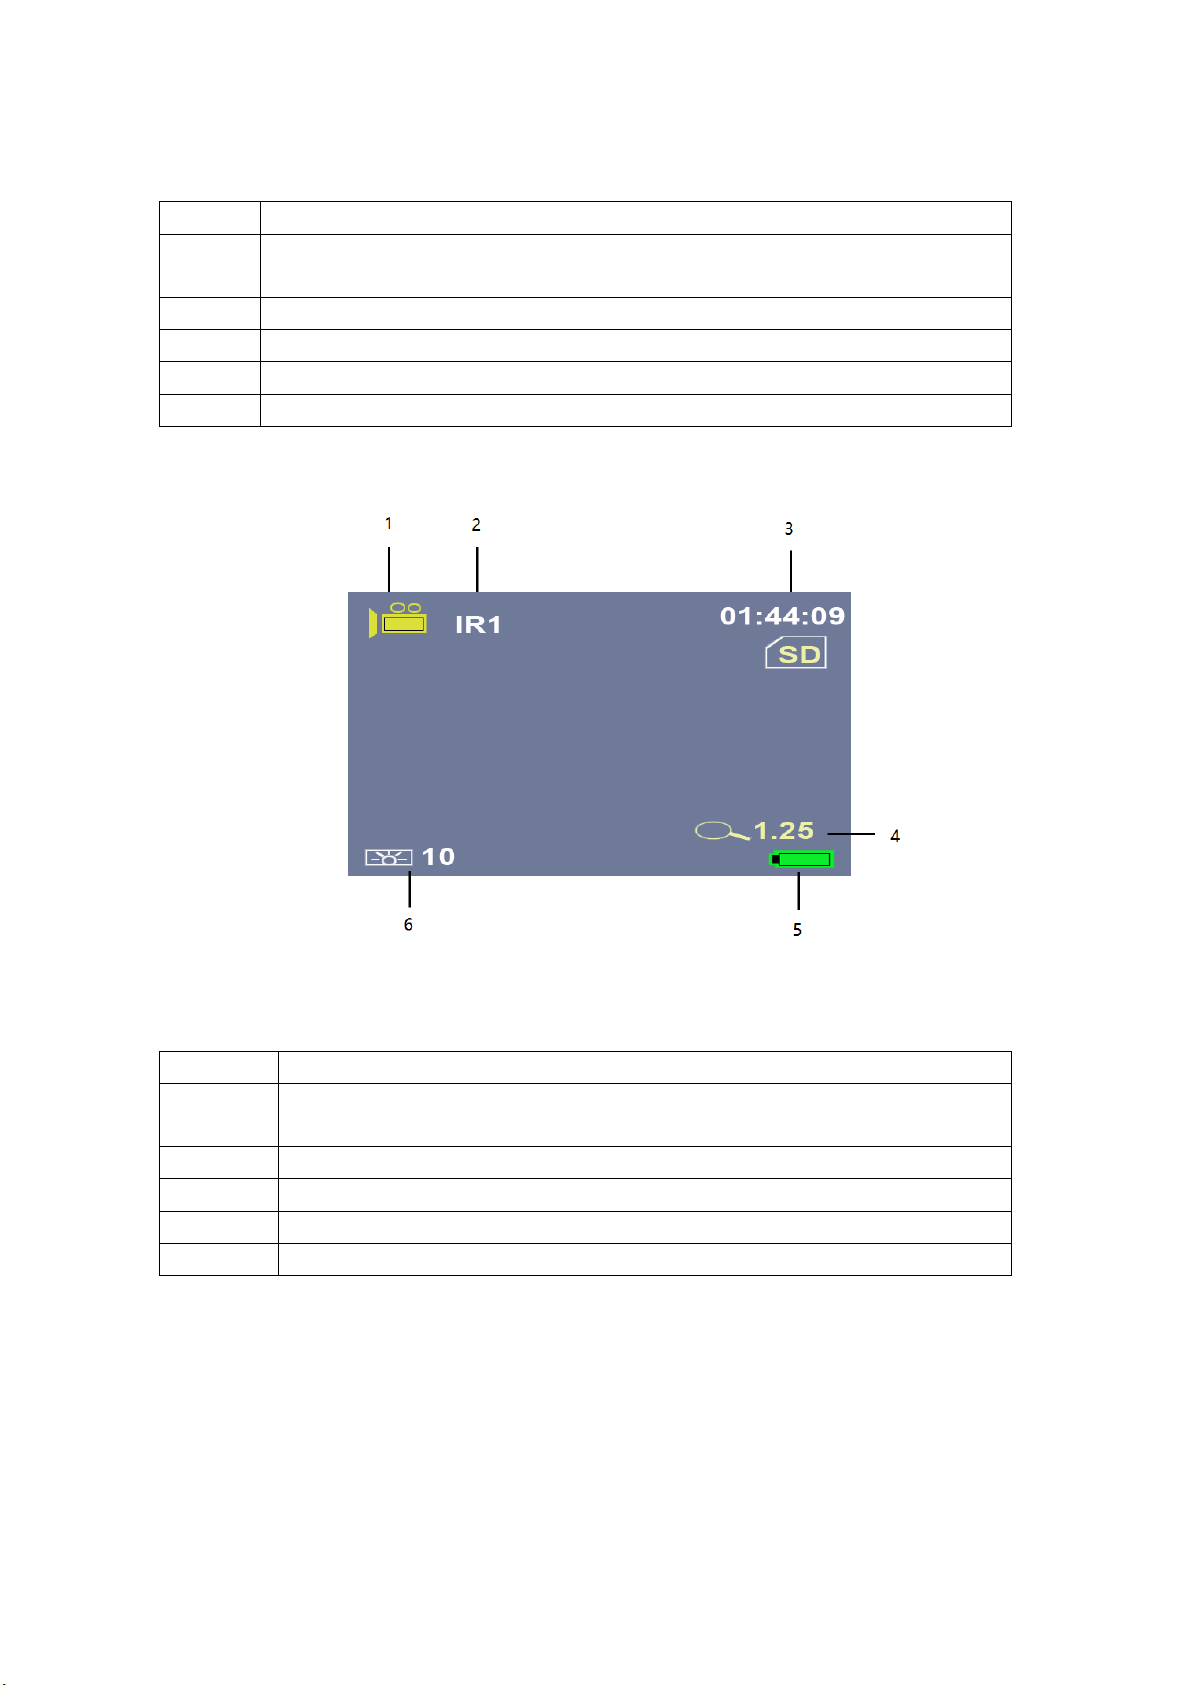
Using the zoom function
This device features a zoom function that can be used while taking a video or photo.
Press the [ZOOM] button to toggle between 1x and 3x digital zoom.
Using IR light in complete darkness
This device can be used in complete darkness when using the built in IR (infrared) light.
Press the [IR] button to activate the infrared light. Remove the IR Lens cover and press the [IR]
button to select between the 5 levels of brightness (while plugging in USB power supply the IR
brightness from 1 to 7).
Viewing videos and photos on TV
Connect the AV output port of the night vision device with an A/V cable.
Connect the other end of the A/V cable to the TV video input.
In playback mode, press the ZOOM/IR buttons to select the file you will display on your TV.
Note: When the night vision device is connected to a T V, the screen inside the device will not work.
Transmitting stored videos and photos to a computer
Using a USB cable, you can connect the night vision device to a computer.
You can find the stored photo/video files on the computer by looking under “My computer \
removable disk”.
Once the removable disk is selected, you can view, delete, move, or copy any video or photo.
WG500B Specification

11
ID
Catalog
Function Description
1
Optiacal
performance
Magnification (3.6-10.8) X31
2
Digital Zoom Max 3x
3 Angle Of View 9.2°
4 Objective Aperture 31mm
5 Exit Pupil Distance 30mm
6
F# for Objective lens 1.3
7 IR ZOOM 2X
8 5m~∞in daytime; Viewing in the darkness up to 300M (monochrome)
9
Video Output
640x360 resolution TFT LCD
10
OSD menu display
11
CVBS always output with VGA resolution
12
Imager
High-sensitivity CMOS Sensor
13
Size 1/2.7''
14
Resolution 1920X1080
15
IR LED
5W Infared 850nm LED
16
TF Card
Support SDHC 4GB~32GB TF Card
17
Hardware Buttons
Power on/off
18
Snap
19
Mode selection
20
Zoom
21
IR switch
22
Operation
Preview
23
Record JPEG file in TF storage
24
Capture mp4 file in TF storage
25
Playback media file from SD storage
26
External power supply - DC 5V/2A

12
Contact us:
Phone Number: (802) 348-1444 (leave voice mail or text us)
Email: [email protected]om
27
Power
8 pcs AA battery 8-12 V
28
Battery life: 10 hours working time with IR off
29
Low battery warning
30
System
4 modes (Capture, Video, Playback Menu)
31
Single frame Image Capture
32
Video image Record
33
Playback image
34
Delete image
35
7 level IR switch
36
SD card format
37
Power save (Off/1 min/ 3min/5 min)
38
Language: English / Français / Español / Deutsch / Italiano/繁體中文 / 简体
中文 /日本語/Português/Русский
39
System Rest
40
Light Freq. 50/60HZ
41
RTC setting
42
Version
43
Size size 170mmx150mmx60mm
44
700g
45
package
USB cable/ AV cable/ TF card/ Bag/Manual

13
Warranty card
Product model:
Order ID:
Date of purchase:
Warranty period:
User Name:
User’s phone:
User Email :
User address:
Warranty records:
Warranty
This product is warranted against defects in materials and workmanship for a period if one year from
the date of purchase.
This warranty is for the original purchaser only!
Notice:
Operate this device in daylight or view any strong radiation source like the Sun, electric welding
and Laser directly may cause permanent damage to internal parts of this device and this is not
covered by the Warranty.
Table of contents
Other JZBRAIN Binoculars manuals