JZBRAIN WG500B User manual

WG500B 1080P
USER MANUAL
Phone Number: (802) 348-1444 (leave voice mail or text us)
Email: cxgz_us@outlook.com

Congratulations on your purchase of this high quality night vision binoculars device. Use this device
to view your surroundings in low light conditions or even in complete darkness with the built-in
infrared light. You can even take pictures and video using the device which can be stored on a TF
card. This device can also be used to take photos and video during the day. Use the supplied A/V
cable to view your images on a television or download the images to your computer using the
supplied USB cable. Also includes a neck strap and handy storage pouch.
Accessories
1x Night vision binoculars 1x Storage pouch
1x 64GB TF card 1x Mini-B USB cable
1x Neck strap 1x AV cable
1x Cleaning Cloth 1x Power bank holder
1x User manual
Over View

Parts overview:
1.Ocular 9.TV out
2.Power button 10. Battery cover
3.IR button 11.Objective lens focus wheel
4.Zoom button 12.Objective lens
5.Mode button 13. Infrared filter
6.Snap button 14.IR Illuminator
7.USB port 15. Infrared zoom
8.TF card slot 16.Tripod adapter

Battery Installation
Open battery compartments and install the 8x1.5v AA LR6 alkaline batteries being sure to follow the
polarity markings inside the battery compartment.
Close the battery covers. Please pay attention to the direction of covers.
NOTE: Do NOT use R6S, R6C or R6P Carbon batteries or rechargeable batteries.
Inserting / Removing the TF card
Insert the TF card into the TF card port and push until it locks in place.
To remove the installed TF card, please push the TF card inward to release it.
Please format the TF card on the device before use. Format using computer if the formatting on the
device is not working.
Storage capacity: 8GB or above is recommended
Note: The device will show the icon " "if the micro SD card in not installed.
Turning On the Night vision binoculars device
Power On: Press the power button still for about several seconds to start the Night vision binoculars
device.
Turning Off the Night vision binoculars device
Power Off: Press the power button for about several seconds to turn off the Night vision binoculars
device.
Key Button Functions
【MODE】
Toggles between Video / Photo / Playback / Menu
【SNAP】
In video mode: Press to take video. To stop recording, press this button again.
In photo capture mode: Press to take photo.
In playback mode: Press to Play or delete the video.
In Menu mode: Press to select.
【ZOOM】
In video mode: Press to zoom out.
In photo capture mode: Press to zoom out.
In playback mode: Press to select the next picture or video
In menu mode: Press to select the previous menu listing.

Taking Photo and Video Function
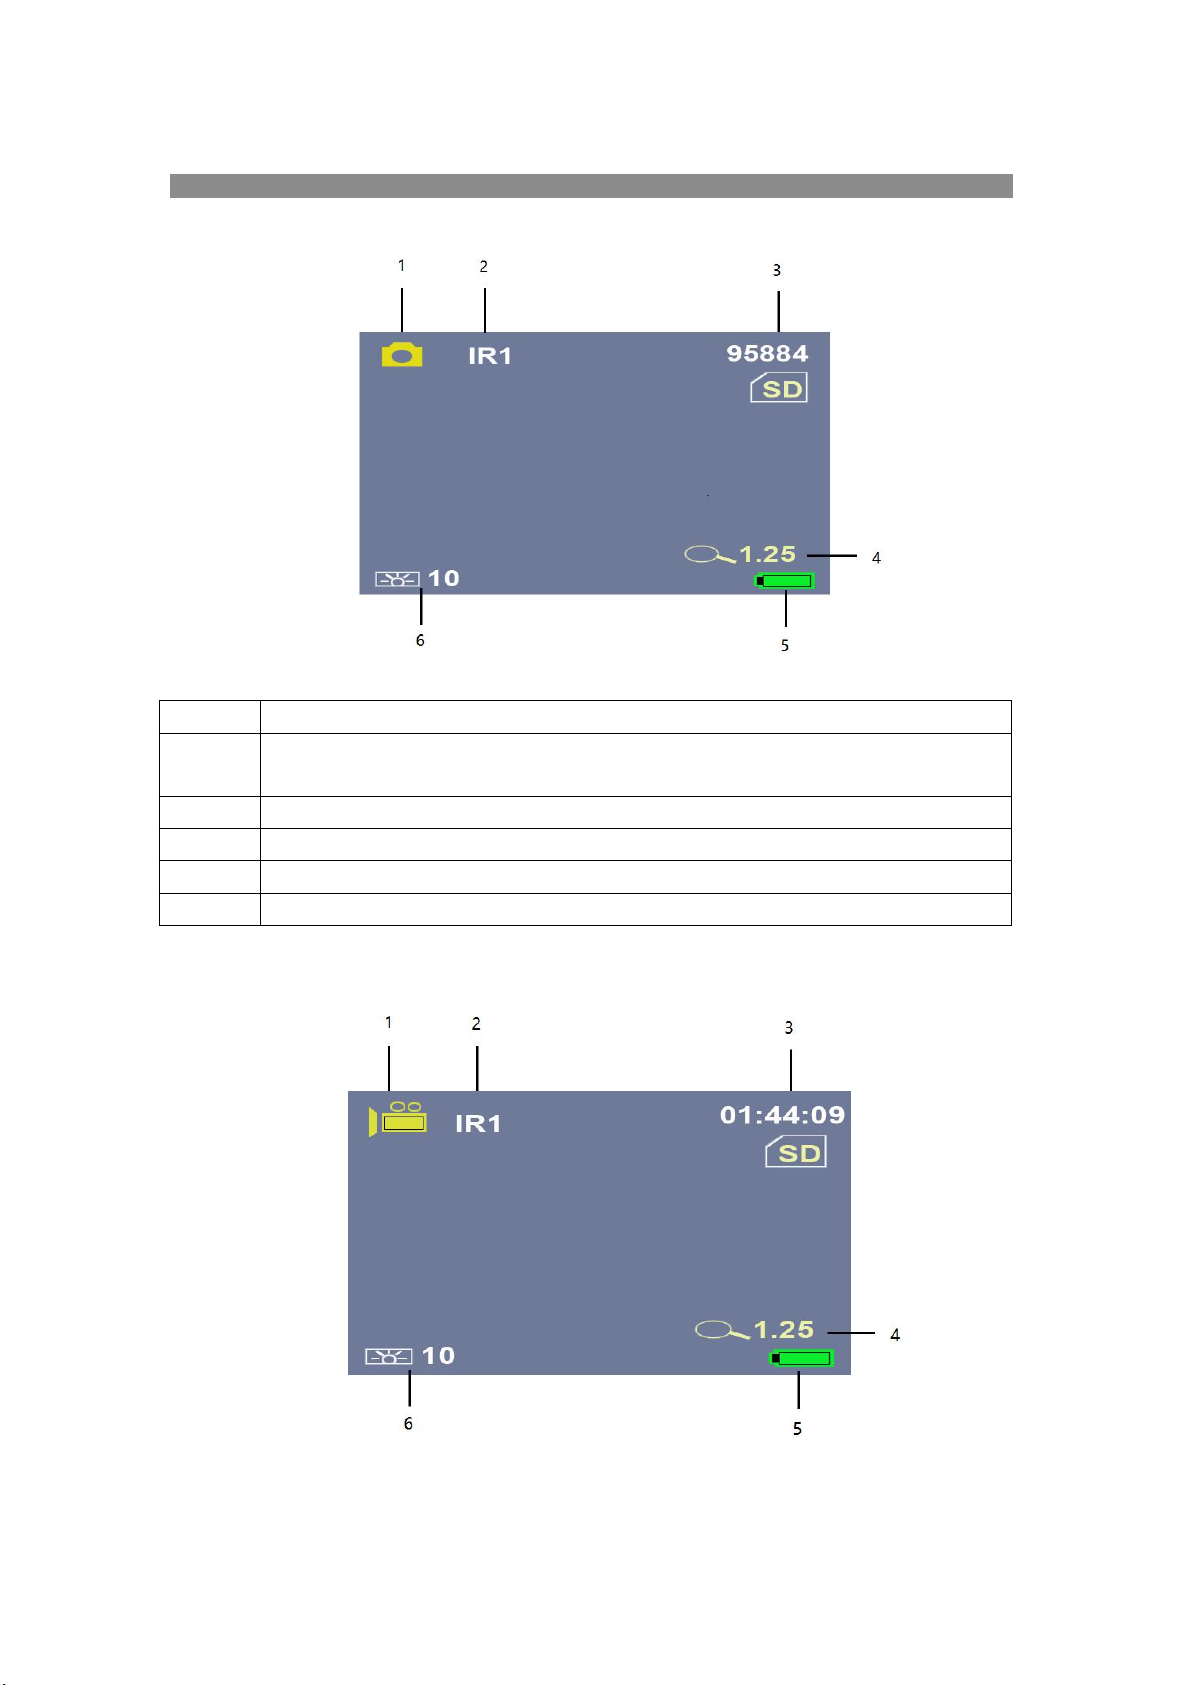
Taking a photo: Press the [MODE] button and select the capture photo mode. The icon
will appear in the top left corner of the screen. It means you enter the photo function. Press the
[SNAP] button to take photos.
Taking a video: Press the [MODE] button and select the video mode. The icon will appear
in the top left corner of the screen. It means you enter the video function. Press the [SNAP] button to
start recording video and press the [SNAP] button again to stop recording.
Watching stored videos and photos: Press the [MODE] button and select playback mode . You
may then look through your saved photos/videos with the [Zoom] or [IR] buttons.[Zoom] or [IR]
buttons can be used for choosing the previous page or next page.
Deleting Stored Videos and Photos: In playback mode, press the [SNAP] button to enter the menu.
You will be given the options to play or to delete the image or video.While deleting the photo, you
will see the menu by pressing the [SNAP] button .The first one is “Delete”.You can choose
“Delete,Delete All or Exit” by [ZOOM] or[IR] . While playing or deleting the videos,you will
see the menu by pressing the [SNAP] button.The first one is “Play”.You can choose
“Play,Delete,Delete All or Exit” by [ZOOM] or[IR] button .
The screen display during 【Playback】mode
【IR】
In Video/Photo mode: Press to turn on the infrared light. With each additional
click, the IR brightness will increase
In playback mode: Press to select the previous photo or video.
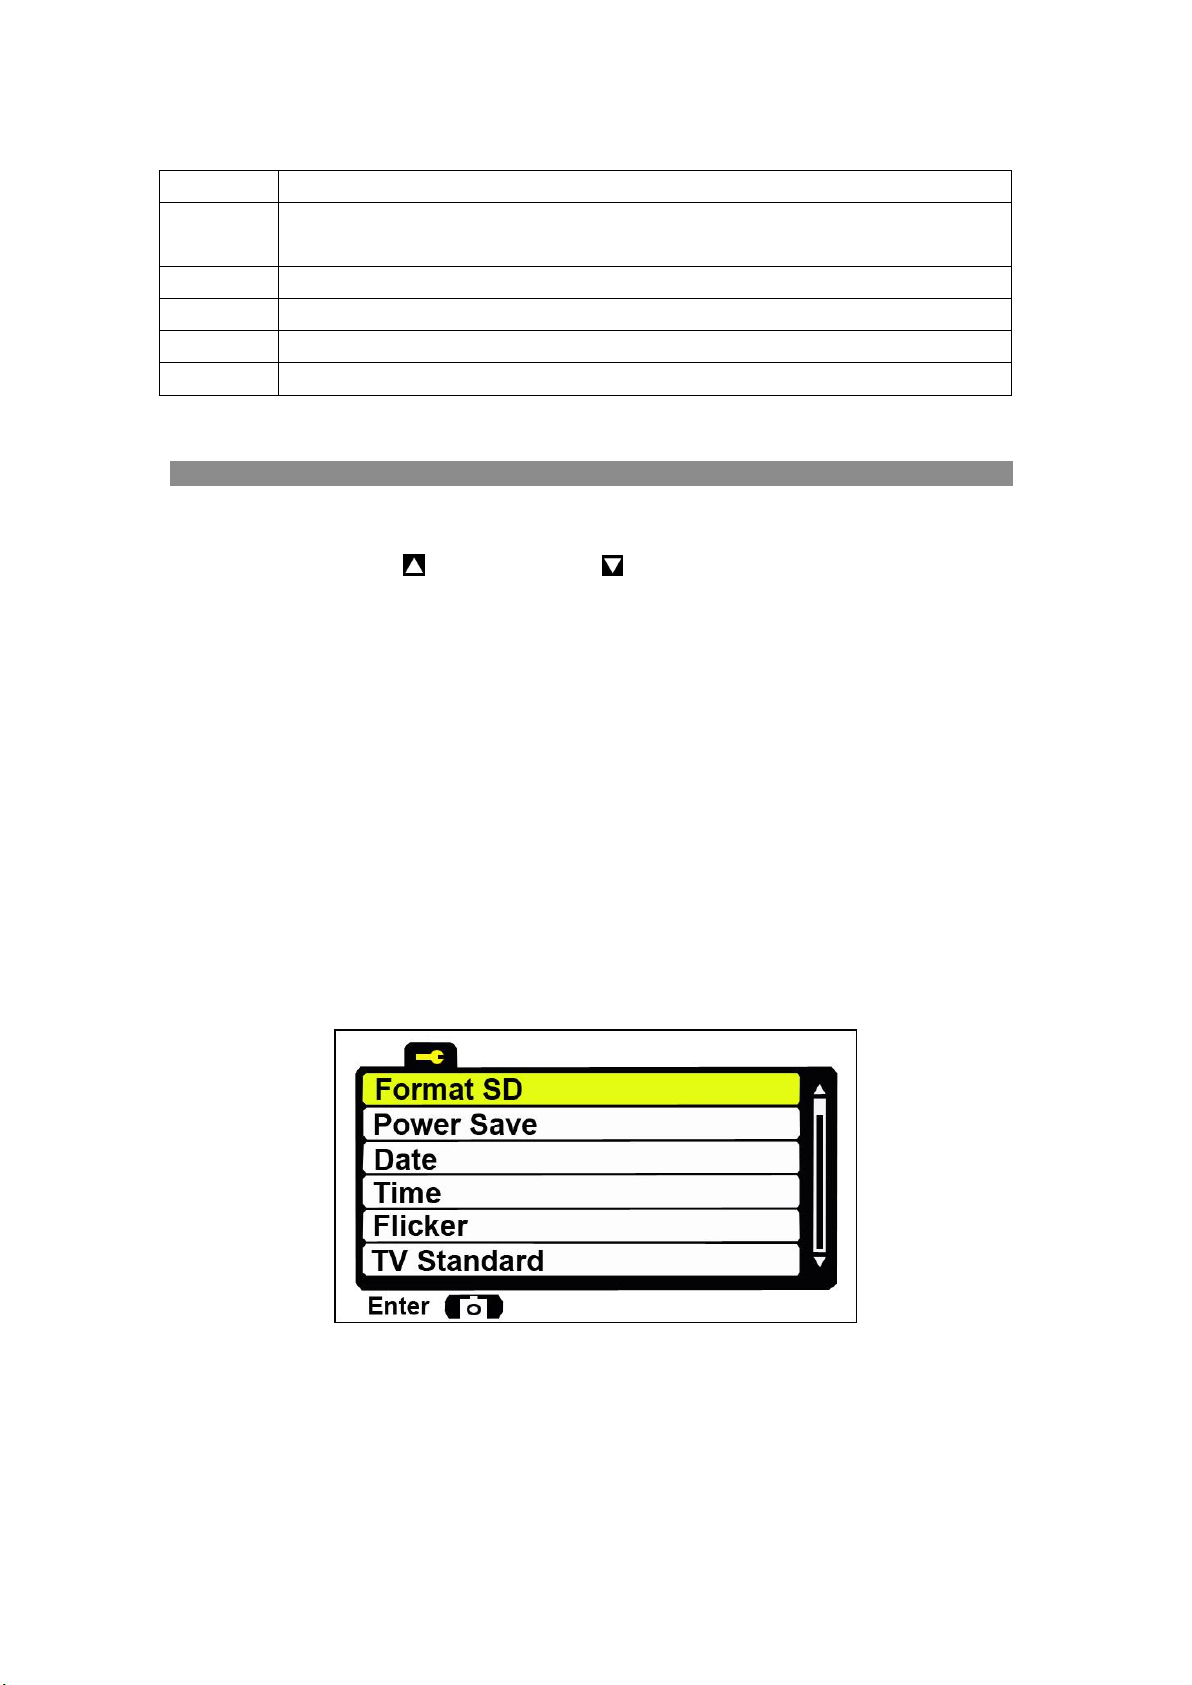
In menu mode: Press to select the next menu listing.

Delete Photos
Play/Delete
Videos
Focusing the image
Target the object you would like to view and turn the focusing wheel located just below the objective
lens until the image on the screen is sharp and clear.The focusing wheel is No.11 in Parts overview
picture.

Adjust infrared projection angle
You can adjust infrared projection angle from 5.2°to 9.2°by No.15 in Parts overview picture.

LCD Display Information.
Your screen display in photo mode
1
Icon displaying that you are in Photo Mode
2
Brightness of IR from 1 to 5 (while plugging in USB power supply the IR brightness
from 1 to 7)
3
Remain capacity quantity
4
Digital zoom
5
Battery power
6
Backlight from 0 to 15
Your screen display in video mode

1
Icon displaying that you are in Video Mode
2
Brightness of IR from 1 to 5(while plugging in USB power supply the IR brightness
from 1 to 7)
3
Remaining time of recording
4
Digital zoom
5
Battery power
6
Backlight from 0 to 15
LCD Display Information.
Press [MODE] four times continuously and enter menu mode.
Note: [ZOOM] means “up” . [IR] means “down” . [SNAP] means “ok” button. After setting, you
can press [MODE] again to exit the menu.
Your screen display during menu mode

Format SD
Select to format the TF card
Format is an operation that initializes a partition on a disk or disk. This
usually causes all files in the existing disk or partition to be erased.You
can choose yes or no by [ZOOM] and [IR] .Lastly press [SNAP] to
confirm.
Power Save
Power off mode :The NV can be set to automatically shut down when
not operating after the selected period of time.
You can choose off 5min.,15 min.,30 min or cancel. For turning the
device off automatically. The buttons of selection and confirmation is the
same as mentioned before.Then choose cancel to exit.

Date
ZOOM: UP IR: DOWN SNAP: OK
Find Date input function by [ZOOM] and [IR]. Press [SNAP] to confirm
and start to set the date .[ZOOM] means up . [IR] means down .
[SNAP] means “ok” button. After setting, you can press [MODE] again
to exit.
Time
ZOOM: UP IR:DOWN SNAP:OK
Find time input function by [ZOOM] and [IR]. Press [SNAP] to confirm
and start to set the date .[ZOOM] means up . [IR] means down .
[SNAP] means “ok” button. After setting, you can press [MODE] again
to exit.
Flicker
You can choose 50Hz or 60Hz by [ZOOM] and [IR] .Lastly press
[SNAP] to confirm.Then choose cancel to exit.

TV Standard
The video output mode can be set to NTSC (North America) or PAL
(Europe)
You can choose NTSC or PAL by [ZOOM] and [IR] .Lastly press
[SNAP] to confirm.Then choose cancel to exit.
Language
You can choose language you need by [ZOOM] and [IR] .Lastly
press [SNAP] to confirm.
LCD Backlight
set the backlight from 0 to 15

You can choose from level 0-15 to decide screen backlight intensity.Find
Backlight function and start to set the level by [ZOOM] or [IR]
button . [SNAP] means “ok” button. After setting, you can press[SNAP]
again to exit.
Date/Time Tag
When you choose on, the date/time will be showed in the picture or
video.
You can choose Off or On you need by [ZOOM] and [IR] .Lastly
press [SNAP] to confirm.
Version
The software version of the device
Using the zoom function
This device features a zoom function that can be used while taking a video or photo.
Press the [ZOOM] button to toggle between 1X and 3X digital zoom.
Optical magnification power :3.6X-10.8X. (The optical magnification is 3.6X)
(3.6X-10.8X Zoom Magnification = Optical Magnification ×Digital Magnification)
Using IR light in complete darkness
This device can be used in complete darkness when using the built in IR (infrared) light.
Press the [IR] button to activate the infrared light. Remove the IR Lens cover and press the [IR]
button to select between the 5 levels of brightness (while plugging in USB power supply the IR

brightness from 1 to 7).
Note:Don’t forget to remove the IR Lens cover while using in the darkness.
Pic. 1
Pic. 2

Viewing videos and photos on TV
Connect the AV output port of the night vision binoculars device with an A/V cable.
Connect the other end of the A/V cable to the TV video input.
In playback mode, press the ZOOM/IR buttons to select the file you will display on your TV.
Note: When the night vision binoculars device is connected to a TV, the screen inside the device will
not work.
Transmitting stored videos and photos to a computer
Using a USB cable, you can connect the night vision binoculars device to a computer.
You can find the stored photo/video files on the computer by looking under “My computer \
removable disk”.
Once the removable disk is selected, you can view, delete, move, or copy any video or photo.
Install power bank on night vision binoculars device
The device is powered by 8 AA batteries or power bank. Please note that plugging in the power bank
will not charge the device because it is not rechargeable. Make sure that it is always plugged into the
power source or the batteries have power during use.

Care and maintenance
Clean the device only with a dry or slightly damp, lint-free cloth.
Do not use abrasive cleaners to clean the device.
This device is a high-precision optical instrument, so in order to avoid damage, please avoid the
following practice:
●Use the device in ultra-high or ultra-low temperature.
●Keep it or use it in moist environment for long.
●Deliver or use it in strongly shocking environment.
Note:Remove the batteries from the device if it is not used for a longer time.
WG500B Specification
Catalog
Function Description
Optiacal
performance
Magnification (3.6-10.8) X31
Digital Zoom Max 3x
Angle Of View 9.2°
Objective Aperture 31mm
Exit Pupil Distance 30mm
F# for Objective lens 1.3
IR ZOOM 2X
5m~∞in daytime; Viewing in the darkness up to 300M (monochrome)
Imager
High-sensitivity CMOS Sensor
Size 1/2.7''
Resolution 1920X1080
Displayer
Backlight 0-15 levels adjustment
OSD menu display
CVBS always output with VGA resolution
IR LED
5W Infared 850nm LED

TF Card
Support SDHC 8GB~128GB TF Card
Operation
Preview
Record JPEG file in TF storage
Capture mp4 file in TF storage
Playback media file from SD storage
Power
External power supply - DC 5V/2A
8 pcs AA battery 8-12 V
Low battery warning
Contact us:
Phone Number: (802) 348-1444 (leave voice mail or text us)
Email: cxgz_us@outlook.com

Warranty card
Product model: ------------------------------------------------------------------------------------------------------
Order ID: -------------------------------------------------------------------------------------------------------------
Date of purchase: ---------------------------------------------------------------------------------------------------
Warranty period: ----------------------------------------------------------------------------------------------------
User Name: ----------------------------------------------------------------------------------------------------------
User’s phone: -------------------------------------------------------------------------------------------------------
User Email: ----------------------------------------------------------------------------------------------------------
User address: --------------------------------------------------------------------------------------------------------
Warranty records: ---------------------------------------------------------------------------------------------------
Warranty
This product is warranted against defects in materials and workmanship for a period if one year from
the date of purchase.
This warranty is for the original purchaser only!
Notice:
Operate this device in daylight or view any strong radiation source like the Sun, electric welding
and Laser directly may cause permanent damage to internal parts of this device and this is not
covered by the Warranty.
Table of contents
Other JZBRAIN Binoculars manuals