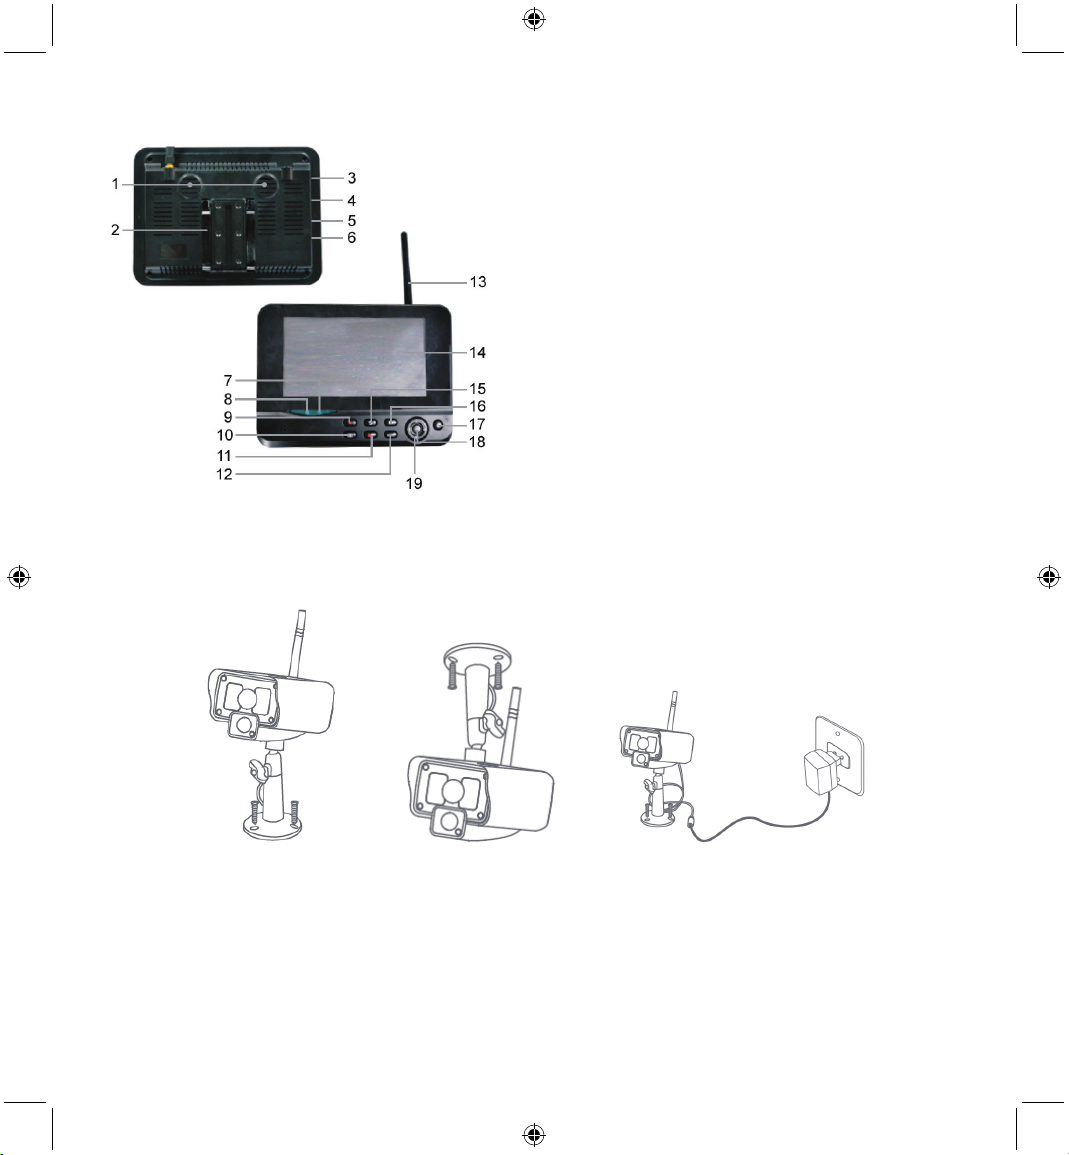
König Electronic SEC-TRANS60 User manual

2012-06-22
SEC-TRANS60
SEC-TRCAM40
MANUAL (p. 2)
Wireless Camera System
ANLEITUNG (S. 12)
Funk-Kamerasystem
MODE D’EMPLOI (p. 24)
Système de caméras sans fil
GEBRUIKSAANWIJZING (p. 35)
Draadloos camerasysteem
MANUALE (p. 46)
Sistema con Videocamera Wireless
MANUAL DE USO (p. 57)
Sistema de cámaras inalámbricas
HASZNÁLATI ÚTMUTATÓ (o. 68.)
Vezeték nélküli kamerás biztonsági rendszer
KÄYTTÖOHJE (s. 79)
Langaton kamerajärjestelmä
BRUKSANVISNING (s. 90)
Trådlöst kamerasystem
NÁVOD K POUŽITÍ (s. 100)
Bezdrátový kamerový systém
MANUAL DE UTILIZARE (p. 111)
Sistem de camerăde luat vederi wireless
ΕΓΧΕΙΡΙΔΙΟ XPHΣHΣ(σελ. 123)
Ασύρματο σύστημα ασφαλείας
BRUGERVEJLEDNING (s. 134)
Trådløst kamerasystem
VEILEDNING (s. 145)
Trådløst kamerasystem

2
ENGLISH
Wireless Camera System
Introduction:
Watch over your properties with this new 2.4 GHz digital wireless security camera system. The 7" LCD monitor can
support up to 4 cameras and has an integrated digital video recorder. The camera offers a very sharp and stable image
with night vision and the technology used improves the image quality even further. The system uses digital wireless
technology and is equipped with advanced frequency signal encryption capabilities, which reduce interference caused by
other applications using the 2.4 GHz frequency band. This digital technology ensures your privacy and allows you to use
it over an extra long distance. THE BEST THAT WIRELESS HAS TO OFFER.
The monitor and camera are paired by factory default already. When adding the additional camera SEC-TRCAM40 (4
cameras max.) to the system, please refer to the section PAIRING for adding cameras.
Please note following:
1. When the alarm sounds press the “Delete” button to stop the alarm.
2. The Harddisk/SD devices do not support hot plugging
3. The monitor only accepts the SD card or harddisk devices with format Fat32. Users could format the SD card or
harddisk to Fat32 on computer.
4. Please properly format the SD card/Harddisk after long time use.
• We recommend that you read this manual before installing/using the camera system.
• Keep this manual in a safe place for future reference.
Packaging content:
1x camera with bracket
1x 7" monitor
2x antenna
1x AV output cable
2x AC/DC power supply
Technical specifications:
Camera:
Transmitting frequency: 2.4-2.4835 GHz Digital
Modulation: 16QAM, QPSK, BPSK
Range: Indoor ±50 m, open area ±150 m (depending on local conditions)
Image chip: 1/4" CMOS
Lens: 2.0mm
View angle: 73°
Infrared illumination (LED): 5 M
Protection: IP54
Microphone: mono
Working temperature: -10°C ~ 50°C
Voltage: 5 V DC/400 mA
Dimensions: 132x64x57mm (without bracket)
Weight: 287 g (included cable)
LCD monitor:
Receiving frequency: 2.4-2.4835 GHz Digital
Channels: 4

3
Size: 7" TFT/LCD
Max. resolution: 800 RGB (H)* 480 (V) pixels
SD card: up to 32 GB (not included)
Video frame rate: 25 fps (max.) 10 fps (4x cameras)
Recording frame rate: 25 fps per channel
Video resolution: CIF/VGA
Video format: AVI
USB: 2.0
Menu language: English, German, French and Dutch
Video output level: 1 Vp-p/75 Ohm
Audio output level: 2Vrms@600ohm mono
Audio/video output connector: 2.5mm jack (2.5mm cable to 3 x RCA included)
Range: Indoor ±50 m, open area ±150 m (depending on local conditions)
Operating temperature: 0°C to +40°C
Voltage: 5 V DC/650 mA
Dimensions: 214x157x26 mm
Weight: 488 g
Safety precautions:
• Do not open the camera or monitor in the event of a malfunction. These products should only be opened by a qualified
engineer.
• Do not submerge the camera in liquid.
• Do not expose the monitor to water or humidity.
• Do not expose the monitor or camera to high temperatures (see technical specifications).
• Do not install the system close to strong magnetic fields, such as a speaker. This may affect the quality.
Product description:
Camera:
1. Infrared LEDs
2. Lens
3. PIR infrared sensor
4. Microphone
5. Bracket
6. Antenna
7. Pair Button
8. Power Input
9. Antenna Socket
10. Link Indicator
11. Power Indicator

4
Monitor:
1. Speaker
2. Bracket
3. USB Port
4. SD Card Slot
5. AV Output
6. Power Port
7. Link Indicator
8. Power Indicator
9. Record/stop Video
10. Quarter Display Button
11. Delete file/LCD, TV Switch
12. Menu
13. Antenna
14. 7" TFT-LCD
15. Display Mode
16. Playback Video
17. Power on/off
18. OK Button
19. Navigate Button
Installation instructions:
Camera:
The camera can be mounted in different ways. For ceiling mounting use the screw thread on top of the camera. After
mounting the camera connect the AC/DC power supply to the camera and a wall outlet.
Monitor:
The monitor can be placed on a flat surface or mounted to the wall. After placing the monitor connect the AC/DC power
supply to the monitor and a wall outlet. The camera is powered on automatically after connecting the AC/DC power
supply. Optional: the monitor can be connected to a monitor with the video output of the monitor.

5
Video Cable
User instructions:
1. Insert an SD card in the SD card slot of the monitor. Or connect an external hard disk drive to the USB port of the
monitor.
2. Press the power on/off button for about 2 seconds to power on the monitor. The power indicator should light up and the
picture appear.
3. For systems settings press the menu button to open the main menu. The following screen should appear. Use the
navigate, OK and menu buttons to navigate through the menu.

6
System
1. Press OK to enter the system settings. The system offers the following options:
Date / Time Set the time and date.
Language Set the language.
Record Mode Set to stop recording or overwrite the first video record when the storage medium is full.
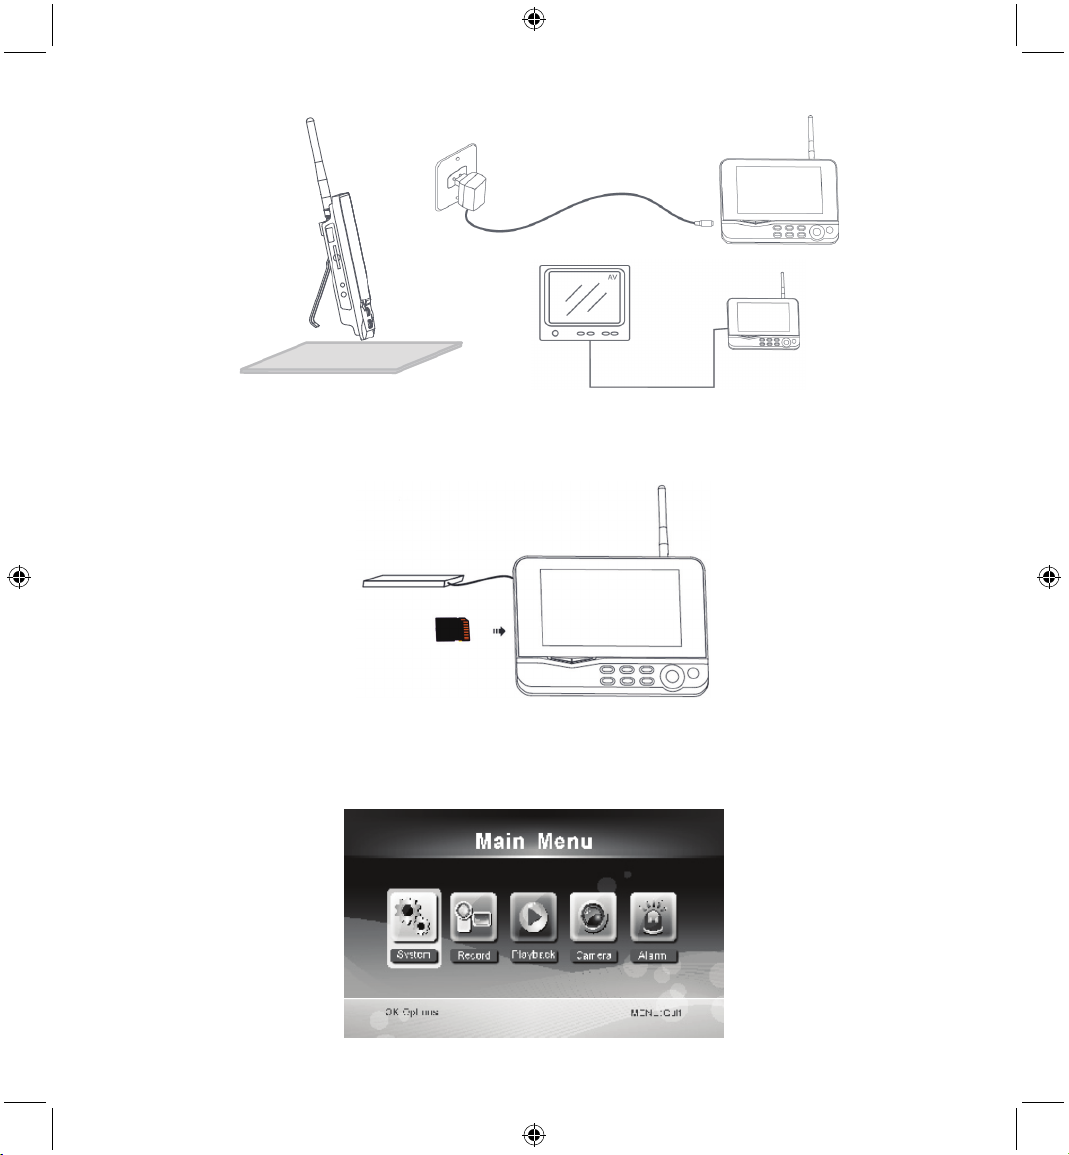
Format SD/USB Set to format the storage medium.
Storage for Recording Set the storage medium.
Display Items Set to display RSSI, Time, SD/USB status and camera on the screen and the recorded video.
TV System Select a TV system (PAL for Europe).
System Information Shows the system information.
Scan Mode Period Set the cyclic display interval of the monitoring picture on the camera.
Mute Turns on/off the speaker on the monitor.
Load Default Reset the factory default settings.
Record Date/Time Set to display the current recording time and date on the recorded video.
Brightness Adjust brightness of the picture.
Volume Adjust the volume.
2. Select date/time with the navigate button and press OK to enter the date/time setting.
• Press the left or right arrow button to select.
• Press the up or down arrow button to adjust.
• Press the OK button to confirm.
• Press the MENU button to exit.
3. Select language with the navigate button and press OK to enter the language setting.
• Press the down or up arrow button to select language.
• Press the OK button to confirm and exit.
4. Select record mode with the navigate button and press OK to enter the record mode setting.
• Press the up or down arrow button to select “Normal” or “Overwrite”.
• Press the OK button to confirm and exit.
Remarks:
Normal: When the SD card or the mobile hard disk is full, the system stops recording automatically.
Overwrite: When the SD card or the mobile hard disk is full, the system automatically deletes the first video and reserves
sufficient storage space to guarantee latest recording.
5. Select format SD/USB with the navigate button and press OK to enter the format SD/USB setting.
• Press the up or down arrow button to select “Cancel”, “SD Card” or “USB Device”;
- Cancel: cancels formatting.
- SD Card: formats the SD card.
- USB Device: formats the external hard disk drive (if connected)
• Press the OK button to format:
• After formatting, the system shows “Format Successfully”, indicating that formatting succeeds.
• Press the OK button to confirm and exit.
6. Select storage for recording with the navigate button and press OK to enter the storage for recording setting.
• Press the up or down button to select “SD Card” or “USB Device”
• Press the OK button to confirm and exit.
7. Select display items with the navigate button and press OK to enter the display items setting.

7
• Press the up or down arrow button to select.
• Click the OK button to confirm the display items in the picture.
- RSSI: Signal intensity icon
- SD USB status: Whether the SD card or mobile hard disk is inserted
- Camera: Camera name icons
• After setting, press the MENU button to confirm and exit.
8. Select TV system with the navigate button and press OK to enter the TV system setting.
• Press the up or down button to select NTSC or PAL (PAL for Europe).
• Press OK button to confirm and exit.
9. Select system information with the navigate button and press OK to enter the system information setting.
• Press OK to see the information about the system.
• Press the menu button to exit.
10. Select system upgrade with the navigate button and press OK to enter the system upgrade setting.
• Press the up or down arrow button to select.
• Press OK.
• Press the record/stop video button to confirm.
11. Select scan mode period with the navigate button and press OK to enter the scan mode period setting.
• Press the up or down arrow button to select the period for scanning the connected cameras.
• Press the OK button again to confirm and exit.
12. Select mute with the navigate button and press OK to enter the mute setting.
• Press the up or down arrow button to select “On” or “Off”.
• Press the OK button again to confirm and exit.
13. Select load default with the navigate button and press OK to enter the load default setting.
• Press the up or down button to select “Cancel” or “OK”.
- Cancel: Cancels option default settings.
- OK: Resets default settings.
• Press the OK button to confirm and exit.
14. Select brightness with the navigate button and press OK to enter the brightness setting.
• Press the left or right arrow button to adjust the brightness.
• Press the OK button to confirm and exit.
15. Select volume with the navigate button and press OK to enter the volume setting.
• Press the left or right arrow button to adjust the volume.
• Press the OK button to confirm and exit.
Note: The volume can also be adjusted with the up or down arrow in live view monitoring.
16. Press menu to return to the main menu.
Record
Press the right arrow button in the main menu to select the record settings and press OK.
Timer Recording:
Set the recording start/stop time through the “Timer Recording” menu. The device automatically records according the set
start/stop time.
1. Select timer recording with the navigate button and press OK to enter a new schedule setting.
• Press OK to enter the timer recording menu.

8
• Press the up or down arrow button to select;
• Press the left or right button to adjust;
• Press the OK button to confirm and exit.
2. After setting, the device automatically records according to the set start/stop time.
3. If you press the record/stop video button on the device during the recording process, set by timer recording, the
recording stops.
Manual Recording:
1. In live view monitoring, press the left and right arrow buttons to select the camera for video recording.
2. Press the record/stop video button on the device. The recording icon is displayed on the screen, indicating that
recording is starting.
3. Press the button on the device again to stop recording.
PIR Recording:
PIR Recording: If there is human motion detected by any accessed camera, recording can be triggered.
1. Select PIR recording with the navigate button and press OK to enter the PIR recording setting.
• Press the up or down button to select the camera.
• Press the left or right arrow button to select “On”.
• Press the OK button to confirm and exit.
Note: when “Off” is set, the motion detection function is turned off. The infrared sensing distance of PIR is 5m. If the
distance exceeds 5m, sensing may fail.
Playback
Press the right arrow button in the main menu to select the playback settings and press OK.
Note: for playback functions it's necessary that an SD card is inserted or an external hard disk drive is connected.
The playback function can also be accessed in live view monitoring by pressing the playback video button.
1. Press the up or down arrow button to select the folder.
2. Press the OK button to confirm and enter.

9
Camera 1
Camera 2
Camera 4
Not browsed
File size
3. Press the up or down arrow button to select the video file.
4. Press the OK button for playback.
5. Press the left or right arrow button to go backward/forward in fastforward.
6. Press the OK button again to pause.
7. Press the MENU button to quit the playback.
Delete video
In video playback mode, press the up or down arrow button to select the video or video folder to be deleted.
• Press the delete file/LCD button on the monitor to delete it.
Note: only an empty folder can be deleted as folder.
Camera
When adding the additional camera SEC-CAMTR40 (max. 4) the camera needs to be paired to the system for the system
to recognize the camera.
Press the right arrow button in the main menu to select the camera settings and press OK.
Pairing:
1. Press OK to enter the pairing menu.
2. Select the camera with the up and down arrow buttons.
3. Press OK, and the following screen will appear.

10
4. Press the pair button within 60 seconds for 2 seconds on the backside of the camera.
5. After the successful pairing of the camera and the monitor, the monitor shows PAIRING OK.
6. Press the menu button to return to the camera menu.
Note: if pairing fails, retry the above steps and be sure that the monitor and camera are not further away than 2 metres for
pairing procedure.
Active:
1. Select active with the down arrow button and press OK.
2. Press the up or down arrow button to select the camera.
3. Press the left or right arrow button to select “On” or “Off”.
4. Press the OK button to confirm and exit.
Note: only paired cameras can be set to active or not active. When a camera is set to off, it cannot be seen in live view,
recorded, etc.
PIP setting:
Set the picture resolution size and recording quality.
1. Select PIP setting with the up and down arrow buttons and press OK.
2. Select the camera with the up and down arrow buttons and press OK. The following screen appears.
3. Press the left or right arrow button to select “Resolution Size” or “Quality”.
4. Press the up or down arrow button to select “Top”, “High”, “Medium” or “Low”.
5. Press the OK button to adjust.
6. Press the MENU button to confirm and exit.
Note: the high resolution size is VGA and low is CIF.

11
Alarm
When PIR detection is set to on, the system will give an alarm when motion is detected.
1. Select alarm in the main menu and press OK.
2. The screen shows PIR detection, press OK.
3. Press “On” or “Off” with the up and down arrow button.
4. Press OK to confirm and exit.
Live view:
Press the quarter display button to select the type of view.
Time stamp
Picture in picture view
Quad view Full screen view
Note: use the left and right arrow button to select a camera
Press the display mode button to enter cyclic mode view. Five cyclic intervals are available: 5s, 10s, 15s, 20s, and 30s
and can be set under “System” > Scan Mode Period in the mean menu.
Mobile hard disk inserted successfully
SD card inserted successfully
Camera name

12
Current camera
Recording status
Signal intensity
Maintenance:
Clean the camera and the monitor with a dry cloth.
Do not use cleaning solvents or abrasives.
Warranty:
No guarantee or liability can be accepted for any changes and modifications of the product or damage caused due to
incorrect use of this product.
Disclaimer:
Designs and specifications are subject to change without notice. All logos, brands and product names are trademarks or
registered trademarks of their respective holders and are hereby recognised as such.
Attention:
• This product is designated for separate collection at an appropriate collection point. Do not dispose of this
product with household waste.
• For more information, contact the retailer or the local authority responsible for waste management.
DEUTSCH
Funk-Kamerasystem
Einleitung:
Überwachen Sie Ihr Eigentum mit diesem neuen 2,4 GHz digitalen Funk-Überwachungskamerasystem. Der 18cm (7")
LCD-Monitor kann bis zu 4 Kameras unterstützen und verfügt über einen integrierten digitalen Videorekorder. Die
Kamera bietet ein sehr scharfes und stabiles Bild mit Nachtsicht, und die verwendete Technologie verbessert die
Bildqualität noch weiter. Das System verwendet digitale Funktechnologie und ist mit modernsten
Frequenzsignal-Verschlüsselungsfunktionen ausgestattet, die die Störungen auf Grund von anderen Anwendungen unter
Verwendung des 2,4 GHz-Frequenzbandes verringern. Diese digitale Technologie sorgt für Ihre Privatsphäre und
ermöglicht Ihnen die Verwendung auf einer extra langen Strecke. DAS BESTE, WAS FUNK ZU BIETEN HAT.
Der Monitor und die Kamera sind bereits werkseitig standardmäßig gekoppelt. Sollte eine zusätzliche Kamera
SEC-TRCAM40 (4 Kameras max.) zu dem System hinzugefügt werden, lesen Sie den Abschnitt: KOPPELN und weitere
Kameras hinzufügen.
Bitte beachten Sie Folgendes:
1. Wenn der Alarm ertönt, drücken Sie die Taste „Delete“, um den Alarm zu stoppen.
2. Die Festplatte/SD-Geräte unterstützen nicht die Hot-Plugging.
3. Der Monitor akzeptiert nur die SD-Karte oder Festplattengeräte mit dem Format FAT32. Die Benutzer können die
SD-Karte oder Festplatte in das FAT32-Dateisystem auf ihrem Computer formatieren.

13
4. Bitte formatieren Sie richtig die SD-Karte/Festplatte nach einer längeren Verwendung.
• Wir empfehlen Ihnen, dieses Handbuch zu lesen, bevor das Kamerasystem installiert/verwendet wird.
• Bitte bewahren Sie dieses Handbuch für den späteren Gebrauch sicher auf.
Packungsinhalt:
1x Kamera mit Halterung
1x 18cm (7") Monitor
2x Antenne
1x AV Ausgangskabel
2x AC/DC Netzteil
Technische Daten:
Kamera:
Sendefrequenz: 2,4 - 2,4835 GHz digital
Modulation: 16QAM, QPSK, BPSK
Reichweite: Innenbereich ±50 m, feie Sicht ±150 m (je nach örtlichen Gegebenheiten)
Bildchip: 1/4" CMOS
Objektiv: 2,0mm
Betrachtungswinkel: 73°
Infrarotbeleuchtung (LED): 5 m
Schutz: IP54
Mikrofon: Mono
Betriebstemperatur: -10°C bis 50°C
Spannung: 5 V DC/400 mA
Abmessungen: 132x64x57mm (ohne Halterung)
Gewicht: 287 g (einschließlich des Kabels)
LCD-Monitor:
Empfangsfrequenz: 2,4 - 2,4835 GHz digital
Kanäle: 4
Größe: 18cm (7") TFT/LCD
Max. Auflösung: 800 RGB (H)* 480 (V) Pixel
SD-Karte: bis zu 32 GB (nicht enthalten)
Video-Bildfrequenz: 25 fps (max.) 10 fps (4x Kameras)
Aufnahme-Bildfrequenz: 25 fps pro Kanal
Videoauflösung: CIF/VGA
Videoformat: AVI
USB: 2.0
Menüsprache: Englisch, Deutsch, Französisch und Niederländisch
Videoausgangspegel: 1 Vss/75 Ohm
Audioausgangspegel: 2Vrms@600 Ohm Mono
Audio-/Videoausgangsbuchse: 2,5mm Klinkenstecker (2,5 mm-Kabel mit 3 x Cinch im Lieferumfang enthalten)
Reichweite: Innenbereich ±50 m, feie Sicht ±150 m (je nach örtlichen Gegebenheiten)
Betriebstemperatur: 0°c bis +40°C
Spannung: 5 V DC/650 mA
Abmessungen: 214x157x26 mm
Gewicht: 488 g

14
Sicherheitshinweise:
• Öffnen Sie nicht die Kamera oder Monitor im Falle einer Störung. Diese Produkte sollen nur vom qualifizierten
Fachpersonal geöffnet werden.
• Tauchen Sie die Kamera nicht in Flüssigkeiten.
• Setzen Sie den Monitor nicht Wasser oder Feuchtigkeit aus.
• Setzen Sie den Monitor oder die Kamera nicht den hohen Temperaturen aus (siehe technische Daten).
• Installieren Sie das System nicht in die Nähe starker magnetischer Felder wie z. B. Lautsprecher. Dies kann
Auswirkungen auf die Qualität haben.
Produktbeschreibung:
Kamera:
1. Infrarot LEDs
2. Objektiv
3. PIR-Infrarotsensor
4. Mikrofon
5. Halterung
6. Antenne
7. Kopplungs-Taste
8. Spannungsversorgung
9. Antennenbuchse
10. Verbindungsanzeige
11. Betriebsanzeige
Monitor:
1. Lautsprecher
2. Halterung
3. USB-Anschluss
4. SD-Kartensteckplatz
5. AV-Ausgang
6. Stromanschluss
7. Verbindungsanzeige
8. Betriebsanzeige
9. Video aufnehmen/beenden
10. Quarter-Anzeigetaste
11. Datei löschen /LCD, TV-Schalter
12. Menü
13. Antenne
14. 18cm (7") TFT-LCD
15. Anzeigemodus
16. Videowiedergabe
17. Ein-/Aus-Taste
18. OK-Taste
19. Navigationstaste

15
Installationsanleitung:
Kamera:
Die Kamera kann auf verschiedene Arten befestigt werden. Für die Deckenmontage verwenden Sie das
Schraubengewinde auf der Kameraoberseite. Nach der Kameramontage schließen Sie das AC / DC-Netzteil an die
Kamera und eine Steckdose an.
Monitor:
Der Monitor kann auf eine ebene Fläche aufgestellt oder an die Wand befestigt werden. Nach der Monitorbefestigung
schließen Sie das AC / DC-Netzteil an den Monitor und eine Steckdose an. Die Kamera wird automatisch nach dem
Anschließen des AC / DC-Netzteils mit Spannung versorgt. Optional: der Monitor kann an einen Monitor mit dem
Videoausgang des Monitors angeschlossen werden.
Videokabel
Gebrauchsanweisung:
1. Legen Sie eine SD-Karte in den SD-Kartensteckplatz des Monitors. Oder schließen Sie eine externe Festplatte an den
USB-Anschluss des Monitors an.

16
2. Drücken Sie die Ein-/Aus-Taste für ca. 2 Sekunden, um den Monitor einzuschalten. Die Betriebsanzeige leuchtet auf
und, das Bild erscheint.
3. Für die Systemeinstellungen drücken Sie die Menütaste, um das Hauptmenü zu öffnen. Das folgende Fenster sollte
erscheinen. Verwenden Sie die Navigations-, OK- und Menü-Tasten zum Navigieren durch das Menü.
System
1. Drücken Sie OK, um die Systemeinstellungen einzugeben. Das System bietet die folgenden Optionen:
Datum / Uhrzeit Stellen Sie die Uhrzeit und das Datum ein.
Sprache Stellen Sie die Sprache ein.
Aufnahmemodus Einstellen, um die Aufnahme zu stoppen oder die erste Videoaufnahme zu überschreiben,
wenn das Speichermedium voll ist.
SD/USB-Format Einstellen, um das Speichermedium zu formatieren.
Aufnahmespeicher Stellen Sie das Speichermedium ein.
Display-Artikel Einstellen, um RSSI, Zeit, SD / USB-Status und die Kamera auf dem Bildschirm und das
aufgenommene Video anzuzeigen.
TV-System Wählen Sie ein TV-System (PAL für Europa).
Systeminformationen Zeigt die Systeminformationen.
Scanmodus-Zeitintervall Stellen Sie das zyklische Anzeigeintervall des Kontrollbildes auf der Kamera.
Stummschalten Schaltet den Lautsprecher auf dem Monitor ein/aus.
Laden von Vorgaben Setzen Sie die Standardwerkseinstellungen zurück.
Aufnahmedatum/-uhrzeit Einstellen, um die aktuelle Aufnahmeuhrzeit und das -datum auf dem aufgenommenen Video
anzuzeigen.

17
Helligkeit Stellen Sie die Helligkeit des Bildes ein.
Lautstärke Stellen Sie die Lautstärke ein.
2. Wählen Sie das Datum/die Uhrzeit mit der Navigationstaste und drücken Sie OK, um die Datum-/Uhrzeit-Einstellungen
einzugeben.
• Drücken Sie die linke oder rechte Pfeiltaste, um auszuwählen.
• Drücken Sie die Aufwärts- oder Abwärtspfeiltaste, um einzustellen.
• Drücken Sie die OK-Taste zur Bestätigung.
• Drücken Sie die MENU-Taste, um zu beenden.
3. Wählen Sie die Sprache mit der Navigationstaste und drücken Sie OK, um die Spracheinstellungen einzugeben.
• Drücken Sie die Aufwärts- oder Abwärtspfeiltaste, um die Sprache auszuwählen.
• Drücken Sie die OK-Taste, um zu bestätigen und beenden.
4. Wählen Sie den Aufnahmemodus mit der Navigationstaste und drücken Sie OK, um den Aufnahmemodus
einzugeben.
• Drücken Sie die Aufwärts- oder Abwärtspfeiltaste, um „Normal“ oder „Overwrite“ (Überschreiben) auszuwählen.
• Drücken Sie die OK-Taste, um zu bestätigen und beenden.
Anmerkungen:
Normal: Wenn die SD-Karte oder die mobile Festplatte voll ist, stoppt das System die Aufnahme automatisch.
Überschreiben: Ist die SD-Karte oder die mobile Festplatte voll, löscht das System automatisch das erste Video und
behält sich ausreichenden Speicherplatz, um letzte Aufnahme zu gewährleisten.
5. Wählen Sie das SD-/USB-Format mit der Navigationstaste und drücken Sie OK, um die SD-/USB-Formateinstellungen
einzugeben.
• Drücken Sie die Aufwärts- oder Abwärtspfeiltaste, um „Cancel“ (Abbrechen), „SD Card“ (SD-Karte) oder „USB
Device“ (USB-Gerät )auszuwählen;
- Abbrechen: Bricht die Formatierung ab.
- SD-Karte: formatiert die SD-Karte.
- USB-Gerät: formatiert die externe Festplatte (sofern angeschlossen)
• Drücken Sie die OK–Taste zum Formatieren:
• Nach der Formatierung zeigt das System „Format Successfully“, was darauf hindeutet, dass die Formatierung
erfolgreich ist.
• Drücken Sie die OK-Taste, um zu bestätigen und beenden.
6. Wählen Sie den Speicher für die Aufnahme mit der Navigationstaste und drücken Sie OK, um die
Speichereinstellungen für die Aufnahme einzugeben.
• Drücken Sie die Aufwärts- oder Abwärtspfeiltaste, um „SD Card“ (SD-Karte) oder „USB Device“ (USB-Gerät )
auszuwählen.
• Drücken Sie die OK-Taste, um zu bestätigen und beenden.
7. Wählen Sie die Display-Artikel mit der Navigationstaste und drücken Sie OK, um die Einstellungen der Display-Artikel
einzugeben.
• Drücken Sie die Aufwärts- oder Abwärtspfeiltaste, um auszuwählen.
• Klicken Sie die OK-Taste, um die Display-Artikel im Bild zu bestätigen.
- RSSI: Signalstärke-Symbol
- SD/USB-Status: Ob die SD-Karte oder mobile Festplatte eingesetzt wird
- Kamera: Namen der Kamerasymbole
• Nach der Einstellung drücken Sie die MENU-Taste, um zu bestätigen und beenden.

18
8. Wählen Sie das TV-System mit der Navigationstaste und drücken Sie OK, um die Einstellungen des TV-Systems
einzugeben.
• Drücken Sie die Aufwärts- oder Abwärtspfeiltaste, um NTSC oder PAL (PAL für Europa) auszuwählen.
• Drücken Sie die OK-Taste, um zu bestätigen und beenden.
9. Wählen Sie die Systeminformationen mit der Navigationstaste und drücken Sie OK, um die Einstellungen der
Systeminformationen einzugeben.
• Drücken Sie OK, um die Informationen über das System zu sehen.
• Drücken Sie die Menütaste zu beenden.
10. Wählen Sie das System-Upgrade mit der Navigationstaste und drücken Sie OK, um die
System-Upgrade-Einstellungen einzugeben.
• Drücken Sie die Aufwärts- oder Abwärtspfeiltaste, um auszuwählen.
• Drücken Sie OK.
• Drücken Sie die Aufnahme-/ Stopp-Video-Taste zur Bestätigung.
11. Wählen Sie den Scanmodus mit der Navigationstaste und drücken Sie OK, um die Einstellungen des
Scanmodus-Zeitintervalls einzugeben.
• Drücken Sie die Aufwärts- oder Abwärtspfeiltaste, um die Zeit für das Scannen der angeschlossenen Kameras
auszuwählen.
• Drücken Sie die OK-Taste erneut, um zu bestätigen und beenden.
12. Wählen Sie das Stummschalten mit der Navigationstaste und drücken Sie OK, um die
Stummschalten-Einstellungen einzugeben.
• Drücken Sie die Aufwärts- oder Abwärtspfeiltaste, um „On“ oder „Off“ auszuwählen.
• Drücken Sie die OK-Taste erneut, um zu bestätigen und beenden.
13. Wählen Sie das Laden von Vorgaben mit der Navigationstaste und drücken Sie OK, um das Laden der
Standardeinstellungen einzugeben.
• Drücken Sie die Aufwärts- oder Abwärtspfeiltaste, um „Cancel“ oder „OK“ auszuwählen.
- Cancel: Bricht die Option der Standardeinstellungen ab.
- OK: Setzt die Standardeinstellungen zurück.
• Drücken Sie die OK-Taste, um zu bestätigen und beenden.
14. Wählen Sie die Helligkeit mit der Navigationstaste und drücken Sie OK, um die Helligkeitseinstellungen einzugeben.
• Drücken Sie die Aufwärts- oder Abwärtspfeiltaste, um die Helligkeit einzustellen.
• Drücken Sie die OK-Taste, um zu bestätigen und beenden.
15. Wählen Sie die Lautstärke mit der Navigationstaste und drücken Sie OK, um die Einstellungen für die Lautstärke
einzugeben.
• Drücken Sie die Aufwärts- oder Abwärtspfeiltaste, um die Lautstärke einzustellen.
• Drücken Sie die OK-Taste, um zu bestätigen und beenden.
Hinweis: Die Lautstärke kann auch mit dem Pfeil nach oben oder unten in der Live-Überwachungsansicht eingestellt
werden.
16. Drücken Sie Menü, um zum Hauptmenü zurückzukehren.
Aufnahme
Drücken Sie die rechte Pfeiltaste im Hauptmenü, um die Aufnahmeeinstellungen auszuwählen, und drücken Sie OK.
Timer-Aufnahme:
Stellen Sie die Start-/Stopp-Aufnahmezeit durch das „Timer Recording“-Menü ein. Das Gerät zeichnet automatisch nach
der eingestellten Start-/Stopp-Zeit.

19
1. Wählen Sie die Timer-Aufnahme mit der Navigationstaste und drücken Sie OK, um die Einstellungen für einen neuen
Zeitplan einzugeben.
• Drücken Sie OK, um das Timer-Aufnahmemenü aufzurufen.
• Drücken Sie die Aufwärts- oder Abwärtspfeiltaste, um auszuwählen;
• Drücken Sie die linke oder rechte Taste, um zu regulieren;
• Drücken Sie die OK-Taste, um zu bestätigen und beenden.
2. Nach der Einstellung zeichnet das Gerät automatisch nach der eingestellten Start-/Stopp-Zeit.
3. Wenn Sie die Aufnahme-/Stopp-Video-Taste am Gerät während der Aufnahme drücken, die durch die Timer-Aufnahme
eingestellt wird, wird die Aufnahme angehalten.
Manuelle Aufnahme:
1. In der Live-Überwachungsansicht drücken Sie die linken und rechten Pfeiltasten, um die Kamera für die
Videoaufnahme auszuwählen.
2. Drücken Sie die Aufnahme-/Stopp-Video-Taste am Gerät. Das Aufnahme-Symbol wird auf dem Bildschirm angezeigt,
was darauf hinweist, dass die Aufnahme gestartet wird.
3. Drücken Sie die Taste am Gerät erneut, um die Aufnahme zu stoppen.
PIR-Aufnahme:
PIR-Aufnahme: Wenn die menschliche Bewegung von jeder abgerufen Kamera erkannt wird, kann die Aufnahme
ausgelöst werden.
1. Wählen Sie die PIR-Aufnahme mit der Navigationstaste aus und drücken Sie OK, um die PIR-Aufnahmeeinstellungen
einzugeben.
• Drücken Sie die Taste nach oben oder unten, um die Kamera auszuwählen.
• Drücken Sie die linke oder rechte Taste, um „On“ auszuwählen.
• Drücken Sie die OK-Taste, um zu bestätigen und beenden.
Hinweis: wenn „Off“ eingestellt ist, wird die Funktion der Bewegungserkennung ausgeschaltet. Die Infrarot-Reichweite
von PIR ist 5m. Wenn der Abstand größer als 5m ist, könnte Erfassen fehlschlagen.
Wiedergabe
Drücken Sie die rechte Pfeiltaste im Hauptmenü, um die Wiedergabe-Einstellungen auszuwählen, und drücken Sie OK.
Hinweis: für die Wiedergabe-Funktionen ist es notwendig, dass eine SD-Karte eingesteckt wird oder eine externe
Festplatte angeschlossen ist.
Die Wiedergabe-Funktion ist auch in der Live-Überwachungsansicht verfügbar, indem Sie die Videowiedergabe-Taste
drücken.

20
1. Drücken Sie die Aufwärts- oder Abwärtspfeiltaste, um den Ordner auszuwählen.
2. Drücken Sie die OK-Taste, um zu bestätigen und einzugeben
Kamera 1
Kamera 2
Kamera 4
Nicht durchsucht
Dateigröße
3. Drücken Sie die Aufwärts-oder Abwärtspfeiltaste, um die Videodatei auszuwählen.
4. Drücken Sie die OK-Taste für die Wiedergabe.
5. Drücken Sie die linke oder rechte Pfeiltaste, um rückwärts/vorwärts im Schnellvorlauf zu gehen.
6. Drücken Sie die Taste OK erneut, um zu unterbrechen.
7. Drücken Sie die MENU–Taste, um die Wiedergabe zu beenden.
Video löschen
Im Videowiedergabe-Modus drücken Sie die Aufwärts- oder Abwärtspfeiltaste, um das Video oder den Video-Ordner zum
Löschen auszuwählen.
• Drücken Sie die Datei löschen/LCD-Taste auf dem Monitor, um sie zu löschen.
Hinweis: nur ein leerer Ordner kann als Ordner gelöscht werden.
Kamera
Wenn Sie die zusätzliche Kamera SEC-CAMTR40 (max. 4) hinzufügen möchten, muss die Kamera mit dem System zur
Erkennung der Kamera gekoppelt werden.
Drücken Sie die rechte Pfeiltaste im Hauptmenü, um die Kameraeinstellungen auszuwählen, und drücken Sie OK.
Koppeln:
1. Drücken Sie OK, um das Kopplungs-Menü aufzurufen.
2. Wählen Sie die Kamera mit den Aufwärts- oder Abwärtspfeiltasten aus.
3. Drücken Sie OK, und der folgende Bildschirm erscheint.
This manual suits for next models
1
Table of contents
Languages:
Other König Electronic Digital Camera manuals