K2 Bike k2 bikes User manual

K2 Bike
Owner’s Manual
1998 K2 BIKE OWNER'S MANUAL - PDF

TABLE OF CONTENTS
Introduction . . . . . . . . . . . . . . . . . . . . . . . . . . . . . . . . . . . . . . . . . . . . . . . . . . 2
Your K2 Bike . . . . . . . . . . . . . . . . . . . . . . . . . . . . . . . . . . . . . . . . . . . . . . . . . . 2
GENERAL BICYCLE INFORMATION
Safety and Fit . . . . . . . . . . . . . . . . . . . . . . . . . . . . . . . . . . . . . . . . . . . . . . . . . 2
Safety Tips
Cable Routing
Proper Frame Sizing
Mechanical Quick Check
Bicycle Care . . . . . . . . . . . . . . . . . . . . . . . . . . . . . . . . . . . . . . . . . . . . . . . . . . . 6
Cleanliness
Bike Storage
Proper Shifting
Avoid Jumping
Preventing Bicycle Theft
Lubrication
Operation . . . . . . . . . . . . . . . . . . . . . . . . . . . . . . . . . . . . . . . . . . . . . . . . . . . . . 6
Quick Releases
Wheel Removal
Braking
Shifting
Pedals
Maintenance . . . . . . . . . . . . . . . . . . . . . . . . . . . . . . . . . . . . . . . . . . . . . . . . . . . 8
Lubrication
Brakes
Drive System
Wheels and Tires
General Maintenance Schedule
K2 BIKE SPECIFIC INFORMATION
Suspension Tuning . . . . . . . . . . . . . . . . . . . . . . . . . . . . . . . . . . . . . . . . . . . . . . 11
Tuning Variables
Tuning Adjustments
Smart Shock
K2 Bike Specific Maintenance . . . . . . . . . . . . . . . . . . . . . . . . . . . . . . . . . . . . . . 14
Main Pivot Maintenance
K2 Bike Maintenance Schedule
Torque and Lubrication Table
Service Kits

2
INTRODUCTION
CongratulationsonthepurchaseofyournewK2Bike®.Since1989,whenwejumpstartedthesuspensionrevolutionwiththeintroductionofthe
Flexstem,™we’vebeenattheforefrontofsuspensioninnovation.In1990,wereleasedthefirstproductionfullsuspensionmountainbikeever—
theoriginalPro-Flex®.Overthelasteightyears,we’verefinedouroriginaldesignstoprovideyouwiththecomfortandcontrolonlyawelldesigned
suspensionbikecanprovide.Happytrails!
YOUR K2 BIKE
Safety Tips
Whilebicyclescanbeanenjoyablemeansofrecreationortransportation,youshouldrecognizetheresponsibilitiesrequiredforsafeoperation.Itis
importantthatallusersunderstandtherulesofsaferidingandareproperlypreparedforallridingconditions.K2Bikestronglyrecommendsa
formalcourseinbicyclesafety.Also,followthesegeneralguidelinesforsafeoperation:
1. AlwayswearprotectiveclothingincludinganANSIorSnellapprovedbicyclehelmet, eyeprotection,andgloves.Be
certainthatyourclothingcannotbecomeentangledinthechainringsorwheels.
2. Makesurethebicyclefitstherider,andthattheridercaneasilyreachandoperatethecontrols.
3. Alwaysabidebytrafficlawswhenridingontheroad.Usehandsignals,ridewithtraffic,andalwaysridesinglefile
whenridingwithagroup.Ridedefensively.Bealert.Youmaybehardformotoriststosee.Bereadytostopsuddenly
andavoidhazardsatalltimes.
4. Ifyouintendtorideatnight,donotremovethestandardreflectorsonyourbike.K2Bikestronglyrecommendsthe
useofaftermarketlightsfrontand rear.It isimportantthatyoucan seeandbeseenin thedarkness.Reflective
clothingisalsorecommended.
CAUTION: Girvin strongly recommends that you add proper front and rear lights if bicycle will ridden at night
or in low light situations. Night riding without lights can be extremely dangerous, and can result in the rider
running into something, or being run in to, causing severe injuries or death.
GENERAL BICYCLE INFORMATION
SAFETY AND FIT
In this section:
• Safety Tips
• Cable Routing
• Proper Frame
Sizing
• Mechanical Quick
Check
!

3
5. Brakecarefully.Applysteady,evenpressuretobothbrakelevers.Toomuchpressureontherearbrakecanlockupthe
wheelandleadtolossofcontrol.Toomuchpressureonthefrontbrakecancausetherearwheeltoliftofftheground
orthefrontbraketolockupandslipoutfromunderyou.Allowextrastoppingdistanceinwetweather.Yourbrakes
andtireswillhaveless gripin wetconditions. Forfurtherinstructionsonbraking,seeOperation:Braking.
6. Mountanybags,racksorotheraccessoriessecurely.Addedweightshouldbeminimizedasitcanalterthehandling
ofabicycle.Becertainthattheseaccessoriescannotlimitbrakeoperationorbecomeentangledinthewheelsor
drivetrainparts.
CAUTION: Never attempt to ride with more than one person on your bicycle. K2 Bike bicycles are designed
for single riders only. An extra rider can negatively affect bicycle handling, and can result in loss of control
and severe injuries.
7. Ifyourframeorforkdevelopsacrackorisinvolvedinanaccident,itshouldbebroughttoyourdealerforcomplete
inspection.Donotrideadamagedbicycle.
CAUTION: In the event of a crash, there could be damage to your K2 Bike that may not be immediately
visible. Damaged bikes can be extremely dangerous and can result in failure during use and severe injuries.
After a crash, take your bike to your authorized K2 Bike dealer or other qualified technician to verify its
structural integrity.
8. Offroadridingrequiresthedevelopmentofspecialskillstocopewithvariedhazards:
• Rideonestablishedtrails.
• Avoidrocks,logs,holes,dropoffs,andotherobstacles.
• Ondescents,reducespeed,shiftyourweightback,griptheseatbetweenyourthighs,andapplyslightlymore
pressuretotherearbrakethantothefront.
• Beconsiderateofothertrailusers.
• Alwaysride within thelimitsofyourskill level.
• Attendamountainbikeclass,readbooksandarticlesaboutmountainbiketechniqueandseekouttheinstruction
ofexperiencedriders.
WARNING: Riding over off road obstacles, steep downhills, and wet terrain can be extremely dangerous and
can result in serious injuries. Be sure of your abilities before attempting to ride difficult terrain.
CAUTION: K2 Bike strongly recommends that your K2 Bike be assembled and adjusted by your authorized K2
Bike dealer. Your authorized K2 Bike dealer possesses the proper training and tools to service your bicycle.
Improperly assembled or adjusted bicycles can be extremely dangerous, and can result in failure during use
and severe injuries.
Ifyouhavequestionsaboutanypartofyourbicycle,contactyourauthorizedK2Bikedealerorcallusat 401-765-0130.
Cable Routing
Makesurethatbrakeandgearcablesarecuttotheproperlengthandproperlyrouted.Youshouldbeabletoturnyourhandlebarsfromsidetoside
withoutanytensionorpullingonthecables.Youshouldalsobeabletocompresstherearsuspensionwithoutanytensionorpullingonthe cables.
Also,allofyourfrontcablesshouldberoutedontheinsideofthelegsontheNoleenCross-LinkandChubbyforks.Formoredetailedinstructions
onpropercablerouting,seeyour NoleenCross-Link orNoleen ChubbyOwner's Manual.
CAUTION: Make sure that your brake and gear cables are routed properly on your K2 Bike. Failure to route
your cables properly can be extremely dangerous and result in a loss of control and severe injuries.
!
!
!
!
!

4
Proper Frame Sizing
Standover Height
MostK2Bikeframesareofferedinfoursizes.Wedesignourbikeswithaslowofastandoverheightaspossible.Whensizingaframe,aminimum
ofthreeinchesofclearancebetweentherider'scrotchandthetoptubeofthebicycleisrequired.Thisroomisneededduetotheuneventerrain
encounteredwhenridingoffroad.Thethreeinchesshouldallowyoutohopoffofthepedalsandstraddlethetoptubesafelyinapanicsituation.
Warning: Riding a frame that is too large or too small can lead to loss of control and injury.
Saddle Height and Position
Youshouldadjusttheheightofyoursaddletoaccommodateyourleglength.Whenseatedonthebicycleinanormalridingposition,yourknee
shouldbeslightlybentatmaximumextension(pedalatlowestpoint).Tosetthisheight,sitonthebikeandplaceoneheelonapedal.Withthe
pedalatitslowestpoint(thedownposition),youshouldjustbeabletotouchthepedalwithyourheel.
Raiseorlowertheseatpostbylooseningthepostbinderboltorusingthequickreleaseasyouwouldafrontorrearwheelquickrelease.Underno
circumstancesshouldtheseatpostextendfromtheframebeyondits”MinimumInsertion“or”MaximumExtension“mark.OnsomeK2Bike
modelsthereisamaximumheightholeonthebackoftheseattubeorseatmast.Donotextendtheseatpostbeyondthishole.
CAUTION: Adjusting the seatpost higher than the maximum height mark on post, or maximum height hole
on frame can result in failure during use and severe injuries.
Itisalsopossibletoadjusttheseatforeandaft,ortoadjusttheangletoenhanceindividualcomfort.Wesuggestyoustartwiththesaddleina
middlepositionwiththeseatpostclampcenteredontheseatrails,andwiththetopofthesaddlelevelwiththeground.Verysmallchangesto
saddlecanhaveasubstantialeffectoncomfortandperformance.Consequently,whenevermakingchangestosaddleposition,dosoinsmall
incrementsuntilyouhavefoundthemostcomfortableposition.Besuretotightenallboltsafteradjustmenthasbeencompleted.
Handlebar Height and Reach
YourK2Bike isequippedwith astemwhichclampsontotheoutsideofthesteerertubeofthefork.Theheightofthisstemmay bechanged
slightlybyaddingorremovingheadsetspacers.Ifyouneedtoadjustyourhandlebarpositionbeyondthesesmalladjustments,you'llhavetogeta
longerorshorterstemwithahigherorlowerrise.Anotheroptionisadifferenthandlebarwithadifferentrise.Consultyourdealerforanychanges
thatyoumayfeelarenecessary.Besuretoretightenallboltsafteradjustmentshavebeencompleted.
Control Position
Thebrakeandshiftingcontrolsonyourbikearepositionedwheretheyworkbestformostpeople.Theangleofthecontrolsandtheirpositioncan
bechanged.Askyourdealerforhelpwiththisadjustment.
Manybikeshavebrakeleverswhichcanbeadjustedforreach.Ifyouhavesmallhandsandfinditdifficulttosqueezethebrakelevers,yourdealer
canadjustthereachforyou.Yourbrakeswillrequirereadjustmentofthereachadjustmentischanged.RefertoMaintenance :Brakesformore
informationonadjustingyourbrakelevers.
Mechanical Quick Check
Beforeeveryride,takeafewminutestoinspectyourK2Bikeasfollows:
Important:This is nota comprehensive maintenancechecklist. If yoususpect a problemwith your bicycle,do
not ride the bike until the problem has been corrected. If you are uncertain about the cause of, or how to
correct, a problem, consult your authorized K2 Bike Dealer.
Check this out:
• QuickReleases
• TireInflation
• BrakeFunction
• WheelStraightness
CorrectStandover
Height
CorrectSaddle Height
Saddle Position
Handlebar Position
!
!
!

5
4Quick Release Wheels - Are the quick releases tightened properly?
CAUTION: Improperly adjusted wheel quick releases can be extremely dangerous, and can result in failure
during use and severe injuries.
ThewheelsonyournewK2Bikeareattachedwithconvenientsingleleverquickreleases,allowingthemtobeeasilyremovedandreinstalled.For
detailedinstructionsontheproperoperationofyourquickreleases,refertoOperation:QuickReleases.Pleasereadandfollowtheseinstructions
toensuresafeinstallationofyourbike’swheels:
Quick Release Tests:
• Liftthefront/rearofthebicycleoffthegroundandgivethetireasharpdownwardblow.Thewheelshouldfeelsolidly
mounted.
• Trytorotatethequickreleaseleverscounterclockwise(withoutrotatingout).Aproperlytightenedquickreleaseleverwill
notspin.
Ifyouareuncertainaboutthewheeltightness,orhaveanyfurtherquestionsabouttheproperfunctionofquickreleaselevers,pleasereferto
Operation:Quick Releasesinthe nextsection.
4 Tire Inflation - Are your tires pumped up enough?
Inflate your tires to the desired pressure within the range printed on the side wall. Higherpressurewithin the range provides lessrolling
resistanceonpavementorharddirt,andalsogivesaharderride.Lowerpressurewithintherangeprovidesimprovedtractioninoffroadconditions
andasofter,morecushionedride.K2Bikerecommendsthatyouuseahandpumpandgaugetoachievepropertireinflation.Gasstationpumps/
gaugesareofteninaccurateandcaneasilyoverinflatetires.
Therearetwodifferenttypesofvalvesforbicycletubes:schraderandpresta.AllK2Bikemodelsuseprestavalves.Schradervalvesarestandard
automobiletirevalvesandcanbeinflatedwithmoststandardpumps.Prestavalvesareanarrowervalvethatrequiretheusertounscrewthetop
ofthevalvebeforeinflation.Ifyoudonothaveapumpthatwillworkwithprestavalves,anadaptorisavailablefromyourlocaldealerthatwill
allowtheuseofastandardschraderpumpwithaprestavalve.
4 Brake Function - Are the brakes working well?
Firmlypresseachbrakelevertobesurethebrakemechanismsworkfreelyandproperly.Besurethereisnobindingandthatthebrakepadssqueeze
therimtightlyenoughtostopthebicyclesafely.Thefrontedgeofthepadsshouldbespaced1mmfromtherimsurface withtherearedge3mm
fromthe rimsurface.Thisisreferredtoas”toe-in“.Forfurtherinstructions onbrakeadjustment,seeMaintenance:Brakes.Visuallyinspectthe
brakepadstobesurethat:
1. Thebrakepadsarealignedwiththerimsurfaceandarestrikingtheriminthemiddleofthesidewallandarenot
slippingoff oftheriminto thetireoroff therimtowardsthe centeroftherim.
2. Thetrailing(rear)edgeofeachbrakepadisspaced2mmfurtherawayfromtherimsurfacethantheleading
(front)edgeofthebrakepad.(Referredtoas“toein”)
3. Thecurved”leadpipe”thatholdsthebrakecablehousingisfirmlyseatedinitsholderthatattachestothetopof
thebrakearm.
If yourbrakes aretight, loose,or improperlycentered, referto Maintenance: Brakesforfurtherinstructions.
CAUTION: If your brakes are not working properly, do not ride your bicycle. If you are unsure of how to
adjust your brakes, K2 Bike suggests you take your bike to an authorized K2 Bike dealer for service. Improp-
erly adjusted brakes can be extremely dangerous, and can result in failure during use and severe injuries.
4 Wheel Straightness - Are the rims rubbing against the brakes?
Checktoseethatyourwheelsarenotwarped.Lift oneendofthebikeandspinthewheel.Watchthegapbetweentherimandbrakepad.Ifthe
gapremainsconstant,therimisstraight.Ifthegapvaries,takeyourwheelstoyourauthorizedK2Bikedealerbeforeridingyourbicycle.
WhileyourK2Bikeisdesignedforoffroadriding,itwilllastlongerandgiveyouyearsofenjoymentwhenproperlytakencareof.Pleasefollow
thesebicyclecareinstructionstokeepyourK2Bikerunningwell.
Pad Aligned with
Rim Surface
QuickReleaseCheck
QuickReleaseCheck
Inflation / Presta valve
Tire
Rim Pad
Parallel
Brake Pad Alignment
3mm
1mm
Direction
of Rim
Rotation
Brake Pad Toe-in
!
!

6
Cleanliness - Keep Your Bike Clean!
Removedirtandmudwithwater,milddetergent,andadampcloth.Don'tspraythemudanddirtoffofyourbikewithapressurizedhose.Ifthe
bearingsintheheadset,hubs,orbottombracketgrindorsoundsandy,theymayneedtobeservicedoradjusted.TakeyourbiketoyourlocalK2
Bikedealerforhelp.Neversubmergethebearings,asthiscanleadtoprematurewear. Shouldyouaccidentallysubmergeanybearing,youmay
havecontaminatedthebearinggrease.Disassemblyandregreasingmaybenecessary.Aftercleaningyourbike,dryallpartswithasoftclothand
refer to Maintenance: Lubrication for further instructions.
Bike Storage - Store Your Bike Inside!
Protectyourbikefromrain,snowandmoisturetoavoidcorrosion.Storeyourbikeawayfromsunlightasultravioletrayscanfadepaintandcrack
rubberandplasticpartsovertime.Whenstoringyourbikeforprolongedperiods,firstcleanandlubricateit.Hangthebicycleofftheground.Be
surethoroughlytoexaminethebicyclebeforeridingitafteraperiodofstorage.
Proper Shifting- Ease up when shifting!
Reducepedalpressureslightlybeforeandduringeachshift.Lesspressurereduceswearandtearandthepossibilityofbentshiftingcomponents,
aswellasproducingsmoother,moreprecisegearchanges.
Avoid Jumping - Ride safely!
Neverintentionallymanipulateyourbikesoastomakethewheelsleavetheground.Rideslowlyoversteps,curbs,andbumps.
Caution: Jumping or stunt riding can lead to frame or component failure during use and severe injuries.
Preventing Bicycle Theft - Be careful when leaving your bike!
Keeparecordofyourbike’sserialnumber(locatedonthebottombrackethousing).Alwaysuseaneffectivelockwhenleavingyourbicycle
unattended.Whenlockingyourbike,securebothwheelsaswellastheframe.Bewareofseat/seatposttheft.Thebestformoftheftprotectionis
commonsense.Beawareofyoursurroundingsandbecarefulwhereyouleaveyourbike,lockedorunlocked.Ifyouplanonleavingyourbike
unattendedforalongperiodoftime,donotleaveitalone!
Lubrication
KeepingyourbicycleproperlylubricatedisoneofthemostimportantthingsyoucandotomaintaintheproperfunctionofyourK2Bike.Donot
overlubricateyourbike.ThestepsforproperlubricationarecoveredinMaintenance:Lubrication.
D
FamiliarizingyourselfwithhowyourbicycleworksisveryimportantandwillallowyoutogetthemostenjoymentfromyourK2Bike.Thefollowing
sectionhighlightsafewofthemainfunctionsofyourbicycle.
Quick Releases
ThewheelsonyournewK2Bikeareattachedwithconvenientsingleleverquickreleases,allowingthemtobeeasilyremovedandreinstalled.
Pleasereadandfollowtheseinstructionstoensuresafeinstallation/operationofyourbike’swheels:
1. Alwayscheckbothwheelsbeforeyouride.
2. Reachdownandopenthequickreleaselever.
3. Gentlypushdownonthebicycleandmakesurethattheaxleisfirmlyseatedintheframeorforkdropouts.
4. Whilepositioningthequick releaselevertostickstraightout(90½fromthebicycle),spinthe adjusternutonthe
oppositesideofthequickreleaseclockwiseuntilyoufeelslightresistance.
BICYCLE CARE
In This Section:
• Cleanliness
• Bike Storage
• Proper Shifting
• Avoid Jumping
• Preventing Bicycle
Theft
• Lubrication
OPERATION
In This Section:
• Quick Releases
• Wheel Removal
• Braking
• Shifting
• Pedals
!

7
5. Withthe heel ofyour hand, rotatethe quickrelease lever intoward thebicycle. Makesure thelever is tucked
against the frame or fork so that it is safe from trail hazards which might force it open. As you rotate the
leverin towardthe bike,you willfeelresistance.Donot tightenthe quick releaseby holdingthe adjusting nut
and simply spinning the quick release lever. The cam action of the lever is necessary to ensure adequate
wheel attachment.
6. Ifyoudidnotfeelresistancewhentighteningthelever,thequickreleaseisnottightenough.Returnthelevertothe
openposition(90½fromthebicycle),spintheadjusternutclockwiseacouplemoreturns,andretightenthelever,
testingforresistance.
7. Repeatstep6untilyoumustuseconsiderable,butnotuncomfortableforcetotightenthequickreleaselever.
8. Makesurethequickreleaseleverdoesnotcomeincontactwiththeforklegofthebicycle.Onceagain,makesure
the quick release is tucked in so as not to be vulnerable to trail obstacles which might inadvertently
release it. Refer to Safety and Fit: Mechanical Quick Check to make sure you've tightened the quick re-
leasesproperly.
Wheel Removal
CAUTION: Improperly adjusted wheel quick releases can be extremely dangerous, and can result in failure
during use and severe injuries.
ThewheelsonyournewK2Bikeareattachedwithconvenientsingleleverquickreleases,allowingthemeasilytobe removedandreinstalled.
Toremoveawheel,firstdisconnectthe”leadpipe“fromitsholderandopenupthebrakes.Thenopenthequickreleaselever.Youmayneedto
holdtheadjustingnutoppositethequickreleaseandspinthereleaseleverbeforepullingthewheelfree.
Intherear, shiftthegearstothesmallestcogandopenthebrakesbyreleasingthe”leadpipe“ontheV-Brakes.Openthequickreleaseand,while
holdingthebikeoffoftheground,firmlystrikethetopoftherearwheel.Thewheelshouldfalloffeasily.
Toreinstallthewheel,placetheaxleinthedropoutsandgentlypushdownonthebicycletomakesuretheaxleisfirmlyseated.Thewheelshould
becenteredbetweentheforklegsortherearchainstaysandseatstays.Intherear,linethesmallestcogontherearwheelwiththechainandhold
therearderailleurbackwhileyouslidetheaxleintothedropouts.Releasetherearderailleurwhenthewheelisseatedfirmlyintheframe.Follow
theinstructionsaboveonQuickReleases.
Braking
Yourbicycleisequippedwithabrakeleverforeachhand.Therightleveroperatestherearbrake,whiletheleftleveroperatesthefrontbrake.You
shouldfamiliarizeyourselfwithbrakingactionthroughpracticeandrepeateduse. Whilebothbrakesisveryeffectiveinmakingquickstops,it’s
possibletoinitiatealossofcontrolbybrakingaggressivelywhileturningonslipperysurfaces.Also,recognizethatwateronyourwheelswillcause
thebrakestolosestoppingpower.Thinkaheadinwetsituationsandapplybrakesearlier.
ManyK2BikemodelsareequippedwithV-Brake-stylebrakes.Thesebrakesprovideatremendousamountofstoppingpowerandshouldbeused
carefully.Makesurethatyouarefamiliarwiththepowerofthebrakesbeforeyouattemptanyoff-roadriding.
Caution: Improper brake operation can be extremely dangerous and can result in severe injuries.
Shifting
Therearetwoshiftercontrolsmountedonyourhandlebars.It’simportantthatyoulearntousetheshifterstocycleeffectivelyinvariedterrain.The
lefthandshiftercontrolsthechainpositiononthefrontsprockets.Therighthandshiftermovesthechainfromonesprockettothenextintherear.
Youshouldexperimentwiththesecontrolsuntilyoubecomefamiliarwiththeiruse.
Thepedalsmustbeturningwhileyoumovetheshifters.Youshouldonlyputlightpressureonthepedalsduringeachshiftsothatthechaincan
easilymovefromsprockettosprocket.Optimalpedalrotationspeedis50to90revolutionsperminute.
Youwillfindthatshiftingtoasmallerfrontsprocketoralargerrearsprocketwillallowyoutoclimbhillseasier.Movethechainclosertothecenter
ofthebicycletoclimbhills,andawayfromthecenterasspeedsincrease.
Open
Closed
QuickRelease
Operation
QuickRelease
Operation
V-Brake -style Brake
Release
Brake Lever
Proper Shifting
Climb Hills
High Speed
(Chain Movement)
!
!

8
Pedals
Toe Clips/Straps
Ifyourbikeisequippedwithtoeclips/straps,itisimportanttofamiliarizeyourselfwiththeiruse.Ifyoudonothavepreviousexperiencewiththe
system,practiceentryandexitbeforeyouride.Positionyourbikebesideawallandholdyourselfupwhileyoupractice.Then,proceedtoaflat,
emptyspotsuchasafieldorparkinglotforsomeeasyridepractice.Inaddition:
1. Keeptoestrapsloosewhenridinginunfamiliarorroughterrainwhereyoumayneedtoremoveyourfeetfromthe
pedalsquicklyorunexpectedly.Loosenstrapswiththestrapbuckle.
2. Toenterthepedals,straddlethebikeandpositiontherightpedalinthe4o’clockposition.Thepedalcagewillhang
upsidedown.Placetheballofyourfootonthefrontedgeofthepedalandscrapeyourfoot backwardstorotatethe
clip180½.Nowslideyourtoeforwardintotheclip.Pushdownonthepedal,sitontheseat,andstartrolling
3. Takea fewpedalstrokestogainmomentum.Nowrepeattheprocesstoplaceyourleftfootinthelefttoeclip.
Gettingintoyourpedalsmayseemdifficultatfirst,butthemoreyoupracticetheeasieritwillbecome.
4. Toreleasefromthepedals,raiseyourheelandpullyourfootupandback.
Important:Alwaysdisengageatleastonefootfromthepedalsbeforecomingtoacompletestop.
Caution: Improper use of clipless pedals can be extremely dangerous, and can result in loss of control and
severe injuries. Consult your authorized K2 Bike dealer if you are unsure about clipless pedal operation.
Clipless Pedals
Ifyourbikeisequippedwithcliplesspedals,itisimportanttofamiliarizeyourselfwiththeiruse.If youdonothavepreviousexperiencewiththe
system,practiceentryandexitbeforeyouride.Positionyourbikebesideawallandholdyourselfupwhileyoupractice.Then,proceedtoaflat,
emptyspotsuchasafieldorparkinglotforsomeeasyridepractice.Inaddition:
1. Beforeattemptingtoclickintoyourpedals,inspectthecleatsurfacesonyourshoesandtheclipsurfacesonthe
pedalstoensurethereisnodebris(mud,stones,etc.)thatmightinterferewiththeactionofthesystem.
2. Toenterthepedals,placeyourfootonthepedalsurfaceandmoveituntilyoufeelthecleatbegintoengageinthe
retentionsurface.Pressdownandyoushouldhearaclicktosignalthatyouarelockedintothepedal.Liftyourfoot
gentlytobesureyourcleatsarecompletelyengaged.
3. Toreleasefromthepedals,twistyourheeloutawayfromthebikewhilekeepingyourfootlevelwiththeground.
Important: Always disengage at least one foot from the pedals before coming to a complete stop.
Caution: Improper use of clipless pedals can be extremely dangerous, and can result in loss of control and
severe injuries. Consult your authorized K2 Bike dealer if you are unsure about clipless pedal operation.
D
Lubrication
1. Chain:Thedrivechainhasmanymovingpartsandshouldbelubricatedoften.Removeexcessdirtorgrimeanduse
a qualitychainluberegularly.Wipeexcesslubefromthechain.Donotgetanylubeontherims,asthiswillprohibit
properbrakefunction.
2. DerailleurandBrakeCables:It’simportantthatyouperiodicallylubricatecablestoensureproperbrakeandshifter
actuation.YourK2Bikeisequippedwithslottedcablestopsthatallowyoutoremovecablehousingfromtheframe.
Slidethehousingsalongthecablewireandlubricatetheportionsofcablesthatarenormallylocatedwithinthe
housing.
3. Brakeand Derailleur Pivots:Everymonth youshould putafewdropsoflubricantonthebrakeandderailleur
pivots.Becarefulnottogetanyoilonthebrakepadsorrims.Wipeoffexcessoilbeforeriding.
MAINTENANCE
In this section:
• Lubrication
• Brakes
• Drive System
• Wheels and Tires
• General Bicycle
Maintenance
Proper Toe-Clip use
Clipless Pedal Entry
CliplessPedal Release
!
!

9
4. Wheel,Crank,andHeadsetBearings:Onceayearyoushouldhaveyourdealerinspect,lubricate,andadjustyour
bike.Ifyouridemanymiles,orfrequentlyrideinoffroadormuddyconditions,haveyourbikecheckedmoreoften.
Brakes
ThebrakesonyournewK2Bikeshouldhavebeencompletelyadjustedbyyourdealerwhennew.Duetocablestretchandpadwearduringuse,
thebrakesshouldbeadjustedperiodically.Don’twaituntilthe handleversbottom outonthe handlebars.Itis safesttotake yourbiketo an
Authorized K2 Bike dealer for brake adjustment. Your authorized dealer has the training, experience, and proper tools to do the job.
The following instructions are provided for the owners having sufficient knowledge and proper tools to do the job.
1. Loosenthebarreladjustinglocknutandturntheadjustercounterclockwiseuntilthebrakepadsareapproximately
1.5mmfromtherimsurface. Thentightentheadjustingbarrellocknuttokeeptheadjusterinplace.
2. Iftheadjusterisunscrewedalltheway andyou stillhave morethan 1.5mm ofpad-to-rim clearance,turnthe
adjustingbarrelclockwiseallthewaybackintotheholder.Loosenthecableanchornutandholdthebrakepads
againsttherim.Pullthecablethroughtheanchornut withpliersandretightenthecableanchornut.
3. Loosenthebrakepadfixingboltandadjustthepadtoeinsothattherearofthepadisspaced3mmfromtherim
surfacewhilethefrontofthepadhas1mmofrimclearance.Retightenthepadfixingbolt
Somebicyclesareprovidedwithanadjustmentforleverreach.Byturningtheleveradjustmentscrewclockwise,theleverscanbeadjustedcloser
tothehandlebarsforriderswithsmallerhands.Barreladjustersarealsoprovidedtocompensateforcablestretch.Asthebrakepadswear,thehand
leverwillgetcloserandclosertothebarbeforeapplyingthebrakes.Turnthebarreladjustercounterclockwisetocompensate.Whenyouhave
achievedthecorrectcabletension,tightenthebarreladjusterlocknutwithyourthumbandforefinger.
CAUTION: If your brakes are not working properly, do not ride your bicycle. If you are at all unsure of how to
adjust your brakes, Girvin strongly recommends that you take your bike to an authorized K2 Bike dealer for
service. Improperly adjusted brakes can be extremely dangerous, and can result in failure during use and
severe injuries.
Drive System
Itmaybenecessarytoadjustshifterstocompensateforcablestretch.WesuggestthatalladjustmentsbemadebyyourK2BikeDealerorother
qualifiedtechnician.Therearesmalladjustments,however,thatcanbemadebytheconsumertoimprovetheshiftingofyourbicycle.The
followingeasystepsshowyouhowtomakesmalladjustmentstoyourbicycle’sshiftingsystem.
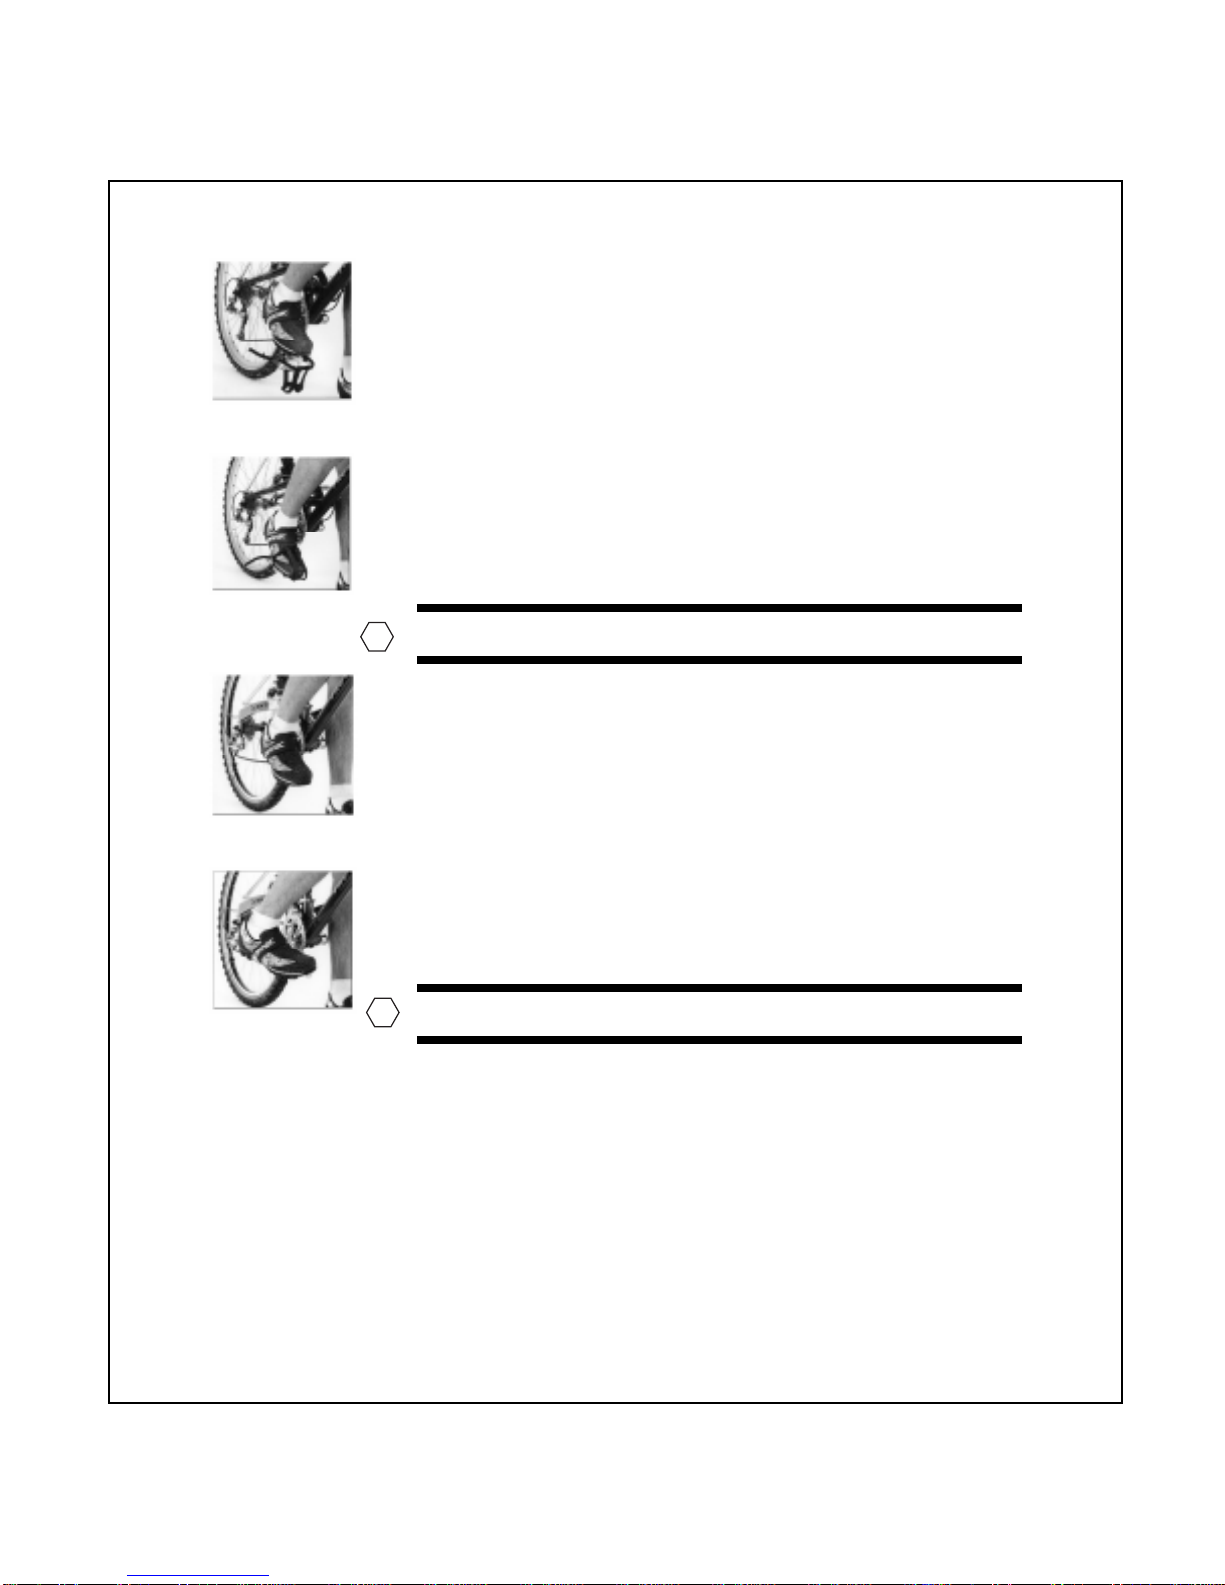
1. Shiftyourbicycleintothesmallestcogintheback(hardestgear)andintothemiddlechainringinthefront.
2. Shiftintothenextbigger coginthebackgearswiththeshifterand,whileholding therearwheelofftheground,
pedalthebicycle.
3. Ifthebikedoesnotshiftintothenextgear,orhesitatesandmakesalotofnoise,youwillneedtotightenthegear
cable.Movetostep#4.Ifthechainmovesuptothenextgearwithouthesitation,yourgearsarefine.
4. Whenlookingatthebackofthebicycle,youwillseeabarreladjusteronthebackoftherearderailleur.Totightenthe
gearcable,turnthebarreladjustercounterclockwise1/4turn.Donotturntheadjustermorethan1/4turn.
5. Repeat Steps#1through#4untilthebikeshiftswell.Ifthisadjustmentdoesn’tsolvetheproblem,takeyourbiketo
anauthorizeddealerforservice.
Wheels and Tires
Otherthanproperinflation,yourwheelsandtiresneedoccasionalmaintenance.Inspectthewheelforstraightnessandforanydentsorcracksin
therim.Inaddition:
1. Checkwheelsandspokesfortightnesseachweek.Ifanyspokesarenottightortendtorattle,youshouldhavethe
spokestensionedandthewheelalignedatyourdealer.
2. Ifyounoticeloosenesswhenyoumovethewheelfromsidetoside,havethewheelbearingsadjustedbyyourdealer.
3. Cleanthebrakingsurfaceonthesidesoftherimsregularlytoensuregoodbrakeperformance.
4. Checkyourtirepressurebeforeeveryride.Maintainpressureattherecommendedlevelprintedonthetiresidewall.
Brake Lever
Adjustment
Drive System
Adjustment
!

General Bicycle Maintenance Schedule
Required Inspection/Service Every Ride Weekly Monthly Yearly
Checkquickrelease/wheelattachment 4
Checktireinflation 4
Checkwheelstraightness 4
Checkbrakefunction 4
Checkshiftingsystem 4
Retightenallbolts 4
Cleanbicycleframe/components 4
Checkforloosespokes 4
Inspectandlubricatechain 4
Inspectandlubricatederailleurs 4
Checktiresforwear 4
Inspectandlubricatehandbrakelevers 4
Inspectandlubricatebrakepivots 4
Inspectandtightencrankset 4
Clean,inspect,andlubricatepedals 4
Inspectreflectors 4
Regreasewheelbearings 4
Regreaseheadsetbearings 4
Lubricateseatpost 4
D
10

K2 BIKE SPECIFIC INFORMATION
InthissectionyouwilllearnhowtosetupproperlyyourK2Bikesuspension.Ourbicyclesaredesignedtoofferwideadjustabilityformanydifferent
riders.ItmaybenecessarytopurchasedifferentspringsinordertotuneyourK2Bike.Weofferawidevarietyofcoilspringsforthispurpose.
Thissectionprovides guidelinesfor tuningyourK2Bikerearsuspensionandalso brieflydiscussesNoleenfrontsuspensionset up.For amore
completeguideto frontsuspension tuning,pleaserefertoyourNoleenCross-Link orNoleen Chubby Owner'sManual.
Tuning Variables
Allridersaredifferent.Therefore,bicyclesuspensionneedstobeabletoadjusttothedifferentneedsanddesiresofmanydifferentriders.The
followingvariablesorfactorsshouldbeconsideredwhenadjustingthesuspensionofaK2Bike:
Rider Weight
Smallerbicyclesareassumedtoberiddenbylighterridersandaresuppliedwithsoftersuspensionsthanlargerbikes.Ifyouraretallandslimor
shortandstocky, youmaywishtoinstall softerorstiffersprings.
Type of Riding
Abicycleusedforhigh-performanceoff-roadridingshouldhavestiffersuspensionthanoneintendedforrecreationalroaduse.Thesevereimpacts
andhighspeedsofseriousoff-roadridingdemandstiffersprings,whilemorecasualridingismorecomfortablewithsoftersprings.Ingeneral,the
bikeshouldbesetuptomaximizetheuseoffullsuspensiontravelintheconditionstobeencountered.
Personal Preference
Newsuspensionridersoftenpreferstiffersuspensionsthatfeelmorelikea rigidbikes.However,suspensionworksbestwhena rideradapts his
stylefullytouse thesuspension.Aspringthatfeelssoftatfirstmaybe exactlywhatyouwantafteraweekofriding.
Tuning Adjustments
Onceyouhaveanunderstandingofthevariablesaffectingsuspensiontuning,youcannowmoveontoactuallyadjustingyoursuspensiontofit
yourneeds.TheTuningAdjustmentsofyourK2Bikesuspensionare:
Spring Rate
SpringRateistheamountofloadrequiredtocompressacoilspringoneinch. Wesuggestdifferentspringratesforourbikesandforksbecause
differentridersplacedifferentloadsonbicycles. Theprovidedspringratechartsaresuggestedspringratesaccordingtoriderweight. Keepinmind
thesechartsareonlysuggestions.
Springselectionisalsoaffectedgreatlybyriderpreference. Moreaggressiveridersmaydesiretheirspringstobestiffer, whileamorerecreationally
orientedridermaylikeasofterridewithsoftersprings. Experimentationwithacoupledifferentspringratesmaybenecessarytofindthecorrect
setup.
Consultthetablesonthefollowingpagetoselectthespringsetthat’sbestforyou.Remember,thesearerecommendations.Youmaywishtotry
stifferorsofterspringsthanrecommendedduetotheterrainyouride,yourridingstyle,andpersonalpreference.
Noleen Forks Cross-Link Chubby Chubby LT
upto 140
1
175
2
3Blue, 3Tan 4Blue,4Tan
130-170 200 1Blue,5 Tan 2Blue,6Tan
160-200 200 6Tan 8Tan
190-230 225 5Tan,1Pink 7 Tan,1 Pink
over230 250 4 Tan,2Pink 6 Tan,2 Pink
SpringType NB2L-x-x
3
MCU
4
MCU
SUSPENSION
TUNING
In this section:
• Tuning Variables
• Tuning Adjust-
ments
• Smart Shock
11

K2 Bike 5500C,4500C, 3000, 2000 Animal, Beast
Rear 5000, 4000 1000 Animal DH
4
upto 140 400 200 550
130-170 500 250 600
160-200 550 300 650
190-230 600 350 700
over230 650 400 750
SpringType NB175-x-x NB2-x-x NB175-x-x orNB2-x-x
Springratehasaneffectondamping. Thehigherthespringrate,themoredampingwillberequiredtocontrolthemotionoftheshock. Thisis
whylighterridersfeeltheirshocksmaybeoverdampedwhileheavierridersmaynotperceiveenoughdamping. Seethenoteson Rebound
Dampingand Compression Dampingbelowforafurtherexplanation.
Changing Coil Springs
CAUTION: Girvin strongly recommends that your K2 Bike be disassembled and adjusted by your authorized
K2 Bike dealer. Your authorized K2 Bike dealer possesses the proper training and tools to service your bi-
cycle.Improperlyassembled or adjusted bicyclescan beextremelydangerous,andcan result in failureduring
use and severe injuries. These instructions are provided for owners having sufficient knowledge and the
proper tools to do the job.
YoumayneedtochangethecoilspringsonyourK2Bikeinordertotuneyoursuspensionproperly.Wesuggestthis
bedonebyyourlocalK2Bikedealerorotherqualifiedtechnician,butifyouwouldliketochangethespringsonyour
own,followtheseinstructions:
1. Removetherearwheelfromthebike.
2. Removetheuppershockboltwheretheshockattachestotheframeandalsotheloweroneortwoboltsholding
theshockorshockstruttotheswingarm.
3. Loosenpreloadcollarfromthespringbyturningbothpreloadadjustercollarandspringsimultaneouslyandre-
movepreloadcollarcompletelyorloosenpreloadcollarenoughtoremovelowerspringclip.
4. Removespringandreplacewithdesiredspring.Makesurethatthespringisthecorrectlengthfortheshock.Make
suretopreloadthespringwithatleast1-2mmofpreload.
5. Reinstalltheshockontheframeandtorqueallshockmountboltsto150in-lbs.
Onceyouhaveselectedthecorrectspringforyou,youwillneedtosetupyoursuspensionwiththeproperamountofsuspensionsag.Suspen-
sionsag is theamount ashock compressesunder theweightof therider. Allsuspensionsystemsshould exhibitsomeamountofsuspension
sag. Girvinbikesandforksshouldall beset upproperlywithacertainamountofsag. The optimum sagamount forall ofour rearand front
suspension systems is 20% of the total shock shaft stroke, or 20% of the total wheel travel. For example:
OurCross-Linkforkshaveatotalshockshafttravelof52mmwhichyieldsatotalwheeltravelof76mm. Tocalculate
theoptimum sagforthisfork,multiply52mmby.2. The answergivesyou asuggestedsag,whichfortheCross-
Linkis10mmattheshock,or15mmatthewheel. Wesuggestthatyoumeasuretheamountofsagattheshock
insteadofthewheel.
Seethe nextsection on Preload to adjustthe amountof sag.Thesuggested suspensionsag amountsfor ourbikes andforksareasfollows:
Frame (Rear shock) / Fork (Front shock) Total Wheel Travel Sagat Shock
CarbonFrame (5500C,4500C) 100mm 8mm
2-Tubeframe(5000,4000) 100mm 8mm
ExtremeFrame(Animal,Beast) 125mm 8mm
WorldCupFrame(3000,2000,1000) 90mm 10mm
DownhillFrame(AnimalDH) 150mm 10mm
Cross-Link(Allmodels) 76mm 10mm
Chubby 100mm 20mm
ChubbyLT 125mm 25mm
RearShockRemoval
Shock Spring Removal
12
!

13
Preload
Preloadistheamountofload placedonaspringtoincreasethespringrateintheinitialpartofthetravel.Allofourshocksfeatureadjustable
preload. Preload is used to achieve the proper amount of suspension sag for your bike or fork. Remember: You must first start with
the proper spring rate in order to get the correct amount of sag.
Preloadisgovernedbyafewguidelines:
1. All springs should be preloaded at least 1-2mm in order to hold the spring in place firmly.
2. Thecorrect amount of preloadcan only be achieved with the propersuggested spring rate. Seethe spring
ratechartstofindthecorrectspringforyourweight.
3. Never increase the preload on a spring past 5 full turns of the preload adjuster. Ifyou have tightened the
preloadadjusteroverfivefullturnsandarestillgettingtoomuchsag,moveuptothenextspringrate.
SpringPreloadAdjustment
1. Tightenpreloadadjusteruntilthespringisheldfirmly(1-2mm)and measurethedistance betweenthepreload
adjuster and the bottom containment washer.
2. Positionthebicyclebesideawallandgeton.Placeyourfingerslightlyonthewalltosteadyyourself,andputyour
feetonthepedalsandsitontheseat.Haveafriendre-measurethe newdistance betweenthese twopoints.
Subtract the seated measurement from the unseated measurement to find the amount of sag. Refer to
theSuspension Sag chartforthe proper amountof sagfor yourbike orfork.
3. Ifthe bike compresses under the rider morethan recommended, tightenthe preload a bit at a timeand re-
measure the compression until you hit the right amount. If the bike is compressing less than recom-
mended, loosen the preload to get the right amount of sag.
4. If the preload is at full loose and the bike still won’t compress enough, you probably need softer springs.
If you have preloaded the spring more than five full turns, try stiffer springs.
Damping
Dampingistheactionofcontrollingshockshaftspeed. Therateatwhichaspringcompressesandextendscanbecontrolledbyanumberofways.
OurNoleenShocksusehydraulicstocontrolthemotionofourshocks.Therearetwotypesofdamping:reboundandcompression.
Thefirsttypeofdampingthateffectsshockperformanceisrebounddamping. Rebounddampingcontrolstherateatwhichthespringextends
backtoitsoptimumsaglength. Ifthespringextendstooquickly,thesuspensionwillexhibita“bouncy”or“overlylively”feel.Toomuchrebound
dampingwillcausetheshocktofeel”dead“or“unresponsive”. Thechartbelowprovidesguidelinestoadjustingyourshockdamping.
Thesecondtype ofdamping is compressiondamping. Compressiondampingassiststhespring tocontrol therateofshockcompression.
Adjustingthecompressiondampingwillmaketheshockfeelessentiallyharderorsofter. Compressiondampingbecomesmoreimportantas
suspensiontravelincreasesandas shockshaftspeedincreases. Refertothe chartbelowtoseewhenmoreorlesscompression dampingis
preferred.
RiderVariables Rebound Damping Compression Damping
LighterRiders needless needless
HeavierRiders needmore needmore
AggressiveRiders needmore needmore
Recreationalriders needless needless
manysmallbumps needless needless
bighitsandbumps needmore needmore
CrossCountryriding needless needless
Downhillriding needmore needmore
Thedampingactionthatariderislookingforisacontrolledsuspensionaction. Thiscontrolledfeelingmayvaryaccordingtoriderpreference,
terrain,and may otherfactors. Experimenting with different levels of damping helps a rider "dial in" their preferred level of suspension
damping. Withshocksthathaveadjustabledamping,liketheNoleenNR-2andNR-4,ridersshouldtryridingwiththedampingdialsatthefulloff
positionandthefullonposition. Thedesiredadjustmentwillprobablyfallsomewhereinbetween,endingupclosertothefullonposition.
Noleenshockscanalsobe”revalved“or”customized“tosuitaparticularrider'sneeds.ThisworkshouldonlybecompletedNoleenorbyanother
authorizedNoleenServiceCenter.Donotattempttoworkontheinternalsofanyshock.
Measuring Optimum
Suspension Sag
Setting Spring Preload
Adjusting Damping

14
Noleen shocks may only be serviced by Noleen or by an authorized Noleen Service Center. Service that is
performedby anyone otherthan Noleen oran Authorized ServiceCenter can damagetheshock and resultin
failure during use and severe injury.
Noleen shocks are pressurized with 200 psi of nitrogen. Attempting to disassemble a charged shock is ex-
tremely dangerous and can result in serious injury.
Smart Shock
IfyourK2Bike isequippedwithanNR-5SmartShock,thenreadon.Ifyouhavenotread theSuspensionTuning:Damping sectionyet,please
dosonow.Thedampingsectionwillprovideyouwithan understandingoftheconceptsofshockdamping,andspecifically,compression
damping.TheSmartShocksystem isanelectronic compressiondamping adjusterwhich automaticallyadjusts formore orless compres-
sion damping according to shock shaft speed and main piston location.
IfyourK2BikemodelisequippedwithSmartShocktechnology,youwillprobablywanttorunthemodesettingon”Smart“modemostofthe
time.Smartmodeoptimizesshockactionforever-changingoff-roadconditions.Inafewcases,thestifforsoftsettingsmaybedesirable.For
instance,onalong,smoothclimb,thestiffsettingwillreducesuspensionmotionifdesired.
Whenyou stopto take abreak, SmartShock automaticallyswitches to”sleep“ modeto save energy.Standard9-voltbatteriespowerthe
system,yieldingabouteighthoursofusepercharge.Rechargeablebatteriesare recommended.Ifthebatteriesshouldgetusedupduringthe
ride, the shock will not cease to function. The Smart Shock will simply revert to a base line compression damping setting that delivers
thesame high standard of performance Noleen Shock users havecome to expect.
D
Tools Needed:
• 5and6mmHexWrench • In-lbTorqueWrenchwith5and6mmhexbits
• K2Goo(orotherTeflon-fortifiedgrease) • Thread-lockingcompound-LoctiteBlue#242
Main Pivot Maintenance
TheK2Bikepivotisdesignedtobeeasilymaintained.Themainpivotbolttorqueandswingarmpinchbolttensionshouldbecheckedeachmonth
Wealsorecommendyearlydisassemblyandregreasingformaximumperformanceanddurability. Referto K2BikeMaintenance:ServiceTables
foralltorqueandlubricationspecifications.
PIvot Adjustment
1. Removetherearwheel.
2. Removetheboltsthatattachtheshockorstrut/shocktotheswingarmanddisconnectthestrut.
3. Looseneachswingarmpinchboltoneturn.Lifttheswingarmashighaspossiblewithouthittingtheframe,thenlet
itfall.(Don’tletswingarmfallintofrontderailleur).Theswingarmshoulddropwithnoresistance.
4. Nowgraduallytightenbothpinchboltsindividuallyuntil theswingarmfallsslowlythrough itsarc underits own
weight.Bothboltsshouldhaveroughlythesametorque.
5. Reinstalltheshockorstrut/shockpivotboltsandtherearwheel.SeeServiceTablesfortorquespecs.
NOTE:Do notovertightenthepinchboltsasthiscancausedamageandprematureweartothepivotassembly.
Pivot Lubrication
1. Removetherearwheelandtheshockorstrut/shock.
2. Loosenthetwoswingarmpinchbolts.
K2 BIKE SPECIFIC
MAINTENANCE
• Tools Needed
• Main Pivot
• Maintenance
Schedule
• Torque and
Lubrication Table
• Service Kits
PIvot Adjustment
!
!

15
3. Loosenandunscrewthemainpivotboltsixorseventurns.Tapontheheadoftheboltwithaplastichammertopush
outthelefthandpivotaxle.
4. Removethepivotaxleboltandthreaditintothelefthandpivotaxle.Usethebolttopulltheaxleout.
5. Gentlytaptheright-handpivotaxleoutfromtheinsidewithasocketheaddriverorsmalltap.
6. Removetheswingarmfromthepivot,takingcarenottolosethefourquadrings.
7. Thoroughlycleanallpartsandinspectforwearordamage.Replacepartsasnecessary.
8. LiberallygreaseallnylonbearingsandquadringswithK2Gooorotherwaterproof,Teflon-fortifiedgrease.
9. Placequadringsbackintorecessedgroovesoninsideandoutsideofeachswingarmknuckle.
10. Reinstallswingarmandpivotaxles.Torquemainpivotboltto175in-lbs.Makesurethatpivotaxlesarepressinginto
themainpivothole.
11. See the previousnotes on MainPivot Adjustment.
K2 Bike Maintenance Schedule
Required Inspection/Service Every Ride Weekly Monthly Yearly
Checktorqueonallbolts 4
Checkshockfunction 4
Cleanbicycleframe/component/shocks 4
Adjustspringpreloadsetting 4
Adjustswingarmpinchbolts 4
Lubricatefork(seeNoleenForkManual) 4
InspectFrame/Swingarmfordamage* 4
Remove/regreaseorreLoctite /retorqueallbolts 4
Inspect/serviceshock 4
Inspect/ServiceallNylonBearings 4
*YoushouldperiodicallyinspectyourK2Bikeframeandswingarmfordamagefromcrashesandhardriding.Youshouldcleanandcloselyinspect
theheadtubearea,bottombracketarea,andallfrontandrearsuspensionparts.
Torque and Lubrication Table
ThesetablesareprovidedasareferenceforqualifiedtechnicianstoserviceallK2Bikes.
Product PartName/Location Size/Description Torque(in-lbs) Lubrication Loctite
5500C,4500C, Mainpivotscrew M8 x 1.25 x 65 SHCS 175 Yes Blue
5000, 4000, Swingarmpinch M6 x 1 x 20 SHCS varies Yes Blue
3000, 2000, 1000 Brakepivot(1000-3000) M10 60 No Red
Animal,Beast, Brakepivot(allotherbikes) M8 60 No Red
AnimalDH, Uppershock M6 x 1 x 45 BHCS 150 Yes Blue
LiteTechLT450 Lowershock(mostbikes) M6 x 1 x 38 SHCS 150 Yes Blue
Lowershock (3000.,2000, 1000) M6 x 1 x 20 SHCS 150 No None
Lower strut(3000, 2000,1000) M6 x 1 x 23 BHCS 60 Yes Blue
Derailleurhanger M4 x 8 FHCS 20 Yes Blue
Bottleboss M5 x .8 x 15 SHCS 60 Yes None
Service Kits
ThefollowingReplacement/ServiceKitsareavailablefromyourK2Bike/NoleenAuthorizedDealer.TheyareintendedforusebyyourK2Bike/
Noleendealerorotherqualifiedmechanicpossesingthepropertrainingandtools.
K2Bike 1000,2000, 3000(also857-style) Bearing/ SealKit Replacesallbearingsandseals RK001
K2Bike 5500C -4000 (Mostbikes) Bearing/Seal Kit Replacesallbearingsandseals RK008
Cross-LinkSealKit(allmodels) Replacesallclearpivotsealsandotherparts RK004
Cross-LinkBearingKit Replacesalllinkbearings RK006
ChubbySealKit(ChubbyandChubbyLT) ReplacesallChubbyseals RK007
PIvot Lubrication
Table of contents
Other K2 Bike Bicycle Accessories manuals
Popular Bicycle Accessories manuals by other brands

ROSE Bikes
ROSE Bikes PRO R-074 owner's manual

King-Meter
King-Meter SW-U LCD user guide

Cateye
Cateye VELO WIRELESS CC-VT200W owner's manual

Rocky Mountain
Rocky Mountain SLAYER RIDE-4 Setup guide

lehman Trikes
lehman Trikes raider XL series installation instructions

Rose electronics
Rose electronics GRAND TOUR VI owner's manual