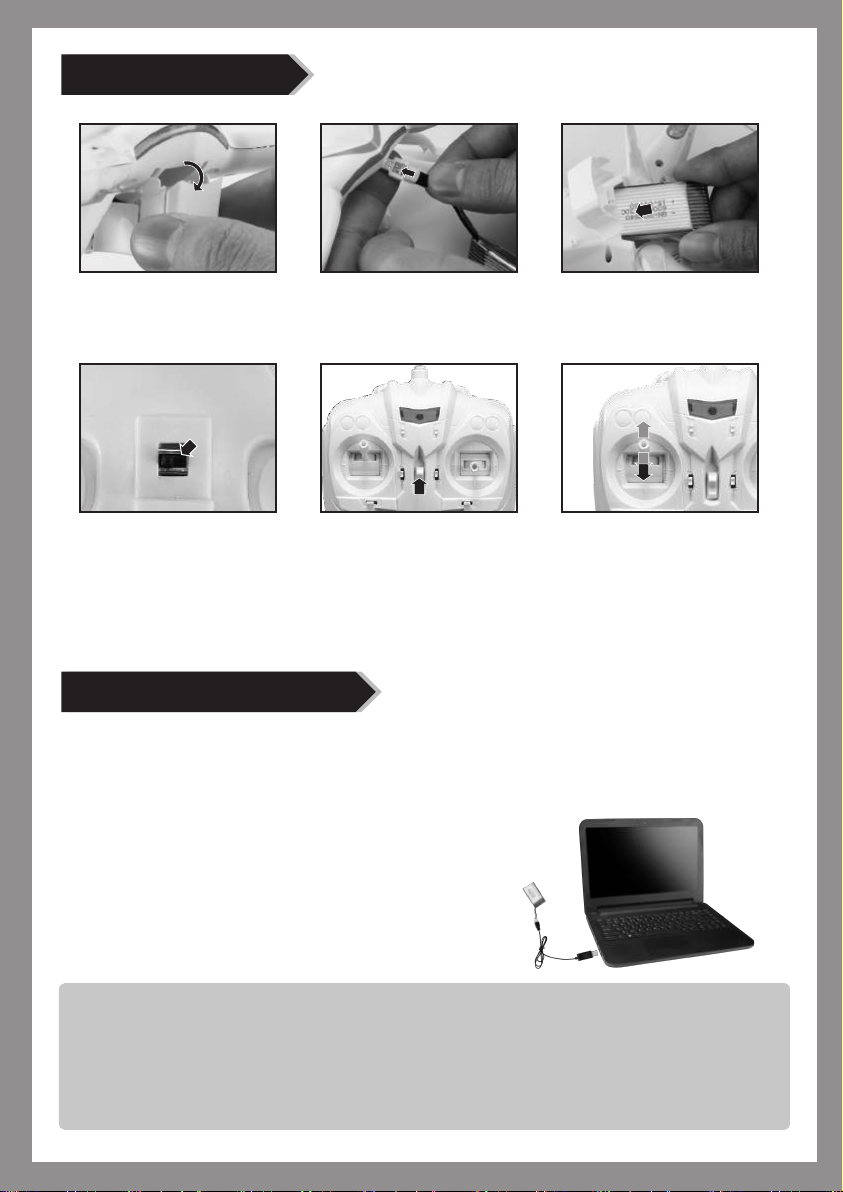
KaiDeng K60 User manual

2.4Ghz
6 AXIS R/C QUADCOPTER
14+
The knowledge and safety notes below are useful for your operation .Please
read this manual carefully before start and keep it for further reference.
Instruction Manual

Major Parts
Transmitter battery installation
Main instruction for the remote control
Landing gear
Blade
Motor
Protect cover
LED night light
CF Mode
Left control Stick
up & down control for camera
Switch for 2MP camera
(Not available for 30W camera) Right control Stick
One key to return
Antenna Indication light
3D flip
Speed switch
Left/right side-fly trimmer
Left/right trimmer
Forward/backward trimmerPower switch
Video
Photograph
Light switch
Open the cover of battery case. Insert 4 AA
batteries properly following the polar indicator.
(The batteries are not included. Do not mix
new batteries with new.) 4 “AA” battery Battery
cover
1

Instruction for video shooting /photographing
(0.3MP / 2MP camera suit should be purchased additionally)
Protect cover / Landing gear installation
1.Insert the SD card slightly into the webcam module’s card slot, then tighten the module to the
card slot at the bottom of the battery case ,and then open the upper cover and take out the
webcam’s plug and insert it to the slot at the bottom of the quadcopter.
2.By pressing the photography key, the red light of the quadcopter would flash once, indicating
that photos are being taken; by pressing the video key, the red light would flash two times,
meaning that the quadcopter is taking video; Press the video key again to stop the shooting
and the red light turns off , that means a video is finished .
(* Quadcopter with a 2MP camera could adjust the camera angle by the up/down button on
the remote control)
3.To take out the recorded data, press the SD card slightly to take it out, then insert the card
into the card reader and insert the reader into the USB slot of the computer. Its address is “my
computer”-“portable hard disk”
2
1.Insert the protect
cover firmly to the
slots on the quadcopter.
2.Screw clockwise to
tighten. 4.Screw clockwise to
tighten.
3.Insert the landing gear
firmly to the slots on the
quadcopter.
30W camera installation
2 MP camera installation

Operation guide
3
Ascend/
descend
Turn left/
right
Turn left/
right
adjustment
Forward/
backward
Left/ right
side fly
Push up/down the left control
stick, the quadcopter ascends/
descends accordingly.
Push left/ right the left control
stick, the quadcopter turn left/
right accordingly.
Forward/
backward
adjustment
Left/ right
side fly
adjustment
If the quadcopter keeps moving
forward/ backward without control,
push the trimmer down/ up until it
turns balanced.
When hovering, if the quadcopter
keeps left/ right side fly without
control, push the trimmer right/ left
until it turns balanced.
When hovering, if the quadcopter
keeps turn left/ right fly without
control, push the trimmer right/ left
until it turns balanced.
Push up/ down the right control
stick, the quadcopter moves
forward/ backward.
Push left/ right the right control
stick, the quadcopter make left/
right side fly.
Tips:
1. If there is no SD card or it is in incorrect position, the red indication light of
the camera would flicker.
2. Make sure to press the VIDEO key for the second time to save the video.
3. Make sure there is a video player available for AVI format.
4. If the SD card is out of storage, the green light would be constant on and the
red light would be off.

4
3D flip
High or low speed switch
Ascending the quad copter to 2 meters high, press the 3D flip button and then push the right
control stick in any direction at the utmost, the quadcopter will roll over accordingly , press the
3D flip button again to exit the mode.
CF mode:
Exit the CF mode:
Adjust the direction in CF mode:
After matching of the quadcopter and the remote control, press the CF mode button on the
remote control, the buzzer in the remote control makes the sound "di", the lights of the
quadcopter change from constantly on to flickering, the quadcopter turns in CF mode.
When the quadcopter is in CF mode, press the CF mode button on the remote control, the
buzzer makes the sound “di”, the lights of the quadcopter change from flickering to constantly
on, the quadcopter exit the CF mode.
When the quadcopter is in CF mode, it is necessary to adjust the direction first. Make sure the
front of the quadcopter points ahead in the same direction of the operater(Pic.1), then push the
left and right control stick to the lower left direction at the same time for about 2 seconds(Pic.2),
the indication lights of the quadcopter change from slowly flickering to fast flickering for 2
seconds, which means the direction adjustment is finished.
CF mode
Pic.1 Pic.2
The default is 25%, press the speed switch button, "di di" indicates 50%; press again to get
"di di di " to 100% (fast gear) ; press the third time to reset 25% with one sound “di”.

5
One key to return
When in CF mode, press the “one key to return” key, the quadcopter will fly towards the
operator. Press this key again or push up the right control stick to exit this function.(To make
a safe return, push the right control stick to left/right if the quadcopter’s return deviates to
right/left)
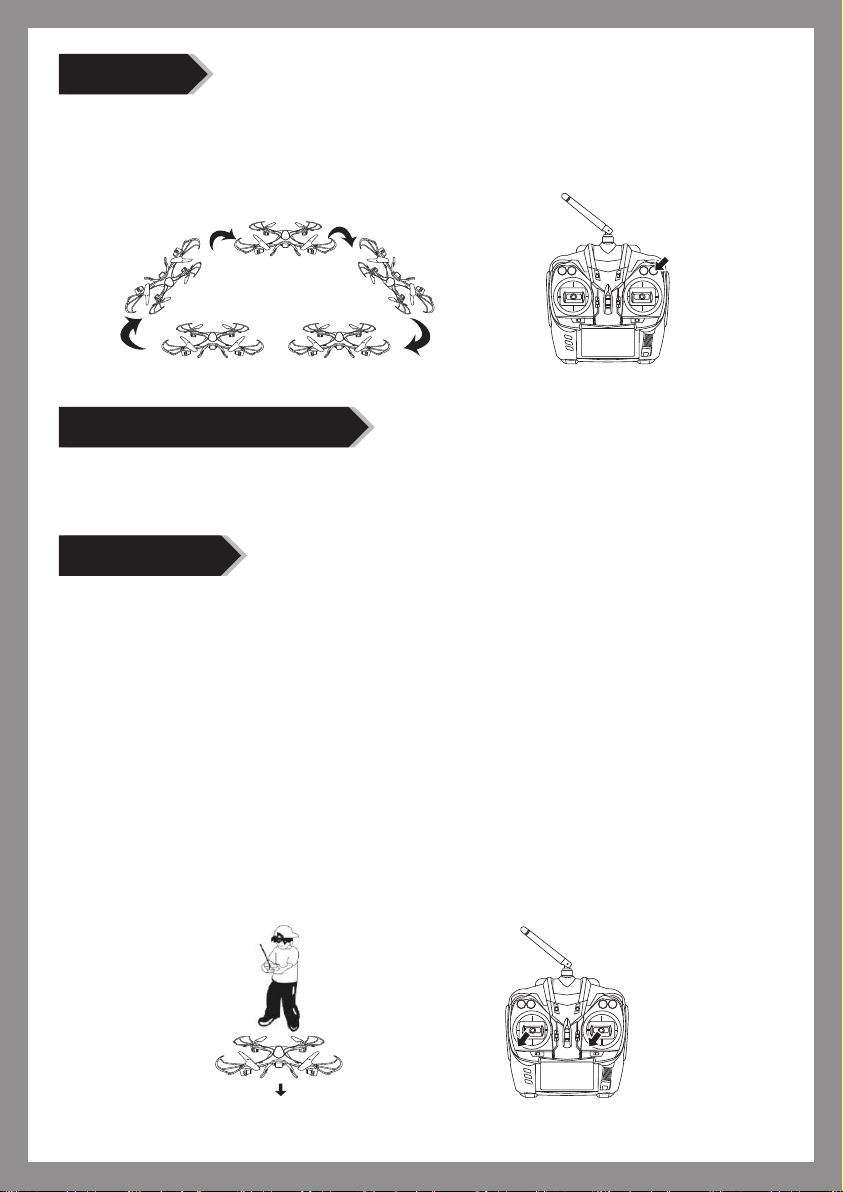
Control the directions in CF mode:
In CF mode, the forward direction is the direction which the quadcopter pointed to in the
previous step. The operator should face this forward direction, otherwise the direction will
not in the correct control. Please follow the below steps:
Hints:
1. To make the quadcopter flying in CF mode, a direction adjustment and confirmation step is
important, and the operator should face the direction to which the front of the quadcopter pointed.
The orientation of the operator should not change to avoid effect on controlling the quadcopter.
2. When in CF mode, if the direction of the quadcopter is not in accordance with the operator or
makes deviation, please stop flying to make a readjustment and confirmation of the direction.
Push the right control stick up,
the quadcopter flies forward
based on the direction which
the operator faced in the
adjustment step.
Push the control stick to make
right side fly, the quadcopter
will make right side fly based on
the direction which the operator
face in the adjustment step.
Push the control stick to make
a right turn, the quadcopter will
turn right based on the direction
which the operator faced in the
adjustment step.
Push the control stick to make
a left turn, the quadcopter will
turn left based on the direction
which the operator faced in the
adjustment step.
Push the right control stick
down, the quadcopter flies
backwards based on the
direction which the operator
faced in the adjustment step.
Push the control stick to make
left side fly, the quadcopter
will make left side fly based on
the direction which the
operator faced in the
adjustment step.

6
Preparing for flight
Charging the quadcopter
Note:
In case that the quadcopter might descend to a further or insecure zone due to the low
battery power when flying in outdoor, the quadcopter is specially designed with the function
of secure warning. When the battery power is too low, the led light would turn from constant
on to flickering. Then the operator would have time to take back the quadcopter and change
the battery or recharge it for the next flight.
Take out the USB cable. Connect it with the battery’s charging port, and then connect the USB
cable with computer or compatible USB power adapter. It starts charging. While charging, the
charge indication light is red. The light turns off when charging is finished. Charging period is
about 80 minutes.)
1. If the battery is being charged by computer, make sure
to pull out the USB cable if you want to shut down the
computer.
2. When connecting the USB cable with the battery, make
sure to follow the correct polar indicator.
1.Open battery cover.
4. Turn on the switch on
the bottom of the
quadcopter.
5. Push the ON/OFF
power switch up.
2.Connect battery connector
with dash receiver。3. Enclose the battery into
battery case. Close the
battery cover.
6.Push the throttle lever to the
highest position,and the pull
back to the lowest position.
There will be one clear sound
from the transmitter,this shows
that the quadcopter has entered
into the pre-fly status.

7
Accessories(choose to buy )
K60-01A
Body-White
K60-01B
Body- Black
K60-02
Forward blade -White
Rollback blade -White/Black
K60-05
Rollback motor Forward motor motor
K60-06
K60-03 K60-04A K60-04B
Landing Gear-White Landing Gear-Black
K60-07
K60-08
500mAh battery
K60-10
Memory card
K60-09
USB line
The following is selection of accessories for convenience of customers’ purchase. They could
be purchased from local vendor. Please note the color before order.

8
K60-11
Transparent lampshade
K60-12
PBC
K60-13A
Protect cover-White
Protect cover-Black
K60-13B K60-14A
0.3 MP camera - White 0.3 MP camera - Black
2 MP camera -Black
2 MP camera - White
K60-14B
K60-15A K60-15B
Reader
K60-16
K60-17
Remote Control

9
Trouble shooting
Make correct adjustments but
the quadcopter still couldn’t
turn balanced
The quadcopter becomes out
of control after crashing
1. The blades are distorted
2.The motor doesn’t work properly 1. Replace the blades
2. Replace the motor
Three-axis acceleration sensor
lose its balance after crashing Put the quadcopter on the
ground for 5-10 seconds
Problem Reason Solution
The indication light of the
quadcopter is flashing and
without reaction
The quadcopter’s blades turn
around but the quadcopter
cannot take off
The quadcopter shakes hardly
1.The quadcopter and the
transmitter are out of radio
connection.
2.Insufficient battery power
1.Repeat the connecton
procedure.
2.Recharge the battery
1. Insufficient battery power
2. The blades are distorted 1.Recharge the battery
2.Replace the blades
The blades are distorted Replace the blades
Table of contents
Other KaiDeng Quadcopter manuals