KD-002/30-220 204x46,8x65,8 800 x2100 25-45
KD-002/30-221 204x46,8x65,9 800 x 2100 25-45
KD-002/30-230 204x46,8x65,10 950 x 2100 40-65
KD-002/30-231 204x46,8x65,11 950 x 2100 40-65
KD-002/30-330 226x47,2x66,5 950 x 2100 40-65
KD-002/30-331 226x47,2x66,6 950 x 2100 40-65
KD-002/30-440 248x47,2x66,5 1050 x 2400 60-85
KD-002/30-441 248x47,2x66,6 1050 x 2400 60-85
KD-002/30-550 248x47,2x66,5 1200 x 2400 80-120
KD-002/30-551 248x47,2x66,6 1200 x 2400 80-120
KD-002/50-400 248x47,2x66,6 1200 x 2400 25-120
KD-002/50-401 248x47,2x66,6 1200 x 2400
RULES TO BE FOLLOWED DURING OPERATION,
INSTALLATION, MAINTENANCE AND EASY REPAIRS
extend it by turning the rod counterclockwise.
manner.
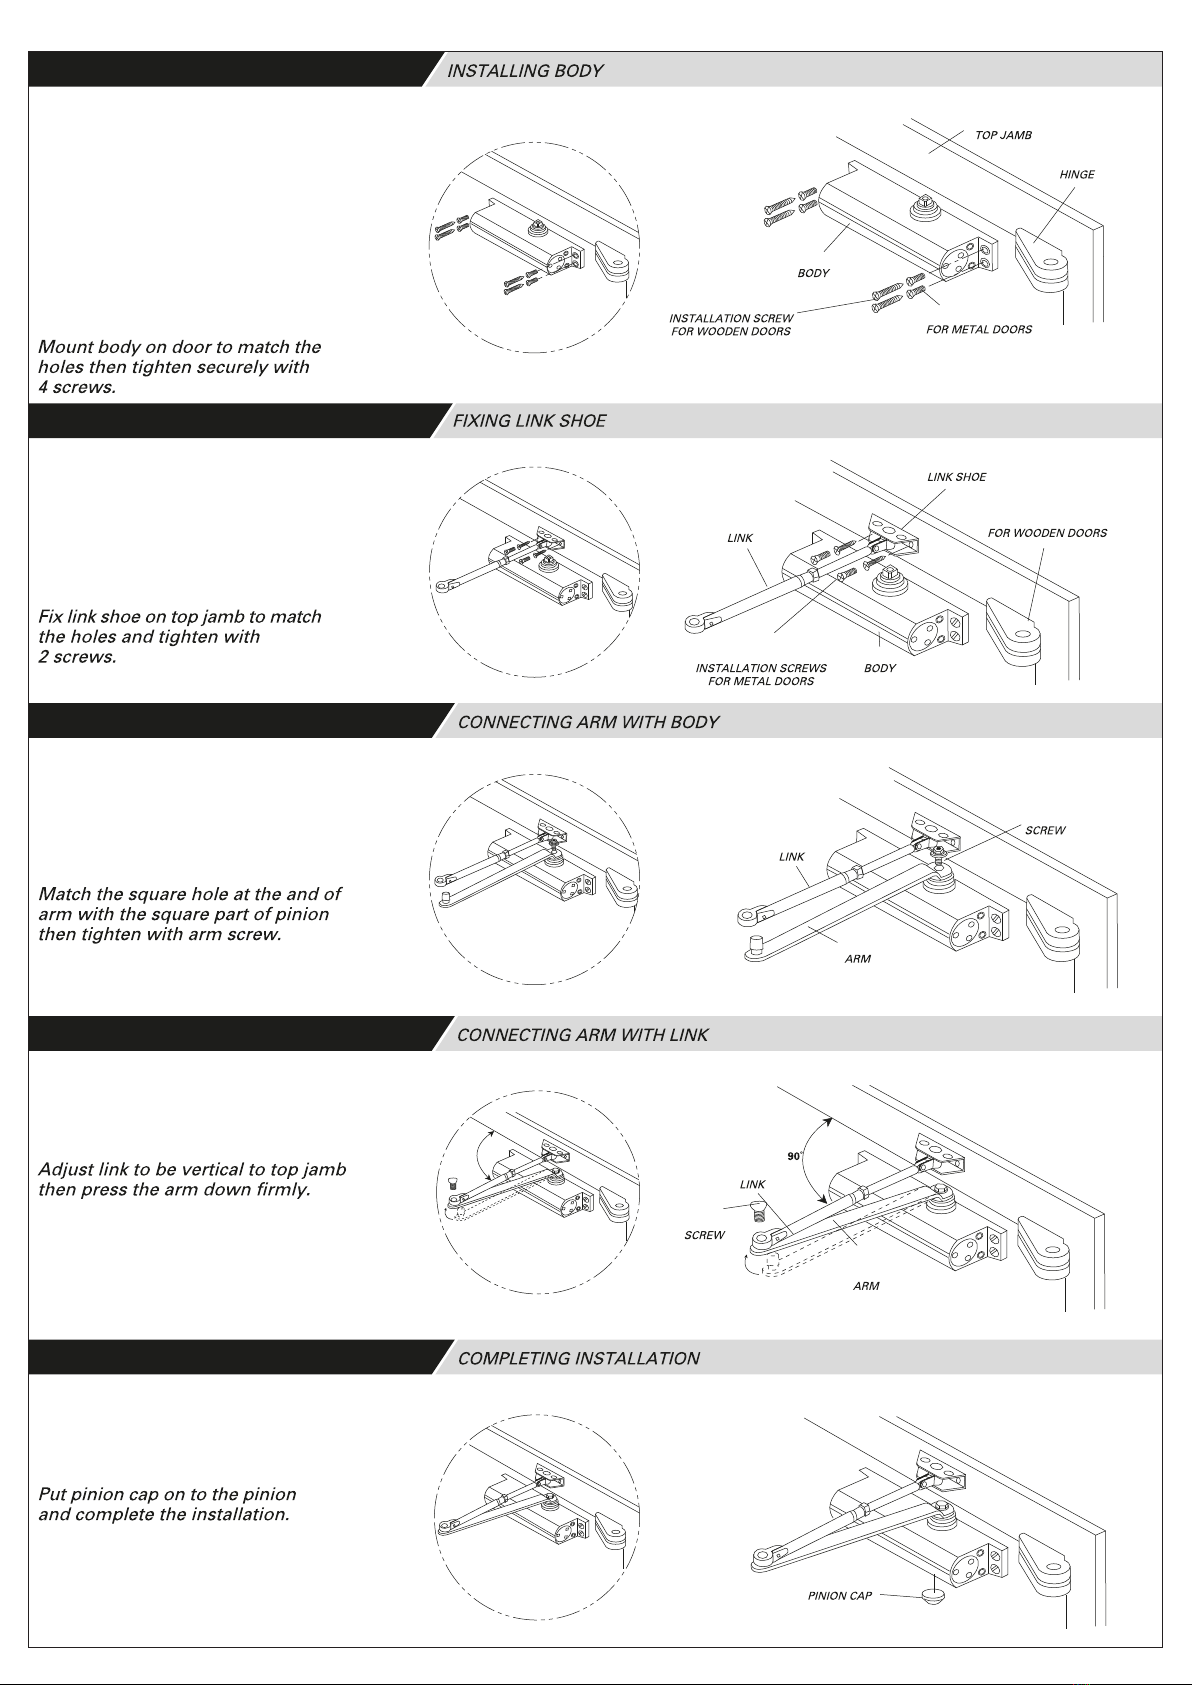
1. Assemble the product as shown in the assembly template.
2. Use the product in the doors having defined dimensions and weight in the technical specification. (to be included in the manual)
3. Assembly and installation must be performed by experts. You can consult with tecnical service department for the assembly work.
4. Ensure that children pass through the door in company with the attendance of adults. There is a potential risk of children fall and
injury due to door slam.
5. Do not stand behind the door wing and frame while closing the gate. It may cause crushing and injuries.
6. Prior to assembly, make sure that door opens and closes properly.
7. While adjusting closing and slam speed, do not open your door completely, make the adjustment according to sufficient opening to
passage.
8. In order to enhance spring force at door close position, shorten it by turning link rod clockwise. İn order to decrease spring force,
1. Do not carry or transport the product when the door is installed on it.
2. While carrying the door on which the product is connected, do not carry it by holding the product.
3. Make sure that the product is being shipped in its own box and packaged.
1. According to size and weight of closing and slam speed, perform the assembly later on.
2. Speed adjustment must be made by expert people and do not loose the rigging screws completely.
3. Do not leave the door open for prolonged time (more than a day), do not use any object that blocks the door closing.
4. Wind and air circulation may increase or decrease door closing speed. In such cases, help the door to close properly in a controlled
1. There is not any item within this product which can be repaired by the consumer. In case of a failure, please consult technical service
department.
2. Do not open or break up inside of the product. This situation may cause serious injuries
PRODUCT SELECTION TABLE
MATTERS TO BE TAKEN INTO ACCOUNT WHILE CARRYING
OR TRANSPORTING THE PRODUCT
INFORMATION RELATING TO MAINTENANCE, REPAIR OR CLEANING
OF THE PRODUCT THAT CONSUMER MAY HANDLE
MODEL’S SPECIFICATIONS
INFORMATION RELATING TO MISUSAGE
Product Code Dimensions LxWxH (mm) Recommended Door
Weight ( Kg )
Recommended Door
Width / Height (mm)
25-120
1. Asamblati produsul conform ghidului de asamblare
2. Utilizati produsul corect conform dimensiunilor si greutatii usii specicate in sa tehnica.
3. Asamblarea si instalarea produsului trebuie efectuate de o persoana calicata.
4. Asigurati-va ca trecerea copiilor prin usi prevazute cu amortizor se face cu supravegherea adultilor sau insotiti de acestia.
Exista risc de cadere a copiilor si de ranire in urma trantirii usii.
5. Nu ramaneti in cadrul usii sau langa toc in timpul inchiderii acesteia, exista risc de lovire/strivire.
6. Inainte de instalare asigurati-va ca usa se inchide/deschide in mod corect.
7. Nu deschideti complet usa in timpul reglarii vitezei de inchidere si de impact, faceti reglarea cu usa deschisa la unghiul
necesar de trecere.
8. Pentru a creste forta elanului amortizorului, rasuciti conexiunea in sensul acelor de ceas. Pentru a scadea forta elanului,
rasuciti conexiunea in sensul invers acelor de ceas.
CONSIDERAȚIUNI PENTRU TRANSPORT
ȘI DEPLASARE PRODUS
UTILIZARE NECORESPUNZĂTOARE
CARACTERISTICI MODEL
1. Nu carati sau transportati produsul gata instalat pe usa
2. Nu tineti de amortizor in timp ce carati usa cu produsul instalat.
3. Asigurati-va ca produsul v-a fost livrat in ambalajul original si ca a fost impachetat corespunzator.
1. Efectuati asamblarea doar dupa ce determinati dimensiunile si greutatea usii, precum si viteza de inchidere si de impact.
2. Reglarea vitezei trebuie facuta de o persoana calicata; nu slabiti complet suruburile de echipare
3. Nu tineti dechisa usa echipata cu amortizor pe perioade indelungate (mai mult de 1 zi), nu utilizati diverse obiecte pentru
a bloca inchiderea usii.
4. Vantul si curentul de aer pot creste sau scadea viteza de inchidere a usii, caz in care directionati manual usa pentru o
inchidere controlata.
1. Nu exista componente ale produsului care pot reparate de catre utilizator. In caz de defectiune contactati un reparator calicat.
2. Nu deschideti sau dezasamblati produsul, exista riscul de ranire grava.
INSTRUCȚIUNI PENTRU OPERAȚIUNILE DE
INSTALARE, MENTENANȚĂ ȘI REPARAȚII MINORE
TABEL SELECTARE PRODUS /
COD PRODUS DIMENSIUNI Lxlxh (mm) RECOMANDARE UȘĂ
Lățime / Înălțime (mm) GREUTATE UȘĂ
Greutate (kg)
INFORMAȚII DESPRE MENTENANȚĂ, REPARAȚII SAU
CURĂȚARE PRODUS EFECTUATE DE UTILIZATOR