Kalenji CW-400 User manual

CW Kalenji 400 Coded Heartwear
Oxylane - 4 Boulevard de Mons
BP299 - 59665 Villeneuve d’Ascq Cedex
France
IMPORTADO PARA BRASIL POR IGUASPORT Ltda
CNPJ : 02.314.041/0001-88
Импортер: ООО «Октоблу», 141031, Россия, Московская область, Мытищинский район, МКАД 84-й км.,
ТПЗ «Алтуфьево», владение 3, строение 3
TURKSPORT Spor Urünleri Sanayi ve Ticaret Ltd.Şti
Forum Istanbul AVM. Kocatepe Mah. G Blok No: 1
Bayrampaşa - 34235 Istanbul - Turkey
Réf. notice : 1188.171
合格品
.kalenji.com Made in China
Fabricado na China
Произведено в Китае
İmal edildiği yer Çin
中国 制造

2
3
EN: Fitting procedure
FR : Procédure d’installation
ES : Procedimiento de instalación
DE : Installationsverfahren
IT : Procedura d’installazione
NL : Installatieprocedure
PT : Procedimentode instalação
PL : Procedura instalacji
HU : Telepítési eljárás
RU : Порядок установки
RO : Procedura de instalare
CS : Instalační proces
SV : Installationsanvisningar
BG : Начин на поставяне
TR : Kurulum prosedürü
AR :
ZH :
ZT :
EN: Reception area
FR : Cône de réception
ES : Cono de recepción
DE : Empfangsbereich
IT : Cono di ricezione
NL : Ontvangstbereik
PT : Zona de recepção
PL : Strefa odbioru
HU : Kúp alakú adatvételi sáv
RU : Радиус действия
RO : Con de recepţie
CS : Přijímací kužel
SV : Mottagningszon
BG : Рецепторна зона
TR : Sinyal alış konisi (bölgesi)
AR :
ZH :
ZT :
EN: Navigation diagram
FR : Schéma de navigation
ES : Esquema de navegación
DE : Navigationsschema
IT : Schema di navigazione
NL : Navigatieschema
PT : Esquema de navegação
PL : Strefa odbioru
HU : Navigáció vázlata
RU : Схема управления
RO : Schema de navigaţie
CS : Navigační schéma
SV : Navigeringskarta
BG : Схема на навигация
TR : Navigasyon şeması
AR :
ZH : 浏览图解
ZT :
SCHEMA 1
SCHEMA 2
SCHEMA 3
*19.68 inchs
**39.36 inchs
D : LIGHT
C : MODE
A: START/STOP
B : LAP/RESET
*19.68 inchs
50 cm*
50 cm* 50 cm*
50 cm*
100 cm**

4
5
+-
5AT M
1AT M
EN : Press once / FR : Appuyez 1 fois /ES : Pulse 1 vez
/DE : 1 mal drücken /IT : Premere 1 volta /NL : 1
keer drukken /PT : Prima 1 vez /PL: Naciśnij 1 raz
/HU : Nyomja meg egyszer /RU : Нажать 1 раз /
RO : Apăsaţi 1 dată /CS : Stiskněte 1x /SV: Tryck en
gång /BG : Натистене 1 път /TR : 1 kere basın /AR :
/ZH : /ZT :
EN : Hold for 3 sec / FR : Appuyez 3 sec /ES : Pulse 3 seg
/DE : 3 Sek. lang drücken IT : Tenere premuto per 3
sec /NL : 3 seconden drukken /PT : Prima durante
3 segundos /PL : Przyciskaj przez 3 sekundy /
HU : Tartsa lenyomva 3 mpig /RU : Удерживать 3
сек /RO : Apăsaţi 3 sec /CS : Stiskněte po dobu 3
vteřin /SV : Tryck tre sekunder /BG : Натиснете 3
сек /TR : 3 saniye basın /AR : /ZH
: /ZT :
EN : Press + or - to set and to conrm / FR :
Appuyez sur - ou + pour régler et pour valider
/ ES : Pulse + o – para regular y para validar /
DE : Drücken Sie zum Einstellen auf + oder – und zum
Bestätigen auf
/IT : Premere + o – per regolare e
per confermare /NL : Druk op + of – om in te
stellen en op om te bevestigen /PT : Prima + ou
– para ajustar e para validar /PL : Naciśnij + lub –
aby ustawić oraz zatwierdzić /HU : ANyomja meg
a + vagy –gombot a beállításhoz és a gombot
az érvényesítéshez /RU : Нажать на + или – для
настройки и подтверждения /RO : Apăsaţi pe
+ sau - pentru reglare şi pentru validare /CS :
Stiskněte + nebo – pro nastavení a pro potvrzení
/SV : Tryck på + eller – för att ställa in och för
att godkänna /BG : За регулиране натиснете + или
– ,за потвърждение натиснете /TR : Ayarlamak
için + veya -’ye, onaylamak için ’ye basın /AR :
/ZH :
/ZT :
3 sec
EN: Conditions of use
FR : Conditions d'utilisation
ES : Condiciones de uso
DE : Nutzungsbedingungen
IT : Condizioni di utilizzo
NL : Gebruiksomstandigheden
PT : Condições de utilização
PL :
Warunki określające użytkowanie
HU : Használati feltételek
RU : Условия эксплуатации
RO : Condiţii de utilizare
CS : Podmínky užívání
SV :
Anvisningar för användning
BG : Условия за ползване
TR : Kullanım koşulları
AR :
ZH :
ZT :
EN: Changing the batteries
FR : Changement de piles
ES : Cambio de pilas
DE : Batterienwechsel
IT : Sostituzione delle pile
NL :
Vervangen van de batterijen
PT : Substituição das pilhas
PL : Wymiana baterii
HU : Elemcsere
RU :
Замена элементов питания
RO : Schimbarea bateriilor
CS : Výměna baterií
SV : Batteribyte
BG : Смяна на батериите
TR : Pil değiştirme
AR :
ZH :
ZT :
SCHEMA 4

67
EN
EN
If you regularly run or want to progress through training, this product is for you. This
product has been designed to be comfortable, adapt to all body types and for easy use
during exercise.
1/ Device and navigation overview
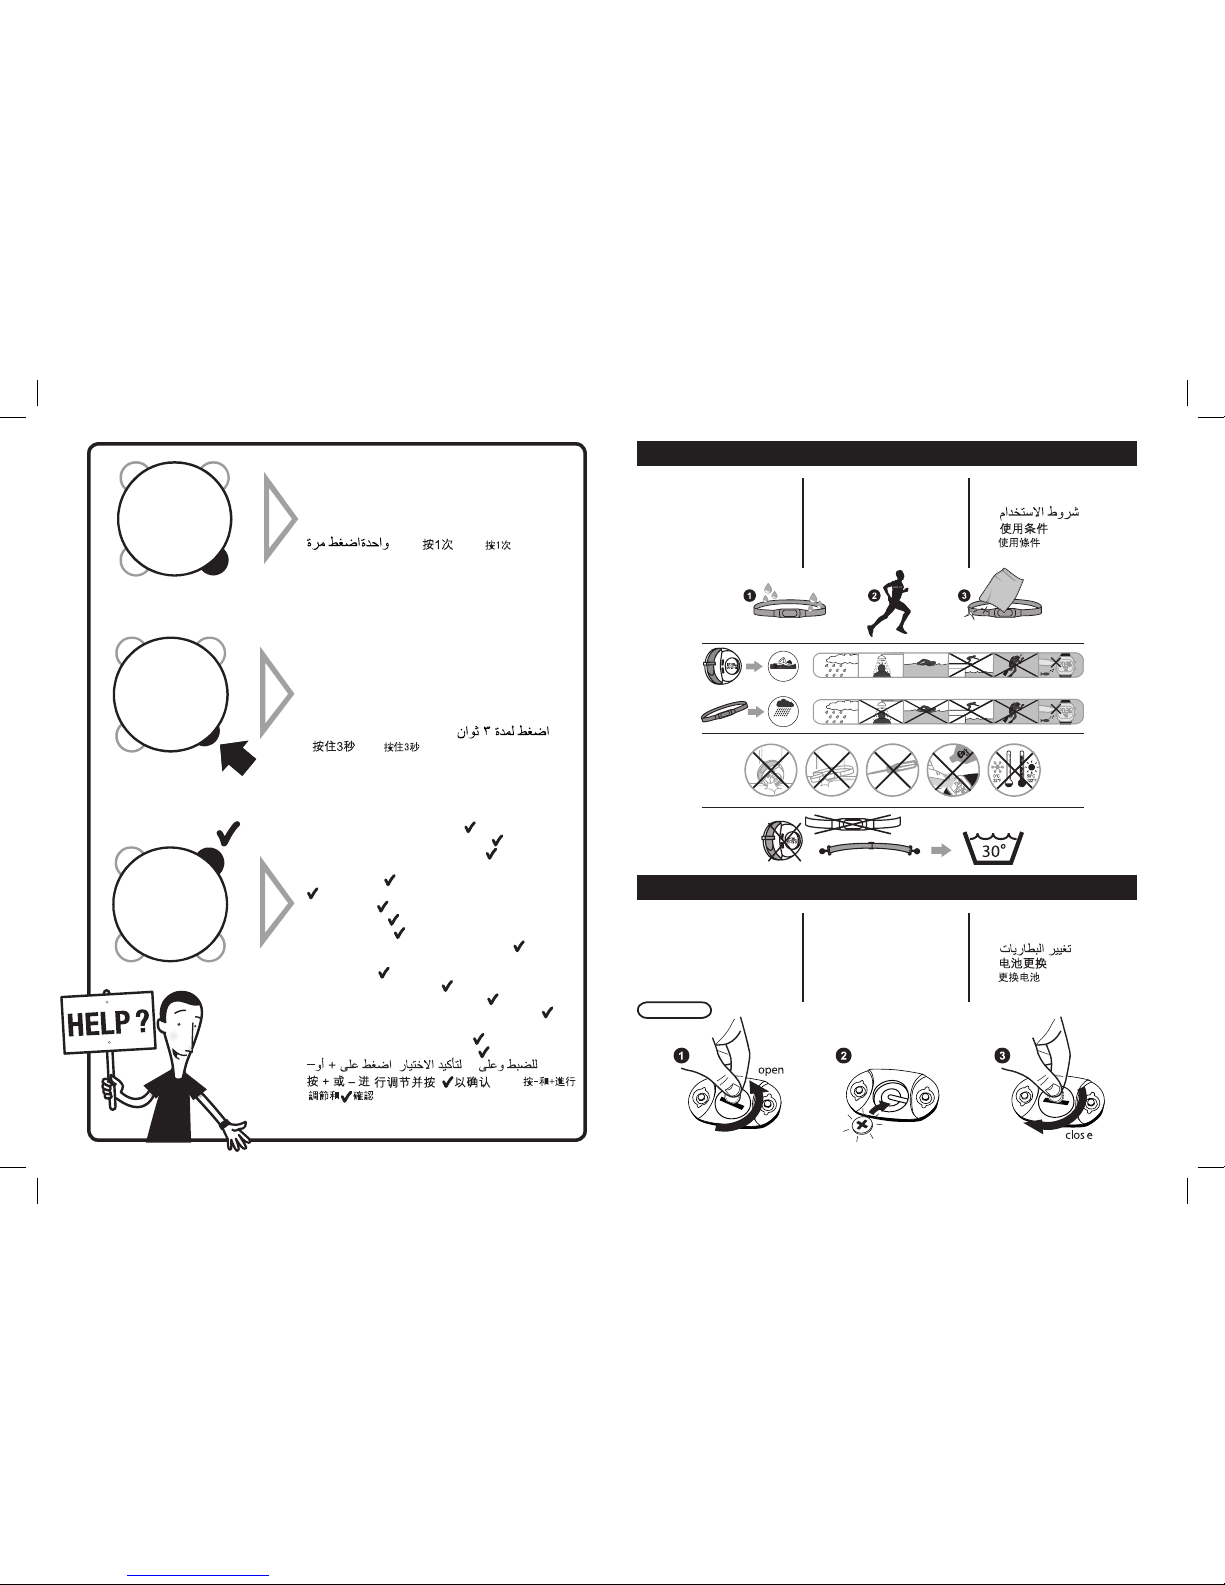
A : START/STOP : Start/stop the stopwatch. Activate or deactivate a
function.
B : LAP/RESET : Taking lap times (LAP). Scroll through the values of
a parameter; reset the stopwatch to 0.
C: MODE BUTTON: Navigate between modes (time, cardio, calories,
data, settings).
D : LIGHT : Activate backlighting.
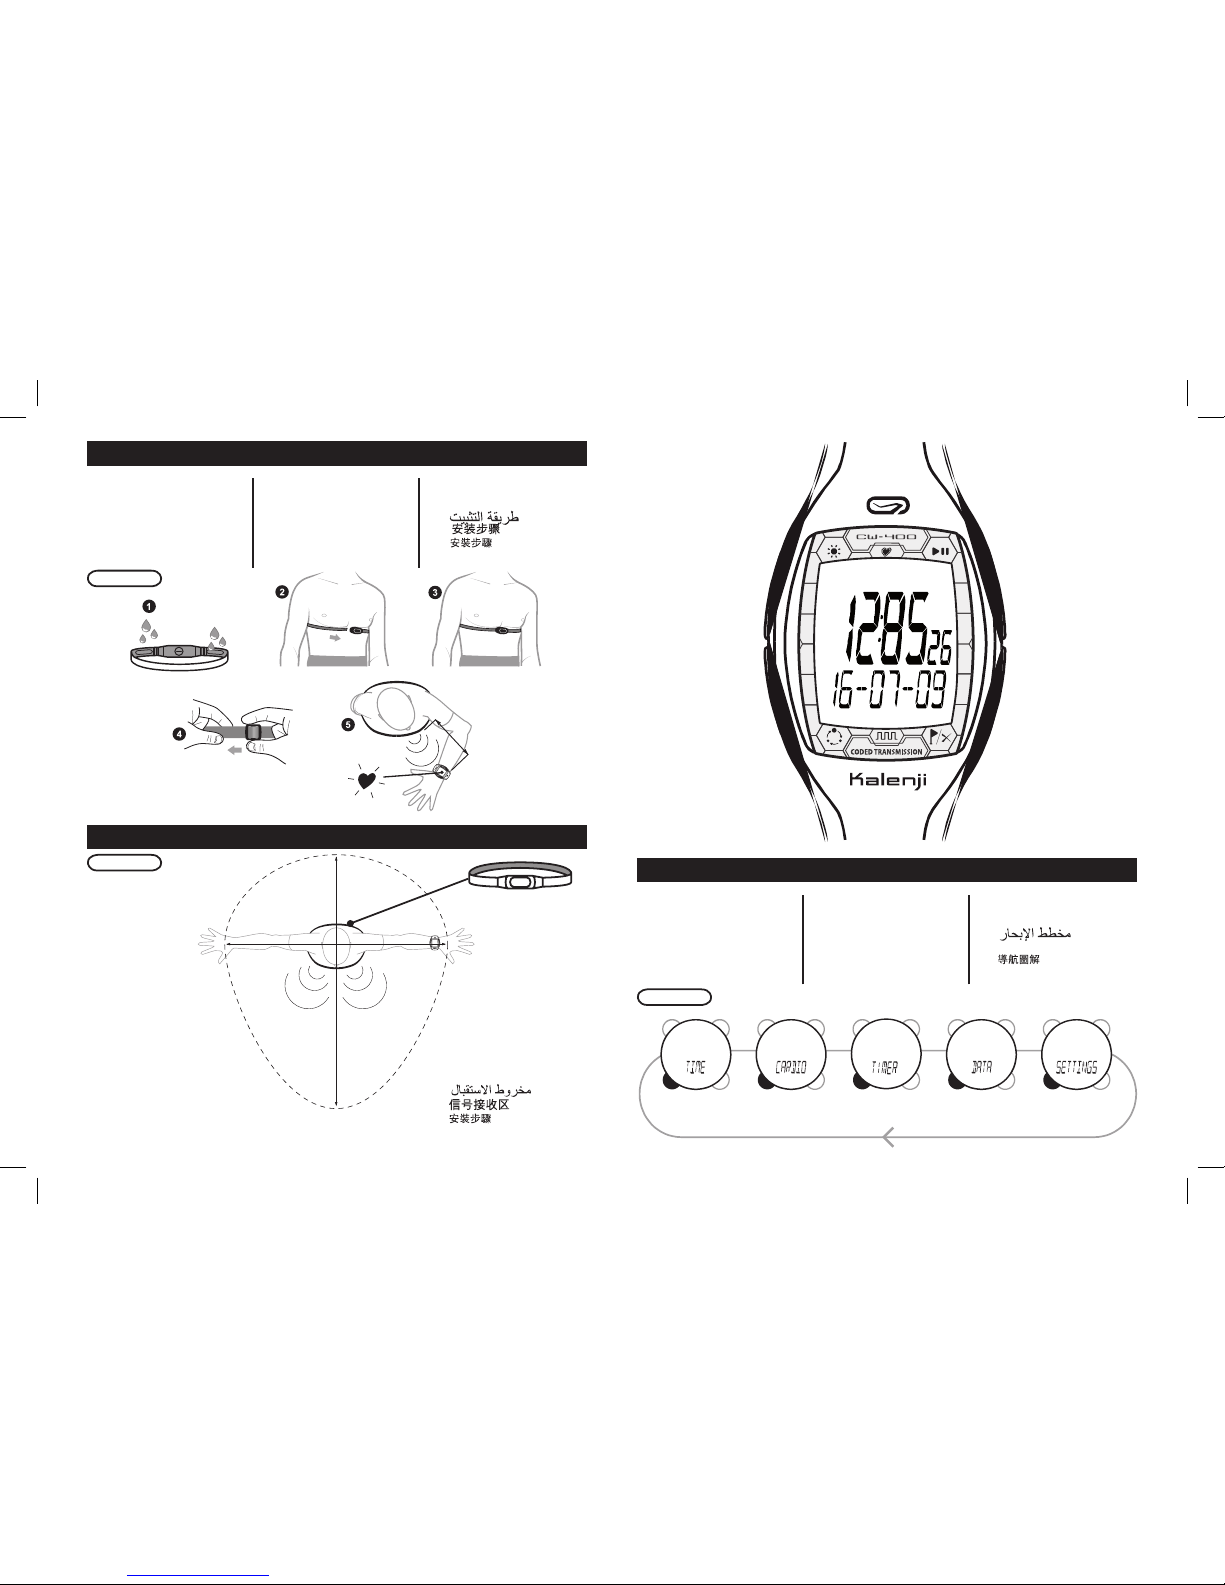
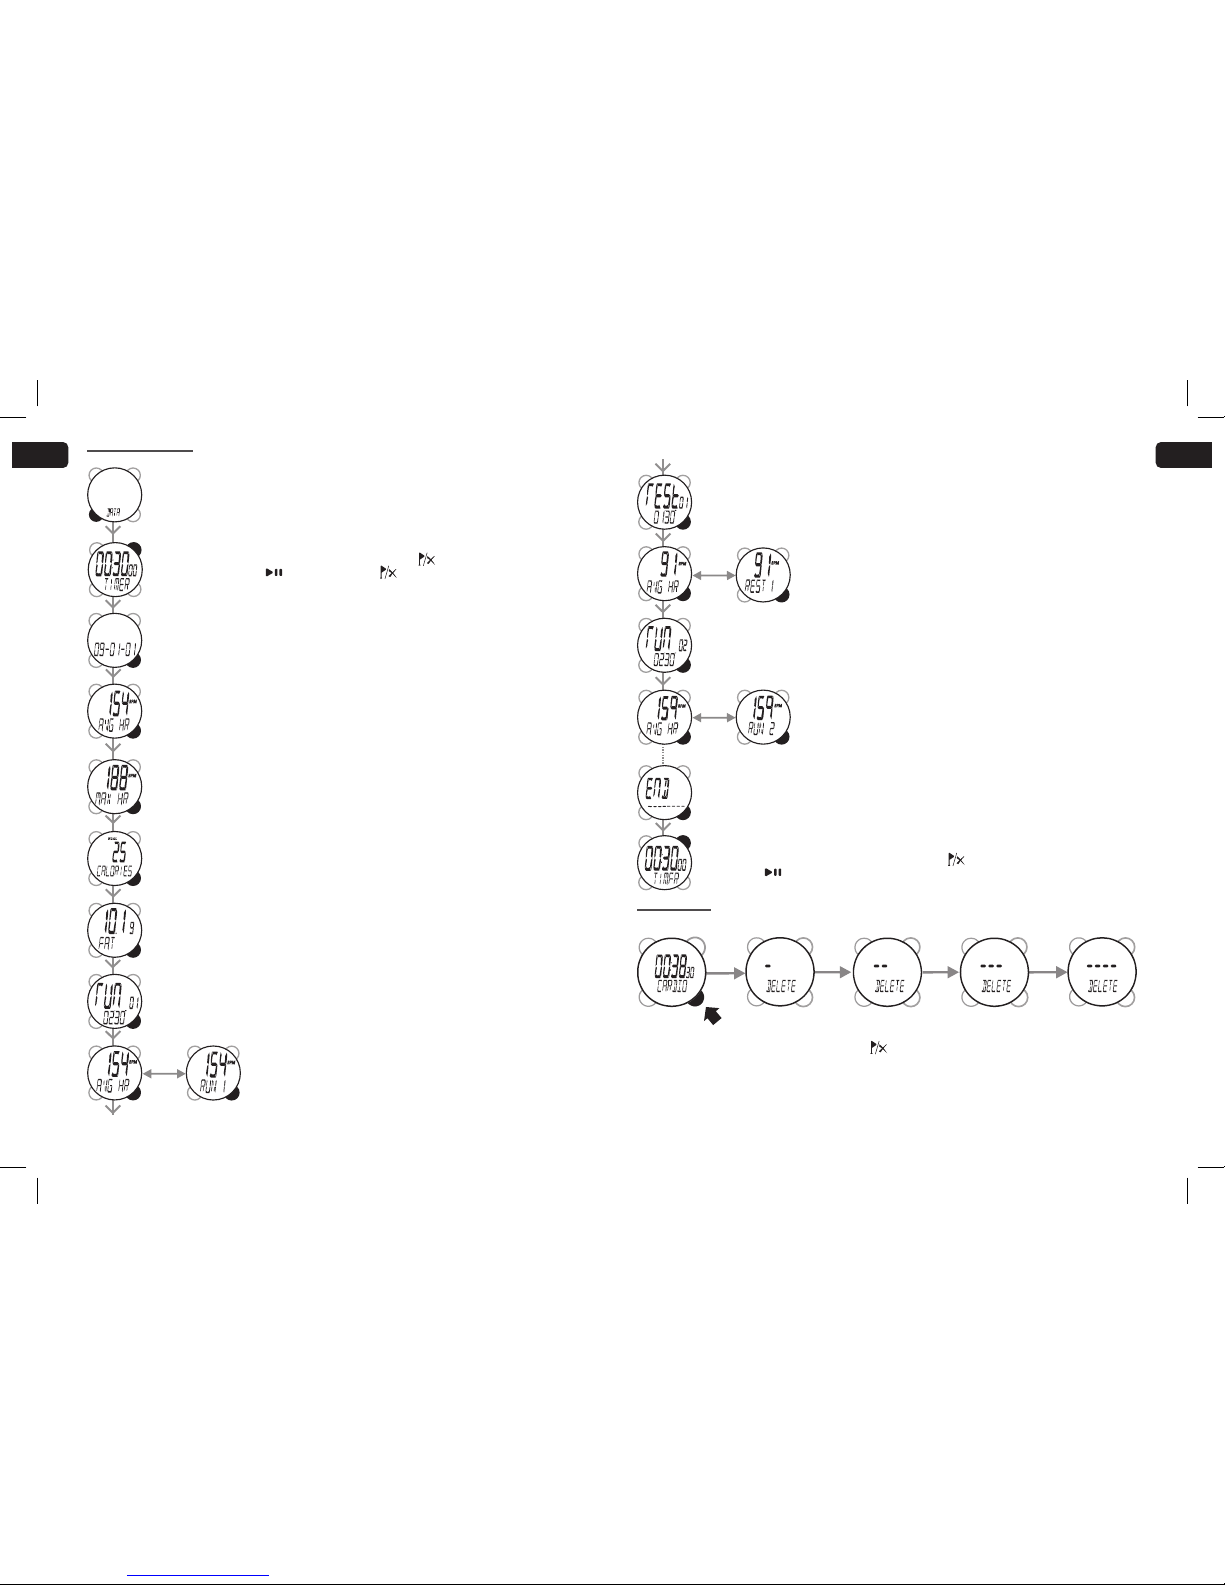
Navigation system: The navigation diagram is at the beginning of the manual (diagram 3).
5 main modes: press MODE to change between modes .
- TIME : permanently displays the time and date.
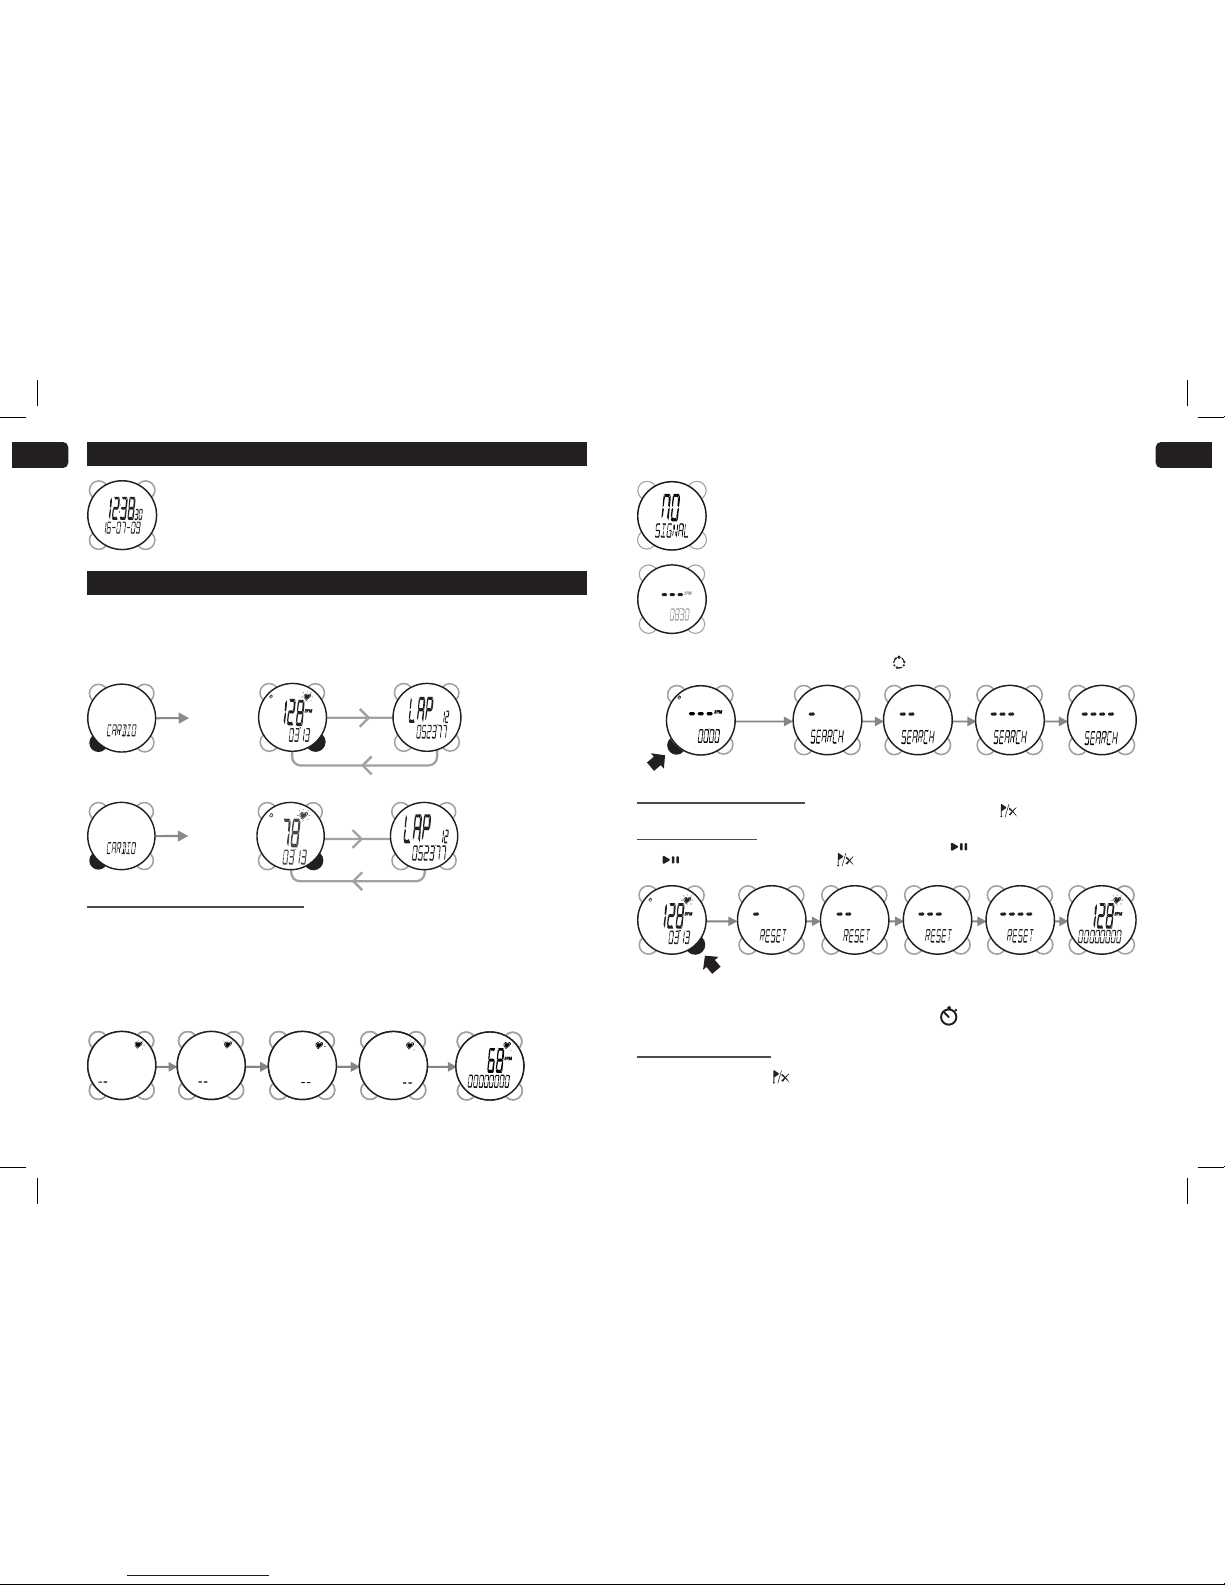
- CARDIO : training mode with heart rate as the main data item.
- TIMER : training mode using a double repetitive countdown.
- DATA : training reports for the 5 most recent training sessions.
- SETTINGS : all the device’s settings: height, weight, target zone, etc.
2/ Use / Precautions for use
This heart rate monitor is made up of a watch and a chest strap. The watch is designed to be worn on the wrist or placed on a bicycle
holder during various sporting, physical activities in a temperate climate. The chest strap has a 32 channel coded transmitter.
User limitations / precautions for use:
All precautions for use and restrictions are listed on page 3 of these instructions.
WARNING!!!
This equipment is designed for sports and leisure use. It is not a medical monitoring device. The information provided by this
equipment or manual are only used by way of example and must only be used to monitor a medical disorder after consulting and
obtaining agreement from your doctor.
A
B
D
C
Similarly, athletes in good health must take into account the fact that determining your maximum heart rate and personal training
zones are vital elements in designing an effective and risk-free training programme.
Advice from your doctor or health professional is recommended in order to set your maximum heart rate, your higher and lower heart
rate limits and the frequency and duration suitable for your age, physical condition and target results.
Finally, as a result of possible disturbance caused by the radio transmission system, we do not recommend that users of heart
stimulators use a heart rate monitor which uses this form of technology.
Not observing these precautions may put your life at risk.
3/ The chest strap
3.1/ Fitting the chest strap
The installation process for the strap is explained at the start of these instructions (diagram 1). The chest strap serves as a sensor
and transmitter. It measures the differences of potential created by the heartbeat on the surface of the skin. It transmits this
information
to the watch by radio signal. The quality and accuracy of its
measurements and comfort during use depend on it being correctly
positioned. As shown in the diagram, the sensors are black rubber
surfaces either side of the central part.
When correctly placed, the strap sends heart rate information to the watch. Located within the reception area (diagram 2), the watch
displays the heart rate and offers different information to manage and optimise your weight loss or training programme.
Avoid positioning the sensors in overly hairy areas. In cold and dry climates, the strap may need
several minutes to work properly. This is perfectly normal as the sensors need a lm of sweat to
ensure contact with the skin. When measurements start, the watch may indicate very high values
for around 20 seconds. This is due to the initialisation of the algorithm. It will display correct values
following initialisation.

EN
8
9
EN
3 sec
3 sec
4/ Time mode ( TIME )
- Using time mode
The time is displayed on the main line and the date is displayed on the second line in the format selected
in SETTINGS mode.
- Setting the time, date and 12/24 hour mode.
Changes are made in the SETTINGS mode.
5/ Cardio mode (CARDIO)
If the signal has not been found, the watch displays “NO SIGNAL”.
If the connection is broken for more than ve minutes, the display changes to ---.
To reactivate the signal search, press down MODE for 3 seconds
5.2/ Secondary information display
The secondary information on the second line can be changed by pressing down LAP/RESET
5.2.1/ Training stopwatch
This is the standard display when entering CARDIO mode. Press START/STOP to start the stopwatch. Then press START/
STOP again to stop it. Hold down LAP/RESET for 3 seconds to put it back to 0.
Training stopwatch
Training stopwatch Taking
lap
times
Taking
lap
times
Display of readings as beats per minute (BPM):
The default display for your heart rate values is in beats per minute (BPM is visible on the screen). They can also be displayed as
a percentage of the maximum heart rate (%). BPM is no longer visible on the screen. This display selection is made within the
SETTINGS mode via the HR Units parameter.
Display readings as a percentage of maximum heart rate (%):
5.1/ Using cardio mode and main information
The main information in this mode is the heart rate.
IMPORTANT:
• To get heart rate information, you must be wearing your strap. (Don’t forget to moisten it beforehand). If it is correctly tted it will
automatically emit the heart rate signal. For more information on tting the strap, see diagram 1 or paragraph 3.
• Before using cardio mode, we also advise you to check that you have set the correct values for yourself (height, weight, target
zone) within mode (see the corresponding chapter). If not, the values given by the watch may be incorrect.
When entering CARDIO mode, the watch will search for the signal.
It will automatically receive the signal if it is within range of the strap.
In this case, the symbol (heart) at the top left of the screen ashes and the heart rate is displayed on the main line.
NB: 1. The stopwatch can only be started or stopped when it is displayed on the screen.
2. When the user changes mode while the stopwatch is running, a symbol is displayed in all other modes.
3. The stopwatch can measure a duration of time from 0 to 23h 59min 59s.
5.2.2/ Lap information (LAP)
During your workout, you have the option of taking and saving your “lap time”(LAP). To do this, simply press down the button
when the stopwatch is activated .The watch displays the “lap time”to you for 5 seconds. You will be able to consult these
“lap times”within the DATA mode, when your sessions are being displayed. You can take as many laps as you wish, but only the
50 most recent will be stored.

EN
10
11
EN
3 sec
6/ Timer Mode
6.1/ Principle of the TIMER mode
The double timer function enables a two value repetitive countdown that provides the option to programme a training session that
includes a workout period and a rest period which are different from each other.
6.2/ Utilisation of the Timer mode
If you want to use the timer, press down the Mode button until TIMER appears on the screen. The watch will spend a few moments
searching for your heart rate (see chapter 5.1); once it has done this you will be be able to use the double timer using the following
steps:
Press down START/STOP to start the rst timer (RUN), your watch will emit a noise signal when this has reached zero and the
second timer (REST) will start up straight after.
RUN workout time.
REST rest time.
Moreover, these two timers will start up one after the other for as many times as you have programmed the repetition without taking
any additional steps. However the number of repetitions cannot exceed 25.
The timer is set within the SETTINGS mode (see chapter 8)
E.G.: you programme an exercise with the following values: RUN 3 mins and REST 1 min and 2 repetitions. To stop the Timer at any
time during the session, press down the START/STOP button. Press it a second time to resume the training.
7/ Training report mode (DATA)
Data storage rules:
The report is reset when the training stopwatch is started for the rst time: if a user goes into DATA mode at that time, he or she will
see NO DATA. The data is stored in the memory when the user stops the stopwatch: the user who enters DATA mode will then see
the training report from the session which he or she has just undertaken, as well as those previously saved.
You can save up to 5 sessions. When the watch memory is full, it will automatically delete the oldest session.
Consulting the saved sessions:
The most recent session is displayed rst. Sessions are identiable by the duration and the mode used “CARDIO”or “TIMER”.
In between each repetition, the watch displays the number of the next repetition, the total number of programmed repetitions and
RUN or REST. RUN workout phase
REST rest phase.
During each repetition, pressing down LAP/RESET enables the number and phase of the repetition to be displayed.
When your session ends or the training stopwatch is stopped, hold down the LAP/RESET button . “RESET” appears on the
screen, hold down the button for 3 seconds. Your session is put back to 0.
5.2.3/ Target zone (as a percentage of the maximum heart rate or in beats per minutes)
A target zone is a heart rate zone in which you wish to exercise. The watch will sound an alarm if your heart beats faster than the
upper limit or slower than the lower limit. This target zone is set in SETTINGS mode. See the corresponding section for more
information.
The target zone will be expressed in beats per minute but you have the option to express it as a percentage of the maximum heart
rate by modifying the HR UNIT parameter within the SETTING mode.
NB: 1. The target zone is active when it is set to ON (setting within Settings) and the training stopwatch has started up.
2. If you go over the Upper limit 2 beeps every 10 seconds will sound and the symbol (▲) will be displayed on the watch
screen. If you go below the Lower limit 1 beep every 10 seconds will sound and the symbol (▼) will be displayed on the watch
screen.
3. It is possible to only use the upper limit or the lower limit by setting the other to an unattainable value (e.g. 30 bpm for the
lower limit).

EN
12
13
EN
Number of grams of fat burnt during the training.
Time produced on the 1st lap (Lap1).
Total number of kilocalories burnt during the training session.
Average heart rate (AVG HR) in Beats per minute (Bpm is displayed)over lap 1 or as
a percentage of the maximum rate (BPM is not displayed) if you have programmed HR
Units as a %. AVG HR and the lap number (LAP) are displayed alternately.
Time produced on the 8th lap (Lap 8).
Average heart rate (AVG HR) in Beats per minute (Bpm is displayed)over lap 8 or as
a percentage of the maximum rate (BPM is not displayed) if you have programmed HR
Units as a %. AVG HR and the lap number ( LAP ) are displayed alternately.
Return to the home screen. Press down LAP/RESET to consult the previous session or on START/
STOP to review the contents of this session.
All the session data has been shown.
Split time (SPLIT) of lap 1.
Split time (SPLIT) of lap 8.
Consultation mode of the training reports:
Date of the session.
Average heart rate (AVG HR) in Beats per minute (Bpm is displayed)over the duration of the training or as a
percentage of the maximum heart rate (BPM is not displayed) if you have programmed HR Units as a %.
Maximum heart rate (MAX HR) in Beats per minute (Bpm is displayed ) over the duration of the training or as a
percentage of the maximum heart rate (BPM is not displayed) if you have programmed HR Units as a %.
Time spent in the target zone in hours minutes seconds. The value is 0 if the target zone has been deactivated.
Détail de la séance Cardio:
You move from one session to another by pressing LAP/RESET . You consult the contents of a session
by pressing START/STOP . Each time LAP/RESET is pressed you can scroll through the information
about the selected session.

EN
14
15
EN
Average heart rate (AVG HR) in Beats per minute (Bpm) is displayed)over rest time 1
or as a percentage of the maximum rate (BPM is not displayed) if you have programmed
HR Units as a %. AVG HR and the lap number (LAP) are displayed alternately.
Second run time saved (Run2) and its duration.
Average heart rate (AVG HR) over the workout time 2 in Beats per minute (Bpm) or as
a percentage (%) if you have set HR units as a %, during the rst rest time (Run 2).
All the session data has been shown.
Return to the home screen. Press down LAP/RESET to consult the previous session or on
START/STOP to review the contents of this session.
Number of grams of fat burnt during the training.
First run time saved (Run1) and its duration.
Average heart rate (AVG HR) in Beats per minute (Bpm is displayed)over workout
time 1 or as a percentage of the maximum rate (BPM is not displayed) if you have
programmed HR Units as a %. AVG HR and the lap number (LAP) are displayed
alternately.
First rest time saved (Rest 1) and its duration.
Total number of kilocalories burnt during the training period.
Détail de la séance Timer:
Deleting sessions
Consultation mode of the exercise reports:
Date de la séance.
Average heart rate (AVG HR) in Beats per minute (Bpm is displayed)over the duration of the training or as a
percentage of the maximum heart rate (BPM is not displayed) if you have programmed HR Units as a %.
Maximum heart rate (MAX HR) in Beats per minute (Bpm is displayed ) over the duration of the training or as a
percentage of the maximum heart rate (BPM is not displayed) if you have programmed HR Units as a %.
You move from one session to another by pressing LAP/RESET . You consult the contents of a session
by pressing START/STOP . Each time LAP/RESET is pressed you can scroll through the information
about the selected session.
To select the session to be deleted, hold down LAP/RESET for 3 seconds until the word DELETE disappears.
3 sec

EN
16
17
EN
8/ Parameter mode (Settings)
The general setting rule is to select the parameter to be set by successively pressing on LAP/RESET , then to enter the setting
mode by pressing on START/STOP , then to increase or decrease the value by pressing on MODE or LAP/RESET
and lastly to validate this by pressing on START/STOP .
Setting the target zone
When entering setting mode of the target zone, the type of target zone is displayed:
- Press down on START/STOP , you access the setting of the SecondTimer REST (rest time). Set the number of seconds using
the LAP/RESET (+) and MODE buttons (-). Press down on START/STOP to access the setting of the number of
minutes. Set the number of minutes using the LAP/RESET (+) and MODE (-) buttons.
- Press down on START/STOP , you have the option of activating or deactivating the repetition of timers set previously, in order
to do this use the LAP/RESET (+) or MODE buttons. (-), ON or OFF is displayed on the screen.
If “ON”is selected press down START/STOP , you will access the setting of the number of repetitions of the timers.
Set it using the LAP/RESET (+) and MODE buttons (-).
Once you have set the parameter, you have two options. If you want to set other heart rate parameters, once you have returned
to the SET TIMER display, press down once on LAP/RESET . If you want to exit the SETTINGS mode, press down once on
the MODE button .
Practical information:
- When setting things, the LAP/RESET button enables the value to be increased and the MODE button
enables it to be decreased.
- To set things more quickly, you can keep LAP/RESET or MODE pushed in and the values will change
rapidly.
- If no button is pressed for 2 minutes during setting, the watch automatically exits setting mode.
Either the target zone is deactivated (ZONE: OFF) or it is activated and expressed in beats per minute (BPM) or as a percentage of
the maximum heart rate. The watch will then alternately display the selected mode and the zone values.
Modication to the upper and lower levels in one of the two display modes will be automatically converted to the other mode.
If you want to modify the target zone mode to be used, select it using START/STOP , then change it by pressing down LAP/
RESET . Validate your selection by pressing again on START/STOP , you will then access the setting mode for the
target zone values.
Activating/deactivating the timer repetitions:
ON/OFFON/OFF ON/OFFON/OFF
Setting the timer
The TIMER mode is set within the SETTINGS mode, press down the Mode button several times to access it.
Once you are in SETTINGS, these are the steps to take:
- Press down on LAP/RESET once, SET TIMER appears on the screen.
- Press down on START/STOP , you access the setting of the First Timer RUN (workout). Set the number of seconds using the
LAP/RESET (+) and MODE (-) buttons.
- Press down on START/STOP to access the setting of the number of minutes. Set the number of minutes using the LAP/
RESET (+) and MODE (-) buttons.

EN
18
19
EN
VIEW
LAP
/RESET
LAP
/RESET
LAP
/RESET
LAP
/RESET
LAP
/RESET
LAP
/RESET
LAP
/RESET
LAP
/RESET
LAP
/RESET
Setting the alarm
When you activate the alarm (ON, a small musical note icon will appear at the bottom right of your watch
screen. This will disappear when you deactivate the alarm (OFF).
ON/OFF ON/OFF
Setting the time
Setting the alarm
You can switch the button tone (ON) or
(OFF).
You can use the watch with Anglo-Saxon
units (weight in pounds, height in inches,
time display in 12 hour mode with AM and
PM, and date in YY-MM-DD order) or with
European units (weight in kg, height in cm,
time in 24 hour display, and date in DD-MM-
YY order).
Setting the system of units.
Setting your age (in years).
Setting your height (the unit is displayed
according to the system used: cm
(centimetres) or inches.
Setting your weight (the unit is displayed
according to the system used: kg (kilograms)
or lb (pounds).
Setting your personal information
MALE/
FEMALE
MALE/
FEMALE
Your gender (male (M) or female (F)).
You can’t set the seconds to a precise value, but can only reset them to 0 when you conrm by pressing
START/STOP .
Setting the date
Setting your resting heart rate
Resting heart rate plays a part in the calculation of grams of fat burnt during exercising. To determine it, after waking up, stay lying
down. Measure your heart rate after a few minutes; try to remain as still as possible. Repeat the procedure on several consecutive
days and take the average of these values.

EN
20
21
EN
LAP
/RESET
LAP
/RESET
LAP
/RESET
3 SEC3 SEC
3 SEC3 SEC
Entering maximum heart rate
The maximum heart rate is the highest heart
rate that you can reach when exercising.
Its default setting is 220 - Age. This value
impacts the heart rate value expressed as
a percentage of the HR max. In chapter 10
“Training principles”, you will nd a tness
It is set in the same way as the other
parameters START/STOP for selecting
it, LAP/RESET and MODE for
setting its value, START/STOP for
checking its value.
test for evaluating your maximum heart rate.
Setting the heart rate display
This parameter enables you to display your heart rate and target zone values, either in beats per minute
or as a percentage of the maximum heart rate.
You can use the unit that is most convenient to you.
As you enter the CARDIO and TIMER modes, the choice of display as a percentage of the maximum heart
rate will be shown by the following temporary screen.
It is set in the same way as the other parameters START/STOP for selecting it, LAP/RESET and MODE for setting its
value, START/STOP for checking its value). 9/ Resetting the watch
10/ Training principles
For reasons of effectiveness and safety, it is essential that you are aware of some training-specic physiological guidelines. The
advice we give below is an indication for healthy, sporty people with no medical disorders. We strongly recommend that you seek
advice from your doctor for more precise information on training zones. Know your limits and do not exceed them!
Values to be aware of
To optimise the benets of your physical training, you must rst know your
maximumheartrate(HRmax)inbeatsperminute(bpm).TheHRmaxcan
be estimated using the following calculation: HRmax = 220 – your age.
A tness test will however enable you to obtain a more accurate value.
After warming-up properly, run around the running track at low intensity, followed by a second time at moderate intensity and then
a third even faster circuit accelerating as much as you can over the last 100 metres. The heart rate retained is that displayed when
you pass the nish line.
Careful, do not proceed to this type of exercise without having consulted your doctor beforehand and having explained to him or her
the type of exercise that you wish to undertake.
Training zones
During a tness programme, several training zones will give specic results which correspond to different objectives. Depending on
the intensity of the training, the percentage of energy produced by burning sugar and burning fat will change.
- Within the endurance zone (70 to 80% of HR max) the sportsperson works his or her overall tness, long distances and general
endurance levels. It’s the pace at which you can run for more than an hour. Energy combustion uses a proportion of fats that
becomes increasingly signicant according to the duration of the training.
- Within the resistance zone (80 to 90% HR max) the sportsperson works at strengthening his or her heart and muscles, his or
her middle distance speed and resistance at full strength. It’s the pace at which you run 5 to 10 km in competition. This pace is
no longer comfortable and you get tired. Energy combustion uses sugars almost exclusively, especially if you can’t keep up this
pace for more than half an hour.
E.g.: A 30-year-old athlete training using aerobic endurance to increase his or her resistance to effort and improve his or her half
marathon time. The most effective training area for her objective will be the resistance zone.
Heart
rate
200
Resistance
Endurance
HRmax =
220 - age
All segments are displayed for a short time and then the watch will be restarted.

EN
22
23
EN
11/ Troubleshooting
11.1/ Abnormal heart rate
You have noticed large uctuations in your heart rate.
Check that the strap is in place and the sensors have been moistened (diagram 1, page 1).
Interferences in the environment due to electromagnetic disturbance can make heartbeat readings temporarily unstable or
inaccurate. This is nearly always due to being in close proximity to high voltage lines, overhead lines, trafc lights, televisions, car
engines, some motorised sporting equipment, mobile phones, computer screens, microwave ovens or when you are going through
electrical security gates.
There are other causes for altered heartbeat readings:
- Clothes that chafe on the strap or are full of static electricity.
- Very hairy chests.
- Dirt on the strap.
If heartbeat readings are unstable, rst check that none of the causes above are responsible for the problem.
11.2/ Detecting the strap
If the does not ash:
- Move the strap closer to the watch.
- Adjust the position of the strap by moistening the sensors further.
- Check that the batteries are working, especially in the strap.
- In CARDIO or TIMER mode Synchronise the watch by holding down the MODE button . (see Chapter 5.1)
If the link with the strap is broken temporarily, a heart rate of 0 is displayed on the main line.
If the link is broken for more than ve minutes, the display changes to ---. In order to reactivate the signal
search, press down for 3 seconds on MODE . The search will begin again. (see Chapter 5.1).
11.3/ Advice on use for people tted with a coronary stent
A coronary stent can affect the transmission of the heartbeat from the strap to the watch, we advise you wear the strap above
pectoral muscles.
11.4/ Abnormal ashing of the display or malfunctions.
The battery is probably at, it must be changed.
12/ Technical characteristics
13/ Limited warranty
OXYLANE guarantees to the initial purchaser of this item that it is exempt from all faults linked to materials and manufacture. This
product is guaranteed for two years from the purchase date. Please keep your receipt as proof of purchase.
The warranty does not cover:
• damage resulting from misuse, from a failure to respect the precautions for use, from accidents, from improper maintenance or
from commercial use of the product.
• damage resulting from repairs carried out by persons not authorised by OXYLANE.
• batteries or casings which are cracked or broken or which show signs of impact.
• During the warranty period, the item will either be repaired free of charge by an authorised repair service or replaced free of charge
(depending on the distributor) .
• The warranty does not cover the elastic strap, which is subject to wear and tear.
Watches Heart rate
monitor strap
Waterproof design 5 ATM 1 ATM
Range according to the sports use of the
product (with the strap)
1 hour/week 20 months 32 months
4 hours/week 15 months 10 months
Memory 5 sessions, 50 laps (CARDIO) or 25
repetitions (TIMER) per session
Bracket of authorised values
Heart rate target
zone 30 - 230 beats per minute
Heart rate 30 - 230 beats per minute
Communication protocols 5.3 Khz coded 5.3 Khz coded
Transmission reach: 1 m in use 0.5 m in detection 1 m in use 0.5 m in
detection
Functional temperatures: -10°C to 50°C -10°C to 50°C
Batteries CR 2032 CR 2032
Weight 48 g. 64 g.

EN
24
14/ Batteries
Watch
Please note: if you note that the display is flashing unusually or doesn’t appear to be working
correctly, this usually means that the battery is low and needs to be replaced. To change the
battery: contact the retail outlet where you bought your product. If you change it yourself, you risk
damaging the seal and impairing the waterproof design as well as voiding your warranty. Battery life
is influenced by the length of time it is stored in the shop and the way in which you use the product.
Chest strap
If the heart rate values become incoherent or the heart signal reception does not respond normally when the watch is inside the
reception area, you may need to change the battery in the chest strap.You can change the strap battery yourself without the need
for specialist tools (diagram 4).If you have any problems, contact your retailer.
Take the batteries and unusable electronic products to an authorised collection area
for recycling.
15/ Contact us
We would like to hear your views on the quality, functionality or usage of our products: www.kalenji.com
We will reply as soon as possible.
Table of contents
Other Kalenji Heart Rate Monitor manuals