Kamstrup MULTICAL 603 User manual

Installation and user’s guide
MULTICAL® 603
θ: 2 °C ...180 °C
: 3 K ...178 K
Cooling meter (E3)
θ: 2 °C ...180 °C
Heat meter (E1)
: 3 K ...178 K ∆Θ∆Θ
S/N: 80000095/K8/17
DK-0200-MI004-040
qp, p/l: See display
TS 27.02 012
θhc: See display
Pt500-EN60751
Type: 603C219
Battery, 1 x D-cell
θ: 2 °C ...180 °C
: 3 K ...178 K
Cooling meter (E3)
θ: 2 °C ...180 °C
Heat meter (E1)
: 3 K ...178 K ∆Θ∆Θ
S/N: 80000095/K8/17
DK-0200-MI004-040
qp, p/l: See display
TS 27.02 012
θhc: See display
Pt500-EN60751
Type: 603C219
Battery, 1 x D-cell

2 Kamstrup A/S • 55122070_A2_GB_07.2017
MULTICAL® 603
Information
Permissible operating conditions / measuring ranges
Heat meter with approval according to MID and EN1434:
Temperature range q: 2 °C…180 °C DΘ: 3 K…178 K
ULTRAFLOW® (temperature of medium) qq: 15 °C…130 °C
Cooling meter with approval according to DK-BEK 1178 and EN1434:
Temperature range q: 2 °C…180 °C DΘ: 3 K…178 K
ULTRAFLOW® (temperature of medium) qq: 2 °C…130 °C
MID designation
Mechanical environment
Class M1 and M2
Electromagnetic environment
Class E1 (housing/light industry) and class E2 (industry). The meter’s control cables must be
drawn at min. 25 cm distance from other installations.
Climatic environment
Non-condensing, closed location (installation indoors), ambient temperature 5…55 °C.
Maintenance and repair
The energy supplier can replace temperature sensor pairs, flow sensor as well as supply and
communication modules. Other repairs require subsequent reverification in an accredited
laboratory.
Selecting a temperature sensor pair
MULTICAL® 603-A - Pt100 Pt100 - EN 60751, 2-wire connection
MULTICAL® 603-B - Pt100 Pt100 - EN 60751, 4-wire connection
MULTICAL® 603-C/E/F - Pt500 Pt500 - EN 60751, 2-wire connection
MULTICAL® 603-D/G - Pt500 Pt500 - EN 60751, 4-wire connection
Battery for replacement
Kamstrup type HC-993-09 (2 x A-cells)
Kamstrup type HC-993-02 (1 x D-cell)
Communication Modules
An overview of available modules is found in the paragraph Communication modules.

3Kamstrup A/S • 55122070_A2_GB_07.2017
MULTICAL® 603
Contents
1 General information 4
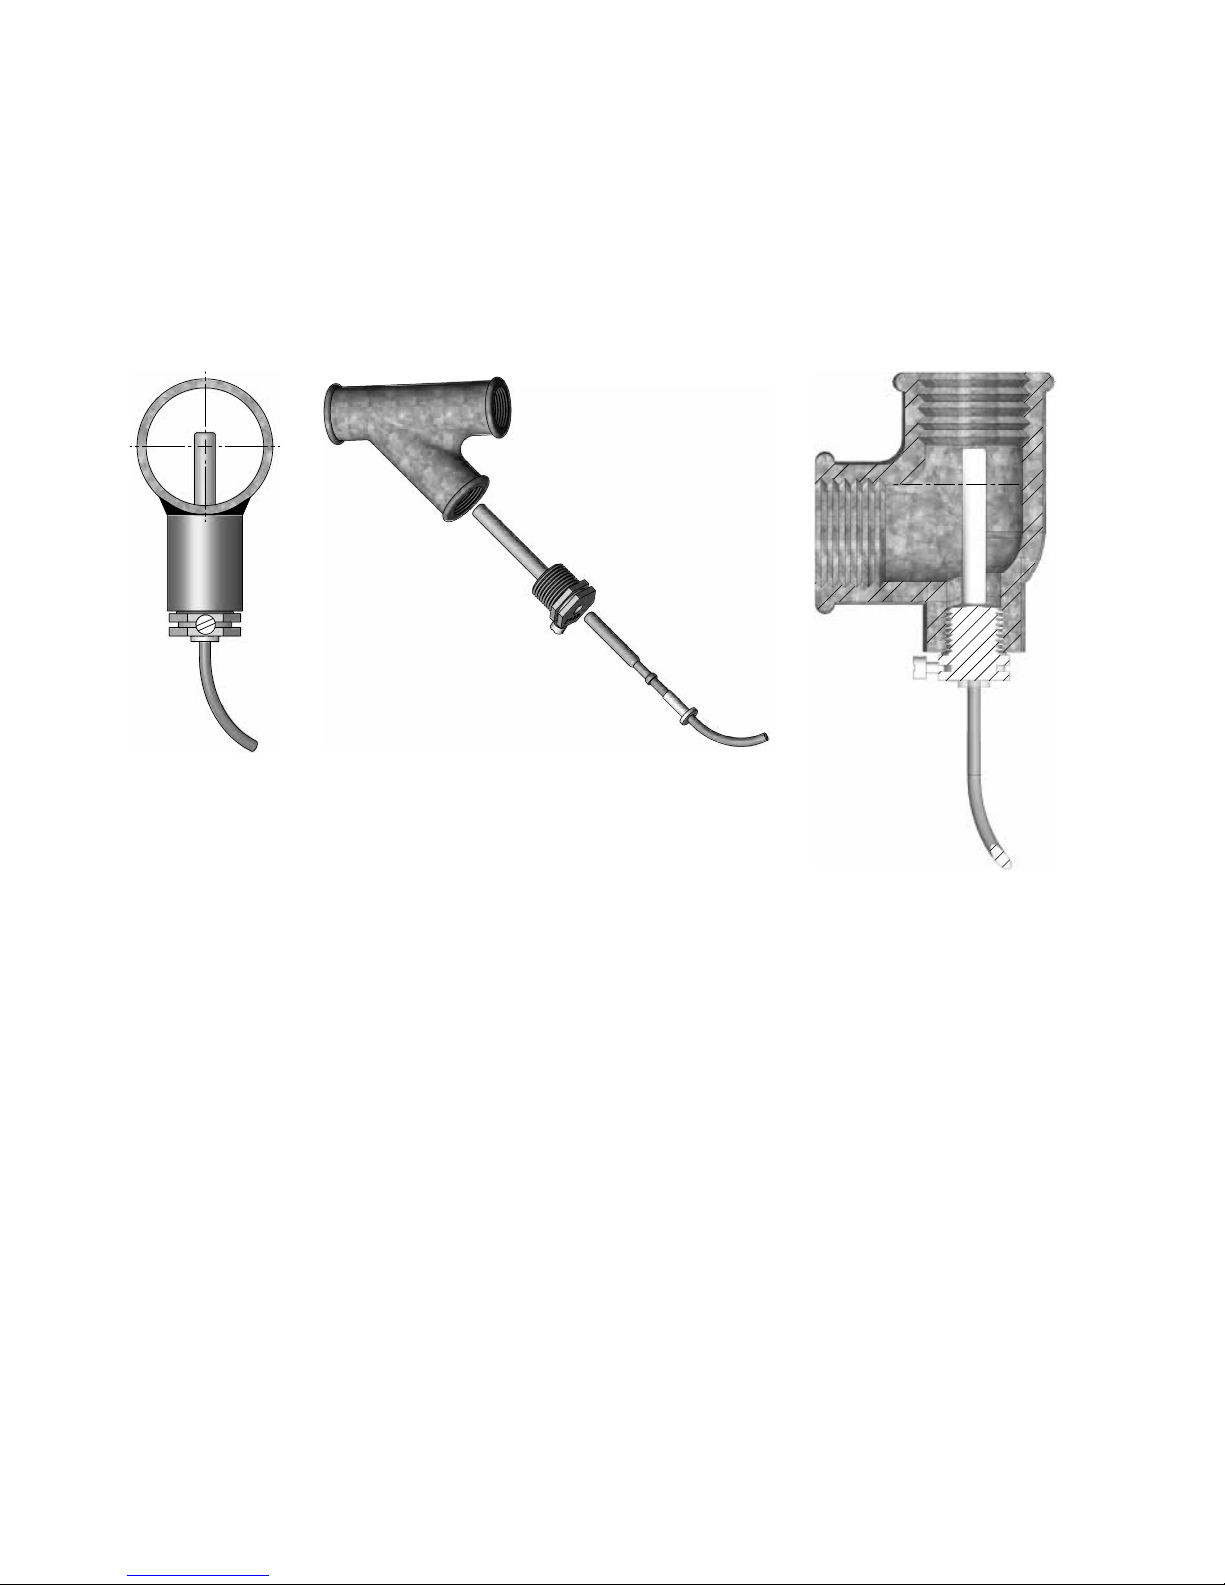
2 Mounting of temperature sensors 5
2.1 Short direct sensor (DS) 5
2.2 Pocket sensor (PL) 6
3 Mounting of flow sensor 7
3.1 Mounting of couplings and short direct sensor in flow sensor 7
3.3 Mounting of ULTRAFLOW® 54 ≥ DN150 8
3.2 Mounting of ULTRAFLOW® ≤ DN125 8
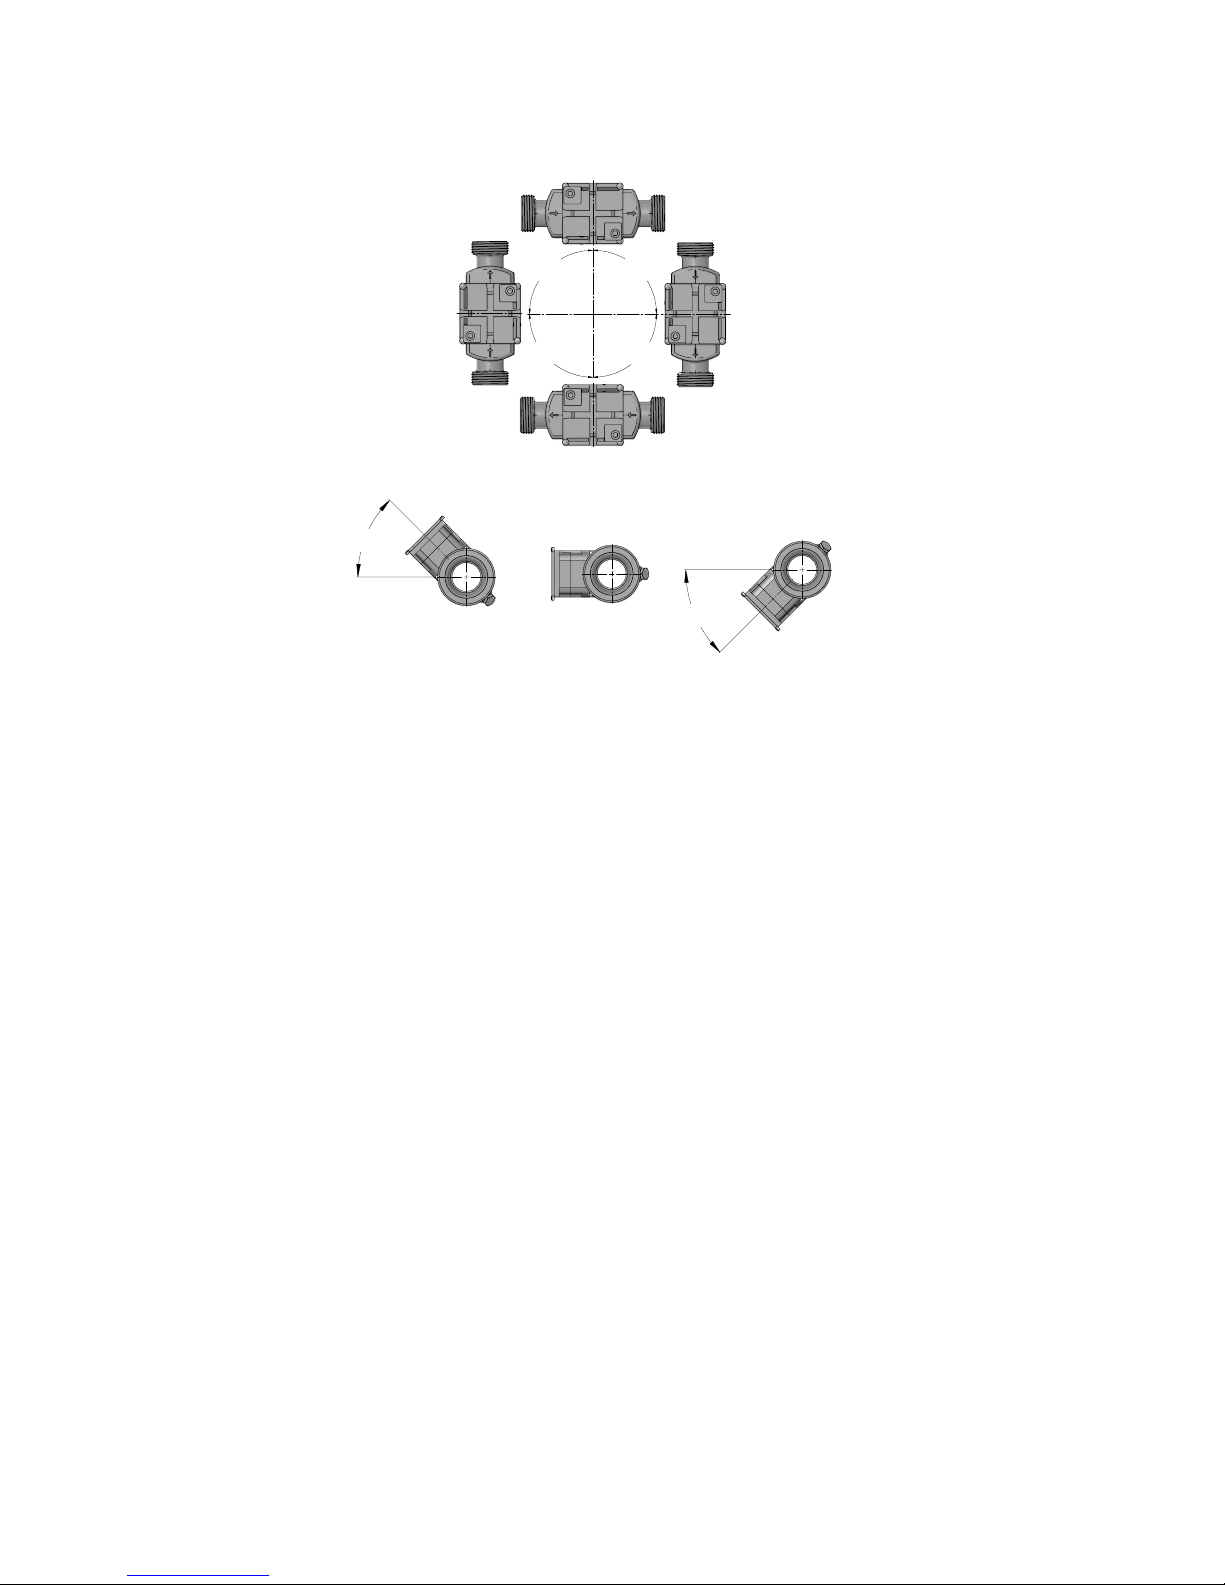
3.4 Flow sensor position 9
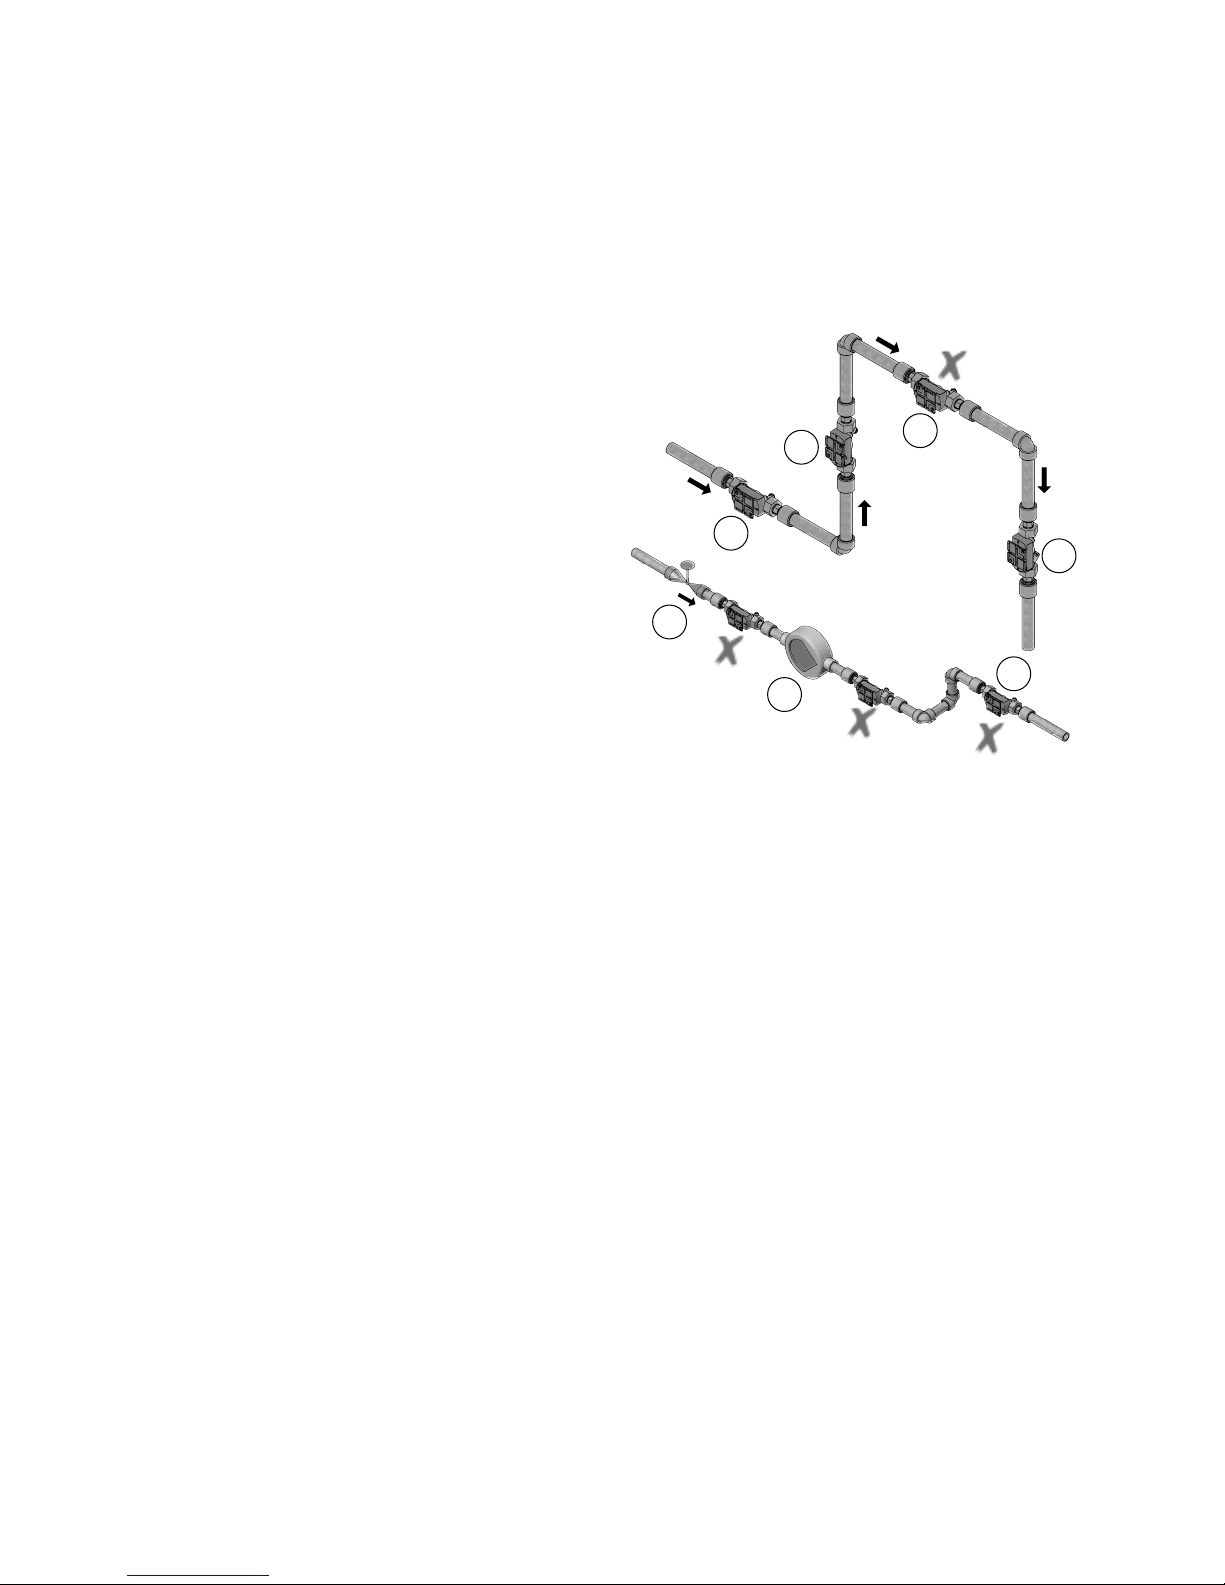
3.5 Installations with two ULTRAFLOW® sensors 10
4 Mounting the calculator 11
4.1 Compact mounting 11
4.2 Wall-mounting 11
5 Electrical connection 12
5.3 Cable Extender Box 12
5.4 Electrical connection of Pulse Transmitter 12
5.1 Connection of temperature sensors 12
5.2 Connection of ULTRAFLOW® 12
5.5 Connection of other flow sensors 13
5.7 Internal communication 13
5.6 Connection of power supply 13
6 Testing of function 14
7 Information code 15
8 Communication Modules 16
8.1 Module overview 16
8.2 Pulse inputs 16
8.3 Pulse outputs 17
8.4 Data + pulse inputs, type HC-003-10 17
8.5 Data + pulse outputs, type HC-003-11 17
8.6 M-Bus + pulse inputs, type HC-003-20 18
8.7 M-Bus + pulse outputs, type HC-003-21 18
8.8 M-Bus + Thermal Disconnect, type HC-003-22 18
8.9 Wireless M-Bus + pulse inputs, type HC-003-30 19
8.10 Wireless M-Bus + pulse outputs, type HC-003-31 19
8.11 Analog outputs, type HC-003-40 19
8.12 LON FT-X3 + 2 pulse inputs, type HC-003-60 20
8.13 BACnet MS/TP + 2 pulse inputs, type HC-003-66 20
8.14 Modbus + pulse inputs, type HC-003-67 20
9 Set-up via front keys 21

4 Kamstrup A/S • 55122070_A2_GB_07.2017
MULTICAL® 603
1 General information
Please read this guide carefully before installing the energy meter.
In case of incorrect mounting, Kamstrup's guarantee obligations no longer apply.
By connecting to 230 V supply, there is a risk of electric shock.
When working on the flow sensor in the installation, there is a risk of outflow of (hot) water
under pressure.
At a media temperature higher than 60 °C, the flow sensor should be shielded from
unintended contact.
Please note that the following installation conditions must be obeyed:
- Pressure stage Kamstrup ULTRAFLOW®: PN16/PN25/PN40, see marking. The
meter marking does not apply to enclosed
accessories.
- Pressure stage Kamstrup sensor pair, type DS: PN16
- Pressure stage Kamstrup pocket sensors, type PL: PN25
At media temperatures above 90 °C, we recommend flange sensors as well as wall-mounting of
MULTICAL®.
At media temperatures below the ambient temperature, MULTICAL® must be wall-mounted, and
the flow sensor must be a condensation-proof version.

5Kamstrup A/S • 55122070_A2_GB_07.2017
MULTICAL® 603
2 Mounting of temperature sensors
The temperature sensors used for measuring inlet and outlet temperatures respectively,
constitute a matched sensor pair, which must never be separated. Temperature sensors are
usually mounted in the calculator from the factory. According to EN 1434/OIML R75 the cable
length must not be changed. Should replacement be necessary, both sensors must be replaced.
The sensor marked with a red sign is to be installed in the inlet pipe. The other sensor, marked with
a blue sign, is to be installed in the outlet pipe. For mounting in the calculator, see the paragraph
”Electrical connection”.
Note: The sensor cables must neither be exposed to jerking nor pulling. Please be aware of this
when binding the cables, and be careful not to pull the binders unnecessarily tight as this
may damage the cables. Please also note that temperature sensors must be mounted from
below in cooling and heat/cooling installations.
2.1 Short direct sensor (DS)
The short, direct sensors up to DN25 can be mounted in special ball valves with built-in M 10
socket for the short direct sensor. They can also be mounted in installations with standard tee-
pieces. Kamstrup A/S can supply R½ and R¾ brass nipples that fit our short direct sensors. The
short direct sensor can be also be mounted directly in selected flow sensors from Kamstrup A/S.
Fasten the sensors’ brass unions lightly (approx. 4 Nm) using a 12 mm face wrench, and seal the
sensors with seal and locking wire.

6 Kamstrup A/S • 55122070_A2_GB_07.2017
MULTICAL® 603
2.2 Pocket sensor (PL)
The sensor pockets can be mounted in e.g. a welding sleeve or in a 45° lateral Y-piece. The tip
of the sensor pocket must be placed in the middle of the flow. Push the temperature sensors as
deep as possible into the pockets. If a short response time is required, “non-hardening” thermally
conductive paste can be used. Push the plastic sleeve on the sensor cable into the sensor pocket
and secure the cable by means of the enclosed M4 sealing screw. Fasten the screw with your
fingers only. Seal the pockets using seal and locking wire.
A
A
B
B
B
B
SECTION
B-B
SCALE
1 : 1

7Kamstrup A/S • 55122070_A2_GB_07.2017
MULTICAL® 603
3 Mounting of flow sensor
Prior to installation of the flow sensor, the system should be flushed and protection plugs/plastic
diaphragms removed from the flow sensor.
Correct position of the flow sensor appears either from the calculator’s type label or from the
display where symbolises the position in inlet, whereas indicates the position in outlet.
The flow direction is symbolised by an arrow on the flow sensor.
3.1 Mounting of couplings and short direct sensor in flow sensor
The short direct sensor from Kamstrup may be
installed in PN16 installations only. Flow sensor
and any mounted blind plug can be used in
connection with both PN16 and PN25. The flow
sensor is available with either PN16 or PN25
marking as required. Enclosed couplings, if
any, are only intended for PN16. Suitable PN25
couplings must be used in PN25 installations.
In connection with flow sensors with the
nominal dimensions G¾Bx110 mm and
G1Bx110 mm, it must be checked if the thread
run-out is sufficient.
Couplings and gaskets are mounted as shown
in the figure.
Gasket
Moment approx. 4 Nm
12 mm

8 Kamstrup A/S • 55122070_A2_GB_07.2017
MULTICAL® 603
3.2 Mounting of ULTRAFLOW® ≤ DN125
90°90°
90° 90°
The flow sensor can be mounted horizontally, vertically or at an angle.
Max. 45°
Max. 45°
The flow sensor should be mounted with the plastic casing placed on the side (at horizontal mounting).
The flow sensor may be turned up to ±45° in relation to the pipe axis, if necessary*.
* Flow sensors of the type 65-5-XXHX-XXX in the sizes qp0.6...2.5 m3/h must not be turned
upwards.
Note: In installations in which the media temperature is below the ambient temperature,
ULTRAFLOW® in a condensation-proof version must be used. At the same time,
ULTRAFLOW® must not be mounted with the plastic casing turned to below 0°. It is
recommended to turn the plastic casing 45° upwards.
3.3 Mounting of ULTRAFLOW® 54 ≥ DN150
See Installation and user guide no. 5512-887

9Kamstrup A/S • 55122070_A2_GB_07.2017
MULTICAL® 603
3.4 Flow sensor position
Kamstrup flow sensors require neither straight inlet nor straight outlet to meet the Measuring
Instruments Directive (MID) 2014/32/EU, OIML R75:2002 and EN 1434:2015. A straight inlet section
will only be necessary in case of heavy flow disturbances before the meter. It is recommended to
follow the guidelines of CEN CR 13582.
A Recommended position.
B Recommended position.
C Unacceptable position due to risk of air
build-up.
D Acceptable position in closed systems.
E Ought not to be placed immediately after
a valve, with the exception of block valves
(ball valve type) which must be fully open
when not used for blocking.
F Ought not to be placed immediately before
or after a pump.
G Ought not to be placed immediately after a
double bend in two planes.
A
BC
D
E
FG
In order to avoid cavitation, the back pressure at the flow sensor (the pressure at the flow sensor
outlet) must be minimum 1.5 bar at qp(nominal flow) and minimum 2.5 bar at qs(maximum flow).
This applies to temperatures up to approx. 80 °C. The flow sensor must not be exposed to pressure
lower than the ambient pressure (vacuum).

10 Kamstrup A/S • 55122070_A2_GB_07.2017
MULTICAL® 603
3.5 Installations with two ULTRAFLOW® sensors
MULTICAL® can be used in various applications
with two ULTRAFLOW® sensors, including leak
surveillance and open systems. As a main rule,
when two ULTRAFLOW® sensors are installed
with one MULTICAL®, a close electric coupling
between the two pipes ought to be carried out
on which the two flow sensors are mounted. If
the two pipes are installed in a heat exchanger,
close to the flow sensors, however, the heat
exchanger will provide the necessary electric
coupling.
ULTRAFLOW®
MULTICAL®
ULTRAFLOW®
Electrical connection
• Inlet and outlet pipes are closely electrically coupled.
• The parts of the pipe installation that are electrically connected to the flow sensors must bot be
subjected to soldering.
In installations where the electric coupling
is not possible or welding*can occur in the
pipe system, the cable from one ULTRAFLOW®
must be led through a Pulse Transmitter to
obtain galvanic separation before the cable is
connected to MULTICAL®.
* Electric welding must always be carried out
with the earth pole closest to the welding
point. Damage to meters due to welding is
not comprised by the factory guarantee.
ULTRAFLOW®
MULTICAL®
Pulse Transmitter
ULTRAFLOW®

11Kamstrup A/S • 55122070_A2_GB_07.2017
MULTICAL® 603
4 Mounting the calculator
The MULTICAL® calculator can be mounted in different ways; either directly on ULTRAFLOW®
(compact mounting) or on a wall (wall-mounting).
4.1 Compact mounting
At compact mounting, the MULTICAL®
calculator is mounted directly on ULTRAFLOW®
by sliding the calculator onto the fitting of the
plastic casing of the flow sensor. Having been
mounted, the calculator is sealed with seal
and locking wire or sealing label. At the risk of
condensation (e.g. in cooling applications), the
calculator must be wall-mounted. In addition, a
condensation-proof flow sensor must be used
in cooling applications.
Note: In case of compact mounting, it may
be necessary to use the enclosed angle
fitting with some types of ULTRAFLOW®
to obtain the required combination of
viewing angle for the calculator’s display
and installation angle for ULTRAFLOW®.
4.2 Wall-mounting
MULTICAL® can be mounted on an even wall.
Wall-mounting requires a wall fitting which
is available as an accessory to MULTICAL®.
Use the wall fitting as a template to mark and
drill two 6 mm holes in the wall. Then mount
the wall fitting with the enclosed screws and
rawlplugs. Mount MULTICAL® on the wall fitting
by sliding the calculator onto the fitting in the
same way as it is done by compact mounting.
51

12 Kamstrup A/S • 55122070_A2_GB_07.2017
MULTICAL® 603
5 Electrical connection
5.1 Connection of temperature sensors
Temperature sensors are connected to
MULTICAL® via the connection PCB. According
to meter type, the terminal numbers in the
table for temperature sensor connection are
used.
2-wire 4-wire
Sensor Terminal number Terminal number
t1
5
6
1
2
5
6
t2
7
8
3
4
7
8
t3
51
52
5.2 Connection of ULTRAFLOW®
ULTRAFLOW® is connected to MULTICAL®
via the connection PCB using the terminal
numbers in the table.
Wire ULTRAFLOW®
9 + Red
V110 Sig Yellow
11 - Blue
9 + Red
V269 Sig Yellow
11 - Blue
5.3 Cable Extender Box
If a cable longer than 10 m is required between MULTICAL® and ULTRAFLOW®, it is possible at
lengths between 10 and 30 m to use Cable Extender Box. See further information in the document
5512-2008.
5.4 Electrical connection of Pulse Transmitter
If ULTRAFLOW® 54 is used together with third-party equipment, it must be connected through a
Pulse Transmitter or Pulse Divider. See instructions 5512-1387 for further information.

13Kamstrup A/S • 55122070_A2_GB_07.2017
MULTICAL® 603
5.5 Connection of other flow sensors
Other passive flow sensors with either reed switch or transistor
output can be connected to MULTICAL® via the terminal numbers
in the table. Be aware of correct mounting of + and - of flow
sensors with transistor outputs.
Flow sensor
10 + V1
11 -
69 + V2
11 -
Some types of MULTICAL® can be connected to other flow
sensors with 24 V active pulse outputs using the terminal
numbers in the table. Be aware of correct mounting of + and -.
Flow sensor
10B + V1
11B -
5.6 Connection of power supply
5.6.1 Battery supply
MULTICAL® can be delivered battery-supplied with a number of various batteries. Optimal battery
lifetime is obtained by keeping the battery temperature below 30 °C, e.g. by wall mounting. The
voltage of a lithium battery is almost constant throughout the lifetime of the battery (approx. 3.65
VDC). Therefore, it is not possible to determine the remaining capacity of the battery by measuring
the voltage. However, the information code of the meter indicates if the battery level is low, see
the paragraph “Information code”. The battery cannot and must not be charged and must not be
short-circuited. Used batteries must be handed in for approved destruction, e.g. at Kamstrup A/S.
Further details appear from document on handling and disposal of lithium batteries (5510-408).
5.6.2 Mains supply
MULTICAL® is available with supply modules for either 24 VAC* or 230 VAC.
The supply modules are protection class II and are connected via a two-wire cable (without earth)
through the big cable bush at the bottom of the connection base. Use connecting cable with an
outer diameter of 5-8 mm and ensure correct cable stripping as well as correct mounting of cable
relief. If connecting to 230 VAC, it is important to make sure that the whole installation complies
with current regulations. MULTICAL® can be delivered with 2 x 0.75 mm² supply cable. The supply
cable for the meter must never be protected by a fuse larger than the one permitted.
In case of doubt, it is recommended to take advice from an authorised electrician and get an
individual assessment of the execution of the installation in question. In addition, note that work
on fixed installations and any intervention in the fuse box, must be carried our by an authorized
electrician only.
For installation in Denmark: See “Installation of mains connected equipment for registration of
consumption” from the Danish National Safety Board.
* By use of a 24 VAC/VDC “high-power” supply module, MULTICAL® can also be supplied from 24
VDC.
5.7 Internal communication
According to type, MULTICAL® 603 has the possibility of internal M-Bus communication, M-Bus is
connected via the connection PCB using terminals 24 and 25.

14 Kamstrup A/S • 55122070_A2_GB_07.2017
MULTICAL® 603
6 Testing of function
Carry out an operational check when the energy meter has been fully mounted. Open
thermoregulators and valves to enable water flow through the heating system. Activate the front
key of MULTICAL® to change display reading, and check that the displayed values for temperatures
and water flow are credible values.

15Kamstrup A/S • 55122070_A2_GB_07.2017
MULTICAL® 603
7 Information code
MULTICAL® constantly monitors a number of important
functions. If errors occur in the measuring system or installation,
a flashing “INFO” appears in the display. The “INFO” field keeps
flashing as long as the error is present, no matter which reading
you choose. The “INFO” field automatically switches off when
the error has been corrected. For indicating current errors in
MULTICAL®, it is possible to scroll to the information code in the
display, this is the display in which INFO does not flash, but is
shown permanently. The information code display is available
both in the USER loop and TECH loop. The info code consists of 8
digits, and each functionality has its own digit dedicated to the
indication of relevant information. For instance all information
concerning temperature sensor t1 is shown in the display as the
second digit from the left.
Display digit Description
1 2 3 4 5 6 7 8
Info t1 t2 t3 V1 V2 In-A In-B
1No voltage supply
2 Low battery level
9 External alarm (e.g. via KMP)
1 t1 Above measuring range or switched off
1 t2 Above measuring range or switched off
1 t3 Above measuring range or switched off
2 t1 Below measuring range or short-circuited
2 t2 Below measuring range or short-circuited
2 t3 Below measuring range or short-circuited
9 9 Invalid temperature difference (t1-t2)
1 V1 Communication error
1 V2 Communication error
2V1 Wrong pulse figure
2V2 Wrong pulse figure
3V1 Air
3V2 Air
4 V1 Wrong flow direction
4V2 Wrong flow direction
6V1 Increased flow
6V2 Increased flow
7 Burst, water runs out of the system
7 Burst, water runs into the system
8 Leakage, water runs out of the system
8 Leakage, water runs into the system
7 Pulse input A2 Leakage in the system
8 Pulse input A1 Leakage in the system
9 Pulse input A1/A2 External alarm
7 Pulse input B2 Leakage in the system
8 Pulse input B1 Leakage in the system
9 Pulse input B1/B2 External alarm

16 Kamstrup A/S • 55122070_A2_GB_07.2017
MULTICAL® 603
8 Communication Modules
MULTICAL® 603 can be extended by a wide range of extra functions by means of communication
modules. Below, pulse inputs/outputs and module types are briefly described.
Note: Before replacing or mounting modules, the supply to the meter must be switched off. The
same applies for mounting of an antenna.
8.1 Module overview
MULTICAL® 603 communication modules
Type No. Description
HC-003-10 Data + 2 pulse inputs (In-A, In-B)
HC-003-11 Data + 2 pulse outputs (Out-C, Out-D)
HC-003-20 M-Bus, configurable + 2 pulse inputs (In-A, In-B)
HC-003-21 M-Bus, configurable + 2 pulse outputs (Out-C, Out-D)
HC-003-22 M-Bus, configurable w/ Thermal Disconnect
HC-003-30 Wireless M-Bus, configurable, 868 MHz + 2 pulse inputs (In-A, In-B)
HC-003-31 Wireless M-Bus + pulse outputs
HC-003-40 Analog module 0/4…20 mA
HC-003-60 LON FT-X3 + 2 pulse inputs
HC-003-66 BACnet MS/TP + 2 pulse inputs
HC-003-67 Modbus RTU (RS-485) + 2 pulse inputs (In-A, In-B)
8.2 Pulse inputs
Pulse inputs A and B are used for connection of
extra meters with either Reed-switch output or
passive electronic pulse output.
Min. pulse duration is 30 ms. and max pulse
frequency is 3 Hz.
65 + Pulse input C
66 -
67 + Pulse input D
68 -
If a module with pulse inputs is mounted in MULTICAL®, the meter is automatically configured for
pulse inputs. Note that the pulse figure (litres/pulse) must match the extra water meters and the
configurations of inputs A and B. After delivery, the configurations of pulse inputs A and B can be
changed by means of the PC program METERTOOL HCW.

17Kamstrup A/S • 55122070_A2_GB_07.2017
MULTICAL® 603
8.3 Pulse outputs
Pulse outputs for energy and volume are
made with darlington optocouplers, the pulse
outputs are available on a number of the
communication modules.
Max. voltage and current of the outputs are 30
VDC and 10 mA respectively.
16 + Pulse output C
17 -
18 + Pulse output D
19 -
When a module with pulse outputs is mounted in MULTICAL®, the meter is automatically
configured for pulse outputs. The pulse duration is ordered at 32 ms. or 100 ms. After delivery the
pulse duration can be changed by means of the PC program METERTOOL HCW.
The resolutions of the pulse outputs always follow the least significant digit displayed for energy
and volume respectively.
8.4 Data + pulse inputs, type HC-003-10
The data terminals are used for connection of
e.g. a PC. The signal is passive and galvanically
separated by means of optocouplers.
Conversion to RS232 level requires connection
of data cable 66-99-106 (D-SUB 9F) or
66-99-098 (USB type A) with the following
connections:
62 Brown (DAT)
63 White (REQ)
64 Green (GND)
8.5 Data + pulse outputs, type HC-003-11
The data terminals are used for connection of
e.g. a PC. The signal is passive and galvanically
separated by means of optocouplers.
Conversion to RS232 level requires connection
of data cable 66-99-106 (D-SUB 9F) or
66-99-098 (USB type A) with the following
connections:
62 Brown (DAT)
63 White (REQ)
64 Green (GND)

18 Kamstrup A/S • 55122070_A2_GB_07.2017
MULTICAL® 603
8.6 M-Bus + pulse inputs, type HC-003-20
M-Bus module with primary, secondary and
enhanced secondary addressing.
The module is connected to an M-Bus master
via terminals 24 and 25 using a twisted pair.
The polarity is without importance for the
functionality.
The module is powered by the connected
master.
8.7 M-Bus + pulse outputs, type HC-003-21
M-Bus module with primary, secondary and
enhanced secondary addressing.
The module is connected to an M-Bus master
via terminals 24 and 25 using a twisted pair.
The polarity is without importance for the
functionality.
The module is powered by the connected
master.
8.8 M-Bus + Thermal Disconnect, type HC-003-22
M-Bus module with primary, secondary and
enhanced secondary addressing. The module
is connected to an M-Bus master via terminals
24 and 25 using a twisted pair. The polarity is
without importance for the functionality.
The meter must be supplied by 24 VAC or 230
VAC.
The module requires an external 24 VAC power
supply for operating the connected actuator.

19Kamstrup A/S • 55122070_A2_GB_07.2017
MULTICAL® 603
8.9 Wireless M-Bus + pulse inputs, type HC-003-30*
The wireless M-Bus module has been designed
to form part of Kamstrup’s hand-held Wireless
M-Bus Reader system, which operates within
the unlicensed frequency band in the 868 MHz
area. The radio module is available with either
internal or external antenna. Please note that
both antenna types use the same connection.
8.10 Wireless M-Bus + pulse outputs, type HC-003-31*
The wireless M-Bus module has been designed
to form part of Kamstrup’s hand-held Wireless
M-Bus Reader system, which operates within
the unlicensed frequency band in the 868 MHz
area. The radio module is available with either
internal or external antenna. Please note that
both antenna types use the same connection.
8.11 Analog outputs, type HC-003-40
Analog module with 2 pcs. 0/4..20 mA current
outputs. The current is measured directly via
the 2 sets of output terminals 80-81 and 82-
83.
The meter must be supplied by 24 VAC or 230
VAC.
The module requires an external 24 VAC power
supply for operating the analog outputs.
* The wireless M-Bus module must be connected to an internal or external antenna. When
mounting an external antenna, ensure that the antenna cable is not jammed or damaged when
the calculator is assembled. Before replacing or mounting modules, the supply to the meter
must be switched off. The same applies to mounting of an antenna.

20 Kamstrup A/S • 55122070_A2_GB_07.2017
MULTICAL® 603
8.12 LON FT-X3 + 2 pulse inputs, type HC-003-60
The LON FT-X3 module is designed for use in
free topology communication TP/FT-10. The
module is compatible with LONWORKS® 2.0
and supports high-speed communication up to
78600 baud.
The LON module enables the integration of the
energy meters in building automation systems
or in industrial applications. The LON module
is delivered with bar codes with imprinted LON
Node ID to ease the commissioning.
The module is power-supplied by the 24 VAC or
230 VAC power supply in MULTICAL®. The power
supply must be in the high-power version. It is
not possible to battery-supply MULTICAL®.
8.13 BACnet MS/TP + 2 pulse inputs, type HC-003-66
The BACnet module is designed for use in
free topology communication. The module is
compatible with ASHRAE 135 and supports
high-speed communication up to 76800 baud.
The BACnet module enables the integration
of the energy meters in building automation
systems or in industrial applications.
The BACnet module is BACnet-certified and
registered in the BTL list.
The module is power-supplied by the 24 VAC or
230 VAC power supply in MULTICAL®. MULTICAL®
cannot be battery-supplied.
8.14 Modbus + pulse inputs, type HC-003-67
Modbus RTU slave module. Communication
on RS485 with twisted shielded cables via the
terminals 137, 138 an 139.
The meter must be supplied by 24 VAC or 230
VAC.
Other manuals for MULTICAL 603
2
Table of contents